目录
AOP
1)AOP(Aspect-Oriented Programming,面向切面编程):是一种新的方法论,是对传
统 OOP(Object-Oriented Programming,面向对象编程)的补充。
面向对象 纵向继承机制
面向切面 横向抽取机制
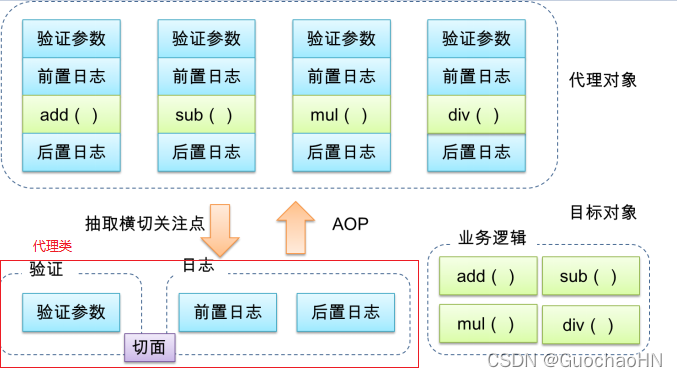
2)AOP编程操作的主要对象是切面(aspect),而切面用于模块化横切关注点(公共功能)。
3)在应用AOP编程时,仍然需要定义公共功能,但可以明确的定义这个功能应用在哪里,以什么方式应用,并且不必修改受影响的类。这样一来横切关注点就被模块化到特殊的类里——这样的类我们通常称之为“切面”。
4)AOP的好处:
① 每个事物逻辑位于一个位置,代码不分散,便于维护和升级
② 业务模块更简洁,只包含核心业务代码
③ AOP图解

AspectJ
AspectJ:Java社区里最完整最流行的AOP框架。
在Spring2.0以上版本中,可以使用基于AspectJ注解或基于XML配置的AOP。
在Spring中启用AspectJ注解支持
1)导入JAR包
com.springsource.net.sf.cglib-2.2.0.jar
com.springsource.org.aopalliance-1.0.0.jar
com.springsource.org.aspectj.weaver-1.6.8.RELEASE.jar
spring-aop-4.0.0.RELEASE.jar
spring-aspects-4.0.0.RELEASE.jar
2)引入aop名称空间
3)配置
<aop:aspectj-autoproxy>
当Spring IOC容器侦测到bean配置文件中的<aop:aspectj-autoproxy>元素时,会自动为 与AspectJ切面匹配的bean创建代理
用AspectJ注解声明切面
用AspectJ注解声明切面
1)要在Spring中声明AspectJ切面,只需要在IOC容器中将切面声明为bean实例。
2)当在Spring IOC容器中初始化AspectJ切面之后,Spring IOC容器就会为那些与 AspectJ切面相匹配的bean创建代理。
3)在AspectJ注解中,切面只是一个带有@Aspect注解的Java类,它往往要包含很多通知。
4)通知是标注有某种注解的简单的Java方法。
5)AspectJ支持5种类型的通知注解:
① @Before:前置通知,在方法执行之前执行
② @After:后置通知,在方法执行之后执行
③ @AfterRunning:返回通知,在方法返回结果之后执行
④ @AfterThrowing:异常通知,在方法抛出异常之后执行
⑥ @Around:环绕通知,围绕着方法执行
切入点表达式
通过表达式的方式定位一个或多个具体的连接点。
1)切入点表达式的语法格式
execution([权限修饰符] [返回值类型] [简单类名/全类名] [方法名]([参数列表]))
2)在AspectJ中,切入点表达式可以通过 “&&”、“||”、“!”等操作符结合起来。
execution (* *.add(int,..)) || execution(* *.sub(int,..))
含义	任意类中第一个参数为int类型的add方法或sub方法
前置通知
1)前置通知:在方法执行之前执行的通知
2)使用@Before注解
后置通知
1)后置通知:后置通知是在连接点完成之后执行的,即连接点返回结果或者抛出异常的时候
2)使用@After注解
返回通知
1)返回通知:无论连接点是正常返回还是抛出异常,后置通知都会执行。如果只想在连接点返回的时候记录日志,应使用返回通知代替后置通知。
2)使用@AfterReturning注解,在返回通知中访问连接点的返回值
①在返回通知中,只要将returning属性添加到@AfterReturning注解中,就可以访问连接点的返回值。该属性的值即为用来传入返回值的参数名称
②必须在通知方法的签名中添加一个同名参数。在运行时Spring AOP会通过这个参数传递返回值
③原始的切点表达式需要出现在pointcut属性中
异常通知
1)异常通知:只在连接点抛出异常时才执行异常通知
2)将throwing属性添加到@AfterThrowing注解中,也可以访问连接点抛出的异常。Throwable是所有错误和异常类的顶级父类,所以在异常通知方法可以捕获到任何错误和异常。
3)如果只对某种特殊的异常类型感兴趣,可以将参数声明为其他异常的参数类型。然后通知就只在抛出这个类型及其子类的异常时才被执行
环绕通知
1)环绕通知是所有通知类型中功能最为强大的,能够全面地控制连接点,甚至可以控制是否执行连接点。
2)对于环绕通知来说,连接点的参数类型必须是ProceedingJoinPoint。它是 JoinPoint的子接口,允许控制何时执行,是否执行连接点。
3)在环绕通知中需要明确调用ProceedingJoinPoint的proceed()方法来执行被代理的方法。如果忘记这样做就会导致通知被执行了,但目标方法没有被执行。
4)注意:环绕通知的方法需要返回目标方法执行之后的结果,即调用 joinPoint.proceed();的返回值,否则会出现空指针异常。
指定切面的优先级
1)在同一个连接点上应用不止一个切面时,除非明确指定,否则它们的优先级是不确定的。
2)切面的优先级可以通过实现Ordered接口或利用@Order注解指定。
3)实现Ordered接口,getOrder()方法的返回值越小,优先级越高。
4)若使用@Order注解,序号出现在注解中
演示案例:
aop.xml
<?xml version="1.0" encoding="UTF-8"?>
<beans xmlns="http://www.springframework.org/schema/beans"
       xmlns:xsi="http://www.w3.org/2001/XMLSchema-instance" xmlns:aop="http://www.springframework.org/schema/aop"
       xmlns:context="http://www.springframework.org/schema/context"
       xsi:schemaLocation="http://www.springframework.org/schema/beans
                           http://www.springframework.org/schema/beans/spring-beans.xsd
                           http://www.springframework.org/schema/aop
                           http://www.springframework.org/schema/aop/spring-aop.xsd
                           http://www.springframework.org/schema/context
                           http://www.springframework.org/schema/context/spring-context.xsd">
    <!-- 扫描组件-->
    <context:component-scan base-package="com.spring.aop"/>

    <!-- 开启aspectj的自动代理功能-->
    <aop:aspectj-autoproxy/>
</beans>
MathImpl
package com.spring.aop;
import org.springframework.stereotype.Component;

@Component
public class MathImpl implements MathI {
	@Override
	public int add(int i, int j) {
		int result = i + j;
		return result;
	}
	@Override
	public int sub(int i, int j) {
		int result = i - j;
		return result;
	}
	@Override
	public int mul(int i, int j) {
		int result = i * j;
		return result;
	}
	@Override
	public int div(int i, int j) {
		int result = i / j;
		return result;
	}
}
MyloggerAspect切面
package com.spring.aop;
import org.aspectj.lang.JoinPoint;
import org.aspectj.lang.annotation.*;
import org.springframework.core.annotation.Order;
import org.springframework.stereotype.Component;
import java.util.Arrays;

@Component
@Aspect//标注当前类为切面
@Order(1)//定义切面作用的优先级,值越小优先级越高,默认值为int的最大值
public class MyloggerAspect {

//在AspectJ切面中,可以通过@Pointcut注解将一个切入点声明成简单的方法。
// 切入点的方法体通常是空的,因为将切入点定义与应用程序逻辑混在一起是不合理的。
    @Pointcut(value="execution(* com.spring.aop.*.*(..))")
    public void test() {}

    /**
     * @Before:将方法指定为前置通知
     * 必须设置value,其值为切入点表达式
     * 前置通知:作用于方法执行之前
     * @Before(value="execution(* om.spring.aop.*.*(..))")
     * 第一个*代表任意的访问修饰符和返回值类型
     * 第二个*代表任意类
     * 第三个*代表类中任意方法
     * ..代表任意的参数列表
     */
   // @Before(value = "execution(public int com.spring.aop.MathImpl.add(int,int))")//作用到指定方法之前
    //@Before(value = "execution(* com.spring.aop.*.*(..))")//作用到aop包下所有的类以及所有的方法之前
    @Before(value = "test()")//
    public void brforeMethod(JoinPoint joinPoint){
        Object[] args = joinPoint.getArgs();//获取切入方法的参数
        String methodName = joinPoint.getSignature().getName();//获取切入方法名
        System.out.println("前置通知:method:"+methodName+",arguments:"+ Arrays.toString(args));
    }
    /**
     * @After:将方法标注为后置通知
     * 后置通知:作用于方法的finally语句块,即不管有没有异常都会执行
     */
    @After(value = "execution(* com.spring.aop.*.*(..))")
    public void afterMethod(){
        System.out.println("后置通知");
    }
    /**
     * @AfterReturning:将方法标注为返回通知
     * 返回通知:作用于方法执行之后
     * 可通过returning设置接收方法返回值的变量名,要想在方法中使用,必须在方法的形参中设置和变量名相同的参数名的参数
     */
    @AfterReturning(value="execution(* com.spring.aop.*.*(..))", returning="result")
    //@AfterReturning(value="test()", returning="result")
    public void afterReturningMethod(JoinPoint joinPoint, Object result) {
        //result用于接收方法的返回值
        String methodName = joinPoint.getSignature().getName();
        System.out.println("返回通知:method:"+methodName+",result:"+result);
    }

    /**
     * @AfterThrowing:将方法标注为异常通知(例外通知)
     * 异常通知(例外通知):作用于方法抛出异常时
     * 可通过throwing设置接收方法返回的异常信息,在参数列表中课通过具体的异常类型,来对指定的异常信息进行操作
     */
    @AfterThrowing(value = "execution(* com.spring.aop.*.*(..))",throwing = "ex")
    public void afterThrowingMethod(Exception ex){
        System.out.println("有异常,message:"+ex);
    }

//    @Around(value="execution(* com.spring.aop.*.*(..))")//少用
//    public Object aroundMethod(ProceedingJoinPoint joinPoint) {
//
//        Object result = null;
//
//        try {
//            //前置通知
//            System.out.println("Around:Before");
//            result = joinPoint.proceed();//执行方法
//            //返回通知
//            System.out.println("Around:AfterReturning");
//            return result;
//        } catch (Throwable e) {
//            // TODO Auto-generated catch block
//            e.printStackTrace();
//            //异常通知
//            System.out.println("Around:AfterThrowing");
//        } finally {
//            //后置通知
//            System.out.println("Around:After");
//        }
//
//        return -1;
//    }
}
TestHandler切面
package com.spring.aop;
import org.aspectj.lang.annotation.Aspect;
import org.aspectj.lang.annotation.Before;
import org.springframework.core.annotation.Order;
import org.springframework.stereotype.Component;

@Component
@Aspect
@Order(0)
public class TestHandler  {
    @Before(value="execution(* com.spring.aop.*.*(..))")
    public void before() {
        System.out.println("TestHandler==>前置通知");
    }
}
public class TestAOP {
    public static void main(String[] args) {

        ClassPathXmlApplicationContext applicationContext = new ClassPathXmlApplicationContext("aop.xml");
        MathI mathImpl = applicationContext.getBean("mathImpl", MathI.class);
        //注意:不是MathImpl.class 因为采用的是动态代理,通过接口实现调用。
        mathImpl.add(1,2);
        System.out.println("------------------------");
        mathImpl.sub(4,2);
        System.out.println("------------------------");
        mathImpl.div(1,0);
    }
}
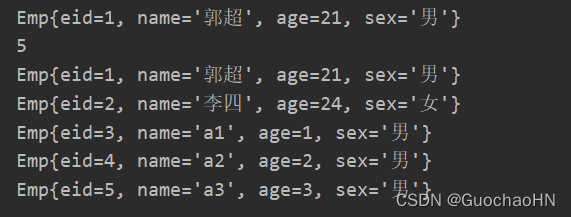
测试结果:

以XML方式配置切面
除了使用AspectJ注解声明切面,Spring也支持在bean配置文件中声明切面。这种声明是通过aop名称空间中的XML元素完成的。
正常情况下,基于注解的声明要优先于基于XML的声明。通过AspectJ注解,切面可以与AspectJ兼容,而基于XML的配置则是Spring专有的。由于AspectJ得到越来越多的 AOP框架支持,所以以注解风格编写的切面将会有更多重用的机会。
<?xml version="1.0" encoding="UTF-8"?>
<beans xmlns="http://www.springframework.org/schema/beans"
       xmlns:xsi="http://www.w3.org/2001/XMLSchema-instance"
       xmlns:context="http://www.springframework.org/schema/context"
       xmlns:aop="http://www.springframework.org/schema/aop"
       xsi:schemaLocation="http://www.springframework.org/schema/beans http://www.springframework.org/schema/beans/spring-beans.xsd http://www.springframework.org/schema/context http://www.springframework.org/schema/context/spring-context.xsd http://www.springframework.org/schema/aop http://www.springframework.org/schema/aop/spring-aop.xsd">


    <context:component-scan base-package="com.spring.aopxml"></context:component-scan>

    <aop:config>
        <aop:aspect ref="myLogger">
            <aop:pointcut id="cut" expression="execution(* com.spring.aopxml.*.*(..))"/>
             <!-- <aop:before method="before" pointcut="execution(* com.spring.aopxml.*.*(..))"/>-->
            <aop:before method="before" pointcut-ref="cut"/>
        </aop:aspect>

    </aop:config>
</beans>
package com.spring.aopxml;
import org.springframework.stereotype.Component;
@Component
public class MyLogger {

    public void before(){
        System.out.println("前置通知:");
    }
}
package com.spring.aopxml;
import org.springframework.context.support.ClassPathXmlApplicationContext;
public class test {
    public static void main(String[] args) {
        ClassPathXmlApplicationContext applicationContext = new ClassPathXmlApplicationContext("aopxml.xml");
        MathI mathImpl = applicationContext.getBean("mathImpl", MathI.class);
        System.out.println(mathImpl.add(12,12));
    }
}

JdbcTemplate
为了使JDBC更加易于使用,Spring在JDBC API上定义了一个抽象层,以此建立一个JDBC存取框架。
作为Spring JDBC框架的核心,JDBC模板的设计目的是为不同类型的JDBC操作提供模板方法,通过这种方式,可以在尽可能保留灵活性的情况下,将数据库存取的工作量降到最低。
可以将Spring的JdbcTemplate看作是一个小型的轻量级持久化层框架,和我们之前使用过的DBUtils风格非常接近。
环境准备
导入JAR包
1)IOC容器所需要的JAR包
commons-logging-1.1.1.jar
spring-beans-4.0.0.RELEASE.jar
spring-context-4.0.0.RELEASE.jar
spring-core-4.0.0.RELEASE.jar
spring-expression-4.0.0.RELEASE.jar
2)JdbcTemplate所需要的JAR包
spring-jdbc-4.0.0.RELEASE.jar
spring-orm-4.0.0.RELEASE.jar
spring-tx-4.0.0.RELEASE.jar
3)数据库驱动和数据源
druid-1.1.9.jar
mysql-connector-java-5.1.7-bin.jar
持久化操作
首先配置文件:
<!--    引入资源文件-->
    <context:property-placeholder location="db.properties"></context:property-placeholder>

<!--    创建数据源-->
    <bean id="dataSource" class="com.alibaba.druid.pool.DruidDataSource">
        <property name="driverClassName" value="${jdbc.driver}"></property>
        <property name="url" value="${jdbc.url}"></property>
        <property name="username" value="${jdbc.username}"></property>
        <property name="password" value="${jdbc.password}"></property>
    </bean>

<!--    通过数据源配置jdbctemplate-->
    <bean id="jdbcTemplate" class="org.springframework.jdbc.core.JdbcTemplate">
        <property name="dataSource" ref="dataSource"></property>
    </bean>

通过IOC容器获得jdbctemplate对象
ClassPathXmlApplicationContext applicationContext = new ClassPathXmlApplicationContext("jdbc.xml");
    JdbcTemplate jdbcTemplate = applicationContext.getBean("jdbcTemplate", JdbcTemplate.class);
增删改
增删改:
  @Test
    public void test(){
        //jdbcTemplate.update("insert  into emp values(null, '郭超','21','男') ");
        String sql="insert into emp values(null,?,?,?)";
        jdbcTemplate.update(sql,"李四",24,"女");

        //注意通过update实现批量删除或修改即where ... in(?)模式 不能用通配符赋值
        String deletesql="delete from emp where eid in (?)";
        String eids="1,2,3";
        jdbcTemplate.update(deletesql,eids);//无论执行多少次,最终结果只是删除了eid=1的数据行
        /*为通配符赋值是通过调用preparestatement的setString方法,即将字符串的值赋给?
        但是varchar数据类型在数据库中是要加单引号的,所以setString方法将字符自动加上单引号——默认在通配符两边加单引号
        所以上面的最终sql语句变为:delete from emp where eid in ('1,2,3')
        可通过下面的代码实现:
        String eid="1,2,3";
        String sql ="delete from emp where eid in (+eid+)";
        jdbcTemplate.update(sql);*/

        //同理:模糊查询也不可以用通配符:select* from emp where ename like '%?%',原因相同
    }
批量增删改
@Test
    public void testBatchUpdate(){
           //int a[]=new int[]{1,2,3};
        String sql="insert into emp values(null,?,?,?)";
        ArrayList<Object[]> list = new ArrayList<>();
        list.add(new Object[]{"a1",1,"男"});
        list.add(new Object[]{"a2",2,"男"});
        list.add(new Object[]{"a3",3,"男"});
        jdbcTemplate.batchUpdate(sql,list);//批量修改

    }
查询
@Test
    public void testqueryforobject() {
        // jdbcTemplate.queryForObject(sql,requiredType);用来获取单个的值
        // jdbcTemplate.queryForObject(sql,rowMapper);用来获取单条数据
        String sql = "select ename,age,sex,eid from emp where eid=?";
        BeanPropertyRowMapper<Emp> rowMapper = new BeanPropertyRowMapper<>(Emp.class);//将列名(字段名或字段的别名)与类的属性名进行映射,一定要与类中的属性名相同才会赋值成功
        Emp emp = jdbcTemplate.queryForObject(sql, new Object[]{1}, rowMapper);
        System.out.println(emp);

        String sql2 = "select count(*) from emp";
        Integer count = jdbcTemplate.queryForObject(sql2, Integer.class);
        System.out.println(count);

        String sql3 = "select ename,age,eid,sex from emp";
        List<Emp> list = jdbcTemplate.query(sql3, rowMapper);
        for (Emp emplist : list) {
            System.out.println(emplist);
        }
    }

事务问题
事务就是一组由于逻辑上紧密关联而合并成一个整体(工作单元)的多个数据库操作,这些操作要么都执行,要么都不执行。
Spring事务管理
编程式事务管理
1)使用原生的JDBC API进行事务管理
①获取数据库连接Connection对象
②取消事务的自动提交
③执行操作
④正常完成操作时手动提交事务
⑤执行失败时回滚事务
⑥关闭相关资源
2)评价
使用原生的JDBC API实现事务管理是所有事务管理方式的基石,同时也是最典型的编程式事务管理。编程式事务管理需要将事务管理代码嵌入到业务方法中来控制事务的提交和回滚。在使用编程的方式管理事务时,必须在每个事务操作中包含额外的事务管理代码。相对于核心业务而言,事务管理的代码显然属于非核心业务,如果多个模块都使用同样模式的代码进行事务管理,显然会造成较大程度的代码冗余。
声明式事务管理
大多数情况下声明式事务比编程式事务管理更好:它将事务管理代码从业务方法中分离出来,以声明的方式来实现事务管理。
事务管理代码的固定模式作为一种横切关注点,可以通过AOP方法模块化,进而借助Spring AOP框架实现声明式事务管理。
Spring在不同的事务管理API之上定义了一个抽象层,通过配置的方式使其生效,从而让应用程序开发人员不必了解事务管理API的底层实现细节,就可以使用Spring的事务管理机制。
Spring既支持编程式事务管理,也支持声明式的事务管理。
Spring提供的事务管理器
Spring从不同的事务管理API中抽象出了一整套事务管理机制,让事务管理代码从特定的事务技术中独立出来。开发人员通过配置的方式进行事务管理,而不必了解其底层是如何实现的。
Spring的核心事务管理抽象是它为事务管理封装了一组独立于技术的方法。无论使用Spring的哪种事务管理策略(编程式或声明式),事务管理器都是必须的。
事务管理器可以以普通的bean的形式声明在Spring IOC容器中。
事务管理器的主要实现:
1)DataSourceTransactionManager:在应用程序中只需要处理一个数据源,而且通过JDBC存取。
2)JtaTransactionManager:在JavaEE应用服务器上用JTA(Java Transaction API)进行事务管理
3)HibernateTransactionManager:用Hibernate框架存取数据库
事务的传播行为
当事务方法被另一个事务方法调用时,必须指定事务应该如何传播。例如:方法可能继续在现有事务中运行,也可能开启一个新事务,并在自己的事务中运行。
事务的传播行为可以由传播属性指定。Spring定义了7种类传播行为。
事务传播属性可以在@Transactional注解的propagation属性中定义。

说明
①REQUIRED传播行为
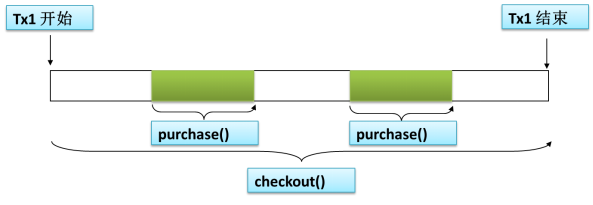
当bookService的purchase()方法被另一个事务方法checkout()调用时,它默认会在现有的事务内运行。这个默认的传播行为就是REQUIRED。因此在checkout()方法的开始和终止边界内只有一个事务。这个事务只在checkout()方法结束的时候被提交,结果用户一本书都买不了。

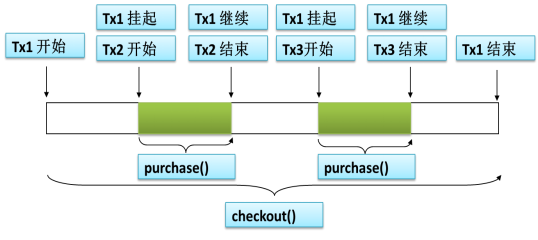
②REQUIRES_NEW传播行为
表示该方法必须启动一个新事务,并在自己的事务内运行。如果有事务在运行,就应该先挂起它。

事务的隔离级别
数据库事务并发问题
假设现在有两个事务:Transaction01和Transaction02并发执行。
1)脏读
①Transaction01将某条记录的AGE值从20修改为30。
②Transaction02读取了Transaction01更新后的值:30。
③Transaction01回滚,AGE值恢复到了20。
④Transaction02读取到的30就是一个无效的值。
2)不可重复读
①Transaction01读取了AGE值为20。
②Transaction02将AGE值修改为30。
③Transaction01再次读取AGE值为30,和第一次读取不一致。
3)幻读
①Transaction01读取了STUDENT表中的一部分数据。
②Transaction02向STUDENT表中插入了新的行。
③Transaction01读取了STUDENT表时,多出了一些行。
事务的超时和只读属性
由于事务可以在行和表上获得锁,因此长事务会占用资源,并对整体性能产生影响。
如果一个事务只读取数据但不做修改,数据库引擎可以对这个事务进行优化。
超时事务属性:事务在强制回滚之前可以保持多久。这样可以防止长期运行的事务占用资源。
只读事务属性: 表示这个事务只读取数据但不更新数据, 这样可以帮助数据库引擎优化事务。
事务总结(源代码测试)
通过aspectj注解方式配置事务
book.xml
<?xml version="1.0" encoding="UTF-8"?>
<beans xmlns="http://www.springframework.org/schema/beans"
       xmlns:xsi="http://www.w3.org/2001/XMLSchema-instance"
       xmlns:context="http://www.springframework.org/schema/context" xmlns:tx="http://www.springframework.org/schema/tx"
       xsi:schemaLocation="http://www.springframework.org/schema/beans http://www.springframework.org/schema/beans/spring-beans.xsd http://www.springframework.org/schema/context http://www.springframework.org/schema/context/spring-context.xsd http://www.springframework.org/schema/tx http://www.springframework.org/schema/tx/spring-tx.xsd">


    <context:component-scan base-package="com.spring.book"></context:component-scan>
    <!--    引入资源文件-->
    <context:property-placeholder location="db.properties"></context:property-placeholder>

    <!--    创建数据源-->
    <bean id="dataSource" class="com.alibaba.druid.pool.DruidDataSource">
        <property name="driverClassName" value="${jdbc.driver}"></property>
        <property name="url" value="${jdbc.url}"></property>
        <property name="username" value="${jdbc.username}"></property>
        <property name="password" value="${jdbc.password}"></property>
    </bean>

    <!--    通过数据源配置jdbctemplate-->
    <bean id="jdbcTemplate" class="org.springframework.jdbc.core.JdbcTemplate">
        <property name="dataSource" ref="dataSource"></property>
    </bean>

<!--配置事务管理器-->
    <bean class="org.springframework.jdbc.datasource.DataSourceTransactionManager" id="dataSourceTransactionManager">
        <property name="dataSource" ref="dataSource"></property>
    </bean>

  <!-- 开启注解驱动,即对事务相关的注解进行扫描,解析含义并执行功能-->
   <!--通过aspectJ配置-->
<tx:annotation-driven transaction-manager="dataSourceTransactionManager"/>

</beans>
BookDaoImpl
package com.spring.book.dao;
import com.spring.book.MyException;
import org.springframework.beans.factory.annotation.Autowired;
import org.springframework.jdbc.core.JdbcTemplate;
import org.springframework.stereotype.Repository;

@Repository
public class BookDaoImpl implements BookDao {
    @Autowired
    private JdbcTemplate jdbcTemplate;

    @Override
    public Integer selectPrice(String bid) {
        Integer price = jdbcTemplate.queryForObject("select price from book where bid=?", new Object[]{bid}, Integer.class);
        return price;
    }
    @Override
    public void updateSt(String bid) {
        //获取书籍库存
        Integer integer = jdbcTemplate.queryForObject("select st from stock where sid=?", new Object[]{bid}, Integer.class);
        if (integer<=0){
            throw new RuntimeException();
        }else {
            jdbcTemplate.update("update stock set st=st-1 where sid=?",bid);
        }

    }
    @Override
    public void updateBalance(String uid ,Integer price) {
        Integer integer = jdbcTemplate.queryForObject("select balance from customer where uid=?", new Object[]{uid}, Integer.class);
        if (integer<price){
            throw new MyException();
        }else{
            jdbcTemplate.update("update customer set balance=balance-? where uid=? ",price,uid);
        }

    }
}
BookServiceImpl
package com.spring.book.service;

import com.spring.book.MyException;
import com.spring.book.dao.BookDao;
import org.springframework.beans.factory.annotation.Autowired;
import org.springframework.stereotype.Service;
import org.springframework.transaction.annotation.Propagation;
import org.springframework.transaction.annotation.Transactional;

@Service
//@Transactional
public class BookServiceImpl implements BookService {
    @Autowired
    private BookDao bookDao;

    /**
     * @Transactional :对方法中所有的操作作为一个事务进行管理
     * 在方法上使用,只对方法有效;在类上使用,对类中所有的方法都有效
     *@Transactional中可以设置的属性:
     *
     * propagation:A方法和B方法都有事务,当A在调用B时,会将A中的事务传播给B方法,B方法对于事务的处理方式就是事务的传播行为
     *Propagation.REQUIRED:必须使用调用者的事务(默认值)
     *Propagation.REQUIRES_NEW:将调用者的事务挂起,不使用调用者的事务,使用新的事务进行处理
     *
     * isolation:事务的隔离级别,在并发的情况下,操作数据的一种规定
     *                读未提交:脏读   1
     *                读已提交:不可重复读   2
     *                可重复读:幻读   4
     *                串行化:性能低,消耗大   8
     *
     * timeout:在事务强制回滚前最多可以执行(等待)的时间
     *
     *  readOnly:指定当前事务中的一系列的操作是否为只读
     *若设置为只读,不管事务中有没有写的操作,mysql都会在请求访问数据的时候,不加锁,提高性能
     *但是如果有写操作的情况,建议一定不能设置只读(只有操作全为read的时候设置为true才有用)
     *
     *
     *  ollbackFor|rollbackForClassName|noRollbackFor|noRollbackForClassName:设置事务回滚的条件
     */
    @Override
    @Transactional(propagation = Propagation.REQUIRES_NEW,timeout = 3,rollbackFor = {NullPointerException.class, MyException.class})//三秒钟之内,事务没有执行完,则强制执行回滚
    //通过@Transactional注解实现事务管理
    public void buyBook(String bid, String uid) {//传播者是checkOutbook()

//        try {
//            Thread.sleep(2000);
//        } catch (InterruptedException e) {
//            e.printStackTrace();
//        }

        //一下三个操作要么都执行,要么都不执行
        Integer price = bookDao.selectPrice(bid);//查询价格
        bookDao.updateSt(bid);//更新图书库存
        bookDao.updateBalance(uid,price);//更新用户余额
    }
}
CashierServiceImpl
package com.spring.book.service;
import org.springframework.beans.factory.annotation.Autowired;
import org.springframework.stereotype.Service;
import org.springframework.transaction.annotation.Transactional;
import java.util.List;

@Service
@Transactional
public class CashierServiceImpl implements  Cashier {

    @Autowired
    private  BookService service;

    @Override
    public void checkOut(String uid, List<String> bids) {
        for (String bid :
                bids) {
            service.buyBook(bid,uid);//checkout事务传播给buybook事务
        }
    }
}
BookController
package com.spring.book.controller;
import com.spring.book.service.BookService;
import com.spring.book.service.Cashier;
import org.springframework.beans.factory.annotation.Autowired;
import org.springframework.stereotype.Controller;

import java.util.ArrayList;

@Controller
public class BookController {

    @Autowired
    private BookService bookService;
    @Autowired
    private Cashier cashier;
    public void buybook(){
        bookService.buyBook("1","1001");
    }

    public void checkOut(){
        ArrayList<String> bids = new ArrayList<>();
        bids.add("1");
        bids.add("2");
        cashier.checkOut("1001",bids);
    }
}
public class test {

    public static void main(String[] args) {
        ClassPathXmlApplicationContext applicationContext = new ClassPathXmlApplicationContext("book.xml");
        BookController controller = applicationContext.getBean("bookController", BookController.class);
       // controller.buybook();
        controller.checkOut();
    }
}
通过xml配置事务
<?xml version="1.0" encoding="UTF-8"?>
<beans xmlns="http://www.springframework.org/schema/beans"
	xmlns:xsi="http://www.w3.org/2001/XMLSchema-instance"
	xmlns:context="http://www.springframework.org/schema/context"
	xmlns:aop="http://www.springframework.org/schema/aop"
	xmlns:tx="http://www.springframework.org/schema/tx"
	xsi:schemaLocation="http://www.springframework.org/schema/beans http://www.springframework.org/schema/beans/spring-beans.xsd
		http://www.springframework.org/schema/context http://www.springframework.org/schema/context/spring-context-4.0.xsd
		http://www.springframework.org/schema/aop http://www.springframework.org/schema/aop/spring-aop-4.0.xsd
		http://www.springframework.org/schema/tx http://www.springframework.org/schema/tx/spring-tx-4.0.xsd">

	<context:component-scan base-package="com.atguigu.book_xml"></context:component-scan>

	<!-- 引入属性文件 -->
	<context:property-placeholder location="db.properties"/>

	<!-- 创建数据源 -->
	<bean id="dataSource" class="com.alibaba.druid.pool.DruidDataSource">
		<property name="driverClassName" value="${jdbc.driver}"></property>
		<property name="url" value="${jdbc.url}"></property>
		<property name="username" value="${jdbc.username}"></property>
		<property name="password" value="${jdbc.password}"></property>
	</bean>

	<!-- 通过数据源配置JdbcTemplate -->
	<bean id="jdbcTemplate" class="org.springframework.jdbc.core.JdbcTemplate">
		<property name="dataSource" ref="dataSource"></property>
	</bean>

	<!-- 配置事务管理器,不管是用注解方式或xml方式配置事务,一定要有DataSourceTransactionManager事务管理器的支持 -->
	<bean id="dataSourceTransactionManager" class="org.springframework.jdbc.datasource.DataSourceTransactionManager">
		<property name="dataSource" ref="dataSource"></property>
	</bean>

	<!-- 配置事务通知 -->
	<tx:advice id="tx" transaction-manager="dataSourceTransactionManager">
		<tx:attributes>
			<!-- 在设置好的切入点表达式下再次进行事务设置 -->
			<tx:method name="buyBook"/>
			<tx:method name="checkOut"/>

			<!-- 只有select开头的方法才会被事务处理 -->
			<tx:method name="select*" read-only="true"/>
			<tx:method name="insert*"/>
			<tx:method name="update*"/>
			<tx:method name="delete*"/>

			<tx:method name="*"/>

		</tx:attributes>
	</tx:advice>

	<!-- 配置切入点表达式 -->
	<aop:config>
		<aop:pointcut expression="execution(* com.atguigu.book_xml.service.impl.*.*(..))" id="pointCut"/>
		<aop:advisor advice-ref="tx" pointcut-ref="pointCut"/>
	</aop:config>

</beans>