码农的世界里,一切皆对象。
Spring的世界里,一切对象皆Bean。
没有任何一个业务功能是Spring Bean不能实现的,如果不能,那就再来一个Bean。
Spring两大杀手锏 IoC 和 AOP
一、IoC(Inversion of Control:控制反转)是一种设计思想
1、IoC的简单理解
控制反转,似乎不太好理解,换种说法就是反向控制,是相对于正向控制而言的(通过new等主动显示地创建所需引用的对象)。反向控制,既封装简化了对象创建的繁琐过程,又巧妙灵活地处理了对象间的相互依赖关系,降低了耦合度。结合Spring简单来说,就是Spring 容器管理着一堆的Bean,当一个Bean需要引用另一个Bean时,Spring管理容器会通过依赖注入(Dependency Injection,简称DI)的方式给当前对象注入需要的Bean。
注入方式有手动配置注入,如spring-beans.xml文件结合对象的构造函数或setter方法等实现注入。不过现在都流行注解方式注入,一般通过@Autowired 标记自动注入,当Bean的实现类有多个时,需要指定Bean的名称(通过依赖查找匹配注入:Dependency Lookup,简称DL):
@Qualifier("beanName")
@Autowired
?
或?

@Resource(name = "beanName")
2、BeanFactory 与 FactoryBean
Spring 一切对象皆Bean,很有必要搞清楚这两个接口类。
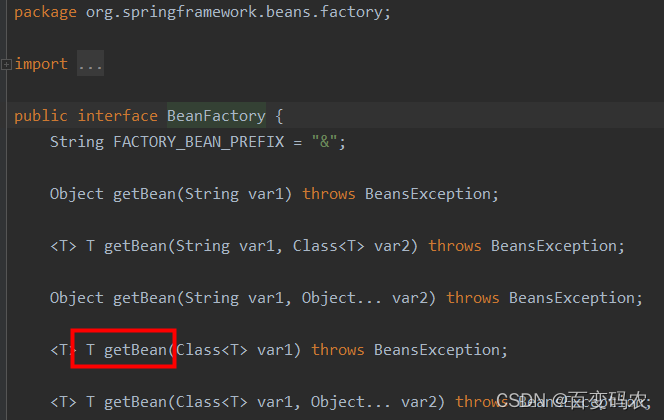
BeanFactory:

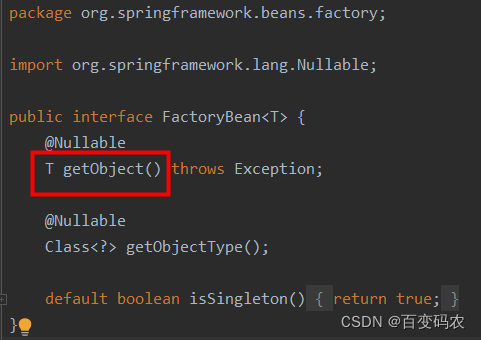
FactoryBean:

通过对比可见,BeanFactory是管理Bean的通用IoC容器,就是Bean工厂?。
FactoryBean 本身也是一个Bean, 接收一个泛型,用于构建并获取较复杂的或有特殊用法的Bean。也就是说当我们需要控制某一个Bean的创建过程或需要改造增强一个Bean的功能时,可以采用这种方法来创建扩展Bean,一般结合Bean的生命周期管理处理,比如:ForkJoinPoolFactoryBean
public class ForkJoinPoolFactoryBean implements FactoryBean<ForkJoinPool>, InitializingBean, DisposableBean {

    private boolean commonPool = false;
    private int parallelism = Runtime.getRuntime().availableProcessors();
    private ForkJoinWorkerThreadFactory threadFactory;
    @Nullable
    private UncaughtExceptionHandler uncaughtExceptionHandler;
    private boolean asyncMode;
    private int awaitTerminationSeconds;
    @Nullable
    private ForkJoinPool forkJoinPool;

    // InitializingBean 加载完配置后初始化方法
    public void afterPropertiesSet() {
        this.forkJoinPool = this.commonPool ? ForkJoinPool.commonPool() :
        new ForkJoinPool(this.parallelism, this.threadFactory,
        this.uncaughtExceptionHandler, this.asyncMode);
    }

    // FactoryBean方法
    @Nullable
    public ForkJoinPool getObject() {
        return this.forkJoinPool;
    }

    public Class<?> getObjectType() {
        return ForkJoinPool.class;
    }

    public boolean isSingleton() {
        return true;
    }

    // DisposableBean 销毁方法
    public void destroy() {
        if (this.forkJoinPool != null) {
            this.forkJoinPool.shutdown();
            if (this.awaitTerminationSeconds > 0) {
                try {
                   this.forkJoinPool.awaitTermination(
                        (long)this.awaitTerminationSeconds, TimeUnit.SECONDS);
                } catch (InterruptedException var2) {
                    Thread.currentThread().interrupt();
                }
            }
        }

    }
}
3、Spring是如何解决循环依赖注入的呢?
Spring Bean既然通过依赖注入维护对象间的引用,随着业务变得逐步复杂,当Bean多了以后,Bean之间必然会存在直接或间接的相互依赖关系,可能会形成循环依赖,简单的比如说BeanA 依赖BeanB, BeanB又反过来依赖BeanA, 这样就构成了依赖环路。那Spring是如何解决的呢?
spring内部有三级缓存:
-
singletonObjects 一级缓存,用于保存完成初始化的bean实例
-
earlySingletonObjects 二级缓存,用于保存完成实例化的bean实例
-
singletonFactories 三级缓存,用于保存bean创建工厂,便于扩展创建代理对象。
下面以Bean A 和 B二者的简单循环依赖注入为例解说:
其实,循环依赖注入就像永动机一样,一直这样引用并驱动依赖对象完成实例化及初始化,直至所有的依赖对象(包括间接依赖)都完成初始化,然后结束循环依赖注入流程。
另外,再说说为何三级缓存要存放Bean工厂,而非Bean对象实例,这主要是考虑到我们使用Bean时可以灵活扩展(可以参考前面说的FactoryBean)
尽管Spring帮我们解决了大多数情况下的循环依赖问题,但有时还是会存在循环依赖注入的问题。
这类循环依赖问题的出现,比如:代理对象,多例,构造函数注入,@DependsOn循环依赖等。
解决方法主要有:
-
使用
@Lazy注解,延迟加载 -
使用
@DependsOn注解,调整加载先后关系 -
修改文件名称,改变循环依赖类的加载顺序
二、AOP(Aspect Oriented Programming:面向切面编程)是 OOP(面向对象编程)的延续
1、AOP有何作用
AOP通过动态代理方式可以集中解决一些公共业务逻辑,并尽可能减少对原有功能的影响,典型的应用比如Spring的事务管理控制,日志采集记录,异常处理等。
2、代理模式
代理模式,分静态代理(也即设计模式中的代理模式)和 动态代理。
- 静态代理,主要是针对某一个类的代理,要一一对应的编写繁多的代理类,不便扩展。
- 动态代理,主要通过反射机制自动生成代理类,无需关心代理类,只需关注业务类,易扩展。
动态代理分JDK动态代理以及CGLIB动态代理。
2.1 JDK 动态代理
为了看起来更直观,特将相关的类都放在一个文件里,便于查看理解:
import java.lang.reflect.InvocationHandler;
import java.lang.reflect.Method;

/**
 * 被代理接口类型
 */
public interface PersonInterface {
    PersonInterface hello(String desc);
}

/**
 * 被代理接口实现类一
 */
class MaleImpl implements PersonInterface {
    @Override
    public PersonInterface hello(String desc) {
        String className = this.getClass().getSimpleName();
        System.out.println(className + ":hello " + desc);
        return this;
    }
}

/**
 * 被代理接口实现类二
 */
class FemaleImpl implements PersonInterface {
    @Override
    public PersonInterface hello(String desc) {
        String className = this.getClass().getSimpleName();
        System.out.println(className + ":hello " + desc);
        return this;
    }
}

/**
 * 代理处理逻辑(在被代理实现类的业务方法前后可以追加处理逻辑,改造或增强功能)
 */
class ProxyInvocationHandler implements InvocationHandler {
    private PersonInterface person;

    public ProxyInvocationHandler(PersonInterface person) {
        this.person = person;
    }

    @Override
    public Object invoke(Object proxy, Method method, Object[] args) throws Throwable {
        if(method.getName().equals("hello")){
            System.out.println("Do before service method");
            Object result = method.invoke(person, args);
            System.out.println("Do after service method,result:" + result.toString());

            // proxy的作用:
            // 1-可以获取代理类的信息
            // 2-返回代理对象后可用于代理的链式调用(被代理对象要返回同一接口类型)
            System.out.println(proxy.getClass().getName());
            return proxy;
        }
        return null;
    }
}
测试代理功能:
import java.lang.reflect.InvocationHandler;
import java.lang.reflect.Proxy;

public class TestJDKProxy {

    public static void main(String[] args) {
        // 添加此代码,可以保留自动生成的代理类
        // (在工作空间根目录下:com.sun.proxy.$Proxy0.class)
        System.getProperties()
        .setProperty("sun.misc.ProxyGenerator.saveGeneratedFiles", "true");

        // 第一个被代理类,注入InvocationHandler交由$Proxy0代理处理
        PersonInterface male = new MaleImpl();
        InvocationHandler manHandler = new ProxyInvocationHandler(male);
        // 代理面向接口
        PersonInterface proxyMale = (PersonInterface) Proxy.newProxyInstance(
                PersonInterface.class.getClassLoader(),
                new Class<?>[]{PersonInterface.class}, manHandler);
        // 参见下面测试时贴出的源码 $Proxy0.hello(),调用invocationHandler.invoke()
        proxyMale.hello("proxyMale");

        System.out.println("=====楚河=====汉界=====");

        // 第二个被代理类,注入InvocationHandler交由$Proxy0代理处理
        PersonInterface female = new FemaleImpl();
        InvocationHandler womanHandler = new ProxyInvocationHandler(female);
        PersonInterface proxyFemale = (PersonInterface) Proxy.newProxyInstance(
                PersonInterface.class.getClassLoader(),
                new Class<?>[]{PersonInterface.class}, womanHandler);
        // InvocationHandler返回proxy代理对象后可以链式调用
        //(被代理接口方法需返回同一接口类型)
        proxyFemale.hello("proxyFemale").hello("proxyFemale chain request");
    }

}
测试结果输出:
Do before service method
MaleImpl:hello proxyMale
Do after service method,result:com.siqi.im.upush.MaleImpl@553f17c
com.sun.proxy.$Proxy0

=====楚河=====汉界=====
Do before service method
FemaleImpl:hello proxyFemale
Do after service method,result:com.siqi.im.upush.FemaleImpl@271053e1
com.sun.proxy.$Proxy0

Do before service method
FemaleImpl:hello proxyFemale chain request
Do after service method,result:com.siqi.im.upush.FemaleImpl@271053e1
com.sun.proxy.$Proxy0
以上测试结果可见,针对同一接口类型只生成了一个代理对象com.sun.proxy.$Proxy0。
看下生成的源码:
package com.sun.proxy;

import com.siqi.im.upush.PersonInterface;
import java.lang.reflect.InvocationHandler;
import java.lang.reflect.Method;
import java.lang.reflect.Proxy;
import java.lang.reflect.UndeclaredThrowableException;

// 自动生成的代理类,通过集成Proxy实现被代理接口
public final class $Proxy0 extends Proxy implements PersonInterface {
    private static Method m1;
    private static Method m2;
    private static Method m3;
    private static Method m0;

    public $Proxy0(InvocationHandler var1) throws  {
        super(var1);
    }

    public final boolean equals(Object var1) throws  {
        try {
            return (Boolean)super.h.invoke(this, m1, new Object[]{var1});
        } catch (RuntimeException | Error var3) {
            throw var3;
        } catch (Throwable var4) {
            throw new UndeclaredThrowableException(var4);
        }
    }

    public final String toString() throws  {
        try {
            return (String)super.h.invoke(this, m2, (Object[])null);
        } catch (RuntimeException | Error var2) {
            throw var2;
        } catch (Throwable var3) {
            throw new UndeclaredThrowableException(var3);
        }
    }

    // 被代理的接口方法
    public final PersonInterface hello(String var1) throws  {
        try {
            // $Proxy0 extends Proxy (Proxy有属性InvocationHandler h)
            return (PersonInterface)super.h.invoke(this, m3, new Object[]{var1});
        } catch (RuntimeException | Error var3) {
            throw var3;
        } catch (Throwable var4) {
            throw new UndeclaredThrowableException(var4);
        }
    }

    public final int hashCode() throws  {
        try {
            return (Integer)super.h.invoke(this, m0, (Object[])null);
        } catch (RuntimeException | Error var2) {
            throw var2;
        } catch (Throwable var3) {
            throw new UndeclaredThrowableException(var3);
        }
    }

    static {
        try {
            m1 = Class.forName("java.lang.Object").getMethod("equals", Class.forName("java.lang.Object"));
            m2 = Class.forName("java.lang.Object").getMethod("toString");
            m3 = Class.forName("com.siqi.im.upush.PersonInterface").getMethod("hello", Class.forName("java.lang.String"));
            m0 = Class.forName("java.lang.Object").getMethod("hashCode");
        } catch (NoSuchMethodException var2) {
            throw new NoSuchMethodError(var2.getMessage());
        } catch (ClassNotFoundException var3) {
            throw new NoClassDefFoundError(var3.getMessage());
        }
    }
}
2.2?CGLIB 动态代理
引入maven依赖:
<dependency>
    <groupId>cglib</groupId>
    <artifactId>cglib</artifactId>
    <version>3.3.0</version>
</dependency>
处理方法拦截:
import net.sf.cglib.proxy.MethodInterceptor;
import net.sf.cglib.proxy.MethodProxy;

import java.lang.reflect.Method;

public class MyMethodInterceptor implements MethodInterceptor {

    @Override
    public Object intercept(Object obj, Method method, Object[] args, MethodProxy proxy)
                                                                      throws Throwable {
        System.out.println("对目标类方法前增强");

        // 此处方法调用为直接调用,不是用的反射
        Object object = proxy.invokeSuper(obj, args);

        System.out.println("对目标类方法后增强");

        return object;
    }
}
测试类:
import net.sf.cglib.core.DebuggingClassWriter;
import net.sf.cglib.proxy.Enhancer;

public class CGLIBDynamicProxyTest {

    public static void main(String[] args) {
        // 在指定目录下保留自动生成的动态代理类
        System.setProperty(DebuggingClassWriter.DEBUG_LOCATION_PROPERTY, "D:\\demo");

        // 创建Enhancer对象,类似于JDK动态代理的Proxy类
        Enhancer enhancer = new Enhancer();
        // 设置目标类的字节码文件(非接口类,为具体类)
        enhancer.setSuperclass(User.class);
        // 设置回调函数
        enhancer.setCallback(new MyMethodInterceptor());

        // 创建代理类
        User proxyUser = (User)enhancer.create();
        // 调用代理类方法
        proxyUser.hello("CGLIB");
    }
}
测试结果输出:
CGLIB debugging enabled, writing to 'D:\demo'
对目标类方法前增强
hello:CGLIB
对目标类方法后增强
观察下自动生成的源码(截取关键片段):
import java.lang.reflect.Method;
import net.sf.cglib.core.ReflectUtils;
import net.sf.cglib.core.Signature;
import net.sf.cglib.proxy.Callback;
import net.sf.cglib.proxy.Factory;
import net.sf.cglib.proxy.MethodInterceptor;
import net.sf.cglib.proxy.MethodProxy;

// 可以发现自动生成的代理类直接继承于被代理类
public class User$$EnhancerByCGLIB$$8ff59cb4 extends User implements Factory {

       public final void hello(String var1) {
              MethodInterceptor var10000 = this.CGLIB$CALLBACK_0;
              if (var10000 == null) {
                   CGLIB$BIND_CALLBACKS(this);
                   var10000 = this.CGLIB$CALLBACK_0;
              }

              if (var10000 != null) {
                   // 若设置了增强callBack(MethodInterceptor),则调用代理增强方法
                   var10000.intercept(this, CGLIB$hello$0$Method,
                          new Object[]{var1}, CGLIB$hello$0$Proxy);
              } else {
                   // 否则直接调用被代理的父类方法
                   super.hello(var1);
              }
      }

}
3、AOP 应用举例(以注解的方式)
3.1 自定义注解
import java.lang.annotation.ElementType;
import java.lang.annotation.Retention;
import java.lang.annotation.RetentionPolicy;
import java.lang.annotation.Target;

@Retention(RetentionPolicy.RUNTIME)
@Target(ElementType.METHOD)
public @interface Test {

    String value() default "";

    String type() default "";
}
3.2 定义切面类
import lombok.extern.slf4j.Slf4j;
import org.aspectj.lang.ProceedingJoinPoint;
import org.aspectj.lang.annotation.Around;
import org.aspectj.lang.annotation.Aspect;
import org.aspectj.lang.annotation.Pointcut;
import org.aspectj.lang.reflect.MethodSignature;
import org.springframework.stereotype.Component;

import java.lang.reflect.Method;

@Slf4j
@Aspect
@Component
public class TestAspect {

    // 定义切入点
    // @Pointcut("within(com.bruce.controller.*)")
    // public void pointcut1(){}

    // pointcut可以如下合并简写
    // @Around(value = "pointcut1() && @annotation(test)")
    @Around(value = "within(com.bruce.controller.*) && @annotation(test)")
    public Object advise(ProceedingJoinPoint pjp, Test test) throws Throwable {
        Object result = null;
        try {
            Class<?> targetClass = pjp.getTarget().getClass();
            String methodName = pjp.getSignature().getName();

            Class<?>[] parameterTypes = ((MethodSignature)
                       pjp.getSignature()).getParameterTypes();

            Method method = targetClass.getMethod(methodName, parameterTypes);

            Test testAnnotation = method.getAnnotation(Test.class);
            if(testAnnotation != null){
                String type = testAnnotation.type();
                String value = testAnnotation.value();

                result = pjp.proceed(pjp.getArgs());

                log.info("type:" + type + ";value:" + value);
                return result;
            }else{
                result = pjp.proceed(pjp.getArgs());
            }
        } catch (Exception e) {
            log.error(e.getMessage());
        }

        return result;
    }

}
五种通知方法:
- @Before,前置通知。
- @After,后置【finally】通知。
- @AfterReturning,后置【try】通知,使用returning来引用方法返回值。
- @AfterThrowing,后置【catch】通知,使用throwing来引用抛出的异常。
- @Around,环绕通知,有返回值。
3.3?需求切入的类的方法上标记注解
    @Test(type = "type1", value = "value1")
    @PostMapping(value = "/test", produces = MediaType.APPLICATION_JSON_UTF8_VALUE)\
    public String test(@RequestBody BaseRequest<Void> baseRequest) {
        return "test";
    }
3.4?启动动态代理
// 同配置:<aop:aspectj-autoproxy proxy-target-class="true"/>
@EnableAspectJAutoProxy
@SpringBootApplication
public class TestApplication {

    public static void main(String[] args) {
        SpringApplication.run(TestApplication.class, args);
    }

}
注意:切入点扫描的包路径需在SpringBoot默认扫描范围内,并且记得开启动态代理。
proxy-target-class(注解配置时属性为:proxyTargetClass)的作用:
该属性值默认为false,表示使用JDK动态代理织入增强;当值为true时,表示使用CGLib动态代理。
但是,即使设置为false,如果目标类没有声明接口,则Spring将自动使用CGLib动态代理。
