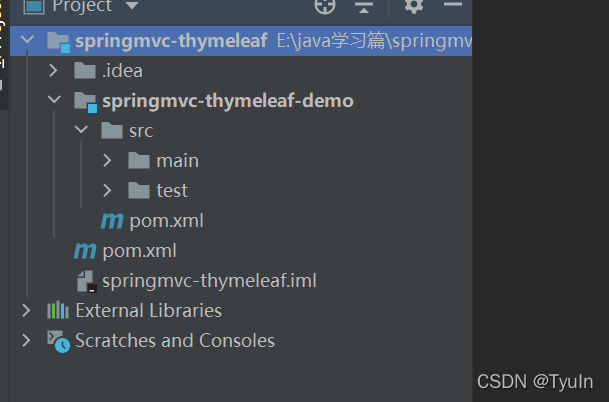
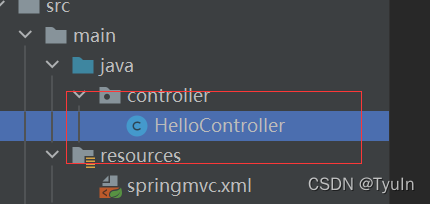
一、首先创建一个简单的 maven 项目 springmvc-thymeleaf 作为父项目,删除 src 目录,之后再创建一个 子模块 springmvc-thymeleaf-demo,具体流程不再叙述。

二、在子模块中导入项目所需 jar 包(当然你也可以把一些所有模块都需要的 jar 包导入写在 父项目的 pom.xml 文件中),我这里就直接放在子模块的 pom.xml 中。
<?xml version="1.0" encoding="UTF-8"?>
<project xmlns="http://maven.apache.org/POM/4.0.0"
         xmlns:xsi="http://www.w3.org/2001/XMLSchema-instance"
         xsi:schemaLocation="http://maven.apache.org/POM/4.0.0 http://maven.apache.org/xsd/maven-4.0.0.xsd">
    <parent>
        <artifactId>springmvc-thymeleaf</artifactId>
        <groupId>org.example</groupId>
        <version>1.0-SNAPSHOT</version>
    </parent>
    <modelVersion>4.0.0</modelVersion>
    <packaging>war</packaging>

    <artifactId>springmvc-thymeleaf-demo</artifactId>

    <dependencies>
        <!-- springmvc jar包 -->
        <dependency>
            <groupId>org.springframework</groupId>
            <artifactId>spring-webmvc</artifactId>
            <version>5.2.18.RELEASE</version>
        </dependency>
        <!-- servlet jar包 -->
        <dependency>
            <groupId>javax.servlet</groupId>
            <artifactId>javax.servlet-api</artifactId>
            <version>4.0.1</version>
            <scope>provided</scope>
        </dependency>
        <!-- logback日志包 -->
        <dependency>
            <groupId>ch.qos.logback</groupId>
            <artifactId>logback-classic</artifactId>
            <version>1.2.3</version>
        </dependency>
        <!-- spring 框架 和 thymeleaf 整合包 -->
        <dependency>
            <groupId>org.thymeleaf</groupId>
            <artifactId>thymeleaf-spring5</artifactId>
            <version>3.0.12.RELEASE</version>
        </dependency>
    </dependencies>


</project>
需要注意的地方:


三、如下,创建一个 webapp 文件夹

四、创建一个 web.xml 文件,步骤如下:


五、编写 web.xml 文件,配置 springmvc 框架的前端控制器,匹配请求路径等,如下:
<?xml version="1.0" encoding="UTF-8"?>
<web-app xmlns="http://xmlns.jcp.org/xml/ns/javaee"
         xmlns:xsi="http://www.w3.org/2001/XMLSchema-instance"
         xsi:schemaLocation="http://xmlns.jcp.org/xml/ns/javaee http://xmlns.jcp.org/xml/ns/javaee/web-app_4_0.xsd"
         version="4.0">

    <!-- 设置 springmvc 的前端控制器 -->
    <servlet>
        <servlet-name>springmvc</servlet-name>
        <servlet-class>org.springframework.web.servlet.DispatcherServlet</servlet-class>
        <!-- 通过初始化参数指定 springmvc 配置文件的位置和名称 -->
        <init-param>
            <!-- contextConfigLocation为固定名称 -->
            <param-name>contextConfigLocation</param-name>
            <!-- 使用classpath:表示从类路径查找配置文件,例如 maven 工程中的 src/main/resources -->
            <param-value>classpath:springmvc.xml</param-value>
        </init-param>
        <!--
            作为框架的核心组件,在启动过程中有大量的初始化操作要做
            而这些操作放在第一次请求时才执行会严重影响访问速度
            因此需要通过此标签将启动控制 DispatcherServlet 的初始化时间提前到服务器启动时
        -->
        <load-on-startup>1</load-on-startup>
    </servlet>
    <servlet-mapping>
        <servlet-name>springmvc</servlet-name>
        <!--
            设置 springmvc 核心容器所能处理的请求的请求路径
            / 匹配的请求可以是 /login 或者 .html .js .css方式的请求路径
            但是不能匹配 .jsp 请求路径
         -->
        <url-pattern>/</url-pattern>
    </servlet-mapping>

</web-app>
六、编写 spring 配置文件 springmvc.xml

<?xml version="1.0" encoding="UTF-8"?>
<beans xmlns="http://www.springframework.org/schema/beans"
       xmlns:xsi="http://www.w3.org/2001/XMLSchema-instance"
       xmlns:context="http://www.springframework.org/schema/context"
       xsi:schemaLocation="http://www.springframework.org/schema/beans
            http://www.springframework.org/schema/beans/spring-beans.xsd
            http://www.springframework.org/schema/context
            http://www.springframework.org/schema/context/spring-context.xsd">

    <context:component-scan base-package="controller"/>

    <!-- 配置 thymeleaf 视图解析器 -->
    <bean id="viewResolver" class="org.thymeleaf.spring5.view.ThymeleafViewResolver">
        <!-- 配置优先级 -->
        <property name="order" value="1"/>
        <property name="characterEncoding" value="UTF-8"/>
        <property name="templateEngine">
            <bean class="org.thymeleaf.spring5.SpringTemplateEngine">
                <property name="templateResolver">
                    <bean class="org.thymeleaf.spring5.templateresolver.SpringResourceTemplateResolver">
                        <!-- 视图前缀 -->
                        <property name="prefix" value="/WEB-INF/templates/"/>
                        <!-- 视图后缀 -->
                        <property name="suffix" value=".html"/>
                        <property name="templateMode" value="HTML5"/>
                        <property name="characterEncoding" value="UTF-8"/>
                    </bean>
                </property>
            </bean>
        </property>
    </bean>

</beans>
七、编写业务代码 HelloController.java

@Controller
public class HelloController {

    @GetMapping("/index")
    public String toIndex() {
        return "index";
    }

}
八、创建响应页面 index.html

<!DOCTYPE html>
<html lang="en" xmlns:th="http://www.thymeleaf.org">
<head>
    <meta charset="UTF-8">
    <title>首页</title>
</head>
<body>
<h3>hello springmvc-thymeleaf</h3>
</body>
</html>
九、配置 tomcat 服务器,这里不进行叙述了。
十、运行项目

从对应的日志打印中也可以看到:

本篇博客主要是创建 springmvc 整合 thymeleaf 项目,不涉及其他更多操作,thymeleaf 的相关内容请自行了解,如果在上面的步骤有任何问题欢迎在评论区指出,码字不易,路过的朋友们可以的话点赞支持一下!!!万分感谢。