前言
通过第二节的学习,我们构建的是微服务生产者的模块,那么这一节我们构建的就是微服务消费者的模块,首先,我们思考一下消费者,那他们是不是就不需要关注如何生产和创建,那么这一层我们就可想而知,不应该存在service。
我们只需要controller,但是我们如何调用呢?
我们按照第二节的方式,再次构建一个模块。

相同的内容我也就不再赘述了。
相关代码如下:
<?xml version="1.0" encoding="UTF-8"?>
<project xmlns="http://maven.apache.org/POM/4.0.0"
         xmlns:xsi="http://www.w3.org/2001/XMLSchema-instance"
         xsi:schemaLocation="http://maven.apache.org/POM/4.0.0 http://maven.apache.org/xsd/maven-4.0.0.xsd">
    <parent>
        <artifactId>cloud2020</artifactId>
        <groupId>com.hyf.springcloud</groupId>
        <version>1.0-SNAPSHOT</version>
    </parent>
    <modelVersion>4.0.0</modelVersion>

    <artifactId>cloud-consumer-order80</artifactId>

    <dependencies>

        <dependency>
            <groupId>org.springframework.boot</groupId>
            <artifactId>spring-boot-starter-web</artifactId>
        </dependency>
        <dependency>
            <groupId>org.springframework.boot</groupId>
            <artifactId>spring-boot-starter-actuator</artifactId>
        </dependency>

        <dependency>
            <groupId>org.springframework.boot</groupId>
            <artifactId>spring-boot-devtools</artifactId>
            <scope>runtime</scope>
            <optional>true</optional>
        </dependency>
        <dependency>
            <groupId>org.projectlombok</groupId>
            <artifactId>lombok</artifactId>
            <optional>true</optional>
        </dependency>
        <dependency>
            <groupId>org.springframework.boot</groupId>
            <artifactId>spring-boot-starter-test</artifactId>
            <scope>test</scope>
        </dependency>
    </dependencies>
</project>


yml:

server:
  port: 80
entity包下的内容复制粘贴过来即可。
下面是业务类的编写。
在前言中我们提到过,在这个模块里面,我们没有service,那我们的controller应该如何调用呢?首先我们是否可以跟原来一样private XXX xxx。答案是不可以,我们没有办法去 通过两个不同端口号的模块进行互相之间爱安德调用,因此,我们引入了一个新的东西。RestTemplate。
简介:spring框架提供的RestTemplate类可用于在应用中调用rest服务,它简化了与http服务的通信方式,统一了RESTful的标准,封装了http链接, 我们只需要传入url及返回值类型即可。相较于之前常用的HttpClient,RestTemplate是一种更优雅的调用RESTful服务的方式。
在Spring应用程序中访问第三方REST服务与使用Spring RestTemplate类有关。RestTemplate类的设计原则与许多其他Spring *模板类(例如JdbcTemplate、JmsTemplate)相同,为执行复杂任务提供了一种具有默认行为的简化方法。
RestTemplate默认依赖JDK提供http连接的能力(HttpURLConnection),如果有需要的话也可以通过setRequestFactory方法替换为例如 Apache HttpComponents、Netty或OkHttp等其它HTTP library。
考虑到RestTemplate类是为调用REST服务而设计的,因此它的主要方法与REST的基础紧密相连就不足为奇了,后者是HTTP协议的方法:HEAD、GET、POST、PUT、DELETE和OPTIONS。例如,RestTemplate类具有headForHeaders()、getForObject()、postForObject()、put()和delete()等方法。
下面直接实战。


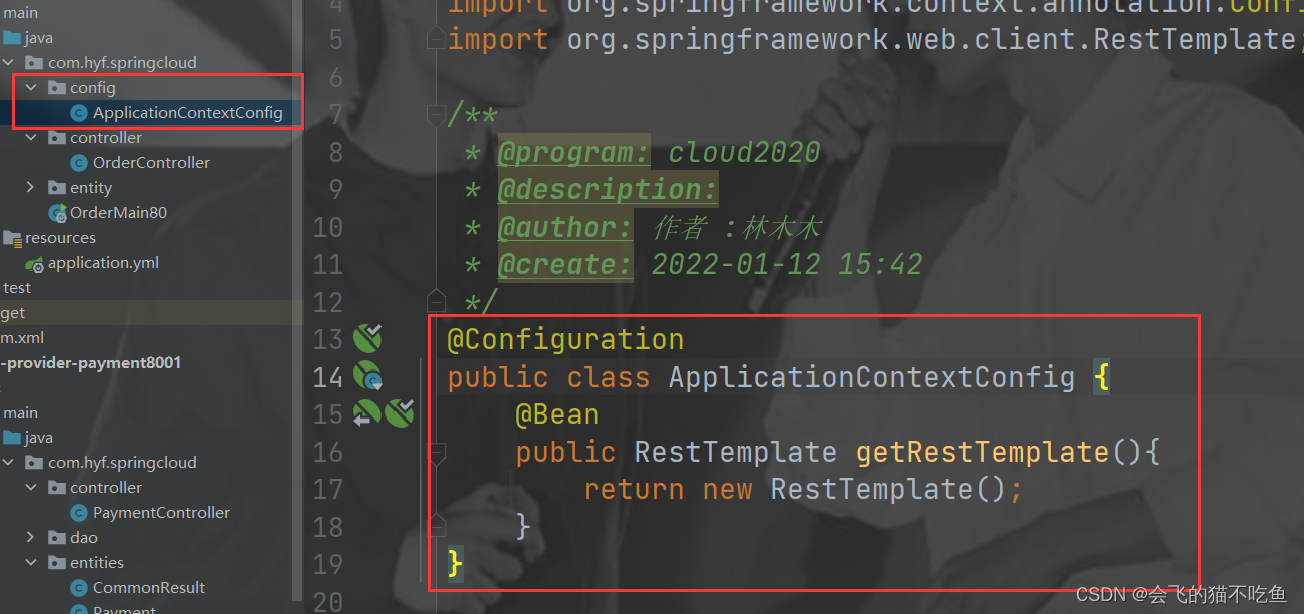
代码粘贴如下:
@Configuration
public class ApplicationContextConfig {
    @Bean
    public RestTemplate getRestTemplate(){
        return new RestTemplate();
    }
}

@RestController
@Slf4j
public class OrderController {

    public static final String PAYMENT_URL="http://localhost:8001";
    @Resource
    private RestTemplate restTemplate;

    @GetMapping("/consumer/payment/create")
    public CommonResult<Payment> create(Payment payment){
        log.info("****开始日志****");
        return restTemplate.postForObject(PAYMENT_URL+"/payment/create",payment,CommonResult.class);
    }

    @GetMapping("/consumer/payment/get/{id}")
    public CommonResult<Payment> getPayment(@PathVariable("id") Long id){
        return restTemplate.getForObject(PAYMENT_URL+"/payment/get/"+id,CommonResult.class);
    }
}

 好了,结束。。。。。
你们是不是真的以为这一节就结束了,其实不是,看我们的标题,还有一个知识点没有讲,那就是 工程重构。
观察代码发现
我们与第二节的代码对比,发现了一件什么事情?
是不是我们有一段相同的entity的代码?
那么减少代码的冗余性,我们需要为我们的工程进行重构。
如何重构呢?
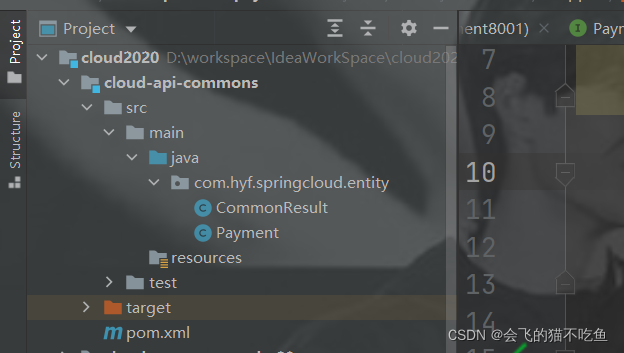
我们先是要新建一个工程,cloud-api-commoms,然后把我们的共有代码放在这个里面。

pom文件
<?xml version="1.0" encoding="UTF-8"?>
<project xmlns="http://maven.apache.org/POM/4.0.0"
         xmlns:xsi="http://www.w3.org/2001/XMLSchema-instance"
         xsi:schemaLocation="http://maven.apache.org/POM/4.0.0 http://maven.apache.org/xsd/maven-4.0.0.xsd">
    <parent>
        <artifactId>cloud2020</artifactId>
        <groupId>com.hyf.springcloud</groupId>
        <version>1.0-SNAPSHOT</version>
    </parent>
    <modelVersion>4.0.0</modelVersion>

    <artifactId>cloud-api-commons</artifactId>

    <properties>
        <maven.compiler.source>8</maven.compiler.source>
        <maven.compiler.target>8</maven.compiler.target>
    </properties>

    <dependencies>
        <dependency>
            <groupId>org.springframework.boot</groupId>
            <artifactId>spring-boot-devtools</artifactId>
            <scope>runtime</scope>
            <optional>true</optional>
        </dependency>
        <dependency>
            <groupId>org.projectlombok</groupId>
            <artifactId>lombok</artifactId>
            <optional>true</optional>
        </dependency>
        <dependency>
            <groupId>cn.hutool</groupId>
            <artifactId>hutool-all</artifactId>
            <version>5.1.0</version>
        </dependency>
    </dependencies>
</project>

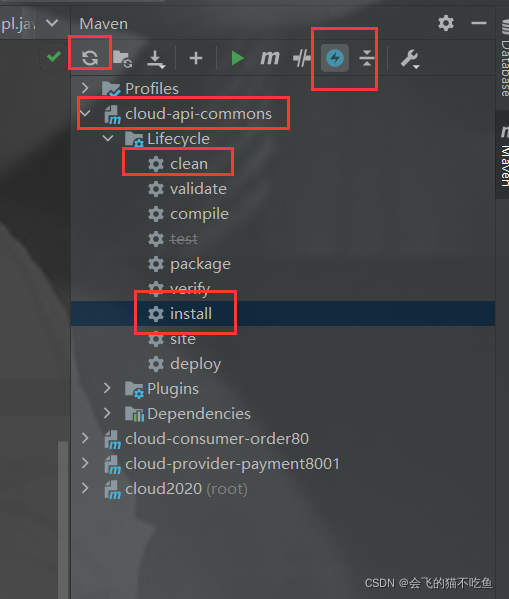
先clean,再install。当你在控制台看见sucess的时候,你就成功了。
然后,我们把下面两个工程的entity包删除掉。
然后在他们的pom文件中引入我们自定义的jar。

<dependency><!-- 引入自己定义的api通用包,可以使用Payment支付Entity -->
            <groupId>com.hyf.springcloud</groupId>
            <artifactId>cloud-api-commons</artifactId>
            <version>${project.version}</version>
        </dependency>
然后静静的等待它把自己爆红的地方,重新导包就行了,如果它自己不行,那你们就帮助他导个包就好了。
重新测试:


成功!我们下一节再见!!!