📑本篇内容:SSM框架构建简单的计划任务清单项目——项目实战
📘 文章专栏:SSM入门到入坟——一站式基础以及进阶栏目
🎬最近更新:2022年1月20日 SpringMVC入门到入坟 一站式基础及进阶——囊括面试点与初学基础——从0到1 Servlet都会了那它就是小case
🙊个人简介:一只二本院校在读的大三程序猿,本着注重基础,打卡算法,分享技术作为个人的经验总结性的博文博主,虽然可能有时会犯懒,但是还是会坚持下去的,如果你很喜欢博文的话,建议看下面一行~(疯狂暗示QwQ)
🌇点赞 👍 收藏 ?留言 📝 一键三连 关爱程序猿,从你我做起
本文目录
🚀SSM框架构建简单的计划任务清单项目——项目实战🚀
💖写在前面💖
因为这不前几天二刷完SSM这三大框架么~我又没事闲的把我之前做过的简单整合项目又做了一遍,这次下的功夫不只是40多分钟把这个项目写完,同时这次我还利用了Git操作将其传至Github上了,也将其打成war包发布在了自己的服务器上,其实这应该利用Nginx负载均衡来部署毕竟我那个小服务器哪里承受的住呀,不过用来测试罢了,废话就这么多,剩下的话全写在这篇文章里了。
用来二刷快速过一遍SSM很有用的哦! 如果有能力记得用Git操作上传到远程仓库,多学点分布式的操作,后面也会用得到是吧!
如果不会Git请看这里:Git就该这么学~ 从入门到操作 学不会 来打我~
Github项目地址:如有需要请自取~
HHXiaoFu/StudyListSSM.github.io: 简单的SSM项目30min快速入门上手
🎄1、项目展示
🪁1、页面布局展示
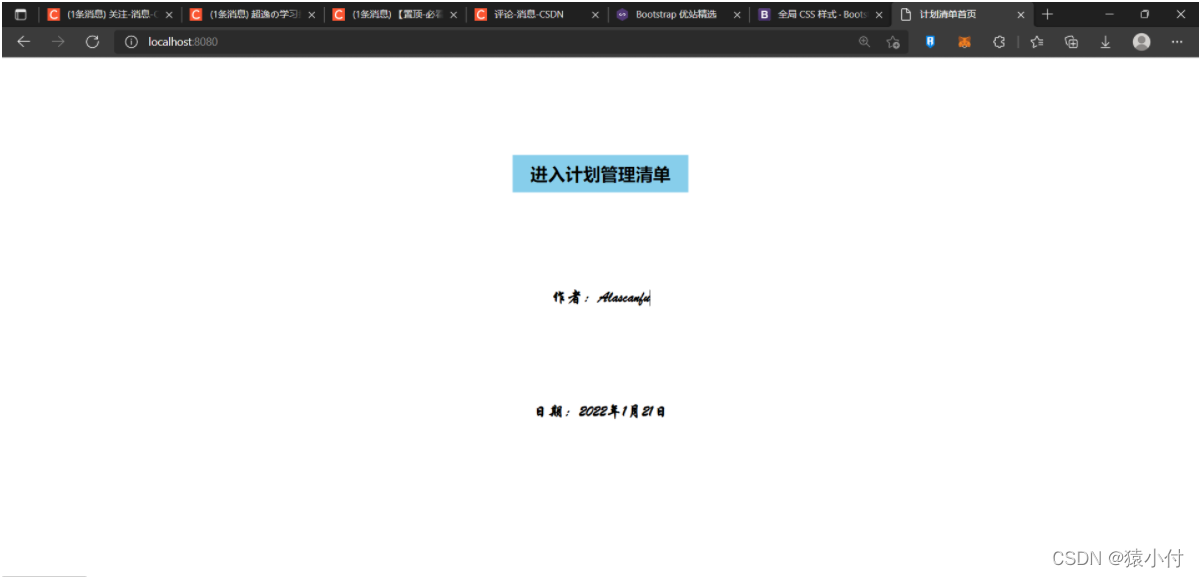
计划清单进入页面:

计划清单所有计划显示页面:

计划清单中新增计划页面

计划清单中修改计划页面

🪁2、项目框架结构
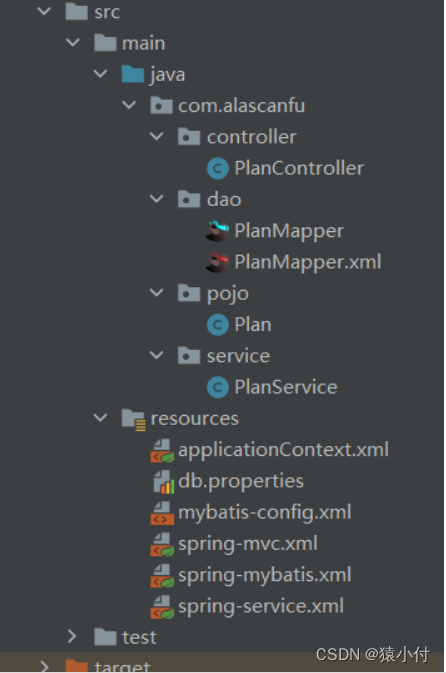
工程结构图
├─src
│  ├─main
│  │  ├─java
│  │  │  └─com
│  │  │      └─alascanfu
│  │  │          ├─controller
│  │  │          │      PlanController.java
│  │  │          │
│  │  │          ├─dao
│  │  │          │      PlanMapper.java
│  │  │          │      PlanMapper.xml
│  │  │          │
│  │  │          ├─pojo
│  │  │          │      Plan.java
│  │  │          │
│  │  │          └─service
│  │  │                  PlanService.java
│  │  │
│  │  └─resources
│  │          applicationContext.xml
│  │          db.properties
│  │          mybatis-config.xml
│  │          spring-mvc.xml
│  │          spring-mybatis.xml
│  │          spring-service.xml
│  │
│  └─test
│      └─java
│              Test.java
└─web
    │  index.jsp
    │
    └─WEB-INF
        │  web.xml
        │
        └─jsp
                addPlan.jsp
                deletePlan.jsp
                planList.jsp
                updatePlan.jsp
idea中的功能结构图


🎄2、项目开发环境以及技术栈
1、技术栈
项目所需掌握的技术栈
Spring+SpringMVC+MyBatis+MySQL+Bootstrap+Tomcat
?2、开发环境?
项目开发环境
这里小付用的是Spring5.3.9——MySQL8.0.25——Tomcat8.5.682
?3、前置知识掌握?
前置知识掌握
上述前置知识掌握,写的较为详细,初学者建议直接入手SSM与MySQL的相关知识
🎄3、计划清单项目
🎍1、新建Maven项目 导入依赖
步骤1:新建Maven项目 导入相关项目依赖并且设置pom.xml文件对Maven打包进行过滤
pom.xml
<?xml version="1.0" encoding="UTF-8"?>
<project xmlns="http://maven.apache.org/POM/4.0.0"
         xmlns:xsi="http://www.w3.org/2001/XMLSchema-instance"
         xsi:schemaLocation="http://maven.apache.org/POM/4.0.0 http://maven.apache.org/xsd/maven-4.0.0.xsd">
    <modelVersion>4.0.0</modelVersion>

    <groupId>com.alascanfu</groupId>
    <artifactId>StudyPlanSystem</artifactId>
    <version>1.0-SNAPSHOT</version>

<!--添加依赖-->
    <dependencies>
        <!--单元测试依赖-->
        <dependency>
            <groupId>junit</groupId>
            <artifactId>junit</artifactId>
            <version>4.12</version>
            <scope>test</scope>
        </dependency>
        <!--支持servlet,JavaWeb编程-->
        <dependency>
            <groupId>javax.servlet</groupId>
            <artifactId>javax.servlet-api</artifactId>
            <version>4.0.1</version>
        </dependency>
        <!--支持jsp-->
        <dependency>
            <groupId>javax.servlet.jsp</groupId>
            <artifactId>jsp-api</artifactId>
            <version>2.2</version>
        </dependency>
        <dependency>
            <groupId>jstl</groupId>
            <artifactId>jstl</artifactId>
            <version>1.2</version>
        </dependency>
        <!--数据库驱动依赖-->
        <dependency>
            <groupId>mysql</groupId>
            <artifactId>mysql-connector-java</artifactId>
            <version>8.0.26</version>
        </dependency>
        <!--支持mybatis-->
        <dependency>
            <groupId>org.mybatis</groupId>
            <artifactId>mybatis</artifactId>
            <version>3.5.7</version>
        </dependency>
        <!--支持德鲁伊数据库管理-->
        <dependency>
            <groupId>com.alibaba</groupId>
            <artifactId>druid</artifactId>
            <version>1.2.6</version>
        </dependency>
        <!--支持spring-mybatis-->
        <dependency>
            <groupId>org.mybatis</groupId>
            <artifactId>mybatis-spring</artifactId>
            <version>2.0.6</version>
        </dependency>
        <!--支持SpringMVC-->
        <dependency>
            <groupId>org.springframework</groupId>
            <artifactId>spring-webmvc</artifactId>
            <version>5.3.9</version>
        </dependency>
        <!--支持spring-jdbc-->
        <dependency>
            <groupId>org.springframework</groupId>
            <artifactId>spring-jdbc</artifactId>
            <version>5.3.9</version>
        </dependency>
        <!--支持spring-aop-->
        <dependency>
            <groupId>org.springframework</groupId>
            <artifactId>spring-aop</artifactId>
            <version>5.3.9</version>
        </dependency>
        <dependency>
            <groupId>org.aspectj</groupId>
            <artifactId>aspectjweaver</artifactId>
            <version>1.9.8.M1</version>
        </dependency>
    </dependencies>

<!--打包过滤配置-->
    <build>
        <resources>
            <resource>
                <directory>src/main/java</directory>
                <includes>
                    <include>**/*.xml</include>
                    <include>**/*.properties</include>
                </includes>
                <filtering>true</filtering>
            </resource>
            <resource>
                <directory>src/main/resources</directory>
                <includes>
                    <include>**/*.xml</include>
                    <include>**/*.properties</include>
                </includes>
                <filtering>true</filtering>
            </resource>
        </resources>
    </build>
</project>
🎍2、设计数据库
步骤2:设计数据库 并创建相关表 为其中添加部分数据用于进行测试
数据库的创建
CREATE DATABASE plansystem;

CREATE TABLE plan (
	`plan_id` int PRIMARY KEY NOT NULL AUTO_INCREMENT,
	`start_date` VARCHAR(64) NOT NULL,
	`end_date` VARCHAR(64) ,
	`context` VARCHAR(64) NOT NULL
)ENGINE=INNODB DEFAULT charset=utf8
为数据库添加部分数据用于后续测试

🎍3、创建web工程 配置web.xml 装配Tomcat
步骤3:创建web工程,配置web.xml文件

创建好web工程之后切勿忘记配置Artifacts通过Tomcat构建服务器输出
注意点:此时一定要将所有的依赖都要Put into Output Root否则对应的依赖可能无法被正常加载。

web.xml
<?xml version="1.0" encoding="UTF-8"?>
<web-app xmlns="http://xmlns.jcp.org/xml/ns/javaee"
         xmlns:xsi="http://www.w3.org/2001/XMLSchema-instance"
         xsi:schemaLocation="http://xmlns.jcp.org/xml/ns/javaee http://xmlns.jcp.org/xml/ns/javaee/web-app_4_0.xsd"
         version="4.0">
    <servlet>
        <servlet-name>springmvc</servlet-name>
        <servlet-class>org.springframework.web.servlet.DispatcherServlet</servlet-class>
        <init-param>
            <param-name>contextConfigLocation</param-name>
            <param-value>classpath:applicationContext.xml</param-value>
        </init-param>
        <load-on-startup>1</load-on-startup>
    </servlet>
    <servlet-mapping>
        <servlet-name>springmvc</servlet-name>
        <url-pattern>/</url-pattern>
    </servlet-mapping>

    <filter>
        <filter-name>encodingFilter</filter-name>
        <filter-class>org.springframework.web.filter.CharacterEncodingFilter</filter-class>
        <init-param>
            <param-name>encoding</param-name>
            <param-value>utf-8</param-value>
        </init-param>
    </filter>

    <filter-mapping>
        <filter-name>encodingFilter</filter-name>
        <url-pattern>/*</url-pattern>
    </filter-mapping>

    <session-config>
        <session-timeout>15</session-timeout>
    </session-config>


</web-app>
上述web.xml文件配置了前端控制器 DispatcherServlet 以及它对应的 配置文件路径 applicationContext.xml文件,其次通过了 CharacterEncodingFilter配置了字符编码格式,以及session 存活时间。
🎄4、编写DAO层与Service层 并且 整合
🎁1、DAO层的编写 与 Spring和Mybatis整合
Plan.java
/**
 * 功能描述
 * Plan的实体类
 * @author Alascanfu
 * @date 2022/1/20
 */
public class Plan {
    private int planId;
    private String startDate;
    private String endDate;
    private String context;

    public Plan() {
    }

    public Plan(int planId, String startDate, String endDate, String context) {
        this.planId = planId;
        this.startDate = startDate;
        this.endDate = endDate;
        this.context = context;
    }

    public int getPlanId() {
        return planId;
    }

    public void setPlanId(int planId) {
        this.planId = planId;
    }

    public String getStartDate() {
        return startDate;
    }

    public void setStartDate(String startDate) {
        this.startDate = startDate;
    }

    public String getEndDate() {
        return endDate;
    }

    public void setEndDate(String endDate) {
        this.endDate = endDate;
    }

    public String getContext() {
        return context;
    }

    public void setContext(String context) {
        this.context = context;
    }

    @Override
    public String toString() {
        return "Plan{" +
            "planId=" + planId +
            ", startDate='" + startDate + '\'' +
            ", endDate='" + endDate + '\'' +
            ", context='" + context + '\'' +
            '}';
    }
}
PlanMapper.java
/**
 * 功能描述
 * PlanMapper
 * @author Alascanfu
 * @date 2022/1/20
 */
public interface PlanMapper {
    //增加一个计划信息
    public int addPlan(Plan plan);
    //删除指定id的计划信息
    public int deletePlanById(@Param("planId") int id);
    //更新指定id的计划信息
    public int updatePlanById(Plan plan);
    //读取指定id的计划信息
    public Plan queryPlanById(int id);
    //获取全部的计划信息
    public List<Plan> queryAllPlan();

    //获取选定日期中的所有计划
    public List<Plan> queryDate(Plan plan);
}
PlanMapper.xml
<?xml version="1.0" encoding="UTF-8" ?>
<!DOCTYPE mapper
PUBLIC "-//mybatis.org//DTD Mapper 3.0//EN"
"http://mybatis.org/dtd/mybatis-3-mapper.dtd">
<mapper namespace="com.alascanfu.dao.PlanMapper">
<insert id="addPlan" parameterType="com.alascanfu.pojo.Plan">
insert into plan(start_date,end_date,context)
values (#{startDate},#{endDate},#{context})
</insert>
<update id="updatePlanById">
update plan
set start_date = #{startDate},end_date = #{endDate},context = #{context}
where plan_id = #{planId}
</update>
<delete id="deletePlanById" parameterType="int">
delete from plan
where plan_id = #{planId}
</delete>
<select id="queryPlanById" resultType="com.alascanfu.pojo.Plan">
select plan_id,start_date,end_date,context from plan where plan_id = #{planId}
</select>
<select id="queryAllPlan" resultType="com.alascanfu.pojo.Plan">
select plan_id,start_date,end_date,context from plan
</select>
<select id="queryDate" resultType="com.alascanfu.pojo.Plan">
select plan_id,start_date,end_date,context
from plan
where
STR_TO_DATE(start_date,'%Y-%m-%d') <= STR_TO_DATE(#{startDate},'%Y-%m-%d')
and STR_TO_DATE(#{startDate},'%Y-%m-%d') <= STR_TO_DATE(end_date,'%Y-%m-%d')
</select>
</mapper>
mybatis-config.xml
<?xml version="1.0" encoding="UTF-8" ?>
<!DOCTYPE configuration
        PUBLIC "-//mybatis.org//DTD Config 3.0//EN"
        "http://mybatis.org/dtd/mybatis-3-config.dtd">
<configuration>
    <!-- 开启驼峰命名 -->
    <settings>
        <setting name="mapUnderscoreToCamelCase" value="true"/>
    </settings>

    <typeAliases>

    </typeAliases>
</configuration>
db.properties
jdbc.url=jdbc:mysql://localhost:3306/plansystem?useSSL=true&useUnicode=true&characterEncoding=utf8&serverTimezone=Asia/Shanghai
jdbc.username=root
jdbc.password=123456
jdbc.driverClassName=com.mysql.cj.jdbc.Driver
这里需要注意哈Mybatis8.0以上就必须要增加时区了哦~
spring-mybatis.xml
<?xml version="1.0" encoding="UTF-8"?>
<beans xmlns="http://www.springframework.org/schema/beans"
       xmlns:xsi="http://www.w3.org/2001/XMLSchema-instance"
       xmlns:context="http://www.springframework.org/schema/context"
       xsi:schemaLocation="http://www.springframework.org/schema/beans http://www.springframework.org/schema/beans/spring-beans.xsd http://www.springframework.org/schema/context https://www.springframework.org/schema/context/spring-context.xsd">

    <context:property-placeholder location="classpath:db.properties"/>
<!--    配置Druid数据源-->
    <bean class="com.alibaba.druid.pool.DruidDataSource" id="dataSource">
        <property name="driverClassName" value="${jdbc.driverClassName}"/>
        <property name="url" value="${jdbc.url}"/>
        <property name="username" value="${jdbc.username}"/>
        <property name="password" value="${jdbc.password}"/>
    </bean>
<!--    将SqlSessionFactory注入到IOC容器当中,并且配置mapper的映射文件地址与mybatis-config的文件地址-->
    <bean class="org.mybatis.spring.SqlSessionFactoryBean" id="sqlSessionFactory">
        <property name="dataSource" ref="dataSource"/>
        <property name="configLocation" value="classpath:mybatis-config.xml"/>
        <property name="mapperLocations" value="classpath:com/alascanfu/dao/*.xml"/>
    </bean>
<!-- 自动帮助我们映射 -->
    <bean class="org.mybatis.spring.mapper.MapperScannerConfigurer">
        <property name="basePackage" value="com.alascanfu.dao"/>
    </bean>
</beans>
🎁2、编写Sercvice服务层 并且配置spring-service.xml
PlanService.java
@Service("planService")
public class PlanService {

    @Autowired
    PlanMapper planMapper;
    //增加一个计划信息
    public int addPlan(Plan plan){
        return planMapper.addPlan(plan);
    }
    //删除指定id的计划信息
    public int deletePlanById(@Param("planId") int id){
        return planMapper.deletePlanById(id);
    }
    //更新指定id的计划信息
    public int updatePlanById(Plan plan){
        return planMapper.updatePlanById(plan);
    }
    //读取指定id的计划信息
    public Plan queryPlanById(int id){
        return planMapper.queryPlanById(id);
    }
    //获取全部的计划信息
    public List<Plan> queryAllPlan(){
        return planMapper.queryAllPlan();
    }

    //获取当天日期的所有计划
    public List<Plan> queryDate(Plan plan){
        return planMapper.queryDate(plan);
    }
}
上述用到了注解将Service层直接注入到IOC容器当中且在需要PlanMapper的时候自动通过反射构建对象。
spring-service.xml
<?xml version="1.0" encoding="UTF-8"?>
<beans
        xmlns="http://www.springframework.org/schema/beans"
        xmlns:context="http://www.springframework.org/schema/context"
        xmlns:tx="http://www.springframework.org/schema/tx"
        xmlns:aop="http://www.springframework.org/schema/aop"
       xmlns:xsi="http://www.w3.org/2001/XMLSchema-instance"

       xsi:schemaLocation="
       http://www.springframework.org/schema/beans
        http://www.springframework.org/schema/beans/spring-beans.xsd
        http://www.springframework.org/schema/context
        http://www.springframework.org/schema/context/spring-context.xsd
        http://www.springframework.org/schema/tx
        http://www.springframework.org/schema/tx/spring-tx.xsd
        http://www.springframework.org/schema/aop
        http://www.springframework.org/schema/aop/spring-aop.xsd
">
    <context:component-scan base-package="com.alascanfu.service"/>
    <context:annotation-config/>
    <aop:aspectj-autoproxy/>
    <tx:annotation-driven/>
    <import resource="spring-mybatis.xml"/>

    <bean class="org.springframework.jdbc.datasource.DataSourceTransactionManager">
        <property name="dataSource" ref="dataSource"/>
    </bean>

</beans>
因为小付这里并没有增加AOP的相关操作,没有在服务层上添加响应代理 所以这个配置文件不配置也罢,但是要注意要将含有@Service的类通过DI注入到IOC容器当中。
此时的applicationContext.xml
<?xml version="1.0" encoding="UTF-8"?>
<beans xmlns="http://www.springframework.org/schema/beans"
       xmlns:xsi="http://www.w3.org/2001/XMLSchema-instance"
       xmlns:context="http://www.springframework.org/schema/context"

       xsi:schemaLocation="http://www.springframework.org/schema/beans
        http://www.springframework.org/schema/beans/spring-beans.xsd http://www.springframework.org/schema/context https://www.springframework.org/schema/context/spring-context.xsd">
    <context:component-scan base-package="com.alascanfu"/>
    <context:annotation-config/>
    <import resource="classpath:spring-mybatis.xml"/>
    <import resource="classpath:spring-service.xml"/>
</beans>
🎄5、编写Controller层以及对应的前端页面
🎁1、编写首页界面并为之稍微美化
index.jsp
<%--
  Created by IntelliJ IDEA.
  User: 帝白灬黎墨
  Date: 2022/1/20
  Time: 18:13
  To change this template use File | Settings | File Templates.
--%>
<%@ page contentType="text/html;charset=UTF-8" language="java" %>
<html>
  <head>
    <title>计划清单首页</title>
  </head>
  <style>
    a {
      color: black;
      text-decoration: none;
      font-size: 18px;
    }
    h3{
      width: 180px;
      height: 38px;
      margin: 100px auto;
      line-height: 38px;
      text-align: center ;
      background-color: skyblue;
    }
    h4{
      text-align: center;
      margin: 100px auto;
      font-family: 华文行楷;
    }
  </style>
  <body>
  <h3>
    <a href="${pageContext.request.contextPath}/planSystem/allPlan">进入计划管理清单</a>
    <h4>作者:Alascanfu</h4>
    <h4>日期:2022年1月21日</h4>
  </h3>
  </body>
</html>
?2、显示计划清单中的所有计划?
PlanController.java
@Controller
@RequestMapping("/planSystem")
public class PlanController {
    @Autowired
    PlanService planService;

    /**
     *功能描述
     * 查询所有的计划清单返回到清单显示页面
     * @date 2022/1/20
     *  @author Alascanfu
     */
    @RequestMapping("/allPlan")
    public String planList(Model model){
        List<Plan> plans = planService.queryAllPlan();
        model.addAttribute("plans",plans);
        return "planList";
    }
}
用于测试的页面
<%--
  Created by IntelliJ IDEA.
  User: 帝白灬黎墨
  Date: 2022/1/20
  Time: 18:36
  To change this template use File | Settings | File Templates.
--%>
<%@ page contentType="text/html;charset=UTF-8" language="java" %>
<html>
<head>
    <title>planList</title>
</head>
<body>
<h1>计划清单:${plans}</h1>
</body>
</html>

可以测试出对应的数据之后我们就需要进行美化页面了
这里应用到了部分Bootstrap的相关技术,栅格化系统挺实用的,不会的去看看官网,大概一个多小时就能速成
PlanList.jsp
<%@ taglib prefix="c" uri="http://java.sun.com/jsp/jstl/core" %>
<%--
  Created by IntelliJ IDEA.
  User: 帝白灬黎墨
  Date: 2022/1/20
  Time: 18:36
  To change this template use File | Settings | File Templates.
--%>
<%@ page contentType="text/html;charset=UTF-8" language="java" %>
<html>
<head>
    <title>planList</title>
    <link href="https://cdn.staticfile.org/twitter-bootstrap/3.3.7/css/bootstrap.min.css" rel="stylesheet">
</head>
<body>
<div class="container">
    <div class="row clearfix">
        <div class="col-md-12 ">
            <div class="page-header">
                <h1>
                    <small>计划清单————显示所有计划</small>
                </h1>
            </div>
        </div>
    </div>

    <div class="row clearfix">
        <div class="col-md-12">
            <table class="table table-hover table-striped">
                <thead>
                    <tr>
                        <th>计划编号</th>
                        <th>起始日期</th>
                        <th>截止日期</th>
                        <th>简要内容</th>
                    </tr>
                </thead>
                <tbody>
                    <c:forEach var="plan" items="#{plans}">
                        <tr>
                            <td>${plan.planId}</td>
                            <td>${plan.startDate}</td>
                            <td>${plan.endDate}</td>
                            <td>${plan.context}</td>
                        </tr>
                    </c:forEach>
                </tbody>
            </table>
        </div>
    </div>
</div>
</body>
</html>
显示如图:

?3、新增计划页面编写 与 显示全部 以及其Controller?
对刚才的planList页面进行修改增加一个按钮用于增加计划
planList.jsp
<div class="row">
        <div class="col-md-4 column">
            <a class="btn btn-info" href="${pageContext.request.contextPath}/planSystem/toAddPlan">新增计划</a>
            <a class="btn btn-info" href="${pageContext.request.contextPath}/planSystem/allPlan">显示全部</a>
        </div>
</div>
将其加入到表格之上
PlanController.java
/**
     *功能描述
     * 跳转到增加计划的页面
     * @date 2022/1/21
     *  @author Alascanfu
     */
@RequestMapping("/toAddPlan")
public String toAddPlan(){
    return "addPlan";
}

    /**
     *功能描述
     * 添加计划
     * @date 2022/1/21
     *  @author Alascanfu
     */
@RequestMapping("/addPlan")
public String addPlan(Plan plan){
    planService.addPlan(plan);
        return "redirect:/planSystem/allPlan";
}
addPlan.jsp
<%--
  Created by IntelliJ IDEA.
  User: 帝白灬黎墨
  Date: 2022/1/21
  Time: 14:49
  To change this template use File | Settings | File Templates.
--%>
<%@ page contentType="text/html;charset=UTF-8" language="java" %>
<html>
<head>
    <title>addPlan</title>
    <link href="https://cdn.staticfile.org/twitter-bootstrap/3.3.7/css/bootstrap.min.css" rel="stylesheet">
</head>
<body>
<div class="container">
    <div class="row clearfix">
        <div class="col-md-12 ">
            <div class="page-header">
                <h1>
                    <small>计划清单————新增计划</small>
                </h1>
            </div>
        </div>
    </div>

    <form action="${pageContext.request.contextPath}/planSystem/addPlan" method="post">
        <div class="form-group">
            <label>起始日期</label>
            <input type="date" class="form-control" name="startDate" placeholder="2022-01-21" required>
        </div>
        <div class="form-group">
            <label>截止日期</label>
            <input type="date" class="form-control" name="endDate" placeholder="2022-01-22" required>
        </div>
        <div class="form-group">
            <label>计划内容</label>
            <input type="text" class="form-control" name="context" placeholder="请简要阐述计划内容" required>
        </div>

        <button type="submit" class="btn btn-default">提交</button>
    </form>
</div>
</body>
</html>
进行测试——Test

对数据进行添加查看结果
上述的Controller层次 工作流向 :当我们在planList页面进行点击新增计划时,我们客户端(浏览器)会向我们的Tomcat服务器发出请求,之后他会被前端控制器接收到Controller进行适配进行Controller层的相关处理,我们这里是通过/toAddPlan的请求到了addPlan页面进行添加数据,当我们添加完数据之后提交表单会再次到达Controller中的/addPlan将数据持久化到数据库中,然后重定向会planList页面显示数据库中现在的所有数据。
?4、删除计划Controller层以及跳转处理?
PlanController.java
    /**
     *功能描述
     * 删除指定计划
     * @date 2022/1/21
     *  @author Alascanfu
     */
    @RequestMapping("/deletePlan")
    public String deletePlan(int planId){
        planService.deletePlanById(planId);
        return "redirect:/planSystem/allPlan";
    }
对之前的前端页面进行美化以及编写
<div class="row clearfix">
<div class="col-md-12">
<table class="table table-hover table-striped">
<thead>
<tr>
<th>计划编号</th>
<th>起始日期</th>
<th>截止日期</th>
<th>简要内容</th>
<th>操作</th>
</tr>
</thead>
<tbody>
<c:forEach var="plan" items="#{plans}">
<tr>
<td>${plan.planId}</td>
<td>${plan.startDate}</td>
<td>${plan.endDate}</td>
<td>${plan.context}</td>
<td>
<a class="btn btn-info" href="${pageContext.request.contextPath}/planSystem/toUpdatePlan?planId=${plan.planId}">修改</a>
|
<a class="btn btn-info" href="${pageContext.request.contextPath}/planSystem/deletePlan?planId=${plan.planId}">删除</a>
</td>
</tr>
</c:forEach>
</tbody>
</table>
</div>
?5、修改计划Controller以及页面编写?
PlanController.java
/**
     *功能描述
     * 跳转到修改计划的页面
     * @date 2022/1/21
     *  @author Alascanfu
     */
    @RequestMapping("/toUpdatePlan")
    public String toUpdatePlan(Plan plan,Model model){
        Plan qPlan = planService.queryPlanById(plan.getPlanId());
        model.addAttribute("QPlan",qPlan);
        return "updatePlan";
    }

    /**
     *功能描述
     * 修改指定计划
     * @date 2022/1/21
     *  @author Alascanfu
     */
    @RequestMapping("/updatePlan")
    public String updatePlan(Plan plan, Model model){
        planService.updatePlanById(plan);
        return "redirect:/planSystem/allPlan";
    }
这里需要一个由前端进行跳转的Controller处理用来保留数据使得用户无法修改计划编号,以及将计划传入之后后续更新完会重定向到所有计划页面
updatePlan.jsp
<%--
  Created by IntelliJ IDEA.
  User: 帝白灬黎墨
  Date: 2022/1/21
  Time: 14:49
  To change this template use File | Settings | File Templates.
--%>
<%@ page contentType="text/html;charset=UTF-8" language="java" %>
<html>
<head>
    <title>updatePlan</title>
    <link href="https://cdn.staticfile.org/twitter-bootstrap/3.3.7/css/bootstrap.min.css" rel="stylesheet">
</head>
<body>
<div class="container">
    <div class="row clearfix">
        <div class="col-md-12 ">
            <div class="page-header">
                <h1>
                    <small>计划清单————修改计划</small>
                </h1>
            </div>
        </div>
    </div>

    <form action="${pageContext.request.contextPath}/planSystem/updatePlan" method="post">
        <div class="form-group">
            <label>计划编号</label>
            <input  type="hidden" class="form-control" name="planId" value="${QPlan.planId}" required>
            <p class="form-control-static">${QPlan.planId}</p>
        </div>
        <div class="form-group">
            <label>起始日期</label>
            <input type="date" class="form-control" name="startDate" value="${QPlan.startDate}" required>
        </div>
        <div class="form-group">
            <label>截止日期</label>
            <input type="date" class="form-control" name="endDate" value="${QPlan.endDate}" required>
        </div>
        <div class="form-group">
            <label>计划内容</label>
            <input type="text" class="form-control" name="context" placeholder="${QPlan.context}" required>
        </div>

        <button type="submit" class="btn btn-default">提交</button>
    </form>
</div>
</body>
</html>
?6、对日期计划查询(显示所查询日期需要完成的计划)?
PlanController.java
    /**
     * 功能描述
     * 拓展功能:显示所有的查询日期需要进行的计划
     * @date 2022/1/21
     * @author Alascanfu
     */
    @RequestMapping("/queryDate")
    public String queryStartDate(Plan plan,Model model){
        List<Plan> plans = planService.queryDate(plan);
        model.addAttribute("plans",plans);
        return "planList";
    }
??7、整体的JSP页面(planList)??
此时设计的JSP主页面:
<%@ taglib prefix="c" uri="http://java.sun.com/jsp/jstl/core" %>
<%--
Created by IntelliJ IDEA.
User: 帝白灬黎墨
Date: 2022/1/20
Time: 18:36
To change this template use File | Settings | File Templates.
--%>
<%@ page contentType="text/html;charset=UTF-8" language="java" %>
<html>
<head>
<title>planList</title>
<link href="https://cdn.staticfile.org/twitter-bootstrap/3.3.7/css/bootstrap.min.css" rel="stylesheet">
</head>
<body>
<div class="container">
<div class="row clearfix">
<div class="col-md-12 ">
<div class="page-header">
<h1>
<small>计划清单————显示所有计划</small>
</h1>
</div>
</div>
</div>
<div class="row">
<div class="col-md-4 column">
<a class="btn btn-info" href="${pageContext.request.contextPath}/planSystem/toAddPlan">新增计划</a>
<a class="btn btn-info" href="${pageContext.request.contextPath}/planSystem/allPlan">显示全部</a>
</div>
<div class="col-md-4">
<form action="${pageContext.request.contextPath}/planSystem/queryDate" method="post" class="form-inline">
<div class="form-group">
<input type="date" name="startDate" class="form-control" />
</div>
<button type="submit" class="btn btn-default">查询</button>
</form>
</div>
</div>
<div class="row clearfix">
<div class="col-md-12">
<table class="table table-hover table-striped">
<thead>
<tr>
<th>计划编号</th>
<th>起始日期</th>
<th>截止日期</th>
<th>简要内容</th>
<th>操作</th>
</tr>
</thead>
<tbody>
<c:forEach var="plan" items="#{plans}">
<tr>
<td>${plan.planId}</td>
<td>${plan.startDate}</td>
<td>${plan.endDate}</td>
<td>${plan.context}</td>
<td>
<a class="btn btn-info" href="${pageContext.request.contextPath}/planSystem/toUpdatePlan?planId=${plan.planId}">修改</a>
|
<a class="btn btn-info" href="${pageContext.request.contextPath}/planSystem/deletePlan?planId=${plan.planId}">删除</a>
</td>
</tr>
</c:forEach>
</tbody>
</table>
</div>
</div>
</div>
</body>
</html>
🎁8、测试项目🎁
新增计划

删除计划

查询指定日期需要完成的计划

🎄6、项目总结
这是一个非常非常简单基础的SSM项目,很快上手,初学大概可能会花上1个小时甚至更多,但是二刷时,这个项目就信手拈来,小付大概写了40分钟左右就拿捏了这个项目了,是不错的一个小项目,大家也可以对其改善完成属于自己的小项目Demo,比如说什么分页查询啊,模糊查询什么的,我会将其传入Github上供大家参阅,一同学习,一起进步,加油,相信自己绝对没啥问题的。
💖写在最后💖
SSM框架复习告一段落~
后续小付会二刷SpringBoot 快速开发上手 !
以及期间会继续更新JVM 操作系统 计算机网络 算法等相关知识
每天学一点,至少有所收获 有所得 这就是美好的一天吧~
最后的最后 xdm加油!!! 为梦想而进 无怨无悔~