?
目录
1、Spring 框架一般都是基于 AspectJ 实现 AOP 操作
1、概念
1、什么是 AOP
(1)面向切面编程(方面),利用 AOP 可以对业务逻辑的各个部分进行隔离,从而使得业务逻辑各部分之间的耦合度降低,提高程序的可重用性,同时提高了开发的效率。
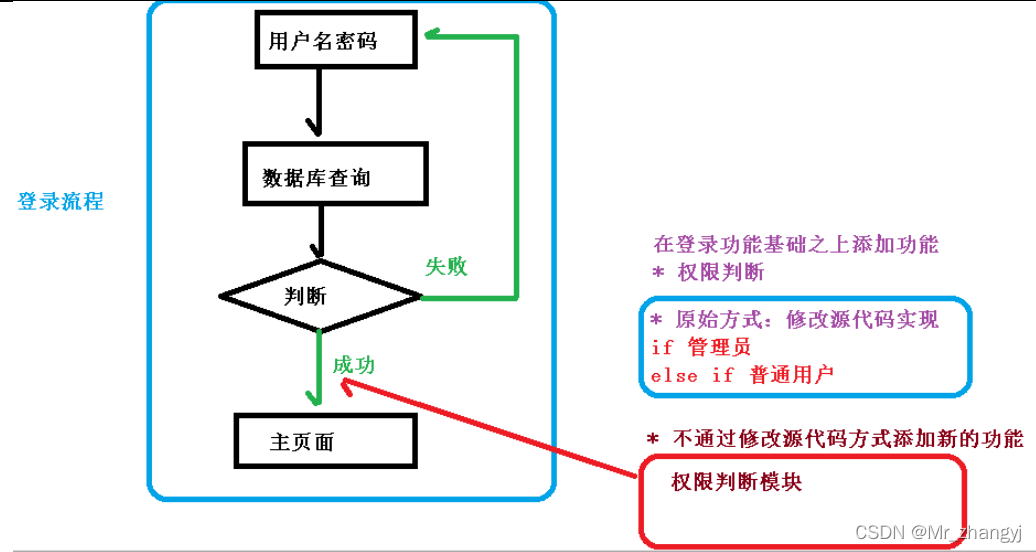
(2)通俗描述:不通过修改源代码方式,在主干功能里面添加新功能
(3)使用登录例子说明 AOP

2、底层原理:动态代理
2.1、有接口情况,使用 JDK 动态代理
创建接口实现类代理对象,增强类的方法

2.2、没有接口情况,使用 CGLIB 动态代理
创建子类的代理对象,增强类的方法

?3、JDK动态代理
3.1、使用的方法
使用 JDK 动态代理,使用 Proxy 类里面的方法创建代理对象

第一参数,类加载器
第二参数,增强方法所在的类,这个类实现的接口,支持多个接口
第三参数,实现这个接口 InvocationHandler,创建代理对象,写增强的部分?
3.2、代码实现
① 创建UserDao接口及UserDaoImpl类
UserDao 接口:
public interface UserDao {

    public int add(int a, int b);

    public String update(String id);

}
UserDaoImpl 实现类:
public class UserDaoImpl implements UserDao{

    @Override
    public int add(int a, int b) {
        return a + b;
    }

    @Override
    public String update(String id) {
        return id;
    }

}
② 创建代理类
public class JDKProxy {
    public static void main(String[] args) {
        Class[] interfaces = {UserDao.class};
        //for (Class anInterface : interfaces) {
        //    System.out.println(anInterface);
        //}
        UserDaoImpl userDao = new UserDaoImpl();
        UserDao dao = (UserDao) Proxy.newProxyInstance(JDKProxy.class.getClassLoader(), interfaces, new UserDaoProxy(userDao));
        int result = dao.add(1, 2);
        System.out.println(result);
    }
}

// 创建代理对象
class UserDaoProxy implements InvocationHandler{

    // 把被代理对象传过来,通过有参构造传递
    private Object obj;

    public UserDaoProxy(Object obj) {
        this.obj = obj;
    }

    public UserDaoProxy() {

    }

    // 增强的逻辑
    @Override
    public Object invoke(Object proxy, Method method, Object[] args) throws Throwable {
        // 方法之前
        System.out.println("方法之前执行  " + method.getName() + "  传递的参数:" + Arrays.toString(args));

        // 被增强的方法执行
        Object res = method.invoke(obj, args);

        // 方法之后
        System.out.println("方法之后执行  " + obj);
        return res;
    }
}
4、AOP术语
4.1、连接点
类中能被增强的方法都是连接点
4.2、切入点
实际被真正增强的方法称为切入点?
4.3、通知(增强)
1、实际增强的逻辑部分成为通知(增强)
2、通知有多种类型
? ? ? ? 前置通知
? ? ? ? 后置通知
? ? ? ? 环绕通知
? ? ? ? 异常通知
? ? ? ? 最终通知,例如 finally
4.4、切面
是动作,把通知应用到切入点的过程
5、AOP操作——准备工作
1、Spring 框架一般都是基于 AspectJ 实现 AOP 操作
AspectJ 不是 Spring 组成部分,独立 AOP 框架,一般把 AspectJ 和 Spirng 框架一起使
用,进行 AOP 操作
2、基于 AspectJ 实现 AOP 操作
(1)基于 xml 配置文件实现
(2)基于注解方式实现(一般使用注解)
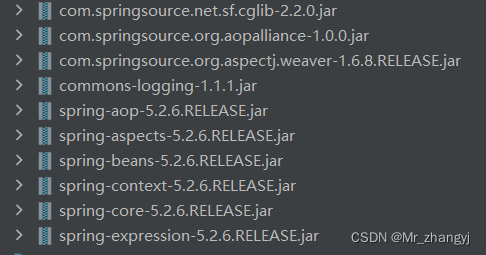
3、AOP操作所需的依赖

?4、切入点表达式
?(1)切入点表达式作用:知道对哪个类里面的哪个方法进行增强
?(2)语法结构
????????execution([权限修饰符] [返回类型] [类全路径] [方法名称]([参数列表]) )
注:权限修饰符的 * 表示任意类型,参数列表可以用?.. 来表示
????????举例 1:对 com.atguigu.dao.BookDao 类里面的 add 进行增强
????????????????execution(* com.atguigu.dao.BookDao.add(..))
????????举例 2:对 com.atguigu.dao.BookDao 类里面的所有的方法进行增强
????????????????execution(* com.atguigu.dao.BookDao.* (..))
????????举例 3:对 com.atguigu.dao 包里面所有类,类里面所有方法进行增强
????????????????execution(* com.atguigu.dao.*.* (..))
5、AOP操作——AspectJ注解
5.1、各种注解
????????@Before:前置通知,在方法执行之前执行
????????@After:后置通知,在方法执行之后执行
????????@AfterReturning:返回后通知在某连接点(join point)正常完成后执行的通知:例如,一个方法没有抛出任何异常,正常返回
????????@AfterThrowing:异常通知,方法抛出异常退出时执行的通知
????????@Around:环绕通知,包围一个连接点(join point)的通知,如方法调用。这是最强大的一种通知类型,环绕通知可以在方法调用前后完成自定义的行为,它也会选择是否继续执行连接点或直接返回它们自己的返回值或抛出异常来结束执行
5.2、注解执行顺序
有异常顺序:
????????环绕之前
????????before()方法
????????after()方法
????????afterThrowing()方法
无异常顺序:
????????环绕之前
????????before()方法
????????User--add
????????环绕之后
????????after()方法
????????afterReturning()方法
5.3、演示
1、 创建类,在类里面定义方法及注解
// 被增强的类
@Component
public class User {

    public void add(){
        //int i = 12 / 0;
        System.out.println("User--add");
    }

}
2、 创建增强类(编写增强逻辑)
在增强类里面创建方法,让不同的方法代表不同的通知类型
// 增强的类
@Component
@Aspect   //生成代理对象
class UserProxy {

    // 相同切入点抽取
    @Pointcut(value = "execution(* aspectJAnnotation.User.add(..))")
    public void pointDemo() {
    }

    // 前置通知, @Before注解表示作为前置通知
    @Before(value = "pointDemo()") //使用相同切入点
    public void before(){
        System.out.println("before()方法");
    }

    // 方法执行之后执行
    @After(value = "execution(* aspectJAnnotation.User.add(..))")
    public void after(){
        System.out.println("after()方法");
    }

    @AfterReturning(value = "execution(* aspectJAnnotation.User.add(..))")
    public void afterReturning(){
        System.out.println("afterReturning()方法");
    }

    // 异常通知
    @AfterThrowing(value = "execution(* aspectJAnnotation.User.add(..))")
    public void afterThrowing(){
        System.out.println("afterThrowing()方法");
    }

    // 环绕通知:方法之前和之后都会执行
    @Around(value = "execution(* aspectJAnnotation.User.add(..))")
    public void around(ProceedingJoinPoint proceedingJoinPoint) throws Throwable {
        System.out.println("环绕之前");

        // 被增强的方法执行
        proceedingJoinPoint.proceed();

        System.out.println("环绕之后");
    }

}
3、开启context和aop命名空间,配置注解扫描及aspectJ注解
<?xml version="1.0" encoding="UTF-8"?>
<beans xmlns="http://www.springframework.org/schema/beans"
       xmlns:xsi="http://www.w3.org/2001/XMLSchema-instance"
       xmlns:context="http://www.springframework.org/schema/context"
       xmlns:aop="http://www.springframework.org/schema/aop"
       xsi:schemaLocation="http://www.springframework.org/schema/beans http://www.springframework.org/schema/beans/spring-beans.xsd
       http://www.springframework.org/schema/aop http://www.springframework.org/schema/aop/spring-aop.xsd
       http://www.springframework.org/schema/context http://www.springframework.org/schema/context/spring-context.xsd">

    <!-- 开启注解扫描 -->
    <context:component-scan base-package="aspectJAnnotation"></context:component-scan>
    <!-- 开启Aspect生成代理对象 -->
    <aop:aspectj-autoproxy></aop:aspectj-autoproxy>
4、创建测试类进行测试
    @Test
    public void test1(){
        ApplicationContext context = new ClassPathXmlApplicationContext("bean1.xml");
        User user = context.getBean("user", User.class);
        user.add();
        /**
         * 无异常结果:
         * 环绕之前
         * before()方法
         * User--add
         * 环绕之后
         * after()方法
         * afterReturning()方法
         */
        /**
         * 有异常结果:
         * 环绕之前
         * before()方法
         * after()方法
         * afterThrowing()方法
         *
         */
    }
5.4、其他细节
5.4.1、多个增强类对同一个方法增强,设置增强类的优先级
在增强类上面添加注解 @Order(数字类型值),数字类型值越小优先级越高(从0开始)
① 在新建一个类
@Component
@Aspect
@Order(1)
public class PersonProxy {

    @Before(value = "execution(* aspectJAnnotation.User.add())")
    public void before(){
        System.out.println("Person--before()");
    }

}
② 在UserProxy类加上@Order注解
@Component
@Aspect   //生成代理对象
@Order(0)
class UserProxy {
③ 测试结果
1、若UserProxy类的Order值较小输出结果:
环绕之前
before()方法
Person--before()
User--add
环绕之后
after()方法
afterReturning()方法
2、若UserProxy类的Order值较大输出结果:
Person--before()
环绕之前
before()方法
User--add
环绕之后
after()方法
afterReturning()方法
5.4.2、AspectJ配置文件
① 创建增强类和被增强类?
Book类 :
public class Book {

    public void buy(){
        System.out.println("Book.buy()");
    }

}
BookProxy类:
public class BookProxy {

    public void before(){
        System.out.println("BookProxy.before()");
    }

}
② 在spring配置文件进行配置(记得 context 和 aop 命名空间)
aspectJXml.xml:
<?xml version="1.0" encoding="UTF-8"?>
<beans xmlns="http://www.springframework.org/schema/beans"
       xmlns:xsi="http://www.w3.org/2001/XMLSchema-instance"
       xmlns:context="http://www.springframework.org/schema/context"
       xmlns:aop="http://www.springframework.org/schema/aop"
       xsi:schemaLocation="http://www.springframework.org/schema/beans http://www.springframework.org/schema/beans/spring-beans.xsd
        http://www.springframework.org/schema/context http://www.springframework.org/schema/context/spring-context.xsd
        http://www.springframework.org/schema/aop http://www.springframework.org/schema/aop/spring-aop.xsd">

    <!-- 创建对象 -->
    <bean id="book" class="AspectXml.Book"></bean>
    <bean id="bookProxy" class="AspectXml.BookProxy"></bean>

    <!-- 配置aop增强 -->
    <aop:config>
        <!-- 配置切入点(被增强的方法) -->
        <aop:pointcut id="p" expression="execution(* AspectXml.Book.buy(..))"/>

        <!-- 配置切面(把通知应用到切入点的过程) -->
        <aop:aspect ref="bookProxy">
            <!--
                配置增强作用在哪一个方法上
                    method:增强方法
                    pointcut-ref:被增强方法的id
             -->
            <aop:before method="before" pointcut-ref="p"></aop:before>
        </aop:aspect>

    </aop:config>

</beans>
5.4.3、完全注解开发
① 创建配置类,替代配置文件
@Configuration
@ComponentScan(basePackages = {"aspectJAnnotation"})
@EnableAspectJAutoProxy(proxyTargetClass = true)
public class configAop {

}
替代:
<?xml version="1.0" encoding="UTF-8"?>
<beans xmlns="http://www.springframework.org/schema/beans"
       xmlns:xsi="http://www.w3.org/2001/XMLSchema-instance"
       xmlns:context="http://www.springframework.org/schema/context"
       xmlns:aop="http://www.springframework.org/schema/aop"
       xsi:schemaLocation="http://www.springframework.org/schema/beans http://www.springframework.org/schema/beans/spring-beans.xsd
       http://www.springframework.org/schema/aop http://www.springframework.org/schema/aop/spring-aop.xsd
       http://www.springframework.org/schema/context http://www.springframework.org/schema/context/spring-context.xsd">

    <!-- 开启注解扫描 -->
    <context:component-scan base-package="aspectJAnnotation"></context:component-scan>
    <!-- 开启Aspect生成代理对象 -->
    <aop:aspectj-autoproxy></aop:aspectj-autoproxy>

</beans>