三. SpringBoot原理
对于springboot来说,还有两块是比较有意思的,第一就是发现他内置了tomcat,接下来一快就是他对springmvc进行了无缝整合
1. 内嵌tomcat
首先来看下最简单的tomcat集成。
pom
<?xml version="1.0" encoding="UTF-8"?>
<project xmlns="http://maven.apache.org/POM/4.0.0"
         xmlns:xsi="http://www.w3.org/2001/XMLSchema-instance"
         xsi:schemaLocation="http://maven.apache.org/POM/4.0.0 http://maven.apache.org/xsd/maven-4.0.0.xsd">
    <modelVersion>4.0.0</modelVersion>

    <groupId>hgy</groupId>
    <artifactId>embed-tomcat</artifactId>
    <version>1.0-SNAPSHOT</version>

    <dependencies>
        <!--Java语言操作tomcat -->
        <dependency>
            <groupId>org.apache.tomcat.embed</groupId>
            <artifactId>tomcat-embed-core</artifactId>
            <version>8.5.11</version>
        </dependency>

        <!-- tomcat对jsp支持 -->
        <dependency>
            <groupId>org.apache.tomcat</groupId>
            <artifactId>tomcat-jasper</artifactId>
            <version>8.5.11</version>
        </dependency>
    </dependencies>
</project>
新建立一个servlet
package len.hgy.servlet;

import java.io.IOException;
import javax.servlet.ServletException;
import javax.servlet.http.HttpServlet;
import javax.servlet.http.HttpServletRequest;
import javax.servlet.http.HttpServletResponse;

public class IndexServlet extends HttpServlet {

    @Override
    protected void doGet(HttpServletRequest req, HttpServletResponse resp) throws ServletException, IOException {
        doPost(req, resp);
    }

    @Override
    protected void doPost(HttpServletRequest req, HttpServletResponse resp) throws ServletException, IOException {
        resp.getWriter().print("this is index... tomcat");
    }
}
tomcat 整合
package len.hgy;

import len.hgy.servlet.IndexServlet;
import org.apache.catalina.LifecycleException;
import org.apache.catalina.core.StandardContext;
import org.apache.catalina.startup.Tomcat;

public class MyTomcat {
    private static final int PORT = 8080;
    private static final String CONTEX_PATH = "/hgy";
    private static final String SERVLET_NAME = "indexServlet";

    public static void main(String[] args) throws LifecycleException, InterruptedException {
        // 创建tomcat服务器
        Tomcat tomcatServer = new Tomcat();
        // 指定端口号
        tomcatServer.setPort(PORT);
        // 是否设置自动部署
        tomcatServer.getHost().setAutoDeploy(false);
        // 创建上下文
        StandardContext standardContext = new StandardContext();
        standardContext.setPath(CONTEX_PATH);
        // 监听上下文
        standardContext.addLifecycleListener(new Tomcat.FixContextListener());
        // tomcat容器添加standardContext
        tomcatServer.getHost().addChild(standardContext);

        // 创建Servlet
        tomcatServer.addServlet(CONTEX_PATH, SERVLET_NAME, new IndexServlet());
        // servleturl映射
        standardContext.addServletMappingDecoded("/index", SERVLET_NAME);
        tomcatServer.start();
        System.out.println("tomcat服务器启动成功..");
        // 异步进行接收请求
        tomcatServer.getServer().await();
    }
}
运行main方法,在浏览器输入:
http://localhost:8080/hgy/index
注意: 9.xx版本的并不能直接访问
2. SpringMVC 整合
新增spring依赖
<dependency>
    <groupId>org.springframework</groupId>
    <artifactId>spring-web</artifactId>
    <version>5.0.4.RELEASE</version>
    <scope>compile</scope>
</dependency>
<dependency>
    <groupId>org.springframework</groupId>
    <artifactId>spring-webmvc</artifactId>
    <version>5.0.4.RELEASE</version>
    <scope>compile</scope>
</dependency>
UserService
package len.hgy.service;

import org.springframework.stereotype.Service;

@Service
public class UserService {
    public String index() {
        return "springboot 2.0  我正在加载UserService";
    }
}
RestController
package len.hgy.controller;

import len.hgy.service.UserService;
import org.springframework.beans.factory.annotation.Autowired;
import org.springframework.web.bind.annotation.RequestMapping;
import org.springframework.web.bind.annotation.RestController;

@RestController
public class IndexController {
    @Autowired
    private UserService userService;

    @RequestMapping(value = "/index", produces = "text/html;charset=UTF-8")
    public String index() {
        return userService.index();
    }
}
DispatcherServlet配置类
虽然前面有了service,有了controller,但依然没有把这些组建交给spring,对于springmvc来说,有个DispatcherServlet,这是springmvc的前端控制器,以前是配置在web.xml中。只是现在用的是注解。
package len.hgy.conf;

import org.springframework.context.annotation.ComponentScan;
import org.springframework.context.annotation.Configuration;

@Configuration
@ComponentScan("len.hgy")
public class RootConfig {
}
package len.hgy.conf;

import org.springframework.context.annotation.ComponentScan;
import org.springframework.context.annotation.Configuration;
import org.springframework.web.servlet.config.annotation.EnableWebMvc;
import org.springframework.web.servlet.config.annotation.WebMvcConfigurer;

@Configuration
@EnableWebMvc
@ComponentScan(basePackages = {"len.hgy.controller"})
//public class WebConfig extends WebMvcConfigurerAdapter {
public class WebConfig implements WebMvcConfigurer {
}
package len.hgy.conf;

import org.springframework.context.annotation.Configuration;
import org.springframework.web.servlet.support.AbstractAnnotationConfigDispatcherServletInitializer;

@Configuration
public class SpringWebAppInitializer extends AbstractAnnotationConfigDispatcherServletInitializer {
    // 加载根配置信息 spring核心
    protected Class<?>[] getRootConfigClasses() {
        return new Class[]{RootConfig.class};
    }

    // springmvc 加载 配置信息
    protected Class<?>[] getServletConfigClasses() {
        return new Class[]{WebConfig.class};
    }

    // springmvc 拦截url映射 拦截所有请求
    protected String[] getServletMappings() {
        return new String[]{"/"};
    }
}
Tomcat集成
TomcatApp
package len.hgy;

import java.io.File;
import javax.servlet.ServletException;
import org.apache.catalina.LifecycleException;
import org.apache.catalina.WebResourceRoot;
import org.apache.catalina.core.StandardContext;
import org.apache.catalina.startup.Tomcat;
import org.apache.catalina.webresources.DirResourceSet;
import org.apache.catalina.webresources.StandardRoot;

public class TomcatApp {
    public static void main(String[] args) throws ServletException, LifecycleException {
        start();
    }

    public static void start() throws ServletException, LifecycleException {
        // 创建Tomcat容器
        Tomcat tomcatServer = new Tomcat();
        // 端口号设置
        tomcatServer.setPort(9090);
        // 读取项目路径 加载静态资源
        StandardContext ctx = (StandardContext) tomcatServer.addWebapp("/", new File("src/main").getAbsolutePath());
        // 禁止重新载入
        ctx.setReloadable(false);
        // class文件读取地址
        File additionWebInfClasses = new File("target/classes");
        // 创建WebRoot
        WebResourceRoot resources = new StandardRoot(ctx);
        // tomcat内部读取Class执行
        resources.addPreResources(
            new DirResourceSet(resources, "/WEB-INF/classes", additionWebInfClasses.getAbsolutePath(), "/"));
        tomcatServer.start();
        // 异步等待请求执行
        tomcatServer.getServer().await();
    }
}
启动,在地址栏输入:
http://localhost:9090/index
JSP支持
要支持JSP,回忆学习springmvc中的内容,需要用到一个试图解析器
修改WebConfig
@Configuration
@EnableWebMvc
@ComponentScan(basePackages = {"len.hgy.controller"})
//public class WebConfig extends WebMvcConfigurerAdapter {
public class WebConfig implements WebMvcConfigurer {
    // 创建SpringMVC视图解析器
    @Override
    public void configureViewResolvers(ViewResolverRegistry registry) {
        InternalResourceViewResolver viewResolver = new InternalResourceViewResolver();
        viewResolver.setPrefix("/WEB-INF/views/");
        viewResolver.setSuffix(".jsp");
        // 可以在JSP页面中通过${}访问beans
        viewResolver.setExposeContextBeansAsAttributes(true);

        registry.viewResolver(viewResolver);
    }
}
新增controller
@Controller
public class UserController {
    @RequestMapping("/pageIndex")
    public String pageIndex() {
        return "pageIndex";
    }
}
增加JSP
在resources里面新增WEB-INF\views\pageIndex.jsp
<%@ page language="java" contentType="text/html; charset=UTF-8" pageEncoding="UTF-8" %>
<!DOCTYPE html PUBLIC "-//W3C//DTD HTML 4.01 Transitional//EN" "http://www.w3.org/TR/html4/loose.dtd">
<html>
<head>
    <meta http-equiv="Content-Type" content="text/html; charset=UTF-8">
    <title>jsp page</title>
</head>
<body>
<h1>这是个jsp页面</h1>
</body>
</html>
重启tomcat ,访问 http://localhost:9090/pageIndex
3. SpringBootTomcat 加载流程
tomcat如何启动的?
org.springframework.boot.autoconfigure.EnableAutoConfiguration=\
...
org.springframework.boot.autoconfigure.web.servlet.ServletWebServerFactoryAutoConfiguration,\
...

ServletWebServerFactoryAutoConfiguration 这类里面有个TomcatServletWebServerFactoryCustomizer这个类实现了WebServerFactoryCustomizer
@Configuration
@AutoConfigureOrder(Ordered.HIGHEST_PRECEDENCE)
@ConditionalOnClass(ServletRequest.class)
@ConditionalOnWebApplication(type = Type.SERVLET)
@EnableConfigurationProperties(ServerProperties.class)
@Import({ ServletWebServerFactoryAutoConfiguration.BeanPostProcessorsRegistrar.class,
		ServletWebServerFactoryConfiguration.EmbeddedTomcat.class,
		ServletWebServerFactoryConfiguration.EmbeddedJetty.class,
		ServletWebServerFactoryConfiguration.EmbeddedUndertow.class })
public class ServletWebServerFactoryAutoConfiguration {
EmbeddedTomcat->TomcatServletWebServerFactory->TomcatServletWebServerFactory.getWebServer()->getTomcatWebServer->TomcatWebServer->启动tomcat
// Start the server to trigger initialization listeners
this.tomcat.start();
在注入bean时候已经在构造器里面启动了tomcat
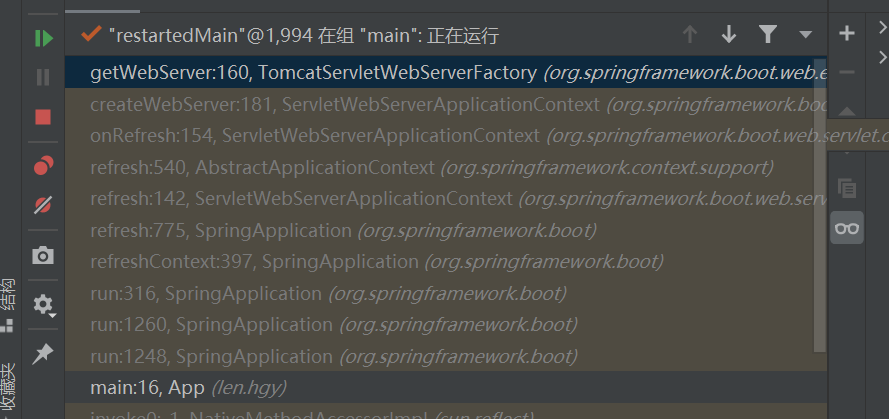
getWebServer谁调用的?

SpringApplication.run(App.class, args);
org.springframework.boot.SpringApplication#refreshContext
org.springframework.context.support.AbstractApplicationContext#refresh (Spring启动的核心方法)
org.springframework.boot.web.servlet.context.ServletWebServerApplicationContext#onRefresh
org.springframework.boot.web.servlet.context.ServletWebServerApplicationContext#createWebServer
org.springframework.boot.web.embedded.tomcat.TomcatServletWebServerFactory#getWebServer
大致分析:
? 更具classpath中的class分析出当前的项目类型是REACTIVE, SERVELET, NONE, 如果是SERVLET类型创建ServletWebServerApplicationContext的Context, 在AbstractApplicationContext的onRefresh()的钩子方法调用ServletWebServerApplicationContext的onRefresh()方法调用createWebServer(),最终调用如下代码和Tomcat挂钩
if (webServer == null && servletContext == null) {
	ServletWebServerFactory factory = getWebServerFactory();
	this.webServer = factory.getWebServer(getSelfInitializer());
}
以上是SpringBoot在OnRefresh()中启动Tomcat的逻辑, 其实还是在Spring的refresh()流程中
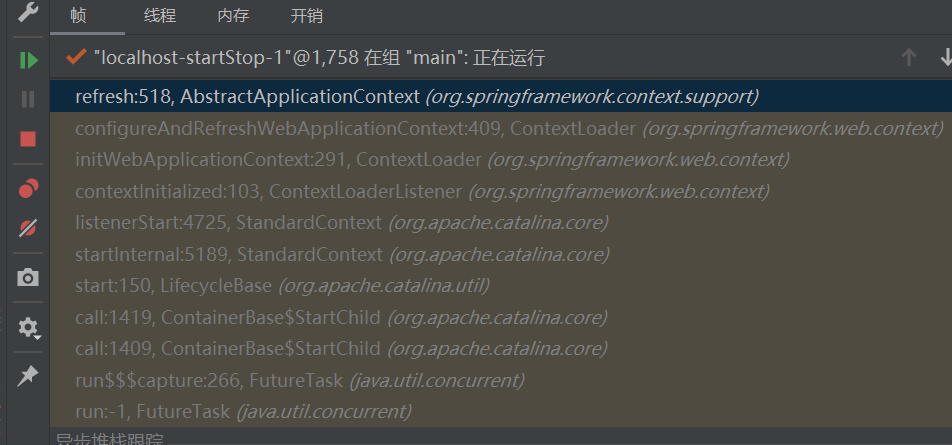
Tomcat如何初始化Spring呢?
只需要在refresh()方法打一个断点就知道了

其中有好几个异步追踪, 说明Tomcat初始化Spring使用的是异步线程方式
main线程
? tomcatServer.start();
? server.start();
? startInternal(); 提交异步任务
异步任务线程1
异步任务线程2
? listener.contextInitialized(tldEvent);
? public void contextInitialized(ServletContextEvent event) {
? this.initWebApplicationContext(event.getServletContext());
? }
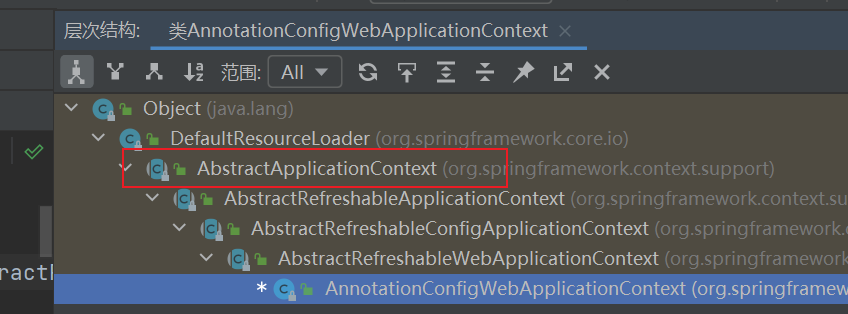
? configureAndRefreshWebApplicationContext的实例是AnnotationConfigWebApplicationContext
而AnnotationConfigWebApplicationContext的继承结构是

所以在调用refresh()方法就会触发spring初始化的核心逻辑
而此时的onRefresh()钩子方法不会触发再次Tomcat启动, 所以不会出现Tomcat重复启动
@Override
protected void onRefresh() {
   this.themeSource = UiApplicationContextUtils.initThemeSource(this);
}
4. SpringBoot 启动流程分析
准备工作
ApplicationContextInitializer Context初始化后调用的类
SpringApplicationRunListener SpringBoot运行监听的类
ApplicationRunner/CommandLineRunner 两个几乎可以等价,用于启动后做客户自定义的操作
MyApplicationRunner
@Component
public class MyApplicationRunner implements ApplicationRunner {
    @Override
    public void run(ApplicationArguments args) throws Exception {
        System.out.println("MyApplicationRunner.run()执行了");
    }
}
MyCommandLineRunner
@Component
public class MyCommandLineRunner implements CommandLineRunner {
    @Override
    public void run(String... args) throws Exception {
        System.out.println("MyCommandLineRunner.run()执行了" + Arrays.asList(args));
    }
}
MyApplicationContextInitializer
public class MyApplicationContextInitializer
    implements ApplicationContextInitializer<ConfigurableApplicationContext> {
    @Override
    public void initialize(ConfigurableApplicationContext applicationContext) {
        System.out.println("MyApplicationContextInitializer.initialize()执行了" + applicationContext);
    }
}
MySpringApplicationRunListener
public class MySpringApplicationRunListener implements SpringApplicationRunListener {
    //必须有的构造器
    public MySpringApplicationRunListener(SpringApplication application, String[] args) {
    }

    @Override
    public void starting() {
        System.out.println("MySpringApplicationRunListener.starting()执行了");
    }

    @Override
    public void environmentPrepared(ConfigurableEnvironment environment) {
        System.out.println("MySpringApplicationRunListener.environmentPrepared()执行了");
    }

    @Override
    public void contextPrepared(ConfigurableApplicationContext context) {
        System.out.println("MySpringApplicationRunListener.contextPrepared()执行了");
    }

    @Override
    public void contextLoaded(ConfigurableApplicationContext context) {
        System.out.println("MySpringApplicationRunListener.contextLoaded()执行了");
    }

    @Override
    public void started(ConfigurableApplicationContext context) {
        System.out.println("MySpringApplicationRunListener.started()执行了");
    }

    @Override
    public void running(ConfigurableApplicationContext context) {
        System.out.println("MySpringApplicationRunListener.running()执行了");
    }

    @Override
    public void failed(ConfigurableApplicationContext context, Throwable exception) {
        System.out.println("MySpringApplicationRunListener.failed()执行了");
    }
}
在resources/META-INF/spring.factories增加
org.springframework.context.ApplicationContextInitializer=len.hgy.listener.MyApplicationContextInitializer
org.springframework.boot.SpringApplicationRunListener=len.hgy.listener.MySpringApplicationRunListener
创建SpringApplication
SpringApplication源码
public static ConfigurableApplicationContext run(Class<?> primarySource,
      String... args) {
   return run(new Class<?>[] { primarySource }, args);
}
其实SpringBoot启动就着两个步骤,先创建ConfigurableApplicationContext ,然后再调用Run方法。
ConfigurableApplicationContext 是其他方式接入Spring的入口上下文
SpringApplication构造方法源码
public SpringApplication(ResourceLoader resourceLoader, Class<?>... primarySources) {
	this.resourceLoader = resourceLoader;
    Assert.notNull(primarySources, "PrimarySources must not be null");
    //保存主类
    this.primarySources = new LinkedHashSet<>(Arrays.asList(primarySources));
    //判断当前是什么类型项目, Tomcat启动Spring不需要判断,因为使用Tomcat就说明是SERVLET类型
    this.webApplicationType = WebApplicationType.deduceFromClasspath();
    //从类路径下找到META-INF/spring.factories配置的所有 ApplicationContextInitializer
    setInitializers((Collection) getSpringFactoriesInstances(
        ApplicationContextInitializer.class));
    //从类路径下找到META-INF/spring.factories配置的所有ApplicationListener
    setListeners((Collection) getSpringFactoriesInstances(ApplicationListener.class));
    this.mainApplicationClass = deduceMainApplicationClass();
}
Run方法
核心方法
public ConfigurableApplicationContext run(String... args) {
    StopWatch stopWatch = new StopWatch();
    stopWatch.start();
    ConfigurableApplicationContext context = null;
    Collection<SpringBootExceptionReporter> exceptionReporters = new ArrayList<>();
    configureHeadlessProperty();
    //从类路径下META‐INF/spring.factories,取得 SpringApplicationRunListeners;
    SpringApplicationRunListeners listeners = getRunListeners(args);
    //回调所有的获取SpringApplicationRunListener.starting()方法
    listeners.starting();
    try {
        //封装命令行参数
        ApplicationArguments applicationArguments = new DefaultApplicationArguments(
            args);
        //准备环境
        ConfigurableEnvironment environment = prepareEnvironment(listeners,
                                                                 applicationArguments);
        configureIgnoreBeanInfo(environment);
        //创回调SpringApplicationRunListener.environmentPrepared();
        //表示环境准备完成

        //打印 Banner
        Banner printedBanner = printBanner(environment);
        //根据环境创建context
        context = createApplicationContext();
        //错误的异常报表
        exceptionReporters = getSpringFactoriesInstances(
            SpringBootExceptionReporter.class,
            new Class[] { ConfigurableApplicationContext.class }, context);
        //准备上下文环境;
        //将environment保存到ioc中;
        //applyInitializers()调用所有的ApplicationContextInitializer的initialize方法
        //调用所有的SpringApplicationRunListener的contextPrepared();
        prepareContext(context, environment, listeners, applicationArguments,
                       printedBanner);
        //SpringApplicationRunListener的contextLoaded
        //刷新容器
        //扫描,创建,加载所有组件;
        refreshContext(context);
        afterRefresh(context, applicationArguments);
        stopWatch.stop();
        if (this.logStartupInfo) {
            new StartupInfoLogger(this.mainApplicationClass)
                .logStarted(getApplicationLog(), stopWatch);
        }
        //所有的SpringApplicationRunListener回调started方法
        listeners.started(context);
        //获取所有的ApplicationRunner和CommandLineRunner进行调用
        callRunners(context, applicationArguments);
    }
    catch (Throwable ex) {
        handleRunFailure(context, ex, exceptionReporters, listeners);
        throw new IllegalStateException(ex);
    }

    try {
        //所有的SpringApplicationRunListener的running();
        listeners.running(context);
    }
    catch (Throwable ex) {
        handleRunFailure(context, ex, exceptionReporters, null);
        throw new IllegalStateException(ex);
    }
    return context;
}
注意
ApplicationContextInitializer是在构造方法中从spring.factories中获取初始化的
SpringApplicationRunListener是在run中获取的
callRunners(context, applicationArguments); // 会调用所有的ApplicationRunner和CommandLineRunner
private void callRunners(ApplicationContext context, ApplicationArguments args) {
    List<Object> runners = new ArrayList<>();
    runners.addAll(context.getBeansOfType(ApplicationRunner.class).values());
    runners.addAll(context.getBeansOfType(CommandLineRunner.class).values());
    AnnotationAwareOrderComparator.sort(runners);
    for (Object runner : new LinkedHashSet<>(runners)) {
        if (runner instanceof ApplicationRunner) {
            callRunner((ApplicationRunner) runner, args);
        }
        if (runner instanceof CommandLineRunner) {
            callRunner((CommandLineRunner) runner, args);
        }
    }
}
spi的bean不需要加注解就可以导入到Spring中, Runner需要加注解才能导入