重学SpringCloud系列一之何为微服务
微服务架构进化论
- 微服务近些年可谓是发展的如火如荼,和别人谈技术不聊点“微服务”,会让自己感觉很落伍。很多人聊微服务,但真的把微服务聊的通俗、聊的通透的人并不多。
- 我想以一种非常通俗的方式和大家解释一下微服务,就是以“夫妻摊位”到“五星饭店”发展的角度为例,为大家说明一下微服务及微服务所解决的问题,带来的挑战。
第一阶段:夫妻摊位
小夫妻俩刚结婚,手里资金有限,就想着开一个路边烧烤摊。丈夫负责烤串做菜、妻子负责服务收银及上菜。这是一个典型的路边烧烤摊的经营模式。大家仔细看这种经营模式的好处在于:
- 因为摊位的桌椅板凳的容量通常是有限的,所以食品总的需求量的上限也基本是固定的。 这种摊位很少会出现长时间的等菜的现象。
- 沟通顺畅、快速,这头点菜点串吼一嗓子、那边就开始做上了。做好了再吼一嗓子,就上菜了。
- 短小精悍、容易掉头。夫妻两有可能干一阵发现这个位置客流少或者只赚辛苦不赚钱,就可以立刻停止经营、换个地方经营或者找别的营生。
这个阶段就有点像一些创业公司,刚开始创业的时候,一般做的应用都是单体应用。笔者也见过一些创业公司,上来就想搞微服务,我觉得这是不太现实。企业的架构都是一步一步衍进的,不要总想着一口吃一个胖子。如果京东淘宝从第一天做应用的时候就想做成今天的样子,他们一定活不到今天。就像一个没开过饭店的人第一次创业就要开五星级饭店,等待他的十有八九就是失败!
那么单体应用的特点有哪些:
- 能够接纳的请求数量时有限的,因为服务器的内存、CPU配置是有限的。
- 展现层、控制层、持久层全都在一个应用里面,调用方便、快速。单个请求的响应结果超快。
- 开发简单、上手快、三五个人团队好管好用。老板决定不干了,随时可以掉头,基本不太肉疼。

第二阶段:门面饭馆
但是,随着小夫妻俩经营有方、待客有道,开始有人愿意为了吃他们做的烧烤排队了。夫妻俩一想,我们这俩人也干不过来啊,怎么办?招人吧、扩大规模吧。
- 招什么人?当然是厨师啊、端菜收银的妻子自己还能干得过来,主要是丈夫的活挺不住了。那就招厨师。
- 不能让人站着吃吧?租一个附近的门市、添置更多的桌椅板凳。
客户端负载均衡与服务端负载均衡是什么?
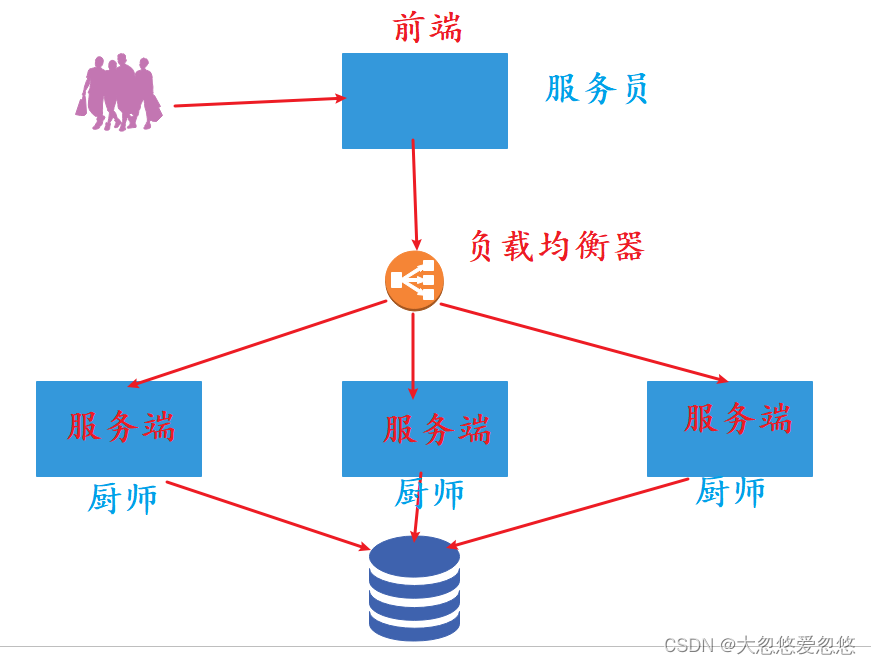
- 小夫妻两一口气为饭馆配置了三个厨师(含丈夫),这下可够用了。妻子将单号订单给张厨师、双号订单给李厨师,两人都干不过来了,再将订单给丈夫。反正外人不用白不用,自己家人能歇会就歇会。这种模式就是“客户端负载均衡”,所有的订单全都记在“妻子”的脑袋里,她说给谁就给谁。
- 有一天这俩厨师提出意见:太累了,要么丈夫多出力,要么涨工资。夫妻俩一合计,还是丈夫多出力吧。那妻子也就没有必要记住“订单的单双号”了,所以就使用一款app,妻子输入顾客订单,该app可以实现订单的均衡分配给厨师。“这种模式就是“服务端负载均衡””,该app就是负载均衡器,常用的软件负载均衡器有nginx、haproxy等。还有一些硬件的负载均衡器,性能上要更好一些,当然收费也更“好”。
利与弊
- “利”就是应用的处理能力增加了,能够处理更多的订单。
- “弊”就是沟通成本增加了,原来吼一嗓子解决的问题,现在需要app转发了(负载均衡器)
也就是说:饭店(应用)现在在处理并发请求的能力和容量上增强了,但是在单个请求的处理速度上下降了。实际上,这就是服务拆分,服务拆分就是在 “用时间换空间” 。你细品!
第三阶段:核心分工精细化
为了解决上一阶段遇到的问题:单个请求的处理速度下降。也就是饭店针对单个订单做菜响应速度下降了,但是由于饭店的菜确实好吃、菜品精良,客流量又持续的增高。该店又再次面临扩容的问题。
- 为了解决客流量持续增高,夫妻又招聘了4位厨师
- 为了解决单个订单处理速度下降的问题,将厨师分为两组,一组专门做烧烤,一组专门做饭菜。专业的人做专业的事情,注意力越集中,办事越熟练、效率越高。
新的问题又出现了,有的顾客既点烧烤又点饭菜。导致后端两组厨师之间沟通不畅,怎么组合套餐推送给前台?厨师之间怎么调用、怎么沟通啊?谁是头?谁是大脑?谁记得A厨师的烧烤和B厨师的饭菜是一桌的?

丈夫一看这种情况,我也别再做厨师了,那做什么?做菜品的配置管理、做订单的服务注册。丈夫负责主动观察问询各工种的工作状态并记录,妻子主动向丈夫问询后端厨师的状态,并根据丈夫的反馈分配订单(客户端负载均衡)。丈夫的新工作实际上就产生了微服务非常重要的组件:服务注册中心和配置管理中心。比如:Spring Cloud Alibaba nacos、eureka、consul、zookeeper、Spring cloud config等
第四阶段:配套管理专业化
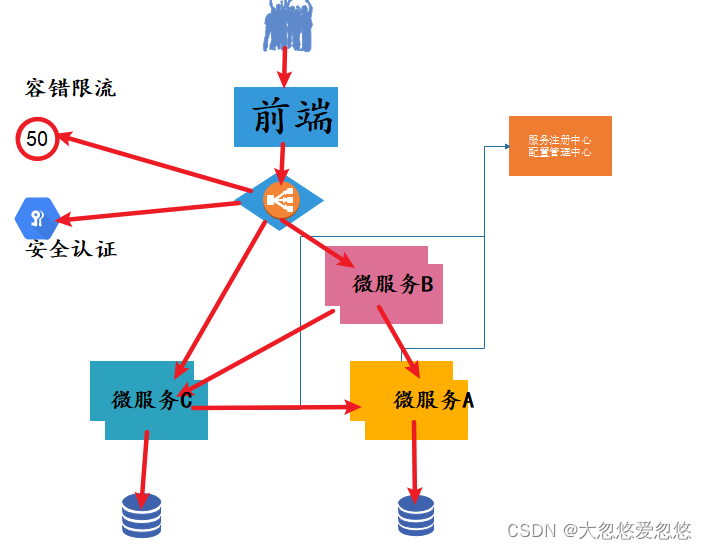
- 需要有统一的门面了:前台。所有的顾客进来,由前台统一接待。比如:Spring Cloud Gateway和zuul。
- 需要有安保人员了:档次高了、进入饭店有预约。最起码得尊重用餐礼仪,不能是背心裤衩大跨栏,否则就不让你进。比如:OAuth2认证服务器和资源服务器。
- 菜品限量提供了:法式菜品、意大利菜品、日本料理。什么时间可以吃得到、可提供多少人份?这些服务都是有限制的。比如:Hytrix熔断限流。
- 工作效率监督:工作流程中每个岗位做了什么工作、用了多长时间。哪个环节出现问题、哪个岗位需要调整。比如:
Sleuth、Zipkin、日志监控ELK等。
第五阶段:容器化、自动化
饭店的规模越来越大了、岗位分工也越来越细了。真的成了超级大饭店了,怎么管?这就需要专业的机器人服务租用公司,这种公司专门出租各种行业专用机器人。
- 服务员统一包装:用自动点餐机、机器人。身高必须一米65,微笑必须漏出四颗牙。
- 物料统一包装:也不用人了,流水作业,一盘菜几块肉、什么料全都自动化配置好。厨师就负责炒熟就行了(拜托,这例子理解就好,不要抬杠)
总之全都自动化。这时公司内部的devops团队就出现了,制定规范、集体包装、流程自动化。突然有一天,饭店承接了大型运动会大型展览,怎么办?要去招服务员么?招员工培训么?不要,租机器人就行了,用完了就还回去。每年的双十一、淘宝京东也都是用容器自动化扩容的方式应对暴涨的服务需求。容器化最大的好处就是:轻量级的发布于与销毁、自动化的扩容。
- 这里的机器人公司,我们可以认为是kubernetes、mesos、swarm
- 这里的机器人,我们可以认为是docker、containerd等
SpringBoot与Cloud选型兼容
如果你使用了Spring Cloud 及 Spring Cloud Alibaba、Spring Boot,你该如何确定具体该使用哪一个版本?
本文就带你从官网提炼一下:该如何确定版本号保证兼容性?重点体现一下这个思考过程,和官网中留下的版本选型依据信息
笔者的版本号选型之路,遵循一个原则:遵循官方建议的基础上、尽量使用最新GA版(GA是指General Availability,正式发布版本)!
Why?
大牛以前都告诉我们,选型不要用最新版的。新版的bug多,我现在还用java8呢。通常来说是这样的,新版本功能性更强,老版本的稳定性更佳。
但Spring Cloud情况有点特殊,它是一个实实在在的“版本帝”,而且其组件的更新换代速度让人瞠目结舌,社区的发展速度和活跃度都非常高,这就带来一个问题,发展越快坑就越多,上一个版本的坑还没填完,新版本新功能新特性就出来了。所以很难去说:老版本维护时间长bug少,新版本的bug多。因此我们倒不如就尽量使用新版本,获得更多的功能性提升。
Spring Boot 版本
下面的截图,截取自Spring Boot的github仓库的wiki:https://github.com/spring-projects/spring-boot/wiki,github中最新的版本是2.3,但wiki中明确说到2.2版本是目前正在支持维护的版本。

这与Spring Boot官方网站中的说明是一致的,下图截取自Spring Boot官方网站。

Spring Cloud版本
Spring Cloud版本的版本号命名比较特殊,它是使用伦敦地铁站的站名作为版本号的。从A、B、C、D、E,目前是Hoxton SR3版本(我们简称H版),SR是service releases的缩写。

兼容性基础约束
在Spring Cloud官网的OverView预览中https://spring.io/projects/spring-cloud/#overview,明确有如下信息:

也就是说:如果你使用Spring Cloud Hoxton,Spring Boot版本就要使用2.2.x。如果你是老项目,使用的是Spring Cloud Greenwich,Spring Boot版本就要使用2.1.x。
我们可以通过访问“/actuator/info”JSON服务端点,https://start.spring.io/actuator/info

从以上的JSON响应信息中心,我们明确的看到:如果你是用Spring Cloud Hoxton,需要使用Spring Boot 2.2.0以上,2.2.6以下。
如果你同时使用到了Spring cloud alibaba,Spring Boot 2.2.0以上,2.3.0以下。
Spring Cloud Reference
最后我们来看一下Spring Cloud Reference文档内部:
https://cloud.spring.io/spring-cloud-static/Hoxton.SR3/reference/html/spring-cloud.html
开篇截图:

所以我们最终选型是

Spring Cloud Alibaba
spring-cloud-alibaba与spring-cloud和spring-boot之间的版本说明

Spring Cloud组件的选型
Spring Cloud与Netflix
Netflix是一家做视频网站的公司,之所以要说一下这个公司是因为Spring Cloud在发展之初,Netflix做了很大的贡献。包括服务注册中心Eureka、服务调用Ribbon、Feign,服务容错限流Hystrix、服务网关Zuul等众多组件都是Netflix贡献给Spring Cloud社区的。
但这些组件在使用过程中也多多少少的暴露了一些弊病,比如:
- 服务网关Zuul是基于servlet开发的,使用阻塞IO,在高并发情况下性能表现一般。
- 公共服务组件过多,部署一个Spring Cloud微服务,公共服务组件就占用了很多的服务器资源。
所以,很多的厂商就基于Spring Cloud设计理念,开发自己的组件,其中比较著名的就是Spring Cloud Alibaba和携程的apollo。

上图中绿色对号的基本上都是Spring Cloud社区第二代组件,也是目前建议使用的组件。图中红色X号的组件,都基本上面临着淘汰与替换。
核心事件追踪
笔者一直关心着Spring Cloud社区的发展,下面将近两年社区的大事件集中展现一下:
- 2018年6月底,Eureka 2.0 开源工作宣告停止,继续使用风险自负。
- 2018年11月底,Hystrix 宣布不再在开源版本上提供新功能。
- 2018年12月,Spring官方宣布Netflix的相关项目进入维护模式(Maintenance Mode)。
从此,Spring Cloud逐渐告别netflix时代。
- 2018年10月31日,Spring Cloud Alibaba正式入驻了Spring Cloud官方孵化器,并在maven中央库发布了第一个版本。
与此同时,Spring Cloud团队内部维护的组件也在积极的更新换代。
服务注册中心选型
- Eureka:Spring Cloud与Netflix的大儿子,出生的时候家里条件一般,长大后素质有限。
- Nacos:后起之秀,曾经Spring Cloud眼中“别人家的孩子”,已经纳入收养范围(Spring Cloud Alibaba孵化项目)。
- Apache Zookeeper:关系户,与hadoop关系比较好
- etcd:关系户,与kubernetes关系比较好
- Consul:关系户,曾经与docker关系比较好
如果你的应用已经使用到了hadoop、kubernetes、docker,在Spring Cloud实施过程中可以考虑使用其关系户组件,避免搭建两套注册中心,节省资源。但是二者兼容使用说说容易,真正用起来还需要功夫。目前看,笔者觉得最佳选择应该是Nacos。
分布式配置管理
目前可选的分布式配置管理中心,有阿里的Nacos、携程的Apollo、和Spring Cloud Config。
- 如果你希望完成单纯的分布式配置集中管理,其实三者都能满足你的需求。
- 如果你考虑到已经用Nacos实现了服务注册中心,不想单独搞出来一个配置管理中心,合二为一的话,nacoos可能是你的最佳选择
- 携程的Apollo与nacos很多相似之处,有颇多的亮点。从笔者的使用感受而言,目前apollo从文档细节到方便度要好于nacos(截止2020年4月)。但是nacos毕竟开源时间较短,依托alibaba的支持,有很大的潜力和发展空间。
- spring cloud config对比其他两者,在功能以及 。友好度方面都逊色。唯一的优点可能是它比较轻量级。

服务网关
服务网关这块就不多说了,没有任何悬念,Spring Cloud Gateway在各方面都碾压Zuul,Zuul2也基本上是胎死腹中。还有一些第三方厂商开发的微服务网关,但基本上没有形成气候!
熔断限流
Hystrix
2018年12月,Spring官方宣布Netflix的相关项目进入维护模式(Maintenance Mode)。不再开发新的功能,但是Hystrix整体上还是比较稳定的,对于老用户不必更换,影响也不大。
resilience4j
Hystrix停更之后,Netflix官方推荐使用resilience4j(https://github.com/resilience4j/resilience4j ),它是一个轻量、易用、可组装的高可用框架,支持熔断、高频控制、隔离、限流、限时、重试等多种高可用机制。
Sentinel(重点)
Sentinel(https://github.com/alibaba/Sentinel )是阿里中间件团队开源的,面向分布式服务架构的轻量级高可用流量控制组件,主要以流量为切入点,从流量控制、熔断降级、系统负载保护等多个维度来帮助用户保护服务的稳定性。
https://github.com/alibaba/Sentinel/wiki/Guideline:-从-Hystrix-迁移到-Sentinel

单体应用与微服务对比
单体应用与微服务
在我之前的章节中,已经通过“开饭店”的例子,为大家说明了从单体应用到微服务的应用架构发展的过程。本节主要是为大家介绍一下单体应用和微服务的优缺点以及应用场景。

单体应用架构
单体应用架构被认为是构建应用程序的传统架构方式。单体应用程序是作为一个不可分割的单元构建的。通常,这种解决方案包括客户端用户界面,服务器端应用程序和数据库。
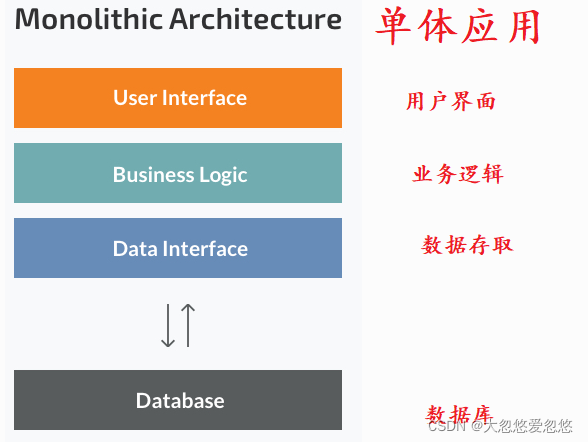
单体架构(monolithic architecture)的优势:
- 上手容易,学习成本低,通常技术栈比较简单。
- 易于部署,单体应用部署的复杂度要比微服务低得多。
- 适合小型团队开发“小而美”的,对业务复杂度不高,对应用扩展能力要求不高的应用程序架构。
单体架构的缺点:
- 随着应用需求的增加以及规模的扩大,由于其代码耦合度高,单体应用自身的代码复杂度会很高,从而变得难以维护。
- 难以维护的一个典型场景就是:修改任何一处细节的代码,都会影响整个系统。因此必须全面协调开发、测试、部署。这使软件迭代变的很慢,交付的效率低。
- 扩展性差:很难去针对某个模块进行扩展,只能针对整个应用程序扩展。IO密集型和计算密集型模块混合在一起,无法独立升级及扩容。
- 新技术壁垒,在单体应用程序中应用新技术极其困难,因为这样就必须重写整个应用程序。
微服务架构
单体架构应用程序是一个统一的整体,而微服务体系结构则将其分解为较小的独立单元的集合。
简而言之,微服务架构风格是一种将单个应用程序拆分为一组小服务的方法,每个小服务都在自己的进程中运行并使用轻量级机制(通常是HTTP资源API)进行通信。 ----马丁·福勒
在微服务架构中,功能被分解为可独立部署的模块,这些模块通过远程调用方法相互通信。每个服务都涵盖了自己的范围,每个服务可以独立更新,部署和扩展。

微服务架构的优势
- 独立组件: 首先,所有服务都可以独立部署和更新,从而提供了更大的灵活性。比如:针对IO密集型服务增加内存,针对计算密集型服务增加服务器的CPU等等,达到资源的合理分配。
- 业务关注更加集中: 将应用程序分解为更小和更简单的组件后,将更易于业务关注理解和管理。您只需专注于与您的业务目标相关的特定服务即可。所以:很多大厂都是面试造火箭,工作拧螺丝。因为微服务化只需要开发人员更专注于自己的服务领域。生产线尽管很庞大,但是只要拆分合理,开发人员只需要拧好自己的“微服务螺丝”就可以了。
- 更好的可扩展性: 微服务另一个优点是每个服务都可以独立缩放。结合容器化编排管理(k8s、docker等),可以快速的实现服务的扩容与缩放。比如:赶上双十一,电商可以快速地增加部署微服务数量以应对更多的并发需求。待高峰过后,可以将微服务容器释放,回收资源。
- 选择技术的灵活性: 工程团队不受一开始就选择的技术的限制。他们可以自由地为每个微服务应用各种技术和框架。只要保证接口通信协议一致即可。
微服务架构的缺点
- 编码复杂度增加: 由于微服务架构是分布式系统,因此会产生分布式的数据库操作及分布式事务等复杂度更高的编码需求。所以一定要进行合理的微服务拆分,合理的确定服务边界,保证服务内部高内聚,降低分布式事务等操作出现的概率。
- 额外关注: 微服务由于其多主机、分布式部署,所以它们需要很多的额外关注:如统一配置,统一日志记录,统一的指标监控,统一的运行状况检查等。
- 测试: 虽然单个微服务的测试复杂度降低,但是众多可独立部署的服务使集成测试变的更加困难。
哪种架构最适合您的业务需求呢?
选择单体架构
- 小团队:如果您是一家初创公司,而您的团队很小,则可能不需要处理微服务架构的复杂性。整体组件可以满足您的所有业务需求,因此无需紧跟炒作。
- 一个简单的应用程序: 不需要大量业务逻辑,小型应用程序与单体应用架构可以更好地协作。
- 没有微服务专业知识:微服务需要深厚的专业知识才能运作良好并带来业务价值。如果您想从头开始没有任何技术专业知识的微服务应用程序,那么很可能不会成功。
- 快速应用:如果您要开发应用程序并尽快应用它,则单体应用架构是更好的选择。当您的公司打算花最少的钱验证您的经营理念时,它会很好地发挥作用。
选择微服务架构
- 用户数量或应用规模庞大:微服务架构使扩展和添加新功能变得更加容易。因此,如果您打算开发具有多个模块和高用户体验的大型并发应用程序时,那么微服务架构可能是您的最佳选择。
- 团队庞大并有足够的技能:由于微服务项目由负责多个服务的多个团队组成,因此您需要有足够的资源来处理所有流程。包括人力(技术人员)、物力(服务器)、财力等等。
- 具有微服务专业知识。没有适当的技能和知识,构建微服务应用程序将具有极大的风险。但是仅具有架构知识还不够,还需要有DevOps和Containers专家。此外,必须具有领域建模专业知识。处理微服务意味着将系统分成单独的功能并划分职责,合理的划分成就效能,不合理的划分导致灾难。
微服务设计拆分原则
- 以业务模型切入,比如:订单管理、商品管理等。
- 单一职责、高内聚:单个微服务的职责尽量单一。但是粒度要适中,不能过度拆分,过度拆分是微服务架构的灾难!
- 充分考虑团队结构:微服务的拆分要充分的考虑团队的结构,与微服务开发运维之间的关系。
- 演进式拆分:如果各方面资源不允许,可以考虑演进式拆分。
- 避免环形依赖与双向依赖:避免微服务之间的环形依赖或者双向依赖。
微服务项目基本开发流程
创建一个基于maven的父项目

由于父项目dongbb-cloud不承担任何的业务代码逻辑,只做子模块的管理。所以创建好之后,可以将src目录删掉。
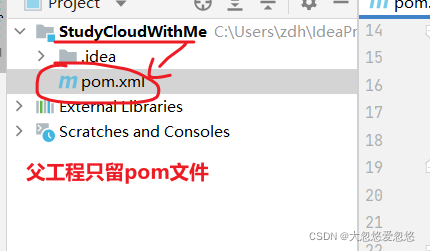
并在pom.xml中将packaging配置为pom。
  <!--  聚合工程,父工程打包方式为pom-->
  <groupId>dhy.xpy</groupId>
  <artifactId>StudyCloudWithMe</artifactId>
  <version>1.0-SNAPSHOT</version>
  <packaging>pom</packaging>
加入一些基础的属性配置
  <!--基础属性设置-->
  <properties>
    <project.build.sourceEncoding>UTF-8</project.build.sourceEncoding>
    <java.version>1.8</java.version>
    <maven.compiler.source>1.8</maven.compiler.source>
    <maven.compiler.target>1.8</maven.compiler.target>
  </properties>
在pom中加入dependencyManagement的代码段。dependencyManagement并不会真的引入依赖包。dependencyManagement会帮助我们做版本管理。如果我们的子项目在引入依赖时,不指定版本号,会从父项目的dependencyManagement管理中查找版本号。
这样做的好处是:统一管理项目的类库版本,避免子模块之间的类库版本不同,导致的冲突及兼容性问题。
<?xml version="1.0" encoding="UTF-8"?>

<project xmlns="http://maven.apache.org/POM/4.0.0" xmlns:xsi="http://www.w3.org/2001/XMLSchema-instance"
  xsi:schemaLocation="http://maven.apache.org/POM/4.0.0 http://maven.apache.org/xsd/maven-4.0.0.xsd">
  <modelVersion>4.0.0</modelVersion>

  <!--  聚合工程,父工程打包方式为pom-->
  <groupId>dhy.xpy</groupId>
  <artifactId>StudyCloudWithMe</artifactId>
  <version>1.0-SNAPSHOT</version>
  <packaging>pom</packaging>

  <modules>
    <module>dhy-service-sms</module>
      <module>dhy-service-common</module>
    <module>dhy-dao-service</module>
  </modules>

  <!--基础属性设置-->
  <properties>
    <project.build.sourceEncoding>UTF-8</project.build.sourceEncoding>
    <java.version>1.8</java.version>
    <maven.compiler.source>1.8</maven.compiler.source>
    <maven.compiler.target>1.8</maven.compiler.target>
  </properties>

  <!-- 统一版本管理 -->
  <dependencyManagement>
    <dependencies>
      <dependency>
        <groupId>org.springframework.boot</groupId>
        <artifactId>spring-boot-starter-parent</artifactId>
        <version>2.2.5.RELEASE</version>
        <type>pom</type>
        <scope>import</scope>
      </dependency>
      <dependency>
        <groupId>dhy.xpy</groupId>
        <artifactId>dhy-service-common</artifactId>
        <version>1.0</version>
      </dependency>
      <dependency>
        <groupId>org.mybatis.spring.boot</groupId>
        <artifactId>mybatis-spring-boot-starter</artifactId>
        <version>2.1.4</version>
        <type>pom</type>
        <scope>import</scope>
      </dependency>
    </dependencies>
  </dependencyManagement>

  <dependencies>
    <dependency>
      <groupId>org.springframework.boot</groupId>
      <artifactId>spring-boot-devtools</artifactId>
      <scope>runtime</scope>
      <optional>true</optional>
    </dependency>
    <dependency>
      <groupId>org.projectlombok</groupId>
      <artifactId>lombok</artifactId>
      <optional>true</optional>
    </dependency>
    <dependency>
      <groupId>org.springframework.boot</groupId>
      <artifactId>spring-boot-starter-test</artifactId>
      <scope>test</scope>
    </dependency>
  </dependencies>

  <build>
    <plugins>
      <plugin>
        <groupId>org.springframework.boot</groupId>
        <artifactId>spring-boot-maven-plugin</artifactId>
        <configuration>
          <excludes>
            <exclude>
              <groupId>org.projectlombok</groupId>
              <artifactId>lombok</artifactId>
            </exclude>
          </excludes>
        </configuration>
      </plugin>
    </plugins>
  </build>

</project>
dependencyManagement可以让子类继承的时候不需要写版本号,对于一些通用都需要继承的jar包,和插件可以在父项目中规定,避免子模块重复写
构建第一个Spring Boot服务子模块
在前面的章节,我们已经说过要进行微服务的拆分。
其中需要新增一个服务是service-sms。
用于发送短信、邮件等的微服务,是新增的服务父项目目录右键->New->Module,使用Spring Assistant创建Spring Boot项目
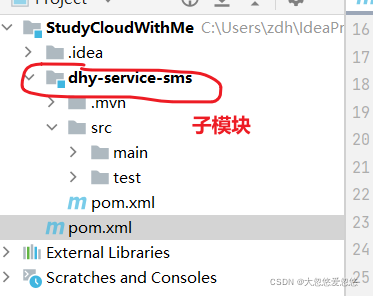
在pom.xml中将spring boot子模块的父项目改为StudyCloudWithMe,如果IDEA帮我们完成了,这不就不用做了。

因为我们在父项目中使用了dependencyManagement管理版本,所以子模块中的dependency是不写version版本号的。如下:
<?xml version="1.0" encoding="UTF-8"?>
<project xmlns="http://maven.apache.org/POM/4.0.0" xmlns:xsi="http://www.w3.org/2001/XMLSchema-instance"
         xsi:schemaLocation="http://maven.apache.org/POM/4.0.0 https://maven.apache.org/xsd/maven-4.0.0.xsd">
    <modelVersion>4.0.0</modelVersion>
    <parent>
        <groupId>dhy.xpy</groupId>
        <artifactId>StudyCloudWithMe</artifactId>
        <version>1.0-SNAPSHOT</version>
    </parent>

    <artifactId>dhy-service-sms</artifactId>
    <version>0.0.1-SNAPSHOT</version>
    <name>dhy-service-sms</name>
    <description>dhy-service-sms</description>


    <dependencies>
        <dependency>
            <groupId>org.springframework.boot</groupId>
            <artifactId>spring-boot-starter-web</artifactId>
        </dependency>
        <dependency>
            <groupId>dhy.xpy</groupId>
            <artifactId>dhy-service-common</artifactId>
        </dependency>
    </dependencies>
</project>
为当前service-sms设置服务名和端口号
server:
  port: 2333
spring:
  application:
    name: dhy-service-sms
通用微服务初始化模块构建
通常情况下,使用Spring Boot搭建一个微服务,微服务模块构建完成之后,需要完成如下的一些初始化工作:
- 自定义异常
- 自定义通用的前后端交互封装数据结构
- 异常的全局处理:知识点是ControllerAdvice和ExceptionHandler
- 统一的Controller日期参数类型装换
- 等等
为了更方便进行Spring Boot微服务项目的构建,我们新建一个模块,该模块的作用就是初始化微服务构建过程中需要做的通用处理、通用工具类等等。
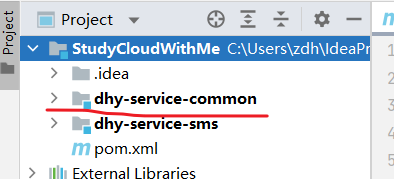
<?xml version="1.0" encoding="UTF-8"?>
<project xmlns="http://maven.apache.org/POM/4.0.0"
         xmlns:xsi="http://www.w3.org/2001/XMLSchema-instance"
         xsi:schemaLocation="http://maven.apache.org/POM/4.0.0 http://maven.apache.org/xsd/maven-4.0.0.xsd">
    <parent>
        <artifactId>StudyCloudWithMe</artifactId>
        <groupId>dhy.xpy</groupId>
        <version>1.0-SNAPSHOT</version>
    </parent>
    <modelVersion>4.0.0</modelVersion>

    <artifactId>dhy-service-common</artifactId>
    <version>1.0</version>

    <dependencies>
        <dependency>
            <groupId>org.springframework.boot</groupId>
            <artifactId>spring-boot-starter-web</artifactId>
        </dependency>
    </dependencies>
</project>
结构与文件说明
该模块的文件如下:


AjaxResponse
import com.exception.CustomException;
import com.exception.CustomExceptionType;
import lombok.Data;


@Data
public class AjaxResponse {

    private boolean isok;  //请求是否处理成功
    private int code; //请求响应状态码(200、400、500)
    private String message;  //请求结果描述信息
    private Object data; //请求结果数据(通常用于查询操作)

    private AjaxResponse(){}

    //请求成功的响应,不带查询数据(用于删除、修改、新增接口)
    public static AjaxResponse success(){
        AjaxResponse ajaxResponse = new AjaxResponse();
        ajaxResponse.setIsok(true);
        ajaxResponse.setCode(200);
        ajaxResponse.setMessage("请求响应成功!");
        return ajaxResponse;
    }

    //请求成功的响应,带有查询数据(用于数据查询接口)
    public static AjaxResponse success(Object obj){
        AjaxResponse ajaxResponse = new AjaxResponse();
        ajaxResponse.setIsok(true);
        ajaxResponse.setCode(200);
        ajaxResponse.setMessage("请求响应成功!");
        ajaxResponse.setData(obj);
        return ajaxResponse;
    }

    //请求成功的响应,带有查询数据(用于数据查询接口)
    public static AjaxResponse success(Object obj,String message){
        AjaxResponse ajaxResponse = new AjaxResponse();
        ajaxResponse.setIsok(true);
        ajaxResponse.setCode(200);
        ajaxResponse.setMessage(message);
        ajaxResponse.setData(obj);
        return ajaxResponse;
    }

    //请求出现异常时的响应数据封装
    public static AjaxResponse error(CustomException e) {
        AjaxResponse resultBean = new AjaxResponse();
        resultBean.setIsok(false);
        resultBean.setCode(e.getCode());
        resultBean.setMessage(e.getMessage());
        return resultBean;
    }

    //请求出现异常时的响应数据封装
    public static AjaxResponse error(CustomExceptionType customExceptionType,
                                     String errorMessage) {
        AjaxResponse resultBean = new AjaxResponse();
        resultBean.setIsok(false);
        resultBean.setCode(customExceptionType.getCode());
        resultBean.setMessage(errorMessage);
        return resultBean;
    }
}
GlobalReponseAdvice
import com.msg.AjaxResponse;
import lombok.extern.slf4j.Slf4j;
import org.springframework.core.MethodParameter;
import org.springframework.http.MediaType;
import org.springframework.http.server.ServerHttpRequest;
import org.springframework.http.server.ServerHttpResponse;
import org.springframework.stereotype.Component;
import org.springframework.web.servlet.mvc.method.annotation.ResponseBodyAdvice;

/**
 * <p>
 *     全局返回值结果处理,加了泛型表示只处理特定的返回值类型
 * </p>
 */
@Component
@Slf4j
public class GlobalReponseAdvice implements ResponseBodyAdvice {


    /**
     * <p>
     *     这个方法表示对于哪些请求要执行beforeBodyWrite,返回true执行,返回false不执行
     * </p>
     * @param methodParameter 方法相关信息
     * @param aClass
     * @return
     */
    @Override
    public boolean supports(MethodParameter methodParameter, Class aClass) {
         log.info("aClass类型: "+aClass);
        return true;
    }

    /**
     * <p>
     *     对于返回的对象如果不是最终对象AjaxResponse,则选包装一下
     * </p>
     * @param o 方法返回的镀锡
     * @param methodParameter 方法参数
     * @param mediaType
     * @param aClass
     * @param serverHttpRequest
     * @param serverHttpResponse
     * @return
     */
    @Override
    public Object beforeBodyWrite(Object o, MethodParameter methodParameter, MediaType mediaType, Class aClass, ServerHttpRequest serverHttpRequest, ServerHttpResponse serverHttpResponse) {
        if(!(o instanceof AjaxResponse))
        {
            return AjaxResponse.success(o);
        }
        return o;
    }
}
GlobalRequestAdvice
import org.springframework.core.MethodParameter;
import org.springframework.http.HttpInputMessage;
import org.springframework.http.converter.HttpMessageConverter;
import org.springframework.web.servlet.mvc.method.annotation.RequestBodyAdviceAdapter;

import java.io.IOException;
import java.lang.reflect.Parameter;
import java.lang.reflect.Type;

/**
  * <p>
 *     RequestBodyAdvice仅对使用了@RqestBody注解的生效 , 因为它原理上还是AOP , 所以GET方法是不会操作的.
  * </p>
 */
public class GlobalRequestAdvice extends RequestBodyAdviceAdapter {
    /**
     * <p>
     *     只对日期进行格式化,对方法参数上加了@DataTimeFormatter注解的参数进行格式化处理
     *     因为@DataTimeFormatter注解只对Date类型生效,对jdk8开始的LocalDateTime不生效,因此这里我们手动适配
     * </p>
     */
    @Override
    public boolean supports(MethodParameter methodParameter, Type type, Class<? extends HttpMessageConverter<?>> aClass) {
        Parameter parameter = methodParameter.getParameter();
        //TODO:这里因为实体类不同,需要根据业务逻辑进行判断,然后进行处理
        return false;
    }

    /**
    * <p>
     *     在读取参数前进行处理
    * </p>
    * */
    @Override
    public HttpInputMessage beforeBodyRead(HttpInputMessage inputMessage, MethodParameter parameter, Type targetType, Class<? extends HttpMessageConverter<?>> converterType) throws IOException {

        return super.beforeBodyRead(inputMessage, parameter, targetType, converterType);
    }
}
CustomException
public class CustomException extends RuntimeException {
    //异常错误编码
    private int code ;
    //异常信息
    private String message;

    private CustomException(){}

    public CustomException(CustomExceptionType exceptionTypeEnum) {
        this.code = exceptionTypeEnum.getCode();
        this.message = exceptionTypeEnum.getDesc();
    }

    public CustomException(CustomExceptionType exceptionTypeEnum,
                           String message) {
        this.code = exceptionTypeEnum.getCode();
        this.message = message;
    }

    public int getCode() {
        return code;
    }

    @Override
    public String getMessage() {
        return message;
    }
}
CustomExceptionType
public enum CustomExceptionType
{
    USER_INPUT_ERROR(400,"您输入的数据错误或您没有权限访问资源!"),
    SYSTEM_ERROR (500,"系统出现异常,请您稍后再试或联系管理员!");

    CustomExceptionType(int code, String desc) {
        this.code = code;
        this.desc = desc;
    }

    private String desc;//异常类型中文描述

    private int code; //code

    public String getDesc() {
        return desc;
    }

    public int getCode() {
        return code;
    }
}
WebExceptionHandler
import com.msg.AjaxResponse;
import org.springframework.web.bind.annotation.ControllerAdvice;
import org.springframework.web.bind.annotation.ExceptionHandler;
import org.springframework.web.bind.annotation.ResponseBody;
import org.springframework.web.bind.annotation.ResponseStatus;

/**
 * @author zdh
 */
@ControllerAdvice
public class WebExceptionHandler {

    @ResponseStatus()
    @ExceptionHandler(CustomException.class)
    @ResponseBody
    public AjaxResponse customerException(CustomException e) {
        return AjaxResponse.error(e);
    }

    @ResponseStatus()
    @ExceptionHandler(Exception.class)
    @ResponseBody
    public AjaxResponse exception(Exception e) {
        return AjaxResponse.error(CustomExceptionType.SYSTEM_ERROR,e.getMessage());
    }
}
如何使用该starter模块
先将通用模块安装到本地仓库中
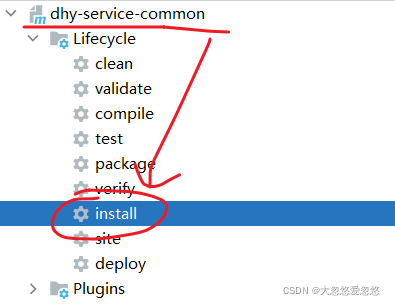
父工程引入该通用服务模块依赖
  <!-- 统一版本管理 -->
  <dependencyManagement>
    <dependencies>
      <dependency>
        <groupId>org.springframework.boot</groupId>
        <artifactId>spring-boot-starter-parent</artifactId>
        <version>2.2.5.RELEASE</version>
        <type>pom</type>
        <scope>import</scope>
      </dependency>
      <dependency>
        <groupId>dhy.xpy</groupId>
        <artifactId>dhy-service-common</artifactId>
        <version>1.0</version>
      </dependency>
    </dependencies>
  </dependencyManagement>
在各个微服务子模块中service-sms中引入(不带版本号)
      <dependency>
            <groupId>dhy.xpy</groupId>
            <artifactId>dhy-service-common</artifactId>
        </dependency>
增加Spring Boot包扫描目录
在各个微服务子模块的启动类
@SpringBootApplication(scanBasePackages={"com.dhy.dhyservicesms"})
public class DhyServiceSmsApplication {
使用方法简介
添加一个api,短信发送服务。所有程序内部异常转化为自定义异常CustomException向上抛出
import com.exception.CustomException;
import com.exception.CustomExceptionType;
import com.msg.AjaxResponse;
import org.springframework.web.bind.annotation.PostMapping;
import org.springframework.web.bind.annotation.RequestMapping;
import org.springframework.web.bind.annotation.RequestParam;
import org.springframework.web.bind.annotation.RestController;

@RestController
@RequestMapping("/sms")
public class SmsController {

    /**
     * 模拟短信发送
     * @param phoneNo
     * @param content
     * @return 短信发送结果
     */
    @PostMapping(value = "/send")
    public AjaxResponse send(@RequestParam String phoneNo,
                             @RequestParam String content) {
        if(content.isEmpty() || phoneNo.isEmpty()){
            throw new CustomException(CustomExceptionType.USER_INPUT_ERROR,
                    "消息内容或手机号不能为空!");
        }
        System.out.println("发送短消息:" + content);

        return AjaxResponse.success("短消息发送成功!");
    }
}
测试
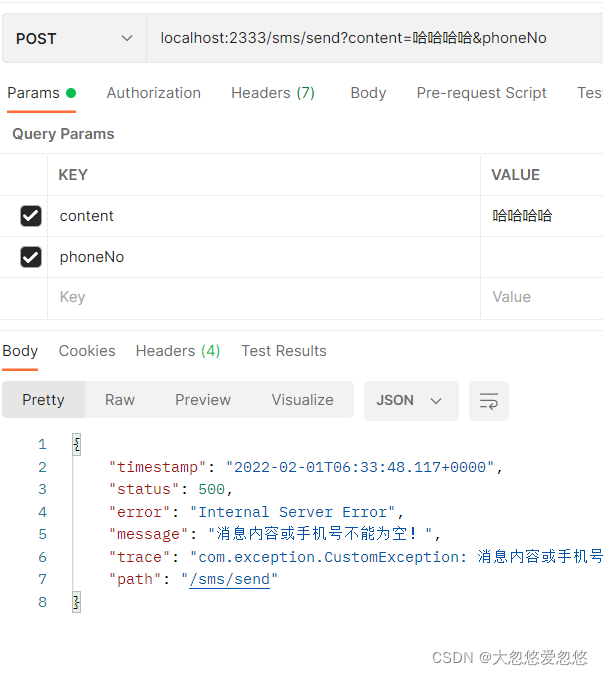
使用postman测试一下,正常的响应结果如下(AjaxResponse数据结构):

异常的响应结果如下:在GlobalExceptionHandler作用下
持久层模块单独拆分
持久层模块单独拆分
术语:持久层。就是进行应用数据存取的代码层,就是将数据持久化保存。可以是保存到文件、数据库等。通常对于web开发就是指针对数据库的操作被称为持久层。
为什么要将持久层的代码单独拆分出来?
通常来说,每一个微服务都单独对应一个数据库实例。但是不排除某些微服务业务发生了拆分,但数据之间的耦合度非常强,仍然存储在同一个数据库里面。这就可能产生一个问题:针对同一个数据库的同一个持久化方法,在不同的微服务里面定义了多次。
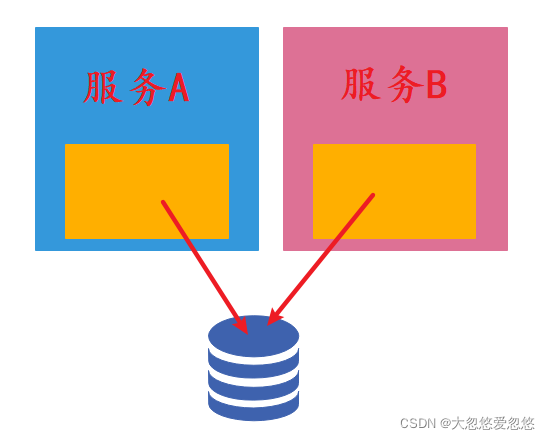
以,通常将持久层的代码单独抽离出来,形成一个模块。这样做的好处在于:
- 避免持久层代码,多次重复定义,造成开发资源的浪费。
- 可以抽离出对SQL优化、数据库知识掌握较好的团队成员,专门维护持久层操作的代码
- 有利于在各个微服务之间的实现跨库的分布式事务
新建持久层模块
首先使用maven的方式,新建一个模块dhy-dao-service。
然后在父项目的pom中dependencyManagement添加版本号管理(我是用的是mybatis构建持久层)
      <dependency>
        <groupId>org.mybatis.spring.boot</groupId>
        <artifactId>mybatis-spring-boot-starter</artifactId>
        <version>2.1.4</version>
        <type>pom</type>
        <scope>import</scope>
      </dependency>
在dhy-dao-service子模块中添加dependency引入jar包
<?xml version="1.0" encoding="UTF-8"?>
<project xmlns="http://maven.apache.org/POM/4.0.0"
         xmlns:xsi="http://www.w3.org/2001/XMLSchema-instance"
         xsi:schemaLocation="http://maven.apache.org/POM/4.0.0 http://maven.apache.org/xsd/maven-4.0.0.xsd">
    <parent>
        <artifactId>StudyCloudWithMe</artifactId>
        <groupId>dhy.xpy</groupId>
        <version>1.0-SNAPSHOT</version>
    </parent>
    <modelVersion>4.0.0</modelVersion>

    <artifactId>dhy-dao-service</artifactId>

     <dependencies>
        <dependency>
            <groupId>org.springframework.boot</groupId>
            <artifactId>spring-boot-starter-web</artifactId>
        </dependency>
        <dependency>
            <groupId>dhy.xpy</groupId>
            <artifactId>dhy-service-common</artifactId>
        </dependency>
            <dependency>
                <groupId>org.mybatis.spring.boot</groupId>
                <artifactId>mybatis-spring-boot-starter</artifactId>
            </dependency>
    </dependencies>

</project>
持久层通用的业务逻辑操作,这里就不再重复书写了,大家依据自己的项目而进行制定
在各微服务中使用持久层模块
在父项目中设定统一版本号管理
      <dependency>
        <groupId>dhy.xpy</groupId>
        <artifactId>dhy-dao-service</artifactId>
        <version>1.0-SNAPSHOT</version>
      </dependency>
先将通用持久层模块安装到本地仓库
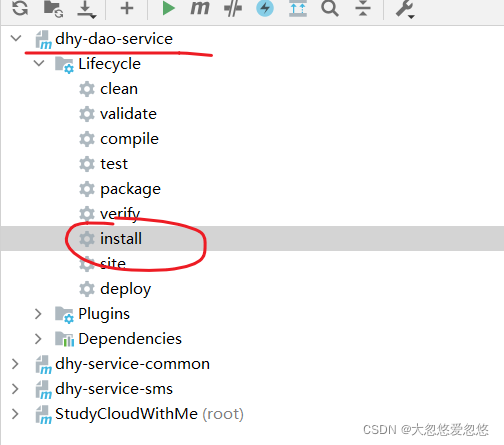
在dhy-service-sms微服务中引用该模块
    <dependencies>
        <dependency>
            <groupId>org.springframework.boot</groupId>
            <artifactId>spring-boot-starter-web</artifactId>
        </dependency>
        <dependency>
            <groupId>dhy.xpy</groupId>
            <artifactId>dhy-service-common</artifactId>
        </dependency>
        <dependency>
            <groupId>dhy.xpy</groupId>
            <artifactId>dhy-dao-service</artifactId>
        </dependency>
    </dependencies>
最后,为了让所有的mybatis mapper都能够被正确的注入Spring,加入mybatis组件的扫描路径。
@MapperScan(basePackages = {"com.mapper"})
public class Main {
当然,你还需要在application.yml中做数据库连接的配置。
总结
到此,微服务入门就介绍完了,主要介绍了微服务的发展历史和基本微服务框架搭建的一个过程。
后面的系列就开始正式引入相关组件,敬请期待!