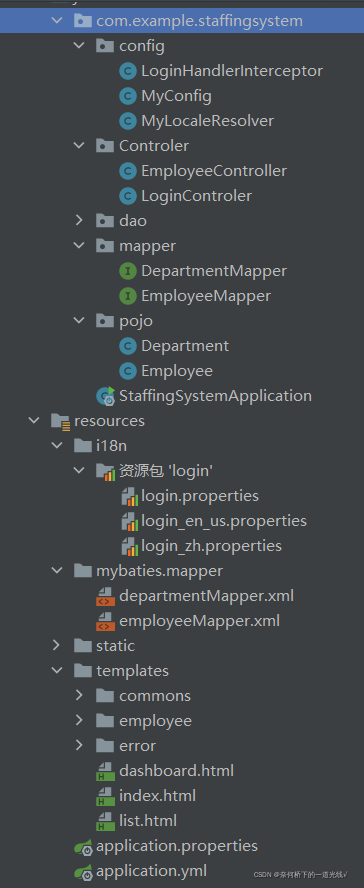
前序:十几天前刚学完学Springboot实现了简单的登录验证,以及crud操作,作为回忆总结。因为学前只具有javaWeb基础阶段的知识,并未深入学过spring,springMVC等知识,只了解一下基本的AOP,IoC概念,因此在学习过程中不懂的注解名字功能很多,但学完后对spring体系也算有了一个基本的了解。
已经实现成果:springboot实现的员工管理系统-Java文档类资源
用到的技术
模板引擎Thymeleaf 用于在前端渲染后端数据
数据库 mysql
持久层框架 myBaties
meaven管理jar包
用到的jar包版本
<?xml version="1.0" encoding="UTF-8"?>
<project xmlns="http://maven.apache.org/POM/4.0.0" xmlns:xsi="http://www.w3.org/2001/XMLSchema-instance"
         xsi:schemaLocation="http://maven.apache.org/POM/4.0.0 https://maven.apache.org/xsd/maven-4.0.0.xsd">
    <modelVersion>4.0.0</modelVersion>
    <parent>
        <groupId>org.springframework.boot</groupId>
        <artifactId>spring-boot-starter-parent</artifactId>
        <version>2.6.3</version>
        <relativePath/> <!-- lookup parent from repository -->
    </parent>
    <groupId>com.example</groupId>
    <artifactId>StaffingSystem</artifactId>
    <version>0.0.1-SNAPSHOT</version>
    <name>StaffingSystem</name>
    <description>Demo project for Spring Boot</description>
    <properties>
        <java.version>1.8</java.version>
    </properties>
    <dependencies>

        <!-- https://mvnrepository.com/artifact/org.mybatis.spring.boot/mybatis-spring-boot-starter -->
        <dependency>
            <groupId>org.mybatis.spring.boot</groupId>
            <artifactId>mybatis-spring-boot-starter</artifactId>
            <version>2.2.1</version>
        </dependency>

        <dependency>
            <groupId>org.springframework.boot</groupId>
            <artifactId>spring-boot-starter-jdbc</artifactId>
        </dependency>

        <dependency>
            <groupId>mysql</groupId>
            <artifactId>mysql-connector-java</artifactId>
            <scope>runtime</scope>
        </dependency>

        <dependency>
            <groupId>org.springframework.boot</groupId>
            <artifactId>spring-boot-starter-thymeleaf</artifactId>
        </dependency>
        <dependency>
            <groupId>org.springframework.boot</groupId>
            <artifactId>spring-boot-starter-web</artifactId>
        </dependency>

        <dependency>
            <groupId>org.springframework.boot</groupId>
            <artifactId>spring-boot-starter-test</artifactId>
            <scope>test</scope>
        </dependency>

        <dependency>
            <groupId>org.projectlombok</groupId>
            <artifactId>lombok</artifactId>
        </dependency>
    </dependencies>

    <build>
        <plugins>
            <plugin>
                <groupId>org.springframework.boot</groupId>
                <artifactId>spring-boot-maven-plugin</artifactId>
            </plugin>
        </plugins>
    </build>

</project>
项目资源列表

后端代码实现过程
拿到前端页面,首先实现登录验证的功能,登录的账号密码采用的写死的形式,没有从数据库中获取。之后完成管理系统数据库部分的增删改查并展示在界面。
登录验证部分
首先书写Login控制器
表单账号密码提交后会请求? /user/login? 映射的方法login,方法中判断账号是否为空,密码是否为123456,登录成功会将用户名保存到session用于拦截器登录过程中的表单验证。登录成功跳转到管理主页面,失败返回首页登录窗口。
@Controller
public class LoginControler {

    @RequestMapping("/user/login")
    //@RequestParam:将请求参数绑定到你控制器的方法参数上(是springmvc中接收普通参数的注解)
    public String login(@RequestParam("username") String username, @RequestParam("password") String password, Model model, HttpSession session){
        //具体业务:
        if(!StringUtils.isEmpty(username)&&"123456".equals(password)){
            session.setAttribute("loginUser",username);
            return "/dashboard.html";
        }else {
            //告诉用户登录失败
            model.addAttribute("msg", "账号或密码错误");
            return "/index.html";
        }

    }
}
之后配置拦截器,防止在不登录的情况下访问主页。
//拦截器
public class LoginHandlerInterceptor implements HandlerInterceptor {
    @Override       /* 在业务处理器处理请求之前被调用。预处理,可以进行编码、安全控制、权限校验等处理;*/
    public boolean preHandle(HttpServletRequest request, HttpServletResponse response, Object handler) throws Exception {

        //登录成功有用户的session
        Object loginUser = request.getSession().getAttribute("loginUser");
        if(loginUser==null){//用户没有登录
            request.setAttribute("msg","用户没有登录");
            request.getRequestDispatcher("/index.html").forward(request,response);
            return false;
        }
        return true;
    }
}
并在MyConfig中将自己定义的拦截器加入到springboot中管理,其中也包含基本的自定义页面跳转。
@Configuration
public class MyConfig implements WebMvcConfigurer {

    //基本页面跳转控制器
    @Override
    public void addViewControllers(ViewControllerRegistry registry) {
        registry.addViewController("/").setViewName("index");
        registry.addViewController("/index.html").setViewName("index");
        registry.addViewController("/main.html").setViewName("dashboard");
    }

    //自定义的国际化组件
    @Bean
    public LocaleResolver localeResolver(){
        return new MyLocaleResolver();
    }

    //自定义的登录拦截器
    @Override
    public void addInterceptors(InterceptorRegistry registry) {
       registry.addInterceptor(new LoginHandlerInterceptor()).addPathPatterns("/**")
               .excludePathPatterns("/index.html","/user/login","/","/css/*","/js/*","/img/*");
    }

}
至此登录功能基本实现,接下来实现数据库增删改查部分。
员工数据管理部分
零,配置application.yml文件
spring:
  datasource:
    username: root
    password: 123456
    url: jdbc:mysql://localhost:3306/staffingsystem?serverTimezone=UTC&useUnicode=true&characterEncoding=utf-8
    driver-class-name: com.mysql.cj.jdbc.Driver

#整合mybaties
mybatis:
  type-aliases-package: com/example/staffingsystem/pojo
  mapper-locations: classpath:mybaties/mapper/*.xml
一,新建数据库表
employee员工表结构

department 部门表结构

?二,根据表的结构建立pojo对象
//部门表
@Data
@AllArgsConstructor
@NoArgsConstructor
public class Department {
    private Integer id;
    private String departmentName;
}
@Data
@AllArgsConstructor
@NoArgsConstructor
public class Employee {
    private Integer id;
    private String lastName;
    private String email;
    private Integer gender;//0:女 1:男
    private Integer departmentId;
    private Date birth;

    public Employee(Integer id, String lastName, String email, Integer gender, int departmentId) {
        this.id = id;
        this.lastName = lastName;
        this.email = email;
        this.gender = gender;
        this.departmentId = departmentId;
        this.birth = new Date();
    }
}
三,利用mybaties实现对持久层dao数据库的处理
PS :其实可以利用mybatiesPlus自动实现基本的sql功能
@Mapper
@Repository
public interface DepartmentMapper {
  //    获取公司部门信息
  List<Department> getDepartments();

  Department getDepartmentById(Integer id);
}
@Mapper
@Repository
public interface EmployeeMapper {
List<Employee> list();
Employee listOneById(Integer id);
int addEmplyee(Employee employee);
int updateEmp(Employee employee);
int delete(Integer id);
}
在resourse表下的mybaties.mapper中利用xml实现sql语句完成
![]()
<?xml version="1.0" encoding="UTF-8" ?>
<!DOCTYPE mapper
        PUBLIC "-//mybatis.org//DTD Mapper 3.0//EN"
        "http://mybatis.org/dtd/mybatis-3-mapper.dtd">
<mapper namespace="com.example.staffingsystem.mapper.DepartmentMapper">
    <select id="getDepartments" resultType="Department">
        select * from staffingsystem.department
    </select>
    <select id="getDepartmentById" resultType="Department">
        select * from  staffingsystem.department where id=#{id}
    </select>
</mapper>?![]()
<?xml version="1.0" encoding="UTF-8" ?>
<!DOCTYPE mapper
        PUBLIC "-//mybatis.org//DTD Mapper 3.0//EN"
        "http://mybatis.org/dtd/mybatis-3-mapper.dtd">
<mapper namespace="com.example.staffingsystem.mapper.EmployeeMapper">
    <select id="list" resultType="Employee">
        select * from employee
    </select>
    <select id="listOneById" resultType="Employee">
        select * from  employee where id=#{id}
    </select>
    <insert id="addEmplyee" parameterType="Employee">
        insert into employee(id, lastName, email, gender,departmentId,birth) VALUES (#{id},#{lastName},#{email},#{gender},#{departmentId},#{birth});
    </insert>
    <update id="updateEmp" parameterType="Employee">
        update employee set lastName=#{lastName},email=#{email},gender=#{gender},departmentId=#{departmentId},birth=#{birth} where id=#{id}
    </update>
    <delete id="delete" parameterType="int">
        delete from employee where id=#{id}
    </delete>
</mapper>
?四,实现service层和Controller层
由于都是些简单的逻辑服务,就将两层合并了
@Controller
public class EmployeeController {
    @Autowired
    DepartmentMapper departmentMapper;
    @Autowired
    EmployeeMapper employeesMapper;
    //查所有员工
    @RequestMapping("/emps")
    public String list(Model model){

        List<Employee> listEmployees = employeesMapper.list();
        System.out.println(listEmployees);
        model.addAttribute("emps",listEmployees);
        return "/list.html";
    }

    @RequestMapping("/emp/add")
    public String toAddEmplyee(Model model){
       //获得公司信息
        Collection<Department> departments = departmentMapper.getDepartments();
        model.addAttribute("departments",departments);
        return "/employee/add.html";
    }

    //增加员工
    @PostMapping("/emp/addSuccess")
    public String addEmplyee(Employee employee){
        System.out.println(employee);
        employeesMapper.addEmplyee(employee);
        return "redirect:/emps";
    }

    //去员工的修改页面
    @RequestMapping("/emp/update")         //通过@PathVariable 可以将URL中占位符参数{xxx}绑定到处理器类的方法形参中@PathVariable(“xxx)
    public String toUpdateEmp(@RequestParam("id") Integer id,Model model){
        //查出原来的数据
        Employee employee = employeesMapper.listOneById(id);
        model.addAttribute("employee",employee);
        //获得公司信息
        Collection<Department> departments = departmentMapper.getDepartments();
        model.addAttribute("departments",departments);
        return "/employee/update.html";
    }
    @PostMapping("/emp/updateSuccess")
    public String updateEmp(Employee employee){
        employeesMapper.updateEmp(employee);
        return "redirect:/emps";
    }
    @RequestMapping("/emp/delete")
    public String delete(@RequestParam("id") Integer id){
        employeesMapper.delete(id);
        return "redirect:/emps";
    }
    @RequestMapping("/emp/logout")
    public String logout(HttpSession session){
        session.invalidate();
        return "redirect:/index.html";
    }
}
五,前端数据渲染
该部分采用Thymeleaf模板引擎,将后端model保存的数据信息渲染到前端页面即可。
总结:该系统最先接触springboot所实现的第一个简单系统,让我初步了解的springboot功能的强大,从基础的JAVAWeb对比来说以前采用Tomcat作为服务器每一次重启都要耗费很长时间,而由于springboot集成了Tomcat启动速度大大降低。在该过程中Thymleaf语法的强大相较于以前的jsp文件,语法简单,而且运行更快,而且可以直接在html文件中运行。所使用的的mybaties框架,不再需要手动连接数据库,书写基础的JDBC数据库增删改查代码,值=只需要配置简单的接口即可使用。最简单好用的还是springboot的配置注解使用,不再需要配置很多跳转配置,至于要一个注解就能简单实现。