1.IOC
1.通过maven导入jar包
<dependency>
   <groupId>org.springframework</groupId>
   <artifactId>spring-webmvc</artifactId>
   <version>5.1.10.RELEASE</version>
</dependency>
2.编写spring的配置文件
<?xml version="1.0" encoding="UTF-8"?>
<beans xmlns="http://www.springframework.org/schema/beans"
      xmlns:xsi="http://www.w3.org/2001/XMLSchema-instance"
      xsi:schemaLocation="http://www.springframework.org/schema/beans
       http://www.springframework.org/schema/beans/spring-beans.xsd">

   <!--bean就是java对象 , 由Spring创建和管理-->
   <bean id="hello" class="com.kuang.pojo.Hello">
       <property name="name" value="Spring"/>
   </bean>

</beans>
3.测试spring(这里通过xml配置文件读取bean)
@Test
public void test(){
   //加载spring配置文件
   ApplicationContext context = new ClassPathXmlApplicationContext("beans.xml");
   //获取配置创建的对象,getBean : 参数即为spring配置文件中bean的id .
   //这里通过spring的IOC容器创建对象,而不再像以前那样自己手动去new一个对象了
   User user = context.getBean("user", User.class);//第二个参数可以显示的指定bean对应java的实体类
}
4.DI(依赖注入)
1.常量注入
 <bean id="student" class="com.kuang.pojo.Student">
     <property name="name" value="小明"/>
 </bean>
2.Bean注入:使用ref
 <bean id="addr" class="com.kuang.pojo.Address">
     <property name="address" value="重庆"/>
 </bean>

 <bean id="student" class="com.kuang.pojo.Student">
     <property name="name" value="小明"/>
     <property name="address" ref="addr"/>
 </bean>
3.数组注入
<bean id="student" class="com.kuang.pojo.Student">
     <property name="name" value="小明"/>
     <property name="address" ref="addr"/>
     <property name="books">
         <array>
             <value>西游记</value>
             <value>红楼梦</value>
             <value>水浒传</value>
         </array>
     </property>
 </bean>
4.List注入
 <property name="hobbys">
     <list>
         <value>听歌</value>
         <value>看电影</value>
         <value>爬山</value>
     </list>
 </property>
5.Map注入
 <property name="card">
     <map>
         <entry key="中国邮政" value="456456456465456"/>
         <entry key="建设" value="1456682255511"/>
     </map>
 </property>
6.set注入
 <property name="games">
     <set>
         <value>LOL</value>
         <value>BOB</value>
         <value>COC</value>
     </set>
 </property>
7.Null注入
<property name="wife"><null/></property>
8.Properties注入
 <property name="info">
     <props>
         <prop key="学号">20190604</prop>
         <prop key="性别">男</prop>
         <prop key="姓名">小明</prop>
     </props>
 </property>
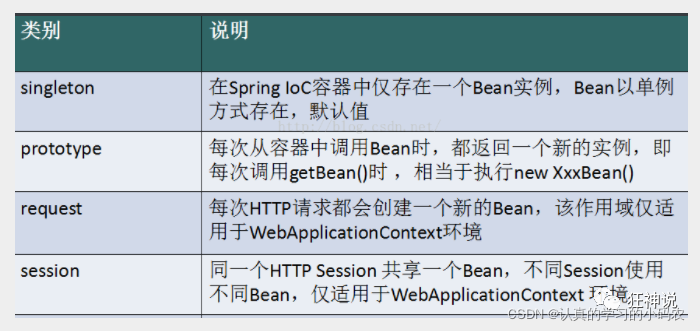
5.Bean的作用域
? 在Spring中,那些组成应用程序的主体及由Spring IoC容器所管理的对象,被称之为bean。简单地讲,bean就是由IOC容器初始化、装配及管理的对象。
? 主要了解singleton和prototype

singleton
? 当一个bean的作用域为Singleton,那么Spring IoC容器中只会存在一个共享的bean实例,并且所有对bean的请求,只要id与该bean定义相匹配,则只会返回bean的同一实例。Singleton是单例类型,就是在创建起容器时就同时自动创建了一个bean的对象,不管你是否使用,他都存在了,每次获取到的对象都是同一个对象。
prototype
? 当一个bean的作用域为Prototype,表示一个bean定义对应多个对象实例。Prototype作用域的bean会导致在每次对该bean请求(将其注入到另一个bean中,或者以程序的方式调用容器的getBean()方法)时都会创建一个新的bean实例。Prototype是原型类型,它在我们创建容器的时候并没有实例化,而是当我们获取bean的时候才会去创建一个对象,而且我们每次获取到的对象都不是同一个对象。根据经验,对有状态的bean应该使用prototype作用域,而对无状态的bean则应该使用singleton作用域。
 <bean id="account" class="com.foo.DefaultAccount" scope="prototype"/>
<!--或者-->
 <bean id="account" class="com.foo.DefaultAccount" singleton="false"/>
6.Bean的生命周期
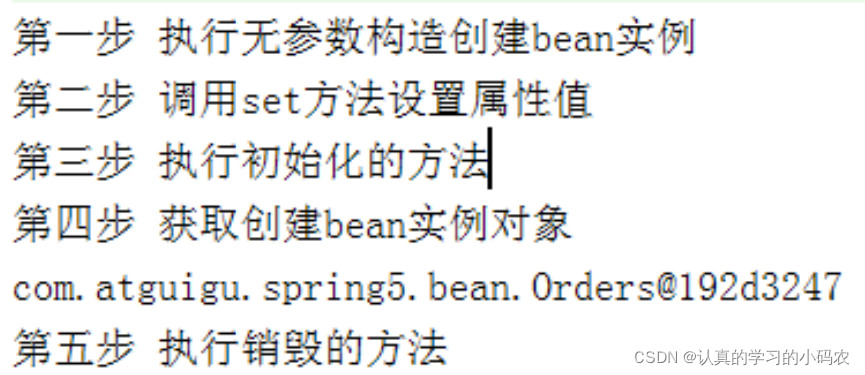
1.Bean的生命周期
(1)通过构造器创建 bean 实例(无参数构造)
(2)为 bean 的属性设置值和对其他 bean 引用(调用 set 方法)
(3)调用 bean 的初始化的方法(需要进行配置初始化的方法)
(4)bean 可以使用了(对象获取到了)
(5)当容器关闭时候,调用 bean 的销毁的方法(需要进行配置销毁的方法)
2.演示bean生命周期
- 创建实体类
public class Orders {
     //无参数构造
     public Orders() {
         System.out.println("第一步 执行无参数构造创建 bean 实例");
    }
    private String oname;
    public void setOname(String oname) {
        this.oname = oname;
        System.out.println("第二步 调用 set 方法设置属性值");
    }
    //创建执行的初始化的方法
    public void initMethod() {
        System.out.println("第三步 执行初始化的方法");
    }
    //创建执行的销毁的方法
    public void destroyMethod() {
        System.out.println("第五步 执行销毁的方法");
    }
}
- 配置bean
<bean id="orders" class="com.atguigu.spring5.bean.Orders" init-method="initMethod"
    destroy-method="destroyMethod">
 <property name="oname" value="手机"></property>
</bean>
- 获取bean
@Test
public void testBean3() {
    //因为ApplicationContext中没有close()方法,即销毁方法,因此使用其实现类ClassPathXmlApplicationContext演示
    ClassPathXmlApplicationContext context = new ClassPathXmlApplicationContext("bean4.xml");
    Orders orders = context.getBean("orders", Orders.class);
    System.out.println("第四步 获取创建 bean 实例对象");
    System.out.println(orders);
    //手动让 bean 实例销毁
    context.close();
}
- 输出结果

3.bean的后置处理器,bean生命周期有七步
(1)通过构造器创建 bean 实例(无参数构造)
(2)为 bean 的属性设置值和对其他 bean 引用(调用 set 方法)
(3)把 bean 实例传递 bean 后置处理器的方法 postProcessBeforeInitialization
(4)调用 bean 的初始化的方法(需要进行配置初始化的方法)
(5)把 bean 实例传递 bean 后置处理器的方法 postProcessAfterInitialization
(6)bean 可以使用了(对象获取到了)
(7)当容器关闭时候,调用 bean 的销毁的方法(需要进行配置销毁的方法)
- 创建一个类继承BeanPostProcessor接口,并重写其中两个方法
public class MyBeanPost implements BeanPostProcessor {
    @Override
    public Object postProcessBeforeInitialization(Object bean, String beanName) throws BeansException {
    System.out.println("在初始化之前执行的方法");
    return bean;
    }
    @Override
    public Object postProcessAfterInitialization(Object bean, String beanName) throws BeansException {
    System.out.println("在初始化之后执行的方法");
    return bean;
    }
}
- 在spring配置文件中配置后置处理器:只要配置了后置处理器,IOC中所有的bean添加后置处理器
<bean id="myBeanPost" class="com.atguigu.spring5.bean.MyBeanPost"></bean>
- 演示结果

7.自动装配
1.自动装配说明
- 自动装配是使用spring满足bean依赖的一种方法
- spring会在应用上下文中为某个bean寻找其依赖的bean
Spring中bean有三种装配机制,分别是:
- 在xml中显示配置
- 在java中显示配置
- 隐式的bean发现机制和自动装配
这里我们主要讲第三种:自动化的装配bean
Spring的自动装配需要从两个角度来实现,或者说是两个操作:
- 组件扫描(component scanning):spring会自动发现应用上下文中所创建的bean;
- 自动装配(autowiring):spring自动满足bean之间的依赖,也就是我们说的IoC/DI;
组件扫描和自动装配组合发挥巨大威力,使得显示的配置降低到最少。
自动化的装配bean
1.在spring配置文件中引入context文件头
xmlns:context="http://www.springframework.org/schema/context"

http://www.springframework.org/schema/context
http://www.springframework.org/schema/context/spring-context.xsd
2.开启属性注解支持
<!--注解驱动-->
<context:annotation-config/>
3.使用注解
@Autowired
-
@Autowired是按类型自动转配的,不支持id匹配
-
需要导入 spring-aop的包
//如果允许对象为null,设置required = false,默认为true
@Autowired(required = false)
private Cat cat;
@Qualifier
- @Autowired是根据类型自动装配的,加上@Qualifier则可以根据byName的方式自动装配
- @Qualifier不能单独使用
进行测试
- 1、配置文件修改内容,保证类型存在对象。且名字不为类的默认名字!
<bean id="cat1" class="com.kuang.pojo.Cat"/>
<bean id="cat2" class="com.kuang.pojo.Cat"/>
- 2、没有加Qualifier测试,直接报错
- 3、在属性上添加Qualifier注解
@Autowired
@Qualifier(value = "cat2")//这里的value就相当于bean里面的id
private Cat cat;
@Resource
- @Resource如有指定的name属性,先按该属性进行byName方式查找装配
- 其次再进行默认的byName方式进行装配;
- 如果以上都不成功,则按byType的方式自动装配。
- 都不成功,则报异常。
4.小结
@Autowired与@Resource异同:
1、@Autowired与@Resource都可以用来装配bean。都可以写在字段上,或写在setter方法上。
2、@Autowired默认按类型装配(属于spring规范),默认情况下必须要求依赖对象必须存在,如果要允许null 值,可以设置它的required属性为false,如:@Autowired(required=false) ,如果我们想使用名称装配可以结合@Qualifier注解进行使用
3、@Resource(属于J2EE复返),默认按照名称进行装配,名称可以通过name属性进行指定。如果没有指定name属性,当注解写在字段上时,默认取字段名进行按照名称查找,如果注解写在setter方法上默认取属性名进行装配。当找不到与名称匹配的bean时才按照类型进行装配。但是需要注意的是,如果name属性一旦指定,就只会按照名称进行装配。
它们的作用相同都是用注解方式注入对象,但执行顺序不同。@Autowired先byType,@Resource先byName。
8.使用注解开发
1.在spring4之后,想要使用注解形式,必须得要引入aop的包
2.在配置文件当中,还得要引入一个context约束
<?xml version="1.0" encoding="UTF-8"?>
<beans xmlns="http://www.springframework.org/schema/beans"
      xmlns:xsi="http://www.w3.org/2001/XMLSchema-instance"
      xmlns:context="http://www.springframework.org/schema/context"
      xsi:schemaLocation="http://www.springframework.org/schema/beans
       http://www.springframework.org/schema/beans/spring-beans.xsd
       http://www.springframework.org/schema/context
       http://www.springframework.org/schema/context/spring-context.xsd">

</beans>
3.bean的实现
我们之前都是使用 bean 的标签进行bean注入,但是实际开发中,我们一般都会使用注解!
- 配置扫描哪些包下的注解
<!--指定注解扫描包-->
<context:component-scan base-package="com.kuang.pojo"/>
- 在指定包下编写类,增加注解
@Component("user")
// 相当于配置文件中 <bean id="user" class="当前注解的类"/>
//不在需要想以前一样在spring配置文件中配置那么多的bean
public class User {
   public String name = "秦疆";
}
- 测试
@Test
public void test(){
   ApplicationContext context = new ClassPathXmlApplicationContext("beans.xml");
   User user = context.getBean("user",User.class);
   System.out.println(user.name);
}
4.属性的注入
可以使用注解注入属性
1、可以不用提供set方法,直接在直接名上添加@value(“值”)
@Component("user")
// 相当于配置文件中 <bean id="user" class="当前注解的类"/>
public class User {
   @Value("秦疆")
   // 相当于配置文件中 <property name="name" value="秦疆"/>
   public String name;
}
2、如果提供了set方法,在set方法上添加@value(“值”);
@Component("user")
public class User {
   public String name;

   @Value("秦疆")
   public void setName(String name) {
       this.name = name;
  }
}
5.衍生注解
@Component三个衍生注解
为了更好的进行分层,Spring可以使用其它三个注解,功能一样,目前使用哪一个功能都一样。
- @Controller:web层
- @Service:service层
- @Repository:dao层
写上这些注解,就相当于将这个类交给Spring管理装配了!
6.自动装配注解(在上一点)
7.作用域
@scope
- singleton:默认的,Spring会采用单例模式创建这个对象。关闭工厂 ,所有的对象都会销毁。
- prototype:多例模式。关闭工厂 ,所有的对象不会销毁。内部的垃圾回收机制会回收
@Controller("user")
@Scope("prototype")
public class User {
   @Value("秦疆")
   public String name;
}
8.小结
XML与注解的比较
- XML可以适用任何场景 ,结构清晰,维护方便
- 注解不是自己提供的类使用不了,开发简单方便
XML与注解整合开发:推荐最佳实践
- xml管理Bean
- 注解完成属性注入
- 使用过程中, 可以不用扫描,扫描是为了类上的注解
<!--注解驱动-->
<context:annotation-config/>
作用
- 进行注解驱动注册,从而使注解生效
- 用于激活那些已经在spring容器里注册过的bean上面的注解,也就是显示的向Spring注册
- 如果不扫描包,就需要手动配置bean
- 如果不加注解驱动,则注入的值为null!
2.AOP
1.AOP在spring中的作用
提供声明式事务、允许用户自定义切面
以下名词需要了解:
- 连接点(JointPoint):类中可以被增强的方法
- 切入点(PointCut):类中实际被增强的方法
- 通知(增强)(Advice):实际增强的逻辑部分
- 切面(ASPECT):是一个动作,即把通知应用到切入点的过程
通知的五种类型:
- before:前置通知,在一个方法执行前被调用。
- after:最终通知, 在方法执行之后调用的通知,无论方法执行是否成功。
- after-returning: 后置通知,仅当方法成功完成后执行的通知。
- after-throwing:异常通知, 在方法抛出异常退出时执行的通知。
- around: 环绕通知,在方法执行之前和之后调用的通知。
2.使用Spring实现AOP
1.先导入jar包
<dependency>
   <groupId>org.aspectj</groupId>
   <artifactId>aspectjweaver</artifactId>
   <version>1.9.4</version>
</dependency>
2.切入点表达式
- 切入点表达式作用:知道对哪个类里面的哪个方法进行增强
- 语法结构: execution([权限修饰符] [返回类型] [类全路径] 方法名称)
举例:对 com.atguigu.dao.BookDao 类里面的 add 进行增强 execution(* com.atguigu.dao.BookDao.add(…))
? 对 com.atguigu.dao.BookDao 类里面的所有的方法进行增强 execution(* com.atguigu.dao.BookDao.* (…))
3.具体实现
1.AspectJ 配置文件
1、编写业务接口和实现类
public interface UserService {
   public void add();
   public void delete();
   public void update();
   public void search();
}
public class UserServiceImpl implements UserService{

   @Override
   public void add() {
       System.out.println("增加用户");
  }

   @Override
   public void delete() {
       System.out.println("删除用户");
  }

   @Override
   public void update() {
       System.out.println("更新用户");
  }

   @Override
   public void search() {
       System.out.println("查询用户");
  }
}
2、自定义切入类
public class DiyPointcut {

   public void before(){
       System.out.println("---------方法执行前---------");
  }
   public void after(){
       System.out.println("---------方法执行后---------");
  }
}
3、去spring中配置(注意导入约束)
<?xml version="1.0" encoding="UTF-8"?>
<beans xmlns="http://www.springframework.org/schema/beans"
      xmlns:xsi="http://www.w3.org/2001/XMLSchema-instance"
      xmlns:aop="http://www.springframework.org/schema/aop"
      xsi:schemaLocation="http://www.springframework.org/schema/beans
       http://www.springframework.org/schema/beans/spring-beans.xsd
       http://www.springframework.org/schema/aop
       http://www.springframework.org/schema/aop/spring-aop.xsd">

<!--注册bean-->
<bean id="diy" class="com.kuang.config.DiyPointcut"/>

<!--aop的配置-->
<aop:config>
   <!--第一种方式:使用AOP的标签实现-->
   <aop:aspect ref="diy">
       <aop:pointcut id="diyPonitcut" expression="execution(* com.kuang.service.UserServiceImpl.*(..))"/>
       <aop:before pointcut-ref="diyPonitcut" method="before"/>
       <aop:after pointcut-ref="diyPonitcut" method="after"/>
   </aop:aspect>
</aop:config>
2.使用AspectJ注解实现
1、依然是先编写接口和实现类
2、编写注解实现的增强类
@Component
@Aspect
public class AnnotationPointcut {
   @Before("execution(* com.kuang.service.UserServiceImpl.*(..))")
   public void before(){
       System.out.println("---------方法执行前---------");
  }

   @After("execution(* com.kuang.service.UserServiceImpl.*(..))")
   public void after(){
       System.out.println("---------方法执行后---------");
  }

   @Around("execution(* com.kuang.service.UserServiceImpl.*(..))")
   public void around(ProceedingJoinPoint jp) throws Throwable {
       System.out.println("环绕前");
       //执行目标方法proceed
       Object proceed = jp.proceed();
       System.out.println("环绕后");
  }
}
3、在Spring配置文件中,注册bean,并增加支持注解的配置
<!--开启注解扫描-->
<context:component-scan base-package="com.kuang.service"></context:component-scan>
<!-- 开启 Aspect 生成代理对象-->
<aop:aspectj-autoproxy/>
3.其他
有相同切入点时可以抽取出来
//相同切入点抽取
@Pointcut(value = "execution(* com.atguigu.spring5.aopanno.User.add(..))")
	public void pointdemo() {
}
@Before(value = "pointdemo()")
public void before() {
	System.out.println("before.........");
}
有多个增强类多同一个方法进行增强,设置增强类优先级,在增强类上面添加注解 @Order(数字类型值),数字类型值越小优先级越高
@Component
@Aspect
@Order(1)
public class PersonProxy{}
3.声明式事务
1.在 spring 配置文件配置事务管理器
<!--创建事务管理器-->
<bean id="transactionManager"class="org.springframework.jdbc.datasource.DataSourceTransactionManager">
 <!--注入数据源-->
 <property name="dataSource" ref="dataSource"></property>
</bean>
2.在spring配置文件中引入名称空间
<beans xmlns:tx="http://www.springframework.org/schema/tx"

http://www.springframework.org/schema/tx
http://www.springframework.org/schema/tx/spring-tx.xsd">
3.开启事务注解
<!--开启事务注解-->
<tx:annotation-driven transactionmanager="transactionManager"></tx:annotation-driven>
4.在 service 类上面(或者 service 类里面方法上面)添加事务注解
- @Transactional,这个注解添加到类上面,也可以添加方法上面
- 如果把这个注解添加类上面,这个类里面所有的方法都添加事务
- 如果把这个注解添加方法上面,为这个方法添加事务
@Service
@Transactional
public class UserService {}
spring中的传播行为
事务传播行为就是多个事务方法相互调用时,事务如何在这些方法间传播。
spring支持7种事务传播行为:
- propagation_requierd:如果当前没有事务,就新建一个事务,如果已存在一个事务中,加入到这个事务中,这是最常见的选择。
- propagation_supports:支持当前事务,如果没有当前事务,就以非事务方法执行。
- propagation_mandatory:使用当前事务,如果没有当前事务,就抛出异常。
- propagation_required_new:新建事务,如果当前存在事务,把当前事务挂起。
- propagation_not_supported:以非事务方式执行操作,如果当前存在事务,就把当前事务挂起。
- propagation_never:以非事务方式执行操作,如果当前事务存在则抛出异常。
- propagation_nested:如果当前存在事务,则在嵌套事务内执行。如果当前没有事务,则执行与propagation_required类似的操作
Spring 默认的事务传播行为是 PROPAGATION_REQUIRED,它适合于绝大多数的情况。
4.整合mybatis
记得先导入mybatis-spring的jar包
<dependency>
   <groupId>org.mybatis</groupId>
   <artifactId>mybatis-spring</artifactId>
   <version>2.0.2</version>
</dependency>
4.1第一种整合方式
1.引入Spring配置文件beans.xml
<?xml version="1.0" encoding="UTF-8"?>
<beans xmlns="http://www.springframework.org/schema/beans"
      xmlns:xsi="http://www.w3.org/2001/XMLSchema-instance"
      xsi:schemaLocation="http://www.springframework.org/schema/beans
       http://www.springframework.org/schema/beans/spring-beans.xsd">
2.将原本需要在mybatis全局配置文件中配置的数据源配置到spring配置文件中
<!--配置数据源:数据源有非常多,可以使用第三方的,也可使使用Spring的-->
<bean id="dataSource" class="org.springframework.jdbc.datasource.DriverManagerDataSource">
   <property name="driverClassName" value="com.mysql.jdbc.Driver"/>
   <property name="url" value="jdbc:mysql://localhost:3306/mybatis"/>
   <property name="username" value="root"/>
   <property name="password" value="123456"/>
</bean>
3.配置SqlSessionFactory,关联MyBatis全局配置文件和mapper映射文件
? 需要注意的是,这个配置文件并不需要是一个完整的 MyBatis 配置。因此我们通常只配置(< settings>) 和 (< typeAliases>)元素。确切地说,任何环境配置(< environments>),数据源(< DataSource>)和 MyBatis 的事务管理器< transactionManager>都会被忽略。SqlSessionFactoryBean 会创建它自有的 MyBatis 环境配置(Environment),并按要求设置自定义环境的值。
<!--配置SqlSessionFactory-->
<bean id="sqlSessionFactory" class="org.mybatis.spring.SqlSessionFactoryBean">
   <property name="dataSource" ref="dataSource"/>
   <!--关联Mybatis-->
   <property name="configLocation" value="classpath:mybatis-config.xml"/>
   <!--关联mapper映射文件的位置-->
   <property name="mapperLocations" value="classpath:com/kuang/dao/*.xml"/>
</bean>
4.注册sqlSessionTemplate,关联sqlSessionFactor
<!--注册sqlSessionTemplate , 关联sqlSessionFactory,这里的sqlSessionTemplate就是sqlSession-->
<bean id="sqlSession" class="org.mybatis.spring.SqlSessionTemplate">
   <!--利用构造器注入,只能使用构造器注入,因为没有set方法-->
   <constructor-arg index="0" ref="sqlSessionFactory"/>
</bean>
5.增加Dao接口的实现类;私有化sqlSessionTemplate
public class UserMapperImpl implements UserMapper {
    //私有化sqlSessionTemplate
    private SqlSessionTemplate sqlSession;
    //设置set方法,可以通过spring注入
    public void setSqlSession(SqlSession sqlSession) {
  	  this.sqlSession = sqlSession;
	}

    public List<User> selectUser() {
       UserMapper mapper = sqlSession.getMapper(UserMapper.class);
       return mapper.selectUser();
  }
}
6.注册bean实现,即创建UserMapperImpl对象并注入SqlSessionTemplate属性
<bean id="userMapperImpl" class="com.kuang.mapper.UserMapperImpl">
   <property name="sqlSession" ref="sqlSession"/>
</bean>
7.测试
@Test
public void test2(){
    ApplicationContext context = new ClassPathXmlApplicationContext("spring-dao.xml");
    UserMapperImpl mapper = context.getBean("userMapperImpl", UserMapperImpl.class);
    List<User> user = mapper.selectUser();
    System.out.println(user);
}
最后发现其实在mybatis全局配置文件中并不需要配置太多的东西
<?xml version="1.0" encoding="UTF-8" ?>
<!DOCTYPE configuration
       PUBLIC "-//mybatis.org//DTD Config 3.0//EN"
       "http://mybatis.org/dtd/mybatis-3-config.dtd">
<configuration>
   <typeAliases>
       <package name="com.kuang.bean"/>
   </typeAliases>
</configuration>
4.2第二种整合方式
mybatis-spring1.2.3版以上的才有这个
mapper实现类继承Support类 , 直接利用 静态方法getSqlSession() 获得 , 然后直接注入SqlSessionFactory . 比起方式1 , 不需要管理SqlSessionTemplate , 而且对事务的支持更加友好 . 可跟踪源码查看
1.将我们上面写的UserMapperImpl修改一下
public class UserDaoImpl extends SqlSessionDaoSupport implements UserMapper {
    public List<User> selectUser() {
   		UserMapper mapper = getSqlSession().getMapper(UserMapper.class);
   		return mapper.selectUser();
    }
}
2.修改bean的配置,可以去除第一种方法的第4步,只需在继承Support类的实现类中注入sqlSessionFactory即可
<bean id="userDaoImpl" class="com.kuang.mapper.UserDaoImpl">
   <property name="sqlSessionFactory" ref="sqlSessionFactory" />
</bean>