前言
前面我们已经学习了SSM整个MyBatis-plus的整合,本节我们就使用整合的项目开发一个简单的登录逻辑。
学习内容
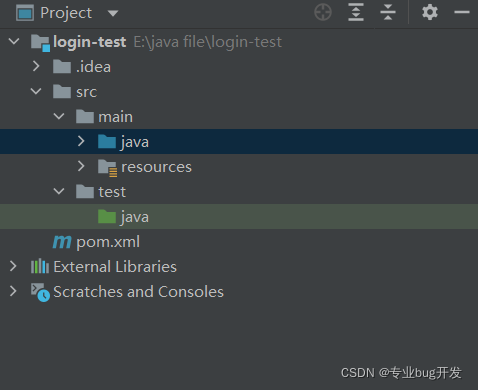
新建项目工程
-
在IDEA中新建一个普通的maven项目;
-
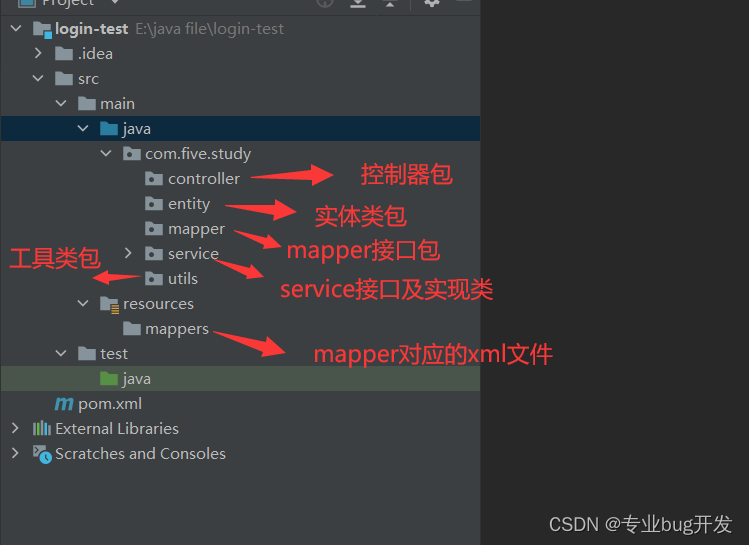
完善我们的工程结构如下,各分包功能如图;
-
引入项目依赖,配置MyBatis-Plus;
参考前面的文章:一起学Java――SSM整合及MyBatis-Plus的使用 -
新建用户数据表;

编写项目代码
- 新建实体类-User;
package com.five.study.entity;

import com.baomidou.mybatisplus.annotation.IdType;
import com.baomidou.mybatisplus.annotation.TableId;
import com.baomidou.mybatisplus.annotation.TableName;

/**
 * Description:
 *
 * @Author: kk(专业bug开发)
 * DateTime: 2022-02-15 16:58
 */
@TableName("user")
public class User {
    @TableId(type= IdType.AUTO)
    private Long userId;
    private String username;
    private String password;
    private Integer salt;

    public Long getUserId() {
        return userId;
    }

    public void setUserId(Long userId) {
        this.userId = userId;
    }

    public String getUsername() {
        return username;
    }

    public void setUsername(String username) {
        this.username = username;
    }

    public String getPassword() {
        return password;
    }

    public void setPassword(String password) {
        this.password = password;
    }

    public Integer getSalt() {
        return salt;
    }

    public void setSalt(Integer salt) {
        this.salt = salt;
    }
}
- 新建mapper接口;
package com.five.study.mapper;

import com.baomidou.mybatisplus.core.mapper.BaseMapper;
import com.five.study.entity.User;

/**
 * Description:
 *
 * @Author: kk(专业bug开发)
 * DateTime: 2022-02-15 17:03
 */
public interface UserMapper extends BaseMapper<User> {
}
- 新建user.xml文件;
<?xml version="1.0" encoding="UTF-8"?>
<!DOCTYPE mapper PUBLIC "-//mybatis.org//DTD Mapper 3.0//EN" "http://mybatis.org/dtd/mybatis-3-mapper.dtd">
<mapper namespace="com.five.study.mapper.UserMapper">

</mapper>
- 编写Service接口;
package com.five.study.service;

import com.five.study.entity.User;

/**
 * Description:
 *
 * @Author: kk(专业bug开发)
 * DateTime: 2022-02-15 17:08
 */
public interface UserService {

    /**
     * 用户注册,创建新用户
     *
     * @param username 用户名
     * @param password 密码
     * @param nickname 昵称
     * @return 新用户对象
     */
    public User createUser(String username, String password, String nickname);

    /**
     * 登录检查
     *
     * @param username 用户名
     * @param password 密码
     * @return 登录对象
     */
    public User checkLogin(String username, String password);
}
- 新建MD5加密工具类;
package com.five.study.utils;


import org.apache.commons.codec.digest.DigestUtils;

/**
 * Description:
 *
 * @Author: kk(专业bug开发)
 * DateTime: 2022-02-12 17:28
 */
public class MD5Utils {
    public static String md5Digest(String source , Integer salt){
        char[] ca = source.toCharArray();
        //混淆源数据
        for(int i = 0 ; i < ca.length ; i++){
            ca[i] = (char) (ca[i] + salt);
        }
        String target = new String(ca);
        String md5 = DigestUtils.md5Hex(target);
        return md5;
    }
}
- 编写Service实现类;
package com.five.study.service.impl;

import com.baomidou.mybatisplus.core.conditions.query.QueryWrapper;
import com.five.study.entity.User;
import com.five.study.mapper.UserMapper;
import com.five.study.service.UserService;
import com.five.study.service.exception.BussinessException;
import com.five.study.utils.MD5Utils;
import org.springframework.stereotype.Service;
import org.springframework.transaction.annotation.Transactional;

import javax.annotation.Resource;
import java.util.Date;
import java.util.List;
import java.util.Random;

/**
 * Description:
 *
 * @Author: kk(专业bug开发)
 * DateTime: 2022-02-15 17:09
 */
@Service("userService")
@Transactional
public class UserServiceImpl implements UserService {

    @Resource
    private UserMapper userMapper;
    /**
     * 用户注册,创建新用户
     *
     * @param username 用户名
     * @param password 密码
     * @param nickname 昵称
     * @return 新用户对象
     */
    public User createUser(String username, String password, String nickname) {
        QueryWrapper<User> queryWrapper = new QueryWrapper<User>();
        queryWrapper.eq("username", username);
        List<User> userList = userMapper.selectList(queryWrapper);
        //判断用户名是否已存在
        if(userList.size() > 0){
            throw new BussinessException("M01","用户名已存在");
        }
        User user = new User();
        user.setUsername(username);
        int salt = new Random().nextInt(1000) + 1000; //盐值
        String md5 = MD5Utils.md5Digest(password, salt);
        user.setPassword(md5);
        user.setSalt(salt);
        userMapper.insert(user);
        return user;
    }

    /**
     * 登录检查
     *
     * @param username 用户名
     * @param password 密码
     * @return 登录对象
     */
    public User checkLogin(String username, String password){
        QueryWrapper<User> queryWrapper = new QueryWrapper<User>();
        queryWrapper.eq("username", username);
        User user = userMapper.selectOne(queryWrapper);
        if(user == null){
            throw new BussinessException("M02", "用户不存在");
        }
        String md5 = MD5Utils.md5Digest(password, user.getSalt());
        if(!md5.equals(user.getPassword())){
            throw new BussinessException("M03", "输入密码有误");
        }
        return user;
    }
}
- 编写Service测试类;
package com.five.study.service.impl;

import com.five.study.service.UserService;
import org.junit.Test;
import org.junit.runner.RunWith;
import org.springframework.test.context.ContextConfiguration;
import org.springframework.test.context.junit4.SpringJUnit4ClassRunner;

import javax.annotation.Resource;

import static org.junit.Assert.*;

/**
 * Description:
 *
 * @Author: kk(专业bug开发)
 * DateTime: 2022-02-15 17:23
 */
@RunWith(SpringJUnit4ClassRunner.class)
@ContextConfiguration(locations = {"classpath:applicationContext.xml"})
public class UserServiceImplTest {
    @Resource
    private UserService userService;

    @Test
    public void createUser() {
        userService.createUser("admin", "123456");
    }

    @Test
    public void checkLogin() {
        userService.checkLogin("admin", "123456");
    }
}
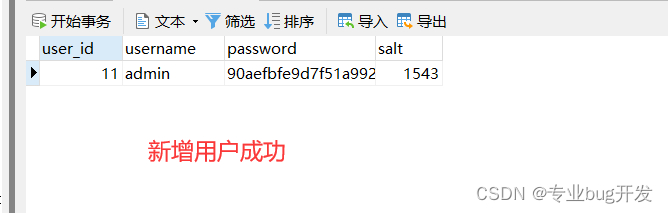
测试结果:

7. 编写控制器Controller;
package com.five.study.controller;

import com.five.study.entity.User;
import com.five.study.service.UserService;
import com.five.study.service.exception.BussinessException;
import org.springframework.stereotype.Controller;
import org.springframework.web.bind.annotation.PostMapping;
import org.springframework.web.bind.annotation.ResponseBody;

import javax.annotation.Resource;
import javax.servlet.http.HttpServletRequest;
import javax.servlet.http.HttpSession;
import java.util.HashMap;
import java.util.Map;

/**
 * Description:
 *
 * @Author: kk(专业bug开发)
 * DateTime: 2022-02-15 17:39
 */
@Controller
public class UserController {
    @Resource
    private UserService userService;

    /**
    *@Description: 注册新用户控制器
    *@Param:
    *@return:
    */
    @PostMapping("/registe")
    @ResponseBody
    public Map registe(String username, String password) {
        Map result = new HashMap();
        try {
            userService.createUser(username, password);
            result.put("code", "0");
            result.put("msg", "success");
        } catch (BussinessException ex) {
            ex.printStackTrace();
            result.put("code", ex.getCode());
            result.put("msg", ex.getMsg());
        }
        return result;
    }

    /**
    *@Description: 登录校验控制器
    *@Param:
    *@return:
    */
    @PostMapping("/check_login")
    @ResponseBody
    public Map checkLogin(String username, String password) {

        Map result = new HashMap();

        try {
            User user = userService.checkLogin(username, password);
            result.put("code", "0");
            result.put("msg", "success");
        } catch (BussinessException ex) {
            ex.printStackTrace();
            result.put("code", ex.getCode());
            result.put("msg", ex.getMsg());
        }
        return result;
    }
}
-
配置tomcat服务器;
参见文章:一起学Java――IDEA快速开发web应用 -
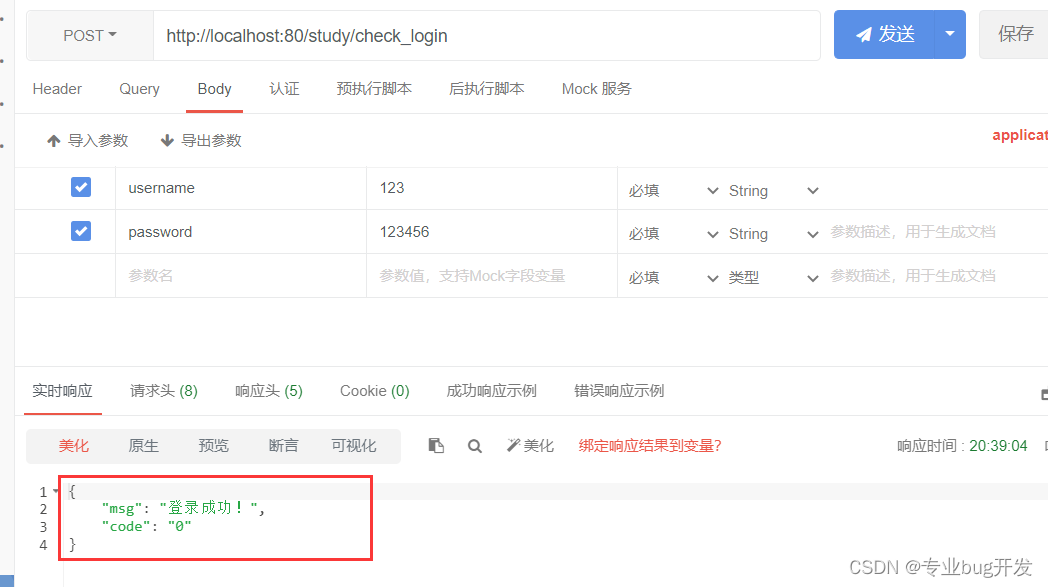
使用APIPost测试;

总结
因为自己也是刚开始使用SSM开发,所以整理的可能不太到位,如果您发现存在问题,欢迎评论区交流~