一、 基础概念
首先来看看RabbitMQ的通信架构模型。

对于以上模型中的各个部分作以简要解释。
-
Producer:消息生产者,也就是消息产生的源头。
-
Consumer:消息消费者。
-
Broker:它提供一种传输服务,它的角色就是维护一条从生产者到消费者的路线,保证数据能按照指定的方式进行传输。
-
Exchange:消息交换机,它指定消息按什么规则,路由到哪个队列。
-
Queue:消息队列,承载消息在RabbitMQ,每个消息都会被投到一个或多个队列。
-
Routing Key:路由键,交换机会根据其配置的路由键将消息路由发送到对应的消息对垒中。
-
Binding:绑定,是将交换机和队列按照路由键进行关系绑定。
二、 搞个Demo
这里我们使用SpingBoot整合RabbitMQ来作模拟实验,便于解释说明。那么二话不说先搞个demo。
- 创建SpringBoot项目,在pom文件中加入以下内容:
<dependency>
   <groupId>org.springframework.boot</groupId>
   <artifactId>spring-boot-starter-amqp</artifactId>
</dependency>
<dependency>
   <groupId>org.springframework.boot</groupId>
   <artifactId>spring-boot-starter-web</artifactId>
</dependency>

<dependency>
   <groupId>org.springframework.boot</groupId>
   <artifactId>spring-boot-starter-test</artifactId>
   <scope>test</scope>
</dependency>
<dependency>
   <groupId>org.springframework.amqp</groupId>
   <artifactId>spring-rabbit-test</artifactId>
   <scope>test</scope>
</dependency>
<dependency>
   <groupId>com.alibaba</groupId>
   <artifactId>fastjson</artifactId>
   <version>1.2.58</version>
</dependency>
<dependency>
   <groupId>org.projectlombok</groupId>
   <artifactId>lombok</artifactId>
   <version>1.18.16</version>
   <scope>provided</scope>
</dependency>
- 在application.yml中添加以下配置:
spring:
  rabbitmq:
    host: "127.0.0.1"
    port: 5672
    username: "admin"
    password: "public"
- 如下图创建包及java文件。

各java类代码如下:
@Configuration
public class RabbitmqConfig {
   private Logger logger = LoggerFactory.getLogger(RabbitmqConfig.class);

   @Value("${spring.rabbitmq.host}")
   private String host;
   @Value("${spring.rabbitmq.port}")
   private int port;
   @Value("${spring.rabbitmq.username}")
   private String username;
   @Value("${spring.rabbitmq.password}")
   private String password;

   @Bean
   public ConnectionFactory connectionFactory() {
	   CachingConnectionFactory factory = new CachingConnectionFactory();
	   factory.setHost(host);
	   factory.setPort(port);
	   factory.setUsername(username);
	   factory.setPassword(password);
	   factory.setPublisherConfirmType(CachingConnectionFactory.ConfirmType.SIMPLE);
	   factory.setPublisherReturns(true);

	   return factory;
   }
}

@RestController
@RequestMapping("/rabbit")
public class RabbitmqController {
   private Logger logger = LoggerFactory.getLogger(RabbitmqController.class);

   @Resource
   private MessageSender messageSender;

   @RequestMapping(value = "/message/send", method = RequestMethod.POST)
   public void directController(@RequestBody Message message) {
	   messageSender.sendMessage(message);
   }
}

@Getter
@Setter
@ToString
public class Message {
   private String routingKey;
   private String exchangeName;
   private String message;
}

@Service
public class MessageSender {

   private Logger logger = LoggerFactory.getLogger(MessageSender.class);

   @Resource(name = "template")
   private RabbitTemplate rabbitTemplate;

   public void sendMessage(Message message) {
	   String routingKey = message.getRoutingKey();
	   String exchangeName = message.getExchangeName();
	   logger.info("Routing key = {} , message = {} ", routingKey, message);

	   byte[] messageBytes = JSONObject.toJSONString(message).getBytes(StandardCharsets.UTF_8);
	   org.springframework.amqp.core.Message mqMessage = new org.springframework.amqp.core.Message(messageBytes);

	   String messageId = UUID.randomUUID().toString();
	   CorrelationData correlationData = new CorrelationData(messageId);

	   rabbitTemplate.send(exchangeName, routingKey, mqMessage, correlationData);
	   logger.error("Message sent.");
   }
}
- 运行Springboot入口启动方法,正常不报错,来给自己比个耶。
三、 关于交换器
RabbitMQ中很重要的一个概念就是交换器,它提供了四种交换器,Direct-Exchange,Topic-Exchange,Fanout-Exchange,Headers-Exchange。接下来,我将会使用springboot整合RabbitMQ的代码来对这四种交换器作以介绍。
(1) Direct-Exchange
直连交换器,顾名思义,这种交换器不会什么拐弯抹角的骚套路,是直接通过一个完全匹配的路由键与队列进行绑定。请看下图:

如上图,直连交换器通过路由键direct.routing.key.one,direct.routing.key.two分别与direct-queue1,direct-queue2绑定。消息的生产者发送消息时,一定知道要发送到哪个交换器,这样一来,就会携带对应的路由键,RabbitMQ根据其路由键就可以找到对应的消息队列。在RabbitmqConfig中添加如下代码:
/**
 * exchange构造函数包含几个重要的参数:
 * 1. durable: 持久化交换器,默认为true,即表示在重启rabbitmq时不需要创建新的交换器
 * 2. exclusive: 表示该交换器是否只在当前连接下生效,默认为false
 * 3. auto-delete: 表示该交换器是否在不使用时自动删除,默认为false
 *
 * @return
 */
@Bean(name = "directExchange")
public Exchange createDirectExchange() {
	Exchange exchange = new DirectExchange("direct-exchange");
	return exchange;
}

/**
 * queue构造函数包含几个重要的参数:
 * 1. durable: 持久化消息队列,默认为true,即表示在重启rabbitmq时不需要创建新的消息队列
 * 2. exclusive: 表示该消息队列是否只在当前连接下生效,默认为false
 * 3. auto-delete: 表示该消息队列是否在不使用时自动删除,默认为false
 *
 * @return
 */
@Bean(name = "directQueueOne")
public Queue createDirectQueueOne() {
	Queue queue = new Queue("direct-queue1");
	return queue;
}

@Bean(name = "directQueueTwo")
public Queue createDirectQueueTwo() {
	Queue queue = new Queue("direct-queue2");
	return queue;
}

@Bean(name = "directBindingOne")
public Binding directBindingOne(@Qualifier(value = "directQueueOne") Queue directQueue, @Qualifier(value = "directExchange") Exchange directExchange) {
	return BindingBuilder.bind(directQueue).to(directExchange).with("direct.routing.key.one").noargs();
}

@Bean(name = "directBindingTwo")
public Binding directBindingTwo(@Qualifier(value = "directQueueTwo") Queue directQueue, @Qualifier(value = "directExchange") Exchange directExchange) {
	return BindingBuilder.bind(directQueue).to(directExchange).with("direct.routing.key.two").noargs();
}
以上代码添加后,运行Springboot入口启动方法,可以在RabbitMQ的web管理端看到创建出了direct-exchange和direct-queue1,direct-queue2。我们使用postman模拟生产者向RabbitMQ发送消息。可以按如下配置在postman中模拟测试:
请求方法: POST
URL: http://localhost:8080/rabbit/message/send
消息体:
{
    "routingKey":"direct.routing.key.two",
    "exchangeName":"direct-exchange",
    "message":"hello direct queue two."
}
发送后,可以看到在direct-queue2队列中接收到了一条消息。如果将上述请求体中的routingKey设置为direct.routing.key.one,发送后会在direct-queue1队列中接收到一条消息。
总结:
-
Direct exchange需要和队列使用完全匹配的路由键进行绑定。
-
一个交换器可以使用唯一的路由键和多个队列对应,举例说明,如果交换器通过路由键“direct.routing.key”和队列“direct-queue1”、“direct-queue2”绑定,那么当生产者向该交换器发送消息时,这2个队列都将会收到同样的消息。
-
如果一个队列通过某个路由键“direct.routing.key.A”与交换器绑定,而后不需要该路由键绑定关系了,需要使用路由键“direct.routing.key.B”进行绑定,那么就需要将“direct.routing.key.A”的绑定关系解除,否则会存在向其他队列发送消息时,该队列接收到不需要的数据的问题。
(2) Topic-Exchange
主题交换器,这个就有点骚套路了。这种类型的交换器与直连交换器基本相似,都需要使用路由键与队列进行路由绑定,但不同的是,Topic Exchange支持通配符匹配。通配符*表示匹配一个单词。通配符#表示匹配0个或多个单词。请看下图:

如上图,主题交换器分别使用通配符路由键与三个队列绑定,生产者一旦发送消息到交换器,就会根据通配符规则进行路由发送。废话不多说,还是从代码入手,在RabbitmqConfig中加入以下代码:
@Bean(name = "topicExchange")
public Exchange createTopicExchange() {
    Exchange exchange = new TopicExchange("topic-exchange");
    return exchange;
}

@Bean(name = "topicQueueOne")
public Queue createTopicQueueOne() {
    Queue queue = new Queue("topic-queue1");
    return queue;
}

@Bean(name = "topicQueueTwo")
public Queue createTopicQueueTwo() {
    Queue queue = new Queue("topic-queue2");
    return queue;
}

@Bean(name = "topicQueueThree")
public Queue createTopicQueueThree() {
    Queue queue = new Queue("topic-queue3");
    return queue;
}

@Bean(name = "topicBindingOne")
public Binding topicBindingOne(@Qualifier(value = "topicQueueOne") Queue topicQueue, @Qualifier(value = "topicExchange") Exchange topicExchange) {
    return BindingBuilder.bind(topicQueue).to(topicExchange).with("topic.routing.key.topic.*").noargs();
}

@Bean(name = "topicBindingTwo")
public Binding topicBindingTwo(@Qualifier(value = "topicQueueTwo") Queue topicQueue, @Qualifier(value = "topicExchange") Exchange topicExchange) {
    return BindingBuilder.bind(topicQueue).to(topicExchange).with("topic.routing.key.#").noargs();
}

@Bean(name = "topicBindingThree")
public Binding topicBindingThree(@Qualifier(value = "topicQueueThree") Queue topicQueue, @Qualifier(value = "topicExchange") Exchange topicExchange) {
    return BindingBuilder.bind(topicQueue).to(topicExchange).with("topic.routing.*.III").noargs();
}
运行Springboot入口启动方法,可以看到相关的Topic Exchange和队列都已创建。我们使用postman模拟生产者向RabbitMQ发送消息。可以按如下配置在postman中模拟测试:
请求方法: POST
URL: http://localhost:8080/rabbit/message/send
消息体:
{
    "routingKey":"topic.routing.key.topic.one",
    "exchangeName":"topic-exchange",
    "message":"hello,topic queue."
}
Topic交换器的路由规则配置非常灵活,下面我们结合上述代码举几个简单的例子,来看看消息是如何路由的。如下:
A. 生产者配置路由键为“topic.routing.key.topic.one”,首先来看topicQueueOne队列的路由绑定关系,topicQueueOne与交换器的路由绑定关系为“topic.routing.key.topic.”,表示只有当路由关系“topic.routing.key.topic”最后一个点后面只有1个单词时才可以匹配,所以topicQueueOne队列可以收到一条消息。然后来看topicQueueTwo队列的路由绑定关系,topicQueueTwo与交换器的路由绑定关系为“topic.routing.key.#”,表示当路由键topic.routing.key后面没有其他单词或者有多个单词时才可以匹配,因此上述路由键“topic.routing.key.topic.one”可以匹配到topicQueueTwo,topicQueueTwo队列也可以收到一条消息。最后来看topicQueueThree队列的路由绑定关系,topicQueueThree与交换器的路由绑定关系为“topic.routing..III”,表示只有当topic.routing和III之间仅包含一个单词的时候,才可以匹配,因此上述路由键“topic.routing.key.topic.one”无法匹配到topicQueueThree队列,队列无法收到生产者的消息。
B. 生产者配置路由键为“topic.routing.key.topic.two.III”,首先来看topicQueueOne队列的路由绑定关系,topicQueueOne与交换器的路由绑定关系为“topic.routing.key.topic.”,表示只有当路由关系“topic.routing.key.topic”最后一个点后面只有1个单词时才可以匹配,上述路由键结尾处包含路由关系以外的两个单词,因此不能匹配。然后来看topicQueueTwo队列的路由绑定关系,topicQueueTwo与交换器的路由绑定关系为“topic.routing.key.#”,表示当路由键topic.routing.key后面没有其他单词或者有多个单词时才可以匹配,因此上述路由键“topic.routing.key.topic.two.III”可以匹配到topicQueueTwo,topicQueueTwo队列可以收到一条消息。最后来看topicQueueThree队列的路由绑定关系,topicQueueThree与交换器的路由绑定关系为“topic.routing..III”,表示只有当topic.routing和III之间仅包含一个单词的时候,才可以匹配,因此上述路由键“topic.routing.key.topic.two.III”无法匹配到topicQueueThree队列,队列无法收到生产者的消息。
C. 生产者配置路由键为“topic.routing.key.III”,首先来看topicQueueOne队列的路由绑定关系,topicQueueOne与交换器的路由绑定关系为“topic.routing.key.topic.”,表示只有当路由关系“topic.routing.key.topic”最后一个点后面只有1个单词时才可以匹配,上述路由键结尾处包含路由关系以外的两个单词,因此不能匹配。然后来看topicQueueTwo队列的路由绑定关系,topicQueueTwo与交换器的路由绑定关系为“topic.routing.key.#”,表示当路由键topic.routing.key后面没有其他单词或者有多个单词时才可以匹配,因此上述路由键“topic.routing.key.III”可以匹配到topicQueueTwo,topicQueueTwo队列可以收到一条消息。最后来看topicQueueThree队列的路由绑定关系,topicQueueThree与交换器的路由绑定关系为“topic.routing..III”,表示只有当topic.routing和III之间仅包含一个单词的时候,才可以匹配,因此上述路由键“topic.routing.key.topic.two.III”无法匹配到topicQueueThree队列,队列无法收到生产者的消息。
D. 生产者配置路由键为“topic.routing.hello.key.III”,此时三个队列的路由规则均无法匹配,该消息会到达交换器,但最终会因为没有匹配到正确的队列,消息将会被丢弃。
总结:
-
通配符*表示匹配一个单词。
-
通配符#表示匹配0个或多个单词。
-
生产者可以通过其路由键使得交换器可以匹配多个队列。
(3) Fanout-Exchange
这个交换器就很简单了,它和队列之间无需路由键绑定,类似于广播,可以和与其绑定的所有队列进行消息通信。请看下图:

由于太简单了,不想多说了,直接上代码。在RabbitmqConfig中增加以下代码。
@Bean(name = "fanoutExchange")
public Exchange createFanoutExchange() {
    Exchange exchange = new FanoutExchange("fanout-exchange");
    return exchange;
}

@Bean(name = "fanoutQueueOne")
public Queue createFanoutQueueOne() {
    Queue queue = new Queue("fanout-queue1");
    return queue;
}

@Bean(name = "fanoutQueueTwo")
public Queue createFanoutQueueTwo() {
    Queue queue = new Queue("fanout-queue2");
    return queue;
}

@Bean(name = "fanoutBindingOne")
public Binding fanoutBindingOne(@Qualifier(value = "fanoutQueueOne") Queue fanoutQueue, @Qualifier(value = "fanoutExchange") Exchange fanoutExchange) {
    return BindingBuilder.bind(fanoutQueue).to(fanoutExchange).with("").noargs();
}

@Bean(name = "fanoutBindingTwo")
public Binding fanoutBindingTwo(@Qualifier(value = "fanoutQueueTwo") Queue fanoutQueue, @Qualifier(value = "fanoutExchange") Exchange fanoutExchange) {
    return BindingBuilder.bind(fanoutQueue).to(fanoutExchange).with("").noargs();
}
运行Springboot入口启动方法,可以看到相关的Fanout Exchange和队列都已创建。由于没有使用路由键绑定,生产者发送消息到交换器,与该交换器绑定的所有队列都可以收到这条消息。我们使用postman模拟生产者向RabbitMQ发送消息。可以按如下配置在postman中模拟测试:
请求方法: POST
URL: http://localhost:8080/rabbit/message/send
消息体:
{
    "routingKey":"aa.bb.cc",
    "exchangeName":"fanout-exchange",
    "message":"hello,fanout queue."
}
(4) Headers-Exchange
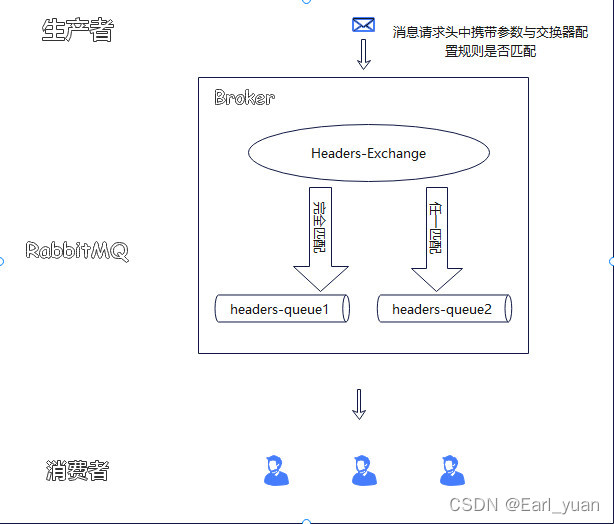
这个交换器在实际应用中并不常见,它和上述的三种交换器有很大的不同在于他并不使用路由键与队列进行绑定,而是通过消息的请求头所携带的内容进行匹配,有完全匹配和任一匹配,只有匹配通过才会将消息路由到正确的队列。请看下图:

在RabbitmqConfig中增加以下代码,如下:
@Bean(name = "headersExchange")
public HeadersExchange createHeadersExchange() {
    HeadersExchange exchange = new HeadersExchange("headers-exchange");
    return exchange;
}

@Bean(name = "headersQueueOne")
public Queue createHeadersQueueOne() {
    Queue queue = new Queue("headers-queue1");
    return queue;
}

@Bean(name = "headersQueueTwo")
public Queue createHeadersQueueTwo() {
    Queue queue = new Queue("headers-queue2");
    return queue;
}

@Bean(name = "headersBindingOne")
public Binding headersBindingOne(@Qualifier(value = "headersQueueOne") Queue headersQueue, @Qualifier(value = "headersExchange") HeadersExchange headersExchange) {
    Map<String, Object> headerMap = new HashMap<>(16);
    headerMap.put("queue", "header-queue-1");
    headerMap.put("bindType", "All");
    return BindingBuilder.bind(headersQueue).to(headersExchange).whereAll(headerMap).match();
}

@Bean(name = "headersBindingTwo")
public Binding headersBindingTwo(@Qualifier(value = "headersQueueTwo") Queue headersQueue, @Qualifier(value = "headersExchange") HeadersExchange headersExchange) {
    Map<String, Object> headerMap = new HashMap<>(16);
    headerMap.put("queue", "header-queue-2");
    headerMap.put("bindType", "Any");
    return BindingBuilder.bind(headersQueue).to(headersExchange).whereAny(headerMap).match();
}
增加一个model类,HeaderMessage继承我们自建的Message类,用于接收请求参数。如下:
@Getter
@Setter
@ToString
public class HeaderMessage extends Message {
    private String queue;
    private String bindType;
}
在MessageSender中增加发送Headers类型的方法,如下:
public void sendHeadersMessage(HeaderMessage message) {
    MessageProperties properties = new MessageProperties();
    Map<String, Object> mapAll = new HashMap<>();
    mapAll.put("queue", message.getQueue());
    mapAll.put("bindType", message.getBindType());
    properties.setContentType("UTF-8");
    properties.getHeaders().putAll(mapAll);

    String exchangeName = message.getExchangeName();
    logger.info("properties = {} ,message = {} ", properties, message);

    byte[] messageBytes = JSONObject.toJSONString(message).getBytes(StandardCharsets.UTF_8);
    org.springframework.amqp.core.Message mqMessage = new org.springframework.amqp.core.Message(messageBytes, properties);
    rabbitTemplate.convertAndSend(exchangeName, null, mqMessage);
}
在RabbitmqController中增加请求的接口,如下:
@RequestMapping(value = "/message/headers/send", method = RequestMethod.POST)
public void headersController(@RequestBody HeaderMessage message) {
    messageSender.sendHeadersMessage(message);
}
运行Springboot入口启动方法,可以看到相关的Headers Exchange和队列都已创建。我们使用postman模拟生产者向RabbitMQ发送消息。可以按如下配置在postman中模拟测试:
请求方法: POST
URL: http://localhost:8080/rabbit/message/headers/send
消息体:
{
    "routingKey":"",
    "exchangeName":"headers-exchange",
    "message":"hello,headers queue.",
    "queue":"header-queue-2",
    "bindType":"All"
}
根据以上代码,由于header-queue-2队列与交换器之间绑定的关系是任一匹配,请求所携带的参数中,queue的值满足,所以可以路由到header-queue-2队列。更多具体路由操作可参考附件源码。