后台管理系统
SpringBoot+Mybatis构建后台管理系统
前言
技术选型:
- SpringBoot 2.6.4
- Mybatis 3.4.6
- mysql 5.1.49
- thymeleaf 2.6.4
开发环境:
- Idea 2020.3
项目地址:
https://github.com/YuyanCai/sys-admin
功能演示
账号密码错误提示
CRUD功能


pom.xml如下:
<?xml version="1.0" encoding="UTF-8"?>
<project xmlns="http://maven.apache.org/POM/4.0.0" xmlns:xsi="http://www.w3.org/2001/XMLSchema-instance"
         xsi:schemaLocation="http://maven.apache.org/POM/4.0.0 https://maven.apache.org/xsd/maven-4.0.0.xsd">
    <modelVersion>4.0.0</modelVersion>
    <parent>
        <groupId>org.springframework.boot</groupId>
        <artifactId>spring-boot-starter-parent</artifactId>
        <version>2.6.4</version>
        <relativePath/> <!-- lookup parent from repository -->
    </parent>
    <groupId>com.caq.boot</groupId>
    <artifactId>sys-admin</artifactId>
    <version>0.0.1-SNAPSHOT</version>
    <name>sys-admin</name>
    <description>Demo project for Spring Boot</description>
    <properties>
        <java.version>1.8</java.version>
    </properties>
    <dependencies>
        <dependency>
            <groupId>org.springframework.boot</groupId>
            <artifactId>spring-boot-starter-thymeleaf</artifactId>
        </dependency>
        <dependency>
            <groupId>org.springframework.boot</groupId>
            <artifactId>spring-boot-starter-web</artifactId>
        </dependency>
        <dependency>
            <groupId>org.mybatis.spring.boot</groupId>
            <artifactId>mybatis-spring-boot-starter</artifactId>
            <version>2.2.2</version>
        </dependency>
        <dependency>
            <groupId>org.mybatis</groupId>
            <artifactId>mybatis</artifactId>
            <version>3.4.6</version>
        </dependency>
        <dependency>
            <groupId>mysql</groupId>
            <artifactId>mysql-connector-java</artifactId>
            <version>5.1.49</version>
        </dependency>

        <dependency>
            <groupId>org.springframework.boot</groupId>
            <artifactId>spring-boot-devtools</artifactId>
            <scope>runtime</scope>
            <optional>true</optional>
        </dependency>
        <dependency>
            <groupId>org.projectlombok</groupId>
            <artifactId>lombok</artifactId>
            <optional>true</optional>
        </dependency>
        <dependency>
            <groupId>org.springframework.boot</groupId>
            <artifactId>spring-boot-starter-test</artifactId>
            <scope>test</scope>
        </dependency>
    </dependencies>

    <build>
        <plugins>
            <plugin>
                <groupId>org.springframework.boot</groupId>
                <artifactId>spring-boot-maven-plugin</artifactId>
                <configuration>
                    <excludes>
                        <exclude>
                            <groupId>org.projectlombok</groupId>
                            <artifactId>lombok</artifactId>
                        </exclude>
                    </excludes>
                </configuration>
            </plugin>
        </plugins>
    </build>

</project>
目录结构如下:
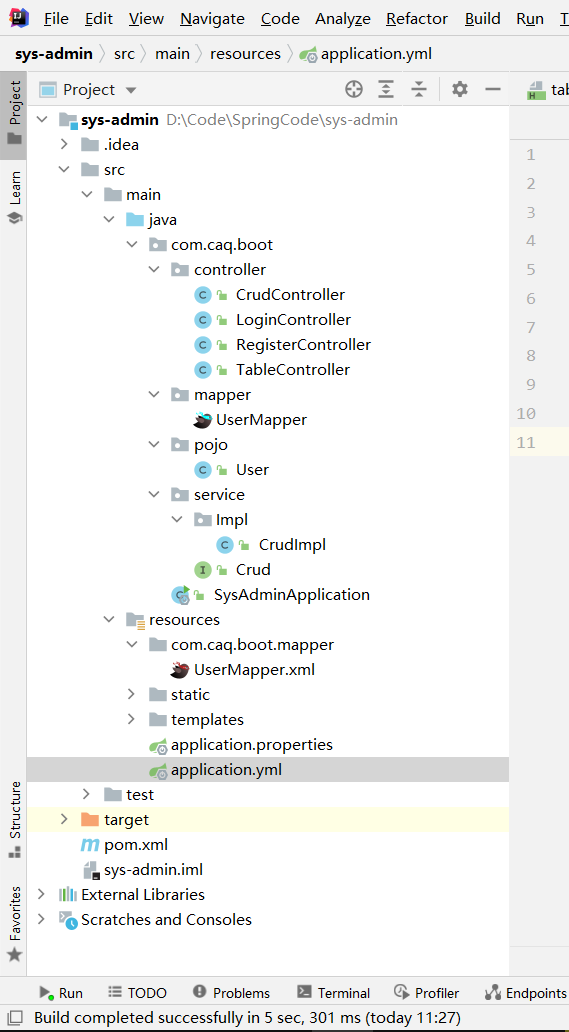
sql语句如下:
可在字段定义脚本中添加comment属性来添加注释
DROP TABLE IF EXISTS user;

CREATE TABLE user
(
	id int(20) NOT NULL AUTO_INCREMENT COMMENT '主键ID',
	name VARCHAR(30) NULL DEFAULT NULL COMMENT '姓名',
	age INT(11) NULL DEFAULT NULL COMMENT '年龄',
	email VARCHAR(50) NULL DEFAULT NULL COMMENT '邮箱',
	PRIMARY KEY (id)
);

DELETE FROM user;
INSERT INTO user (id, name, age, email) VALUES
(1, 'Banana', 18, 'test1@pyy.com'),
(2, 'Jack', 20, 'test2@pyy.com'),
(3, 'Tom', 28, 'test3@pyy.com'),
(4, 'Milk', 21, 'test4@pyy.com'),
(5, 'Apple', 24, 'test5@pyy.com');
1.导入静态资源和网页资源
如下:
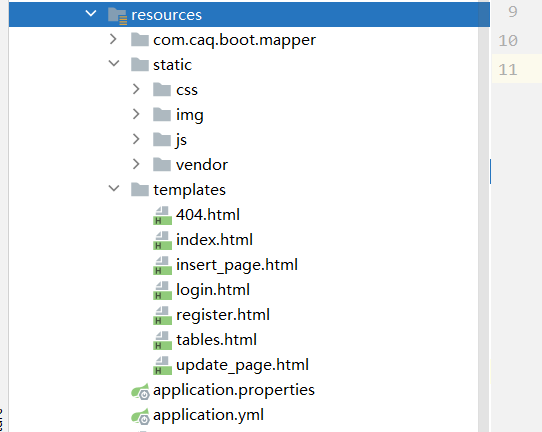
2.设置主页访问路径
访问/或者/login的时候转发到login页面
@Controller
public class LoginController {
    //跳转到登录页
    @GetMapping({"/", "/login"})
    public String login() {
        return "login";
    }
}
3.完成登录功能
action 属性规定当提交表单时,向何处发送表单数据
name属性在input标签中用于对提交到服务器后的表单数据进行标识(只有设置了name属性的表单元素才能在提交表单时传递它们的值)
label 元素不会向用户呈现任何特殊效果。不过,它为鼠标用户改进了可用性。如果您在 label 元素内点击文本,就会触发此控件。就是说,当用户选择该标签时,浏览器就会自动将焦点转到和标签相关的表单控件上。
1、更改表单提交的去向,当表单提交数据的时候向/login发送请求(设置表单的action=/login)
<form class="user" method="post" th:action="@{/login}">
    <div class="form-group">
        <input name="name" type="email" class="form-control form-control-user"
               id="exampleInputEmail" aria-describedby="emailHelp"
               placeholder="Enter Email Address...">
    </div>
    <div class="form-group">
        <input name="age" type="password" class="form-control form-control-user"
               id="exampleInputPassword" placeholder="Password">
    </div>
    <div class="form-group">
        <div class="custom-control custom-checkbox small">
            <input type="checkbox" class="custom-control-input" id="customCheck">
            <label class="custom-control-label" for="customCheck">Remember
                Me</label>
        </div>
    </div>
    <input type="submit" class="btn btn-primary btn-user btn-block">
    <hr>
    <a href="index.html" class="btn btn-google btn-user btn-block">
        <i class="fab fa-google fa-fw"></i> Login with Google
    </a>
    <a href="index.html" class="btn btn-facebook btn-user btn-block">
        <i class="fab fa-facebook-f fa-fw"></i> Login with Facebook
    </a>
</form>
2、在控制层设置@PostMapping来处理表单/login的请求
提交表单的时候我们通过User对象来封装用户输入的username和password
为什么呢封装呢?被框架封装的(百度知道的,先不深入探究)
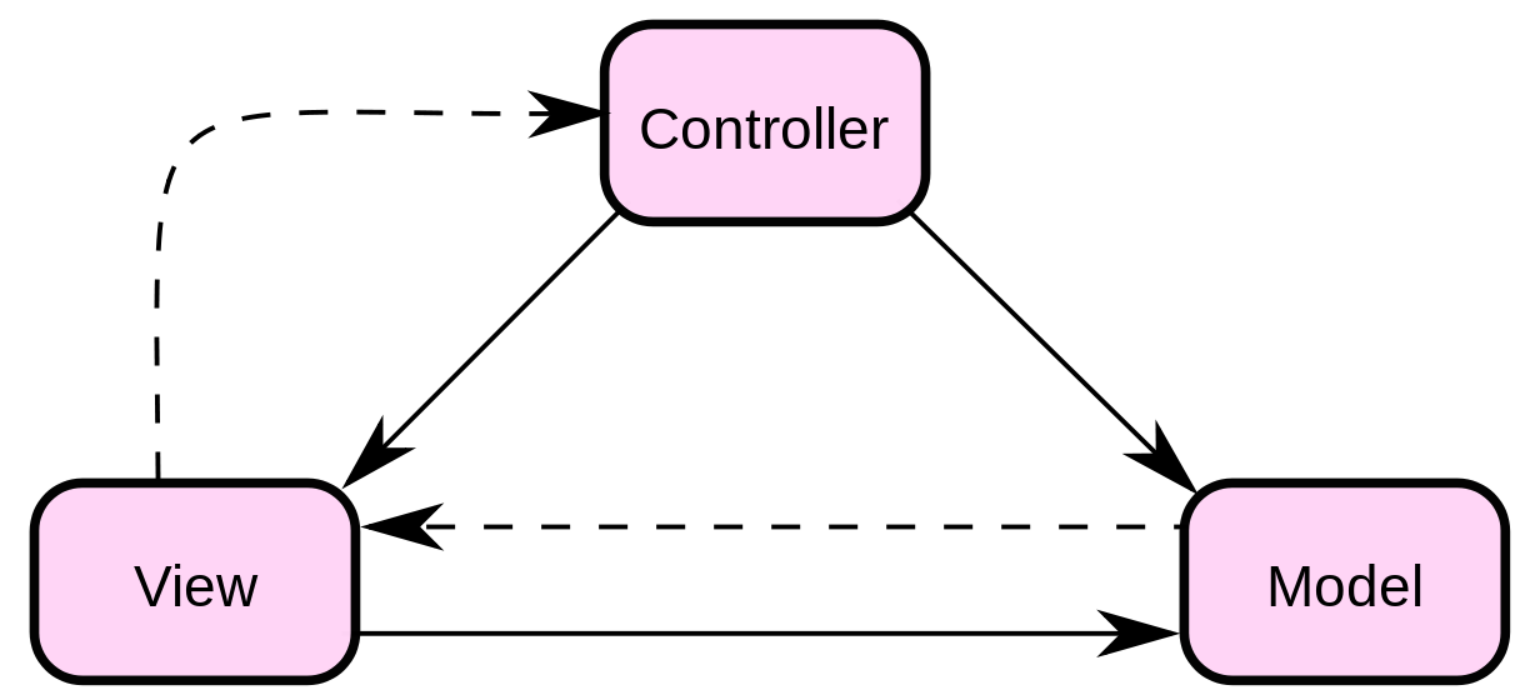
MVC 模式
代表 Model-View-Controller(模型-视图-控制器) 模式。这种模式用于应用程序的分层开发。
Model(模型) - 模型代表一个存取数据的对象或 JAVA POJO。它也可以带有逻辑,在数据变化时更新控制器。
View(视图) - 视图代表模型包含的数据的可视化。
Controller(控制器) - 控制器作用于模型和视图上。它控制数据流向模型对象,并在数据变化时更新视图。它使视图与模型分离开
为了防止表单重复提交和限制登录后才能访问资源,所以登录成功到达的页面我们进行重定向,并把登录成功的用户保存到session域中。保存到session与域的作用是能够判断用户是否登录后进行访问,session会话会一直保留直至浏览器关闭。
如果登录失败,则通过model渲染数据,通过thymeleaf返回给前端页面
这里用到了和后端数据库校验的地方,后面我会详细说
@Controller
public class LoginController {
    @Autowired
    CrudImpl crud;
    //提交表单进行验证
    @PostMapping("/login")
    public String index(@RequestParam("name") String name,
                        @RequestParam("age") String age,
                        HttpSession session,
                        Model model) {

        User acc = crud.getAcc(name,age);
        if (acc != null){
            session.setAttribute("login",acc);
            //重定向防止表单重复提交
            return "redirect:/index";
        }else {
            model.addAttribute("msg","账号或密码错误");
            return "login";
        }
    }
因为我们是重定向到index页面,所以是属于发送了一个/index.html请求
既然是请求那么我们就要处理这个请求,所以我们在写一个方法
因为前面我们做了一个登录成功将用户保存到session域中的操作,所以我们可以通过判断session域中是否存在登录成功的对象,如果有那么才给访问main页面。如果没有那么在通过model进行渲染通过thymeleaf传到前端页面
//    重定向后的判断
@GetMapping("/index")
public String index(HttpSession session,
                    Model model){
    Object login = session.getAttribute("login");
    if (login != null){
        return "index";
    }else {
        model.addAttribute("msg","请重新登录");
        return "login";
    }
}
3、为了实现一个登录成功后,显示登录成功的用户名
定位到页面显示用户名信息的地方
thymeleaf的行内写法
取出登录成功用户的用户名即可实现此功能
(注意是.name不是通过get方法获取的)
[[${session.login.name}}]]
<span class="mr-2 d-none d-lg-inline text-gray-600 small" th:text="${session.login.name}"></span>
4.完成CRUD(Create、Read、Update、Delete)
编码思路
controller层接受用户的请求,将指令传递给业务模型Model(Service+Mapper)进行业务判断、数据库存取,最后根据业务逻辑选择不同的视图
dao层
- 定义操作数据库的service接口,通过service调用mapper完成数据库的增删改查
- 编写Mapper接口,定义操作数据库的方法
- 生成mapper映射文件编写sql语句
- 通过实现类来实现接口定义的功能
2.controller层
- 根据前端页面请求方式,定义对应的映射方法
- 进行简单的判断和跳转处理
查询数据库所有数据,所以返回的是一个User集合(将数据库条目封装成User对象)
4.1 service接口
package com.caq.boot.service;

import com.caq.boot.pojo.User;

import java.util.List;

public interface Crud {

    //登录用户
    User getAcc(String name, String age);

    //查看所有用户
    List<User> listAllAcc();

    //注册,新建用户
    void insertAcc(String name, int age, String email);

    //修改用户
    void updateAcc(String name, int age, String email, int id);

    //按照id查找用户
    User selectById(int id);

    //根据id删除用户
    void deleteUserById(int id);

}
4.2 mapper接口
mapper接口和实体类User对象可通过mybatisX插件进行快速生成
package com.caq.boot.mapper;

import com.caq.boot.pojo.User;
import org.apache.ibatis.annotations.Mapper;

import java.util.List;

/**
* @author Jack
* @description 针对表【user】的数据库操作Mapper
* @createDate 2022-03-01 09:08:01
* @Entity com.caq.boot.pojo.User
*/
@Mapper
public interface UserMapper {

    List<User> selectAll();

    User selectByNameAndAge(String name,String age);

    void insertUser(String name, int age, String email);

    void updateUser(String name, int age, String email,int id);

    User SelectById(int id);

    void deleteUser(int id);
}
4.3 mapper.xml
<?xml version="1.0" encoding="UTF-8"?>
<!DOCTYPE mapper
        PUBLIC "-//mybatis.org//DTD Mapper 3.0//EN"
        "http://mybatis.org/dtd/mybatis-3-mapper.dtd">
<mapper namespace="com.caq.boot.mapper.UserMapper">
    <update id="updateUser">
        update user
        set name  = #{name},
            age   = #{age},
            email = #{email}
        where id = #{id};
    </update>
    <delete id="deleteUser">
        delete
        from user
        where id = #{id}
    </delete>


    <select id="selectByNameAndAge" resultType="com.caq.boot.pojo.User">
        select *
        from user
        where name = #{name}
          and age = #{age};
    </select>

    <select id="selectAll" resultType="com.caq.boot.pojo.User">
        select *
        from user;
    </select>
    <select id="SelectById" resultType="com.caq.boot.pojo.User">
        select *
        from user
        where id = #{id};
    </select>

    <insert id="insertUser">
        INSERT INTO user (name, age, email)
        VALUES (#{name}, #{age}, #{email});
    </insert>
</mapper>
4.4 service实现类
package com.caq.boot.service.Impl;

import com.caq.boot.mapper.UserMapper;
import com.caq.boot.pojo.User;
import com.caq.boot.service.Crud;
import org.springframework.beans.factory.annotation.Autowired;
import org.springframework.stereotype.Service;

import java.util.List;

@Service
public class CrudImpl implements Crud {

    @Autowired
    UserMapper userMapper;

    @Override
    public User getAcc(String name, String age) {
        return userMapper.selectByNameAndAge(name,age);
    }

    @Override
    public void insertAcc(String name, int age, String email) {
        userMapper.insertUser(name,age,email);
    }

    @Override
    public void updateAcc(String name, int age, String email,int id) {
        userMapper.updateUser(name, age, email, id);
    }

    @Override
    public User selectById(int id) {
        return userMapper.SelectById(id);
    }

    @Override
    public void deleteUserById(int id) {
        userMapper.deleteUser(id);
    }

    @Override
    public List<User> listAllAcc() {
        return userMapper.selectAll();
    }

}
4.5 LoginController
控制登录相关的请求
package com.caq.boot.controller;

import com.caq.boot.pojo.User;
import com.caq.boot.service.Impl.CrudImpl;
import org.springframework.beans.factory.annotation.Autowired;
import org.springframework.stereotype.Controller;
import org.springframework.ui.Model;
import org.springframework.web.bind.annotation.GetMapping;
import org.springframework.web.bind.annotation.PostMapping;
import org.springframework.web.bind.annotation.RequestParam;

import javax.servlet.http.HttpSession;

@Controller
public class LoginController {
    @Autowired
    CrudImpl crud;

    //跳转到登录页
    @GetMapping({"/", "/login"})
    public String login() {
        return "login";
    }

    //提交表单进行验证
    @PostMapping("/login")
    public String index(@RequestParam("name") String name,
                        @RequestParam("age") String age,
                        HttpSession session,
                        Model model) {

        User acc = crud.getAcc(name,age);
        if (acc != null){
            session.setAttribute("login",acc);
            return "redirect:/index";
        }else {
            model.addAttribute("msg","账号或密码错误");
            return "login";
        }
    }

//    重定向后的判断
    @GetMapping("/index")
    public String index(HttpSession session,
                        Model model){
        Object login = session.getAttribute("login");
        if (login != null){
            return "index";
        }else {
            model.addAttribute("msg","请重新登录");
            return "login";
        }


    }
}
4.5 RegisterController
package com.caq.boot.controller;

import com.caq.boot.service.Impl.CrudImpl;
import org.springframework.beans.factory.annotation.Autowired;
import org.springframework.stereotype.Controller;
import org.springframework.ui.Model;
import org.springframework.web.bind.annotation.GetMapping;
import org.springframework.web.bind.annotation.PostMapping;
import org.springframework.web.bind.annotation.RequestParam;

import javax.servlet.http.HttpSession;

@Controller
public class RegisterController {
    @Autowired
    CrudImpl crud;

    @GetMapping("register.html")
    public String register(){
        return "register";
    }

    @PostMapping("register")
    public String submit(@RequestParam("name") String name,
                         @RequestParam("age") int age,
                         @RequestParam("email") String email
    ){

        crud.insertAcc(name,age,email);
        return "redirect:/login.html";
    }

    @GetMapping("/login.html")
    public String login(){
        return "login";
    }
}
4.6 tablesController
表格相关的控制
package com.caq.boot.controller;

import org.springframework.stereotype.Controller;
import org.springframework.web.bind.annotation.GetMapping;

@Controller
public class TableController {

    @GetMapping("/tables.html")
    public String tables(){
        return "tables";
    }
}
4.7 Crud相关的控制
package com.caq.boot.controller;

import com.caq.boot.pojo.User;
import com.caq.boot.service.Impl.CrudImpl;
import org.springframework.beans.factory.annotation.Autowired;
import org.springframework.stereotype.Controller;
import org.springframework.ui.Model;
import org.springframework.web.bind.annotation.GetMapping;
import org.springframework.web.bind.annotation.PathVariable;
import org.springframework.web.bind.annotation.PostMapping;
import org.springframework.web.bind.annotation.RequestParam;

import javax.servlet.http.HttpSession;
import java.util.List;

@Controller
public class CrudController {

    @Autowired
    CrudImpl crud;

    @GetMapping("tables")
    public String listAll(Model model,
                          HttpSession session) {
        if (session.getAttribute("login") != null){
            List<User> users = crud.listAllAcc();
            model.addAttribute("listUsers", users);
            return "tables";
        }else {
            model.addAttribute("msg","请先登录");
            return "login";
        }
    }

    //新增用户点击的处理
    @GetMapping("insert_page")
    public String insert(){
        return "insert_page";
    }

    //新增用户后提交表单的处理
    @PostMapping("insert_page")
    public String insertAcc(@RequestParam("name") String name,
                            @RequestParam("age") int age,
                            @RequestParam("email") String email) {
        crud.insertAcc(name, age, email);
        return "redirect:/tables";
    }

    //同上
    @GetMapping("update_page/{id}")
    public String update(@PathVariable("id") int id,
                         Model model){
        User user = crud.selectById(id);
        model.addAttribute("user",user);
        return "update_page";
    }

    @PostMapping("update_page")
    public String update(@RequestParam("name") String name,
                         @RequestParam("age") int age,
                         @RequestParam("email") String email,
                         @RequestParam("id") int id
                         ){
        crud.updateAcc(name,age,email,id);
        return "redirect:/tables";
    }


    //删除用户的请求处理
    @GetMapping("delete/{id}")
    public String delete(@PathVariable("id")int id){
        crud.deleteUserById(id);
        return "redirect:/tables";
    }
}
4.8 前端页面的处理
前端框架
前端页面可以通过网上的UI模板套用
主要是关键的位置,会出现什么样的请求我们处理好这些请求即可
前端页面用到了很多Thymeleaf的知识,下面我会着重写这一块相关的
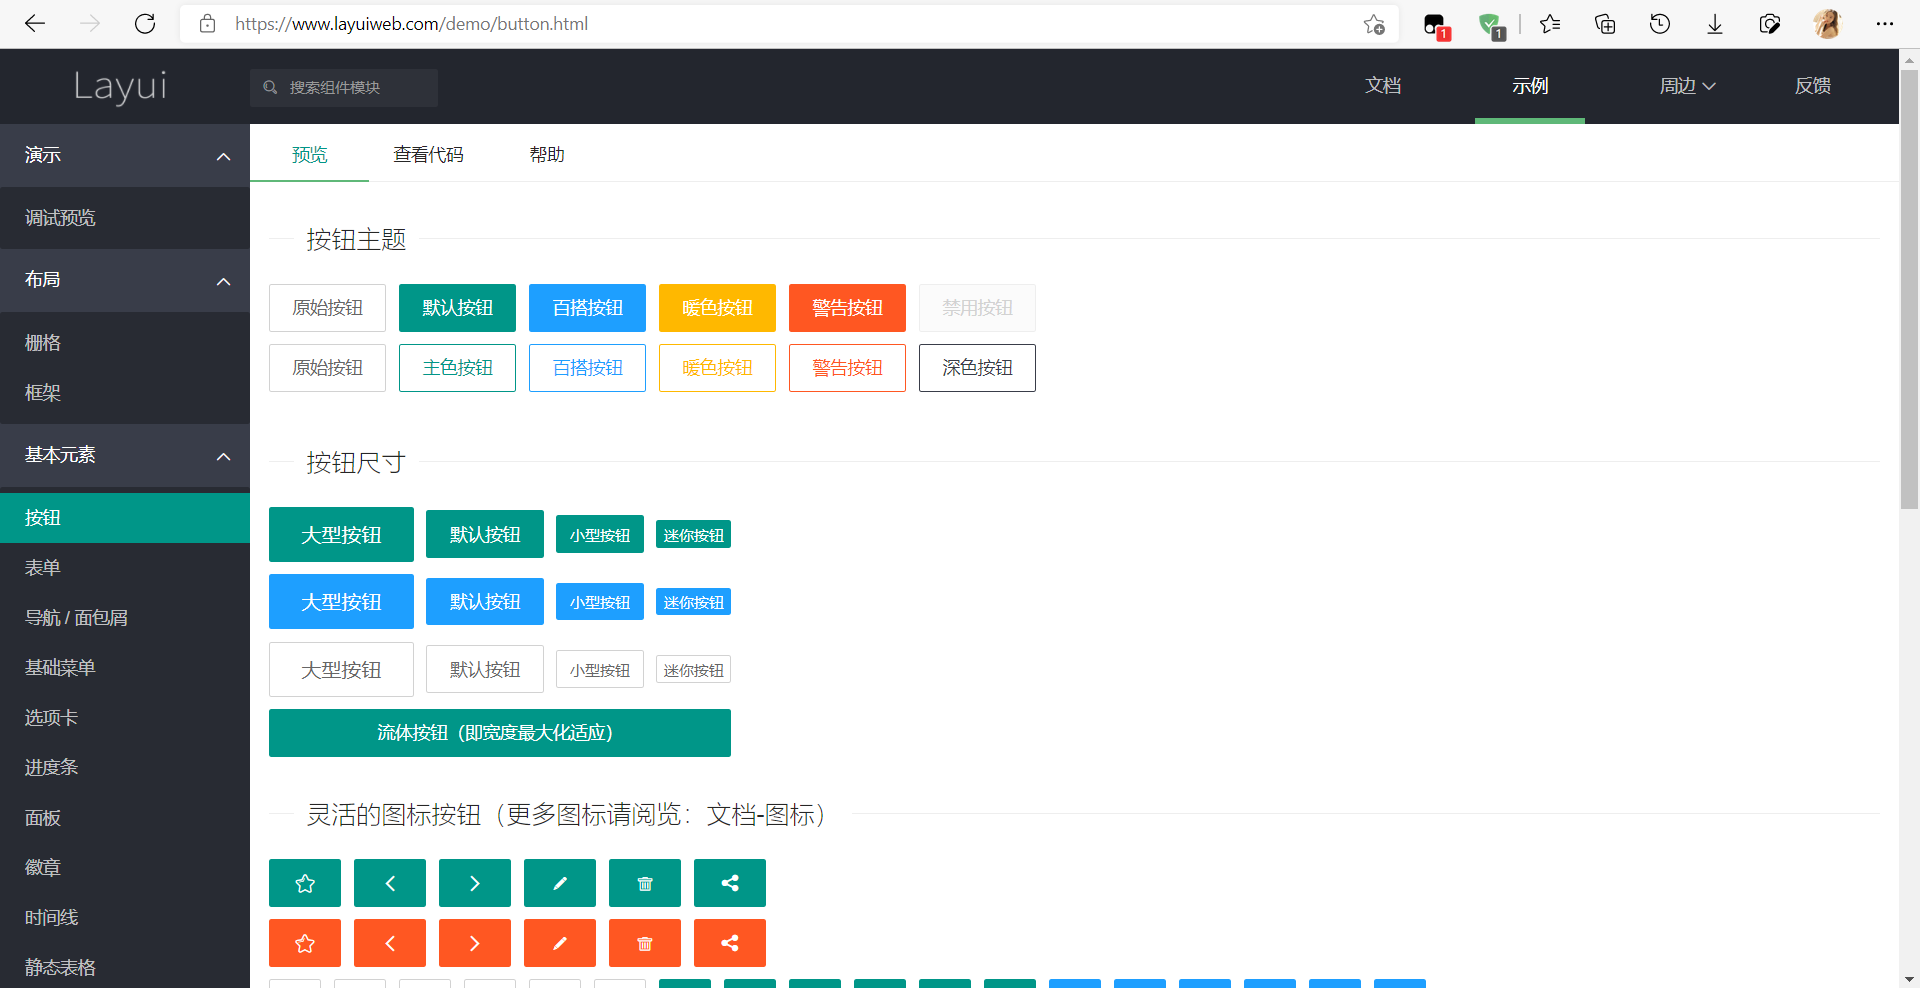
Layui - 经典开源模块化前端 UI 框架(官方文档镜像站) (layuiweb.com)
Examples · Bootstrap (getbootstrap.com)
能在这里拿很多你想要的样式,表单啊、按钮…等等
个性化提示
我们定位到登录页,可以在这里做一个错误提示
例如:如果没有登录就去访问类路径下的资源,那么提示一些警告。
我们在Welcome Back!下面新建一行,这一行来提示错误信息。通过在controller层的判断,如果没有登录就用Model忘请求域中存入错误信息Model.addAttribute(“msg”,密码或账户错误)
我们存取过后呢,在前端页面怎么显示?通过thymeleaf来获取即可
<p style="color: red" th:text="${msg}"></p>
<div class="text-center">
    <h1 class="h4 text-gray-900 mb-4">Welcome Back!</h1>
    <p style="color: red"  th:text="${msg}"></p>
</div>
<form class="user" method="post" th:action="@{/login}">
    <div class="form-group">
        <input name="name" type="email" class="form-control form-control-user"
               id="exampleInputEmail" aria-describedby="emailHelp"
               placeholder="Enter Email Address...">
    </div>
    <div class="form-group">
        <input name="age" type="password" class="form-control form-control-user"
               id="exampleInputPassword" placeholder="Password">
    </div>
    <div class="form-group">
        <div class="custom-control custom-checkbox small">
            <input type="checkbox" class="custom-control-input" id="customCheck">
            <label class="custom-control-label" for="customCheck">Remember
                Me</label>
        </div>
    </div>
    <input type="submit" class="btn btn-primary btn-user btn-block">
</form>
input标签的说明
input标签要注意加上name属性,不然提交的时候请求域中获取不到输入的值
概念
payload,翻译过来是有效载荷
payload 字面意思“有效载荷,有效负荷,有效载重”。
要解释什么是有效载重,用货运行业打个比方:
比如有一位客户需要支付一笔费用委托货车司机运送一车石油,石油本身的重量、车子的重量、司机的重量等等,这些都属于载重(load)。但是对于该客户来说,他关心的只有石油的重量,所以石油的重量是有效载重(payload,也就是付费的重量)。所以抽象一下,payload 可以理解为一系列信息中最为关键的信息。
对于程序员来说就是在程序中 起关键作用的代码。安全方面:
通常在传输数据时,为了使数据传输更可靠,要把原始数据分批传输,并且在每一批数据的头和尾都加上一定的辅助信息,
比如数据量的大小、校验位等,这样就相当于给已经分批的原始数据加一些外套,这些外套起标示作用,使得原始数据不易丢失,
一批数据加上“外套”就形成了传输通道的基本传输单元,叫做数据帧或数据包,而其中的原始数据就是payload
我来模拟一个登录请求,查看一下它提交的信息
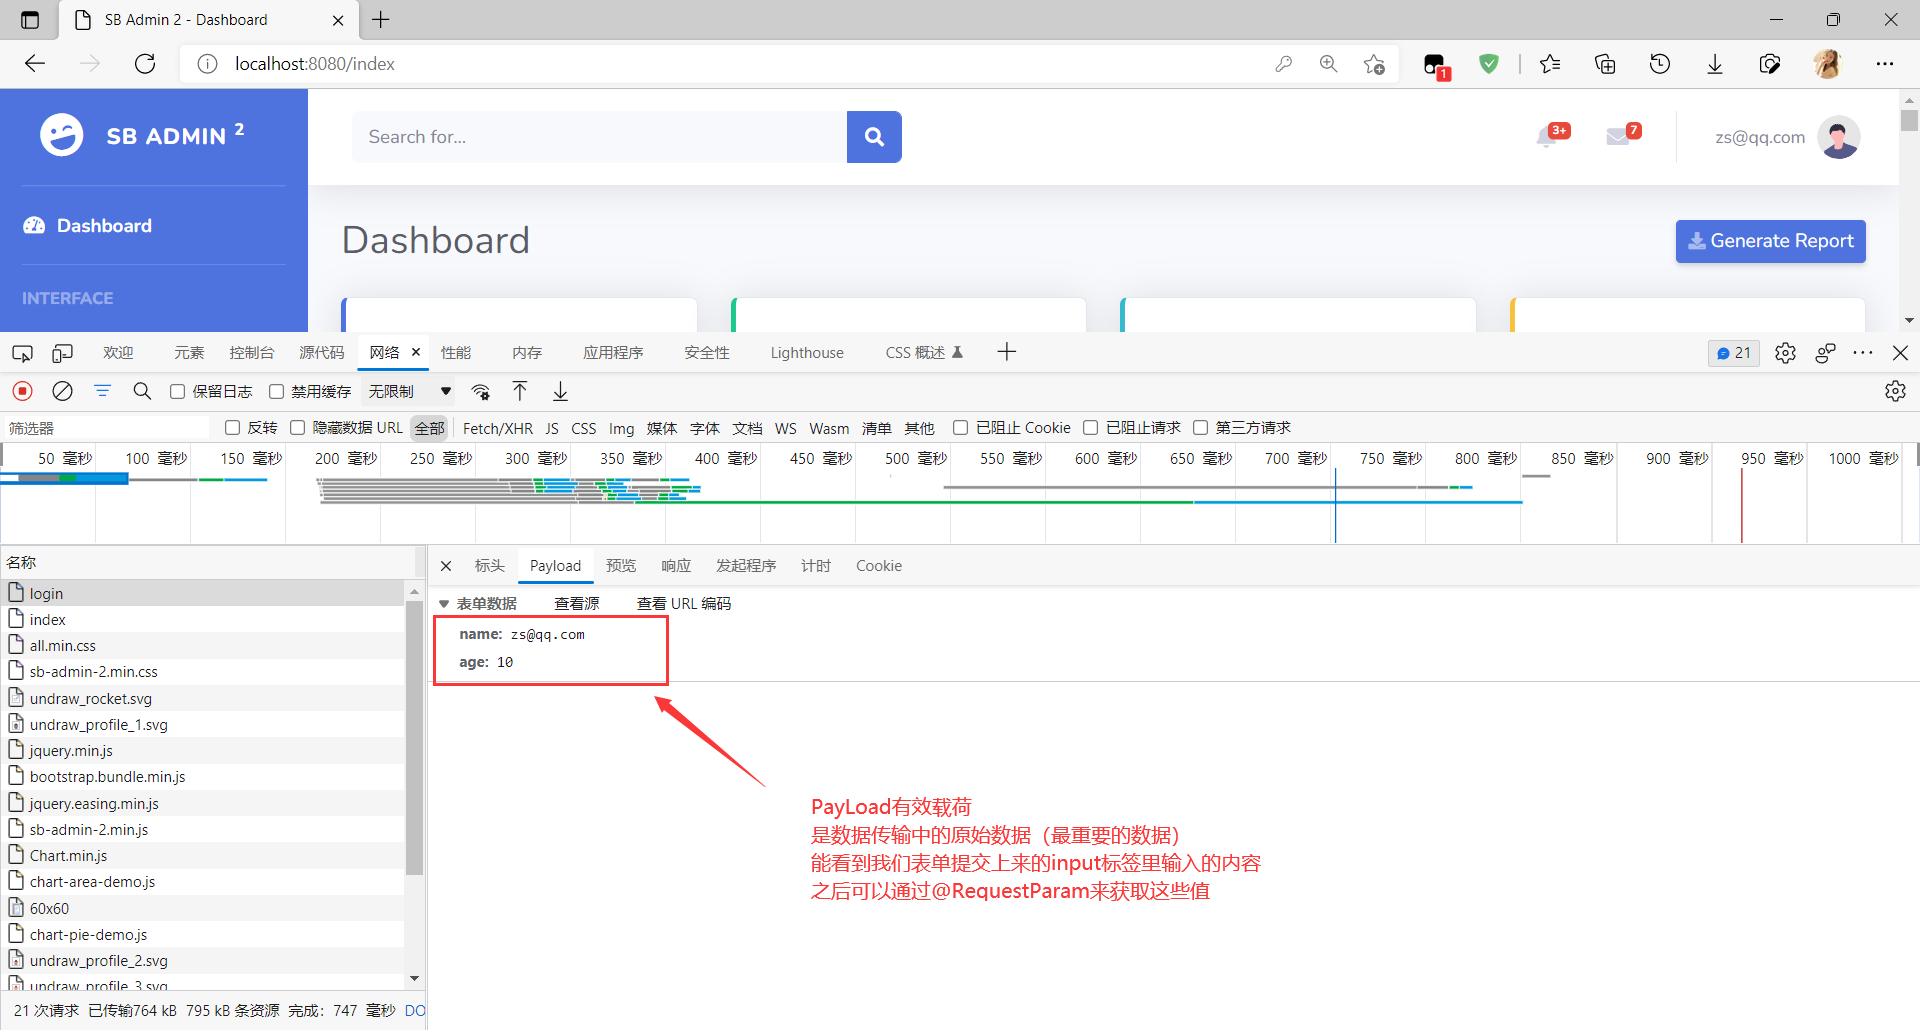
表单提交的说明
表单提交是post请求
thymeleaf的循环
th:each 迭代
th:each="user:${listUsers}"其中listUsers是一个数组,user是遍历的元素
通过这种方式就可以把数据库所有的数据展示到表格中了==(获取到对象后,通过对象的get方法获取对应的属性)==
<table class="table table-bordered" id="dataTable" width="100%" cellspacing="0">
    <!--                                <button class="layui-btn layui-btn-sm" οnclick="window.location.href='insert_page.html'" type="button" >新增</button>-->
    <a th:href="@{/insert_page}" class="layui-btn layui-btn-sm">新增</a>
    <thead>
        <tr>
            <th>id</th>
            <th>name</th>
            <th>age</th>
            <th>email</th>
            <th>操作</th>
        </tr>
    </thead>
    <tbody>
        <tr th:each="user:${listUsers}">
            <td th:text="${user.getId()}"></td>
            <td th:text="${user.getName()}"></td>
            <td th:text="${user.getAge()}"></td>
            <td th:text="${user.getEmail()}"></td>
            <td>
                <a th:href="@{/update_page/ } + ${user.getId()}" class="layui-btn layui-btn-warm layui-btn-sm">编辑</a>
                <a th:href="@{/delete/} + ${user.getId()}" class="layui-btn layui-btn-danger layui-btn-sm">删除</a>
            </td>
        </tr>
    </tbody>
</table>
编辑和删除按钮的使用
把按钮改成超链接标签更好使用,可以直接选择跳转
刚开始学习的时候面临一个问题,如果能够点击按钮的时候获取到id的值呢?因为我们删除和编辑都是基于id进行的
当然还是thymeleaf的方式,通过路径的拼接即可获得
前面我们通过thymeleaf的遍历把数据库中所有的数据都遍历了出来,这样我们就可以通过调用对象的get方法获取用户的id值了
<td>
    <a th:href="@{/update_page/ } + ${user.getId()}" class="layui-btn layui-btn-warm layui-btn-sm">编辑</a>
    <a th:href="@{/delete/} + ${user.getId()}" class="layui-btn layui-btn-danger layui-btn-sm">删除</a>
</td>
5.自我总结
后端算刚刚入门了,前期的学习有点仓促。
后面的学习中还是要稳扎稳打,学一段时间后一定要进行复习,然后通过项目进行练习所学的技术。
以上共勉!