SpringBoot-19-Mybatis的xml配置方式
在上一章节中,我们已经简单介绍mybatis的增删改查的基本操作,基础(单表)的增删改查可以按照,如果稍微复杂一些我们就需要使用mybatis的xml格式去实现。
那么我们开始使用mybatis的xml方式去实现增删改查。
代码实现
依赖的添加
创建项目以后在其pom.xml中添加对应mysql驱动和mybatis的依赖
        <!--mysql驱动-->
        <dependency>
            <groupId>mysql</groupId>
            <artifactId>mysql-connector-java</artifactId>
            <scope>runtime</scope>
        </dependency>

        <!--mybatis依赖-->
        <!-- https://mvnrepository.com/artifact/org.mybatis.spring.boot/mybatis-spring-boot-starter -->
        <dependency>
            <groupId>org.mybatis.spring.boot</groupId>
            <artifactId>mybatis-spring-boot-starter</artifactId>
            <version>2.2.2</version>
        </dependency>
在application.yml添加配置
server:
  port: 8899
spring:
  datasource:
    url: jdbc:mysql://localhost:3306/mybatis?useUnicode=true&serverTimezone=Asia/Shanghai&characterEncoding=utf-8&useSSL=false
    username: root
    password: root
    driver-class-name: com.mysql.cj.jdbc.Driver
mybatis:
  mapper-locations: classpath:mapper/*.xml
注:
- mybatis通过配置
mybatis.mapper-locations来设置*.xml的路径
Student实体类的创建
student表,具体sql可以查看Spring-Data-JPA多数据源配置
@Data
public class Student implements Serializable {

    /**
     * ID
     */
    private Long id;

    /**
     * 学生姓名
     */
    private String name;

    /**
     * 性别默认男
     */
    private String sex;

    /**
     * 年龄
     */
    private Integer age;

    /**
     * 注册手机号
     */
    private String mobile;

    /**
     * 注册邮箱
     */
    private String email;

    private Date createDate;

    private Date updateDate;

    /**
     *是否可用(1 可用,0 删除用户)
     */
    private Integer isEnabled;

    private static final long serialVersionUID = 1L;
}
mapper的接口实现
@Mapper
public interface StudentMapper {
    Student findById(@Param("id") Long id);
    void updateStudent(Student student);
    int insert(@Param("name") String name,
               @Param("sex") String sex,
               @Param("age") Integer age,
               @Param("email") String email,
               @Param("mobile") String mobile
               );
    int insertByObject(Student student);
}
注:这里有一个小知识点上一章节没有讲解
StudentMapper的注入方式:
-
@Mapper方式:通过在mapper接口添加@Mapper注解,让mybatis底层为我们创建这个接口的实现类对象,如上
-
使用@MapperScan(“com.learn.springboot.mapper”)的方式实现批量注入mapper
@MapperScan("com.learn.springboot.mapper")
@SpringBootApplication
public class SpringBootPart19Application {

    public static void main(String[] args) {
        SpringApplication.run(SpringBootPart19Application.class, args);
    }

}
mapper对应的xml的配置实现
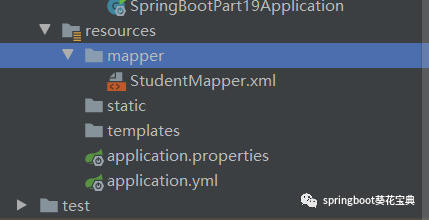
在创建mapper接口以后要在之前配置的路径下面添加其xml配置
<?xml version="1.0" encoding="UTF-8" ?>
<!DOCTYPE mapper
        PUBLIC "-//mybatis.org//DTD Mapper 3.0//EN"
        "http://mybatis.org/dtd/mybatis-3-mapper.dtd">
<mapper namespace="com.learn.springboot.mapper.StudentMapper">
    <select id="findById" resultType="com.learn.springboot.entity.Student">
        SELECT * FROM STUDENT WHERE ID = #{id}
    </select>

    <insert id="insertByObject">
        INSERT INTO STUDENT(NAME, SEX,AGE,EMAIL,MOBILE) VALUES(#{name}, #{sex}, #{age}, #{email}, #{mobile})
    </insert>

    <update id="updateStudent" parameterType="com.learn.springboot.entity.Student">
       UPDATE STUDENT SET NAME=#{name},SEX=#{sex},AGE=#{age},EMAIL=#{email},MOBILE=#{mobile} WHERE id=#{id}
    </update>
</mapper>
注:xml的路径为src\main\resources+mybatis.mapper-locations中配置的路径,例如本文中的xml路径为
src\main\resources\mapper

Service层的实现
在这一层我们分别实现StudentService接口和其接口的实现StudentServiceImpl
- StudentService的实现
public interface StudentService {
    Student updateStudent(Student student);
    int insertByObject(Student student);
    Student findById(Long id);

}
- StudentServiceImpl的实现
@AllArgsConstructor
@Service
public class StudentServiceImpl implements StudentService {

    private StudentMapper studentMapper;

    @Override
    public int insertByObject(Student student){
        return  studentMapper.insertByObject(student);
    }
    @Override
    public Student updateStudent(Student student){
        studentMapper.updateStudent(student);
        return  student;
    }

    @Override
    public Student findById(Long id) {
        return studentMapper.findById(id);
    }
}
控制层的实现
在这一层我们创建StudentController,并将StudentService注入
@Slf4j
@RequestMapping("/student")
@RestController
public class StudentController {

    /**
     * studentService注入StudentController
     */
    @Autowired
    private StudentService studentService;

    @PostMapping("insert")
    public int insertByObject(@RequestBody Student student){
        return  studentService.insertByObject(student);
    }

    @PostMapping("update")
    public Student updateStudent(@RequestBody Student student) {
      return   studentService.updateStudent(student);
    }

    @GetMapping("/select/{id}")
    public Student findByName(@PathVariable("id") Long id) {
        return studentService.findById(id);
    }
}
到此mybatis通过xml方式的实现以及介绍结束,快去实现一下吧,如果没有成功,可以私信我获取代码查看区别。
如果您觉得本文不错,欢迎点击下方关注支持,您的关注是我坚持的动力!
原创不易,转载请注明出处,感谢支持!如果本文对您有用,欢迎转发分享!