Springboot入门
pom.xml
- 新建项目就有的,springboot为我们简约了非常多的配置,甚至是版本,都是自动管理的,我们导入依赖时不需要指定版本,直接从父pom继承。
- pom.xml包含了一个个starter启动器,开启了一个启动器,就会把相关依赖全部导入。官方提供的starters
<?xml version="1.0" encoding="UTF-8"?>
<project xmlns="http://maven.apache.org/POM/4.0.0" xmlns:xsi="http://www.w3.org/2001/XMLSchema-instance"
         xsi:schemaLocation="http://maven.apache.org/POM/4.0.0 https://maven.apache.org/xsd/maven-4.0.0.xsd">
    <modelVersion>4.0.0</modelVersion>
    <parent>
        <groupId>org.springframework.boot</groupId>
        <artifactId>spring-boot-starter-parent</artifactId>
        <version>2.6.4</version>
        <relativePath/> <!-- lookup parent from repository -->
    </parent>
    <groupId>com.springboot-study</groupId>
    <artifactId>springboot-01-helloworld</artifactId>
    <version>0.0.1-SNAPSHOT</version>
    <name>springboot-01-helloworld</name>
    <description>Demo project for Spring Boot</description>
    <properties>
        <java.version>1.8</java.version>
    </properties>
    <dependencies>
        <!--启动器-->
        <dependency>
            <groupId>org.springframework.boot</groupId>
            <artifactId>spring-boot-starter</artifactId>
        </dependency>

        <dependency>
            <groupId>org.springframework.boot</groupId>
            <artifactId>spring-boot-starter-test</artifactId>
            <scope>test</scope>
        </dependency>
        <dependency>
            <groupId>org.springframework.boot</groupId>
            <artifactId>spring-boot-starter-web</artifactId>
        </dependency>
    </dependencies>

    <build>
        <plugins>
            <plugin>
                <groupId>org.springframework.boot</groupId>
                <artifactId>spring-boot-maven-plugin</artifactId>
            </plugin>
        </plugins>
    </build>

</project>
Springboot原理(自动装配)
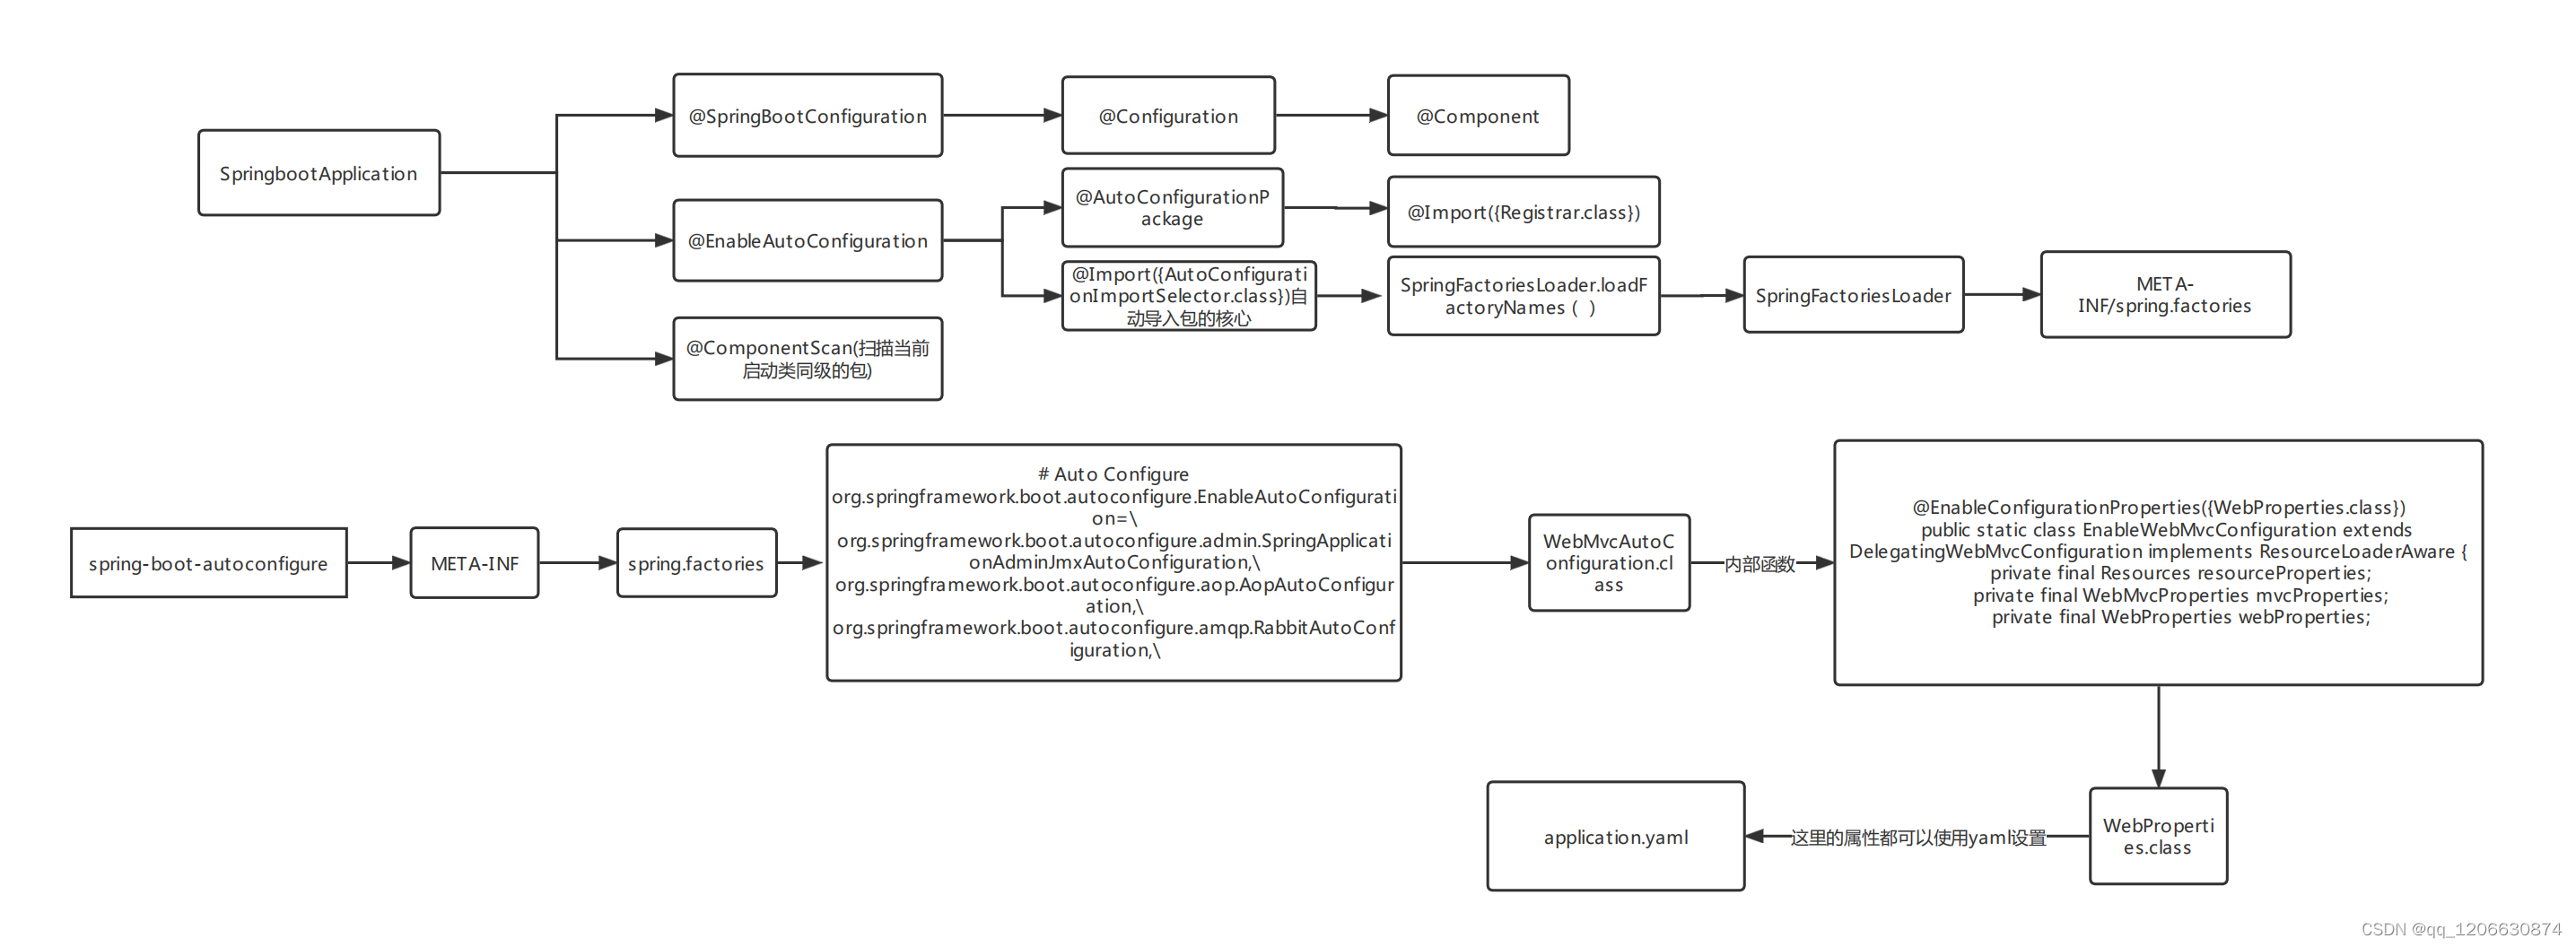
这个图不太清晰,我的proscesson绘图链接在这
springboot怎么启动的:(图中第一部分)
如图所示,这个注解一直可以找到spring.factories,说明启动时,加载了这个文件中的配置,至于这么多配置,为什么只加载了一部分,就是使用了注解EnableAutoConfiguration,只有满足了条件才会加载,(这里感觉 就是starter!看视频好像有点模糊)
@SpringBootApplication
public class Springboot01HelloworldApplication {
    public static void main(String[] args) {
        SpringApplication.run(Springboot01HelloworldApplication.class, args);
    }
}
这里的注解标记了这个类是个springboot应用,main函数SpringApplication的run方法会启动一个新的线程运行程序。
# Auto Configure
org.springframework.boot.autoconfigure.EnableAutoConfiguration=\
org.springframework.boot.autoconfigure.admin.SpringApplicationAdminJmxAutoConfiguration,\
org.springframework.boot.autoconfigure.aop.AopAutoConfiguration,\
org.springframework.boot.autoconfigure.amqp.RabbitAutoConfiguration,\
org.springframework.boot.autoconfigure.batch.BatchAutoConfiguration,\
org.springframework.boot.autoconfigure.cache.CacheAutoConfiguration,\
org.springframework.boot.autoconfigure.cassandra.CassandraAutoConfiguration,\
org.springframework.boot.autoconfigure.context.ConfigurationPropertiesAutoConfiguration,\
org.springframework.boot.autoconfigure.context.LifecycleAutoConfiguration,\
org.springframework.boot.autoconfigure.context.MessageSourceAutoConfiguration,\
...
...
springboot中的自动配置(图中第二部分)
- springboot能够自动装配的在spring-boot-autoconfigure资源的MATA-INF/spring.factories下,有很多对应的xxxAutoConfiguration,从这里对应了每个自动配置的类,比如WebMvcAutoConfiguration.class(狂神视频里版本不一样,他的是.java)
- 从WebMvcAutoConfiguration.class 里继续找到WebProperties.class,这里的属性就是对应了yaml可以配置的属性,配置yaml时都会自动提示。
以上主要就是yaml配置,xxxAutoConfiguration和xxxProperties的关系。
Springboot web开发
静态资源(js css image)放在哪? 看源码分析!
- 首先,我们要确定从哪开始找:我们要找的时web开发的 ,找WebMvcAutoConfiguer.class
- 搜resource 看看相关的函数
 public void addResourceHandlers(ResourceHandlerRegistry registry) {
            if (!this.resourceProperties.isAddMappings()) {
                logger.debug("Default resource handling disabled");
            } else {
                this.addResourceHandler(registry, "/webjars/**", "classpath:/META-INF/resources/webjars/");
                this.addResourceHandler(registry, this.mvcProperties.getStaticPathPattern(), (registration) -> {
                    registration.addResourceLocations(this.resourceProperties.getStaticLocations());
                    if (this.servletContext != null) {
                        ServletContextResource resource = new ServletContextResource(this.servletContext, "/");
                        registration.addResourceLocations(new Resource[]{resource});
                    }
                });
            }
        }
找到了添加资源处理器函数:
isAddMappings,如果开发者自定义了一个resourceProperties的映射,默认的资源处理器就会失效。否则,
1、将路径"/webjars"映射为"classpath:/META-INF/resources/webjars/"。
2、添加getStaticLocations返回的的路径,这里干了啥 要到this.resourceProperties看了。
public static class Resources {
		//私有静态变量,这里的顺序  是按照优先级设置的, 所以如果这四个不同的路径下有相同的资源,不会报错,而是按照这个顺序加载,越靠前优先级越高。
        private static final String[] CLASSPATH_RESOURCE_LOCATIONS = new String[]{"classpath:/META-INF/resources/", "classpath:/resources/", "classpath:/static/", "classpath:/public/"};
        private String[] staticLocations;
        private boolean addMappings;
        private boolean customized;
        private final WebProperties.Resources.Chain chain;
        private final WebProperties.Resources.Cache cache;
		//无参的构造方法
        public Resources() {
        	//创建对象时设置属性
            this.staticLocations = CLASSPATH_RESOURCE_LOCATIONS;
            this.addMappings = true;
            this.customized = false;
            this.chain = new WebProperties.Resources.Chain();
            this.cache = new WebProperties.Resources.Cache();
        }
		//getStaticLocations返回StaticLocations  4个,
        public String[] getStaticLocations() {
            return this.staticLocations;
        }
首页放在哪? 看源码分析~(也看webmvc的)
(1)、这里的classpath: 就是resources和java,可以通过分析target/classes分析得到。
(2)、平时不太喜欢看英文,但是这里源码连英文注释都没有,找源码函数先凭感觉搜 比如index welcome可能和首页相关
//这里使用了几个重载的方法,之间互相调用
private Resource getWelcomePage() {
   String[] var1 = this.resourceProperties.getStaticLocations();
   int var2 = var1.length;
   /*
   从
   "classpath:/META-INF/resources/"
   "classpath:/resources/"
   "classpath:/static/"
   "classpath:/public/"
   这几个路径下去找
   */
   for(int var3 = 0; var3 < var2; ++var3) {
       String location = var1[var3];
       Resource indexHtml = this.getIndexHtml(location);
       if (indexHtml != null) {
           return indexHtml;
       }
   }
   ServletContext servletContext = this.getServletContext();
   if (servletContext != null) {
       return this.getIndexHtml((Resource)(new ServletContextResource(servletContext, "/")));
   } else {
       return null;
   }
}
private Resource getIndexHtml(String location) {
   return this.getIndexHtml(this.resourceLoader.getResource(location));
}
private Resource getIndexHtml(Resource location) {
   try {
   		//这里告诉了我们首页的名字
       Resource resource = location.createRelative("index.html");
       if (resource.exists() && resource.getURL() != null) {
           return resource;
       }
   } catch (Exception var3) {
   }
   return null;
}