SpringMVC
一、MVC简介
MVC:Model模型层 (dao、service)、View视图层 (jsp)、Controller控制层 (servlet),是一个软件设计规范 (架构),见JavaWeb-MVC:https://editor.csdn.net/md/?articleId=123122567
二、SpringMVC的简单使用
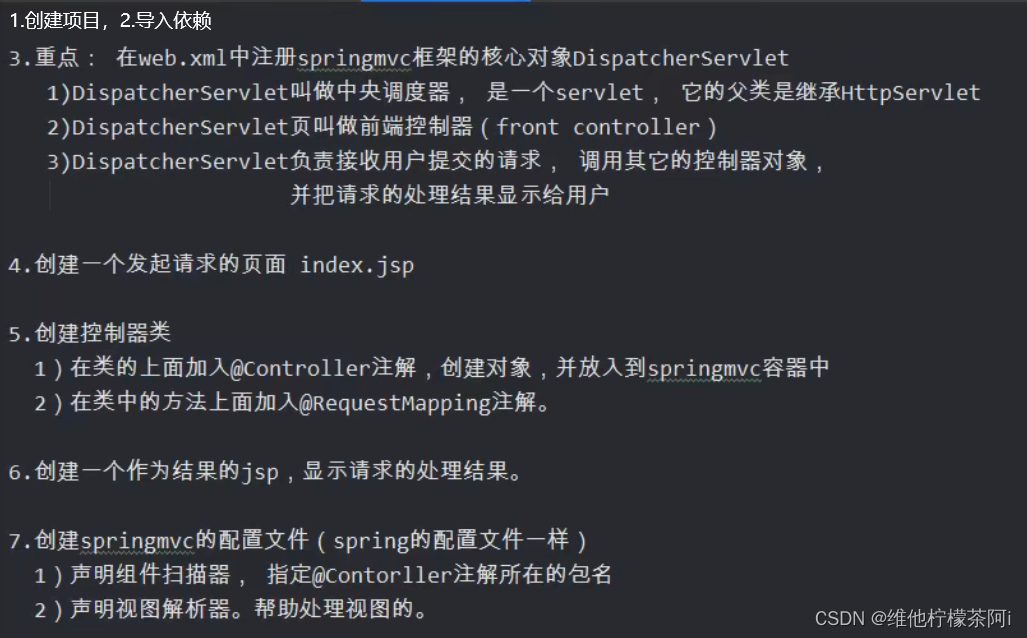
1.简介
是基于spring的一个框架,可以理解为servlet的升级

2.简单使用

(1) 可能用到的依赖
见: https://blog.csdn.net/weixin_42431775/article/details/123555841
(2) 配置web.xml文件
<?xml version="1.0" encoding="UTF-8"?>
<web-app xmlns="http://xmlns.jcp.org/xml/ns/javaee"
         xmlns:xsi="http://www.w3.org/2001/XMLSchema-instance"
         xsi:schemaLocation="http://xmlns.jcp.org/xml/ns/javaee http://xmlns.jcp.org/xml/ns/javaee/web-app_4_0.xsd"
         version="4.0">

    <!--注册SpringMVC中的核心对象:DispatcherServlet,
    	在DispatcherServlet创建的过程中会同时创建springmvc容器对象,读取springmvc的配置文件-->
    <servlet>
        <servlet-name>springmvc</servlet-name>
        <servlet-class>org.springframework.web.servlet.DispatcherServlet</servlet-class>
        <!--自定义springmvc读取的配置文件的位置-->
        <init-param>
            <param-name>contextConfigLocation</param-name>
            <param-value>classpath:springmvc-servlet.xml</param-value>
        </init-param>
        <!--在Tomcat启动后创建servlet对象-->
        <load-on-startup>1</load-on-startup>
    </servlet>
    <servlet-mapping>
        <servlet-name>springmvc</servlet-name>
        <!--1.自定义扩展名:*.xxx (xxx为自定义扩展名,如*.do、*.action等),
            2.使用/-->
        <!--表示凡是xx.do的访问,都由springmvc的DispatcherServlet去处理-->
        <url-pattern>*.do</url-pattern>
    </servlet-mapping>
</web-app>
(3) 创建index.jsp页面
<%@ page contentType="text/html;charset=UTF-8" language="java" %>
<html>
<head>
    <title>$Title$</title>
</head>
<body>
    $END$
    <p>第一个springmvc项目</p>
    <p><a href="some.do">发起some.do请求</a></p>
</body>
</html>
(4) 创建控制器 (处理器)类
@Controller(value = "myController")
//@RequestMapping("/test"),表示该类下的映射方法都在某个模块下 (此时的/some.do实际上为/test/some.do)
public class MyController {
    //自定义方法:处理用户提交的强求
    /**
     * @RequestMapping:请求映射
     * 作用:把一个请求地址和一个方法进行绑定。
     * value表示【请求的url的地址】
     * 使用了该注释的方法叫处理器方法或控制器方法
     * 若@RequestMapping放在了类的上边,则此时的value可表示某个模块
     **/
    @RequestMapping(value = "/some.do")
    public ModelAndView doSome(){
        //处理some.do请求 (相当于service调用处理结束了)
        ModelAndView modelAndView = new ModelAndView();
        //添加数据,框架在请求的最后把这些数据放入request作用域中 (相当于req.setAttribut("msg", "欢迎使用springmvc进行开发"))
        modelAndView.addObject("msg", "欢迎使用springmvc进行开发");
        modelAndView.addObject("fun", "执行的是dosome方法");

        //指定视图,相当于req.getRequestDispather("/show.jsp").forward(req, resp);
        modelAndView.setViewName("/show.jsp");

        return modelAndView;
    }
}
(5) 创建作为结果的jsp页面,显示请求的处理结果
<%@ page contentType="text/html;charset=UTF-8" language="java" %>
<html>
<head>
    <title>Title</title>
</head>
<body>
    <h3>这是show.jsp从request作用域中获取数据</h3>
    <br>
    <h3>msg数据是:${msg}</h3>
    <h3>fun数据是:${fun}</h3>
</body>
</html>
(6) 创建springmvc的配置文件springmvc.xml
<?xml version="1.0" encoding="UTF-8"?>
<beans xmlns="http://www.springframework.org/schema/beans"
       xmlns:xsi="http://www.w3.org/2001/XMLSchema-instance"
       xmlns:context="http://www.springframework.org/schema/context"
       xmlns:mvc="http://www.springframework.org/schema/mvc"
       xsi:schemaLocation="http://www.springframework.org/schema/beans
       http://www.springframework.org/schema/beans/spring-beans.xsd
       http://www.springframework.org/schema/context
       https://www.springframework.org/schema/context/spring-context.xsd http://www.springframework.org/schema/mvc https://www.springframework.org/schema/mvc/spring-mvc.xsd">

    <!--解决无法访问静态资源-->
    <mvc:default-servlet-handler/>
    <mvc:annotation-driven/>

    <!--声明组件扫描器-->
    <context:component-scan base-package="com.veterlemon.controller"/>
</beans>
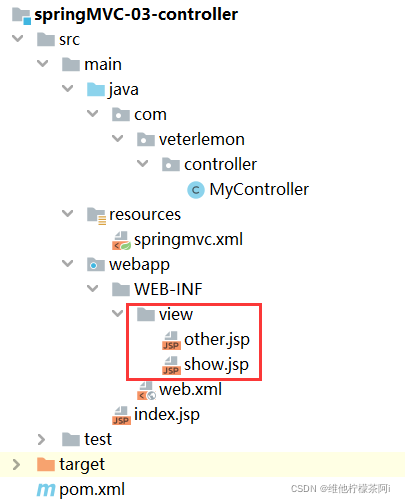
3.提高jsp页面安全性
将一些有安全隐患的页面放置在WEB-INF包下

优化 springmvc.xml
在springmvc.xml中新增
<!--声明springmvc的视图解析器,作用:帮助开发人员设置视图文件的路径-->
<bean class="org.springframework.web.servlet.view.InternalResourceViewResolver">
    <!--前缀:视图文件的路径-->
    <property name="prefix" value="/WEB-INF/view/"/>
    <!--后缀:视图文件的扩展名-->
    <property name="suffix" value=".jsp"/>
</bean>
优化MyController类
显式转发:forward:/视图全路径 (不受视图解析器的限制,转发是【一次http请求】)
显式重定向:redirect:/视图全路径 (不受视图解析器的限制,重定向是【两次http请求】故【不能使用请求作用域,除非使用框架来获取 (在后端设置值,在前端页面使用${param.xx}获取)】且【访问的地址会发生变化】,重定向不能访问【WEB-INF的资源】)
public class MyController {
	//value 可以设置多个别名,用 {} 括起来即可
    @RequestMapping(value = {"/some.do","/first.do"})
    public ModelAndView doSome(){
        ModelAndView modelAndView = new ModelAndView();
        modelAndView.addObject("msg", "欢迎使用springmvc进行开发");
        modelAndView.addObject("fun", "执行的是doSome方法");

        //指定视图之优化:设置了视图解析器后,可以用文件名来指定视图
        modelAndView.setViewName("show");
        //当想访问的页面不在view包下时 (在WEB-INF的other包下),可使用显式转发 (不受视图解析器的限制)
        //modelAndView.setViewName("forward:/WEB-INF/other/show.jsp");
        return modelAndView;
    }

    @RequestMapping(value = {"/other.do","/second.do"})
    public ModelAndView doOther(){
        ModelAndView modelAndView = new ModelAndView();
        //设置值,方便重定向后取值
        modelAndView.addObject("msg", "===欢迎使用springmvc进行开发===");
        modelAndView.addObject("fun", "执行的是doOther方法");

        //modelAndView.setViewName("other");
        //显式重定向,访问不到WEB-INF下的资源
        modelAndView.setViewName("redierect:/other/other.jsp");
        return modelAndView;
    }
}

//显示重定向后获取值
<h3>这是show.jsp从request作用域中获取数据</h3>
<br>
<h3>msg数据是:${param.msg}</h3>
<h3>fun数据是:${param.fun}</h3>
4.★★SpringMVC请求的处理过程★★
DispatcherServlet中央控制处理器:实质上是一个HttpServlet,所有的请求都有经过它来统一分发


三、SpringMVC注解式开发
1.@RequestMapping
@RequestMapping:请求映射,作用:把一个请求地址和一个方法进行绑定
@RequestMapping 放于不同位置时的作用
(1) 放在类的上边时,表示该类下的【映射方法】都在【某个模块】下 ,如
@Controller
@RequestMapping(/user)		//表示/some.do是在user模块下的方法
public class MyController {
    @RequestMapping(value = {"/some.do","/first.do"})
    public ModelAndView doSome(){}

(2) 放在方法上时,表示设置【处理器方法】,如
@RequestMapping(value = "/some.do")
public ModelAndView doSome(){}
@RequestMapping 的 value 属性
value属性表示【为该方法设置个地址别名 (可设多个)】,前端页面可以指向该地址,如
@RequestMapping(value = {"/test/some.do","/test/first.do"})

<a href="test/some.do">发起some.do请求</a>
@RequestMapping 的 method 属性
method属性可以【设置该处理器方法的请求方式:get/post】,如
@RequestMapping(value = "/other.do",method = RequestMethod.POST)
public ModelAndView doOther(){}

<form action="user/other.do" method="post">
    <input type="submit" value="发起other.do的post请求">
</form>
@RequestMapping 的 produces 属性
produces属性可以【指定服务器编码方式】
@RequestMapping(value = "/other.do",produces = "text/plain;charset=utf-8")
2.@RequestParam
在2的基础上使用@RequestParam,可以在使用【逐个接收】的方式中解决请求参数名称与处理器方法形参名不一致仅限于逐个接收方式使用
@RequestParam的 required 属性 (默认为true),要求内容必须不为空 (设置为false即可为空)
//处理器类
@Controller
public class MyController {
    //@RequestParam:解决请求参数名称与处理器方法形参名不一致
    @RequestMapping(value = "/receiveParam.do",method = RequestMethod.POST)
    public ModelAndView doOther(@RequestParam("rusername")String username, @RequestParam(value = "rage",required = false)Integer age){
        ModelAndView modelAndView = new ModelAndView();
        modelAndView.addObject("username", username);
        modelAndView.addObject("age", age);
        modelAndView.setViewName("other");

        return modelAndView;
    }
}

//other.jsp
<h3>other.jsp从request作用域中获取数据</h3>
<br>
<h3>用户名是:${username}</h3>
<h3>年龄是:${age}</h3>

//index.jsp
<p>请求参数名称与处理器方法形参名不一致</p>
<form action="receiveParam.do" method="post">
    <label for="rusername">用户名:</label>
    <input type="text" name="rusername" id="rusername">
    <br>
    <label for="rage">年龄:</label>
    <input type="text" name="rage" id="rage">
    <br>
    <input type="submit" value="发起other.do的post请求">
</form>
四、处理器方法接收的参数
复制项目:打开项目所在地,复制一份,删掉target包,在Modules点+号引入即可

★接收用户提交的数据★
方式一:逐个接收要求:处理器方法的形参名要和请求中的参数名一致
//处理器类
@Controller
public class MyController {
    //逐个接收请求的参数,要求:处理器方法的形参名要和请求中的参数名一致
    @RequestMapping(value = "/receiveProperty.do",method = RequestMethod.POST)
    public ModelAndView doSome(String username, Integer age){
        ModelAndView modelAndView = new ModelAndView();
        modelAndView.addObject("username", username);
        modelAndView.addObject("age", age);
        modelAndView.setViewName("show");

        return modelAndView;
    }
}

//show.jsp源码
<h3>这是show.jsp从request作用域中获取数据</h3>
<br>
<h3>用户名是:${username}</h3>
<h3>年龄是:${age}</h3>

//index.jsp页面
<p>请求参数名称与处理器方法形参名一致</p>
<form action="receiveProperty.do" method="post">
    <label for="username">用户名:</label>
    <input type="text" name="username" id="username">
    <br>
    <label for="age">年龄:</label>
    <input type="text" name="age" id="age">
    <br>
    <input type="submit" value="发起other.do的post请求">
</form>
方式二:对象接收 适合接收多个参数
在pojo包下创建vo包,再创建Student类,用来接收【处理器方法】中用户提交的数据
//接收【处理器方法】中用户提交的数据 的类
public class Student {
    //属性名与请求的参数名一样
    private String username;
    private Integer age;

    public String getUsername() { return username; }
    public void setUsername(String username) {
        System.out.println("setName:" + username);
        this.username = username;
    }
    public Integer getAge() { return age;}
    public void setAge(Integer age) {
        if (age>0 && age<200){
            System.out.println("setAge:" + age);
            this.age = age;
        }
    }
    @Override
    public String toString() {
        return "Student{" + "username='" + username + '\'' + ", age=" + age + '}';
    }
}

//first.jsp页面
<h3>这是first.jsp从request作用域中获取数据</h3>
<br>
<h3>username数据是:${username}</h3>
<h3>age数据是:${age}</h3>
<h3>Student数据是:${student}</h3>

// 处理器类
@Controller
public class MyController {
    @RequestMapping(value = "/receiveObject.do",method = RequestMethod.POST)
    public ModelAndView doFirst(Student student){
        ModelAndView modelAndView = new ModelAndView();
        modelAndView.addObject("username", student.getUsername());
        modelAndView.addObject("age", student.getAge());
        modelAndView.addObject("student", student);

        modelAndView.setViewName("first");

        return modelAndView;
    }
}
五、处理器方法的返回值
1.返回ModelAndView
该返回值表示有数据和视图,对视图执行 forward,应用:跳转页面并传参 (如上面例子)
2.返回String
该返回值表示视图,可以是逻辑名称或完整路径,应用:跳转页面 (默认不传参数,参数需要手动获取)
当返回的是完整的视图路径时,不能配置视图解析器
//处理器类
public class MyController {
    //处理器方法的返回值之String,表示视图名称或视图路径,需要配置视图解析器
    @RequestMapping(value = "/returnString-view.do",method = RequestMethod.POST)
    public String doReturnView(HttpServletRequest request, String username, Integer age){
        System.out.println("doReturnView,username="+username+",age="+age);

        //手动获取前端传递过来的值
        request.setAttribute("username", username);
        request.setAttribute("age", age);

        //返回视图逻辑名。执行效果:框架执行forward()方法进行转发
        return "show";
    }
}

//index.jsp
<p>处理器方法的返回值之String,表示视图名称或视图路径</p>
<form action="returnString-view.do" method="post">
    <label for="username">用户名:</label>
    <input type="text" name="username" id="username">
    <br>
    <label for="age">年龄:</label>
    <input type="text" name="age" id="age">
    <br>
    <input type="submit" value="发起post请求">
</form>
<br>

//show.jsp
<h3>这是show.jsp从request作用域中获取数据</h3>
<br>
<h3>用户名是:${username}</h3>
<h3>年龄是:${age}</h3>
3.返回void
不返回任何值,应用:在处理Ajax时使用 (此时处理器方法可以不返回值,由HttpServletResponse输出)
//index.jsp页面
<button type="button" id="#btn">发起Ajax请求</button>
<script src="js/jquery.min.js" type="text/javascript"></script>
<script type="text/javascript">
    $(function () {
        $("button").click(function () {
            $.ajax({
                url:"returnVoid-ajax.do",
                data:{
                    username:"zhangsan",
                    age:18
                },
                type:"POST",
                dataType:"json",
                success:function (response) {
                    alert(response);
                }
            })
        })
    });
</script>

//处理器类
@Controller
public class MyController {
//处理器方法返回void,响应ajax请求
@RequestMapping(value = "/returnVoid-ajax.do")
public void doReturnVoidAjax(HttpServletResponse response, String username, Integer age) throws Exception {
        //处理Ajax,使用json做数据格式 (使用Student表示处理结果)
        Student student = new Student();
        student.setUsername(username);
        student.setAge(age);

        //把结果对象转成json
        String json = "";
        if (student != null){
            ObjectMapper om = new ObjectMapper();
            json = om.writeValueAsString(student);
            System.out.println("student转换的json" + json);
        }

        //输出数据,响应ajax请求
        response.setContentType("application/json;charset=uft-8");
        PrintWriter pw = response.getWriter();
        pw.println(json);
        pw.flush();
    }
}
4.返回Object对象
该返回值表示数据,应用:将数据转成json输出到前端,响应ajax请求。将数据转化成json的步骤如下
示例功能同返回void对象是示例一样,但是更简单更方便 (框架自动实现的)。若返回的Object对象是list集合,则转为jsonArray输出
1.加入处理json的工具库依赖 (springmvc默认使用jackson)
2.在springmvc.xml文件中加入注解驱动 (<mvc: annotation-driven>)
3.在处理方法上面加入【@ResponseBody】注解
//index.jsp页面
<button type="button" id="btn-01">发起Ajax请求</button>
<button type="button" id="btn-02">发起Ajax请求 (返回的是list集合)</button>
<script src="js/jquery.min.js" type="text/javascript"></script>
<script type="text/javascript">
    $(function () {
        $("#btn-01").click(function () {
            $.ajax({
                url:"returnObject-Ajax.do",
                data:{
                    username:"example",
                    age:1
                },
                type:"POST",
                dataType:"json",
                success:function (response) {
                    alert(response.username + "," + response.age);
                }
            })
        })
        $("#btn-02").click(function () {
            $.ajax({
                url:"returnObjectArray-Ajax.do",
                data:{
                    username:"example",
                    age:1
                },
                type:"POST",
                dataType:"json",
                success:function (response) {
                    //因为后端返回的是jsonArray,所以要循环取值。i为循环变量,obj为数组中的对象
                    $.each(response,function (i, obj) {
                        alert(obj.username + "," + obj.age);
                    })
                }
            })
        })
    });
</script>

//处理器类
@Controller
public class MyController {
	//处理器方法返回一个Object对象,通过springmvc将其转为json输出到前端,响应Ajax请求
    @RequestMapping(value = "/returnObject-Ajax.do")
    @ResponseBody
    public Student doReturnObjectAjax(String username, Integer age) {

        Student student = new Student();
        student.setUsername("lisi");
        student.setAge(20);

        return student;
    }

    //处理器方法返回一个【Objects集合】,通过springmvc将其转为jsonArray输出到前端,响应Ajax请求
    @RequestMapping(value = "/returnObjectArray-Ajax.do")
    @ResponseBody
    public List<Student> doReturnObjectAjaxArray(String username, Integer age) {
        ArrayList<Student> list = new ArrayList<>();

        Student student = new Student();
        student.setUsername("李四");
        student.setAge(20);
        list.add(student);

        student = new Student();
        student.setUsername("王五");
        student.setAge(28);
        list.add(student);

        return list;
    }
}
六、Idea创建SpringMVC要注意的事情
1.post提交方式导致的中文乱码
在web.xml文件中声明过滤器
<!--声明过滤器,解决post中文乱码-->
<filter>
    <filter-name>characterEncodingFilter</filter-name>
    <filter-class>org.springframework.web.filter.CharacterEncodingFilter</filter-class>
    <!--设置项目的字符编码-->
    <init-param>
        <param-name>encoding</param-name>
        <param-value>utf-8</param-value>
    </init-param>
    <!--强制请求对象(HttpServletRequest)使用encoding编码-->
    <init-param>
        <param-name>forceRequestEncoding</param-name>
        <param-value>true</param-value>
    </init-param>
    <!--强制请求对象(HttpServletResponse)使用encoding编码-->
    <init-param>
        <param-name>forceResponseEncoding</param-name>
        <param-value>true</param-value>
    </init-param>
</filter>
<filter-mapping>
    <filter-name>characterEncodingFilter</filter-name>
    <!--强制要求所有的请求先通过过滤器-->
    <url-pattern>/*</url-pattern>
</filter-mapping>
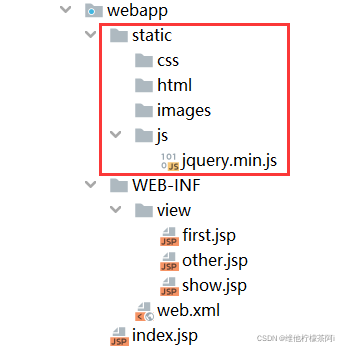
2.在web.xml文件创建DispatcherServlet时使用"/"进行过滤访问,导致静态资源无法正常访问
在 springmvc.xml 写入代码后,选中项目找到项目的Maven,点开 Lifecycle 点击 clean 后重启 Tomcat (或者点击File,选中 Invalidate Caches / Restart…)
<servlet>
    <servlet-name>myweb</servlet-name>
    <servlet-class>org.springframework.web.servlet.DispatcherServlet</servlet-class>
    <!--自定义springmvc读取的配置文件的位置-->
    <init-param>
        <param-name>contextConfigLocation</param-name>
        <param-value>classpath:springmvc.xml</param-value>
    </init-param>
    <!--在Tomcat启动后创建servlet对象-->
    <load-on-startup>1</load-on-startup>
</servlet>
<servlet-mapping>
    <servlet-name>myweb</servlet-name>
    <!--/表示过滤除jsp以外的所有访问,/*表示过滤所有访问-->
    <url-pattern>/</url-pattern>
</servlet-mapping>
问题所在
"/"表示过滤除jsp以外的所有请求,会替换tomcat中的defaultServlet,可能会导致访问静态资源失败
因为DispatcherServlet没有处理静态资源的能力 (静态资源的访问默认是交给tomcat的defaultServlet处理)
解决
(1) 在springmvc.xml配置文件中加入<mvc:default-servlet-handler/>标签
	原理:加入这个标签后,springmvc会创建一个控制器对象,该对象可以把请求或访问转发给tomcat的defaultServlet处理
	在加入该标签后必须要加<mvc:annotation-driven/>,因为该标签与 @RequestMapping注解有冲突
	<mvc:default-servlet-handler/>
	<mvc:annotation-driven/>


(2) 在springmvc.xml配置文件中加入<mvc:resources mapping="" location=""/>标签
	原理:加入这个标签后,springmvc会创建ResourceHttpRequestHandler处理器对象,让该对象处理静态资源的访问,不依赖tomcat
	<!--将js、images、css等静态资源放于static包下,通过static即可访问-->
    <mvc:resources mapping="/static/**" location="/static/"/>
    <mvc:annotation-driven/>

3.运行项目时Tomcat启动失败
报 java.lang.ClassNotFoundException:org.springframework.web.context.ContextLoaderListener 错误
File-->Project Structure-->Artifacts-->在右侧Output Layout右击项目名,选择Put into Output Root,
	执行后,在WEB-INF在增加了lib目录即可
(若已存在lib目录,则选中lib目录-->点击+号-->选中Library Files-->全选Project Libraries内的依赖-->点击ok)


4.访问资源之 相对/绝对 地址
绝对地址:带协议名称的地址,如 http://www.baidu.com
一般是指自己主页上的【文件或目录】在【硬盘上真正的路径】(URL和物理路径)

<a href="/user/some.do">发起some.do请求</a>
当在前端index.jsp页面点击该链接时,会将【服务器地址】与【链接的地址】拼接,然后去访问该资源
	【此时参考地址为服务器地址】http://localhost:8080/ + user/some.do【链接的地址】
	http://localhost:8080/user/some.do
相对地址:不带协议名称的地址,如 user/some.do,是相对与某个基准目录的路径 (HTML中的相对目录)
相对地址不能直接使用,必须【参考地址】+【相对地址】结合才能访问资源

<a href="user/some.do">发起some.do请求</a>
当在前端index.jsp页面点击该链接时,会将【当前页面的地址】与【链接的地址】拼接,然后去访问该资源
	【此时参考地址为当前页面地址】http://localhost:8080/xx项目/ + user/some.do【链接的地址】组合成【绝对地址】
	http://localhost:8080/xx项目/user/some.do
为了能正常访问【项目】的资源,一般这样写
方式一:使用EL表达式
	<a href="${pageContext.request.contextPath}/user/some.do">发起some.do请求</a>
方式二:使用<base>标签来指定项目地址 (推荐)
	<%
        String basePath = request.getScheme() + "://" +
        request.getServerName() + ":" + request.getServerPort() +
        request.getServletPath() + "/";
   	%>
	<head>
		<base href="<%=basePath%>"/>
	<head>
	<a href="user/some.do">发起some.do请求</a>去访问
七、SSM整合开发

八、拦截器
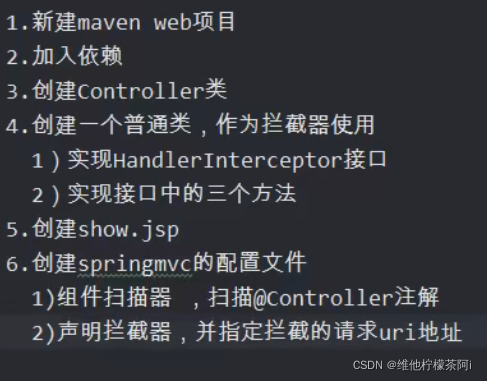
拦截器∶看做是多个Controller中公用的功能,集中到拦截器统一处理。使用的aop的思想


1.基本使用
创建处理器类
@Controller
public class MyController {
    //处理器方法的返回值之String,表示视图名称或视图路径,需要配置视图解析器。此方法传视图逻辑名
    @RequestMapping(value = "/some.do",method = RequestMethod.POST)
    public ModelAndView doSome(HttpServletRequest request, String username, Integer age){
        System.out.println("doSome,username="+username+",age="+age);

        ModelAndView modelAndView = new ModelAndView();
        modelAndView.addObject("username", username);
        modelAndView.addObject("age", age);
        modelAndView.setViewName("show");

        return modelAndView;
    }
}
创建拦截器类
//拦截器类:拦截用户的请求
public class MyInterceptor implements HandlerInterceptor {
	private long btime = 0;

    /*preHandle:预处理方法,handler:被拦截的【控制器】对象(返回值是Boolean,默认全部拦截)。
                该方法会在处理器方法之前执行,用户的请求会先到达这里*/
    @Override
    public boolean preHandle(HttpServletRequest request, HttpServletResponse response, Object handler) throws Exception {
    	btime = System.currentTimeMillis();
        System.out.println("拦截器的preHandle方法");
        //true:放行所有请求,false:拦截所有请求
        return true;
    }

    /*preHandle:后处理方法,handler:被拦截的【控制器】对象,modelAndView:处理器方法的返回值。
                该方法会在处理器方法之后执行,可以用于修正处理器方法的结果*/
    @Override
    public void postHandle(HttpServletRequest request, HttpServletResponse response, Object handler, ModelAndView modelAndView) throws Exception {
        //对处理器方法的结果进行调整:实现转发
        if (modelAndView != null){
            modelAndView.addObject("mydate", new Date());
            modelAndView.setViewName("other");
        }

        System.out.println("拦截器的postHandle方法");
    }

    /*afterCompletion:最后执行的方法,handler:被拦截的【控制器】对象,modelAndView:处理器方法的返回值。
                    该方法会在请求处理结束之后执行 (对视图执行跳转时),一般用于资源回收*/
    @Override
    public void afterCompletion(HttpServletRequest request, HttpServletResponse response, Object handler, Exception ex) throws Exception {
        System.out.println("拦截器的afterCompletion方法");
        long etime = System.currentTimeMillis();
        System.out.println("从preHandler方法到请求处理完成的时间:" + (etime-btime) + "毫秒");
    }
}
创建show.jsp
<h3>这是show.jsp从request作用域中获取数据</h3>
<br>
<h3>用户名是:${username}</h3>
<h3>年龄是:${age}</h3>
配置springmvc.xml
<?xml version="1.0" encoding="UTF-8"?>
<beans xmlns="http://www.springframework.org/schema/beans"
       xmlns:xsi="http://www.w3.org/2001/XMLSchema-instance"
       xmlns:context="http://www.springframework.org/schema/context"
       xmlns:mvc="http://www.springframework.org/schema/mvc"
       xsi:schemaLocation="http://www.springframework.org/schema/beans
       http://www.springframework.org/schema/beans/spring-beans.xsd
       http://www.springframework.org/schema/context
       https://www.springframework.org/schema/context/spring-context.xsd
       http://www.springframework.org/schema/mvc
       https://www.springframework.org/schema/mvc/spring-mvc.xsd">

    <!--解决无法访问静态资源-->
    <mvc:resources mapping="/static/**" location="/static/"/>
    <mvc:annotation-driven/>

    <!--声明组件扫描器-->
    <context:component-scan base-package="com.veterlemon.controller"/>

    <!--声明springmvc的视图解析器,作用:帮助开发人员设置视图文件的路径-->
    <bean class="org.springframework.web.servlet.view.InternalResourceViewResolver">
        <property name="prefix" value="/WEB-INF/view/"/>
        <property name="suffix" value=".jsp"/>
    </bean>

    <!--声明拦截器-->
    <mvc:interceptors>
        <mvc:interceptor>
            <!--指定拦截的uri地址-->
            <mvc:mapping path="/**"/>
            <!--声明拦截器对象-->
            <bean class="com.veterlemon.handler.MyInterceptor"/>
        </mvc:interceptor>
    </mvc:interceptors>
</beans>
2.多个拦截器的使用顺序
当有多个拦截器时,按在 springmvc.xml 中注册的先后来执行
3.拦截器与过滤器的区别
过滤器是 servlet 中的对象 (继承Filter);拦截器是 springmvc 中的对象 (实现HandlerInterceptor)
过滤器通过设置request、response的参数来实现对数据的过滤,在拦截器之前执行
拦截器是用来验证请求的,可以截断、修改请求,若请求不能被 中央调度器 接收,则不会被拦截器处理
