文章目录
SpringBoot启动过程原理源码
1.Spring的SPI
文章中会多次提到SPI这个东西,我们简单的介绍一下,SPI全称为Service Provider Interface 这个东西你可以理解为 它就是一个约定,SPI不是Spring独有的,Java和Dubbo都有自己的SPI,虽然实现方式可能有差异,但是思想一样的,都是我提供接口的定义,具体的实现由由用户去实现,用户实现的接口,系统怎么才能识别到?这个时候就出现一个约定,你要想让系统读取到用户实现的实现类,就必须放在我指定的目录下,系统自动会去该目录下去加载,这样就能识别到用户的自定义实现类。
而Spring的约定是,在资源目录下创建一个META-INF/spring.factory的文件,我找一个spring自带的文件吧
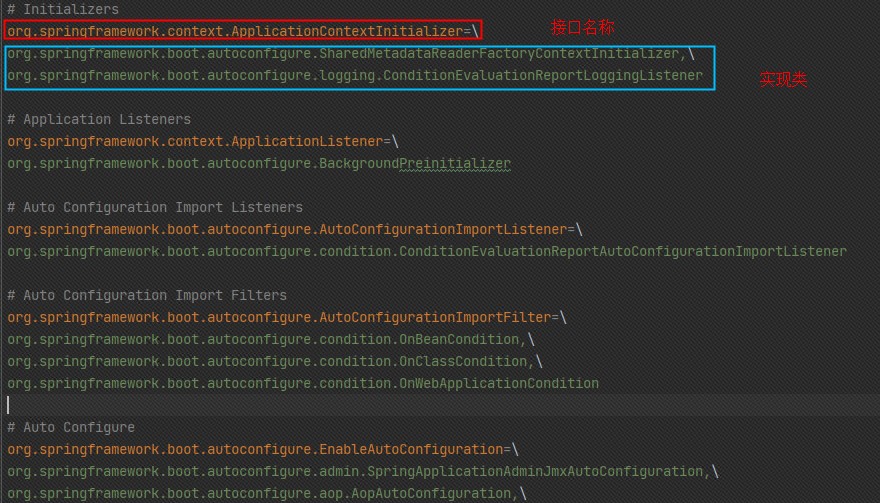
我们可以看到key=接口的全限定名 value = 实现类的全限定名,而且可以同时指定多个实现类。而且一个文件可以指定多个key,
我们来看下具体SPI的代码实现

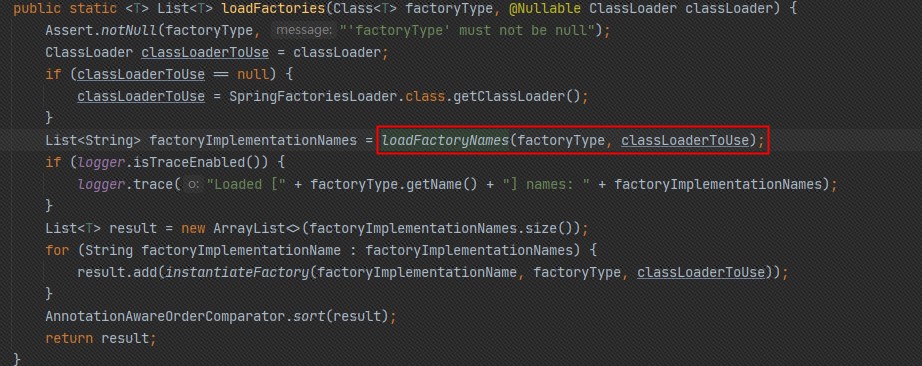
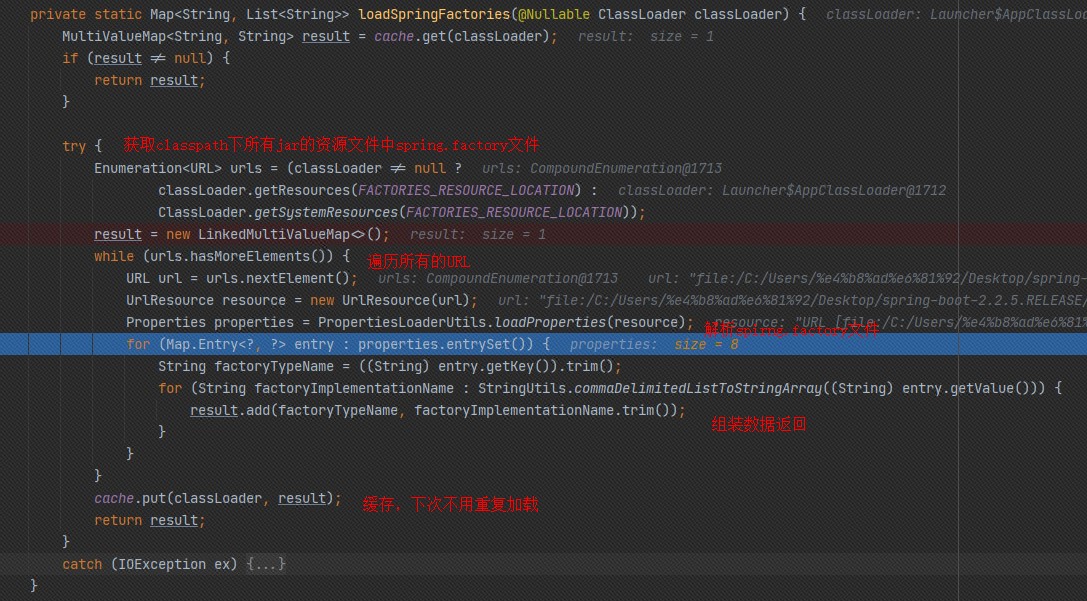
通过代码我们可以知道,Spring会去加载所有jar下classpath目录下的META-INF/spring.factory文件,然后将文件内容解析成propeties,然后根据指定类型获取各个文件符合的类,放到集合中,最后再一起返回,拿到实现类的全限定名后再通过反射生成具体的对象。
public static void main(String[] args) {
    SpringApplication.run(Application.class,args);
}
2.SpringApplication实例化
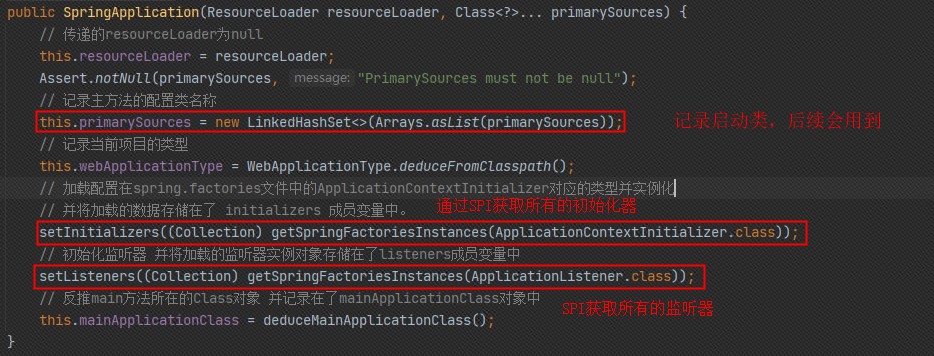
我们能看到SpringApplication构造函数中主要做了以下事情:
- 记录了启动类
- 推测了服务类型,我们是个web服务,所以推断出来是SERVLET
- 通过SPI获取所有的
ApplicationContextInitializer初始化器,并添加到initializers属性中 - 通过SPI获取所有的
ApplicationListener初始化器,并添加到listeners属性中
字体加粗的是很重要的东西,这里记录的初始化器和监听器在run方法的执行过程中会用到。
3.run方法执行流程
run方法执行的流程就比较复杂,做的事情比较多了,我先总结一下run方法做的事情,再来看代码会比较清晰一点
- 记录启动过程中的时间、解析启动方法的args参数、打印Banner图、
- SPI获取事件发布器
SpringApplicationRunListeners - 创建环境对象
- 在启动过程中一些地方发布了一些事件
- 创建了应用上下文对象
ConfigurableApplicationContext - 上下文对象刷新前操作
- 上下文对象刷新操作(重要)
- 上下文对象刷新后操作
- 执行了应用的生命周期函数
我们看下整个run方法代码:
public ConfigurableApplicationContext run(String... args) {
    // 创建一个任务执行观察器
    StopWatch stopWatch = new StopWatch();
    // 开始执行记录执行时间
    stopWatch.start();
    // 声明 ConfigurableApplicationContext 对象
    ConfigurableApplicationContext context = null;
    // 声明集合容器用来存储 SpringBootExceptionReporter 启动错误的回调接口
    Collection<SpringBootExceptionReporter> exceptionReporters = new ArrayList<>();
    // 设置了一个名为java.awt.headless的系统属性 其实是想设置该应用程序,即使没有检测到显示器,也允许其启动. 对于服务器来说,是不需要显示器的,所以要这样设置.
    configureHeadlessProperty();
    // 获取 SpringApplicationRunListener 加载的是 EventPublishingRunListener 获取启动时的监听器---> 事件发布器 发布相关事件的
    SpringApplicationRunListeners listeners = getRunListeners(args);
    // 触发启动事件 发布 starting 事件 --> 那么监听starting事件的监听器就会触发
    listeners.starting();
    try {
        // 构造一个应用程序的参数持有类
        ApplicationArguments applicationArguments = new DefaultApplicationArguments(args);
        // 创建并配置环境
        ConfigurableEnvironment environment = prepareEnvironment(listeners, applicationArguments);
        // 配置需要忽略的BeanInfo信息
        configureIgnoreBeanInfo(environment);
        // 输出的Banner信息
        Banner printedBanner = printBanner(environment);
        // 创建应用上下文对象
        context = createApplicationContext();
        // 加载配置的启动异常处理器
        exceptionReporters = getSpringFactoriesInstances(SpringBootExceptionReporter.class,
                                                         new Class[] { ConfigurableApplicationContext.class }, context);
        // 刷新前操作
        prepareContext(context, environment, listeners, applicationArguments, printedBanner);
        // 刷新应用上下文 完成Spring容器的初始化
        refreshContext(context);
        // 刷新后操作
        afterRefresh(context, applicationArguments);
        // 结束记录启动时间
        stopWatch.stop();
        if (this.logStartupInfo) {
            new StartupInfoLogger(this.mainApplicationClass).logStarted(getApplicationLog(), stopWatch);
        }
        // 事件广播 启动完成了
        listeners.started(context);
        callRunners(context, applicationArguments);
    }
    catch (Throwable ex) {
        // 事件广播启动出错了
        handleRunFailure(context, ex, exceptionReporters, listeners);
        throw new IllegalStateException(ex);
    }
    try {
        // 监听器运行中
        listeners.running(context);
    }
    catch (Throwable ex) {
        handleRunFailure(context, ex, exceptionReporters, null);
        throw new IllegalStateException(ex);
    }
    // 返回上下文对象--> Spring容器对象
    return context;
}
1. 获取事件发布器

我们可以看到这里是通过SPI来获取,通过spring.factory文件配置可以知道事件发布器实际是EventPublishingRunListener,我们的事件就是通过该对象来发布的,只不过该对象最后被包装成了SpringApplicationRunListeners

SpringApplicationRunListeners还定义了各种情况的事件发布方法,这七个事件会逐个在run方法执行的过程中进行事件的发布
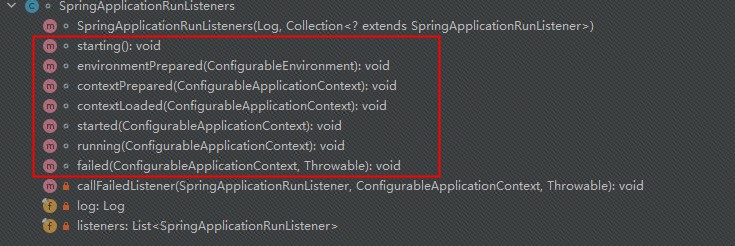
获取到事件发布器以后,立马发了应用启动中的事件(ApplicationStartingEvent),如果我们想在这个过程中做一些事情的话,我们只需要监听该事件。
2. 创建环境对象

准备环境对象主要做了两件事:
- 根据之前SpringApplication推断的类型,生成对应的环境对象
StandardServletEnvironment - 发布环境对象准备好的事件,配置文件就是监听这个事件才开始后续的加载工作。配置文件加载事件监听器
ConfigFileApplicationListener,配置文件的具体加载工作,后期有时间我会单独出一篇博客来讲。
该方法执行完以后,所有的配置文件都已经加载到了环境对象中,我们可以看下
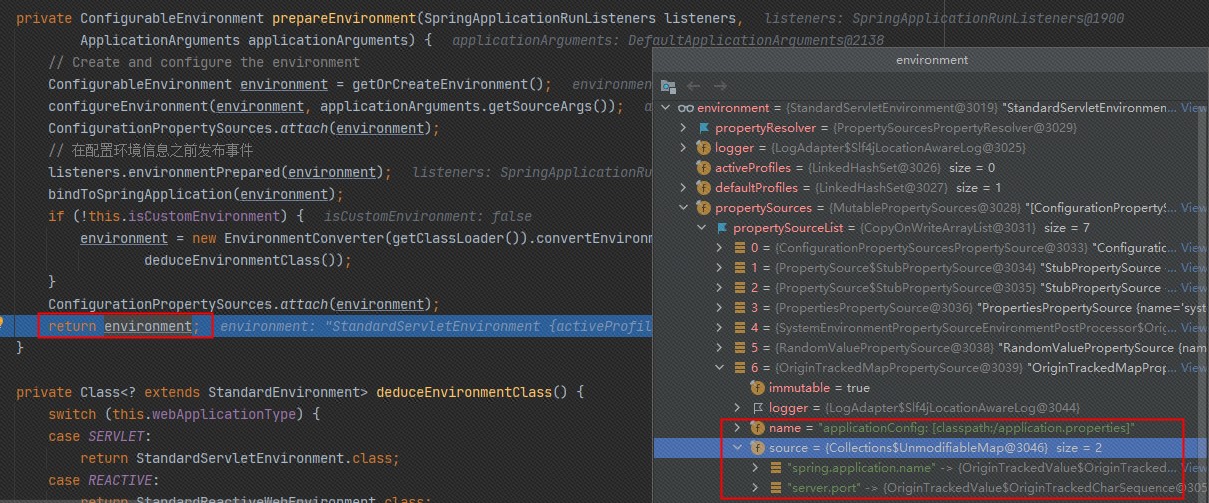
3. 创建上下文对象

这里也是根据应用类型,获取对应的上下文对象,我们这里是AnnotationConfigServletWebServerApplicationContext,然后通过反射对象的创建。
4.上下文刷新前

这里主要做的事情如下:
-
发布了上下文准备完成事件
-
执行了所有的初始化器,这里说一下,只有通过SPI拿到的初始化器才会执行,换句话说就是在
spring.factory文件中配置的才能执行


上面是我们自定义的一个初始化器,实现必须实现ApplicationContextInitializer接口,实现initialize方法,然后在资源目录META-INF/spring.factory中按上图所示配置,配置成功以后我们自定义的初始化器会有一个SPI的标识,这是IDEA为Spring的SPI技术提供的快捷键,点击能直接到META-INF/spring.factory里面。
-
设置BeanDefintion是否运行覆盖默认为false
-
发布上下文加载完成事件
5.上下文刷新
这个方法就有的说了,因为这个方法运行的主要逻辑都在Spring源码里面,如果没有Spring源码基础,想要搞懂确实会有点难度,refreshContext最终会调用到Spring中的AbstractApplicationContext#refresh,该方法包含了整个容器的创建和Bean的生命周期,可以说你搞懂了这个方法,你就搞懂了Spring的IOC和AOP甚至事务,真的一点不夸张,这个方法涉及的东西实在太多了。由于东西太太太多,我们不能每个方法都讲一下,我们这里主要说两个知识点,自动装配的具体实现和Tomcat的启动,我们只说我们涉及到的两个方法。
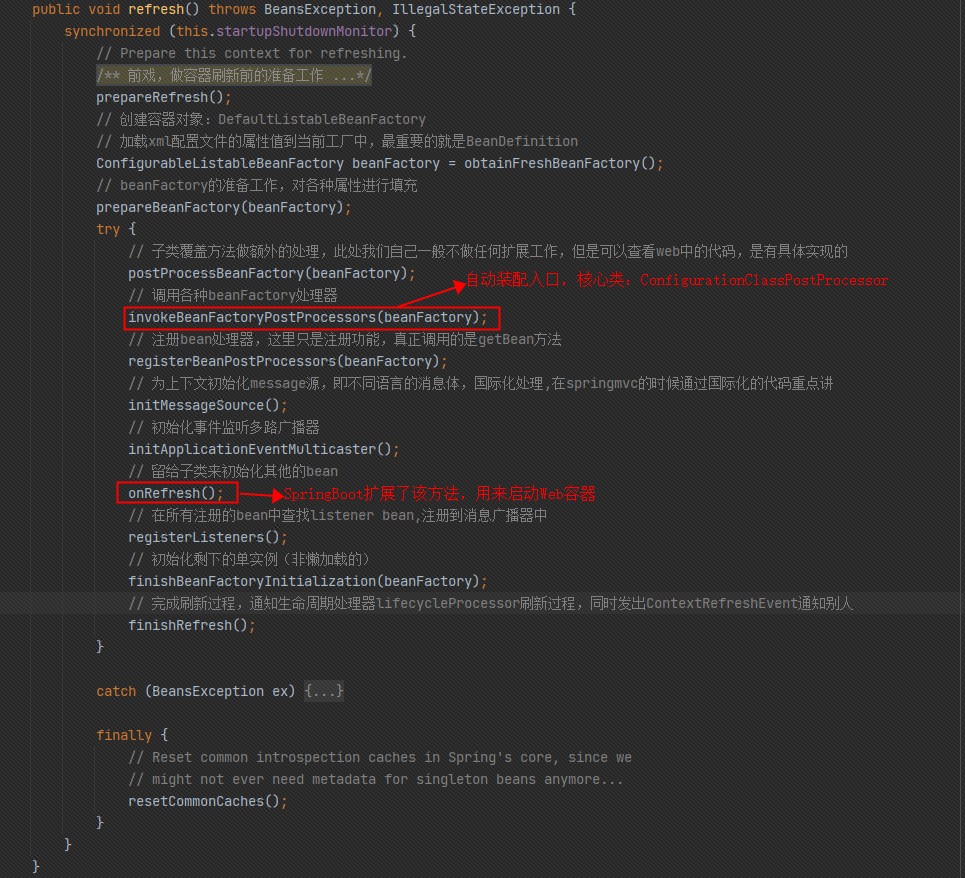
自动装配的入口处,我标出了一个类ConfigurationClassPostProcessor,我们先看下它的类图
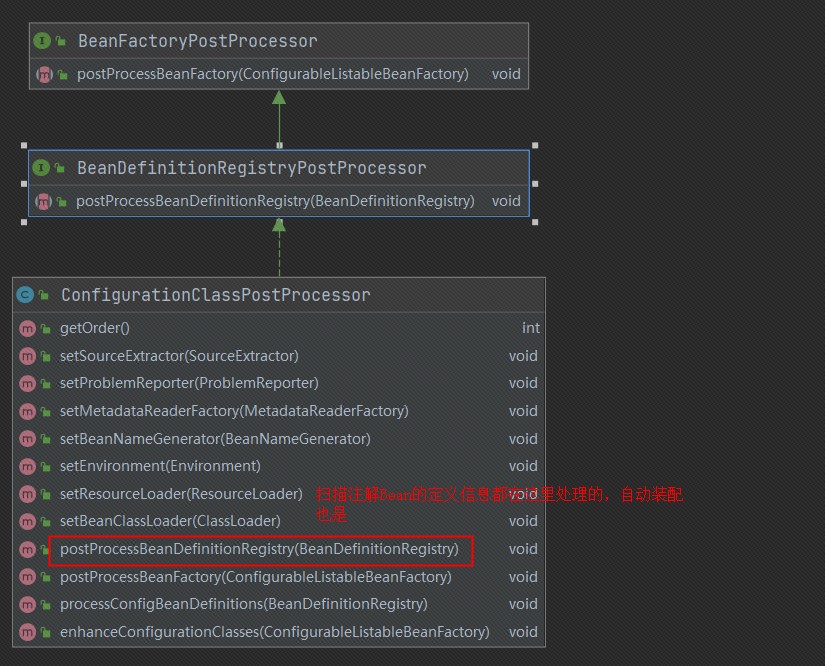
要说注解编程最重要的一个类,那肯定是ConfigurationClassPostProcessor,它扫描了所有的注解得到Bean的定义信息,然后注册到BeanFactory的beanDefintionMap中,我们来看下它代理调用


该方法完成了注解@Controller、@Import、@ImportResource、@ComponentScan、@ComponentScans、@Bean的BeanDefinition的扫描工作,将应用中所有需要交给工厂管理的类都找出来了,还包含了我们自动装配的类,这个parse是个递归方法,扫描到的所有类都会走一次parse方法,不建议去深究递归流程,我现在自己都很难绕过来,我们只需要记住结论:
parse方法递归执行完以后,应用中所有需要交给工厂管理的类都找出来了还包含了我们自动装配的类和自动装配导入的类,并将Bean定义信息注册到了工厂中。
单个配置类扫描到的类都放到了集合configClasses中,通过调用loadBeanDefinitions方法来完成BeanDefintion的注册工作。
我们这里要搞清楚自动装配的具体流程是怎样的,我们必须往下面跟,只需要记住一些关键的类和方法。
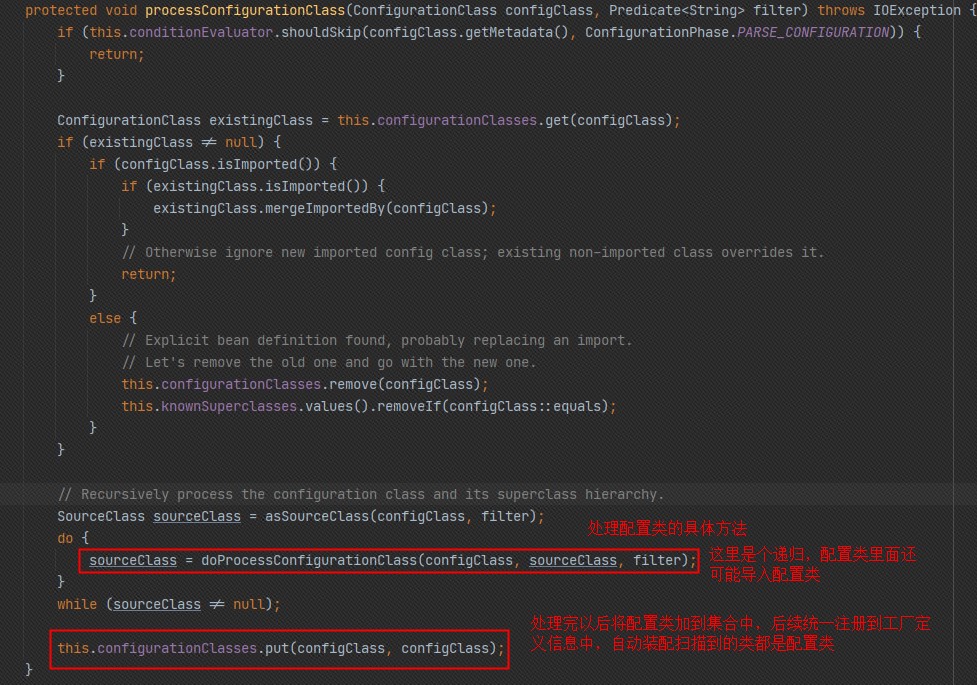
这中间跳过几个调用方法,然后会来到下面这个方法,为了看到关键的方法,我把一些代码收起来了,这个方法里面我们能看到那些常见的注解,当然我们的自动装配处理入口也在这里。
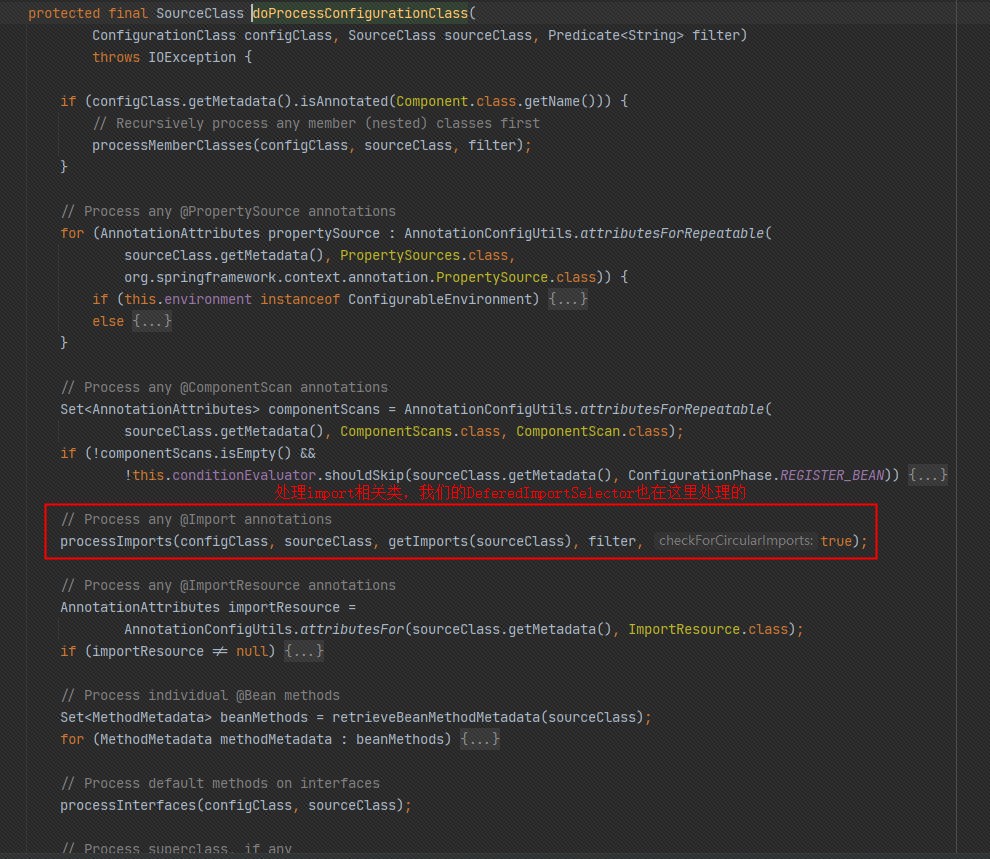
自动装配具体实现
我们这里一下自动装配里面核心的一些东西,需要知道我们的核心类,才能继续往下,注解@SpringBootApplication、@EnableAutoConfiguration和类AutoConfigurationImportSelector。
@SpringBootApplication注解我们都知道,SpringBoot启动类的注解,该注解被@EnableAutoConfiguration修饰,而该注解又导入了AutoConfigurationImportSelector类,该类对于自动装配还是很重要的,我们先看下它的类图。

我们可以看到它实现了一个叫DeferredImportSelector接口,而该接口又继承了ImportSelector,我们看下父类的接口定义
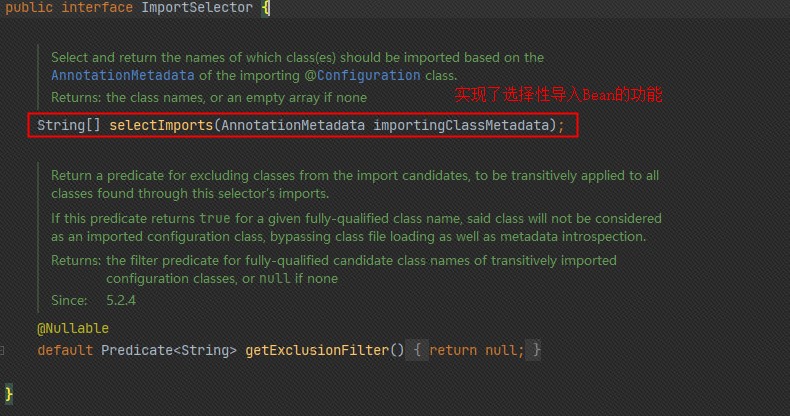
DeferredImportSelector还定义了一个自己的方法,还有个内部接口Group

我们再看AutoConfigurationImportSelector 它是DeferredImportSelector的具体实现类,它指定了getImportGroup的类为AutoConfigurationGroup,该类是父类内部接口Group的具体实现类,该Group类很重要,我们后面会说道,我们继续说处理Import相关的处理流程,这里就能看到我自动装配们的核心处理类
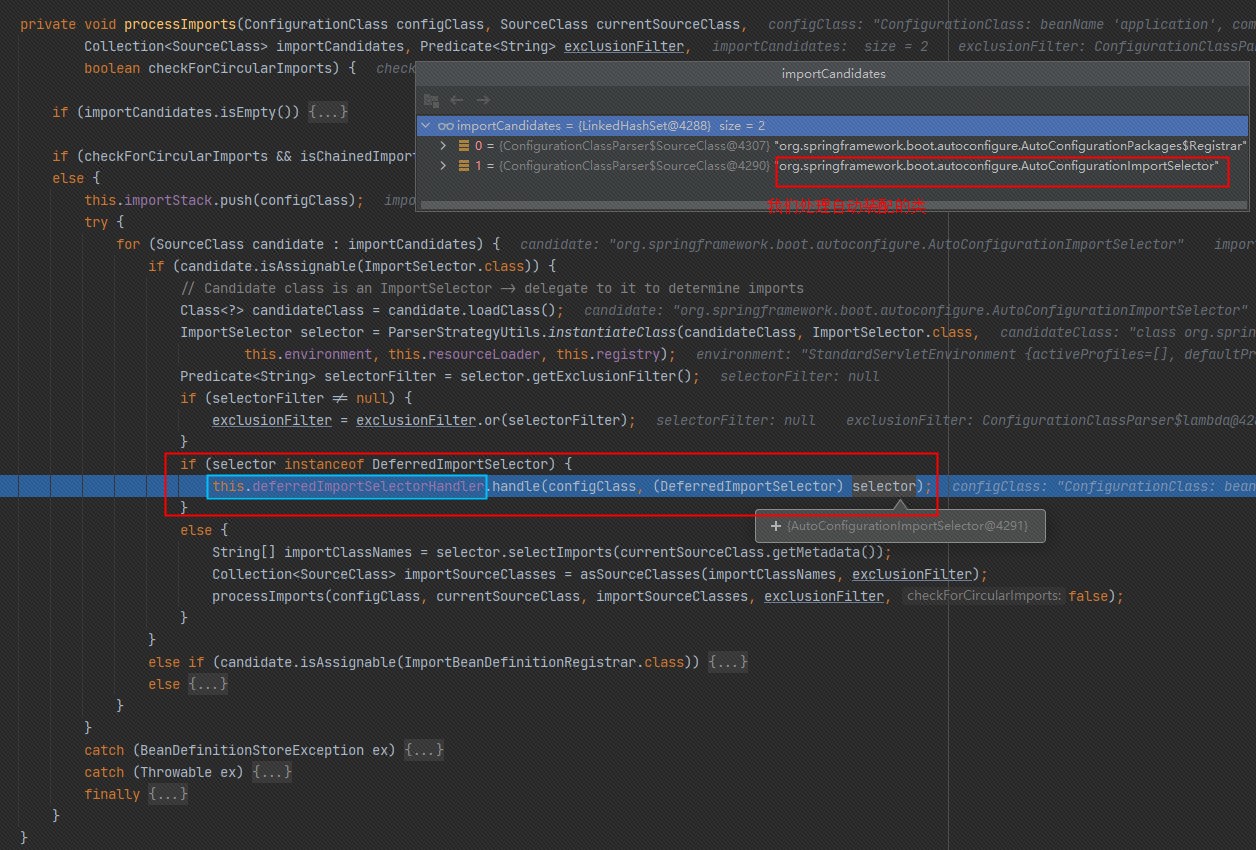
这个handle方法其实就是将我们的自动装配核心类放到了一个deferredImportSelectors集合中,放到后面统一处理,我们看代码


下面这个方法可以说是自动装配中很关键的一个,这里会调到我们自动装配核心类里面设置的那个Group的类,我们就能看到SPI扫描的具体代码啦,因为我们自动装配导入的每个类肯定是想导入其它类,所以这里会继续调用递归处理,找到它导入的那些类。


上面这些代码都是Spring的,终于找到了springboot相关的代码了,真心不容易呀,上面我们说过这个group是我们在自动装配核心类中配置的,我找出来给大家看看

所以上面两个方法都是调用AutoConfigurationGroup的我们来看下这两个方法的具体逻辑

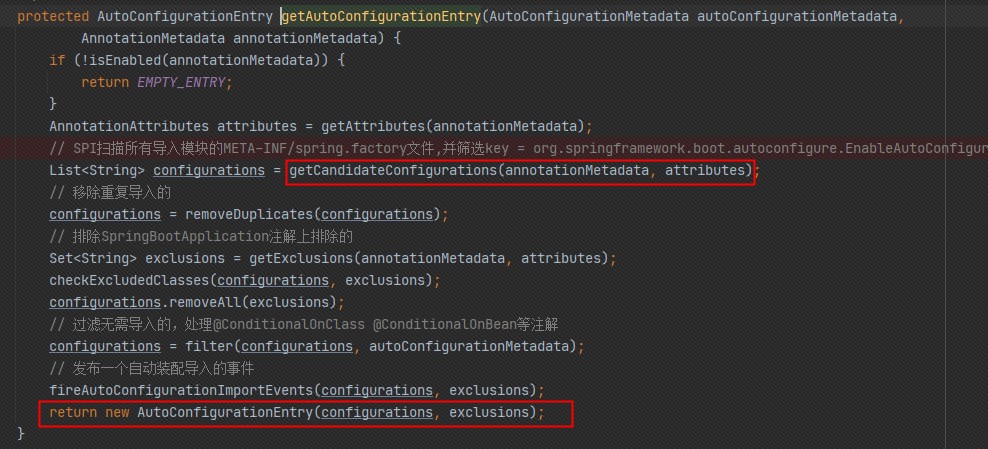
这里我们就能看到SPI去扫描spring.factory的文件,拿到所有以org.springframework.boot.autoconfigure.EnableAutoConfiguration为key的类,这里是扫描所有的模块(导入的jar和我们自己的项目),然后拿到所有导入的配置类。
然后去重,并把用户排除的移除,过滤掉哪些不符合判断条件的(通过条件注解来判断),最后将所有的配置类包装成一个AutoConfigurationEntry的实体类。
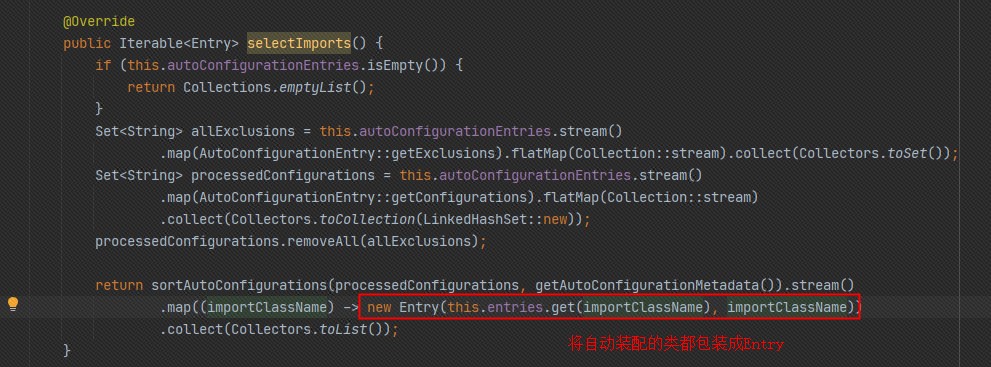
先对AutoConfigurationEntry的实体类进行排序,然后将扫描到的类包装成一个个Entry。
然后一个个遍历作为配置类开始执行processImports方法,执行完该方法,该类以及它导入的类的定义信息都会注册到工厂的定义信息集合中,到这里整个自动装配的过程就完成了。
我们总结一下整个自动装配的过程。
这里有必要说明一下,老版本和当前版本自动装配的处理有所不同,以前扫描自动装配的代码是在
DeferredImportSelector#selectImports实现的,我们这个版本压根没走这个方法,都是通过指定的那个AutoConfigurationGroup来实现的,也正是因为指定了group,才不会走selectImports方法
- 调用上下文的刷新方法时,会调到Spring中的
AbstractApplicationContext#refresh方法中,在执行invokeBeanFactoryPostProcessors方法时,有个名为ConfigurationClassPostProcessor类,它解析了所有的注解和Import相关处理。 - 再处理Import时,会将所有的
DeferredImportSelector接口放到集合中,进行统一的处理 - 我们的自动装配核心类
AutoConfigurationImportSelector实现了DeferredImportSelector接口,该接口隶属于import一类,该类重写了DeferredImportSelector#getImportGroup方法,给出的group类为AutoConfigurationGroup,这个类有两个方法- process:该方法通过Spring的SPI技术扫描了所有自动装配类
- selectImports:将得到的自动装配类,包装成Entry
- 统一处理
DeferredImportSelector时,会先创建一个处理器对象DeferredImportSelectorGroupingHandler,并把设置的Group和该处理器进行绑定 - 处理器在处理的时候会调用group给定的两个方法,拿到自动装配所有配置类,然后把他们当做Import去处理一次
- 执行完以后会将该类添加到配置类中,然后在递归入口处进行Bean定义信息的的注册工作。
Tomcat启动
待实现
6.上下文刷新后
这是个模板方法,留给子类去扩展,目前还没有子类。
7. 应用生命周期函数

上下文刷新方法执行以后,发发布一个容器启动完成的事件ApplicationStartedEvent,SpringBoot提供了两个生命周期的接口ApplicationRunner、CommandLineRunner,可以让程序在启动完后立马执行一些业务逻辑。