我们在项目中有时候会发现设置的变量没有生效,可能是被其它优先级高的变量给覆盖了。所以我们需要搞清楚SpringBoot的加载顺序。
Spring Boot属性加载顺序(优先级由高到底)
- 命令行参数
- SPRING APPLICATION_JSON属性
- ServletConfig初始化参数
- ServletContext初始化参数
- JNDI属性
- Java的系统属性,可以通过System.getProperties()获得的内容。例如java.runtime.name->Java? SE Runtime Environment、java.vm.version->25.191-b12
- 操作系统的环境变量-例如配置的M2_HOME -> D:\software\apache-maven-3.6.3、MYSQL_HOME -> D:\software\mysql-5.7.17-winx64等
- RandomValuePropertySource随机值属性
- jar包外的application-{profile}.properties/yml。properties优先级比yml高
- jar包内的application-{profile}.properties/yml。properties优先级比yml高
- jar包外的application.propertie/yml。properties优先级比yml高
- jar包内的application.properties/yml。properties优先级比yml高
- 通过@PropertySource指定xxx.properties注解定义的属性
- 默认属性(硬编码设置),使用SpringApplication.setDefaultProperties定义的内容
run方法
SpringBoot的run方法
public ConfigurableApplicationContext run(String... args) {
    // 1、创建并启动计时监控类
    StopWatch stopWatch = new StopWatch();
    stopWatch.start();
    // 2、初始化应用上下文和异常报告集合
    ConfigurableApplicationContext context = null;
    Collection<SpringBootExceptionReporter> exceptionReporters = new ArrayList<>();
    // 3、设置系统属性 `java.awt.headless` 的值,默认值为:true
    configureHeadlessProperty();
    // 4、创建所有 Spring 运行监听器并发布应用启动事件
    SpringApplicationRunListeners listeners = getRunListeners(args);
    listeners.starting();

    try {
        // 5、 参数封装,也就是在命令行下启动应用带的参数,如--server.port=9000
        ApplicationArguments applicationArguments = new DefaultApplicationArguments(
                args);
        // 6、根据运行监听器和应用参数来准备 Spring 环境(本文重点)
        ConfigurableEnvironment environment = prepareEnvironment(listeners,
                applicationArguments);
        configureIgnoreBeanInfo(environment);
        // 7、创建 Banner 打印类
        Banner printedBanner = printBanner(environment);
        // 8、创建应用上下文
        context = createApplicationContext();
        // 9、准备异常报告器
        exceptionReporters = getSpringFactoriesInstances(
                SpringBootExceptionReporter.class,
                new Class[] { ConfigurableApplicationContext.class }, context);
        // 10、准备应用上下文
        prepareContext(context, environment, listeners, applicationArguments,
                printedBanner);
        // 11、刷新应用上下文
        refreshContext(context);
        // 12、应用上下文刷新后置处理
        afterRefresh(context, applicationArguments);
        // 13、停止计时监控类
        stopWatch.stop();
        // 14、输出日志记录执行主类名、时间信息
        if (this.logStartupInfo) {
            new StartupInfoLogger(this.mainApplicationClass)
                    .logStarted(getApplicationLog(), stopWatch);
        }
        // 15、发布应用上下文启动完成事件
        listeners.started(context);
        // 16、执行所有 Runner 运行器
        callRunners(context, applicationArguments);
    }
    catch (Throwable ex) {
        handleRunFailure(context, ex, exceptionReporters, listeners);
        throw new IllegalStateException(ex);
    }
    try {
        // 17、发布应用上下文就绪事件
        listeners.running(context);
    }
    catch (Throwable ex) {
        handleRunFailure(context, ex, exceptionReporters, null);
        throw new IllegalStateException(ex);
    }
    // 18、返回应用上下文
    return context;
}
prepareEnvironment
prepareEnvironment按字面意思就是准备环境,让我们看看他是怎么做的
// 准备环境
private ConfigurableEnvironment prepareEnvironment(
        SpringApplicationRunListeners listeners,
        ApplicationArguments applicationArguments) {
    // Create and configure the environment 创建和配置环境

    // 获取或创建环境
    ConfigurableEnvironment environment = getOrCreateEnvironment();
    // 配置环境:配置PropertySources和activeProfiles
    configureEnvironment(environment, applicationArguments.getSourceArgs());
    // listeners环境准备(就是广播ApplicationEnvironmentPreparedEvent事件)。还记得这个listeners怎么来的吗?
    listeners.environmentPrepared(environment);
    // 将环境绑定到SpringApplication
    bindToSpringApplication(environment);
    // 如果是非web环境,将环境转换成StandardEnvironment
    if (this.webApplicationType == WebApplicationType.NONE) {
        environment = new EnvironmentConverter(getClassLoader())
                .convertToStandardEnvironmentIfNecessary(environment);
    }
    // 配置PropertySources对它自己的递归依赖
    ConfigurationPropertySources.attach(environment);
    return environment;
}
getOrCreateEnvironment
- 添加servletConfigInitParams属性集(ServletConfig初始化参数)
- 添加servletContextInitParams属性集(ServletContext初始化参数)
- 添加Jndi属性集
- 添加systemProperties属性集(Java的系统属性)
- 添加systemEnvironment属性集(操作系统环境变量)
判断当前的web环境,使用的是SERVLET,当前会实例化 StandardServletEnvironment
	private ConfigurableEnvironment getOrCreateEnvironment() {
		if (this.environment != null) {
			return this.environment;
		}
		switch (this.webApplicationType) {
		case SERVLET:
			return new StandardServletEnvironment();
		case REACTIVE:
			return new StandardReactiveWebEnvironment();
		default:
			return new StandardEnvironment();
		}
	}
类关系StandardServletEnvironment->StandardEnvironment->AbstractEnvironment
父类AbstractEnvironment的构造器里面回退StandardServletEnvironment的customizePropertySources方法
StandardServletEnvironment中添加servletConfigInitParams属性集和servletContextInitParams属性集
	@Override
	protected void customizePropertySources(MutablePropertySources propertySources) {
		propertySources.addLast(new StubPropertySource(SERVLET_CONFIG_PROPERTY_SOURCE_NAME));
		propertySources.addLast(new StubPropertySource(SERVLET_CONTEXT_PROPERTY_SOURCE_NAME));
		if (JndiLocatorDelegate.isDefaultJndiEnvironmentAvailable()) {
			propertySources.addLast(new JndiPropertySource(JNDI_PROPERTY_SOURCE_NAME));
		}
		super.customizePropertySources(propertySources);
	}
然后子类StandardEnvironment执行customizePropertySources方法.
添加systemProperties属性集和systemEnvironment属性集
	@Override
	protected void customizePropertySources(MutablePropertySources propertySources) {
		propertySources.addLast(
				new PropertiesPropertySource(SYSTEM_PROPERTIES_PROPERTY_SOURCE_NAME, getSystemProperties()));
		propertySources.addLast(
				new SystemEnvironmentPropertySource(SYSTEM_ENVIRONMENT_PROPERTY_SOURCE_NAME, getSystemEnvironment()));
	}
configureEnvironment
- 添加defaultProperties属性集
- 添加commandLineArgs属性集(命令行参数)
	protected void configureEnvironment(ConfigurableEnvironment environment, String[] args) {
		if (this.addConversionService) {
			ConversionService conversionService = ApplicationConversionService.getSharedInstance();
			environment.setConversionService((ConfigurableConversionService) conversionService);
		}
		//在此应用程序的环境中添加、删除或重新排序任何 {@link PropertySource}。
		configurePropertySources(environment, args);
		//配置此应用程序环境中哪些配置文件处于活动状态 spring.profiles.active
		configureProfiles(environment, args);
	}
第一次进来this.defaultProperties为空,此时还没有添加默认属性集,commandLineArgs属性集并放到第一的位置
protected void configurePropertySources(ConfigurableEnvironment environment,
        String[] args) {
    MutablePropertySources sources = environment.getPropertySources();
    // 此时defaultProperties还是null,可能后续过程会初始化,具体详情请期待后续的博文
    if (this.defaultProperties != null && !this.defaultProperties.isEmpty()) {
        // 存在的话将其放到最后位置
        sources.addLast(
                new MapPropertySource("defaultProperties", this.defaultProperties));
    }
    // 存在命令行参数,则解析它并封装进SimpleCommandLinePropertySource对象,同时将此对象放到sources的第一位置(优先级最高)
    if (this.addCommandLineProperties && args.length > 0) {
        String name = CommandLinePropertySource.COMMAND_LINE_PROPERTY_SOURCE_NAME;
        if (sources.contains(name)) {
            PropertySource<?> source = sources.get(name);
            CompositePropertySource composite = new CompositePropertySource(name);
            composite.addPropertySource(new SimpleCommandLinePropertySource(
                    "springApplicationCommandLineArgs", args));
            composite.addPropertySource(source);
            sources.replace(name, composite);
        }
        else {
            // 将其放到第一位置
            sources.addFirst(new SimpleCommandLinePropertySource(args));
        }
    }
}
listeners.environmentPrepared
- 添加spring_application_json属性集
- 添加vcap属性集
- 添加random属性集
- 添加application-profile.(properties/yml)属性集
通过广播器发布环境准备事件,对该事件感兴趣的监听器会做出处理
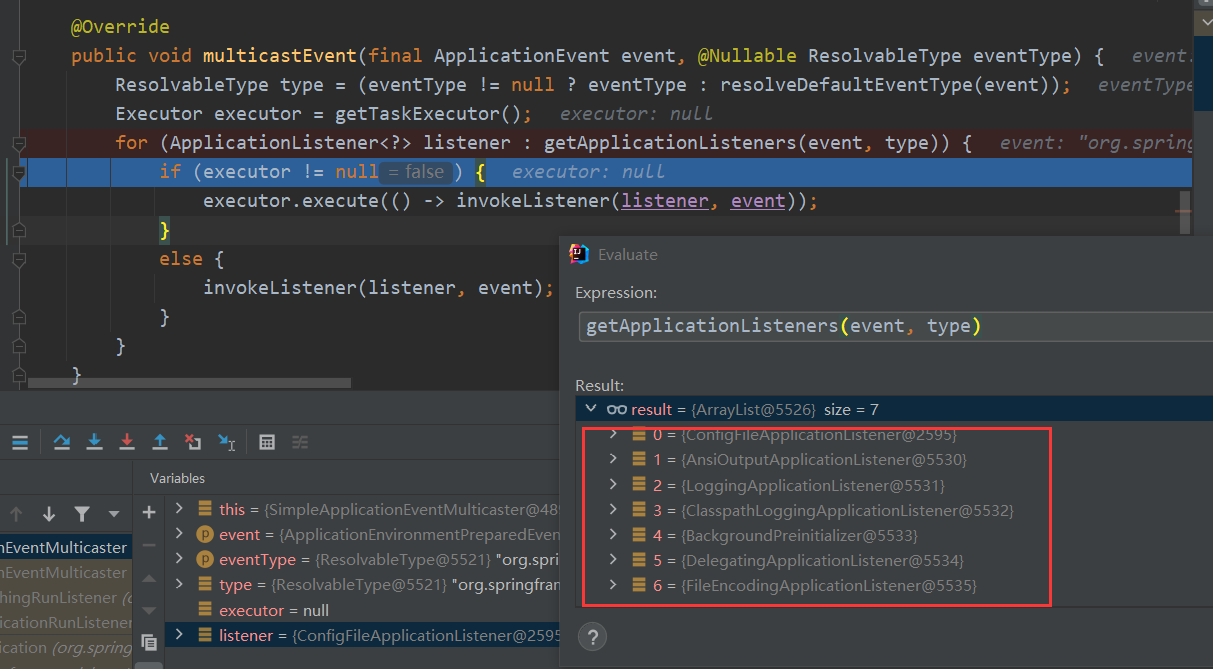
首先是ConfigFileApplicationListener监听器进行处理
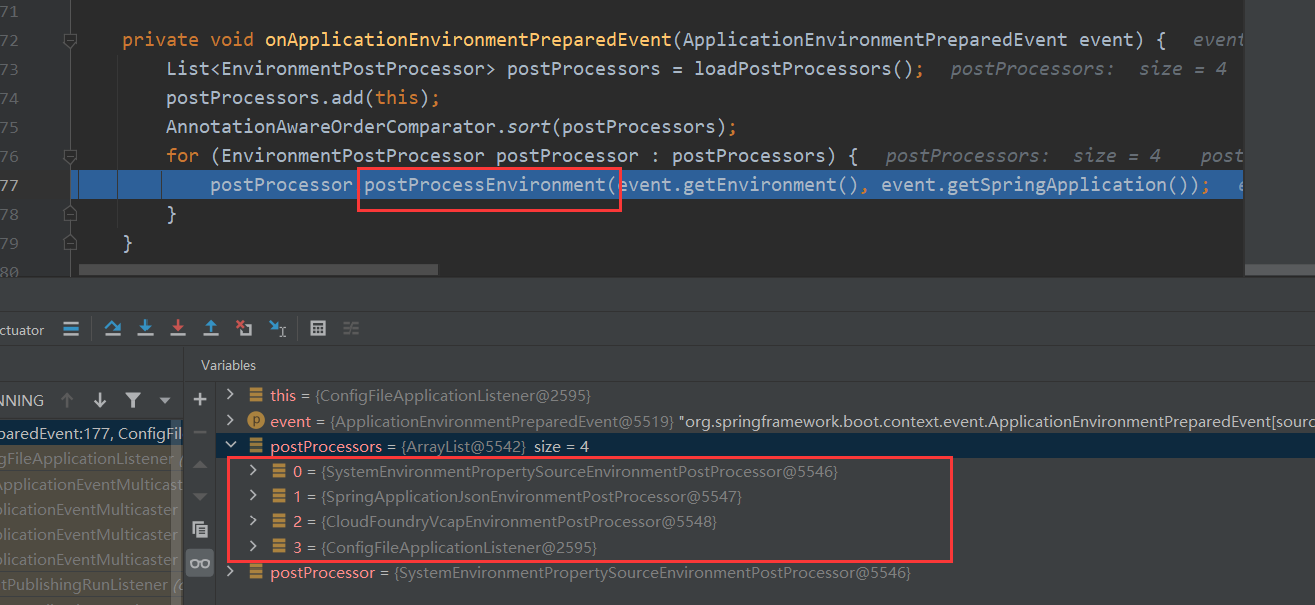
- 1、加载EnvironmentPostProcessor列表,仍然是从META-INF/spring.factories中加载(在SpringApplication实例化的时候已经加载了,这次是从缓存中读取),然后实例化;
- 2、将自己也加入EnvironmentPostProcessor列表;ConfigFileApplicationListener实现了EnvironmentPostProcessor接口,可以看它的类图。
- 3、对EnvironmentPostProcessor列表进行排序;排序之后,EnvironmentPostProcessor列表图如下
SystemEnvironmentPropertySourceEnvironmentPostProcessor
这里只是把systemEnvironment拿出来重新封装了下
	@Override
	public void postProcessEnvironment(ConfigurableEnvironment environment, SpringApplication application) {
		String sourceName = StandardEnvironment.SYSTEM_ENVIRONMENT_PROPERTY_SOURCE_NAME;
		PropertySource<?> propertySource = environment.getPropertySources().get(sourceName);
		if (propertySource != null) {
			replacePropertySource(environment, sourceName, propertySource);
		}
	}

	@SuppressWarnings("unchecked")
	private void replacePropertySource(ConfigurableEnvironment environment, String sourceName,
			PropertySource<?> propertySource) {
		Map<String, Object> originalSource = (Map<String, Object>) propertySource.getSource();
		SystemEnvironmentPropertySource source = new OriginAwareSystemEnvironmentPropertySource(sourceName,
				originalSource);
		environment.getPropertySources().replace(sourceName, source);
	}
SpringApplicationJsonEnvironmentPostProcessor
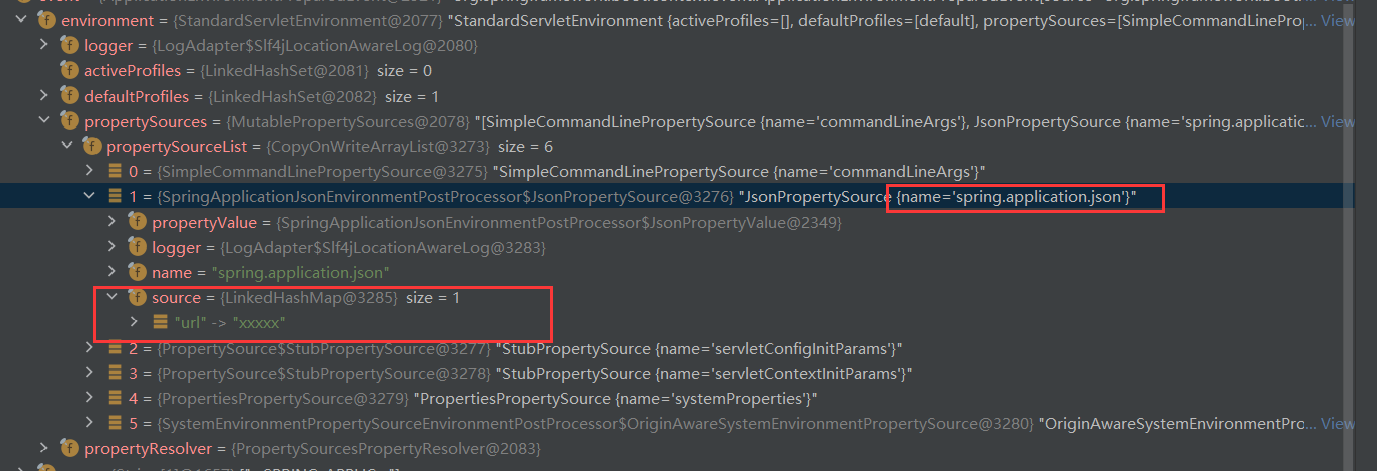
查找命令参数是否有SPRING_APPLICATION_JSON,如果有的话就会添加
例如:启动的时候设置参数

	@Override
	public void postProcessEnvironment(ConfigurableEnvironment environment, SpringApplication application) {
		MutablePropertySources propertySources = environment.getPropertySources();
		propertySources.stream().map(JsonPropertyValue::get).filter(Objects::nonNull).findFirst()
				.ifPresent((v) -> processJson(environment, v));
	}

	private void processJson(ConfigurableEnvironment environment, JsonPropertyValue propertyValue) {
		JsonParser parser = JsonParserFactory.getJsonParser();
		Map<String, Object> map = parser.parseMap(propertyValue.getJson());
		if (!map.isEmpty()) {
			addJsonPropertySource(environment, new JsonPropertySource(propertyValue, flatten(map)));
		}
	}
它就会添加SPRING APPLICATION_JSON属性
CloudFoundryVcapEnvironmentPostProcessor
spring-cloud环境在有用到,这里的话会直接跳过,不做处理
ConfigFileApplicationListener
- 添加一个随机的random属性集
- 初始化Profiles
	protected void addPropertySources(ConfigurableEnvironment environment, ResourceLoader resourceLoader) {
	    //添加一个随机的random属性集
		RandomValuePropertySource.addToEnvironment(environment);
		//初始化Profiles
		new Loader(environment, resourceLoader).load();
	}
- 初始化PropertiesPropertySourceLoader和YamlPropertySourceLoader这两个加载器
- 从file:./config/,file:./,classpath:/config/,classpath:/路径下加载配置文件,PropertiesPropertySourceLoader加载配置文件application.xml和application.properties
new Loader(environment, resourceLoader).load();这个方法我们下面在细说
其它的监听器就不一一列举了
bindToSpringApplication
将获取到的environment中的spring.main配置绑定到SpringApplication的source中。
	protected void bindToSpringApplication(ConfigurableEnvironment environment) {
		try {
			Binder.get(environment).bind("spring.main", Bindable.ofInstance(this));
		}
		catch (Exception ex) {
			throw new IllegalStateException("Cannot bind to SpringApplication", ex);
		}
	}
ConfigurationPropertySources.attach(environment);
	public static void attach(Environment environment) {
		Assert.isInstanceOf(ConfigurableEnvironment.class, environment);
		MutablePropertySources sources = ((ConfigurableEnvironment) environment).getPropertySources();
		PropertySource<?> attached = sources.get(ATTACHED_PROPERTY_SOURCE_NAME);
		if (attached != null && attached.getSource() != sources) {
			sources.remove(ATTACHED_PROPERTY_SOURCE_NAME);
			attached = null;
		}
		if (attached == null) {
			sources.addFirst(new ConfigurationPropertySourcesPropertySource(ATTACHED_PROPERTY_SOURCE_NAME,
					new SpringConfigurationPropertySources(sources)));
		}
	}
添加了一个configurationProperties名字的PropertySource

初始化Profiles
在application.properties里面有配置,并且创建了application-online.properties,application-online2.properties,application-online3.properties 文件
spring.profiles.active=online2
spring.profiles.include=online3
初始化Profiles的load方法
		public void load() {
			this.profiles = new LinkedList<>();
			this.processedProfiles = new LinkedList<>();
			this.activatedProfiles = false;
			this.loaded = new LinkedHashMap<>();
			initializeProfiles();
			while (!this.profiles.isEmpty()) {
				Profile profile = this.profiles.poll();
				if (profile != null && !profile.isDefaultProfile()) {
					addProfileToEnvironment(profile.getName());
				}
				load(profile, this::getPositiveProfileFilter, addToLoaded(MutablePropertySources::addLast, false));
				this.processedProfiles.add(profile);
			}
			resetEnvironmentProfiles(this.processedProfiles);
			load(null, this::getNegativeProfileFilter, addToLoaded(MutablePropertySources::addFirst, true));
			addLoadedPropertySources();
		}
initializeProfiles
- 1.profiles添加null
- 2.查找有没有指定spring.profiles.active或者spring.profiles.include的配置文件,这里是从启动参数上面查找例如
--spring.profiles.active=online - 3.从this.environment.getActiveProfiles()查找不是上一步获取到的属性
- 4.把第2步的放到profiles中
- 5.如果第2步中没有指定的话,profiles就用默认值:
spring.profiles.default,第2步中有值的话profiles就不会添加默认的
从这里我们知道如果application-default.properties和application-online.properties同时存在的话,如果spring.profiles.active指定了online那么application-default.properties就不会生效
		private void initializeProfiles() {
			// The default profile for these purposes is represented as null. We add it
			// first so that it is processed first and has lowest priority.
			this.profiles.add(null);
			//看有没有配置spring.profiles.active和spring.profiles.include
			Set<Profile> activatedViaProperty = getProfilesActivatedViaProperty();
			//获取其他配置文件遍历集合添加到profiles中
			this.profiles.addAll(getOtherActiveProfiles(activatedViaProperty));
			// Any pre-existing active profiles set via property sources (e.g.
			// System properties) take precedence over those added in config files.
			addActiveProfiles(activatedViaProperty);
			//  如果没有其它的配置的话添加null就是1,会进入方法中添加default配置
			if (this.profiles.size() == 1) { // only has null profile
				for (String defaultProfileName : this.environment.getDefaultProfiles()) {
					Profile defaultProfile = new Profile(defaultProfileName, true);
					this.profiles.add(defaultProfile);
				}
			}
		}
getProfilesActivatedViaProperty
		private Set<Profile> getProfilesActivatedViaProperty() {
			// 假如环境中不存在ACTIVE_PROFILES_PROPERTY,INCLUDE_PROFILES_PROPERTY 则返回空集合
			// spring.profiles.active ; spring.profiles.include
			if (!this.environment.containsProperty(ACTIVE_PROFILES_PROPERTY)
					&& !this.environment.containsProperty(INCLUDE_PROFILES_PROPERTY)) {
				return Collections.emptySet();
			}
			// 从环境中获得INCLUDE_PROFILES_PROPERTY,ACTIVE_PROFILES_PROPERTY对应的值
			// 处理并且返回
			Binder binder = Binder.get(this.environment);
			Set<Profile> activeProfiles = new LinkedHashSet<>();
			activeProfiles.addAll(getProfiles(binder, INCLUDE_PROFILES_PROPERTY));
			activeProfiles.addAll(getProfiles(binder, ACTIVE_PROFILES_PROPERTY));
			return activeProfiles;
		}
正常情况下如果没有配置的返回空集合了,如果需要往下走的话需要这样做。创建一个application-online.properties文件,然后在启动参数上面添加--spring.profiles.active=online在application.properties里面写是没有用的,因为这个时候application.properties里面的还没有被加载。如果不指定的话默认生效的文件就是application.properties/yml或者application-default.properties/yml

如果在添加了启动参数这里的activeProfiles就会有值

spring.profiles.include 的作用是可以同时让多个文件生效。
initializeProfiles方法执行完后,profiles会有两个值一个是null,一个是default
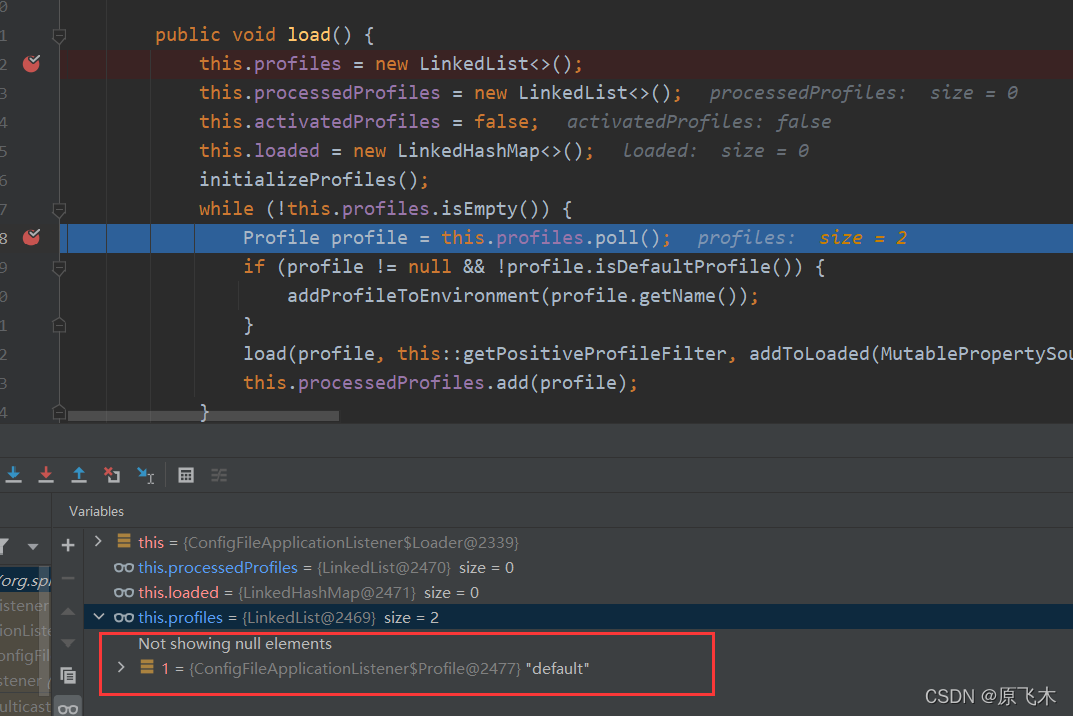
this.profiles.poll();弹出第一个为null,所以直接到load方法
load

getSearchLocations()是获取寻找的路径,如果不指定的话默认就是上面的四个路径,可以通过spring.config.location这个来配置其它的路径,默认的四个路径还是有的。
		private Set<String> getSearchLocations() {
			if (this.environment.containsProperty(CONFIG_LOCATION_PROPERTY)) {
				return getSearchLocations(CONFIG_LOCATION_PROPERTY);
			}
			Set<String> locations = getSearchLocations(CONFIG_ADDITIONAL_LOCATION_PROPERTY);
			//使用默认的加载路径
			locations.addAll(
					asResolvedSet(ConfigFileApplicationListener.this.searchLocations, DEFAULT_SEARCH_LOCATIONS));
			return locations;
		}
getSearchNames()这里就是要找以什么开头的文件比如说默认的是以application…开头的文件,如果要配置以其它开头的话可以通过spring.config.name属性来配置。一般也不会去修改。
		private Set<String> getSearchNames() {
			if (this.environment.containsProperty(CONFIG_NAME_PROPERTY)) {
				String property = this.environment.getProperty(CONFIG_NAME_PROPERTY);
				return asResolvedSet(property, null);
			}
			//使用默认application开头的配置文件
			return asResolvedSet(ConfigFileApplicationListener.this.names, DEFAULT_NAMES);
		}
回到上面加载了四个默认的路径然后执行load方法,由于name=application所以会执行下面的loadForFileExtension方法。
这里this.propertySourceLoaders有两个值,然后遍历执行
- PropertiesPropertySourceLoader(看代码可以知道它主要是读取properties和xml结尾的文件)
- YamlPropertySourceLoader(看代码可以知道它主要是读取yml和yaml结尾的文件)
		private void load(String location, String name, Profile profile, DocumentFilterFactory filterFactory,
				DocumentConsumer consumer) {
			if (!StringUtils.hasText(name)) {
				for (PropertySourceLoader loader : this.propertySourceLoaders) {
					if (canLoadFileExtension(loader, location)) {
						load(loader, location, profile, filterFactory.getDocumentFilter(profile), consumer);
						return;
					}
				}
			}
			Set<String> processed = new HashSet<>();
			for (PropertySourceLoader loader : this.propertySourceLoaders) {
				for (String fileExtension : loader.getFileExtensions()) {
					if (processed.add(fileExtension)) {
						loadForFileExtension(loader, location + name, "." + fileExtension, profile, filterFactory,
								consumer);
					}
				}
			}
		}
loadForFileExtension
根据profile的值来判断,如果为空的话,就会去读取路径下的application.properties,如果profile=online的话就会去读取application-online.properties。类似这样
		private void loadForFileExtension(PropertySourceLoader loader, String prefix, String fileExtension,
				Profile profile, DocumentFilterFactory filterFactory, DocumentConsumer consumer) {
			DocumentFilter defaultFilter = filterFactory.getDocumentFilter(null);
			DocumentFilter profileFilter = filterFactory.getDocumentFilter(profile);
			if (profile != null) {
				// Try profile-specific file & profile section in profile file (gh-340)
				String profileSpecificFile = prefix + "-" + profile + fileExtension;
				load(loader, profileSpecificFile, profile, defaultFilter, consumer);
				load(loader, profileSpecificFile, profile, profileFilter, consumer);
				// Try profile specific sections in files we've already processed
				for (Profile processedProfile : this.processedProfiles) {
					if (processedProfile != null) {
						String previouslyLoaded = prefix + "-" + processedProfile + fileExtension;
						load(loader, previouslyLoaded, profile, profileFilter, consumer);
					}
				}
			}
			// Also try the profile-specific section (if any) of the normal file
			load(loader, prefix + fileExtension, profile, profileFilter, consumer);
		}
让我们看看这个load方法,先判断文件是否存在的一些前置判断。如果配置文件里面有spring.profiles.active,会把它的值放到this.profiles去加载相应对应的配置文件。然后会把application-default.properties给取消了
		private void load(PropertySourceLoader loader, String location, Profile profile, DocumentFilter filter,
				DocumentConsumer consumer) {
			try {
				Resource resource = this.resourceLoader.getResource(location);
				if (resource == null || !resource.exists()) {
					if (this.logger.isTraceEnabled()) {
						StringBuilder description = getDescription("Skipped missing config ", location, resource,
								profile);
						this.logger.trace(description);
					}
					return;
				}
				if (!StringUtils.hasText(StringUtils.getFilenameExtension(resource.getFilename()))) {
					if (this.logger.isTraceEnabled()) {
						StringBuilder description = getDescription("Skipped empty config extension ", location,
								resource, profile);
						this.logger.trace(description);
					}
					return;
				}
				String name = "applicationConfig: [" + location + "]";
				//加载配置文件,如果里面的属性spring.profiles.active或者spring.profiles.include进行处理,看下面的图
				List<Document> documents = loadDocuments(loader, name, resource);
				if (CollectionUtils.isEmpty(documents)) {
					if (this.logger.isTraceEnabled()) {
						StringBuilder description = getDescription("Skipped unloaded config ", location, resource,
								profile);
						this.logger.trace(description);
					}
					return;
				}
				List<Document> loaded = new ArrayList<>();
				for (Document document : documents) {
					if (filter.match(document)) {
					   //this.profiles添加spring.profiles.active属性并移除默认属性default
						addActiveProfiles(document.getActiveProfiles());
					    //this.profiles添加spring.profiles.include属性
					    addIncludedProfiles(document.getIncludeProfiles());
						loaded.add(document);
					}
				}
				Collections.reverse(loaded);
				if (!loaded.isEmpty()) {
					loaded.forEach((document) -> consumer.accept(profile, document));
					if (this.logger.isDebugEnabled()) {
						StringBuilder description = getDescription("Loaded config file ", location, resource, profile);
						this.logger.debug(description);
					}
				}
			}
			catch (Exception ex) {
				throw new IllegalStateException("Failed to load property " + "source from location '" + location + "'",
						ex);
			}
		}

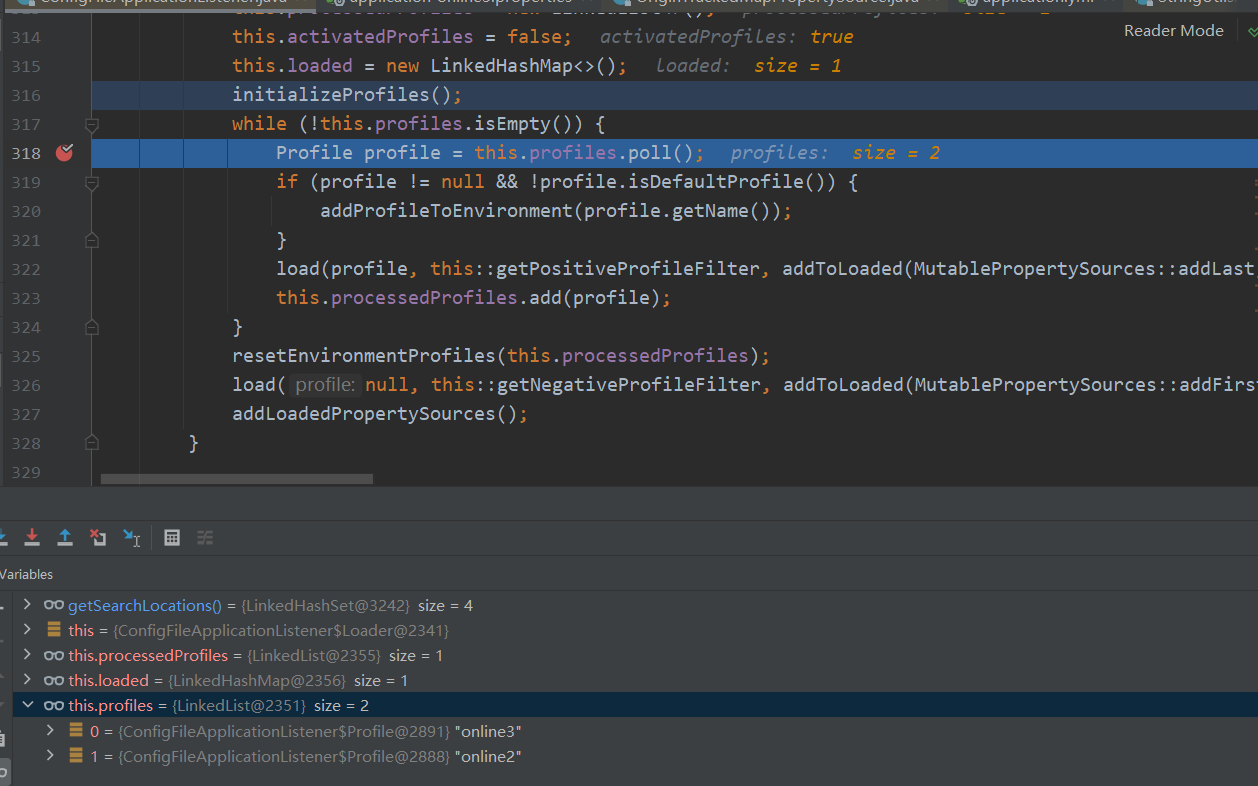
this.profiles第一个变量null走完后,出来就变成online2和online3了,并且default不见了。接下去就是和上面一样的步骤了
resetEnvironmentProfiles
确保Environment 中活动配置文件的顺序与处理配置文件的顺序相匹配。
		private void resetEnvironmentProfiles(List<Profile> processedProfiles) {
			String[] names = processedProfiles.stream()
					.filter((profile) -> profile != null && !profile.isDefaultProfile()).map(Profile::getName)
					.toArray(String[]::new);
			this.environment.setActiveProfiles(names);
		}
load
这个load是防止没有进入循环的时候再去加载一次application.properties/yml
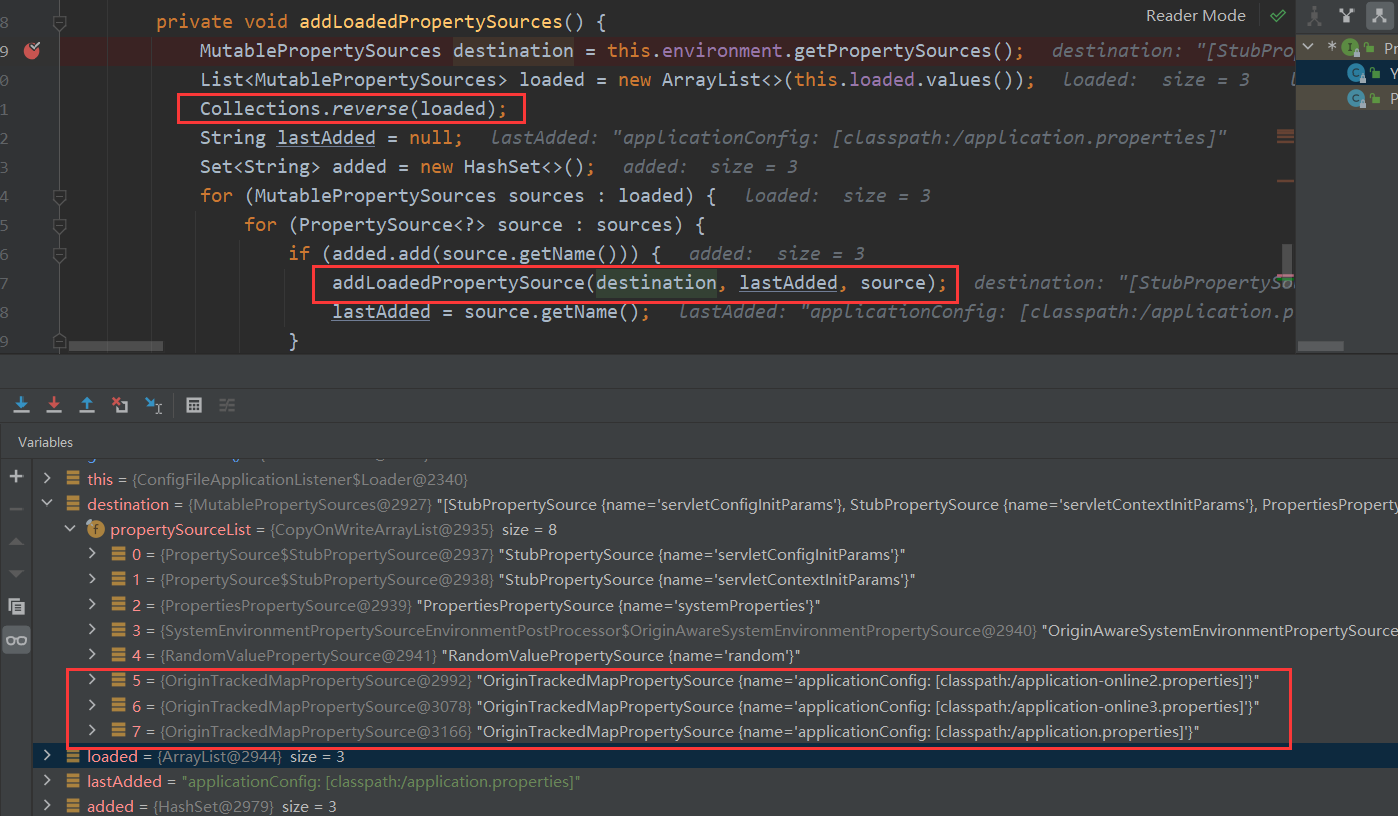
addLoadedPropertySources
添加加载的属性源
变量覆盖的问题
在application.properties引入了两个文件并且设置了一个变量
spring.profiles.active=online2
spring.profiles.include=online3
test.name=application
application-online2.properties中
test.name=online2
application-online3.properties中
test.name=online3
三个文件中都有test.name,按照上面图的顺序,越上面的优先级越高
所以最后test.name的值为online2。测试结果也是这样
为什么是spring.profiles.active中的变量生效呢
执行完addActiveProfiles后this.profiles中会添加online的属性
但是执行addIncludedProfiles会先清空先放include中的online3的属性
		for (Document document : documents) {
			if (filter.match(document)) {
				addActiveProfiles(document.getActiveProfiles());
				addIncludedProfiles(document.getIncludeProfiles());
				loaded.add(document);
			}
		}


		private void addIncludedProfiles(Set<Profile> includeProfiles) {
			LinkedList<Profile> existingProfiles = new LinkedList<>(this.profiles);
			this.profiles.clear();
			this.profiles.addAll(includeProfiles);
			this.profiles.removeAll(this.processedProfiles);
			this.profiles.addAll(existingProfiles);
		}
- this.profiles的第一个值为null,在遍历执行的时候第一个加入的就是application.properties
- 变量完null后又往里面添加了online3和online2所以就是下面图的顺序
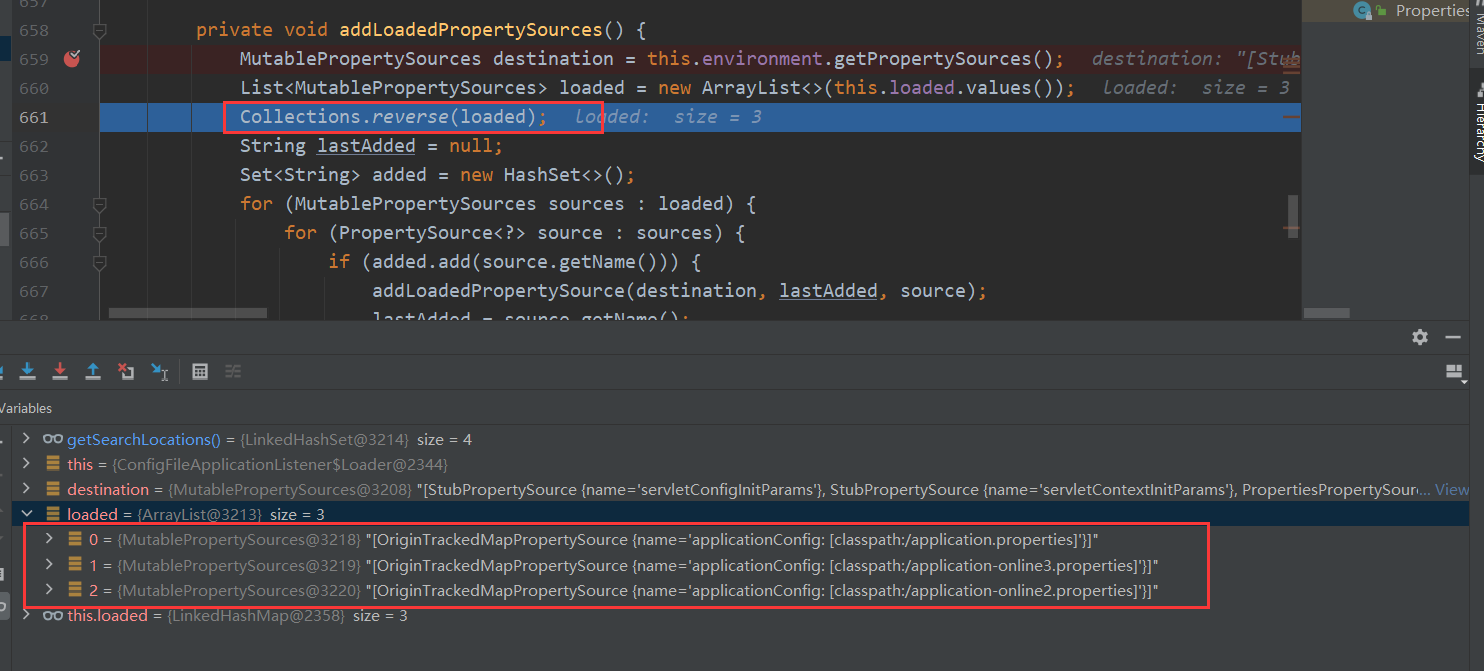
然后执行反转下就是优先级了所以test.name的值为online2