springboot2.x
- 一、零散知识点补充
- 1、@Import注解:导入组件,给容器中自动创建组件
- 2、@Conditional()注解:满足指定条件给容器中创建组件
- 3、@ImportResource("classpath:beans.xml"):导入spring配置文件
- 4、配置文件properties的值绑定
- 5、yaml语法
- 6、springboot项目会识别的静态文件夹(放入进去之后能直接访问的)
- 7、webjars:[官网地址](https://www.webjars.org/)
- 8、springboot的默认首页
- 9、springboot的默认小图标
- 10、restful风格接口
- 11、补充一些请求时的注解,比如@PathVariable、@RequestHeader等
- 12、http请求参数返回类型,比如返回的数据格式是xml或者json或者自定义格式,有两种解决方案;
- 13、判断某服务是否导入了某个类
- 14、springboot获取系统变量、环境变量等
- 二、拦截器和异常
- 三、springboot的一些监控
- 四、外部链接,总结的很详细
一、零散知识点补充
1、@Import注解:导入组件,给容器中自动创建组件
(1)@Import必须配合组件声明的注解一起使用,比如:@Configuration、@Controller、@Service
(2)案例代码:使用@Import

(3)获取容器中的组件并打印

(4)运行结果:可以看见容器中已经有相关的bean了

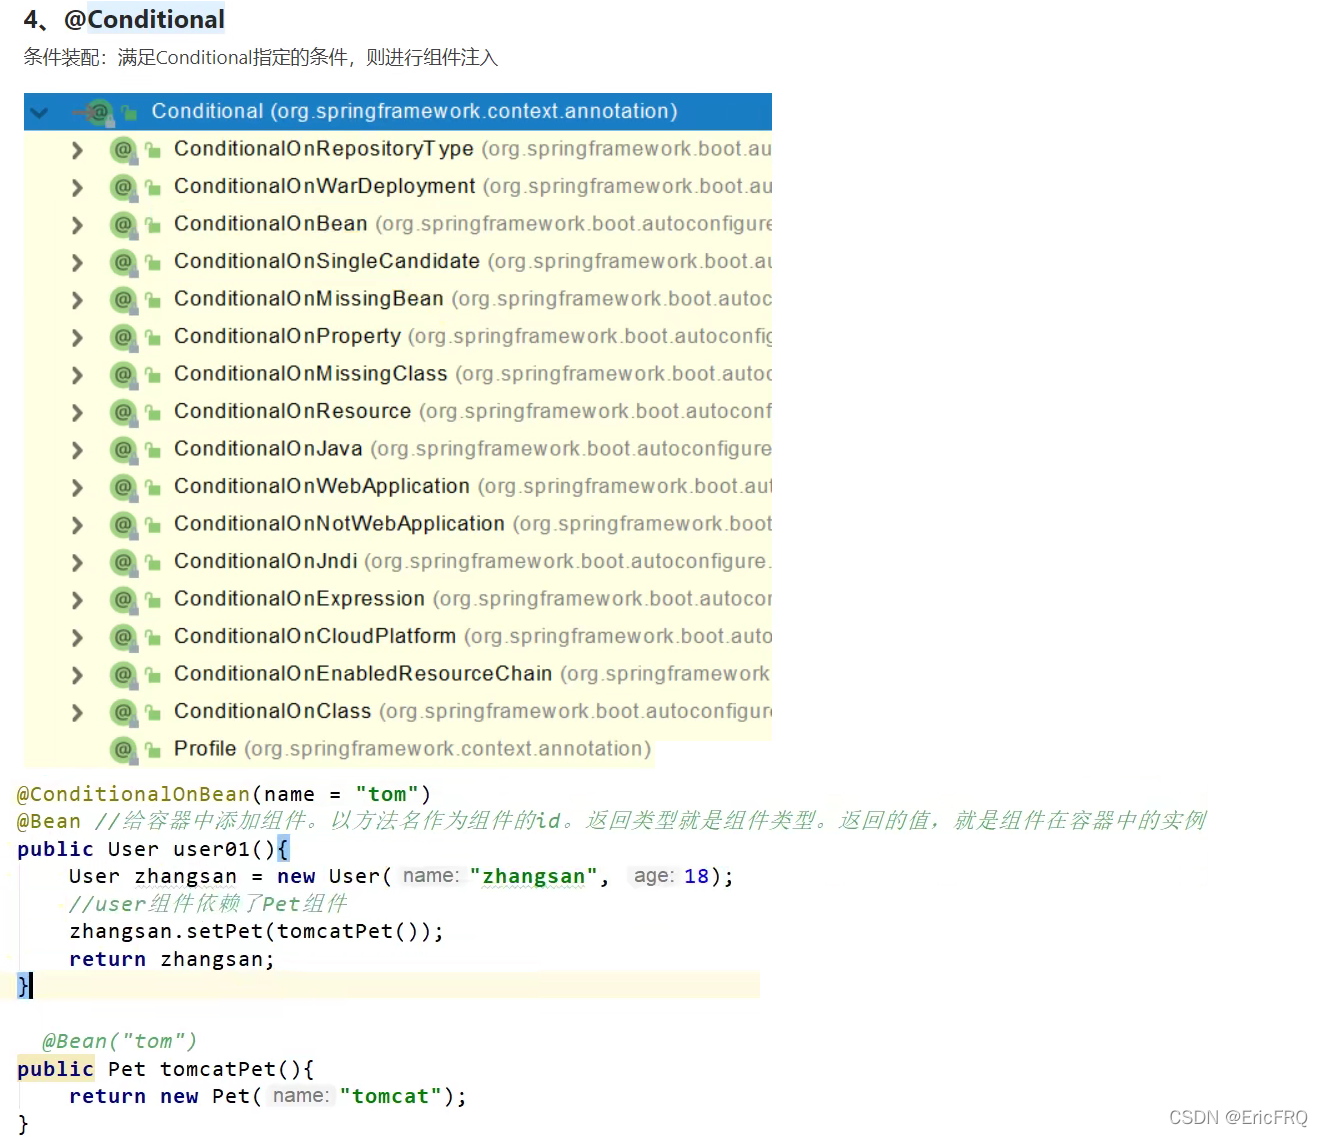
2、@Conditional()注解:满足指定条件给容器中创建组件
举两个实现@Conditional的例子:
(1)使用@ConditionalOnBean(name = “tom”)实现当容器中存在名称为tom的组件时,再创建user01

(2)当容器中不存在名称为tom的bean时,再创建组件@ConditionalOnMissingBean(name = “tom”),用法同上
3、@ImportResource(“classpath:beans.xml”):导入spring配置文件
4、配置文件properties的值绑定
(1)方式一:@Component加@ConfigurationProperties(prefix = "")配合使用
//创建实体类Xxx,Xxx类上面加上
@Component
@ConfigurationProperties(prefix = "abc")
public class Xxx{
	private Integer a;
	private String b;
}
#application.properties配置文件
abc.a=1
abc.b=2
//直接注入即可使用
@Autowired
Xxx xxx;
(2)方式二:@ConfigurationProperties(prefix = "")加@EnableConfigurationProperties(Xxx.class)配合使用
//创建实体类Xxx,Xxx类上面加上
@ConfigurationProperties(prefix = "abc")
public class Xxx{
	private Integer a;
	private String b;
}
//含有注解的@Configuration配置类上面加上@EnableConfigurationProperties,即可实现属性值注入
@Configuration
@EnableConfigurationProperties(Xxx.class)
//直接注入即可使用
@Autowired
Xxx xxx;
5、yaml语法

注意:\n转义的问题

补充:编写yml时有一个属性名称提示的插件,可导入它的依赖并在打包时排除这个插件
<dependency>
  <groupId>org.springframework.boot</groupId>
  <artifactId>spring-boot-autoconfigure-processor</artifactId>
  <optional>true</optional>
</dependency
<project>
  <build>
	  <plugins>
		  <plugin>
			  <groupId>org.springframework.boot</groupId>
			  <artifactId>spring-boot-maven-plugin</artifactId>
			  <configuration>
				  <excludes>
					  <exclude>
						  <groupId>org.springframework.boot</groupId>
						  <artifactId>spring-boot-autoconfigure-processor</artifactId>
					  </exclude>
				  </excludes>
			  </configuration>
		  </plugin>
	  </plugins>
  </build>
</project>
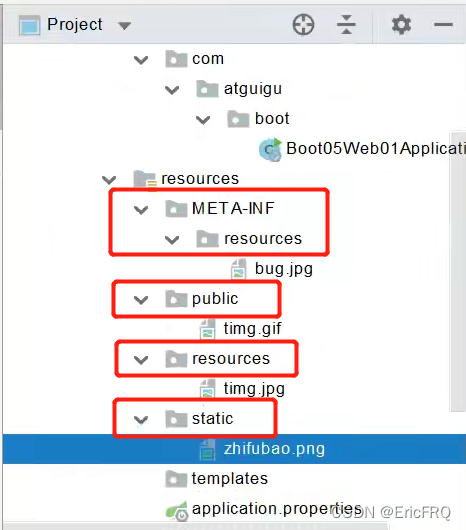
6、springboot项目会识别的静态文件夹(放入进去之后能直接访问的)


- 如果要修改静态资源默认请求路径的前缀(比如Eric),可以添加上配置
spring.mvc.static-path-pattern=/Eric/ - 如果要修改静态资源默认存放路径的前缀(比如webapps),可以添加上配置
spring.web.resources.static-locations=[classpath:/webapps/]
7、webjars:官网地址
- 比如以maven依赖的方式引入jquery,而不是自己下载jquery.js文件放入静态目录下去访问
<dependency>
    <groupId>org.webjars.npm</groupId>
    <artifactId>jquery</artifactId>
    <version>3.6.0</version>
</dependency>
访问localhost:8080/webjars/jquery.js即可访问得到
- 如果使用自定义的webjar,可以参考其他博客:WebJar的打包和使用
8、springboot的默认首页
springboot的默认首页为配置的静态资源根目录下的index.html,比如新建index.html文件,放入resources/static/目录下,访问localhost:8080即可自动访问到index.html
9、springboot的默认小图标
springboot的默认小图标favican.ico,放入resources/static/目录下,访问请求地址查看浏览器小图标即可看到效果

注意:如果要关闭springboot的静态资源访问,比如上面的图标、首页等,添加properties配置web.resources.add-mappings=false
10、restful风格接口
- 表单提交delete、put、patch请求
(1)接口配置加上spring.mvc.hiddenmethod.filter.enabled=true
(2)表单提交类型依旧是post,但表单提交必须带上参数_method,参数值为真正请求方式

如果参数不想使用默认的_method,可以添加配置类自定义参数名称,比如_m

- 如果不是表单提交,比如Ajax、axios,可直接指定为put、delete等方式
11、补充一些请求时的注解,比如@PathVariable、@RequestHeader等


矩阵变量的三种写法

(springboot默认是禁用了矩阵变量的功能)需要手动开启

使用案例


12、http请求参数返回类型,比如返回的数据格式是xml或者json或者自定义格式,有两种解决方案;
- 第一种是请求头方式
(1)直接添加支持xml的依赖即可
<!--xml格式结果返回-->
<dependency>
    <groupId>com.fasterxml.jackson.dataformat</groupId>
    <artifactId>jackson-dataformat-xml</artifactId>
</dependency>
测试返回值类型xml,浏览器请求接口的时候在请求头header里面添加参数Accept的值为application/json或者application/xml

(2)、需要返回自定义格式,比如数据用=Eric=分割
步骤如下:
(2-1)、新建包converter,包下新建类MyMessageConverter,实现HttpMessageConverter<XxxClass>代码如下:
package com.furenqiang.system.config;

import com.furenqiang.system.entity.Test;
import org.springframework.http.HttpInputMessage;
import org.springframework.http.HttpOutputMessage;
import org.springframework.http.MediaType;
import org.springframework.http.converter.HttpMessageConverter;
import org.springframework.http.converter.HttpMessageNotReadableException;
import org.springframework.http.converter.HttpMessageNotWritableException;

import java.io.IOException;
import java.io.OutputStream;
import java.util.List;

public class MyMessageConverter implements HttpMessageConverter<Test> {

    @Override
    public boolean canRead(Class<?> aClass, MediaType mediaType) {
        return false;
    }

    @Override
    public boolean canWrite(Class<?> aClass, MediaType mediaType) {
        //return aClass.isAssignableFrom(Test.class);
        return true;
    }

    @Override
    public List<MediaType> getSupportedMediaTypes() {
        return MediaType.parseMediaTypes("application/x-mymsg");
    }

    @Override
    public Test read(Class<? extends Test> aClass, HttpInputMessage httpInputMessage) throws IOException, HttpMessageNotReadableException {
        return null;
    }

    @Override
    public void write(Test test, MediaType mediaType, HttpOutputMessage httpOutputMessage) throws IOException, HttpMessageNotWritableException {
        //自定义协议数据写出格式
        String data = test.getId() + "=EricFRQ=" + test.getName();
        OutputStream body = httpOutputMessage.getBody();
        body.write(data.getBytes());
    }
}
(2-2)、在配置类里添加自定义类型使其生效
package com.furenqiang.system.config;

import org.springframework.context.annotation.Bean;
import org.springframework.context.annotation.Configuration;
import org.springframework.http.converter.HttpMessageConverter;
import org.springframework.web.servlet.config.annotation.WebMvcConfigurer;

import java.util.List;

@Configuration
public class MyConfig {

    @Bean
    public WebMvcConfigurer webMvcConfigurer(){
        return new WebMvcConfigurer() {
            @Override
            public void extendMessageConverters(List<HttpMessageConverter<?>> converters) {
                converters.add(new MyMessageConverter());
            }
        };
    }
}
(2-3)、用postman测试效果,在请求头上面将参数Accept的值设置为application/x-mymsg

- 第二种是参数方式,springboot2也有相关功能
使用步骤:
(1)、配置文件application.properties添加配置spring.mvc.contentnegotiation.favor-parameter=true开启格式功能
(2)、请求时带上参数format,比如此接口

(2-1)、需要返回成xml
添加依赖
<!--xml格式结果返回-->
<dependency>
    <groupId>com.fasterxml.jackson.dataformat</groupId>
    <artifactId>jackson-dataformat-xml</artifactId>
</dependency>
请求

(2-2)、需要返回成json

(2-3)、需要返回自定义类型
(2-3-1)、新建消息转换器,代码同上:(2-1)
package com.furenqiang.system.config;

import com.furenqiang.system.entity.Test;
import org.springframework.http.HttpInputMessage;
import org.springframework.http.HttpOutputMessage;
import org.springframework.http.MediaType;
import org.springframework.http.converter.HttpMessageConverter;
import org.springframework.http.converter.HttpMessageNotReadableException;
import org.springframework.http.converter.HttpMessageNotWritableException;

import java.io.IOException;
import java.io.OutputStream;
import java.util.List;

public class MyMessageConverter implements HttpMessageConverter<Test> {

    @Override
    public boolean canRead(Class<?> aClass, MediaType mediaType) {
        return false;
    }

    @Override
    public boolean canWrite(Class<?> aClass, MediaType mediaType) {
        //return aClass.isAssignableFrom(Test.class);
        return true;
    }

    @Override
    public List<MediaType> getSupportedMediaTypes() {
        return MediaType.parseMediaTypes("application/x-mymsg");
    }

    @Override
    public Test read(Class<? extends Test> aClass, HttpInputMessage httpInputMessage) throws IOException, HttpMessageNotReadableException {
        return null;
    }

    @Override
    public void write(Test test, MediaType mediaType, HttpOutputMessage httpOutputMessage) throws IOException, HttpMessageNotWritableException {
        //自定义协议数据写出格式
        String data = test.getId() + "=EricFRQ=" + test.getName();
        OutputStream body = httpOutputMessage.getBody();
        body.write(data.getBytes());
    }
}
(2-3-2)、添加配置类,将自定义类型加入配置并生效
package com.furenqiang.system.config;

import org.springframework.context.annotation.Bean;
import org.springframework.context.annotation.Configuration;
import org.springframework.http.MediaType;
import org.springframework.http.converter.HttpMessageConverter;
import org.springframework.web.accept.HeaderContentNegotiationStrategy;
import org.springframework.web.accept.ParameterContentNegotiationStrategy;
import org.springframework.web.servlet.config.annotation.ContentNegotiationConfigurer;
import org.springframework.web.servlet.config.annotation.WebMvcConfigurer;

import java.util.Arrays;
import java.util.HashMap;
import java.util.List;

@Configuration
public class MyConfig {

    @Bean
    public WebMvcConfigurer webMvcConfigurer(){
        return new WebMvcConfigurer() {
            @Override
            public void extendMessageConverters(List<HttpMessageConverter<?>> converters) {
                converters.add(new MyMessageConverter());
            }

            @Override
            public void configureContentNegotiation(ContentNegotiationConfigurer configurer) {
                HashMap<String, MediaType> hashMap = new HashMap<>();
                hashMap.put("json",MediaType.APPLICATION_JSON);
                hashMap.put("xml",MediaType.APPLICATION_XML);
                hashMap.put("mymsg",MediaType.parseMediaType("application/x-mymsg"));
                ParameterContentNegotiationStrategy parameterStrategy = new ParameterContentNegotiationStrategy(hashMap);
                //这里主要是将请求头Accept:application/xml类型消息转换也打开
                HeaderContentNegotiationStrategy headerStrategy = new HeaderContentNegotiationStrategy();
                configurer.strategies(Arrays.asList(parameterStrategy,headerStrategy));
            }
        };
    }
}
(2-3-3)、测试http://localhost:10012/test/getTest?format=mymsg

13、判断某服务是否导入了某个类
public class SystemApplication {
	ClassLoader classLoader = SystemApplication.class.getClassLoader();
	boolean present = ClassUtils.isPresent("com.furenqiang.system.XxxClass", classLoader);
}
14、springboot获取系统变量、环境变量等
方法一:
@Value("${MAVEN_HOME}")
private String msg;
方法二:启动类run方法的返回值
        ConfigurableApplicationContext run = SpringApplication.run(RunPortal.class, args);
        ConfigurableEnvironment environment = run.getEnvironment();
        Map<String, Object> systemEnvironment = environment.getSystemEnvironment();
        Map<String, Object> systemProperties = environment.getSystemProperties();
二、拦截器和异常
1、一般用于登录检查
(1)、配置拦截器要拦截哪些请求,新建拦截器实现HandlerInterceptor接口,重写拦截处理方法
(2)、把这些配置放在容器中,新建配置类
package com.furenqiang.system.config;

import org.springframework.context.annotation.Bean;
import org.springframework.context.annotation.Configuration;
import org.springframework.http.MediaType;
import org.springframework.http.converter.HttpMessageConverter;
import org.springframework.web.accept.HeaderContentNegotiationStrategy;
import org.springframework.web.accept.ParameterContentNegotiationStrategy;
import org.springframework.web.servlet.config.annotation.ContentNegotiationConfigurer;
import org.springframework.web.servlet.config.annotation.WebMvcConfigurer;

import java.util.Arrays;
import java.util.HashMap;
import java.util.List;

@Configuration
public class MyConfig {

    @Bean
    public WebMvcConfigurer webMvcConfigurer(){
        return new WebMvcConfigurer() {
            @Override
			 public void addInterceptors(InterceptorRegistry registry) {
			 }
        };
    }
}
(3)、指定拦截规则

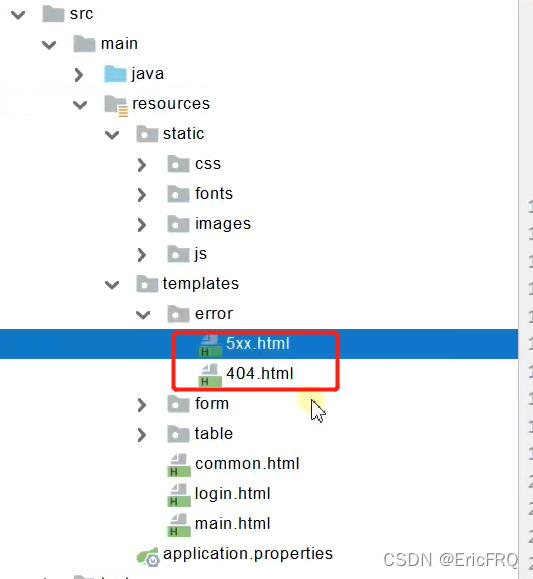
2、统一错误页
比如访问一个未有的资源,会返回默认错误页,如下图

可以设置统一错误页,在下面路径(springboot会自动解析下面路径resources/template/error下的4xx.html\5xx.html)放入自定义的html页面,网上有很多错误页面模板,比如:模板

再次访问不存在的资源,就会跳转到自定义错误页

3、异常处理自动配置

4、统一处理异常
(1)、统一处理spring已有异常,如空指针、数学运算错误异常
新建GlobalExceptionHandler配置类,统一处理异常 ,代码如下:
import org.springframework.web.bind.annotation.ControllerAdvice;
import org.springframework.web.bind.annotation.ExceptionHandler;

/*
* 处理整个web controller异常
* */
@ControllerAdvice
public class GlobalExceptionHandler {

@ExceptionHandler({ArithmeticException.class,NullPointerException.class})
    public String handleArithException(Exception e){
        System.out.println(e);
        return "login";//视图地址
    }
}
(2)统一处理自定义异常
比如自定义一个用户太多异常,代码如下:
import org.springframework.http.HttpStatus;
import org.springframework.web.bind.annotation.ResponseStatus;

@ResponseStatus(value = HttpStatus.FORBIDDEN,reason = "用户太多异常")
public class UserTooManyException extends RuntimeException {

    public UserTooManyException(){
    }

    public UserTooManyException(String message){
        super(message);
    }
}
抛出自定义异常
throw new UserTooManyException();
测试抛出用户太多异常后的结果

(3)上面的@ResponseStatus(value = HttpStatus.FORBIDDEN,reason = "用户太多异常")使用了spring的异常解析器ResponseStatus,我们还可以使用自定义异常解析器

5、springboot中使用Servlet
- 方式一:原生组件注入方式
1、直接使用Servlet Api:直接响应,不会经过spring的拦截器
步骤如下:
(1)、启动类加上注解@ServletComponentScan(basePackages = "com.furenqiang.system")
(2)、自定义Servlet,代码如下:
package com.furenqiang.system.servlet;

import javax.servlet.ServletException;
import javax.servlet.annotation.WebServlet;
import javax.servlet.http.HttpServlet;
import javax.servlet.http.HttpServletRequest;
import javax.servlet.http.HttpServletResponse;
import java.io.IOException;

@WebServlet(urlPatterns = "/my")
public class myServlet extends HttpServlet {

    @Override
    protected void doGet(HttpServletRequest req, HttpServletResponse resp) throws ServletException, IOException {
        resp.getWriter().write("mymymymy");
    }
}
2、过滤器Filter,指定拦截css、images下的资源

3、监听器Listener

- 方式二:RegistrationBean(推荐)
(1)、注释掉上面的@WebServlet(urlPatterns = "/my")、@WebFilter和@WebListener注解,其他不变
(2)、新建配置类,代码如下:

注意加上单实例注解

6、定制化
定制化的常见方式:编写自定义的配置类,不论写了几个配置类,只要实现了WebMvcConfigurer接口,都可以生效

如果要完全控制,加上@EnableWebMvc,但是一般不要用,一旦使用,所有spring默认配置都失效
三、springboot的一些监控
1、springboot集成druid监控服务
Alibaba druid主要是对sql、session、表、http请求的监控
1、引入依赖:

2、相关配置项代表的含义

spring.datasource.url=jdbc:postgresql://localhost:5432/datahub
spring.datasource.username=postgres
spring.datasource.password=qQq314159@26
#druid配置
#配置监控登录页
spring.datasource.druid.stat-view-servlet.enabled=true
spring.datasource.druid.stat-view-servlet.login-username=admin
spring.datasource.druid.stat-view-servlet.login-password=1qaz@WSX
#配置是否可以重置
spring.datasource.druid.stat-view-servlet.reset-enable=false
#监控web
spring.datasource.druid.web-stat-filter.enabled=true
spring.datasource.druid.web-stat-filter.url-pattern=/*
#stat(监控sql)wall(监控防火墙)
spring.datasource.druid.filters=stat,wall

可参考官方使用文档:Spring Boot项目中轻松集成Druid数据库连接池和监控。
访问IP+端口+/druid即可访问
2、springboot Actuator 对每一个微服务进行监控
主要是对多个微服务的监控、追踪、审计、控制等
springboot1.x和springboot2.x内置的actuator版本也是不一样的,区别如下:

使用集成步骤:也可以参考官方文档
1、添加依赖:
<dependencies>
    <dependency>
        <groupId>org.springframework.boot</groupId>
        <artifactId>spring-boot-starter-actuator</artifactId>
    </dependency>
</dependencies>
2、访问ip+端口+/actuator查看信息,每一项代表什么可以参考官方文档
3、如果要以http的方式获取监控指标数据,需要添加以下配置
management.endpoints.enabled-by-default=true #默认开启所有监控端点
management.endpoints.web.exposure.include=* #以web方式暴露所有端点
management.endpoint.health.show-details=always #开启健康状态的详细信息
这时再去访问ip+端口+/actuator/metrics/+具体指标项即可查看服务器相关指标,如下图:

各端点代表的意义是:

常用的三个分别是:health健康状况、metrics运行指标、loggers
4、自定义端点信息,比如自定义health信息

自定义info信息

3、spring-boot-admin监控服务性能界面
使用步骤:
1、新建一个springboot服务,引入依赖
<dependency>
    <groupId>de.codecentric</groupId>
    <artifactId>spring-boot-admin-starter-server</artifactId>
    <version>2.5.1</version>
</dependency>
2、在启动类上加上@EnableAdminServer
@Configuration
@EnableAutoConfiguration
@EnableAdminServer
public class SpringBootAdminApplication {
    public static void main(String[] args) {
        SpringApplication.run(SpringBootAdminApplication.class, args);
    }
}
3、访问ip+端口,即可看到此服务的监控信息
4、将其他微服务也加入此监控服务
(4-1)引入依赖
<dependency>
    <groupId>de.codecentric</groupId>
    <artifactId>spring-boot-admin-starter-client</artifactId>
    <version>2.5.1</version>
</dependency>
(4-2)application加入配置
spring.boot.admin.client.url=http://localhost:8080#填写admin-sever的地址
spring.boot.admin.client.instance.prefer-ip=true#使用IP注册服务
management.endpoints.web.exposure.include=*#以web的方式暴露出去
注意:如果在其他微服务中使用了springsecurity框架控制权限,需要添加以下代码进行监控拦截关闭
@Configuration
public static class SecurityPermitAllConfig extends WebSecurityConfigurerAdapter {
    @Override
    protected void configure(HttpSecurity http) throws Exception {
        http.authorizeRequests().anyRequest().permitAll()
            .and().csrf().disable();
    }
}