Springboot常用的依赖
<!-- Spring Boot提供的配置处理器依赖,代码提示 -->
        <dependency>
            <groupId>org.springframework.boot</groupId>
            <artifactId>spring-boot-configuration-processor</artifactId>
            <optional>true</optional>
        </dependency>

        <!--        web 开发场景-->
        <dependency>
            <groupId>org.springframework.boot</groupId>
            <artifactId>spring-boot-starter-web</artifactId>
        </dependency>

        <!--        测试依赖-->
        <dependency>
            <groupId>org.springframework.boot</groupId>
            <artifactId>spring-boot-starter-test</artifactId>
            <scope>test</scope>
        </dependency>

        <!--        热部署-->
        <dependency>
            <groupId>org.springframework.boot</groupId>
            <artifactId>spring-boot-devtools</artifactId>
        </dependency>

        <!--    静态模板依赖-->
        <dependency>
            <groupId>org.springframework.boot</groupId>
            <artifactId>spring-boot-starter-thymeleaf</artifactId>
        </dependency>


        <!--        IO 操作-->
        <dependency>
            <groupId>commons-io</groupId>
            <artifactId>commons-io</artifactId>
            <version>2.6</version>
        </dependency>


        <!--        数据库连接-->
        <dependency>
            <groupId>mysql</groupId>
            <artifactId>mysql-connector-java</artifactId>
            <scope>runtime</scope>
        </dependency>
        <!--        阿里巴巴 适配的druid数据源启动器 -->
        <dependency>
            <groupId>com.alibaba</groupId>
            <artifactId>druid-spring-boot-starter</artifactId>
            <version>1.1.10</version>
        </dependency>

        <!--        Spring   Data JPA启动器-->
        <dependency>
            <groupId>org.springframework.boot</groupId>
            <artifactId>spring-boot-starter-data-jpa</artifactId>
        </dependency>

        <!--        redis 依赖-->
        <dependency>
            <groupId>org.springframework.boot</groupId>
            <artifactId>spring-boot-starter-data-redis</artifactId>
        </dependency>
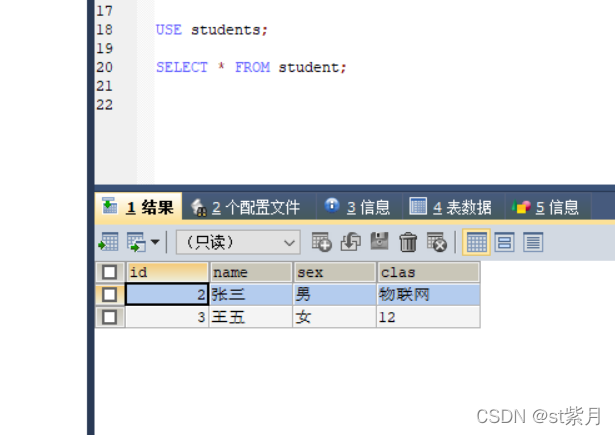
在数据库中新建一个表,student,并且加入一些数据

在idea中的配置文件中配置与数据库相关的信息:
配置数据库连接池Druid的相关信息:
spring.datasource.type=com.alibaba.druid.pool.DruidDataSource
spring.datasource.initialsize=20
spring.datasource.maxactive=100
spring.datasource.minidle=10
配置本地数据库的相关信息:
spring:
  datasource:
    driver-class-name: com.mysql.jdbc.Driver
    url: jdbc:mysql://localhost:3306/students?useUnicode=true&characterEncoding=UTF-8&serverTimezone=Asia/Shanghai&useSSL=false
    username: root
    password: 1234
新建一个student类,与数据表的字段一一对应
package com.example.springbootstudentsystem;

import javax.persistence.Entity;
import javax.persistence.Id;
//类对应的表名
@Entity(name = "student")
public class student {
    //唯一主键
    @Id
    private Integer id;
    private String name;
    private String sex;
    private String clas;

    public Integer getId() {
        return id;
    }

    public void setId(Integer id) {
        this.id = id;
    }

    public String getName() {
        return name;
    }

    public void setName(String name) {
        this.name = name;
    }

    public String getSex() {
        return sex;
    }

    public void setSex(String sex) {
        this.sex = sex;
    }

    public String getClas() {
        return clas;
    }

    public void setClas(String clas) {
        this.clas = clas;
    }

    @Override
    public String toString() {
        return "student{" +
                "id=" + id +
                ", name='" + name + '\'' +
                ", sex='" + sex + '\'' +
                ", clas='" + clas + '\'' +
                '}';
    }
}
新建一个studentTest接口继承jpa的JpaRepository方法,然后给student类增加方法
package com.example.springbootstudentsystem;

import org.apache.ibatis.annotations.Delete;
import org.apache.ibatis.annotations.Insert;
import org.apache.ibatis.annotations.Select;
import org.springframework.data.jpa.repository.JpaRepository;
import org.springframework.data.jpa.repository.Modifying;
import org.springframework.data.jpa.repository.Query;
import org.springframework.stereotype.Repository;

import javax.transaction.Transactional;

//类上面添加注解@Repository,表示包含增删改查等功能的接口
@Repository
public interface studentTest extends JpaRepository<student, Integer>{
    //自己手写SQL代码
    @Select("select * from student where id = #{id}")
    public student getById(Integer id);

	//JpaRepository当中自带的方法
    public student getAllById(Integer Id);

	//第几个问号后面跟对应的数字
	//插入语句
	@Transactional
	@Query(value = "insert into student values(?1,?2,?3,?4)", nativeQuery = true)
	@Modifying
	int insertRule(int nums,int rule);

	//更新语句
	@Transactional
	@Query(value = "update student set name = ?1", nativeQuery = true)
	@Modifying
	public void updateCount(int count);

	//删除语句
	@Transactional
    @Modifying
    @Query(value = "delete from student  where id =?1",nativeQuery = true)
    int deleteId(int id);

	//查询
	@Transactional
	@Query(value = "select * from student")
	@Modifying
	Count selectCount();
}
//到这里,关于jpa的依赖导入和配置基本完成。这里自带很多内置的增删改查方法,不用我们自己写sql语句,直接调用即可。但是也可以自己手写SQL代码

不加@Transactional有可能会抛javax.persistence.TransactionRequiredException:异常,我是在抛异常之后才加上的。
@Transactional、 @Query、@Modifying这三个注解都是需要的
nativeQuery = true代表使用原生sql

在controller访问类当中查询数据库当中的数据
package com.example.springbootstudentsystem;

import org.springframework.beans.factory.annotation.Autowired;
import org.springframework.stereotype.Component;
import org.springframework.stereotype.Controller;
import org.springframework.web.bind.annotation.*;


@CrossOrigin
@Controller
public class test {

    @Autowired
    private studentTest test;

    @ResponseBody
    @RequestMapping("/test")
    public String test(){

        System.out.println(test.getById(3));
        System.out.println(test.getAllById(3));
        test.deleteId(3);
        return "大萨达";

    }

}
查询结果如下:

删除结果如下:


java String.valueOf()的作用
(1)String.valueOf(boolean b) : 将 boolean 变量 b 转换成字符串
(2)String.valueOf(char c) : 将 char 变量 c 转换成字符串
(3)String.valueOf(char[] data) : 将 char 数组 data 转换成字符串
(4)String.valueOf(char[] data, int offset, int count) : 将 char 数组 data 中 由 data[offset] 开始取 count 个元素 转换成字符串
(5)String.valueOf(double d) : 将 double 变量 d 转换成字符串
(6)String.valueOf(float f) : 将 float 变量 f 转换成字符串
(7)String.valueOf(int i) : 将 int 变量 i 转换成字符串
(8)String.valueOf(long l) : 将 long 变量 l 转换成字符串
(9)String.valueOf(Object obj) : 将 obj 对象转换成 字符串, 等于 obj.toString()
getType()函数可以判断变量的数据类型
test.java
package com.example.springbootstudentsystem;

import org.springframework.beans.factory.annotation.Autowired;
import org.springframework.stereotype.Component;
import org.springframework.stereotype.Controller;
import org.springframework.web.bind.annotation.*;


@CrossOrigin
//RestController只能返回字符串
@RestController
public class test {

    @Autowired
    private studentTest test;

    @ResponseBody
    @RequestMapping("/test")
    public String test(){
		//查询到的结果是一个对象,将它转为字符串
        String a = String.valueOf(test.getById(2));
        System.out.println(a);
        return a;
    }

}
当访问对应的端口时

创建ajax对象获取返回的数据
