1、SpringBoot特点
1.1、依赖管理
我们查看一下 pom.xml 文件中的项目依赖情况:
<parent>
    <groupId>org.springframework.boot</groupId>
    <artifactId>spring-boot-starter-parent</artifactId>
    <version>2.6.6</version>
</parent>
点进去之后发现其还有父项目:
<parent>
  	<groupId>org.springframework.boot</groupId>
  	<artifactId>spring-boot-dependencies</artifactId>
 	<version>2.6.6</version>
</parent>
点进去之后:
<?xml version="1.0" encoding="UTF-8"?>
<project xmlns="http://maven.apache.org/POM/4.0.0" xsi:schemaLocation="http://maven.apache.org/POM/4.0.0 http://maven.apache.org/xsd/maven-4.0.0.xsd" xmlns:xsi="http://www.w3.org/2001/XMLSchema-instance">
  <modelVersion>4.0.0</modelVersion>
  <groupId>org.springframework.boot</groupId>
  <artifactId>spring-boot-dependencies</artifactId>
  <version>2.6.6</version>
  <packaging>pom</packaging>
  <name>spring-boot-dependencies</name>
  <description>Spring Boot Dependencies</description>
  <url>https://spring.io/projects/spring-boot</url>
  <licenses>
    <license>
      <name>Apache License, Version 2.0</name>
      <url>https://www.apache.org/licenses/LICENSE-2.0</url>
    </license>
  </licenses>
  <developers>
    <developer>
      <name>Pivotal</name>
      <email>info@pivotal.io</email>
      <organization>Pivotal Software, Inc.</organization>
      <organizationUrl>https://www.spring.io</organizationUrl>
    </developer>
  </developers>
  <scm>
    <url>https://github.com/spring-projects/spring-boot</url>
  </scm>
  <properties>
    <activemq.version>5.16.4</activemq.version>
    <antlr2.version>2.7.7</antlr2.version>
    <appengine-sdk.version>1.9.95</appengine-sdk.version>
    <artemis.version>2.19.1</artemis.version>
      ......
父项目的主要功能就是依赖管理,几乎声明了所有开发中常用的依赖的版本号,自动版本仲裁机制。
-
无需关注版本号,自动版本仲裁
- 引入依赖默认都可以不写版本;
- 引入非版本仲裁的jar,要写版本号。
比如:我们想要引入mysql的依赖
<dependency>
    <groupId>mysql</groupId>
    <artifactId>mysql-connector-java</artifactId>
</dependency>
在这里我们不需要指定版本号。刷新maven后,查看版本号为:8.0.28
可以查找一下
spring-boot-dependencies文件中指定的mysql版本号:<mysql.version>8.0.28</mysql.version> -
可以修改默认版本号
- 查看
spring-boot-dependencies里面规定当前依赖的版本用的key; - 在当前项目里面重写配置
比如:就修改mysql的驱动版本为5.1.43
查看
spring-boot-dependencies里面规定当前依赖的版本用的key:(上边已经提到过了,使用的是<mysql.version>标签)在当前项目的
pom.xml中重写:<properties> <mysql.version>5.1.43</mysql.version> </properties>再次刷新maven,可以看到mysql的包就是5.1.43了。
- 查看
开发导入starter场景启动器
-
spring-boot-starter-*: *就某种场景 -
只要引入starter,这个场景的所有常规需要的依赖我们都自动引入
-
SpringBoot所有支持的场景
https://docs.spring.io/spring-boot/docs/current/reference/html/using.html#using.build-systems.starters
-
*-spring-boot-starter: 第三方为我们提供的简化开发的场景启动器 -
所有场景启动器最底层的依赖
<dependency>
  	<groupId>org.springframework.boot</groupId>
  	<artifactId>spring-boot-starter</artifactId>
  	<version>2.6.6</version>
  	<scope>compile</scope>
</dependency>
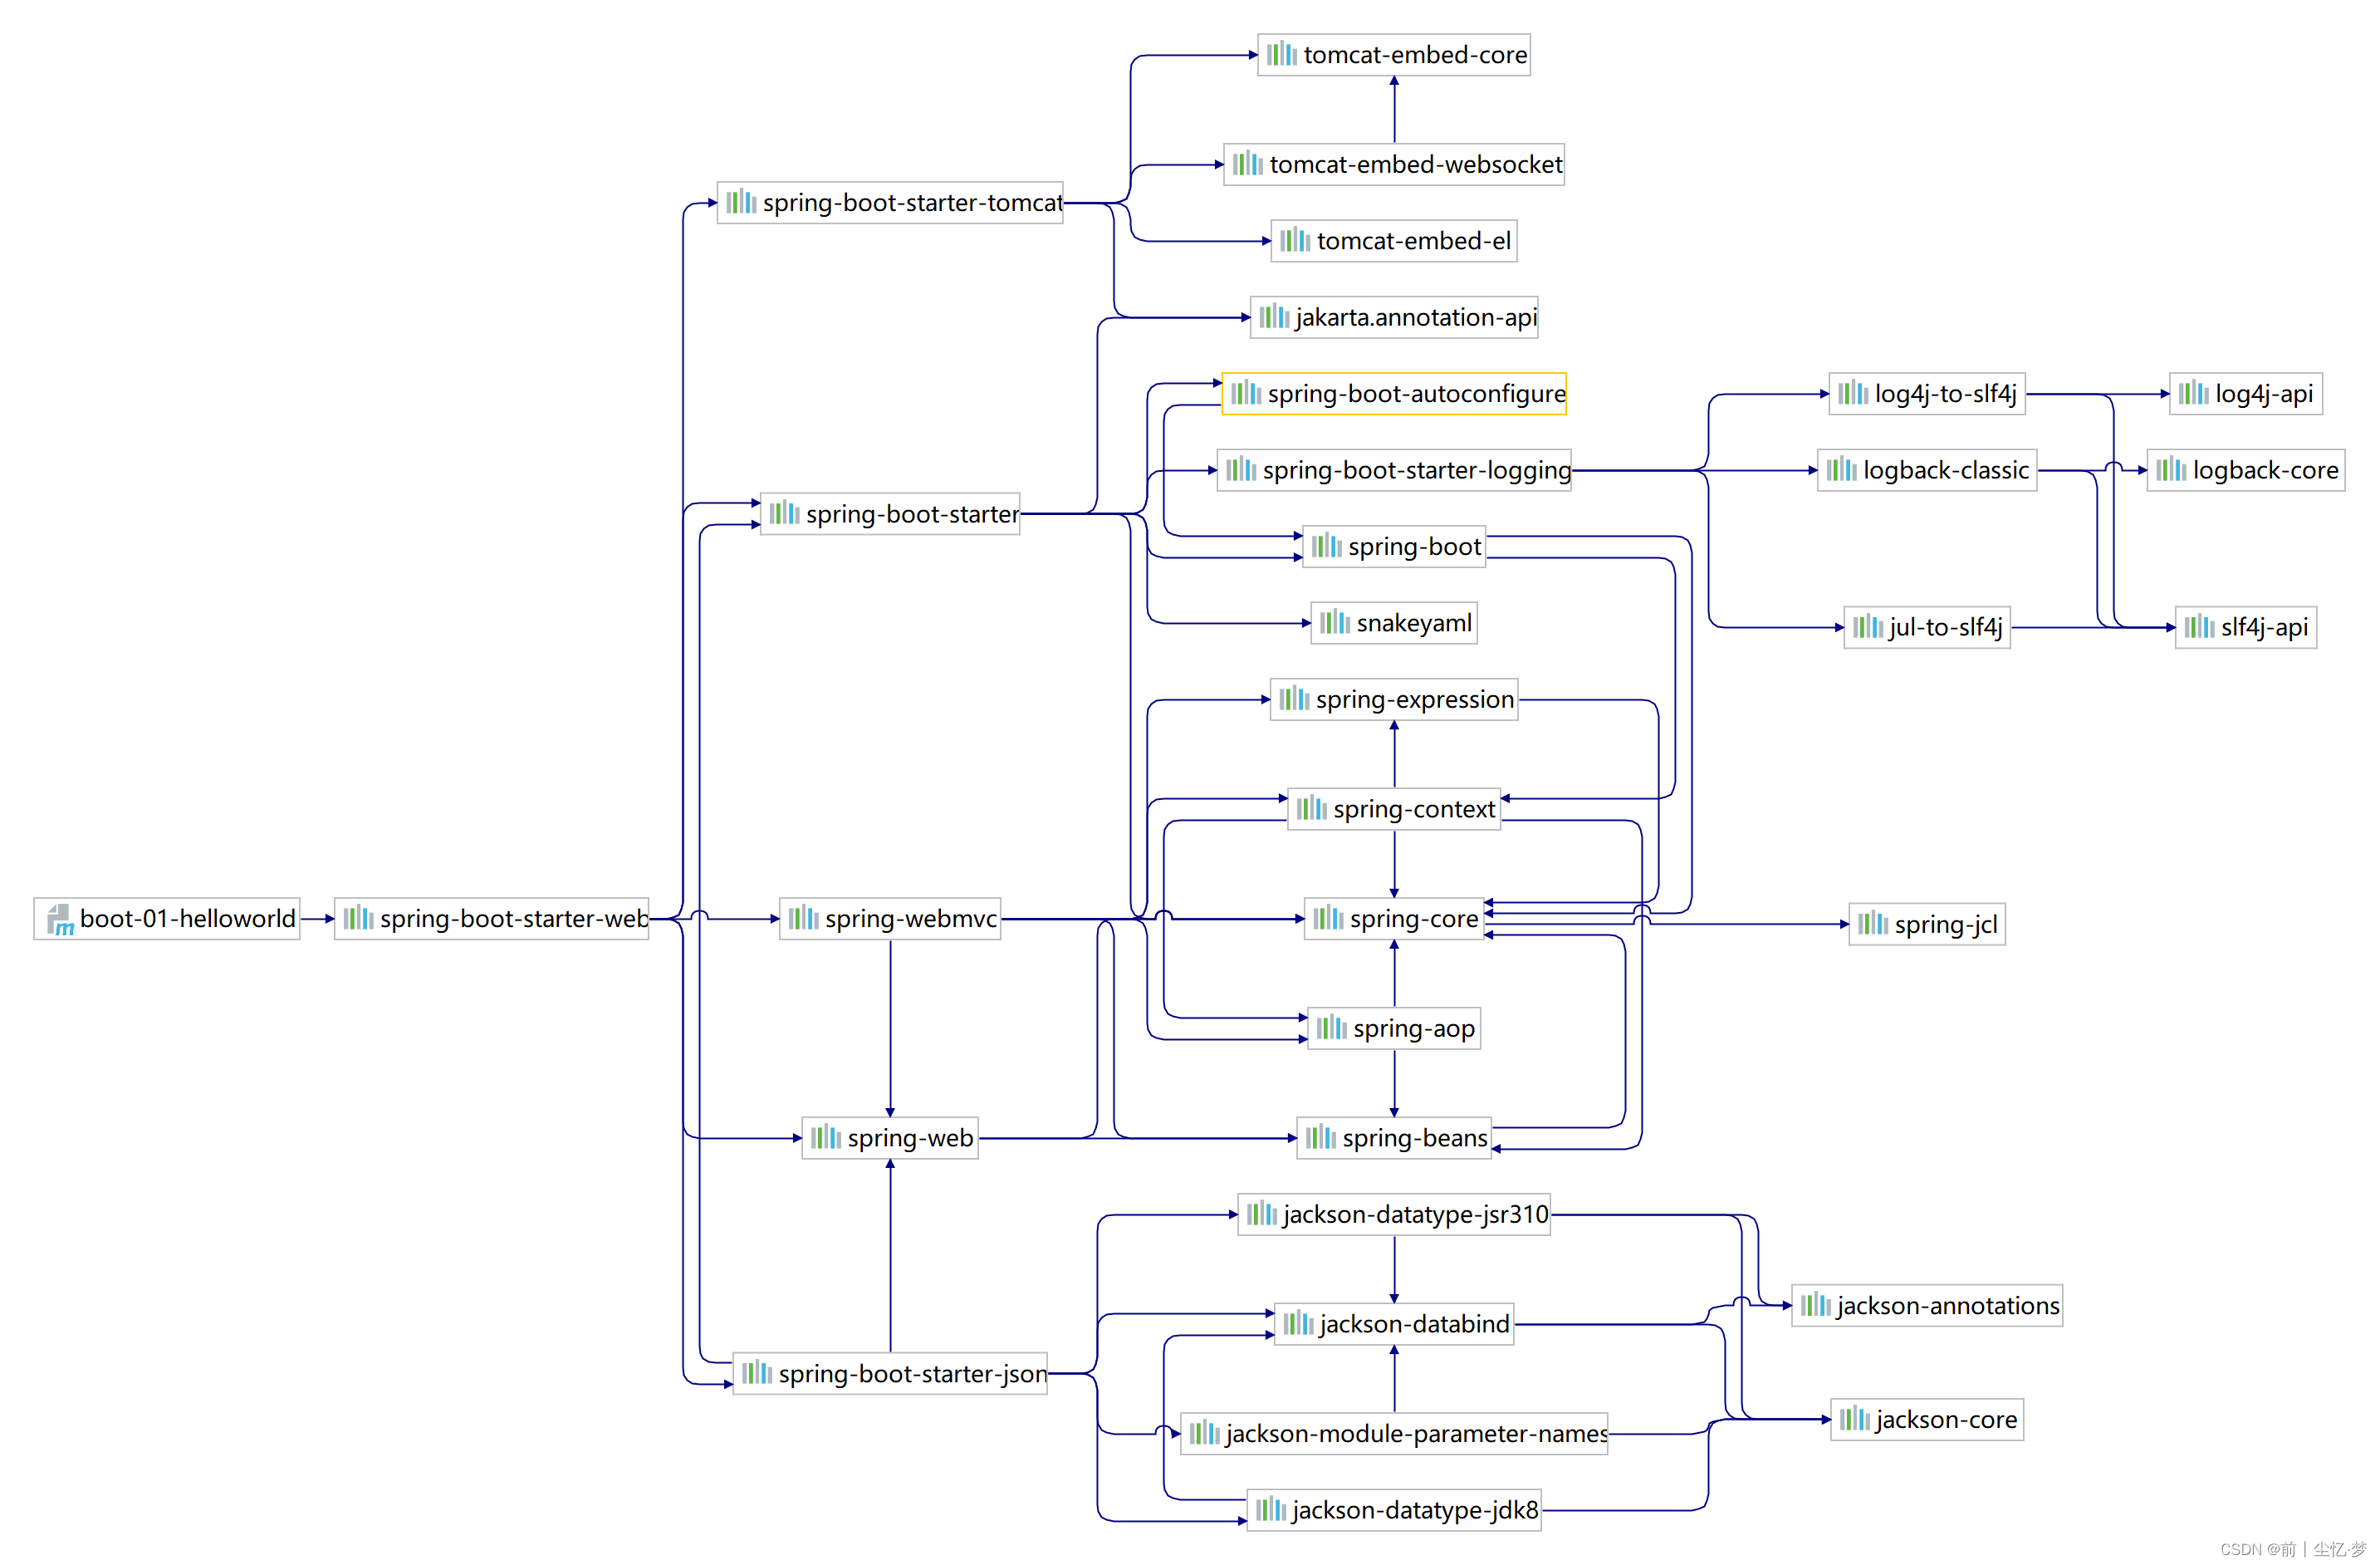
可以使用IDEA的功能,查看一下jar包的依赖关系:

1.2、自动配置
-
自动配好Tomcat
-
引入Tomcat依赖
web的场景
spring-boot-starter-web中已经引入Tomcat:<dependency> <groupId>org.springframework.boot</groupId> <artifactId>spring-boot-starter-tomcat</artifactId> <version>2.6.6</version> <scope>compile</scope> </dependency> -
配置Tomcat
可以在统一的配置文件中进行配置即可。
-
-
自动配好SpringMVC
-
引入SpringMVC全套组件
-
自动配好SpringMVC常用组件(功能)
-
- SpringBoot帮我们配置好了所有web开发的常见场景
验证:在主程序中我们打印一下IOC容器中注册的Bean:
@SpringBootApplication
public class MainApplication {
    public static void main(String[] args) {
        //1、返回IOC容器
        ConfigurableApplicationContext run =
                SpringApplication.run(MainApplication.class, args);
        //2、查看容器里边的组件
        String[] names = run.getBeanDefinitionNames();
        for (String name :
                names) {
            System.out.println(name);
        }
    }

}
第一、在web应用中,肯定要配置的就是前端控制器:dispatcherServlet
org.springframework.boot.autoconfigure.web.servlet.DispatcherServletAutoConfiguration$DispatcherServletConfiguration dispatcherServlet第二、解决字符乱码问题,需要配置字符编码过滤器:characterEncodingFilter
org.springframework.boot.autoconfigure.web.servlet.HttpEncodingAutoConfiguration
characterEncodingFilter
第三、视图解析器
......
defaultViewResolver
viewResolver
......
第四、文件上传解析器:multipartResolver
org.springframework.boot.autoconfigure.web.servlet.MultipartAutoConfiguration multipartConfigElement multipartResolver -
-
-
默认的包结构
-
主程序所在包及其下面的所有子包里面的组件都会被默认扫描进来
-
无需以前的包扫描配置
-
想要改变扫描路径,
@SpringBootApplication(scanBasePackages="com.atguigu")- 或者
@ComponentScan指定扫描路径
查看
@SpringBootApplication源码:@Target({ElementType.TYPE}) @Retention(RetentionPolicy.RUNTIME) @Documented @Inherited @SpringBootConfiguration @EnableAutoConfiguration @ComponentScan( excludeFilters = {@Filter( type = FilterType.CUSTOM, classes = {TypeExcludeFilter.class} ), @Filter( type = FilterType.CUSTOM, classes = {AutoConfigurationExcludeFilter.class} )} ) public @interface SpringBootApplication { ......是一个组合了其他注解的组合注解。
- 或者
-
-
各种配置拥有默认值
-
默认配置最终都是映射到某个类上,如:MultipartProperties

-
配置文件的值最终会绑定每个类上,这个类会在容器中创建对象
-
-
按需加载所有自动配置项
- 非常多的starter
- 引入了哪些场景这个场景的自动配置才会开启
- SpringBoot所有的自动配置功能都在
spring-boot-autoconfigure包里面
2、容器功能
2.1、组件添加
准备两个组件User和Pet:
public class Pet {
    private String name;
    ......
public class User {
    private String name;
    private Integer age;
    ......
之前使用Spring进行组件注册,我们需要创建一个**xml配置文件**,在里边使用 <bean> 标签进行组件注册。
使用SpringBoot,则可以使用 @Configuration 注解。
2.1.1、@Configuration
使用 @Configuration 注解标注一个类(配置类),就相当于说明这是一个配置文件。
@Configuration //告诉SpringBoot,这是一个配置类 == 一个配置文件
public class MyConfig {

    @Bean //给容器中添加组件,以方法名作为组件的id,返回类型是组件类型。返回的值,就是组件在容器中的实例
    public User user01(){
        return new User("zhangsan", 18);
    }

    @Bean("tom") //自定义组件名id
    public Pet tomPet(){
        return new Pet("tomPet");
    }
}
使用 @Bean 注解给容器中注册组件:以方法名作为组件的id,返回类型是组件类型。返回的值,就是组件在容器中的实例。
也就是说,id默认为方法名,也可以自定义组件名id。
那么,如何查看容器中是否包含指定id的类呢?
在主程序中,从IOC容器中获取指定id名的Bean:
@SpringBootApplication
public class MainApplication {
    public static void main(String[] args) {
        //1、返回IOC容器
        ConfigurableApplicationContext run =
                SpringApplication.run(MainApplication.class, args);
        //2、查看容器里边的组件
        String[] names = run.getBeanDefinitionNames();
        for (String name :
                names) {
            System.out.println(name);
        }

        //3、从容器中获取组件
        Pet tom01 = run.getBean("tom", Pet.class);
        Pet tom02 = run.getBean("tom", Pet.class);

        System.out.println(tom01 == tom02); //true
    }

}
也就是说,使用 @Bean 默认就是单实例。
未完待续…