文章目录
一、获取代码
我们从git上拉最新的代码,这里我们要注意一下,一定要拉最新的代码,老代码会有个问题,包是拉不下来的,会有权限问题,Spring内部开发人员已经摒弃了release仓库,类似这种报错。
Could not GET 'https://repo.spring.io/plugins-release/io/spring/gradle/propdeps-plugin/0.0.8-SNAPSHOT/maven-metadata.xml'. Received status code 401 from server: Unauthorized
Disable Gradle 'offline mode' and sync project
后面我又试了各种各样的源,淘宝源、Maven库之类的,都会有差包的问题,所以建议拉最新的就行了。
我们可以在这篇文章中得到一些回答。
https://spring.io/blog/2020/10/29/notice-of-permissions-changes-to-repo-spring-io-fall-and-winter-2020
这里我拉取的是v6.0.0-M3这个版本,加-b XXX可以选择版本。
git clone https://github.com/spring-projects/spring-framework
Tips:为啥叫spring-framework?
This is the home of the Spring Framework: the foundation for all Spring projects. Collectively the Spring Framework and the family of Spring projects are often referred to simply as “Spring”.
二、关于我们使用的IDEA
对于最新的Spring源码,我们相对应的需要使用2021.1以上版本的IDEA,不然在编译的时候会有些问题。
三、关于使用的Gradle
Gradle使用7.0以上的版本就足够了,我用的是7.4.2,我们去官网下载一下,下个完整版的。
https://gradle.org/next-steps/?version=7.4.2&format=all
后续解压,如果需要本地执行命令,在Path里面配置一下就行了,这就不累述了,不是重点。
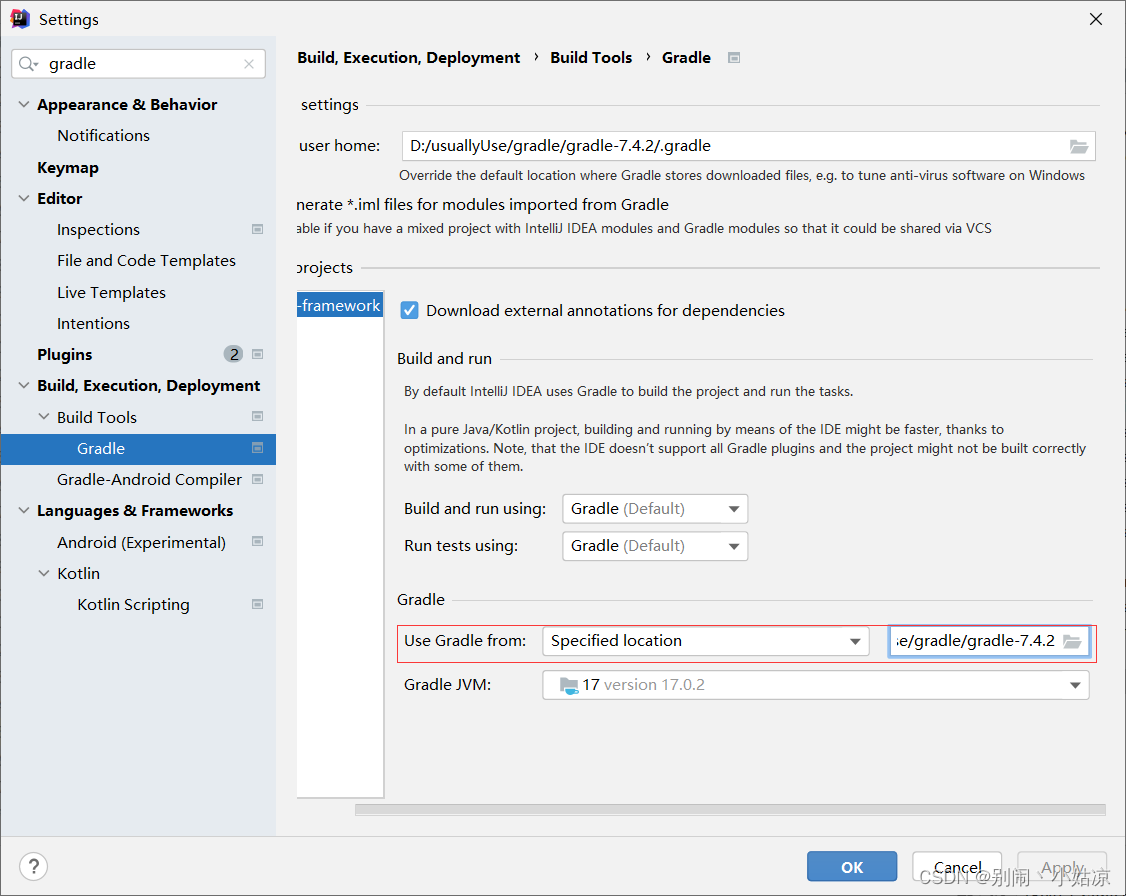
在idea中的选择如下图所示:

- user home:表示gradle的目录,也就是包,执行脚本等等放置的位置,默认在C盘的User下面,我建议换个位置,节省C盘的空间。
- Build and run:可以使用gradle,也可以使用idea自己本身,具体差别不大,不影响我们的操作。
- Use Gradle from:默认使用的是idea自己的gradle,我们可以让他自己下载,但是我选择的是自己配置。
- Gradle JVM:Gradle使用的JVM。
四、关于我们使用的JDK
JDK需要使用17以上的版本,我使用的是17.0.2,在Gradle JVM那里选择一下就行了。
给个下载地址:https://download.oracle.com/java/17/latest/jdk-17_windows-x64_bin.zip
五、关于使用的Kotlin
因为Spring源码最新使用的Gradle使用的是Kotlin语言来写的,所以我们需要装一下Kotlin插件。我使用的是1.6.20版本。
在Settings->Plugins搜索安装一下即可。
六、Spring源码的导入
我们只需要open项目文件夹,IDEA会根据配置文件自动对项目build,如果你发现一些test无法通过并且不想等那么久,我们可以点击在gradle模块的那个大象的图标,自己输入命令gradle build -x test越过测试阶段。
七、自己模块的创建
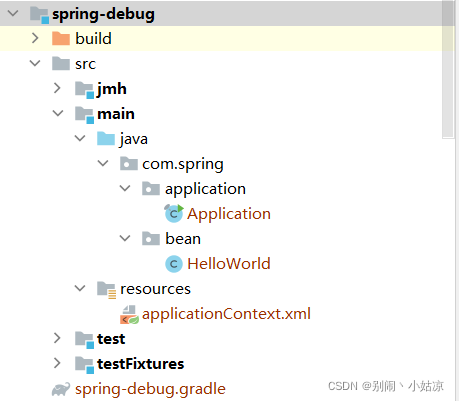
我这里提供一个简单的测试模块

- HelloWorld.java
/*
 * Copyright 2002-2021 the original author or authors.
 *
 * Licensed under the Apache License, Version 2.0 (the "License");
 * you may not use this file except in compliance with the License.
 * You may obtain a copy of the License at
 *
 *      https://www.apache.org/licenses/LICENSE-2.0
 *
 * Unless required by applicable law or agreed to in writing, software
 * distributed under the License is distributed on an "AS IS" BASIS,
 * WITHOUT WARRANTIES OR CONDITIONS OF ANY KIND, either express or implied.
 * See the License for the specific language governing permissions and
 * limitations under the License.
 */

package com.spring.bean;

public class HelloWorld {
	private String user;

	public HelloWorld() {
		System.out.println("HelloWorld's constructor...");
	}

	public void setUser(String user) {
		System.out.println("setUser:" + user);
		this.user = user;
	}

	public HelloWorld(String user) {
		this.user = user;
	}

	public void hello(){
		System.out.println("Hello: " + this.user);
	}

}
- Application.java
/*
 * Copyright 2002-2021 the original author or authors.
 *
 * Licensed under the Apache License, Version 2.0 (the "License");
 * you may not use this file except in compliance with the License.
 * You may obtain a copy of the License at
 *
 *      https://www.apache.org/licenses/LICENSE-2.0
 *
 * Unless required by applicable law or agreed to in writing, software
 * distributed under the License is distributed on an "AS IS" BASIS,
 * WITHOUT WARRANTIES OR CONDITIONS OF ANY KIND, either express or implied.
 * See the License for the specific language governing permissions and
 * limitations under the License.
 */

package com.spring.application;


import com.spring.bean.HelloWorld;

import org.springframework.context.support.AbstractApplicationContext;
import org.springframework.context.support.ClassPathXmlApplicationContext;

final class Application {
	private Application(){}

	public static void main(String[] args) {
		//1. 创建 Spring 的 IOC 容器
		AbstractApplicationContext ctx = new ClassPathXmlApplicationContext("applicationContext.xml");
		//2. 从 IOC 容器中获取 bean 的实例
		HelloWorld helloWorld = ctx.getBean(HelloWorld.class);
		// 根据类型来获取 bean 的实例: 要求在  IOC 容器中只有一个与之类型匹配的 bean, 若有多个则会抛出异常.
		// 一般情况下, 该方法可用, 因为一般情况下, 在一个 IOC 容器中一个类型对应的 bean 也只有一个.
		// HelloWorld helloWorld1 = ctx.getBean(HelloWorld.class);
		//3. 使用 bean
		helloWorld.hello();
	}
}
- applicationContext.xml
<?xml version="1.0" encoding="UTF-8"?>
<beans xmlns="http://www.springframework.org/schema/beans"
	   xmlns:xsi="http://www.w3.org/2001/XMLSchema-instance"
	   xsi:schemaLocation="http://www.springframework.org/schema/beans https://www.springframework.org/schema/beans/spring-beans.xsd">

	<!-- 配置一个 bean -->
	<bean id="helloWorld" class="com.spring.bean.HelloWorld">
		<!-- 为属性赋值 -->
		<property name="user" value="Jerry"></property>
	</bean>
</beans>
- spring-debug.gradle
description = "Spring Debug"

apply plugin: "kotlin"

dependencies {
    api(project(":spring-context"))
}
1、我们需要注意的点(踩的坑)
1.1、在checkstyleMain阶段无法通过编译
Execution failed for task ':spring-debug:checkstyleMain'.
> Checkstyle rule violations were found. See the report at: file:///D:/study/spring6.0M3/spring-framework/spring-debug/build/reports/checkstyle/main.html
  Checkstyle files with violations: 1
  Checkstyle violations by severity: [error:5]

* Try:
> Run with --stacktrace option to get the stack trace.
> Run with --info or --debug option to get more log output.
> Run with --scan to get full insights.
出现这个错,一般是我们没有按照Spring自己的代码规范进行编码,根据他给的网址file:///D:/study/spring6.0M3/spring-framework/spring-debug/build/reports/checkstyle/main.html,查看对应的行的错误修改就行了,本身也是中文提示,一般都是什么开头没注释、空格只能用tab之类的问题。
1.2、出现包没有的情况,AbstractApplicationContext找不到包
第一步、我们要把spring-context引入我们的模块
api(project(":spring-context"))
第二步、我们要改一下gradle文件的名字
因为在Spring源码中默认是去找项目名称.gradle这个文件,我们创建的模块默认叫build.gradle。
具体是setting.gradle里面的配置导致的
rootProject.children.each {project ->
	project.buildFileName = "${project.name}.gradle"
}
第三步、构建项目
改下名字然后重新构建整个项目,也就是点一下那个刷新的图表。
1.3、在构建时告诉我们缺少xml文件
我们可以ctrl + alt + shift + s

把我们自己的xml加一下就行了。