1. 在spring配置文件中配置事务管理器
<!--创建事务管理器-->
    <bean id="transactionManager" class="org.springframework.jdbc.datasource.DataSourceTransactionManager">
        <!--注入数据源-->
        <property name="dataSource" ref="dataSource"></property>
    </bean>
2. 在spring配置文件中开启事务注解
2.1 在spring配置文件中引入名称空间tx
<beans xmlns="http://www.springframework.org/schema/beans"
       xmlns:xsi="http://www.w3.org/2001/XMLSchema-instance"
       xmlns:context="http://www.springframework.org/schema/context"
       xmlns:aop="http://www.springframework.org/schema/aop"
       xmlns:tx="http://www.springframework.org/schema/tx"
       xsi:schemaLocation="http://www.springframework.org/schema/beans http://www.springframework.org/schema/beans/spring-beans.xsd
                        http://www.springframework.org/schema/context http://www.springframework.org/schema/context/spring-context.xsd
                        http://www.springframework.org/schema/aop http://www.springframework.org/schema/aop/spring-aop.xsd
                        http://www.springframework.org/schema/tx http://www.springframework.org/schema/tx/spring-tx.xsd">
2.2 开启事务注解
<!--开启事务注解-->
    <tx:annotation-driven transaction-manager="transactionManager"></tx:annotation-driven>
3. 在Service类上面添加事务注解(可以选择给整个类或者单独给某个方法添加事务注解)
3.1事务注解的相关参数
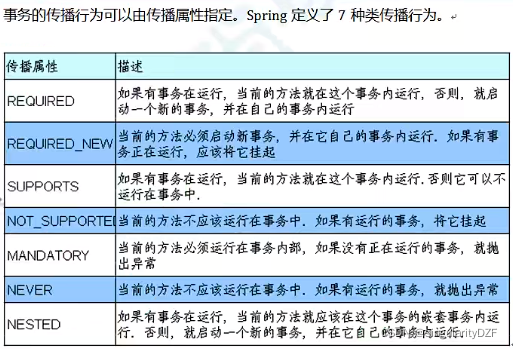
3.1.1 propagation? 事务传播行为:多事务方法之间的相互调用

3.1.2 ioslation? 事务隔离级别:多事务操作之间不会产生影响
? ? ? ? 多事务之间若不进行隔离,则容易发生脏读、不可重复读和虚(幻)读。
? ? ? ? 脏读:一个未提交事务读取到另一个未提交事务的数据,产生数据不一致的严重情况。
? ? ? ? 不可重复读:一个未提交事务读取到另一个提交事务修改后的数据。
????????虚(幻)读:一个未提交事务读取到另一个提交事务添加后的数据。
将事务隔离级别设置为串行化可以解决上述三个问题:
3.1.3 timeout? 超时时间
3.1.4 readOnly? 是否只读 (读:查询数据; 写:添加、修改和删除数据。)
3.1.5 roolbackFor? 回滚
3.1.6 noRollbackFor? 不回滚
下面对完全注解声明式事务管理进行举例:
完成配置类TxConfig:
package com.atguigu.config;

import com.alibaba.druid.pool.DruidDataSource;
import org.springframework.context.annotation.Bean;
import org.springframework.context.annotation.ComponentScan;
import org.springframework.context.annotation.Configuration;
import org.springframework.jdbc.core.JdbcTemplate;
import org.springframework.jdbc.datasource.DataSourceTransactionManager;
import org.springframework.transaction.annotation.EnableTransactionManagement;

import javax.sql.DataSource;

@Configuration//配置类
@ComponentScan(basePackages = "com.atguigu")//组件扫描
@EnableTransactionManagement//开启事务
public class TxConfig {

    //创建数据库连接池
    @Bean
    public DruidDataSource getDruidDataSource(){
        DruidDataSource druidDataSource = new DruidDataSource();
        druidDataSource.setDriverClassName("com.mysql.jdbc.Driver");
        druidDataSource.setUrl("jdbc:mysql:///user_db");
        druidDataSource.setUsername("root");
        druidDataSource.setPassword("root");
        return druidDataSource;
    }

    //创建JdbcTemplate对象
    @Bean
    public JdbcTemplate getJdbcTemplate(DataSource dataSource){
        JdbcTemplate jdbcTemplate = new JdbcTemplate();
        //注入dataSource
        jdbcTemplate.setDataSource(dataSource);
        return jdbcTemplate;
    }

    //创建事务管理器对象
    @Bean
    public DataSourceTransactionManager getDataSourceTransactionManager(DataSource dataSource){
        DataSourceTransactionManager dataSourceTransactionManager = new DataSourceTransactionManager();
        dataSourceTransactionManager.setDataSource(dataSource);
        return dataSourceTransactionManager;
    }
}
对配置类TxConfig进行测试:
@Test
    public void testAccountConfig(){
        ApplicationContext context = new AnnotationConfigApplicationContext(TxConfig.class);
        UserService userService = context.getBean("userService", UserService.class);
        userService.accountMoney();
    }
如下图,测试成功:

