Spring与Web环境集成
项目引入
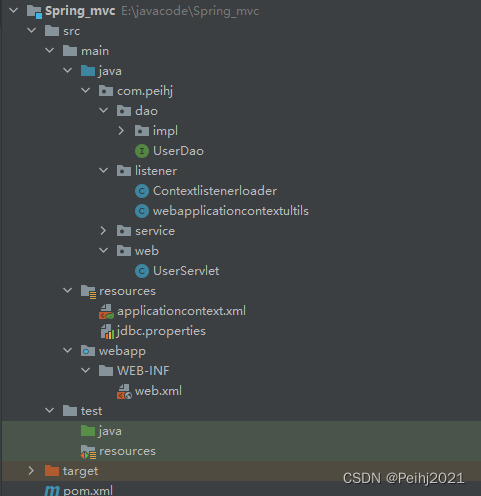
再进行Spring与Web环境集成之前,我们先建立一个Meaven项目以便于演示,该项目为Web项目。

首先我们对于Pom文件进行配置。
<?xml version="1.0" encoding="UTF-8"?>
<project xmlns="http://maven.apache.org/POM/4.0.0"
         xmlns:xsi="http://www.w3.org/2001/XMLSchema-instance"
         xsi:schemaLocation="http://maven.apache.org/POM/4.0.0 http://maven.apache.org/xsd/maven-4.0.0.xsd">
    <modelVersion>4.0.0</modelVersion>

    <groupId>org.example</groupId>
    <artifactId>Spring_mvc</artifactId>
    <version>1.0-SNAPSHOT</version>
    <packaging>war</packaging>

    <properties>
        <maven.compiler.source>8</maven.compiler.source>
        <maven.compiler.target>8</maven.compiler.target>
    </properties>

    <dependencies>
        <dependency>
            <groupId>mysql</groupId>
            <artifactId>mysql-connector-java</artifactId>
            <version>5.1.32</version>
        </dependency>
        <dependency>
            <groupId>junit</groupId>
            <artifactId>junit</artifactId>
            <version>4.12</version>
        </dependency>
        <dependency>
            <groupId>com.alibaba</groupId>
            <artifactId>druid</artifactId>
            <version>1.1.12</version>
        </dependency>
        <dependency>
            <groupId>org.springframework</groupId>
            <artifactId>spring-context</artifactId>
            <version>5.0.5.RELEASE</version>
        </dependency>
        <dependency>
            <groupId>c3p0</groupId>
            <artifactId>c3p0</artifactId>
            <version>0.9.1.2</version>
        </dependency>
        <dependency>
            <groupId>com.mchange</groupId>
            <artifactId>mchange-commons-java</artifactId>
            <version>0.2.20</version>
        </dependency>
        <dependency>
            <groupId>org.springframework</groupId>
            <artifactId>spring-test</artifactId>
            <version>5.0.5.RELEASE</version>
        </dependency>
        <dependency>
            <groupId>javax.servlet</groupId>
            <artifactId>javax.servlet-api</artifactId>
            <version>4.0.1</version>
            <scope>provided</scope>
        </dependency>
        <dependency>
            <groupId>javax.servlet.jsp</groupId>
            <artifactId>javax.servlet.jsp-api</artifactId>
            <version>2.3.3</version>
            <scope>provided</scope>
        </dependency>
        <dependency>
            <groupId>org.springframework</groupId>
            <artifactId>spring-web</artifactId>
            <version>5.0.5.RELEASE</version>
        </dependency>


    </dependencies>

    <build>
        <plugins>
            <plugin>
                <groupId>org.apache.tomcat.maven</groupId>
                <artifactId>tomcat7-maven-plugin</artifactId>
                <version>2.1</version>
            </plugin></plugins>
    </build>

</project>
然后我们创建一个dao文件夹以及对应的接口文件以及实现方法
package com.peihj.dao;

public interface UserDao {
    public void save();
}
package com.peihj.dao.impl;

import com.peihj.dao.UserDao;

public class UserDaoimpl implements UserDao {

    @Override
    public void save() {
        System.out.println("save is running");
    }
}
紧接着我们创建Service文件夹,并创建接口文件并复写接口方法
package com.peihj.service;

public interface Service {
    public void save();
}
package com.peihj.service.impl;

import com.peihj.dao.UserDao;
import com.peihj.service.Service;

public class Serviceimpl implements Service {


    private UserDao userdao;

    public void setUserdao(UserDao userdao) {
        this.userdao = userdao;
    }

    @Override
    public void save() {
        userdao.save();
    }
}
我们再Service方法中用到了set方法,通过set方法我们通过配置Spring配置文件来实现方法注入
<?xml version="1.0" encoding="UTF-8"?>
<beans xmlns="http://www.springframework.org/schema/beans"
       xmlns:xsi="http://www.w3.org/2001/XMLSchema-instance"
       xmlns:context="http://www.springframework.org/schema/context"
       xsi:schemaLocation="http://www.springframework.org/schema/beans http://www.springframework.org/schema/beans/spring-beans.xsd
                           http://www.springframework.org/schema/context  http://www.springframework.org/schema/context/spring-context.xsd">
    <!--    加载外部的propoties文件-->
    <context:property-placeholder location="classpath:jdbc.properties"/>

    <bean id="userdao" class="com.peihj.dao.impl.UserDaoimpl"/>

    <bean id="userservice" class="com.peihj.service.impl.Serviceimpl">
        <!--第一个userdao是set方法对应的userdao,第二给userdao指代Spring容器中的bean方法对应的userdao-->
        <property name="userdao" ref="userdao"/>
    </bean>

    <!--    配置组件扫描-->
    <context:component-scan base-package="com.peihj"/>

</beans>
然后我们创建web文件夹用于创建Servlet,并通过Spring容器对数据进行注入
package com.peihj.web;

import com.peihj.listener.webapplicationcontextultils;
import com.peihj.service.Service;
import org.springframework.context.ApplicationContext;
import org.springframework.context.support.ClassPathXmlApplicationContext;
import org.springframework.web.context.WebApplicationContext;
import org.springframework.web.context.support.WebApplicationContextUtils;

import javax.servlet.ServletContext;
import javax.servlet.ServletException;
import javax.servlet.http.HttpServlet;
import javax.servlet.http.HttpServletRequest;
import javax.servlet.http.HttpServletResponse;
import java.io.IOException;

public class UserServlet extends HttpServlet {

    @Override
    protected void doGet(HttpServletRequest req, HttpServletResponse resp) throws ServletException, IOException {
        // 找Spring容器,要service对象,进行save方法调用
        ApplicationContext app = new ClassPathXmlApplicationContext("applicationcontext.xml");

       ApplicationContext app = (ApplicationContext) servletContext.getAttribute("app");
        Service service = app.getBean(Service.class);
        service.save();
    }

}
ApplicationContext应用上下文获取方式
通过Web层我们可以发现,下面两行代码经常需要用到,冗余度过高。
 ApplicationContext app = new ClassPathXmlApplicationContext("applicationcontext.xml");
 ApplicationContext app = (ApplicationContext) servletContext.getAttribute("app");
应用上下文对象是通过new ClasspathXmlApplicationContext(spring配置文件) 方式获取的,但是每次从容器中获得Bean时都要编写new ClasspathXmlApplicationContext(spring配置文件) ,这样的弊端是配置文件加载多次,应用上下文对象创建多次。
在Web项目中,可以使用ServletContextListener监听Web应用的启动,我们可以在Web应用启动时,就加载Spring的配置文件,创建应用上下文对象ApplicationContext,在将其存储到最大的域servletContext域中,这样就可以在任意位置从域中获得应用上下文ApplicationContext对象了。
手动实现监听器
首先我们需要再web.xml配置全局初始化参数

  <!--全局初始化参数-->
    <context-param>
        <param-name>ContextConfigLocation</param-name>
        <param-value>applicationcontext.xml</param-value>
    </context-param>
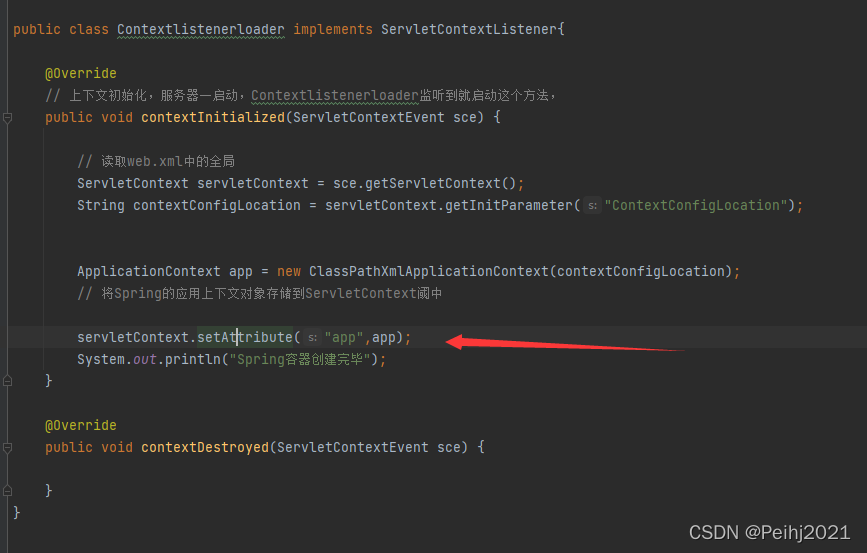
然后便于代码管理我们新建一个listener包,包下面建立我们的配置监听器代码,通过继承ServletContextListener。
public class Contextlistenerloader implements ServletContextListener{

    @Override
    // 上下文初始化,服务器一启动,Contextlistenerloader监听到就启动这个方法,
    public void contextInitialized(ServletContextEvent sce) {

        // 读取web.xml中的全局
        ServletContext servletContext = sce.getServletContext();
        String contextConfigLocation = servletContext.getInitParameter("ContextConfigLocation");


        ApplicationContext app = new ClassPathXmlApplicationContext(contextConfigLocation);
        // 将Spring的应用上下文对象存储到ServletContext阈中

        servletContext.setAttribute("app",app);
        System.out.println("Spring容器创建完毕");
    }

    @Override
    public void contextDestroyed(ServletContextEvent sce) {

    }
}
然后我们再Web.xml文件中配置监听器
  <!--配置一个监听器-->
<!--    <listener>-->
<!--        <listener-class>com.peihj.listener.Contextlistenerloader</listener-class>-->
<!--    </listener>-->
随后就可以将服务器端代码改写为:
package com.peihj.web;

import com.peihj.listener.webapplicationcontextultils;
import com.peihj.service.Service;
import org.springframework.context.ApplicationContext;
import org.springframework.context.support.ClassPathXmlApplicationContext;
import org.springframework.web.context.WebApplicationContext;
import org.springframework.web.context.support.WebApplicationContextUtils;

import javax.servlet.ServletContext;
import javax.servlet.ServletException;
import javax.servlet.http.HttpServlet;
import javax.servlet.http.HttpServletRequest;
import javax.servlet.http.HttpServletResponse;
import java.io.IOException;

public class UserServlet extends HttpServlet {

    @Override
    protected void doGet(HttpServletRequest req, HttpServletResponse resp) throws ServletException, IOException {
        // 找Spring容器,要service对象,进行save方法调用
//        ApplicationContext app = new ClassPathXmlApplicationContext("applicationcontext.xml");
        ServletContext servletContext = req.getServletContext();
        ApplicationContext app = (ApplicationContext) servletContext.getAttribute("app");
        ApplicationContext app = webapplicationcontextultils.getWebApplicationContext(servletContext);
//        ApplicationContext app = WebApplicationContextUtils.getWebApplicationContext(servletContext);  // api调用

        Service service = app.getBean(Service.class);
        service.save();
    }

}
自动实现监听器
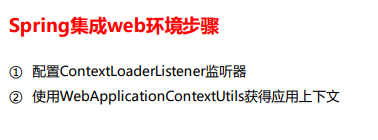
导入Spring集成web的坐标
		<dependency>
            <groupId>org.springframework</groupId>
            <artifactId>spring-web</artifactId>
            <version>5.0.5.RELEASE</version>
        </dependency>
配置ContextLoaderListener监听器
注意:contextConfigLocation,是元素关键词,不要写错。
<context-param>
        <param-name>contextConfigLocation</param-name>
        <param-value>classpath:applicationcontext.xml</param-value>
    </context-param>


    <listener>
        <listener-class>org.springframework.web.context.ContextLoaderListener</listener-class>
    </listener>
通过工具获得应用上下文对象
package com.peihj.web;

import com.peihj.listener.webapplicationcontextultils;
import com.peihj.service.Service;
import org.springframework.context.ApplicationContext;
import org.springframework.context.support.ClassPathXmlApplicationContext;
import org.springframework.web.context.WebApplicationContext;
import org.springframework.web.context.support.WebApplicationContextUtils;

import javax.servlet.ServletContext;
import javax.servlet.ServletException;
import javax.servlet.http.HttpServlet;
import javax.servlet.http.HttpServletRequest;
import javax.servlet.http.HttpServletResponse;
import java.io.IOException;

public class UserServlet extends HttpServlet {

    @Override
    protected void doGet(HttpServletRequest req, HttpServletResponse resp) throws ServletException, IOException {
        // 找Spring容器,要service对象,进行save方法调用
//        ApplicationContext app = new ClassPathXmlApplicationContext("applicationcontext.xml");
        ServletContext servletContext = req.getServletContext();
//        ApplicationContext app = (ApplicationContext) servletContext.getAttribute("app");
//        ApplicationContext app = webapplicationcontextultils.getWebApplicationContext(servletContext);
        ApplicationContext app = WebApplicationContextUtils.getWebApplicationContext(servletContext);  // api调用

        Service service = app.getBean(Service.class);
        service.save();
    }

}
这里额外说一下,因为我们之前手动创建的时候,每次都需要记住上传的关键字,会导致开发过程存在一些遗忘的问题。

基于此我们可以简化开发
package com.peihj.listener;

import org.springframework.context.ApplicationContext;

import javax.servlet.ServletContext;

public class webapplicationcontextultils {

    public static ApplicationContext getWebApplicationContext(ServletContext servletContext){
        return (ApplicationContext) servletContext.getAttribute("app");
    }
}
这样可以简化开发,同时也避免遗忘。
小结

参考
黑马程序员
