Spring全家桶-Spring Security之自定义表单
Spring Security是一个能够为基于Spring的企业应用系统提供声明式的安全访问控制解决方案的安全框架。它提供了一组可以在Spring应用上下文中配置的Bean,充分利用了Spring IoC(控制反转),DI(依赖注入)和AOP(面向切面编程)功能,为应用系统提供声明式的安全访问控制功能,减少了为企业系统安全控制编写大量重复代码的工作。
文章目录
Spring Security之自定义表单
我们前面看到Spring Security给我们提供的默认的登陆页,但是有时候我们希望设置我们自己的登陆页怎么处理呢?
那就用到了Spring Security自定义表单。
一、自定义表单的目的?
很简单,就是不想使用Spring Security默认的表单,自己定制化表单,想怎么整就怎么整呗!
二、实现Spring Security的自定义表单
1.开始撸代码
- 创建工程spring-security-custome-form
POM.xml
<?xml version="1.0" encoding="UTF-8"?>
<project xmlns="http://maven.apache.org/POM/4.0.0"
         xmlns:xsi="http://www.w3.org/2001/XMLSchema-instance"
         xsi:schemaLocation="http://maven.apache.org/POM/4.0.0 http://maven.apache.org/xsd/maven-4.0.0.xsd">
    <parent>
        <artifactId>spring-security-learn</artifactId>
        <groupId>org.tony.spring.security</groupId>
        <version>1.0-SNAPSHOT</version>
    </parent>
    <modelVersion>4.0.0</modelVersion>

    <artifactId>spring-security-custome-form</artifactId>

    <properties>
        <maven.compiler.source>11</maven.compiler.source>
        <maven.compiler.target>11</maven.compiler.target>
    </properties>
	<!--引入相关的依赖-->
    <dependencies>
        <dependency>
            <groupId>org.springframework.boot</groupId>
            <artifactId>spring-boot-starter-security</artifactId>
        </dependency>

        <dependency>
            <groupId>org.springframework.boot</groupId>
            <artifactId>spring-boot-starter-web</artifactId>
        </dependency>
    </dependencies>
</project>
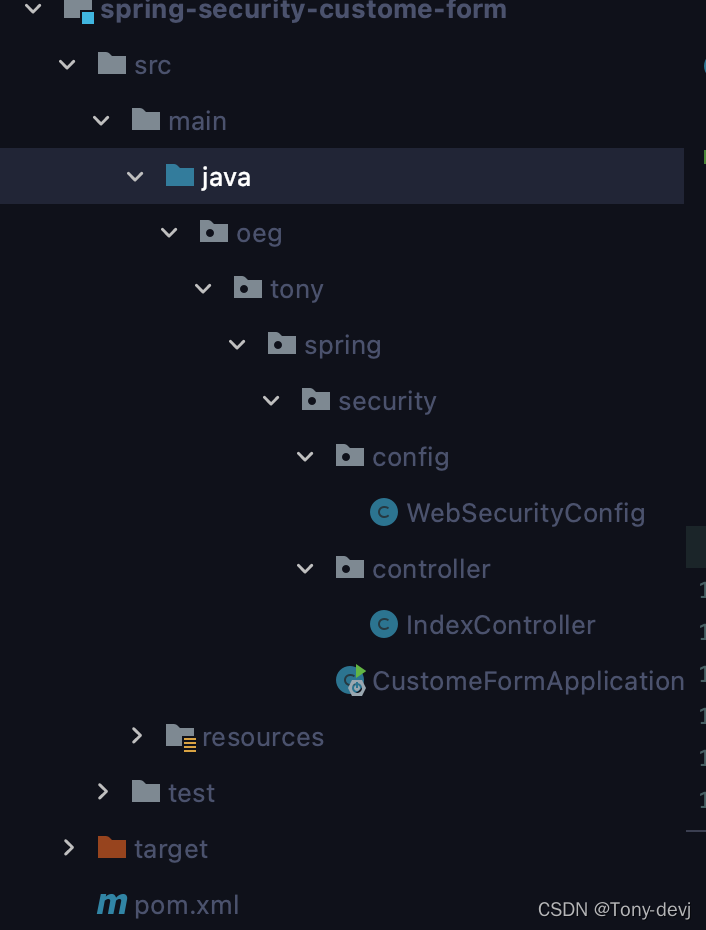
- 项目结构

2.添加配置类WebSecurityConfig替换掉默认的配置类
/**
* 启用spring安全框架
**/
@EnableWebSecurity
public class WebSecurityConfig extends WebSecurityConfigurerAdapter {
    @Override
    protected void configure(HttpSecurity http) throws Exception {
        http.authorizeRequests()
                .anyRequest()
                .authenticated()
                .and()
                .formLogin()
                //自定登陆页
                .loginPage("/login.html")
                .permitAll()
                .and().csrf().disable();
    }
}

图中标红的精华,😄
2.添加resources/static login.html文件
login.html就是我们自定义的登陆页
<!DOCTYPE html>
<html lang="en">
<head>
    <meta charset="UTF-8">
    <title>自定义表单</title>
</head>
<body>
<form action="/login.html" method="post">
    <label>用户名:</label>
    <label>
        <input type="text" name="username" />
    </label>
    <label>密码:</label>
    <label>
        <input type="password" name="password" />
    </label>
    <button type="submit" >登陆</button>
</form>
</body>
</html>
3.运行项目
运行结果:

输入用户名和密码即可进行接口的调用了,IndexController和CustomeFormApplciation和之前的一样。
这样自定义表单基本完成
三、一探究竟(源码分析)
WebSecurityConfig分析
我们进行配置文件调整的时候,创建了WebSecurityConfig并继承了WebSecurityConfigurerAdapter类,并且覆盖了WebSecurityConfigurerAdapter的configure(HttpSecurity http)方法。这里我们要注意我们配置类上的@EnableWebSecurity注解
@Retention(RetentionPolicy.RUNTIME)
@Target({ElementType.TYPE})
@Documented
@Import({WebSecurityConfiguration.class, SpringWebMvcImportSelector.class, OAuth2ImportSelector.class, HttpSecurityConfiguration.class})
@EnableGlobalAuthentication
@Configuration
public @interface EnableWebSecurity {
    boolean debug() default false;
}
@Configuration:声明配置类注解,告诉Spring Boot这是一个配置类。
@EnableGlobalAuthentication:启用全局认证,这个注解包含@Configuration注解和认证配置类
@Import:提供了@Bean注解的功能,同时还有原来Spring基于 xml 配置文件里的标签组织多个分散的xml文件的功能,这里会包含一些与安全相关的配置类WebSecurityConfiguration,SpringWebMvcImportSelector,OAuth2ImportSelector,HttpSecurityConfiguration
- HttpSecurity
这个是对以前spring集成spring security的xml配置的代码实现,我们看到上图标红的地方,HttpSecurity被设计为链式调用,通过相关方法后,都会返回相关的预期对象进行下一步的处理,不然的话,我们需要不断的创建相关对象进行方法调用,这样会增加代码的复杂度。
HttpSecurity会对安全进行相关设置,关于请求的url,登陆页,权限等相关检验和处理。
HttpSecurity提供了很多配置相关的方法, 分别对应命名空间配置中的子标签。
authorizeRequests():返回了一个 URL 拦截注册器,通过相应的方法来匹配系统的URL,并指定安全策略。
formLogin():提供表单认证方式
loginPage():指定自定义登陆页,并且Spring Security会用登陆页注册一个POST路由,用于接受用户的请求。
//AbstractAuthenticationFilterConfigurer.setLoginPage()
private void setLoginPage(String loginPage) {
        this.loginPage = loginPage;
        this.authenticationEntryPoint = new LoginUrlAuthenticationEntryPoint(loginPage);
    }
csrf():Spring Security提供的跨站请求伪造防护功能,当我们继承WebSecurityConfigurerAdapter时会默认开启csrf()方法
并且HttpSecurity还提供了一些像前后端分离的处理,登陆成功或者失败的处理等等。
当我们使用SpringSecurity给我们提供的登陆POST路由的话,我们该怎么处理?我们可以使用loginProcessingUrl()进行指定.
- static文件login.html是如何找到的?
通过指定的登陆页面的方法往下一步一步走,会进入DefaultLoginPageGeneratingFilter过滤器中,进行设置登陆页,并且判断是否为登陆页
private boolean matches(HttpServletRequest request, String url) {
        if ("GET".equals(request.getMethod()) && url != null) {
            String uri = request.getRequestURI();
            int pathParamIndex = uri.indexOf(59);
            if (pathParamIndex > 0) {
                uri = uri.substring(0, pathParamIndex);
            }

            if (request.getQueryString() != null) {
                uri = uri + "?" + request.getQueryString();
            }

            return "".equals(request.getContextPath()) ? uri.equals(url) : uri.equals(request.getContextPath() + url);
        } else {
            return false;
        }
    }
我们知道spring-boot-starter-web默认是使用spring-mvc进行处理的,我们可以再spring-boot-autoconfigure中找到web包,下面有resource的处理,相关类为:WebProperties
 private static final String[] CLASSPATH_RESOURCE_LOCATIONS = new String[]{"classpath:/META-INF/resources/", "classpath:/resources/", "classpath:/static/", "classpath:/public/"};
        private String[] staticLocations;
        private boolean addMappings;
        private boolean customized;
        private final WebProperties.Resources.Chain chain;
        private final WebProperties.Resources.Cache cache;
        public Resources() {
            this.staticLocations = CLASSPATH_RESOURCE_LOCATIONS;
            this.addMappings = true;
            this.customized = false;
            this.chain = new WebProperties.Resources.Chain();
            this.cache = new WebProperties.Resources.Cache();
        }
this.staticLocations = CLASSPATH_RESOURCE_LOCATIONS;进行处理静态资源的路径,进行加载login.html
之后会通过WebMvcAutoConfiguration进行自动配置mvc的相关处理。
通过资源加载器ResourceLoader进行加载相关的资源.
这里面涉及到spring mvc的原理😄
