自动装配作为 Spring Boot 最核心的特性之一,也是面试常问的考点。
灵魂拷问:
- 什么是 Spring Boot 自动装配?
- Spring Boot 为什么要提出自动装配特性?
- Spring Boot 自动装配中装配的是什么?
- Spring Boot 自动装配是如何实现的?
- 如何自定义 Spring Boot 自动装配?
如果你对上面的问题还有疑问,那么跟随脚步,我们一探究竟。
Spring Boot 诞生背景
自动装配毕竟是 Spring Boot 的特性,因此在理解自动装配之前,我们先看下 Spring Boot 是如何诞生的。
Spring Boot 的诞生可以回溯到 2012 年,当时 Spring 团队已经发布了 Spring Framework 3.x 的版本,这个版本的 Spring 进入注解驱动的黄金时代,企业开发常用的功能也基本具备,但是 Spring MVC 项目还是需要发布到 Servlet 容器中才能运行。
此时有一个名叫 Mike Youngstrom 的哥们在 spring jira 提了一个新特性的请求,希望在框架中支持无需容器的 Web 应用架构,这就是 Spring Boot 最初的诞生背景了。
这个请求促使 Spring 团队在 2013 年的时候开始开发,到了 2014 年的时候 Spring Boot 1.0 伴随着 Spring Framework 4.0 诞生。
自动装配诞生背景
由于 Java Servlet 规范要求 Servlet 必须在一个容器中运行,因此 Spring 只能选择将容器嵌入框架中,不过当时已经出现了不少嵌入式的容器,包括 Tomcat、Jetty、Undretow 都提供了一个 jar 包供应用可以直接使用,这些嵌入式容器已经很优秀了,因此 Spring 团队选择将这些容器嵌入到 Spring Boot 框架中。
虽然企业级的应用多为 Web 应用,但不排除也有一些非 Web 应用,这就要求 Spring Boot 能够可选的支持 Web。不过 Servlet 容器有多种,用户到底使用哪种呢?这就需要一种机制,当类路径下某种类型的 Servlet 容器存在时自动选择这个容器。
Spring 怎样统一管理 Servlet 容器呢?自然是将 Servlet 容器适配为 Spring 管理的某种类型的 bean。也就是说,当某个 Servlet 容器存在于类路径下时,自动将这个 Servlet 容器映射为 bean 注册到 Spring 容器中,这也是 Spring Boot 自动装配最初的诞生背景。
理解自动装配
自动装配官方原文为 Auto Configuration,上面介绍自动装配背景的时候提到 Spring Boot 会自动根据类路径下的 Servlet 容器注册 bean,也就是说 自动装配 就是自动进行的条件化的装配 bean。
在 Spring Boot 诞生前,如果想要配置 bean 到容器中,有这么几种方式:
- xml 手动配置 bean;
- xml
<component-scan>标签或@ComponentScan注解扫描 bean; @Import或@ImportResource导入 bean。
对于条件化的 bean 注册,可以使用 @Conditional 注册,待条件满足后注册 bean。
由于 Spring 无法预知所有需要装配的 bean,因此就需要一种机制,查找需要装配的 bean。
直接使用 @Import 只能使用导入有限的 bean,那么可以优先考虑为注入的 bean 添加 @Component 注解,然后使用 @ComponentScan 扫描类路径下的所有类。不过有些配置类可能依赖 @Enable* 注解的元信息,如果没有发现对应的注解可能就会报错,例如 Spring 内部用于支持异步的配置类 ProxyAsyncConfiguration 添加了 @Configuration 注解,当项目中不存在 @EnableAsync 注解时就会启动失败。
综上,Spring 还是要依靠用户决定配置哪些类,并综合注解驱动编程模型、@Enable 模块驱动及条件装配等原生特性,这些技术就是 Spring Boot 自动装配的本质。
启用自动装配
Spring Boot 中使用 @EnableAutoConfiguration 注解开启自动装配特性,这个注解在 Spring Boot 1.0 版本就存在了,到了 Spring Boot 1.2 版本为了简化配置进一步将这个注解整合到 @SpringBootApplication,目前常用的是后者。
@SpringBootApplication
public class SpringBootDemoApplication {
}
开启自动配置后,Spring Boot 才会自动条件化的装配一些 bean。
对于一些常用的 bean,spring-boot-autoconfigure 模块已经内置了支持,例如将依赖 spring-boot-starter-jdbc 添加到类路径,然后将 DataSource 所需属性配置到 application.properties 文件后,就可以直接注入 JdbcTemplate bean,然后就可以进行增删改查各种操作了。
对于一些自定义的 bean,Spring Boot 也支持通过 SPI 的机制查找用户自定义的配置类,然后自动装配配置类指定的 bean,待理解自动装配机制后文我们会再次探讨。
替换自动装配 bean
得益于条件化装配技术,Spring Boot 的自动配置是非侵入性的,开发人员可以在任意一处地方定义配置类,然后覆盖自动装配的组件。例如可以自定义 DataSource bean 覆盖引入 spring-boot-starter-jdbc 后自动装配的 DataSource,Spring Boot 发现存在用户自定义的 DataSource 后将不再进行默认配置。
失效自动配置类
有时候,我们可能想要禁用 Spring Boot 自动装配处理的特定配置类,我们可以将这些自动配置类加入到黑名单。具体来说有三种方式。
1. exclue 属性排除自动配置类
使用 @EnableAutoConfiguration 的 exclue 属性指定要排除的自动装配类。
@SpringBootApplication(exclude = DataSourceAutoConfiguration.class)
public class SpringBootDemoApplication {
}
2. exclueName 属性排除自动配置类
exclue 属性要求要排查的配置类必须在类路径中,如果要排查的配置类不在类路径,可以使用 @EnableAutoConfiguration 的 exclueName 属性指定要排除的配置类。
@SpringBootApplication(excludeName = "org.springframework.boot.autoconfigure.jdbc.DataSourceAutoConfiguration")
public class SpringBootDemoApplication {
}
3. spring.autoconfigure.exclude 环境变量排除自动配置类
除了上述两种方式,Spring Boot 还支持使用 spring.autoconfigure.exclude 环境变量排除不想使用的自动装配类,将这个属性添加到 application.properties 文件中即可。
spring.autoconfigure.exclude=org.springframework.boot.autoconfigure.jdbc.DataSourceAutoConfiguration
自动装配实现原理
按照 @Enable 模块驱动设计模式,看到 @EnableAutoConfiguration 注解名称,很容易猜测它的实现应该与所有的 @Enable* 注解实现方式是通用的。那么到底是不是这样呢?看下这个注解的源码。
@Import(AutoConfigurationImportSelector.class)
public @interface EnableAutoConfiguration {

	String ENABLED_OVERRIDE_PROPERTY = "spring.boot.enableautoconfiguration";

	Class<?>[] exclude() default {};

	String[] excludeName() default {};

}
@EnableAutoConfiguration 注解确实 import 了一个 ImportSelector,那么接下来分析这个 ImportSelector 的实现 AutoConfigurationImportSelector 即可。
public class AutoConfigurationImportSelector implements DeferredImportSelector, BeanClassLoaderAware,
		ResourceLoaderAware, BeanFactoryAware, EnvironmentAware, Ordered {

}
@EnableAutoConfiguration 生命周期
AutoConfigurationImportSelector 实现了接口 DeferredImportSelector,这是个特殊的 ImportSelector,在 Spring Framework 5.0 时提出,由于 《Spring 框架中的 @Enable* 注解是怎样实现的?》 一篇中对 DeferredImportSelector 介绍较少,这里加以补充。DeferredImportSelector 核心源码如下。
public interface DeferredImportSelector extends ImportSelector {

	default Class<? extends Group> getImportGroup() {
		return null;
	}

	interface Group {

		// 使用指定的 DeferredImportSelector 处理配置类的注解元数据
		void process(AnnotationMetadata metadata, DeferredImportSelector selector);

		// 返回应该为当前分组导入哪些类的 Entry
		Iterable<Entry> selectImports();

		class Entry {

			// 正在导入的配置类的注解元数据
			private final AnnotationMetadata metadata;

			// 要导入的类的完全限定符
			private final String importClassName;

		}
	}
}
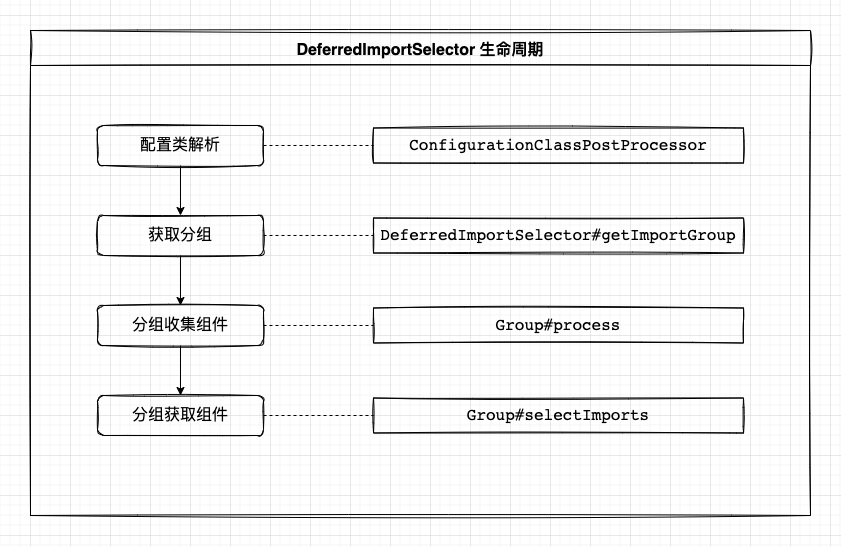
DeferredImportSelector 内部定义一个接口 Group ,ConfigurationClassPostProcessor 在 ApplicationContext 生命周期的某个阶段对注册的 bean 进行解析,发现 @Import 导入的是 DeferredImportSelector 时,先将 DeferredImportSelector 添加到缓存列表,待所有的 bean 解析完毕后按照 DeferredImportSelector#getImportGroup 方法返回的 Group 进行分组,先调用 Group#process 方法收集要导入的类,然后调用 Group#selectImports 获取要导入的类。整个流程可以用如下的图来表示。

AutoConfigurationImportSelector 分析
配置类收集
了解 DeferredImportSelector 生命周期后再回到 AutoConfigurationImportSelector,我们按照生命周期的流程进行分析。首先看收集组件的 Group#process 方法。
public class AutoConfigurationImportSelector implements DeferredImportSelector, BeanClassLoaderAware,
		ResourceLoaderAware, BeanFactoryAware, EnvironmentAware, Ordered {

	@Override
	public Class<? extends Group> getImportGroup() {
		return AutoConfigurationGroup.class;
	}

	private static class AutoConfigurationGroup
			implements DeferredImportSelector.Group, BeanClassLoaderAware, BeanFactoryAware, ResourceLoaderAware {

		// @Import 导入的类 -> @Import 注解所在配置类注解元数据
		private final Map<String, AnnotationMetadata> entries = new LinkedHashMap<>();

		// @Import 导入配置类列表
		private final List<AutoConfigurationEntry> autoConfigurationEntries = new ArrayList<>();

		@Override
		public void process(AnnotationMetadata annotationMetadata, DeferredImportSelector deferredImportSelector) {
			// 收集配置类
			AutoConfigurationEntry autoConfigurationEntry = ((AutoConfigurationImportSelector) deferredImportSelector)
					.getAutoConfigurationEntry(getAutoConfigurationMetadata(), annotationMetadata);
			this.autoConfigurationEntries.add(autoConfigurationEntry);
			for (String importClassName : autoConfigurationEntry.getConfigurations()) {
				this.entries.putIfAbsent(importClassName, annotationMetadata);
			}
		}
	}

}
Group 对组件收集时主要调用了 AutoConfigurationImportSelector#getAutoConfigurationEntry 方法,源码如下。
	protected AutoConfigurationEntry getAutoConfigurationEntry(AutoConfigurationMetadata autoConfigurationMetadata,
															   AnnotationMetadata annotationMetadata) {
		if (!isEnabled(annotationMetadata)) {
			return EMPTY_ENTRY;
		}
		// 获取配置类上的注解属性
		AnnotationAttributes attributes = getAttributes(annotationMetadata);
		// 获取候配置类
		List<String> configurations = getCandidateConfigurations(annotationMetadata, attributes);
		// 移除重复的配置类
		configurations = removeDuplicates(configurations);
		// 获取排除的配置类
		Set<String> exclusions = getExclusions(annotationMetadata, attributes);
		// 检查排除类
		checkExcludedClasses(configurations, exclusions);
		// 移除排除类
		configurations.removeAll(exclusions);
		// 过滤排除类
		configurations = filter(configurations, autoConfigurationMetadata);
		// 发布事件
		fireAutoConfigurationImportEvents(configurations, exclusions);
		return new AutoConfigurationEntry(configurations, exclusions);
	}
这个方法是自动装配的核心方法,流程在源码均已注释,我们最关心的当属候选配置类的获取。
	protected List<String> getCandidateConfigurations(AnnotationMetadata metadata, AnnotationAttributes attributes) {
		List<String> configurations = SpringFactoriesLoader.loadFactoryNames(getSpringFactoriesLoaderFactoryClass(),
				getBeanClassLoader());
		return configurations;
	}

	protected Class<?> getSpringFactoriesLoaderFactoryClass() {
		return EnableAutoConfiguration.class;
	}
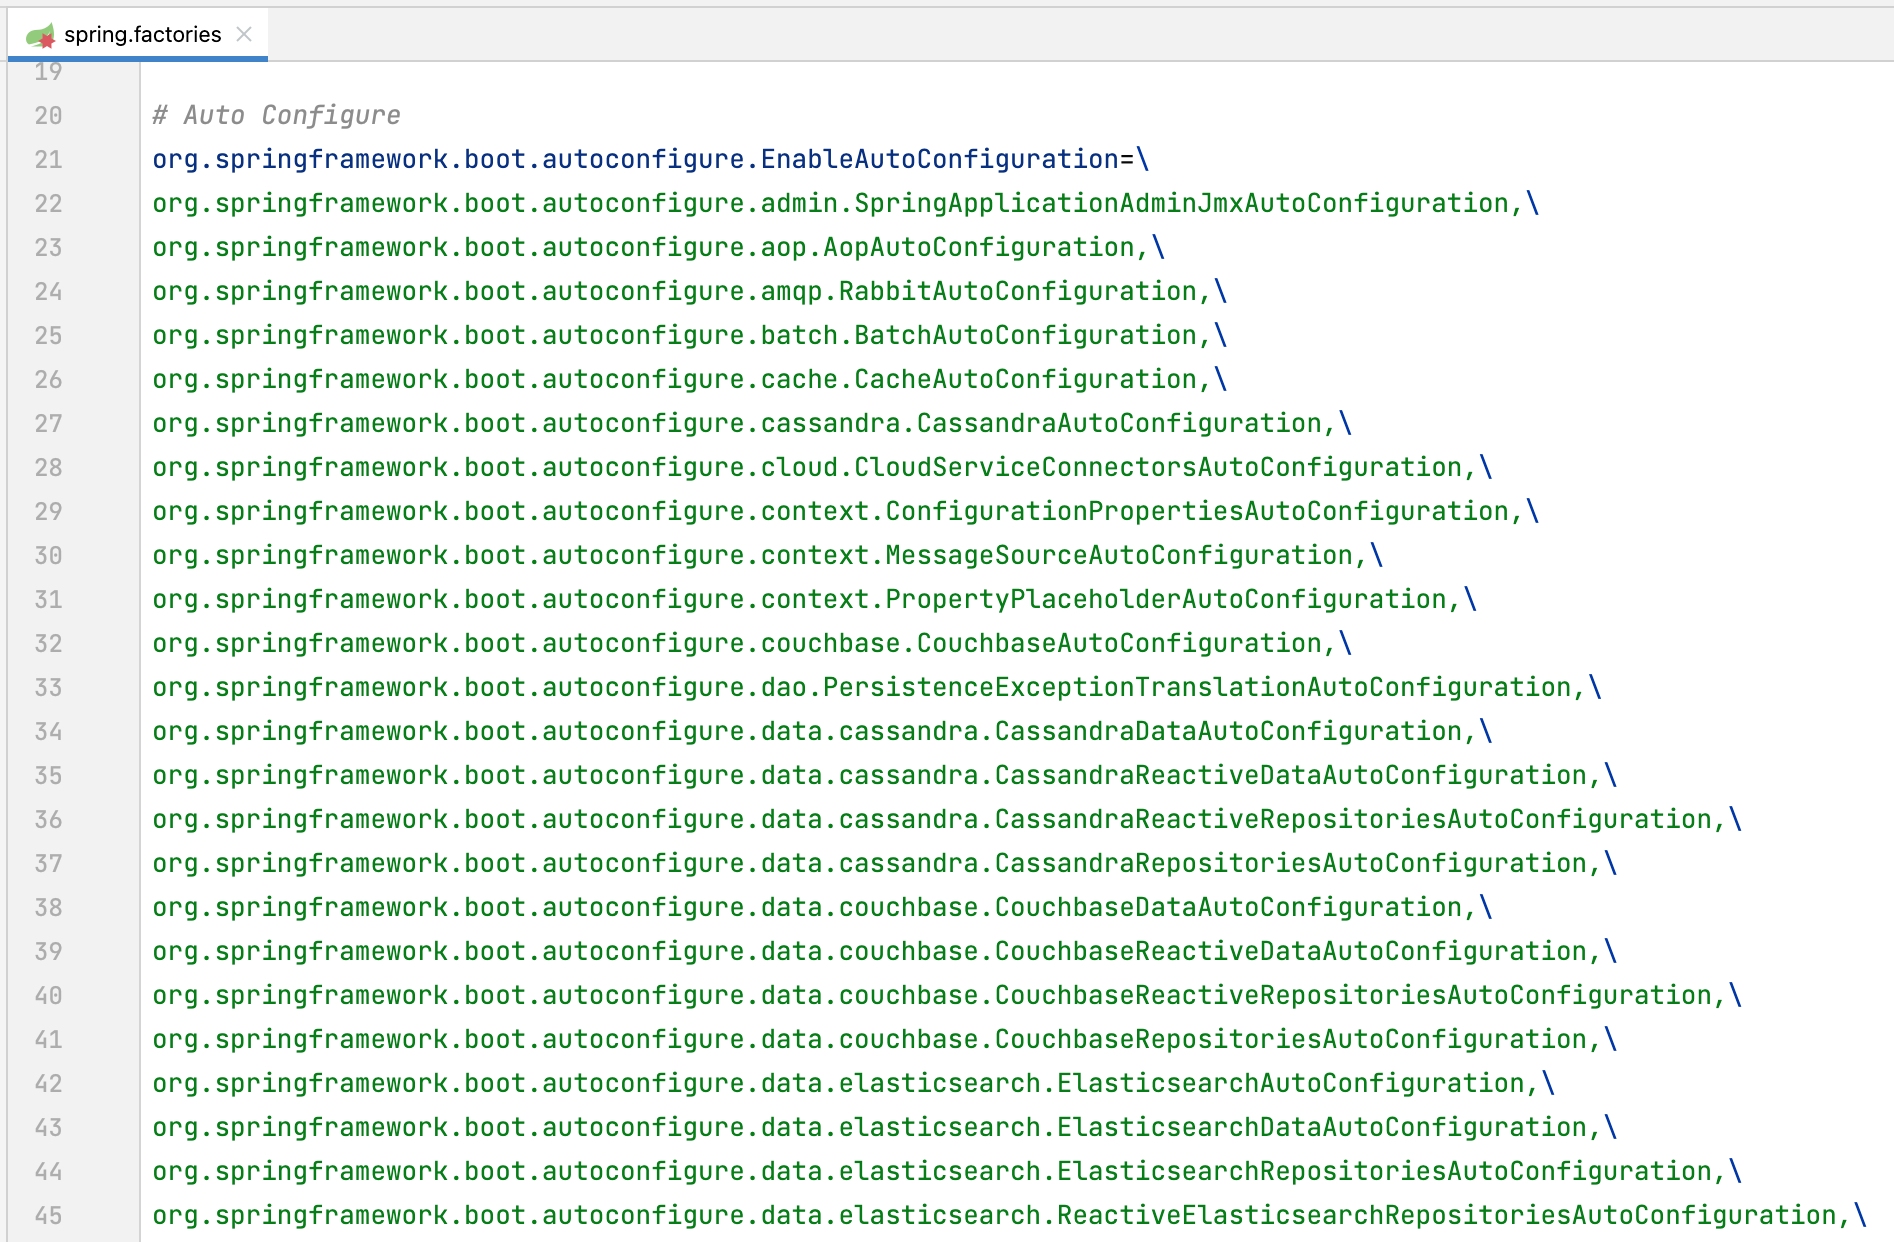
获取候选配置了使用了 Spring Framework 自定义的 SPI 机制,使用 SpringFactoriesLoader#loadFactoryNames 加载了类路径下 /META-INF/spring.factories 文件中的配置类,这个文件内容的格式与 properties 文件相同,这里取的是 key 为 EnableAutoConfiguration 权限定名的属性值。以 spring-boot-autoconfigure 模块为例,其 spring.factories 内容如下。
 由于多个文件可能配置了相同的配置类,Spring Boot 获取到配置类后还会进行去重,并根据
 @EnableAutoConfiguration 的 exclude 或 excludeName 去除配置类,最后使用过滤器对配置类进一步过滤,并发布自动装配的事件。
配置类获取
收集到配置类的元信息之后便会将配置类的元信息以 Entry 的形式供 Spring Boot 框架获取。代码如下。
	private static class AutoConfigurationGroup
			implements DeferredImportSelector.Group, BeanClassLoaderAware, BeanFactoryAware, ResourceLoaderAware {


		@Override
		public Iterable<Entry> selectImports() {
			if (this.autoConfigurationEntries.isEmpty()) {
				return Collections.emptyList();
			}
			Set<String> allExclusions = this.autoConfigurationEntries.stream()
					.map(AutoConfigurationEntry::getExclusions).flatMap(Collection::stream).collect(Collectors.toSet());
			Set<String> processedConfigurations = this.autoConfigurationEntries.stream()
					.map(AutoConfigurationEntry::getConfigurations).flatMap(Collection::stream)
					.collect(Collectors.toCollection(LinkedHashSet::new));
			processedConfigurations.removeAll(allExclusions);

			// 排序
			return sortAutoConfigurations(processedConfigurations, getAutoConfigurationMetadata()).stream()
					.map((importClassName) -> new Entry(this.entries.get(importClassName), importClassName))
					.collect(Collectors.toList());
		}
	}
这些在将元信息转换为 Entry 之前,还会对配置类进行排序。如果一个配置类依赖于另一个配置类,就可以依赖的配置类排到前面。Spring Boot 提供了三个注解用于配置类排序,将其加到配置类上即可,这三个注解分别为 @AutoConfigureOrder、@AutoConfigureBefore、@AutoConfigureAfter,前者需要手动指定排序号,通常推荐使用后面两个。
自定义自动装配
通过上面的分析,可以看出,只要我们的配置类在 /META-INF/spring.factories 中指定,Spring Boot 就能解析,从而实现了自定义自动装配的目的,这也是自定义装配必须要做的唯一一件事情。
不过 Spring Boot 内置的自动装配还支持用户自定义的 bean 覆盖配置类中默认注册的 bean,这又依托于 Spring Framework 4.0 提出的 @Conditional 技术,Spring Boot 将其发扬光大,内置了一些自动装配常用的 @Conditional。
此外,自动装配和我们常见的 spring-boot-starter 也有一定的关系,限于篇幅我将自定义 spring-boot-starter 的一些细节放在下篇进行介绍。
如果你想对自动装配有更细节的认识,也可以留言讨论。目前 《重学 Spring》专栏已经更新近 60 篇了,欢迎想对 Spring 有进一步了解的小伙伴关注。
