文章目录
环境配置
本篇文章按照微服务架构搭建,主要实现为JPA增删改查,条件查询,分页查询等功能,及常规返回值,分页返回值,状态码返回值对象的设计思想综合案例
1. SpringBoot配置
pom.xml 文件中添加依赖
 <!--SpringBoot项目只需要加上 parent依赖即可-->
    <parent>
        <groupId>org.springframework.boot</groupId>
        <artifactId>spring-boot-starter-parent</artifactId>
        <version>2.0.1.RELEASE</version>
        <relativePath/>
    </parent>
    <!--编码方式UTF-8-->
    <properties>
        <project.build.sourceEncoding>UTF-8</project.build.sourceEncoding>
        <project.reporting.outputEncoding>UTF-8</project.reporting.outputEncoding>
        <java.version>1.8</java.version>
    </properties>

    <!--Maven插件-->
    <build>
        <plugins>
            <plugin>
                <groupId>org.springframework.boot</groupId>
                <artifactId>spring-boot-maven-plugin</artifactId>
            </plugin>
        </plugins>
    </build>

    <dependencies>
     <!--数据库JPA mysql-->
        <dependency>
            <groupId>org.springframework.boot</groupId>
            <artifactId>spring-boot-starter-data-jpa</artifactId>
        </dependency>
        <dependency>
            <groupId>mysql</groupId>
            <artifactId>mysql-connector-java</artifactId>
        </dependency>
		 <!--springmvc 和 test-->
		<dependency>
            <groupId>org.springframework.boot</groupId>
            <artifactId>spring-boot-starter-web</artifactId>
        </dependency>
        <dependency>
            <groupId>org.springframework.boot</groupId>
            <artifactId>spring-boot-starter-test</artifactId>
            <scope>test</scope>
        </dependency>
    </dependencies>
resources/application.yml 配置参数
server:
  port: 9001 #根据开发文档API规定的端口
spring:
  application:
    name: tensquare-base # 给当前微服务起名字,添加到微服务注册中心时需要这个名字
  datasource:  # JDBC配置
    driver-class-name: com.mysql.jdbc.Driver
    username: root
    password: root
    url: jdbc:mysql://localhost:3306/tensquare_base?useUnicode=true&characterEncoding=utf-8&useSSL=false
    # spring JPA配置 加不加都不影响
    jpa:
      database: MySQL
      show‐sql: true
      generate‐ddl: true
2. 实体类配置
Label实体类数据库建表语句,复制粘贴执行即可
SET NAMES utf8mb4;
SET FOREIGN_KEY_CHECKS = 0;

-- ----------------------------
-- Table structure for tb_label
-- ----------------------------
DROP TABLE IF EXISTS `tb_label`;
CREATE TABLE `tb_label`  (
  `id` varchar(20) CHARACTER SET utf8 COLLATE utf8_general_ci NOT NULL COMMENT '标签ID',
  `labelname` varchar(100) CHARACTER SET utf8 COLLATE utf8_general_ci NULL DEFAULT NULL COMMENT '标签名称',
  `state` varchar(1) CHARACTER SET utf8 COLLATE utf8_general_ci NULL DEFAULT NULL COMMENT '状态',
  `count` bigint(20) NULL DEFAULT NULL COMMENT '使用数量',
  `recommend` varchar(1) CHARACTER SET utf8 COLLATE utf8_general_ci NULL DEFAULT NULL COMMENT '是否推荐',
  `fans` bigint(20) NULL DEFAULT NULL COMMENT '粉丝数',
  PRIMARY KEY (`id`) USING BTREE
) ENGINE = InnoDB CHARACTER SET = utf8 COLLATE = utf8_general_ci COMMENT = '标签' ROW_FORMAT = Dynamic;

-- ----------------------------
-- Records of tb_label
-- ----------------------------
INSERT INTO `tb_label` VALUES ('1519209207952445440', 'PHP', '1', 5443, '1', 123);
INSERT INTO `tb_label` VALUES ('1519216642389839872', 'Centos', '1', 6554, '1', 888);
INSERT INTO `tb_label` VALUES ('1519216690687250432', 'Java', '1', 23444, '0', 2324);
INSERT INTO `tb_label` VALUES ('1519217313897910272', 'JavaScript', '1', 23444, '0', 198);

SET FOREIGN_KEY_CHECKS = 1;

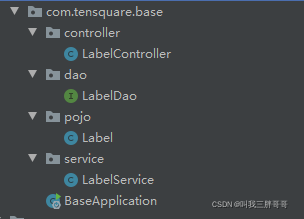
pojo/Label对象实体类
package com.tensquare.base.pojo;

import javax.persistence.Column;
import javax.persistence.Entity;
import javax.persistence.Id;
import javax.persistence.Table;
import java.io.Serializable;

/**
 * 标签实体类
 *
 */
@Entity //该注解表明该类是一个实体类,符合JPA规范,可以映射到数据库表中,该注解必加。
@Table(name="tb_label") // 映射表,和数据库中的表名称一致即可
public class Label  implements Serializable{

    /*
    * //这里没有配置生成策略,因为我项目中用到的是雪花ID赋值
    * 如需要使用主键自增,那么加注解 : @GeneratedValue(strategy = GenerationType.IDENTITY) 主键自增
    * 一共存在4种类型
        –AUTO: 主键由程序控制,是默认选项,不设置即此项
        –IDENTITY:主键由数据库自动生成,即采用数据库ID自增长的方式,Oracle不支持这种方式
        –SEQUENCE:通过数据库的序列产生主键,通过@SequenceGenerator 注解指定序列名,mysql不支持这种方式
        –TABLE:通过特定的数据库表产生主键,使用该策略可以使应用更易于数据库移植
     *
     * 如果表字段名称与实体类属性名称不一致,那么需要添加 @Column(name = "表字段名称")
     * */
    @Id
    private String id;//主键
    private String labelname;//标签名称
    private String state;//状态
    private Long count;//使用数量
    private String recommend;//是否推荐
    private Long fans;//关注数

    ......GET AND SET 自己添加即可
}

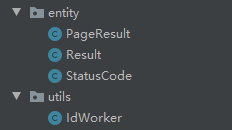
entity/Result返回值对象
package entity;

public class Result {
    private Boolean flag; // 是否成功
    private Integer code; // 返回代码
    private String message; // 返回说明
    private Object data; // 返回对象
    /*
    * 提供三个构造参数,常规返回,带数据返回
    * 和一个无参构造给Spring框架用
    * */
    public Result(Boolean flag, Integer code, String message) {
        this.flag = flag;
        this.code = code;
        this.message = message;
    }

    public Result(Boolean flag, Integer code, String message, Object data) {
        this.flag = flag;
        this.code = code;
        this.message = message;
        this.data = data;
    }
    public Result() {
    }

    ......GET AND SET 自己添加即可
}
entity/PageResult 分页返回值对象
package entity;

import java.util.List;

public class PageResult<T> {
    private Long total; // 分页对象 总条数
    private List<T> rows; // 数据

    /*
    * 分页查询对象,返回总条数和数据
     * */
    public PageResult(Long total, List<T> rows) {
        this.total = total;
        this.rows = rows;
    }

    public PageResult() {
    }
   ......GET AND SET 自己添加即可
}
utils/IdWorker 雪花ID工具类
package utils;

import java.lang.management.ManagementFactory;
import java.net.InetAddress;
import java.net.NetworkInterface;

/**
 * <p>名称:IdWorker.java</p>
 * <p>描述:分布式自增长ID</p>
 * <pre>
 *     Twitter的 Snowflake JAVA实现方案
 * </pre>
 * 核心代码为其IdWorker这个类实现,其原理结构如下,我分别用一个0表示一位,用—分割开部分的作用:
 * 1||0---0000000000 0000000000 0000000000 0000000000 0 --- 00000 ---00000 ---000000000000
 * 在上面的字符串中,第一位为未使用(实际上也可作为long的符号位),接下来的41位为毫秒级时间,
 * 然后5位datacenter标识位,5位机器ID(并不算标识符,实际是为线程标识),
 * 然后12位该毫秒内的当前毫秒内的计数,加起来刚好64位,为一个Long型。
 * 这样的好处是,整体上按照时间自增排序,并且整个分布式系统内不会产生ID碰撞(由datacenter和机器ID作区分),
 * 并且效率较高,经测试,snowflake每秒能够产生26万ID左右,完全满足需要。
 * <p>
 * 64位ID (42(毫秒)+5(机器ID)+5(业务编码)+12(重复累加))
 *
 * @author Polim
 */
public class IdWorker {
    // 时间起始标记点,作为基准,一般取系统的最近时间(一旦确定不能变动)
    private final static long twepoch = 1288834974657L;
    // 机器标识位数
    private final static long workerIdBits = 5L;
    // 数据中心标识位数
    private final static long datacenterIdBits = 5L;
    // 机器ID最大值
    private final static long maxWorkerId = -1L ^ (-1L << workerIdBits);
    // 数据中心ID最大值
    private final static long maxDatacenterId = -1L ^ (-1L << datacenterIdBits);
    // 毫秒内自增位
    private final static long sequenceBits = 12L;
    // 机器ID偏左移12位
    private final static long workerIdShift = sequenceBits;
    // 数据中心ID左移17位
    private final static long datacenterIdShift = sequenceBits + workerIdBits;
    // 时间毫秒左移22位
    private final static long timestampLeftShift = sequenceBits + workerIdBits + datacenterIdBits;

    private final static long sequenceMask = -1L ^ (-1L << sequenceBits);
    /* 上次生产id时间戳 */
    private static long lastTimestamp = -1L;
    // 0,并发控制
    private long sequence = 0L;

    private final long workerId;
    // 数据标识id部分
    private final long datacenterId;

    public IdWorker(){
        this.datacenterId = getDatacenterId(maxDatacenterId);
        this.workerId = getMaxWorkerId(datacenterId, maxWorkerId);
    }
    /**
     * @param workerId
     *            工作机器ID
     * @param datacenterId
     *            序列号
     */
    public IdWorker(long workerId, long datacenterId) {
        if (workerId > maxWorkerId || workerId < 0) {
            throw new IllegalArgumentException(String.format("worker Id can't be greater than %d or less than 0", maxWorkerId));
        }
        if (datacenterId > maxDatacenterId || datacenterId < 0) {
            throw new IllegalArgumentException(String.format("datacenter Id can't be greater than %d or less than 0", maxDatacenterId));
        }
        this.workerId = workerId;
        this.datacenterId = datacenterId;
    }
    /**
     * 获取下一个ID
     *
     * @return
     */
    public synchronized long nextId() {
        long timestamp = timeGen();
        if (timestamp < lastTimestamp) {
            throw new RuntimeException(String.format("Clock moved backwards.  Refusing to generate id for %d milliseconds", lastTimestamp - timestamp));
        }

        if (lastTimestamp == timestamp) {
            // 当前毫秒内,则+1
            sequence = (sequence + 1) & sequenceMask;
            if (sequence == 0) {
                // 当前毫秒内计数满了,则等待下一秒
                timestamp = tilNextMillis(lastTimestamp);
            }
        } else {
            sequence = 0L;
        }
        lastTimestamp = timestamp;
        // ID偏移组合生成最终的ID,并返回ID
        long nextId = ((timestamp - twepoch) << timestampLeftShift)
                | (datacenterId << datacenterIdShift)
                | (workerId << workerIdShift) | sequence;

        return nextId;
    }

    private long tilNextMillis(final long lastTimestamp) {
        long timestamp = this.timeGen();
        while (timestamp <= lastTimestamp) {
            timestamp = this.timeGen();
        }
        return timestamp;
    }

    private long timeGen() {
        return System.currentTimeMillis();
    }

    /**
     * <p>
     * 获取 maxWorkerId
     * </p>
     */
    protected static long getMaxWorkerId(long datacenterId, long maxWorkerId) {
        StringBuffer mpid = new StringBuffer();
        mpid.append(datacenterId);
        String name = ManagementFactory.getRuntimeMXBean().getName();
        if (!name.isEmpty()) {
         /*
          * GET jvmPid
          */
            mpid.append(name.split("@")[0]);
        }
      /*
       * MAC + PID 的 hashcode 获取16个低位
       */
        return (mpid.toString().hashCode() & 0xffff) % (maxWorkerId + 1);
    }

    /**
     * <p>
     * 数据标识id部分
     * </p>
     */
    protected static long getDatacenterId(long maxDatacenterId) {
        long id = 0L;
        try {
            InetAddress ip = InetAddress.getLocalHost();
            NetworkInterface network = NetworkInterface.getByInetAddress(ip);
            if (network == null) {
                id = 1L;
            } else {
                byte[] mac = network.getHardwareAddress();
                id = ((0x000000FF & (long) mac[mac.length - 1])
                        | (0x0000FF00 & (((long) mac[mac.length - 2]) << 8))) >> 6;
                id = id % (maxDatacenterId + 1);
            }
        } catch (Exception e) {
            System.out.println(" getDatacenterId: " + e.getMessage());
        }
        return id;
    }
}
3. BaseApplication配置
注入雪花ID工具类
package com.tensquare.base;

import org.springframework.boot.SpringApplication;
import org.springframework.boot.autoconfigure.SpringBootApplication;
import org.springframework.context.annotation.Bean;
import utils.IdWorker;

@SpringBootApplication
public class BaseApplication {
    public static void main(String[] args) {
        SpringApplication.run(BaseApplication.class);
    }

    // 雪花算法 Bean对象
    @Bean
    public IdWorker idWorker() {
        // 参数分别为(机器组ID,机器ID)
        return new IdWorker(1, 1);
    }
}
4. 代码实现

dao/LabelDao 代码
package com.tensquare.base.dao;

import com.tensquare.base.pojo.Label;
import org.springframework.data.jpa.repository.JpaRepository;
import org.springframework.data.jpa.repository.JpaSpecificationExecutor;

/*
 * JPA的基本操作方法接口,比如findALL(),findById()等: JpaRepository<实体类,主键类型>
 * JPA的分页查询接口: JpaSpecificationExecutor<实体类>
 * */
public interface LabelDao extends JpaRepository<Label, String>, JpaSpecificationExecutor<Label> {
}
service/LabelService 代码
package com.tensquare.base.service;

import com.tensquare.base.dao.LabelDao;
import com.tensquare.base.pojo.Label;
import org.springframework.beans.factory.annotation.Autowired;
import org.springframework.data.domain.Page;
import org.springframework.data.domain.PageRequest;
import org.springframework.data.domain.Pageable;
import org.springframework.data.jpa.domain.Specification;
import org.springframework.stereotype.Service;
import org.springframework.transaction.annotation.Transactional;
import utils.IdWorker;

import javax.persistence.criteria.CriteriaBuilder;
import javax.persistence.criteria.CriteriaQuery;
import javax.persistence.criteria.Predicate;
import javax.persistence.criteria.Root;
import java.util.ArrayList;
import java.util.List;
import java.util.Map;

@Service
@Transactional
public class LabelService {

    @Autowired
    private LabelDao labelDao;

    @Autowired
    private IdWorker idWorker;

    /*
     * 多条件加分页查询
     * map用来接受条件参数
     * page 和 size分别是分页参数
     * */
    public Page<Label> search(Map map, int page, int size) {
        Specification spec = CreatSpecification(map);
        // 创建分页对象 pageable
        Pageable pageable = PageRequest.of(page - 1, size);
        // 使用JPA查询分页数据
        return labelDao.findAll(spec, pageable);
    }

    /*
     * 多条件查询
     * 由于条件可能是多个字段,所以用Map接收
     * */
    public List<Label> search(Map map) {
        // 只有在 Dao接口中 extends JpaSpecificationExecutor
        // 才可以使用 Specification对象
        Specification spec = CreatSpecification(map);
        // 使用JPA封装的重载方法,条件查询,参数为 Specification 对象
        return labelDao.findAll(spec);
    }

    /*
     * 多个函数都需要用到创建条件查询
     * 所以创建一个方法来提供 Specification 对象
     * 这里为了方便只传三个条件参数
     * */
    private Specification CreatSpecification(Map map) {
        Specification spec = new Specification() {
            @Override
            /*
             *cb:它提供了追加条件的API方法
             * cq: 用于生成SQL语句,使用的是SpringDataJpa ,所以这里用不到cq,Spring容器帮我们生成sql语句
             * root: 封装了当前实体类对象(Label),根据Dao继承的 JpaSpecificationExecutor<Label> 泛型来决定的
             * */
            public Predicate toPredicate(Root root, CriteriaQuery cq, CriteriaBuilder cb) {
                // 如果 map中的参数不为空且不是空字符串
                List<Predicate> predicateList = new ArrayList<>();
                if (map.get("labelname") != null && !"".equals(map.get("labelname"))) {
                    // 模糊查询, like (Label对象的labelname字段,模糊查询参数)
                    Predicate p1 = cb.like(root.get("labelname").as(String.class), "%" + map.get("labelname") + "%");
                    predicateList.add(p1);
                }
                if (map.get("state") != null && !"".equals(map.get("state"))) {
                    Predicate p2 = cb.equal(root.get("state").as(String.class), map.get("state") + "");
                    predicateList.add(p2);
                }

                if (map.get("recommend") != null && !"".equals(map.get("recommend"))) {
                    Predicate p3 = cb.equal(root.get("recommend").as(String.class), map.get("recommend") + "");
                    predicateList.add(p3);
                }
                // 把所有的条件放到数组里,然后在合并给一个 Predicate 对象
                Predicate p4 = cb.and(predicateList.toArray(new Predicate[predicateList.size()]));
                return p4;
            }
        };
        return spec;
    }

    // 查询所有
    public List<Label> findAll() {
        return labelDao.findAll();
    }

    // 根据ID查询
    public Label findById(String id) {
        return labelDao.findById(id).get();
    }

    // 添加数据
    public void save(Label label) {
        // label类ID为 雪花ID ,添加时需要setID
        label.setId(idWorker.nextId() + "");
        labelDao.save(label);
    }

    // 修改数据
    public void update(Label label) {
        labelDao.save(label);
    }

    // 删除数据
    public void deleteById(String id) {
        labelDao.deleteById(id);
    }
}
controller/LabelController 代码
package com.tensquare.base.controller;

import com.tensquare.base.pojo.Label;
import com.tensquare.base.service.LabelService;
import entity.PageResult;
import entity.Result;
import entity.StatusCode;
import org.springframework.beans.factory.annotation.Autowired;
import org.springframework.data.domain.Page;
import org.springframework.web.bind.annotation.*;

import java.util.List;
import java.util.Map;

@RestController
@RequestMapping("/label")
public class LabelController {

    @Autowired
    private LabelService labelService;


    /*
     * 多条件加分页查询
     * 注意这里的路径是RestFul请求方式要加上{} ,不然带参数请求会报错 404
     * */
    @RequestMapping(value = "/search/{page}/{size}", method = RequestMethod.POST)
    public Result search(@RequestBody Map map, @PathVariable int page, @PathVariable int size) {
        // 返回一个Page分页对象,泛型是Label
        Page<Label> page1 = labelService.search(map, page, size);        // 通过page1对象可以获取到创建 PageResult对象的总条数和分页数据
        return new Result(true, StatusCode.OK, "查询成功", new PageResult(page1.getTotalElements(), page1.getContent()));
    }

    /*
     * 条件查询
     * */
    @RequestMapping(value = "/search", method = RequestMethod.POST)
    public Result search(@RequestBody Map map) {
        List<Label> search = labelService.search(map);
        return new Result(true, StatusCode.OK, "查询成功", search);
    }

    // 查询所有
    @RequestMapping(method = RequestMethod.GET)
    public Result findAll() {
        List<Label> list = labelService.findAll();
        return new Result(true, StatusCode.OK, "查询成功", list);
    }

    // 根据ID查询
    @RequestMapping(value = "/{id}", method = RequestMethod.GET)
    public Result findById(@PathVariable String id) {
        Label label = labelService.findById(id);
        return new Result(true, StatusCode.OK, "查询成功", label);
    }

    // 添加标签
    @RequestMapping(method = RequestMethod.POST)
    public Result save(@RequestBody Label label) {
        labelService.save(label);
        return new Result(true, StatusCode.OK, "添加成功");
    }

    // 修改标签
    @RequestMapping(value = "/{id}", method = RequestMethod.PUT)
    public Result update(@PathVariable String id, @RequestBody Label label) {
        label.setId(id); // 为保证幂等性
        labelService.update(label);
        return new Result(true, StatusCode.OK, "修改成功");
    }

    // 删除标签
    @RequestMapping(value = "/{id}", method = RequestMethod.DELETE)
    public Result deleteById(@PathVariable String id) {
        labelService.deleteById(id);
        return new Result(true, StatusCode.OK, "删除成功");
    }
}
5. 使用Postman测试
注意这里所有的请求都是RestFul风格,为了方便只展示几种结果,其余的自己测试即可
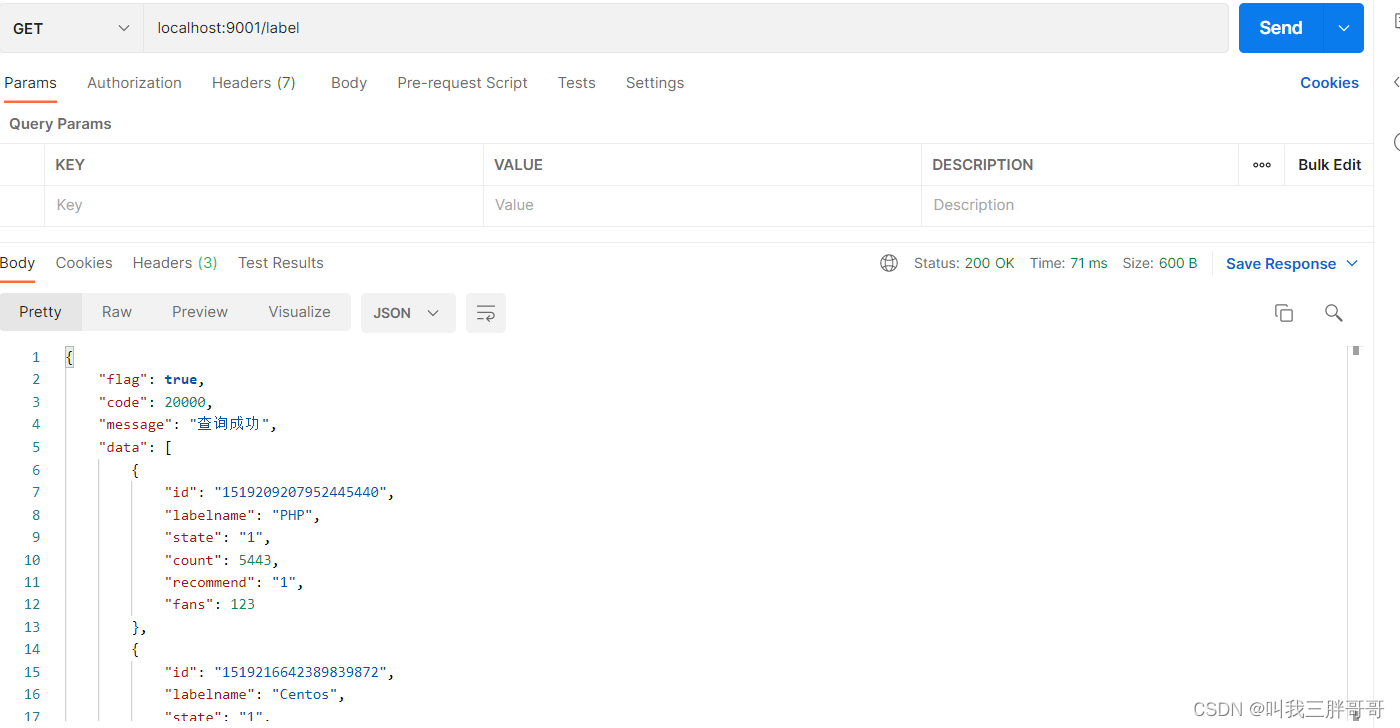
5.1 查询所有
localhost:9001/label,请求方式为 GET

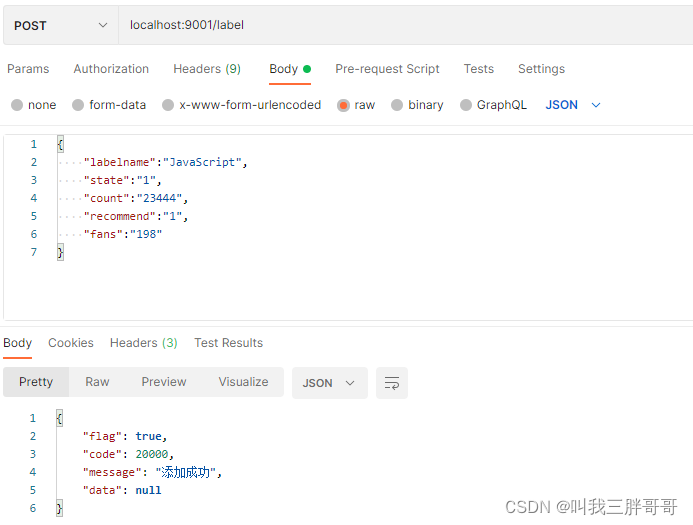
5.2 添加数据
请求地址: localhost:9001/label,请求方式为 POST
json数据
{
    "labelname":"JavaScript",
    "state":"1",
    "count":"23444",
    "recommend":"1",
    "fans":"198"
}

5.3 修改数据
请求地址 : localhost:9001/label/加上ID,请求方式 PUT
json数据自己改改就行

5.4 条件查询
请求地址 : localhost:9001/label/search,请求方式 POST
由于代码里只判断了labelname,state,recommend三个参数,所以我们只在这三个参数中选择就行
json数据
{
    "labelname":"java",
    "recommend":"0"
}

5.5 带条件的分页查询
请求地址: localhost:9001/label/search/第几页/每页显示几条,请求方式为 POST

