参考蚂蚁课堂
1.简介
我们的生产者向消息队列中投递消息,不用非得把他转化成json格式,可以直接投递对象,因为SpringBoot已经帮你实现了序列化,你投递的对象只要实现Seralized接口就行了。同时SpringBoot还可以帮你自动创建交换机,队列这些组件,你不用SpringBoot的话你不创建他就会报错。SpringBoot就相当于一个小女友,十分的贴心处处为你着想。
2.准备工作

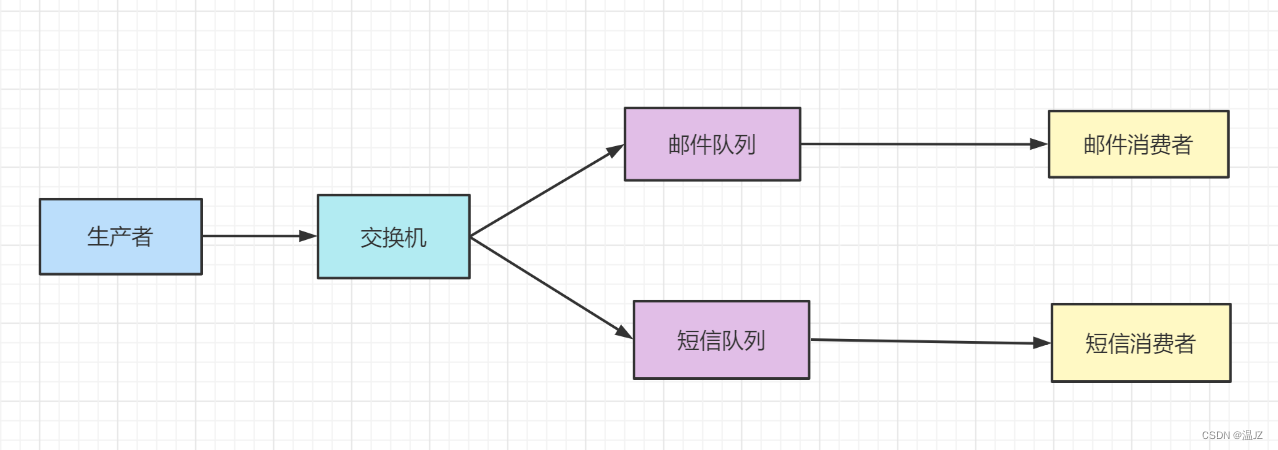
我们大概要实现一个这样的效果,一个生产者,通过fanout交换机将消息投递给两个消息队列当中,然后两个消费者获取队列当中的消息。所以我们需要3个微服务一个生产者服务,两个消费者服务。
2.1生产者
-
生产者配置信息
首先我们要在配置类中规定一些东西,将队列交换机之类的注入到Spring容器当中,然后将队列和交换机进行绑定
@Component
public class RabbitMQConfig {

    /**
     * 定义交换机
     */
    private String EXCHANGE_SPRINGBOOT_NAME = "fanout_exchange";


    /**
     * 短信队列
     */
    private String FANOUT_SMS_QUEUE = "fanout_sms_queue";
    /**
     * 邮件队列
     */
    private String FANOUT_EMAIL_QUEUE = "fanout_email_queue";

    // 1.注入队列和交换机注入到spring容器中
    // 2.关联交换机  <bean id="smsQueue" class="";>

    /**
     * 邮件和短信队列注入到spring容器中
     *
     * @return
     */
    @Bean
    public Queue smsQueue() {
        return new Queue(FANOUT_SMS_QUEUE);
    }

    @Bean
    public Queue emailQueue() {
        return new Queue(FANOUT_EMAIL_QUEUE);
    }

    @Bean
    public FanoutExchange fanoutExchange() {
        return new FanoutExchange(EXCHANGE_SPRINGBOOT_NAME);
    }

    /**
     * 关联交换机
     * 根据参数名称 ioc获取 Queue对象
     */
    @Bean
    public Binding BindingSmsFanoutExchange(Queue smsQueue, FanoutExchange fanoutExchange) {
        return BindingBuilder.bind(smsQueue).to(fanoutExchange);
    }

    @Bean
    public Binding BindingEmailFanoutExchange(Queue emailQueue, FanoutExchange fanoutExchange) {
        return BindingBuilder.bind(emailQueue).to(fanoutExchange);
    }
}
由于生产者的作用是向队列当中投递消息,所以我们写一下他的service类,投递信息的方法。
-
service投递信息
@RestController public class ProducerService { @Autowired private AmqpTemplate amqpTemplate; @RequestMapping("/sendMsg") public void sendMsg() { /** * 参数1 交换机名称 * 参数2 路由key * 参数3 发送内容 */ MsgEntity msgEntity = new MsgEntity(UUID.randomUUID().toString(), "1234", "181111111", "2197206001@qq.com"); amqpTemplate.convertAndSend("fanout_exchange", "", msgEntity); } } -
实体类
@Data
public class MsgEntity implements Serializable {
    private String msgId;
    private String userId;
    private String phone;
    private String email;

    public MsgEntity(String msgId, String userId, String phone, String email) {
        this.msgId = msgId;
        this.userId = userId;
        this.phone = phone;
        this.email = email;
    }
}
这个实体类一定要实现Serializable接口
-
yml文件
spring: rabbitmq: ####连接地址 host: 127.0.0.1 ####端口号 port: 5672 ####账号 username: guest ####密码 password: guest ### virtual-host: /wjzVirtualHost server: port: 9092 -
启动类
@SpringBootApplication
public class AppProducer {
    public static void main(String[] args) {
        SpringApplication.run(AppProducer.class);
    }
}
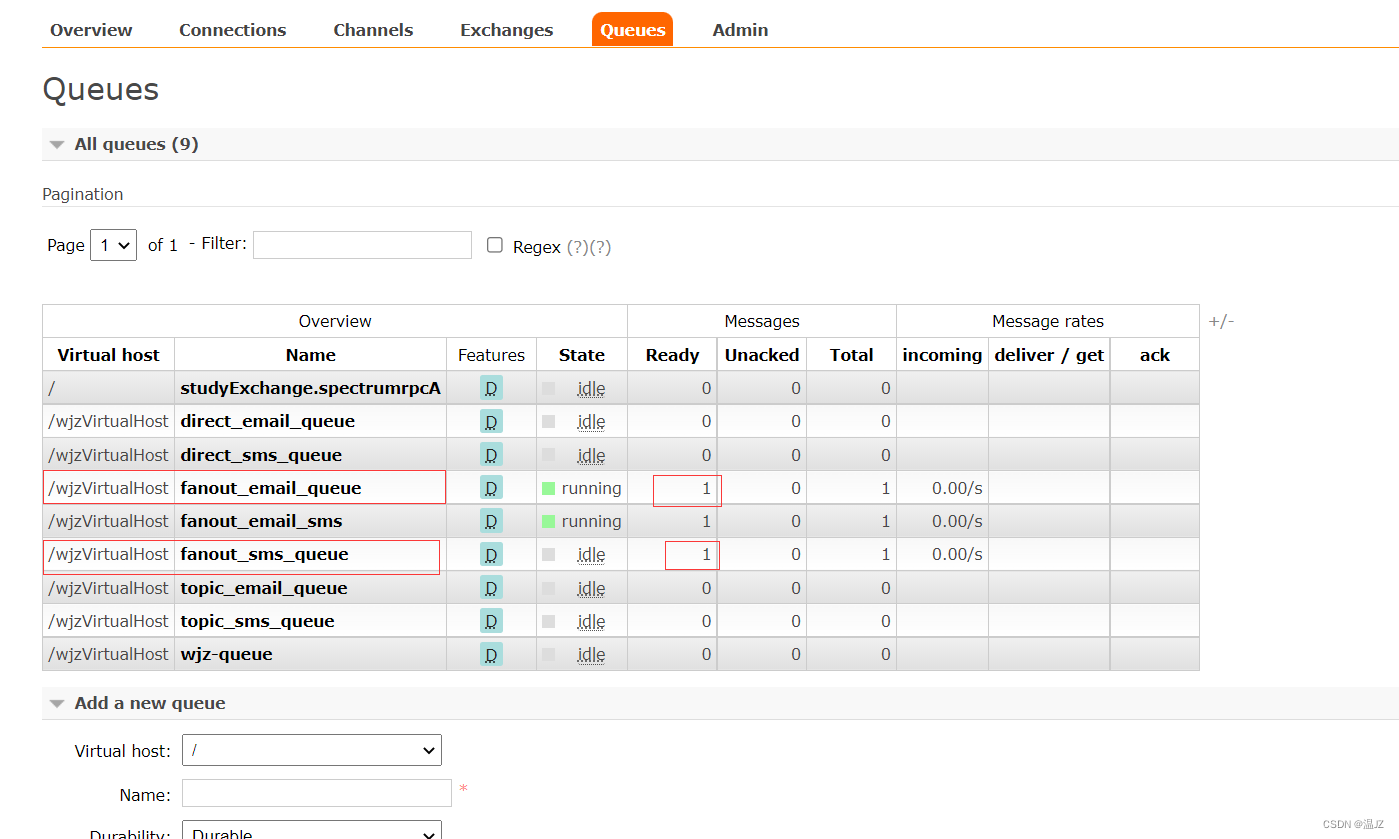
然后我们启动这个服务然后访问到sendMsg这个方法http://localhost:9092/sendMsg,看看我们的消息有没有投递成功。

通过查看控制台我们可以看到消息投递成功。
2.2邮件消费者
消费者这一端只需要消费队列中的消息。所以我们以邮件消费者为例。
@Slf4j
@Component
@RabbitListener(queues = "fanout_email_queue")
public class FanoutEmailConsumer {

    @RabbitHandler
    public void process(MsgEntity msgEntity) {
        log.info("email:msgEntity:" + msgEntity);
    }
}
最主要的方法就是这个通过@RabbitListener注解说明要从哪个队列里获取消息进行消费。然后在方法上加上@RabbitHandler这个注解,就能够消费消息队列里的消息。
yml
spring:
  rabbitmq:
    ####连接地址
    host: 127.0.0.1
    ####端口号
    port: 5672
    ####账号
    username: guest
    ####密码
    password: guest
    ###
    virtual-host: /wjzVirtualHost
启动类
@SpringBootApplication
public class AppEmailConsumer {
    public static void main(String[] args) {
        SpringApplication.run(AppEmailConsumer.class);
    }
}
再来一个和生产者一模一样的实体类。然后启动这个服务看看能不能获取到消息队列中的消息。

如图所示成功接收到了消息。
然后我们再看看短信消费者

这就是通过SpringBoot整合rabbitmq,明显比我们之前硬写要简单,它通过注解的方式帮我们减少了很多操作。
