文章目录
1. 基本认证
1.1 第一个Spring Security项目快速搭建
打开idea,选择创建新项目,选择Spring Initializr,之后按步骤输入相关信息即可
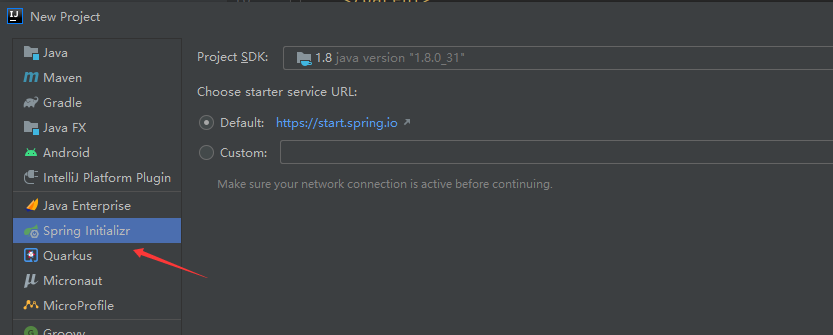
如果因为网络原因无法创建,可以采用以下方式,进入网站https://start.spring.io/:
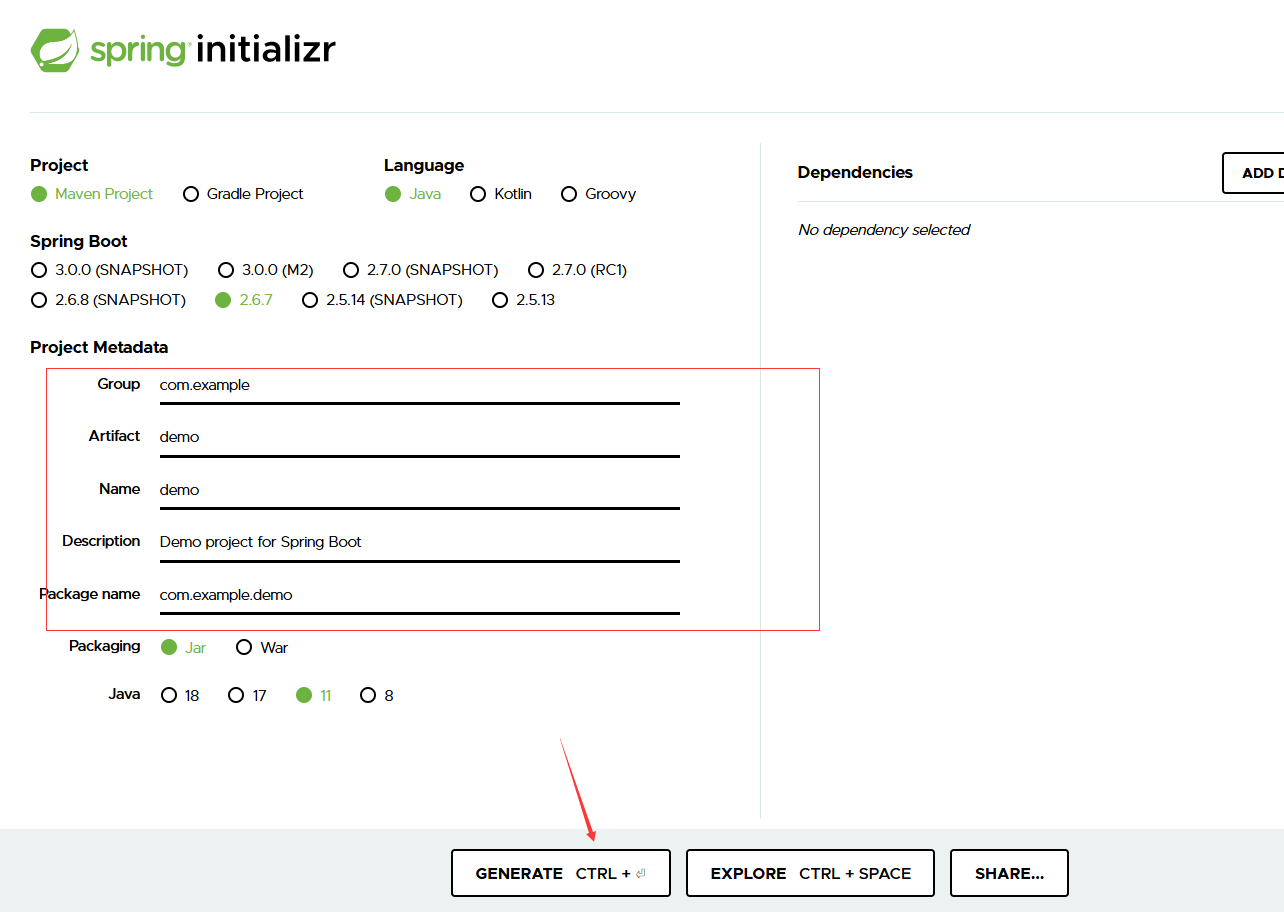
填写相关信息后,点击GENERATE,会下载一个压缩包,解压该压缩包,修改文件夹名称,使用idea打开项目,点击pom.xml,然后选择open as project即可
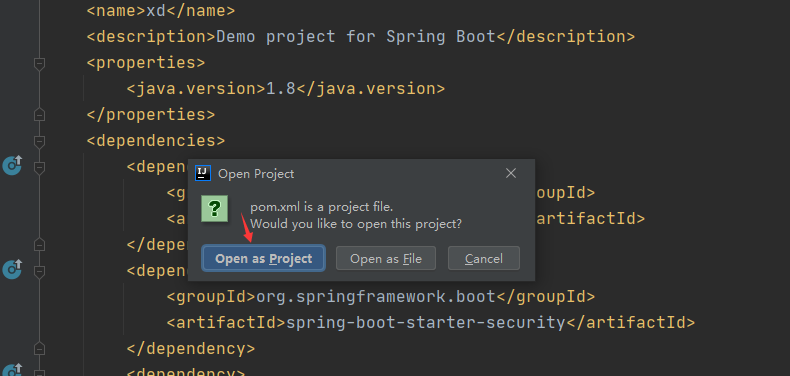
完成以上步骤之后,打开项目中的piom文件,加入以下两个依赖:
		<dependency>
			<groupId>org.springframework.boot</groupId>
			<artifactId>spring-boot-starter-web</artifactId>
		</dependency>
		<dependency>
			<groupId>org.springframework.boot</groupId>
			<artifactId>spring-boot-starter-security</artifactId>
		</dependency>
		<dependency>
创建一个controller包,在改包下面建立一个HelloController.java文件,内容如下:
package cn.edu.xd.controller;

import org.springframework.web.bind.annotation.GetMapping;
import org.springframework.web.bind.annotation.RestController;

@RestController
public class HelloController {
    @GetMapping("/hello")
    public  String hello(){
        return  "hello";
    }
    @GetMapping("/world")
    public  String world(){
        return  "world";
    }
}
打开浏览器输入:http://localhost:8080, 会显示如下页面:
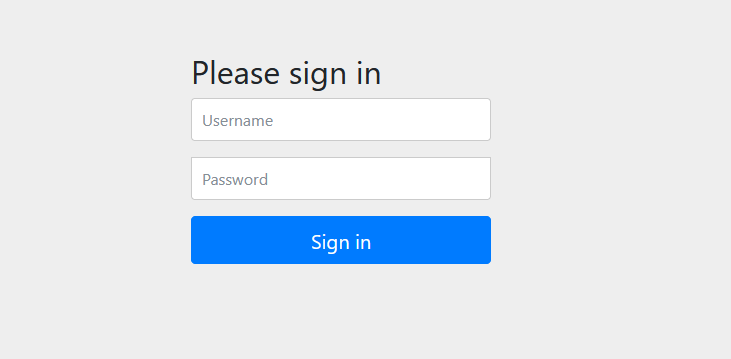
输入默认的用户名:user, 密码显示在idea的控制台:
输入相应的用户名和密码后, 在浏览器输入:http://localhost:8080/hello/
页面会显示hello字符串
1.2 流程分析
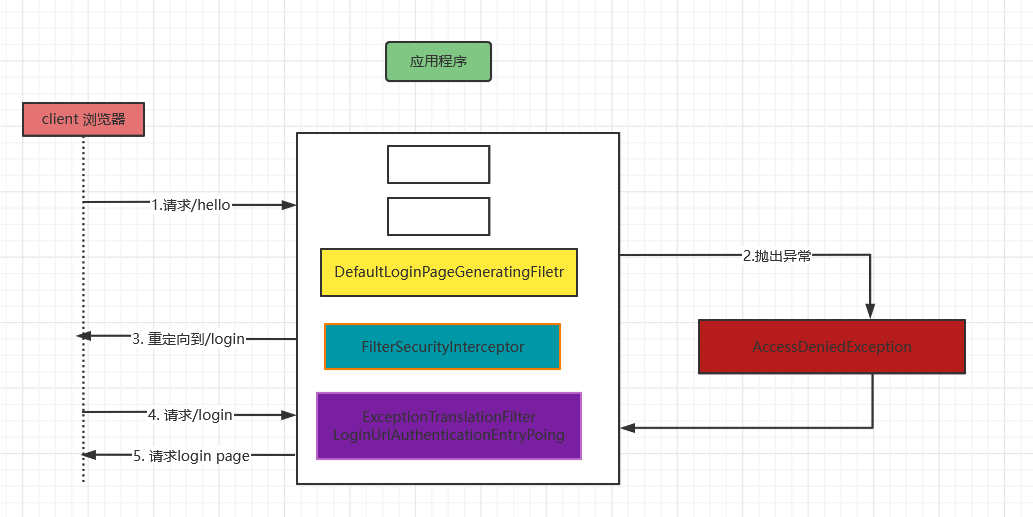
- 客户端发送hello请求
- hello请求被过滤器链拦截,发现用户未登录,抛出访问拒绝异常
- 发生的访问异常在ExceptionTranslationFilter被捕获,调用LoginUrlAuthenticationEntryPoing要求客户端重定向到login请求
- 客户端发送login请求
- login请求被DefaultLoginPageGeneratingFiletr拦截,生成并返回登录页面
所以一开始输入hello请求会先跳转到login页面
1.3 默认用户生成
package org.springframework.security.core.userdetails;

import java.io.Serializable;
import java.util.Collection;
import org.springframework.security.core.GrantedAuthority;

public interface UserDetails extends Serializable {
    Collection<? extends GrantedAuthority> getAuthorities();//返回当前账户拥有的权限

    String getPassword();//返回当前账户的密码

    String getUsername();//返回当前账户的用户名

    boolean isAccountNonExpired();//返回当前账户是否过期

    boolean isAccountNonLocked();//返回当前账户是否被锁定

    boolean isCredentialsNonExpired();//返回当前账户用户凭证是否过期

    boolean isEnabled();//返回当前账户是否可用
}
UserDetails是Spring Security框架中的一个接口,该接口定义了上面7个方法
UserDetails类:用户定义
UserDetailsService类:提供用户数据源
package org.springframework.security.core.userdetails;

public interface UserDetailsService {
//查询用户的方法  var1:用户名
    UserDetails loadUserByUsername(String var1) throws UsernameNotFoundException;
}
实际项目中,开发者可以自己实现 UserDetailsService接口,当然框架中页对该接口有几个默认的实现类

package org.springframework.boot.autoconfigure.security;

import java.util.ArrayList;
import java.util.Arrays;
import java.util.HashSet;
import java.util.List;
import java.util.Set;
import java.util.UUID;
import org.springframework.boot.context.properties.ConfigurationProperties;
import org.springframework.boot.web.servlet.DispatcherType;
import org.springframework.util.StringUtils;

@ConfigurationProperties(
    prefix = "spring.security"
)
public class SecurityProperties {
    public static final int BASIC_AUTH_ORDER = 2147483642;
    public static final int IGNORED_ORDER = -2147483648;
    public static final int DEFAULT_FILTER_ORDER = -100;
    private final SecurityProperties.Filter filter = new SecurityProperties.Filter();
    private final SecurityProperties.User user = new SecurityProperties.User();

    public SecurityProperties() {
    }

    public SecurityProperties.User getUser() {
        return this.user;
    }

    public SecurityProperties.Filter getFilter() {
        return this.filter;
    }

    public static class User {
        private String name = "user";
        private String password = UUID.randomUUID().toString();
        private List<String> roles = new ArrayList();
        private boolean passwordGenerated = true;

        public User() {
        }
        ......
   }
上述类中提供了默认的用户名user和密码(UUID)
如果想要修改默认名和密码,可以在application.properties在添加以下配置:
spring.security.user.name=tom
spring.security.user.password=123
打开浏览器,输入自定义的用户名和密码即可登录
1.4 默认页面生成
默认登录页面:localhost:8080/login
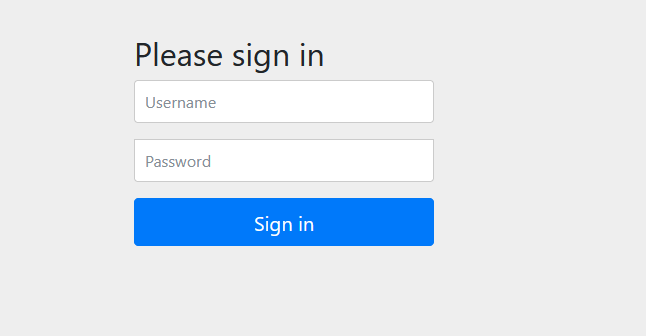
默认退出页面:http://localhost:8080/logout

question: 这两个默认页面从哪来?
ans: 这两个页面由下面两个类生成
package org.springframework.security.web.authentication.ui;
//省略import
public class DefaultLoginPageGeneratingFilter extends GenericFilterBean {
//列出两个主要方法
 private void doFilter(HttpServletRequest request, HttpServletResponse response, FilterChain chain) throws IOException, ServletException {
        boolean loginError = this.isErrorPage(request);
        boolean logoutSuccess = this.isLogoutSuccess(request);
        if (!this.isLoginUrlRequest(request) && !loginError && !logoutSuccess) {
            chain.doFilter(request, response);
        } else {
            String loginPageHtml = this.generateLoginPageHtml(request, loginError, logoutSuccess);
            response.setContentType("text/html;charset=UTF-8");
            response.setContentLength(loginPageHtml.getBytes(StandardCharsets.UTF_8).length);
            response.getWriter().write(loginPageHtml);
        }
    }
}
private String generateLoginPageHtml(HttpServletRequest request, boolean loginError, boolean logoutSuccess) {
        String errorMsg = "Invalid credentials";
        if (loginError) {
            HttpSession session = request.getSession(false);
            if (session != null) {
                AuthenticationException ex = (AuthenticationException)session.getAttribute("SPRING_SECURITY_LAST_EXCEPTION");
                errorMsg = ex != null ? ex.getMessage() : "Invalid credentials";
            }
        }

        String contextPath = request.getContextPath();
        StringBuilder sb = new StringBuilder();
        sb.append("<!DOCTYPE html>\n");
       ..........省略代码
            sb.append("      </form>\n");
        }

        Iterator var7;
        Entry relyingPartyUrlToName;
        String url;
        String partyName;
        if (this.oauth2LoginEnabled) {
              ..........省略代码
            }

            sb.append("</table>\n");
        }

        if (this.saml2LoginEnabled) {
            sb.append("<h2 class=\"form-signin-heading\">Login with SAML 2.0</h2>");
              ..........省略代码
                sb.append("</td></tr>\n");
            }

            sb.append("</table>\n");
        }

        sb.append("</div>\n");
        sb.append("</body></html>");
        return sb.toString();
    }
简单分析:
doFilter中进行了一个判断:登录出错?发起登录?注销成功?
只要是这3个请求中的一个,就会调用后面的generateLoginPageHtml方法生成相应的登录页面,登录页面以字符串返回到doFilter方法中,然后使用response将页面写回前端
package org.springframework.security.web.authentication.ui;
//省略import
//列出主要方法
public class DefaultLogoutPageGeneratingFilter extends OncePerRequestFilter {
    private RequestMatcher matcher = new AntPathRequestMatcher("/logout", "GET");
        protected void doFilterInternal(HttpServletRequest request, HttpServletResponse response, FilterChain filterChain) throws ServletException, IOException {
        if (this.matcher.matches(request)) {
            this.renderLogout(request, response);
        } else {
            if (this.logger.isTraceEnabled()) {
                this.logger.trace(LogMessage.format("Did not render default logout page since request did not match [%s]", this.matcher));
            }

            filterChain.doFilter(request, response);
        }

    }
    private void renderLogout(HttpServletRequest request, HttpServletResponse response) throws IOException {
        StringBuilder sb = new StringBuilder();
        sb.append("<!DOCTYPE html>\n");
           ..........省略代码
        response.setContentType("text/html;charset=UTF-8");
        response.getWriter().write(sb.toString());
    }

   }
判断是否是logout请求,是则生成一个注销页面返回到前端
2. 登录表单配置
2.1 快速入门
创建登录页面
在resources/static目录下建立一个login.xml
<!DOCTYPE html>
<html lang="en">
<head>
    <meta charset="UTF-8">
    <title>登录</title>
    <link href="//maxcdn.bootstrapcdn.com/bootstrap/4.1.1/css/bootstrap.min.css" rel="stylesheet" id="bootstrap-css">
    <script src="//maxcdn.bootstrapcdn.com/bootstrap/4.1.1/js/bootstrap.min.js"></script>
    <script src="//cdnjs.cloudflare.com/ajax/libs/jquery/3.2.1/jquery.min.js"></script>
</head>
<style>
    #login .container #login-row #login-column #login-box {
        border: 1px solid #9C9C9C;
        background-color: #EAEAEA;
    }
</style>
<body>
<div id="login">
    <div class="container">
        <div id="login-row" class="row justify-content-center align-items-center">
            <div id="login-column" class="col-md-6">
                <div id="login-box" class="col-md-12">
                    <form id="login-form" class="form" action="/doLogin" method="post">
                        <h3 class="text-center text-info">登录</h3>
                        <div class="form-group">
                            <label for="username" class="text-info">用户名:</label><br>
                            <input type="text" name="uname" id="username" class="form-control">
                        </div>
                        <div class="form-group">
                            <label for="password" class="text-info">密码:</label><br>
                            <input type="text" name="passwd" id="password" class="form-control">
                        </div>
                        <div class="form-group">
                            <input type="submit" name="submit" class="btn btn-info btn-md" value="登录">
                        </div>
                    </form>
                </div>
            </div>
        </div>
    </div>
</div>
</body>
在controller包中建立一个LoginController类:
package cn.edu.xd.controller;

import org.springframework.web.bind.annotation.RequestMapping;
import org.springframework.web.bind.annotation.RestController;

@RestController
public class LoginController {
    @RequestMapping("/index")
    public String index(){
        return "login success";
    }
    @RequestMapping("/hello")
    public String hello(){
        return "hello spring security";
    }
}
创建一个config包,添加一个配置类:
package cn.edu.xd.config;

import org.springframework.context.annotation.Configuration;
import org.springframework.security.config.annotation.web.builders.HttpSecurity;
import org.springframework.security.config.annotation.web.configuration.WebSecurityConfigurerAdapter;

@Configuration
public class SecurityConfig extends WebSecurityConfigurerAdapter {
    @Override
    protected void configure(HttpSecurity http) throws Exception {
        http.authorizeRequests()
                .anyRequest().authenticated()
                .and()
                .formLogin()
                .loginPage("/login.html")  //配置登录页面地址
                .loginProcessingUrl("/doLogin")//登录接口地址 表单中的action
                .defaultSuccessUrl("/index")//登录成功后的跳转地址
                .failureUrl("/login.html")//登录失败后的跳转地址
                .usernameParameter("uname")//登录用户名的参数 uname和表单中一致
                .passwordParameter("passwd")//登录密码的参数 passwd和表单中一致
                .permitAll()//登录相关的页面和接口不做拦截
                .and()
                .csrf().disable();//禁用CSRF防御功能

    }

}
上面配置类的一些细节:
- 继承自WebSecurityConfigurerAdapter类
- anyRequest().authenticated(): 所有的请求都需要认证
- and(): 表示开始新一轮的配置
- formLogin(): 表示开启表单登录配置
打开浏览器,输入:localhost:8080/index,会先跳转到登录页面
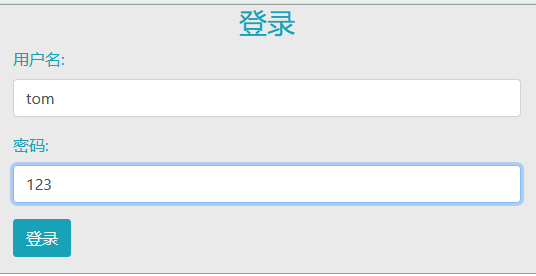
输入用户名和密码后,用户名或密码错误的话则会继续跳转到登录页面:

创建退出页面
修改配置类如下:
protected void configure(HttpSecurity http) throws Exception {
        http.authorizeRequests()
                .anyRequest().authenticated()
                .and()
                .formLogin()
                .loginPage("/login.html")
                .loginProcessingUrl("/doLogin")
                .defaultSuccessUrl("/index")
                .failureUrl("/login.html")
                .usernameParameter("uname")
                .passwordParameter("passwd")
                .permitAll()
                .and()
                .logout()//开启注销登录配置
                .logoutUrl("/logout")//注销登录请求地址
                .invalidateHttpSession(true)//使session失效
                .clearAuthentication(true)//清除认证信息
                .logoutSuccessUrl("/login.html")//注销登录后的跳转地址
                .and()
                .csrf().disable();

    }
当在浏览器输入:localhost:8080/logout
会注销登录,重新跳转到登录页面
2.2 配置细节
1. 实现登录成功之后的跳转页面有2种方法:
 .defaultSuccessUrl("/index")
 .successForwardUrl("/index")
.defaultSuccessUrl: 用户之前如果有访问地址,成功后跳转到用户请求对应的页面
.successForwardUrl:不考虑用户之前的访问地址,成功后直接跳转到设置指定请求或页面
2. 可以使用successHandler来代替上面的跳转
用法:.successHandler(MyAuthenticationSuccessHandler)
public class MyAuthenticationSuccessHandler implements AuthenticationSuccessHandler{
    @Override
    public void onAuthenticationSuccess(HttpServletRequest request, HttpServletResponse response, Authentication authentication) throws IOException, ServletException {
        response.setContentType("application/json;charset=utf-8");
        Map<String, Object> resp = new HashMap<>();
        resp.put("status", 200);
        resp.put("msg", "登录成功!");
        ObjectMapper om = new ObjectMapper();
        String s = om.writeValueAsString(resp);
        response.getWriter().write(s);
    }
}
对于注销也可以使用相同的方式,为了方便也可以使用lambda表达式,eg:
.defaultLogoutSuccessHandlerFor((req,resp,auth)->{
                    resp.setContentType("application/json;charset=utf-8");
                    Map<String, Object> result = new HashMap<>();
                    result.put("status", 200);
                    result.put("msg", "使用 logout1 注销成功!");
                    ObjectMapper om = new ObjectMapper();
                    String s = om.writeValueAsString(result);
                    resp.getWriter().write(s);
                },new AntPathRequestMatcher("/logout1","GET"))
new AntPathRequestMatcher可以指定注销请求,因为可以使用多个注销请求来注销,比如/logout1,/logout2, 用法如下:
 				.logout()
                .logoutRequestMatcher(new OrRequestMatcher(
                        new AntPathRequestMatcher("/logout1", "GET"),
                        new AntPathRequestMatcher("/logout2", "POST")))
                .invalidateHttpSession(true)
                .clearAuthentication(true)
                .defaultLogoutSuccessHandlerFor((req,resp,auth)->{
                    resp.setContentType("application/json;charset=utf-8");
                    Map<String, Object> result = new HashMap<>();
                    result.put("status", 200);
                    result.put("msg", "使用 logout1 注销成功!");
                    ObjectMapper om = new ObjectMapper();
                    String s = om.writeValueAsString(result);
                    resp.getWriter().write(s);
                },new AntPathRequestMatcher("/logout1","GET"))
                .defaultLogoutSuccessHandlerFor((req,resp,auth)->{
                    resp.setContentType("application/json;charset=utf-8");
                    Map<String, Object> result = new HashMap<>();
                    result.put("status", 200);
                    result.put("msg", "使用 logout2 注销成功!");
                    ObjectMapper om = new ObjectMapper();
                    String s = om.writeValueAsString(result);
                    resp.getWriter().write(s);
                },new AntPathRequestMatcher("/logout2","POST"))
3.登录用户数据的获取
3.1 从SecurityContextHolder中获取
新建立一个controller类:
package cn.edu.xd.controller;

import org.springframework.security.core.Authentication;
import org.springframework.security.core.GrantedAuthority;
import org.springframework.security.core.context.SecurityContextHolder;
import org.springframework.web.bind.annotation.GetMapping;
import org.springframework.web.bind.annotation.RestController;

import java.util.Collection;

@RestController
public class UserController {
    @GetMapping("/user")
    public  void  userInfo(){
        Authentication authentication= SecurityContextHolder.getContext().getAuthentication();
        String name=authentication.getName();
        Collection<? extends GrantedAuthority> authorities=authentication.getAuthorities();
        System.out.println("name="+name);
        System.out.println("authorities="+authorities);

    }
}
在登录页面输入用户名和信息登录之后,再在浏览器输入http://localhost:8080/user,可以在控制台看到用户信息的打印

3.2 从当前请求对象中获取
在上面的UserController中添加两个方法:
  @RequestMapping("/authentication")
    public void authentication(Authentication authentication){
        System.out.println("authentication:"+authentication);
    }
    @RequestMapping("/principal")
    public void  principal(Principal principal){
        System.out.println("principal:"+principal);
    }
在登录页面输入用户名和密码之后,在浏览器输入http://localhost:8080/authentication,控制台打印:

在浏览器输入http://localhost:8080/principal,控制台打印:

4. 用户定义
4.1 基于内存
在配置类中添加一个方法:
@Configuration
public class SecurityConfig extends WebSecurityConfigurerAdapter {
....
 @Override
    protected void configure(AuthenticationManagerBuilder auth) throws Exception {
        InMemoryUserDetailsManager manager=new InMemoryUserDetailsManager();
        manager.createUser(User.withUsername("jack").password("{noop}123").roles("admin").build());
        manager.createUser(User.withUsername("jim").password("{noop}123").roles("user").build());
        auth.userDetailsService(manager);

    }
}
上面的代码创建了两个用户,可以在浏览器登录页面中使用这两个用户进行登录
4.2 基于JdbcUserDetailsManager
create table users(username varchar_ignorecase(50) not null primary key,password varchar_ignorecase(500) not null,enabled boolean not null);
create table authorities (username varchar_ignorecase(50) not null,authority varchar_ignorecase(50) not null,constraint fk_authorities_users foreign key(username) references users(username));
create unique index ix_auth_username on authorities (username,authority);
上面的数据库创建代码是Spring Security框架中的,在idea中连按两次shift开始全局查找,输入users.dll即可查看
users:用户信息表
authorities:用户角色表
由于我们使用的是mysql数据库,将上面脚本中的varchar_ignorecase改成varchar
在pom.xml文件中导入两个依赖:
		<dependency>
			<groupId>org.springframework.boot</groupId>
			<artifactId>spring-boot-starter-jdbc</artifactId>
		</dependency>
		<dependency>
			<groupId>mysql</groupId>
			<artifactId>mysql-connector-java</artifactId>
		</dependency>
在application.properties中配置数据库信息:
spring.datasource.username=root
spring.datasource.password=19990502
spring.datasource.url=jdbc:mysql:///security?useUnicode=true&characterEncoding=UTF-8&serverTimezone=Asia/Shanghai
完成上面的配置后,重写WebSecurityConfigurerAdapter类中的configure(AuthenticationManagerBuilder auth)方法
@Configuration
public class SecurityConfig extends WebSecurityConfigurerAdapter {
@Override
    protected void configure(HttpSecurity http) throws Exception {
    ...代码省略
    }
     @Autowired
    DataSource dataSource;
    @Override
    protected void configure(AuthenticationManagerBuilder auth) throws Exception {
        JdbcUserDetailsManager manager = new JdbcUserDetailsManager(dataSource);
        if (!manager.userExists("tom")) {
            manager.createUser(User.withUsername("tom").password("{noop}123").roles("admin").build());
        }
        if (!manager.userExists("bob")) {
            manager.createUser(User.withUsername("bob").password("{noop}123").roles("user").build());
        }
        auth.userDetailsService(manager);

    }
}
运行项目之后,数据库中有了数据记录:

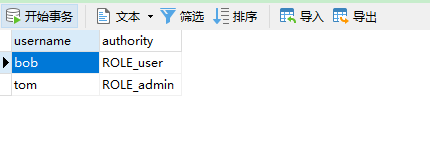
可以用这两个用户和密码进行登录了
4.3 基于MyBatis
创建三张表:用户表,角色表,用户_角色表
因为用户和角色是多对多的关系,需要第三张表进行关联
CREATE TABLE `role` (
  `id` int(11) NOT NULL AUTO_INCREMENT,
  `name` varchar(32) DEFAULT NULL,
  `nameZh` varchar(32) DEFAULT NULL,
  PRIMARY KEY (`id`)
) ENGINE=InnoDB DEFAULT CHARSET=utf8;

INSERT INTO `role` (`id`, `name`, `nameZh`)
VALUES
	(1,'ROLE_dba','数据库管理员'),
	(2,'ROLE_admin','系统管理员'),
	(3,'ROLE_user','用户');
CREATE TABLE `user` (
  `id` int(11) NOT NULL AUTO_INCREMENT,
  `username` varchar(32) DEFAULT NULL,
  `password` varchar(255) DEFAULT NULL,
  `enabled` tinyint(1) DEFAULT NULL,
  `accountNonExpired` tinyint(1) DEFAULT NULL,
  `accountNonLocked` tinyint(1) DEFAULT NULL,
  `credentialsNonExpired` tinyint(1) DEFAULT NULL,
  PRIMARY KEY (`id`)
) ENGINE=InnoDB DEFAULT CHARSET=utf8;


INSERT INTO `user` (`id`, `username`, `password`, `enabled`, `accountNonExpired`, `accountNonLocked`, `credentialsNonExpired`)
VALUES
	(1,'root','{noop}123',1,1,1,1),
	(2,'admin','{noop}123',1,1,1,1),
	(3,'sang','{noop}123',1,1,1,1);
CREATE TABLE `user_role` (
  `id` int(11) NOT NULL AUTO_INCREMENT,
  `uid` int(11) DEFAULT NULL,
  `rid` int(11) DEFAULT NULL,
  PRIMARY KEY (`id`),
  KEY `uid` (`uid`),
  KEY `rid` (`rid`)
) ENGINE=InnoDB DEFAULT CHARSET=utf8;


INSERT INTO `user_role` (`id`, `uid`, `rid`)
VALUES
	(1,1,1),
	(2,1,2),
	(3,2,2),
	(4,3,3);
在pom.xml文件中导入下面两个依赖
	<dependency>
			<groupId>org.mybatis.spring.boot</groupId>
			<artifactId>mybatis-spring-boot-starter</artifactId>
			<version>2.1.4</version>
		</dependency>
		<dependency>
			<groupId>mysql</groupId>
			<artifactId>mysql-connector-java</artifactId>
		</dependency>
application.properties和上一小节一样
-
创建用户类User.java和角色类Role.java
用户类User.java需要实现 UserDetails接口
public class User implements UserDetails -
创建数据库查询接口和mapper.xml文件(接口如果和xml文件一起放在java包中,需要在pom文件中添加包括配置,防止maven打包时自动忽略了xml文件)
	<resources>
			<resource>
				<directory>src/main/java</directory>
				<includes>
					<include>**/*.xml</include>
				</includes>
			</resource>
			<resource>
				<directory>src/main/resources</directory>
			</resource>
		</resources>
- 在SecurityConfig文件在注入UserDetailsService
 @Autowired
    MyUserDetailsService myUserDetailsService;
    @Override
    protected void configure(AuthenticationManagerBuilder auth) throws Exception {
       auth.userDetailsService(myUserDetailsService);

    }
public class MyUserDetailsService implements UserDetailsService {
    @Autowired
    UserMapper userMapper;

    @Override
    public UserDetails loadUserByUsername(String username) throws UsernameNotFoundException {

        User user = userMapper.loadUserByUsername(username);
        System.out.println("name:"+user.getUsername());
        System.out.println("mapper:"+userMapper);
        if (user == null) {
            throw new UsernameNotFoundException("用户不存在");
        }
        user.setRoles(userMapper.getRolesByUid(user.getId()));
        return user;
    }
}
然后就可以用数据库中的用户名和密码进行登录了
