利用Spring boot开发Restful 接口
1:Spring boot
1.1:SpringBoot框架
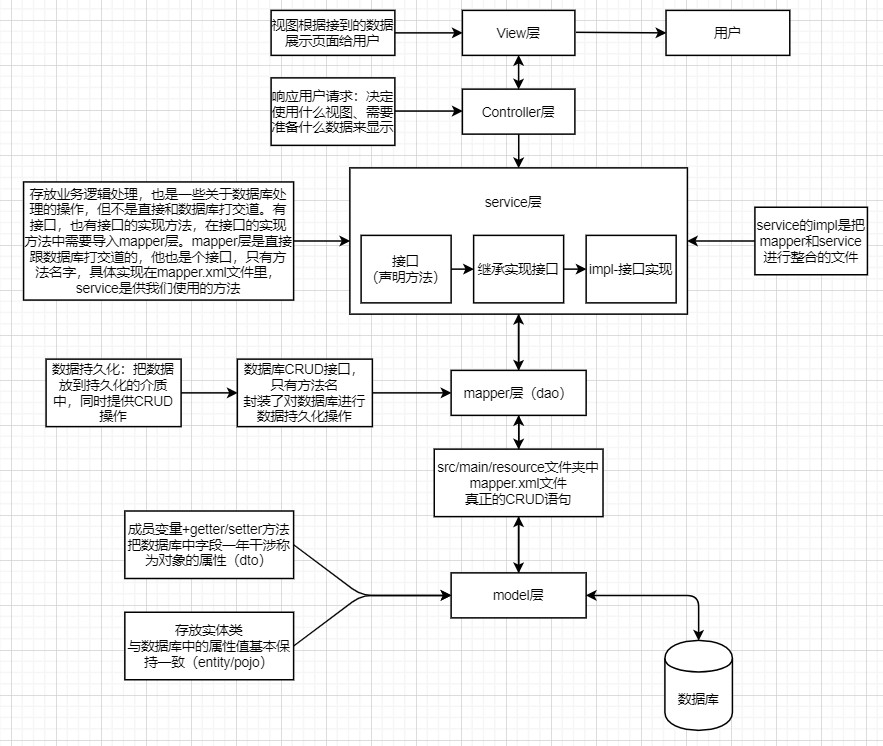
SpringBoot框架一般分为View层、Controller层、Service层、Mapper层、pojo层。
View层:视图层,根据接到的数据展示页面给用户
Controller层:响应用户需求,决定用什么视图,需要准备什么数据来显示。Controller层负责前后端交互,接收前端请求,调用Service层,接收Service层返回的数据,最后返回具体的数据和页面到客户端
Service层:Service层也可以分为三个方面
  (1)接口:用来声明方法

  (2)继承实现接口

  (3)impl:接口的实现(将mapper和service进行整合的文件)

  Service层存放业务逻辑处理,有一些关于数据库处理的操作,但是不是直接和数据库打交道,有接口,也有接口的实现方法,在impl实现接口类中需要导入mapper类,mapper层是直接与数据库进行操作的。
-
Mapper层:也可以称为DAO层,是数据库CRUD的接口,只有方法名,具体实现在mapper.xml文件中,对数据库进行数据持久化操作(把数据放到持久化的介质中,同时提供CRUD操作)
-
src/main/resource文件夹中的mapper.xml文件,里面存储的是真正的数据库CRUD语句
-
Pojo层:存放实体类,与数据库中的属性基本保持一致,一般包括getter、setter、toString方法(未使用插件lombok的情况下)
1.2:框架间联系
controller层(处理前台发送的请求)--->service定义接口(业务逻辑)--->serviceImpl(对接口函数进行实现)
--->mapper(Mapper接口,方法名与Mapper.xml中定义的statement的id相同)--->mapper.xml(写sql语句查询数据库)

由此可见,Service层在Mapper层之上,在Controller层之下,既调用Mapper接口,又提供接口给Controller层用。
分层后,访问数据库和进行Service之间分工明确,对Service的需求修改,无需修改Mapper层,如果有访问数据库的新需求,也只需要在Mapper层修改。
1.3:各层框架的使用
1:mapper层
mapper层一般单独的为一个包
-
扫描mapper第一种方式
每个mapper接口上添加@Mapper注解 这个注解会通过spring boot启动注解自动扫描 -
扫描mapper第二种方式
在main函数中使用@MapperScan(basePackages = “com.demo.mapper”)标注dao所在的包名
这种方式如果引入会有红色波浪线问题 再加上@Repository这个注解就没有了
2:Controller层
@RestController注解表示每个方法返回的数据将直接写入响应体
我们有每个操作的路由(@GetMapping、@PostMapping、@PutMapping和@DeleteMapping,对应于 HTTP GET、POST、PUT和DELETE调用)
2:Restful 介绍
- http是在应用层的?超文本传输协议。
- Restful 基于HTTP、URI、XML、JSON等标准和协议,支持轻量级、跨平台、跨语言的架构设计。是Web服务的一种新的架构风格(一种思想)。
其客户端使用GET、POST、PUT、DELETE4个表示操作方式的动词对服务端资源进行操作:
GET用来获取资源,
POST用来新建资源(也可以用于更新资源),
PUT用来更新资源,
DELETE用来删除资源;
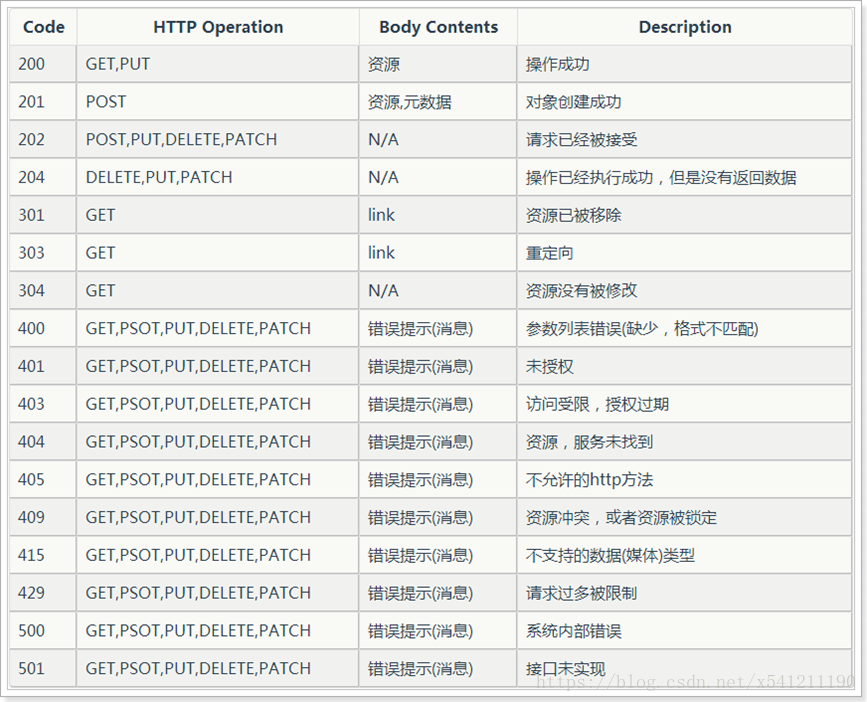
其利用URL进行资源请求,根据http响应码,判断请求状态,进而做出提醒。
3:利用Spring boot开发restFul接口
1:创建pojo层
用于对应数据库对应的属性,必须提供对应的getter,setter,toString方法。如果使用lombok使用@data注解即可实现。
@Data
public class user{
String name,age,like,addr;
}
Spring boot查询数据库底层使用mybatis进行交互,如果没有明确写明实体类和表的字段映射,就是同名对应,匹配成功则数据交互成功,匹配失败则数据交互失败,导致接收空值。
2:创建mapper层
底层利用mybatis和数据库进行交互,提供CRUD增删改查操作。
单独创建mapper的包放mapper类
@Mapper
public interface QueryHsqlMapper {
//根据路由和传参的sql语句执行数据库操作
    @Select("${sqlStr}")
    List<user> getData(@Param("sqlStr") String sqlStr);
}
利用类上的@Mapper注解可实现springboot启动时自动扫描。
使用步骤
- 1:在main函数中使用注解表明该mapper类所在的包位置
@MapperScan(basePackages = "com.demo.mapper")
@SpringBootApplication()
public class Main {
    private static final Logger LOG = LoggerFactory.getLogger(Main.class.getName());

    public static void main(String[] args) throws IOException, InterruptedException {
        SpringApplication.run(Main.class, args);
   }
- 2:在resources目录下创建mapper.xml配置文件
写入内容
<?xml version="1.0" encoding="UTF-8" ?>
<!DOCTYPE mapper PUBLIC "-//mybatis.org//DTD Mapper 3.0//EN" "http://mybatis.org/dtd/mybatis-3-mapper.dtd" >
<mapper namespace="com.demo.mapper.QueryHsqlMapper">
</mapper>
- 3:application.properties文件中使用mapper.xml配置mybatis
mybatis.mapper-locations=classpath*:/mapper/*Mapper.xml
mybatis.configuration.map-underscore-to-camel-case=true
mybatis.configuration.cache-enabled=false
3:创建service层
1:创建接口
2:实现接口
public interface QueryHsqlDB {
    List<user> getData(String sqlStr);
}

@Slf4j
@Service
public class QueryHsqlDBImple implements QueryHsqlDB {
    @Resource
    QueryHsqlMapper
            mapper;

    @Override
    public List<user> getData(String sqlStr) {
        List<user> data = mapper.getData(sqlStr);
        return data;
    }
}
4:创建controller层
定义请求的方式(get/put/post/delete),请求的路径等
@RestController
@CrossOrigin
@RequestMapping({"/data"})
public class Controller {

    @Resource
    private QueryHsqlDB queryHsqlDB;

    @GetMapping(value = "/user")
    public List<user> getuser() {
    String sql="select * from  user";
    return queryHsqlDB.getData(sql)
}
访问时路径即可/data/user即会调用getuser方法,将返回结果传给客户端
5:配置application.properties
springboot采用properties文件作为总配置文件,默认application.properties放在src/main/resource文件
下面介绍一些常用配置
# tomcat启动也就是访问web的端口号
server.port=11080
#xml扫描,多个目录用逗号或者分号分隔(告诉 Mapper 所对应的 XML 文件位置)
mybatis.mapper-locations=classpath*:/mapper/*Mapper.xml
# 是否开启自动驼峰命名规则(camel case)映射,即从经典数据库列名 A_COLUMN(下划线命名) 到经典 Java 属性名 aColumn(驼峰命名) 的类似映射
mybatis.configuration.map-underscore-to-camel-case=true

#jdbc数据库相关配置
#指定数据库驱动
spring.datasource.driver-class-name=com.mysql.cj.jdbc.Driver
#数据库jdbc连接url地址,serverTimezone设置数据库时区东八区
spring.datasource.url=jdbc:mysql://127.0.0.1:3306/login?characterEncoding=UTF-8&serverTimezone=GMT%2B8
#数据库账号
spring.datasource.username=root
spring.datasource.password=root

# 自定义属性用于配置启动时自动打开浏览器
openProject.isOpen=true
openProject.web.openUrl=http://localhost:${server.port}/#/
自定义属性配置
#自定义属性
com.name="111"
com.name1="222"
 # 取值需要在类上使用@Configuration注解后再使用@Value(value="${com.name}")的方式获取赋值并使用
@Value(value="${com.name}")
private  String name;//既可以将name值赋予变量
6:springboot启动自动打开浏览器
windows和linux均可
@Configuration
public class RunConfig implements CommandLineRunner {
// 使用Configuration注解完成配置文件加载映射。获取值@Value("${openProject.isOpen}")
@Value("${openProject.isOpen}")
    private boolean isOpen;

    @Value("${openProject.web.openUrl}")
    private String url ;

    @Value("${openProject.cmd}")
    private String cmd;

   public static void AutoOpenUrl() throws InterruptedException, IOException {
        Runtime run = Runtime.getRuntime();
        String os = System.getProperty("os.name").toLowerCase();
        if (os.indexOf("win") >= 0) {
            try {
                run.exec("rundll32 url.dll,FileProtocolHandler " + url);

            } catch (Exception e) {
                e.printStackTrace();
                LOG.error(e.getMessage());
            }
        } else if (os.indexOf("nix") >= 0 || os.indexOf("nux") >= 0) {
            String currentIp = GetLinuxIp.getInet4Address();
            String[] browsers = {"firefox", "opera", "konqueror", "epiphany", "mozilla", "netscape"};
            String browser = null;
            for (int count = 0; count < browsers.length && browser == null; count++) {
                if (Runtime.getRuntime().exec(
                        new String[]{"which", browsers[count]}).waitFor() == 0) {
                    browser = browsers[count];
                }
            }
            if (browser != null) {
                Runtime.getRuntime().exec(new String[]{browser, url.replaceAll("localhost", currentIp)});
            }
        }

        LOG.info("启动浏览器打开项目成功:" + url);
    }
  }
7:主类启动服务
@MapperScan(basePackages = "com.demo.mapper")
@SpringBootApplication()
public class Main {
    private static final Logger LOG = LoggerFactory.getLogger(Main.class.getName());

    public static void main(String[] args) throws IOException, InterruptedException {
        SpringApplication.run(Main.class, args);
        LOG.info("started......");
} }

