Maven
作用:自动添加依赖,项目的编译、测试、打包全自动
下载
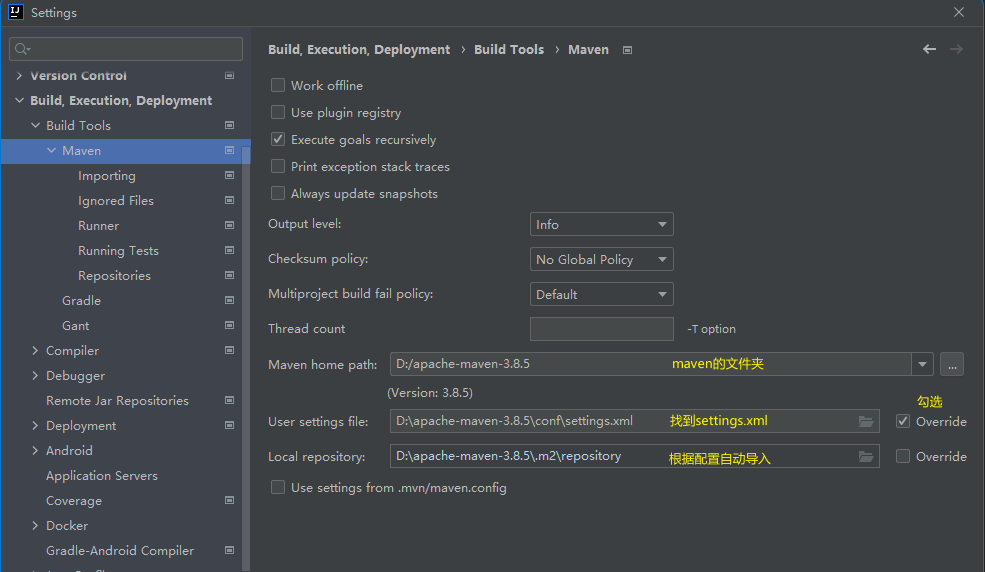
详细安装方法 直接从第四步 在Idea上配置Maven工具 开始
目录结构
my-app
|-- pom.xml
`-- src
    |-- main
    |   |-- java
    |   |    `-- com
    |   |        `-- mycompany
    |   |            `-- app
    |    `-recources    `-- App.java
    `-- test
        `-- java
            `-- com
                `-- mycompany
                    `-- app
                        `-- AppTest.java
| 路径/文件 | 作用 |
|---|---|
| src/main | 主程序:包含java文件和资源文件 |
| src/main/java | 应用程序/库源(程序包和包的Java文件) |
| src/main/resources | 应用程序/库资源(java程序中要使用的配置文件) |
| src/main/filters | 资源筛选器文件 |
| src/main/webapp | Web 应用程序源 |
| src/test/java | 测试源 |
| src/test/resources | 测试资源 |
| src/test/filters | 测试资源筛选器文件 |
| src/it | 集成测试(主要针对插件) |
| src/assembly | 程序集描述符 |
| src/site | 网站 |
| LICENSE.txt | 项目许可证 |
| NOTICE.txt | 项目所依赖的库所需的通知和归属 |
| README.txt | 项目自述文件 |
IDEA创建maven:


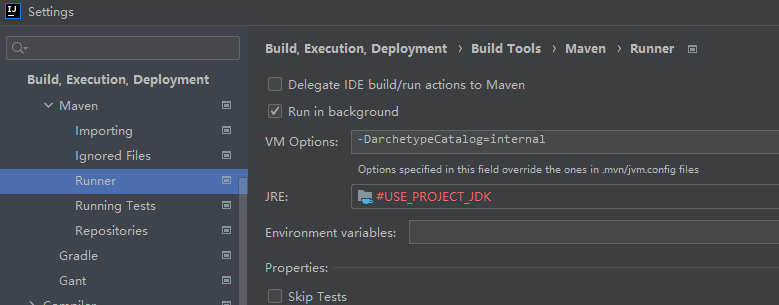
Maven–Runner–VM Options添加,加快创建速度:
-DarchetypeCatalog=internal
dom配置文件
<project xmlns="http://maven.apache.org/POM/4.0.0" xmlns:xsi="http://www.w3.org/2001/XMLSchema-instance"
  xsi:schemaLocation="http://maven.apache.org/POM/4.0.0 http://maven.apache.org/xsd/maven-4.0.0.xsd">
  <modelVersion>4.0.0</modelVersion>
  <!-- 该项目的坐标,全球唯一 groupId/artifactId:version共同使这个软件的坐标成为全球唯一,好像IP地址-->
  <!-- groupid 倒写的网址,这个工程属于哪个公司 -->
  <groupId>org.javaweb</groupId>
  <!-- artifactid:具体的项目,理解为公司的产品-->
  <artifactId>webmaven</artifactId>
  <!-- 产品的版本号 -->
  <version>1.0-SNAPSHOT</version>
  <!-- 打包后的文件格式 ,可以直接在tomcat服务器中使用-->
  <packaging>war</packaging>

  <!-- 属性 -->
  <properties>
    <!-- maven构建项目时使用的编码方式 -->
    <project.build.sourceEncoding>UTF-8</project.build.sourceEncoding>
    <!-- 编译代码使用的jdk版本 -->
    <maven.compiler.source>1.7</maven.compiler.source>
    <!-- 运行程序时jdk版本 -->
    <maven.compiler.target>1.7</maven.compiler.target>
  </properties>
  <!-- 依赖 -->
  <dependencies>
    <!--https://mvnrepository.com/在maven仓库查找-->
    <dependency>
      <groupId>junit</groupId>
      <artifactId>junit</artifactId>
      <version>4.11</version>
      <scope>test</scope>
    </dependency>
  </dependencies>
</project>
全局变量
一般作为版本号使用,比如spring的多个依赖的版本号是一致的,如果要修改需要修改多次,使用变量来代替版本号:
- 定义全局变量:
<properties>
		.
		<spring.version>4.5</spring.version>
</properties>
- 使用全局变量:${ 定义变量时的标签名 }
    <dependency>
      <groupId>junit</groupId>
      <artifactId>junit</artifactId>
      <version>${spring.version}</version>
      <scope>test</scope>
	</dependency>
非resource文件夹下资源的拷贝
- 资源文件夹下的文件在编译时会自动拷贝到目标文件夹target下。
- 有些文件不在资源文件夹,maven不会自动拷贝,所以需要使用以下插件,配置需要拷贝的文件。
- 但是只定义了java目录下的配置文件拷贝,resources目录下的配置文件又不会自动拷贝,所以要定义两个resource
   <build>
    <resources>
      <resource>
        <directory>src/main/java</directory><!-- 文件所在目录 -->
        <includes>    <!-- 包括目录下的.properties,和.xml 文件都会扫描到 -->
          <include>**/*.properties</include>
          <include>**/*.xml</include>
        </includes>
        <filtering>false</filtering><!-- 不启用过滤器 ,已经明确文件的类型 -->
      </resource>
      <resource>
        <directory>src/main/resources</directory><!-- 文件所在目录 -->
        <includes>    <!-- 包括目录下的.properties,和.xml 文件都会扫描到 -->
          <include>**/*.properties</include>
          <include>**/*.xml</include>
        </includes>
        <filtering>false</filtering><!-- 不启用过滤器 ,已经明确文件的类型 -->
      </resource>
    </resources>
  </build>
创建web项目
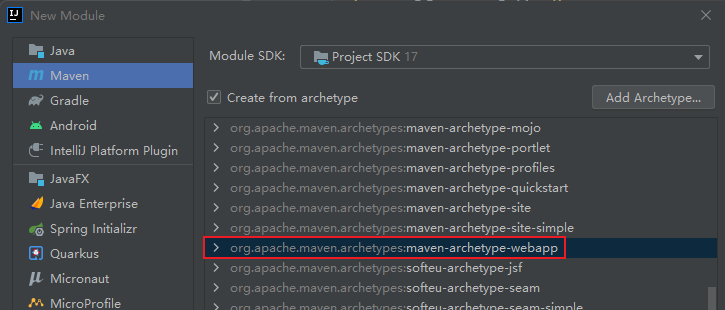
新建模块,选择webapp

- 在pom.xml中添加依赖:(一定要注意对应的版本)
使用的tomcai是10.0.12版本,所以servlet和jsp的包也用这个版本,以防万一
  </dependency>
    <dependency>
      <groupId>org.apache.tomcat</groupId>
      <artifactId>tomcat-servlet-api</artifactId>
      <version>10.0.12</version>
    </dependency>
    <dependency>
      <groupId>org.apache.tomcat</groupId>
      <artifactId>tomcat-jsp-api</artifactId>
      <version>10.0.12</version>
    </dependency>
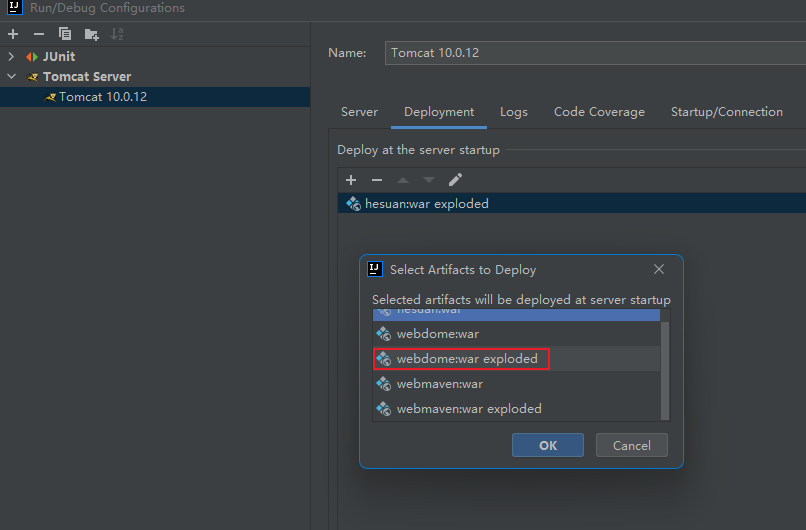
- 配置tomcat服务器
选择带有exploded的选项

