该笔记来自B站SGG-Spring5学习记录及Spring中文网,文章末贴出链接
2022.05.12
Spring
1. 广义
	泛指以 Spring Framework 为核心的 Spring 技术栈。例如 Spring Framework、Spring MVC、SpringBoot、Spring Cloud、Spring Data、Spring Security 等,其中 Spring Framework 是其他子项目的基础。

2. 狭义
	特指 Spring Framework,通常我们将它称为 Spring 框架。其有两个核心部分: IoC 和 AOP。

3. 特点
    方便解耦,简化开发
    Spring 就是一个大工厂,可以将所有对象的创建和依赖关系的维护交给 Spring 管理。

    方便集成各种优秀框架
    Spring 不排斥各种优秀的开源框架,其内部提供了对各种优秀框架(如 Struts2、Hibernate、MyBatis 等)的直接支持。

    降低 Java EE API 的使用难度
    Spring 对 Java EE 开发中非常难用的一些 API(JDBC、JavaMail、远程调用等)都提供了封装,使这些 API 应用的难度大大降低。

    方便程序的测试
    Spring 支持 JUnit4,可以通过注解方便地测试 Spring 程序。

    AOP 编程的支持
    Spring 提供面向切面编程,可以方便地实现对程序进行权限拦截和运行监控等功能。

    声明式事务的支持
    只需要通过配置就可以完成对事务的管理,而无须手动编程。
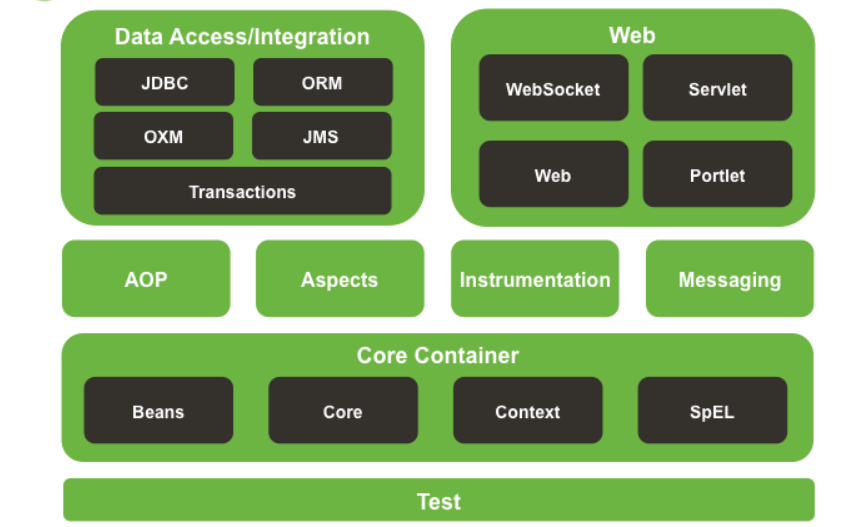
Spring体系

详情请见:http://c.biancheng.net/spring/module.html
Spring基础框架包搭建
1. 访问https://repo.spring.io/ui/native/release/org/springframework/spring/ 该地址获取spring5最新的稳定框架包

2. 获取Core Container架构层下的核心4个jar包
    spring-beans-5.2.6.RELEASE.jar
    spring-context-5.2.6.RELEASE.jar
    spring-core-5.2.6.RELEASE.jar
    spring-expression-5.2.6.RELEASE.jar
    其中还需要一个公共的日志包
    commons-logging-1.1.1.jar
    方便单元测试再加入两个依赖包
    junit-4.12.jar // 该包必须依赖下面的jar包 不然单测启动报错
    hamcrest-core-1.3.jar
Spring run first
// 1. 创建类
public class User {
    private String username;

    public void add() {
        System.out.println("add......");
    }

}

// 2. 创建beans.xml配置文件
<?xml version="1.0" encoding="UTF-8"?>
<beans xmlns="http://www.springframework.org/schema/beans"
       xmlns:xsi="http://www.w3.org/2001/XMLSchema-instance"
       xsi:schemaLocation="http://www.springframework.org/schema/beans http://www.springframework.org/schema/beans/spring-beans.xsd">
    <bean id="user" class="com.spring5.bean.User"></bean>
</beans>

// 3. 创建单测类
public class UserTest {
    @Test
    public void test(){
        User user;
        try (ClassPathXmlApplicationContext classPathXmlApplicationContext = new ClassPathXmlApplicationContext("/bean.xml")) {
            // 此处第一个参数 对应到xml文件中的<bean>标签id
            // 第二个参数 对应到<bean>标签中的class
            user = classPathXmlApplicationContext.getBean("user", User.class);
        }
        System.out.println(user);
        user.add();
    }
}
2022.05.14
什么是IOC
1. 概念
	控制反转,把对象创建和对象之间的调用过程,交给Spring进行管理;
	目的是为了耦合度降低。

2. 底层原理
	xml解析、工厂模式、反射
	2.1 在配置文件(例如 Bean.xml)中,对各个对象以及它们之间的依赖关系进行配置;
	2.2 我们可以把 IoC 容器当做一个工厂,这个工厂的产品就是 Spring Bean;
	2.3	容器启动时会加载并解析这些配置文件,得到对象的基本信息以及它们之间的依赖关系;
	2.4 IoC 利用 Java 的反射机制,根据类名生成相应的对象(即 Spring Bean),并根据依赖关系将这个对象注入到依赖它的对象中。
IOC容器的两种实现
1. IoC 思想基于 IoC 容器实现的,IoC 容器底层其实就是一个 Bean 工厂。

2. Spring提供了IOC容器实现的两种方式(两个接口)
    2.1 BeanFactory: IOC容器的基本实现,是Spring内部使用,不建议给开发人员使用
        // 由 org.springframework.beans.factory.BeanFactory 接口定义。

        特点:BeanFactory 采用懒加载(lazy-load)机制,容器在加载配置文件时并不会立刻创建 Java 对象,只有程序中获取(使用)这个对对象时才会创建。
        BeanFactory context = new ClassPathXmlApplicationContext("Beans.xml");
        HelloWorld obj = context.getBean("helloWorld", HelloWorld.class);
        obj.getMessage();

    2.2 ApplicationContext:BeanFactory接口的子接口,是对BeanFactory的扩展,一般开发人员直接使用
        // 而ApplicationContext接口下有2个实现类
        ClassPathXmlApplicationContext:加载"类路径"classpath下指定的XML配置文件
        // ApplicationContext applicationContext = new ClassPathXmlApplicationContext(String configLocation);
        FileSystemXmlApplicationContext:加载指定的文件系统路径中的xml配置文件
        // ApplicationContext applicationContext = new FileSystemXmlApplicationContext(String configLocation);
        BeanFactory context = new FileSystemXmlApplicationContext("D:\\eclipe workspace\\spring workspace\\HelloSpring\\src\\Beans.xml");
        HelloWorld obj = context.getBean("helloWorld", HelloWorld.class);
        obj.getMessage();

        特点:在加载配置文件的时候就会把配置文件中的所有对象进行创建
IOC操作Bean管理
1. 依赖注入(CI)
	在面向对象中,对象和对象之间是存在一种叫做“依赖”的关系。简单来说,依赖关系就是在一个对象中需要用到另外一个对象,即对象中存在一个属性,该属性是另外一个类的对象。
	控制反转核心思想就是由 Spring 负责对象的创建。在对象创建过程中,Spring 会自动根据依赖关系,将它依赖的对象注入到当前对象中,这就是所谓的“依赖注入”。
    依赖注入本质上是 Spring Bean 属性注入的一种,只不过这个属性是一个对象属性而已。
2. 基于xml方式创建对象
    // beans.xml
    <bean id="idUser" class="com.home.pojo.User"></bean>
    同时,bean标签中可以添加对应的属性,可以更完善的创建对象,比较常用的如id(唯一标识名称),class属性(类全路径、包类路径),要注意的是,SpringIOC容器在创建对象的时候,默认执行的是无参构造方法,若只有有参则创建报错
[外链图片转存失败,源站可能有防盗链机制,建议将图片保存下来直接上传(img-uc9HJZiw-1652959658527)(https://s2.loli.net/2022/05/14/dXmsND2kPLOzYUu.png)]
3. Spring Bean属性注入
    所谓 Bean 属性注入,简单点说就是将属性注入到 Bean 中的过程,而这属性既可以普通属性,也可以是一个对象(Bean)。
    Spring主要通过2种方式实现属性注入:
    	有参构造函数注入
    	setter注入(设值注入)

    3.1 // setter注入 (通过Bean的setter方法,将属性值注入到Bean属性中)
    	3.1.1 在Bean中(如User.java)中提供一个默认的无参构造函数,并为所需要注入的属性提供一个setXxx()方法
            private String username;
            private Integer id;
            public void setUsername(String username) {
                this.username = username;
            }
            public void setId(Integer id) {
                this.id = id;
            }

    	3.1.2 在Spring的xml配置文件中,使用<beans>及其子元素<bean>对Bean进行定义
    	3.1.3 在<bean>元素内使用<property>元素对各个属性进行赋值
            <bean id="idUserCISetter" class="com.home.pojo.UserCI">
                  <property name="id" value="1"/>
                  <property name="username" value="李大爷"/>
            </bean>

    3.2 //  有参构造函数注入
          3.2.1 在 Bean 中添加一个有参构造函数,构造函数内的每一个参数代表一个需要注入的属性
                private Integer id;
                private String username;
                private Integer age;
                public UserCIConstruct(Integer id, String username, Integer age) {
                    this.id = id;
                    this.username = username;
                    this.age = age;
                }

          3.2.2 在 Spring 的 XML 配置文件中,通过 <beans> 及其子元素 <bean> 对 Bean 进行定义
          3.2.3 在 <bean> 元素内使用 <constructor-arg> 元素,对构造函数内的属性进行赋值,Bean 的构造函数内有多少参数,就需要使用多少个 <constructor-arg> 元素
              	<bean id="idUserCIConstruct" class="com.home.pojo.UserCIConstruct">
                    <constructor-arg name="id" value="2"/>
                    <constructor-arg name="username" value="李大爷"/>
                    <!--        <constructor-arg index="2" value="20"/> index对应属性位置从0 1 2...这样-->
                </bean>

     3.3 p命名空间操作 // 对应setter方法注入
           3.3.1  在配置文件的 <beans> 元素中导入以下 XML 约束。
                  xmlns:p="http://www.springframework.org/schema/p"
                  <bean id="Bean 唯一标志符" class="包名+类名" p:普通属性="普通属性值" p:对象属性-ref="对象的引用">
           3.3.2 注意事项 (使用p命名空间)
                      Java类中必须有setter方法
                      Java 类中必须有无参构造器(类中不包含任何带参构造函数的情况,无参构造函数默认存在)
					在使用 p 命名空间实现属性注入前,XML 配置的 <beans> 元素内必须先导入 p 命名空间的 XML 约束

     3.4 c命名空间操作 // 对应构造函数方法注入
           3.4.1  在配置文件的 <beans> 元素中导入以下 XML 约束。
                  xmlns:c="http://www.springframework.org/schema/c"
                  <bean id="Bean 唯一标志符" class="包名+类名" c:普通属性="普通属性值" c:对象属性-ref="对象的引用">
           3.4.2 注意事项 (使用c命名空间)
                      Java 类中必须包含对应的带参构造器;
					在使用 c 命名空间实现属性注入前,XML 配置的 <beans> 元素内必须先导入 c 命名空间的 XML 约束。
2022.05.14
Spring注入外部Bean
1. 创建service类和dao类
2. service调用dao
    // service
    public class UserServiceImpl implements UserService {
        // 1. 以dao类作为service类属性
        private UserDao userDao;
        // 2. 用setter方法注入dao类对象
        public void setUserDao(UserDao userDao) {
            this.userDao = userDao;
        }
        @Override
        public void testService() {
            System.out.println("i am service func now excute......");
            // 3. 在service方法中调用dao类方法
            userDao.update();
        }
    }
	// dao
    public class UserDaoImpl implements UserDao {
        @Override
        public void update() {
            System.out.println("from dao update func by service func....");
        }
    }

3. spring的xml配置文件中配置
    <!--    依赖注入 外部Bean 采用setter方法
            1. 首先注入Service类
        -->
    <bean id="userServiceImpl" class="com.home.service.impl.UserServiceImpl">
        <!--        3. 此时不再使用value属性 使用ref引用dao类指定id-->
        <property name="userDao" ref="userDaoImpl"/>
    </bean>
    <!--    2. 再注入Dao类-->
    <bean id="userDaoImpl" class="com.home.dao.impl.UserDaoImpl"/>
Spring注入内部Bean
将定义在 <bean> 元素的 <property> 或 <constructor-arg> 元素内部的 Bean,称为“内部 Bean”。

1. 创建dept类和emp类(部门和员工 1对多)
    // dept
    public class Dept {
        private Integer deptno;
        private String dname;
        // 2. 有参构造函数方式
        public Dept(Integer deptno, String dname) {
            this.deptno = deptno;
            this.dname = dname;
        }
        // 1. setter方式
        public void setDeptno(Integer deptno) {
            this.deptno = deptno;
        }
        public void setDname(String dname) {
            this.dname = dname;
        }
        @Override
        public String toString() {
            return "Dept{" +
                "deptno=" + deptno +
                ", dname='" + dname + '\'' +
                '}';
        }
    }
	// emp
    public class Emp {
        private Integer empno;
        private String ename;
        private Dept dept;
        // 2. 有参构造函数方式
        public Emp(Integer empno, String ename, Dept dept) {
            this.empno = empno;
            this.ename = ename;
            this.dept = dept;
        }
        // 1. setter方式
        public void setEmpno(Integer empno) {
            this.empno = empno;
        }
        public void setEname(String ename) {
            this.ename = ename;
        }
        public void setDept(Dept dept) {
            this.dept = dept;
        }
        @Override
        public String toString() {
            return "Emp{" +
                "empno=" + empno +
                ", ename='" + ename + '\'' +
                ", dept=" + dept +
                '}';
        }
    }

2. 配置xml文件
    // setter方式
    <bean id="idEmp" class="com.home.pojo.Emp">
        <property name="empno" value="1"/>
        <property name="ename" value="李大爷"/>
        <property name="dept">
            <bean class="com.home.pojo.Dept">
                <property name="deptno" value="1001"/>
                <property name="dname" value="综合管理部"/>
            </bean>
        </property>
    </bean>
    // 构造函数方式
    <bean id="idEmpC" class="com.home.pojo.Emp">
        <constructor-arg name="empno" value="2"/>
        <constructor-arg name="ename" value="李二爷"/>
        <constructor-arg name="dept">
            <bean class="com.home.pojo.Dept">
                <constructor-arg name="deptno" value="1002"/>
                <constructor-arg name="dname" value="市场营销部"/>
            </bean>
        </constructor-arg>
    </bean>
Spring注入集合(Array&List&Map&Set)
1. 准备一个包含集合属性的类
    public class CollectionTypes {
        // 1. 数组
        private String[] arrays;
        // 2. List
        private List<String> lists;
        // 3. Map
        private Map<String, String> maps;
        // 4. Set
        private Set<Integer> sets;
        // 5. List中带对象
        private List<User> listsObject;
        // 6. 带公共List的属性
        private List<String> commonLists;
        public void setCommonLists(List<String> commonLists) {
            this.commonLists = commonLists;
        }
        public void setListsObject(List<User> listsObject) {
            this.listsObject = listsObject;
        }
        public void setArrays(String[] arrays) {
            this.arrays = arrays;
        }
        public void setLists(List<String> lists) {
            this.lists = lists;
        }
        public void setMaps(Map<String, String> maps) {
            this.maps = maps;
        }
        public void setSets(Set<Integer> sets) {
            this.sets = sets;
        }
        @Override
        public String toString() {
            return "CollectionTypes{" +
                    "arrays=" + Arrays.toString(arrays) +
                    ", lists=" + lists +
                    ", maps=" + maps +
                    ", sets=" + sets +
                    ", listsObject=" + listsObject +
                    ", commonLists=" + commonLists +
                    '}';
        }
    }

2. xml文件中配置
    <!--     依赖注入 集合类型 采用setter -->
    <bean id="collectionTypes" class="com.home.pojo.CollectionTypes">
        <!--        1.Arrays-->
        <property name="arrays">
            <array>
                <value>arrays1</value>
                <value>arrays2</value>
                <value>arrays3</value>
            </array>
        </property>
        <!--        2.List-->
        <property name="lists">
            <list>
                <value>list1</value>
                <value>list2</value>
                <value>list3</value>
            </list>
        </property>
        <!--        3.Map-->
        <property name="maps">
            <map>
                <entry key="key1" value="mapsValue1"/>
                <entry key="key2" value="mapsValue2"/>
            </map>
        </property>
        <!--        4.Set-->
        <property name="sets">
            <set>
                <value>1</value>
                <value>2</value>
                <value>3</value>
            </set>
        </property>
        <!--        5.List<Object>-->
        <property name="listsObject">
            <list>
                <ref bean="idUser"/>
                <ref bean="idUser2"/>
            </list>
        </property>
        <!--        6.commonLists-->
        <property name="commonLists" ref="commonList"/>
    </bean>
    // 给5.List<User>使用
    <bean id="idUser" class="com.home.pojo.User">
        <property name="username" value="我是list集合中的对象" />
    </bean>
    <bean id="idUser2" class="com.home.pojo.User">
        <property name="username" value="我是list集合中的对象2" />
    </bean>
    // 给6.commLists使用
    其中需要添加命名空间
    // xmlns:util="http://www.springframework.org/schema/util"
    // 在xsi:schemaLocation这个后面添加 http://www.springframework.org/schema/util http://www.springframework.org/schema/util/spring-util.xsd
    <!--    公共List集合被多处使用 需要用到util命名空间-->
    <util:list id="commonList">
        <value>我是公共List元素1</value>
        <value>我是公共List元素2</value>
        <value>我是公共List元素3</value>
    </util:list>
Spring注入其他类型
除了以上可以注入外,Spring也支持将例如 Null 值、字面量、复合物属性等注入到Bean中
1. Null值 // 使用<null />标签
<property name="propertyNull">
<null/>
</property>
2. 空字符串
<property name="propertyEmptyString" value="" />
3. 特殊字面量 // 在 XML 配置中“<”、“>”、“&”等特殊字符是不能直接保存
<property name="propertyLiteral" value="<我是含特殊字符>" />
或者使用xml文件专属短字符串<![CDATA[]]>
<property name="propertyLiteral" value="![CDATA[<我是含特殊字符>]]" />
4. 级联属性
可以在 <bean> 的 <property> 子元素中,为它所依赖的 Bean 的属性进行赋值,这就是所谓的“级联属性赋值”。
但需要注意以下3点:
Java 类中必须有 setter 方法;
Java 类中必须有无参构造器(默认存在);
依赖其他 Bean 的类中,必须提供一个它依赖的 Bean 的 getXxx() 方法。
// Emp
public class Emp {
private Dept dept;
public Dept getDept() { // 必须提供依赖其他Bean的getXxx()方法
return dept;
}
}
// Dept
public class Dept {
private Integer deptno;
private String dname;
public void setDeptno(Integer deptno) {
this.deptno = deptno;
}
public void setDname(String dname) {
this.dname = dname;
}
}
// xml
<bean id="idEmp" class="com.home.pojo.Emp">
<property name="dept" ref="idDept"/>
<property name="dept.dname" value="综合管理部"/> // 级联赋值
<property name="dept.deptno" value="1001"/> // 级联赋值
</bean>
<bean id="idDept" class="com.home.pojo.Dept"/>
2022.05.15
Spring两种Bean类型
通常来说,Spring中存在两种Bean,一种普通的Bean(比如上面在xml里面写的所有bean),还有一种就是工厂bean(FactoryBean)
1. 普通bean (在配置文件中定义的bean类型就是返回类型)
	如:<bean id="xxx" class="com.xxx.xx.User" /> // 此处定义了bean是User类型
	User user = context.getBean("xxx", User.class) // 这里接收使用User类型

2. 工厂bean,可以在配置文件中定义的bean类型和返回类型不一样
        2.1 创建类,让这个类实现接口"FactoryBean"
        2.2 实现接口里面的方法,在实现方法中定义返回的bean类型
Spring中的Bean作用域
默认情况下,所有的 Spring Bean 都是单例的,但是我们可以在 <bean> 元素中添加 scope 属性来配置 Spring Bean 的作用范围。
    <bean id="xxx" class="com.xxx.xx.Test" scope="prototype" />
    1. singleton // 默认 单例模式 加载spring 配置文件时候就会创建单实例对象

    2. prototype // 多例模式 不是在加载 spring 配置文件时候创建 对象,在调用getBean 方法时候创建多实例对象

Spring中Bean的生命周期
对于 singleton 作用域的 Bean 来说,Spring IoC 容器能够精确地控制 Bean 何时被创建、何时初始化完成以及何时被销毁;
对于 prototype 作用域的 Bean 来说,Spring IoC 容器只负责创建,然后就将 Bean 的实例交给客户端代码管理,Spring IoC 容器将不再跟踪其生命周期。

1. 生命周期 (简化版 5步)
    Bean 的实例化 // 通过构造器创建 bean 实例(无参数构造)
    Bean 属性赋值 // 为 bean 的属性设置值和对其他 bean 引用(调用 set 方法)
    Bean 的初始化 // 调用 bean 的初始化的方法(需要进行配置初始化的方法)
    Bean 的使用 // bean 可以使用了(对象获取到了)
    Bean 的销毁 // 当容器关闭时候,调用 bean 的销毁的方法(需要进行配置销毁的方法)
    // Book.java
    public class Book {
        private String bName;
        public Book() {
            System.out.println("1. 无参构造函数被调用");
        }
        public void setbName(String bName) {
            this.bName = bName;
            System.out.println("2. setXxx()方法被调用");
        }
        // 初始化方法
        public void initMethodFromBook() {
            System.out.println("3. 初始化被调用");
        }
        // 销毁方法
        public void destroyMethodFromBook(){
            System.out.println("5. 销毁方法被调用");
        }
    }
	// beans.xml
	<!--    测试Bean生命周期-->
    <bean id="idBook" class="com.home.pojo.Book" init-method="initMethodFromBook"
          destroy-method="destroyMethodFromBook">
        <property name="bName" value="这是一本书"/>
    </bean>
    // 其中init-method和destroy-method是3种方式中的一种,指定"bean"初始化的回调和销毁回调

    // test
    ClassPathXmlApplicationContext context = new ClassPathXmlApplicationContext("/beans.xml");
    Book book = context.getBean("idBook", Book.class);
    System.out.println("4. bean被使用了");
    context.close();

	// Bean的生命周期回调方法主要有两种:
	// 初始化回调方法:在Spring Bean被初始化后调用,执行一些自定义的回调操作
	// 销毁回调方法:在Spring Bean被销毁前调用,执行一些自定义的回调操作

	// 同时,可以有3种方式自定义Bean的生命周期回调方法:
	// 1. 通过接口实现 (Bean Java类实现 InitializingBean(afterPropertiesSet方法) 和 DisposableBean(destroy方法) 接口)
	// 2. 通过xml配置init-method和destroy-method(如上面所示)
	// 3. 通过注解实现 @PostConstruct 和 @PreDestory

2. 生命周期(增加后置处理器方法 7步)
    BeanPostProcessor 接口也被称为后置处理器,通过该接口可以自定义调用初始化前后执行的操作方法。
    主要重写其"postProcessBeforeInitialization"和"postProcessAfterInitialization"方法,若存在多个后置处理器,则可以继续实现Ordered接口,重写其"getOrder"方法,数值越大则执行越靠后
    // 最后在bean中配置 则所有的Bean创建都会执行该两次回调方法
    <!--    后置处理器-->
    <bean class="com.home.pojo.BookBack" />

    (1)通过构造器创建 bean 实例(无参数构造)
    (2)为 bean 的属性设置值和对其他 bean 引用(调用 set 方法)
     //(3)把 bean 实例传递 bean 后置处理器的方法 postProcessBeforeInitialization
    (4)调用 bean 的初始化的方法(需要进行配置初始化的方法)
     // (5)把 bean 实例传递 bean 后置处理器的方法 postProcessAfterInitialization
    (6)bean 可以使用了(对象获取到了)
    (7)当容器关闭时候,调用 bean 的销毁的方法(需要进行配置销毁的方法)

3. 生命周期(详细版)
    2.1 Spring 启动,查找并加载需要被 Spring 管理的 Bean,对 Bean 进行实例化。
    2.2 对 Bean 进行属性注入。
    2.3 如果 Bean 实现了 BeanNameAware 接口,则 Spring 调用 Bean 的 setBeanName() 方法传入当前 Bean 的 id 值。
    2.4 如果 Bean 实现了 BeanFactoryAware 接口,则 Spring 调用 setBeanFactory() 方法传入当前工厂实例的引用。
    2.5 如果 Bean 实现了 ApplicationContextAware 接口,则 Spring 调用 setApplicationContext() 方法传入当前 ApplicationContext 实例的引用。
    2.6 如果 Bean 实现了 BeanPostProcessor 接口,则 Spring 调用该接口的预初始化方法 postProcessBeforeInitialzation() 对 Bean 进行加工操作,此处非常重要,Spring 的 AOP 就是利用它实现的。
    2.7 如果 Bean 实现了 InitializingBean 接口,则 Spring 将调用 afterPropertiesSet() 方法。
    2.8 如果在配置文件中通过 init-method 属性指定了初始化方法,则调用该初始化方法。
    2.9 如果 BeanPostProcessor 和 Bean 关联,则 Spring 将调用该接口的初始化方法 postProcessAfterInitialization()。此时,Bean 已经可以被应用系统使用了。
    3.0 如果在 <bean> 中指定了该 Bean 的作用域为 singleton,则将该 Bean 放入 Spring IoC 的缓存池中,触发 Spring 对该 Bean 的生命周期管理;如果在 <bean> 中指定了该 Bean 的作用域为 prototype,则将该 Bean 交给调用者,调用者管理该 Bean 的生命周期,Spring 不再管理该 Bean。
    3.1 如果 Bean 实现了 DisposableBean 接口,则 Spring 会调用 destory() 方法销毁 Bean;如果在配置文件中通过 destory-method 属性指定了 Bean 的销毁方法,则 Spring 将调用该方法对 Bean 进行销毁。
Spring中Bean的继承
在 Spring 中,Bean 和 Bean 之间也存在继承关系。我们将被继承的 Bean 称为父 Bean,将继承父 Bean 配置信息的 Bean 称为子 Bean。
    <!--父Bean-->
    <bean id="parentBean" class="xxx.xxxx.xxx.ParentBean" >
        <property name="xxx" value="xxx"></property>
        <property name="xxx" value="xxx"></property>
    </bean>
    <!--子Bean-->
    <bean id="childBean" class="xxx.xxx.xxx.ChildBean" parent="parentBean"></bean>

在父 Bean 的定义中,有一个十分重要的属性,那就是 abstract 属性。如果一个父 Bean 的 abstract 属性值为 true,则表明这个 Bean 是抽象的。
抽象的父 Bean 只能作为模板被子 Bean 继承,它不能实例化,也不能被其他 Bean 引用。
2022.05.17
Spring中的自动装配(基于xml)
 Spring 在 Bean 与 Bean 之间建立依赖关系的行为称为“装配”。
 在之前我们都是在 XML 配置中通过 <constructor-arg>和 <property> 中的 ref 属性,手动维护 Bean 与 Bean 之间的依赖关系的。

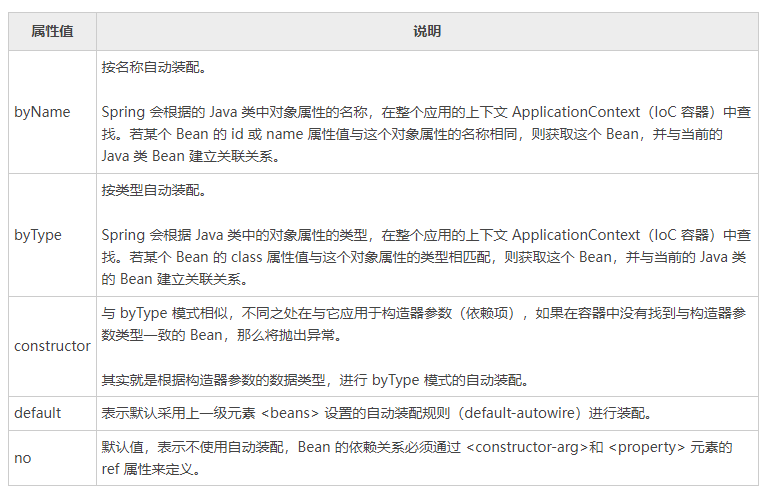
 Spring 的自动装配功能可以让 Spring 容器依据某种规则(自动装配的规则,有五种),为指定的 Bean 从应用的上下文(AppplicationContext 容器)中查找它所依赖的 Bean,并自动建立 Bean 之间的依赖关系。而这一过程是在完全不使用任何 <constructor-arg>和 <property> 元素 ref 属性的情况下进行的。

 Spring 框架式默认不支持自动装配的,要想使用自动装配,则需要对 Spring XML 配置文件中 <bean> 元素的 "autowire" 属性进行设置。

 autowire有5种类型,分别是"byName"\"byType"\"constructor"\"default"\"no"其中最在xmlBean配置种常用的是byName和byType

     1. autowire="no" 表示不使用自动装配,此时我们必须通过 <bean> 元素的 <constructor-arg>和 <property> 元素的 ref 属性维护 Bean 的依赖关系。
	<!--    autowire=no -->
     	<bean id="dept" class="com.home.beanIoc.domain.Dept">
         	<property name="deptNo" value="1"/>
         	<property name="deptName" value="共享中心"/>
         </bean>
         <bean id="emp" class="com.home.beanIoc.domain.Emp">
             <property name="empId" value="10001"/>
             <property name="empName" value="我是autowire=no"/>
             <property name="dept" ref="dept" /> // 这里就跟之前说的外部内引入
         </bean>

    2. autowire="byName" 表示按属性名称自动装配,XML 文件中 Bean 的 id 或 name 必须与类中的属性名称相同。
     <!--    autowire=byName-->
        <bean id="dept" class="com.home.beanIoc.domain.Dept">
            <property name="deptNo" value="1"/>
            <property name="deptName" value="共享中心"/>
        </bean>
        <bean id="emp" class="com.home.beanIoc.domain.Emp" autowire="byName">
            <property name="empId" value="10002"/>
            <property name="empName" value="我是autowire=byName;根据属性名称注入,需要注意被注入的bean的id或者name必须要和类属性名称一样"/>
        </bean>

    3. autowire="byType" 表示按类中对象属性数据类型进行自动装配。即使 XML 文件中 Bean 的 id 或 name 与类中的属性名不同,只要 Bean 的 class 属性值与类中的对象属性的类型相同,就可以完成自动装配。
     <!--    autowire=byType-->
        <bean id="deptxxxx" class="com.home.beanIoc.domain.Dept"> // 注意此处id值任意写了跟类属性名不一致但是是根据属性类型Dept匹配
        // 如果同时存在多个相同类型的 Bean,则注入失败,并且引发异常。则不建议使用byType
            <property name="deptNo" value="1"/>
            <property name="deptName" value="共享中心"/>
        </bean>
        <bean id="emp" class="com.home.beanIoc.domain.Emp" autowire="byType">
            <property name="empId" value="10003"/>
            <property name="empName" value="我是autowire=byType"/>
        </bean

   4. autowire="constructor" 表示按照 Java 类中构造函数进行自动装配。
    <!--    autowire=constructor-->
        <bean id="deptxxxx" class="com.home.beanIoc.domain.Dept">
            <constructor-arg name="deptNo" value="1"/>
            <constructor-arg name="deptName" value="共享中心"/>
        </bean>
        <bean id="emp" class="com.home.beanIoc.domain.Emp" autowire="constructor">
            <constructor-arg name="empId" value="10004"/>
            <constructor-arg name="empName" value="我是autowire=constructor"/>
        </bean>

   5. 默认采用上一级标签 <beans> 设置的自动装配规则(default-autowire)进行装配,Beans.xml 中的配置内容如下。
    <!--    autowire=default-->
        <beans xmlns="http://www.springframework.org/schema/beans"
       xmlns:xsi="http://www.w3.org/2001/XMLSchema-instance"
       xsi:schemaLocation="http://www.springframework.org/schema/beans http://www.springframework.org/schema/beans/spring-beans.xsd"
       default-autowire="byType"> // 注意此处在beans标签下需要设置default-autowire=值,即为bean中的默认装配类型
        <bean id="dept" class="com.home.beanIoc.domain.Dept">
            <property name="deptNo" value="1"/>
            <property name="deptName" value="共享中心"/>
        </bean>
        <bean id="emp" class="com.home.beanIoc.domain.Emp" autowire="default">
            <property name="empId" value="10003"/>
            <property name="empName" value="我是autowire=default"/>
        </bean>

Spring中Bean注入外部属性文件
比如引入数据库配置属性文件

// 1. jdbc.properties
prop.driverClassName=com.mysql.cj.jdbc.Driver
prop.url=jdbc:mysql://localhost:3306/testDB?characterEncoding=utf8&useSSL=false&serverTimezone=GMT%2B8
prop.userName=root
prop.password=123456
prop.initialSize=5
prop.maxActive=10

// 2. 把外部properties属性文件引入到spring配置文件中,此处需要引入context名称空间
<beans xmlns="http://www.springframework.org/schema/beans"
       xmlns:xsi="http://www.w3.org/2001/XMLSchema-instance"
       // 2.1 context-xmlns
       xmlns:context="http://www.springframework.org/schema/context"
       xsi:schemaLocation="http://www.springframework.org/schema/beans 									 http://www.springframework.org/schema/beans/spring-beans.xsd
       // 2.2 context-xsd
          			      http://www.springframework.org/schema/beans/spring-context.xsd
          ">

 // 3. 在配置文件中使用标签引入外部属性文件
  	<context:prperty-placeholder location="classpath:jdbc.properties" />
    <bean id="dataSource" class="com.alibaba.druid.pool.DruidDataSource">
     <property name="driverClassName" value="${prop.driverClassName}"></property>
     <property name="url" value="${prop.url}"></property>
     <property name="username" value="${prop.userName}"></property>
     <property name="password" value="${prop.password}"></property>
    </bean>
 </beans>
2022.05.19
Spring中的自动装配(基于注解)
1. 什么是注解
    (1)注解是代码特殊标记,格式:@注解名称(属性名称=属性值, 属性名称=属性值..)
	(2)使用注解,注解作用在类上面,方法上面,属性上面
	(3)使用注解目的:简化 xml 配置

2. Spring注解自动装配步骤
    引入依赖
    	// spring-aop-5.2.6.RELEASE.jar

    开启组件扫描
    	// 需要开启context名称空间
        <beans xmlns="http://www.springframework.org/schema/beans"
               xmlns:xsi="http://www.w3.org/2001/XMLSchema-instance"
               xmlns:context="http://www.springframework.org/schema/context"
               xsi:schemaLocation="http://www.springframework.org/schema/beans 								http://www.springframework.org/schema/beans/spring-beans.xsd
                                   http://www.springframework.org/schema/context http://www.springframework.org/schema/context/spring-context.xsd">

	    // 开启组件扫描功能
		// 若需要扫描多个包,则多个包之间使用逗号隔开
		// 或者直接扫描其上层包目录 如com.home.beanIoc
		<context:component-scan base-package="com.home.beanIoc" />

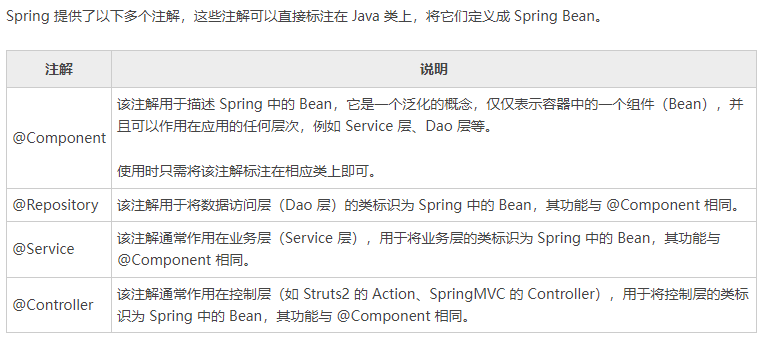
    使用注解定义 Bean
        @Component
        @Repository
        @Service
        @Controller

        // dao层
            // 1. 创建dao接口并创建其实现类
            // 2. 并使用@Repository注解实现类 加入IOC容器中
            // 3. 也可以使用@Component注解

            // @Component(value="IocDaoImpl") 等价于在xml配置文件中的
            // <bean id="IocDaoImpl" class="" />

            // @Repository(value="iAmDaoName")
            @Repository
            public class IocDaoImpl implements IocDao{
                @Override
                public void testIocDao() {
                    System.out.println("我是IocDao实现类");
                }
            }

	    // service层
		   // 1. 创建service接口并创建其实现类
		   // 2. 并使用@Service注解接口类 加入IOC容器中
            // 3. 也可以使用@Component注解
            // 4. 在Service内部声明并使用dao层 (使用@Autowired设置Bean的属性变量自动装配dao层实现类,默认按属性类型装配(byType))等价于在xml配置文件中使用ref引入外部类配置

            // @Component(value="IocServiceImpl") 等价于在xml配置文件中的
            // <bean id="IocServiceImpl" class="" />

		   @Service(value = "iAmServiceName") // 起个别名方便其他地方使用@Qualifier或者@Resource使用
            public class IocServiceImpl implements IocService{
                // 1. 根据类型注入byType 当存在多个实现类时 需要根据名称
                @Autowired
    		   private IocDao iocDao;

                // 2. 根据名称注入byName 同步需要给dao层起一个名称,默认为dao层实现类首字母小写
                @Autowired
                @Qualifier(value="iAmDaoName")
                private IocDao iocDao;

                @Override
                public void testIocService() {
                    System.out.println("我是IocService实现类");
                    iocDao.testIocDao();
                }
            }

	    // controller层
			@Controller("iAmController") // 这里给controller起个别名
                public class IocController {
                    // @Resource // /根据类型进行注入
                    @Resource(name="iAmServiceName") // 根据名称进行注入
                    private IocService iocService;
                    public void testAll(){
                        System.out.println("我是IocController类,接下来准备调用service方法");
                        iocService.testIocService();
                    }
                }


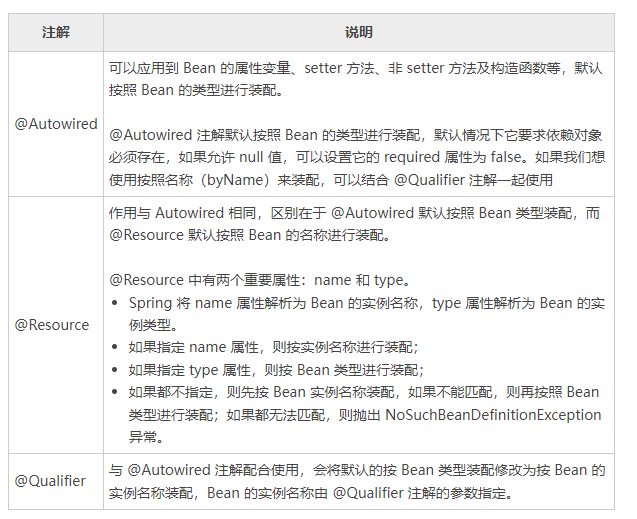
    依赖注入
        (1)@Autowired:根据属性类型进行自动装配
        (2)@Qualifier:根据名称进行注入这个@Qualifier 注解的使用,和上面@Autowired 一起使用
        (3)@Resource:可以根据类型注入,可以根据名称注入
        (4)@Value:注入普通类型属性


组件扫描细节配置
1. 默认全扫描
	<context:component-scan base-package="com.home.beanIoc" />

2. 指定扫描
	// use-default-filters="false" 表示现在不使用默认 filter,自己配置 filter
 context:include-filter ,设置扫描哪些内容
    <context:component-scan base-package="com.home.beanIoc" use-default-filters="false">
     <context:include-filter type="annotation"
                           expression="org.springframework.stereotype.Controller"/>
    </context:component-scan>

3. 指定不扫描
	// 下面配置扫描包所有内容context:exclude-filter: 设置哪些内容不进行扫描
	<context:component-scan base-package="com.home.beanIoc" use-default-filters="false">
 		<context:include-filter type="annotation"
expression="org.springframework.stereotype.Controller" />
	</context:component-scan>
全面开启注解
// SpringConfig.java
@Configuration // 作为配置类,替代 xml 配置文件
@ComponentScan(basePackages = {"com.home.beanIoc"}) // 扫描包位置
public class SpringConfig {
}

// test.java
@Test
public void testAllAnno(){
    ApplicationContext context = new AnnotationConfigApplicationContext(SpringConfig.class);
    IocController iAmControllerName = context.getBean("iAmControllerName", IocController.class);
    iAmControllerName.testAll();
}

// console
我是IocController类,接下来准备调用service方法
我是IocService实现类,接下来准备调用dao方法
我是IocDao实现类
