Spring Boot2
- 这个知识重要吗?有什么用?
- 环境要求
- Hello,SpringBoot
- SpringBoot 简化配置文件
- Spring 打包部署
- SpringBoot 特点
- 容器功能(底层注解)
- 自动配置原理入门(@SpringBootApplication)
- SpringBoot应用应该怎么编写
- 开发插件
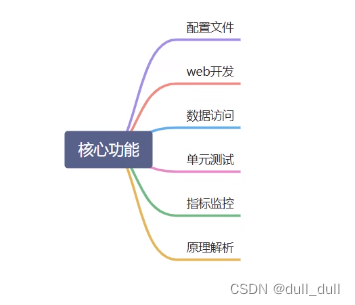
- 开始核心功能篇
- 配置文件-yaml的用法
- 自定义类绑定的配置提示
- 使用 `SpringBoot` 开始 `Web` 开发
- 构建后台管理系统
- 拦截器
- 文件上传
- 异常处理
- 原生组件注入(Servlet、Filter、Listener)
- 数据访问
- 单元测试 JUnit5
- 指导复习的问题
- 容易犯的错误
- 重点
这个知识重要吗?有什么用?
环境要求
- java 8 及以上
- Maven 3.5 及以上
Hello,SpringBoot
- 需求:浏览器发生 /hello 请求,响应 Hello,Spring Boot 2
(0)修改 Maven 配置,使其使用阿里云下载,使用JDK1.8
(1)创建Maven工程,引入依赖(固定写法)
<parent>
	<groupId>org.springframework.boot</groupId>
	<artifactId>spring-boot-starter-parent</artifactId>
	<version>2.3.4.RELEASE</version>
</parent>


<dependencies>
	<dependency>
		<groupId>org.springframework.boot</groupId>
		<artifactId>spring-boot-starter-web</artifactId>
	</dependency>
</dependencies>
(2)编写主程序类
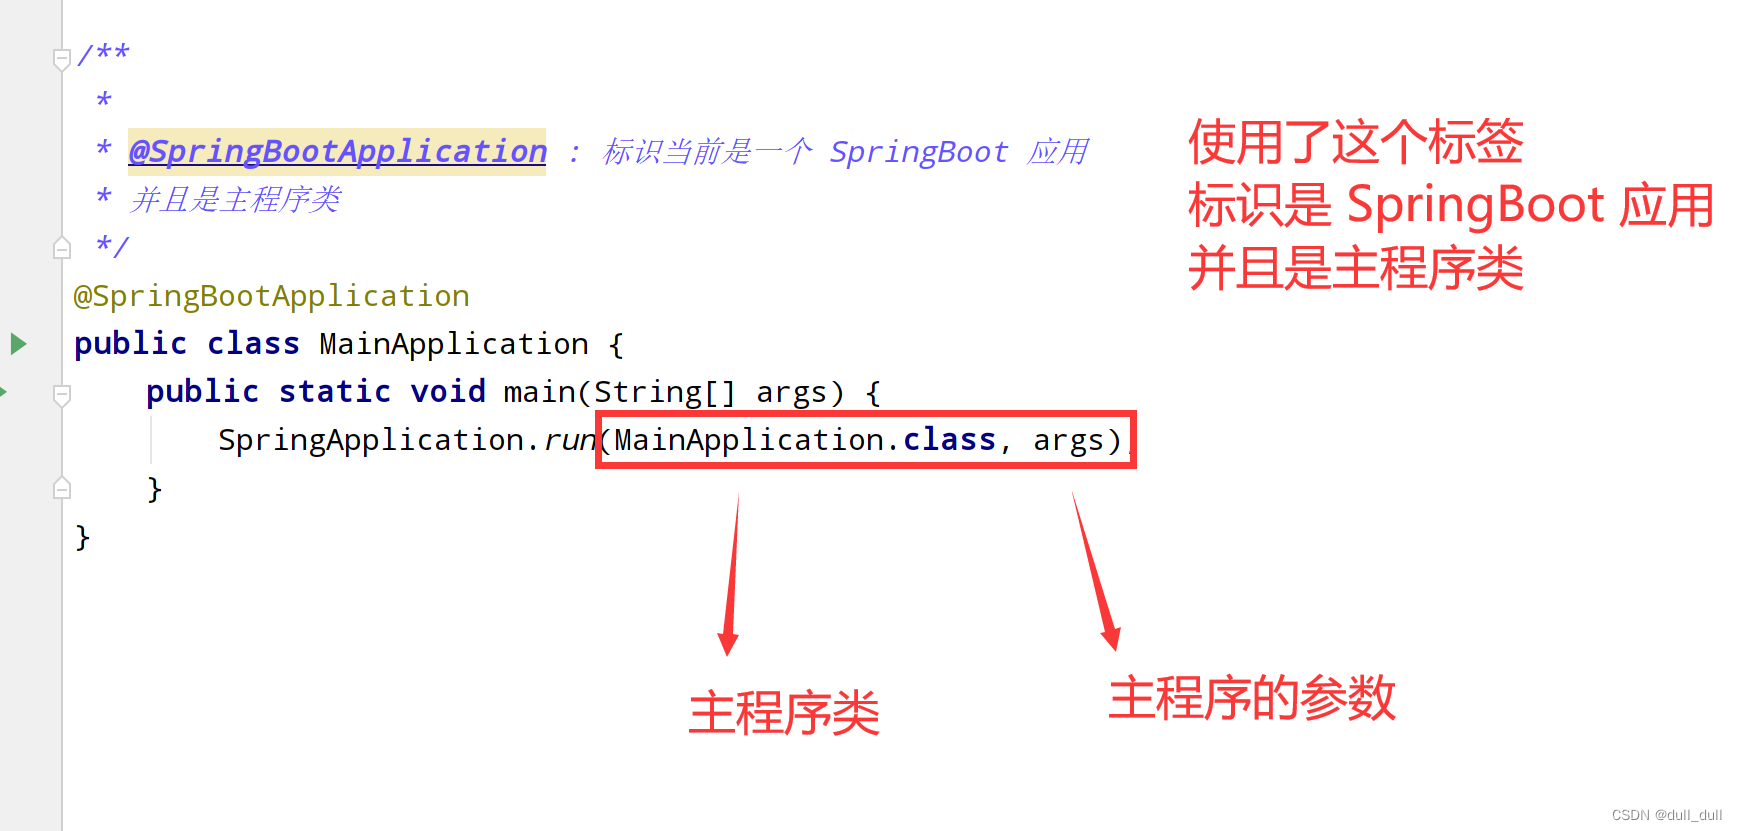
/**
 * 主程序类
 * @SpringBootApplication : 标识当前是一个 SpringBoot 应用
 */
@SpringBootApplication
public class MainApplication {
    public static void main(String[] args) {
        SpringApplication.run(MainApplication.class, args);
    }
}
(3)编写 Controller
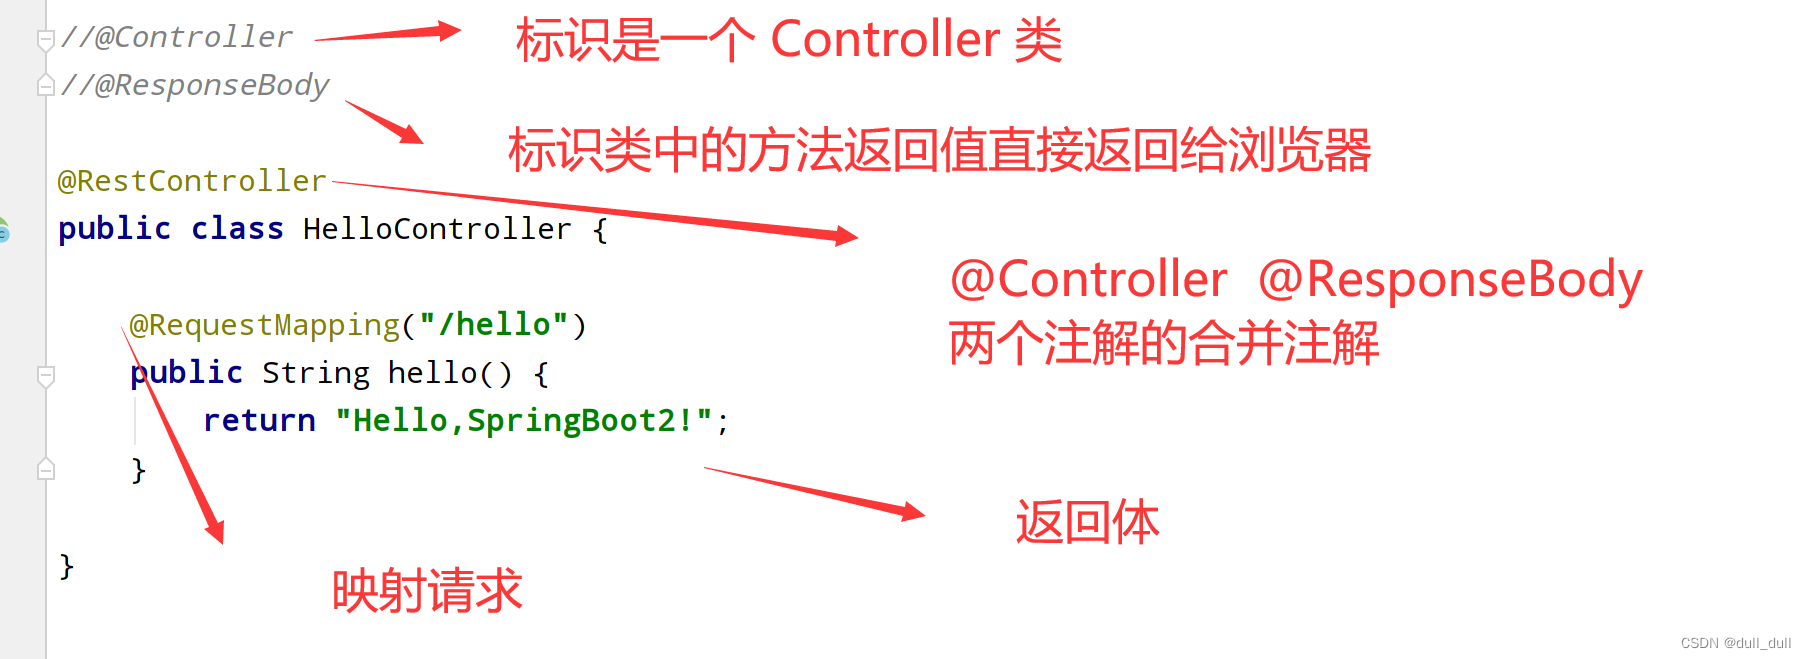
//@Controller
//@ResponseBody
@RestController
public class HelloController {
    @RequestMapping("/hello")
    public String hello() {
        return "Hello,SpringBoot2!";
    }
}
(4)运行主程序类中的Main方法

表示 Tomcat 以及启动成功,此时可以直接通过浏览器进行访问

Hello!SpringBoot2!
SpringBoot 简化配置文件
(1)创建application.properties文件
在maven工程的resource文件夹中创建application.properties文件。
(2)能够配置的属性
Spring 打包部署
(1)修改 pom.xml 文件
在pom.xml添加
<build>
	<plugins>
		<plugin>
			<groupId>org.springframework.boot</groupId>
			<artifactId>spring-boot-maven-plugin</artifactId>
		</plugin>
	</plugins>
</build>
(2)进行打包
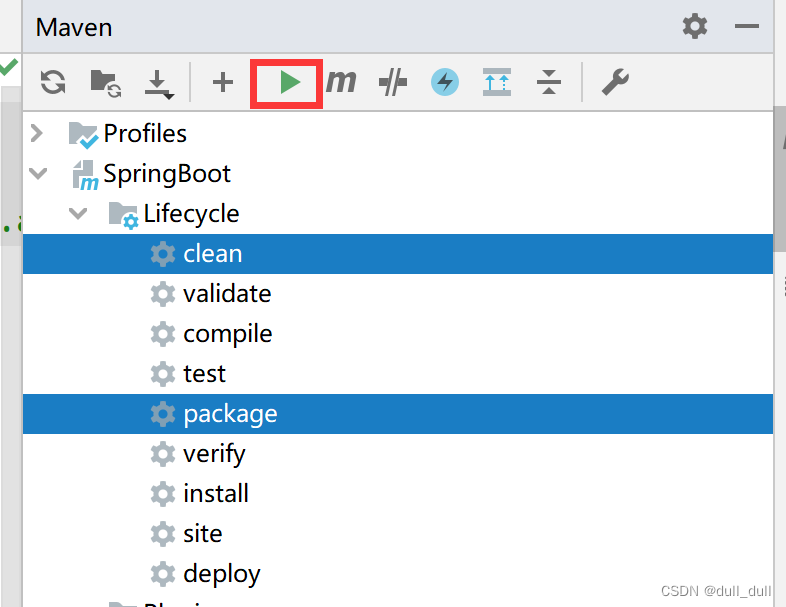
打包生成的文件在工程目录 target 文件夹下。
(3)运行文件
此时进入到文件夹中,使用命令java -jar 包名 就可以运行工程,此时可以直接在服务器运行 jar 包,简化了部署。
SpringBoot 特点
依赖管理
父项目
<parent>
	<groupId>org.springframework.boot</groupId>
	<artifactId>spring-boot-starter-parent</artifactId>
	<version>2.3.4.RELEASE</version>
</parent>
它几乎声明了所有开发中常用的依赖的版本号,自动版本仲裁机制。
如果需要修改版本,那么可以在当前项目 pom.xml 文件重新声明版本号,会就近取用。
场景启动器
spring-boot-starter-*:*代表某种场景- 只要声明了,那么当前场景的依赖都会自动导入。
*-spring-boot-starter: 第三方为我们提供的简化开发的场景启动器。
所有场景启动器最底层的依赖
<dependency>
	<groupId>org.springframework.boot</groupId>
	<artifactId>spring-boot-starter</artifactId>
	<version>2.3.4.RELEASE</version>
	<scope>compile</scope>
</dependency>
自动配置(修改包扫描)
/**
 * 主程序类  主配置类
 * @SpringBootApplication : 标识当前是一个 SpringBoot 应用
 */
@SpringBootApplication
public class MainApplication {
    public static void main(String[] args) {
        // 1.返回 IOC 容器
        ConfigurableApplicationContext run = SpringApplication.run(MainApplication.class, args);

        // 2.容器中的组件
        String[] beanDefinitionNames = run.getBeanDefinitionNames();

        for (String name : beanDefinitionNames) {
            System.out.println(name);
        }
    }
}
-
默认的包结构
-
主程序所在包及其下面的所有子包里面的组件都会被默认扫描进来
-
想要改变扫描路径
@SpringBootApplication(scanBasePackages="包路径")@ComponentScan 指定扫描路径
-
-
各种配置拥有默认值
-
按需加载所有自动配置项
容器功能(底层注解)
@Configuration 声明配置类,注册 Bean
// 声明配置类
// 同时配置类也是容器中的一个组件
@Configuration
public class MyConfig {

    // 给容器中添加组件,以方法名作为组件的 ID ,返回类型就是组件类型。
    @Bean
    public User user01() {
        return new User("张三", 18);
    }

    // 自定义组件 ID 为 dog
    @Bean("dog")
    public Pet pet01() {
        return new Pet("小狗");
    }
}
此时获取的组件是单例的。
	System.out.println(run.getBean("user01"));
	MyConfig bean = run.getBean(MyConfig.class);
	System.out.println(bean);
在Spring 5.2 以后新增 proxyBeanMethods 默认为 true
proxyBeanMethods(注解中属性)
配置类是一个代理对象类
com.wuqiyong.boot.config.MyConfig$$EnhancerBySpringCGLIB$$6fb09b19@43d455c9
-
当
proxyBeanMethods为true时,保持组件单实例它会使用代理对象调用方法,此时就会检查容器中是否有由此方法注册的组件,如果有,那么直接返回,否则调用注册方法进行注册。
-
当
proxyBeanMethods为false时,不保持组件单实例每次都调用组件注册方法,获取一个新的组件。
解决组件依赖的场景
@Bean
    public User user01() {
        return new User("张三", 18, pet01());
    }

    @Bean
    public Pet pet01() {
        return new Pet("小狗");
    }

	User user01 = run.getBean("user01", User.class);

    Pet pet = run.getBean("pet01", Pet.class);

    System.out.println(user01.getPet() == pet);
此时就完成了组件依赖。
proxyBeanMethods 的取值
根据 proxyBeanMethods 的取值,有Full模式(默认)与Lite模式。
Full proxyBeanMethods=true保证每个@Bean方法被调用多少次返回的组件都是单实例的,可以实现组件依赖,但是每次都要进行判断是否有组件依赖。Lit proxyBeanMethods=false每个@Bean方法被调用返回的都是新创建的对象,可以加速容器启动过程,减少判断,提高响应速度。
@import 导入组件
@Bean、@Component、@Controller、@Service、@Repository,它们是Spring的基本标签,在Spring Boot中并未改变它们原来的功能。
@import(class数组)
- 给容器中使用无参构造函数创建组件,使用
import导入的组件,默认名字为全类名。
@Conditional 条件装配
满足Conditional指定的条件,则进行组件注入,可以在注册方法上表示当前方法,可以在类上表示全部注册方法。
	判断当前容器中是否有对应的组件
	// true
    System.out.println(run.containsBean("user01"));
    // false
    System.out.println(run.containsBean("user02"));
ConditionalOnBean()
	@Bean
    // 当容器中有 "pet01" 组件时才注册 user01 否则不进行注册。
    @ConditionalOnBean(name = {"pet01"})
    public User user01() {
        return new User("张三", 18, pet01());
    }

	// 没有注册 pet01
    //@Bean
    public Pet pet01() {
        return new Pet("小狗");
    }

	// false
	System.out.println(run.containsBean("user01"));
@ImportResource导入Spring配置文件
可以在主配置类上使用 @ImportResource 导入 beans.xml 文件
@ImportResource("classpath:beans.xml")
public class MyConfig {
...
}
@ConfigurationProperties配置绑定
(1)@ConfigurationProperties + @Component
// 注意要在容器中才能使用
@Component
// 在配置文件中的前缀,不包括 .    prefix = value
@ConfigurationProperties(prefix = "jdbc")
@Data
public class JDBC {
    private String driver;
    private String url;
    private String root;
    private String password;
}
(2)@EnableConfigurationProperties + @ConfigurationProperties
- 1.在当前类上使用
@ConfigurationProperties - 2.在配置类上使用
@EnableConfigurationProperties - 当前类是第三方提供的时,使用这种方式,因为不能添加
@Component
// 开启属性配置功能
@EnableConfigurationProperties(JDBC.class)
public class MainApplication {}

@ConfigurationProperties(prefix = "jdbc")
@Data
public class JDBC {}
自动配置原理入门(@SpringBootApplication)
-
@SpringBootApplication完成了自动配置,核心是下面三个注解。@SpringBootConfiguration@EnableAutoConfiguration@ComponentScan
(1)@SpringBootConfiguration
@Target(ElementType.TYPE)
@Retention(RetentionPolicy.RUNTIME)
@Documented
@Configuration
public @interface SpringBootConfiguration {}
@Configuration说明@SpringBootConfiguration注释的MainApplication主程序也是SpringBoot中的一个配置类。
(2)@ComponentScan
指定扫描哪些 Spring 注解。
(3)@EnableAutoConfiguration 核心
@Target(ElementType.TYPE)
@Retention(RetentionPolicy.RUNTIME)
@Documented
@Inherited
@AutoConfigurationPackage
@Import(AutoConfigurationImportSelector.class)
public @interface EnableAutoConfiguration {}
重点是@AutoConfigurationPackage 与 @Import(AutoConfigurationImportSelector.class)
(1)@AutoConfigurationPackage 自动配置包
//给容器中导入一个组件
@Import(AutoConfigurationPackages.Registrar.class)
public @interface AutoConfigurationPackage {}
给当前容器导入 AutoConfigurationPackages.Registrar 组件
Registrar
利用 Registrar 批量给容器中进行注册
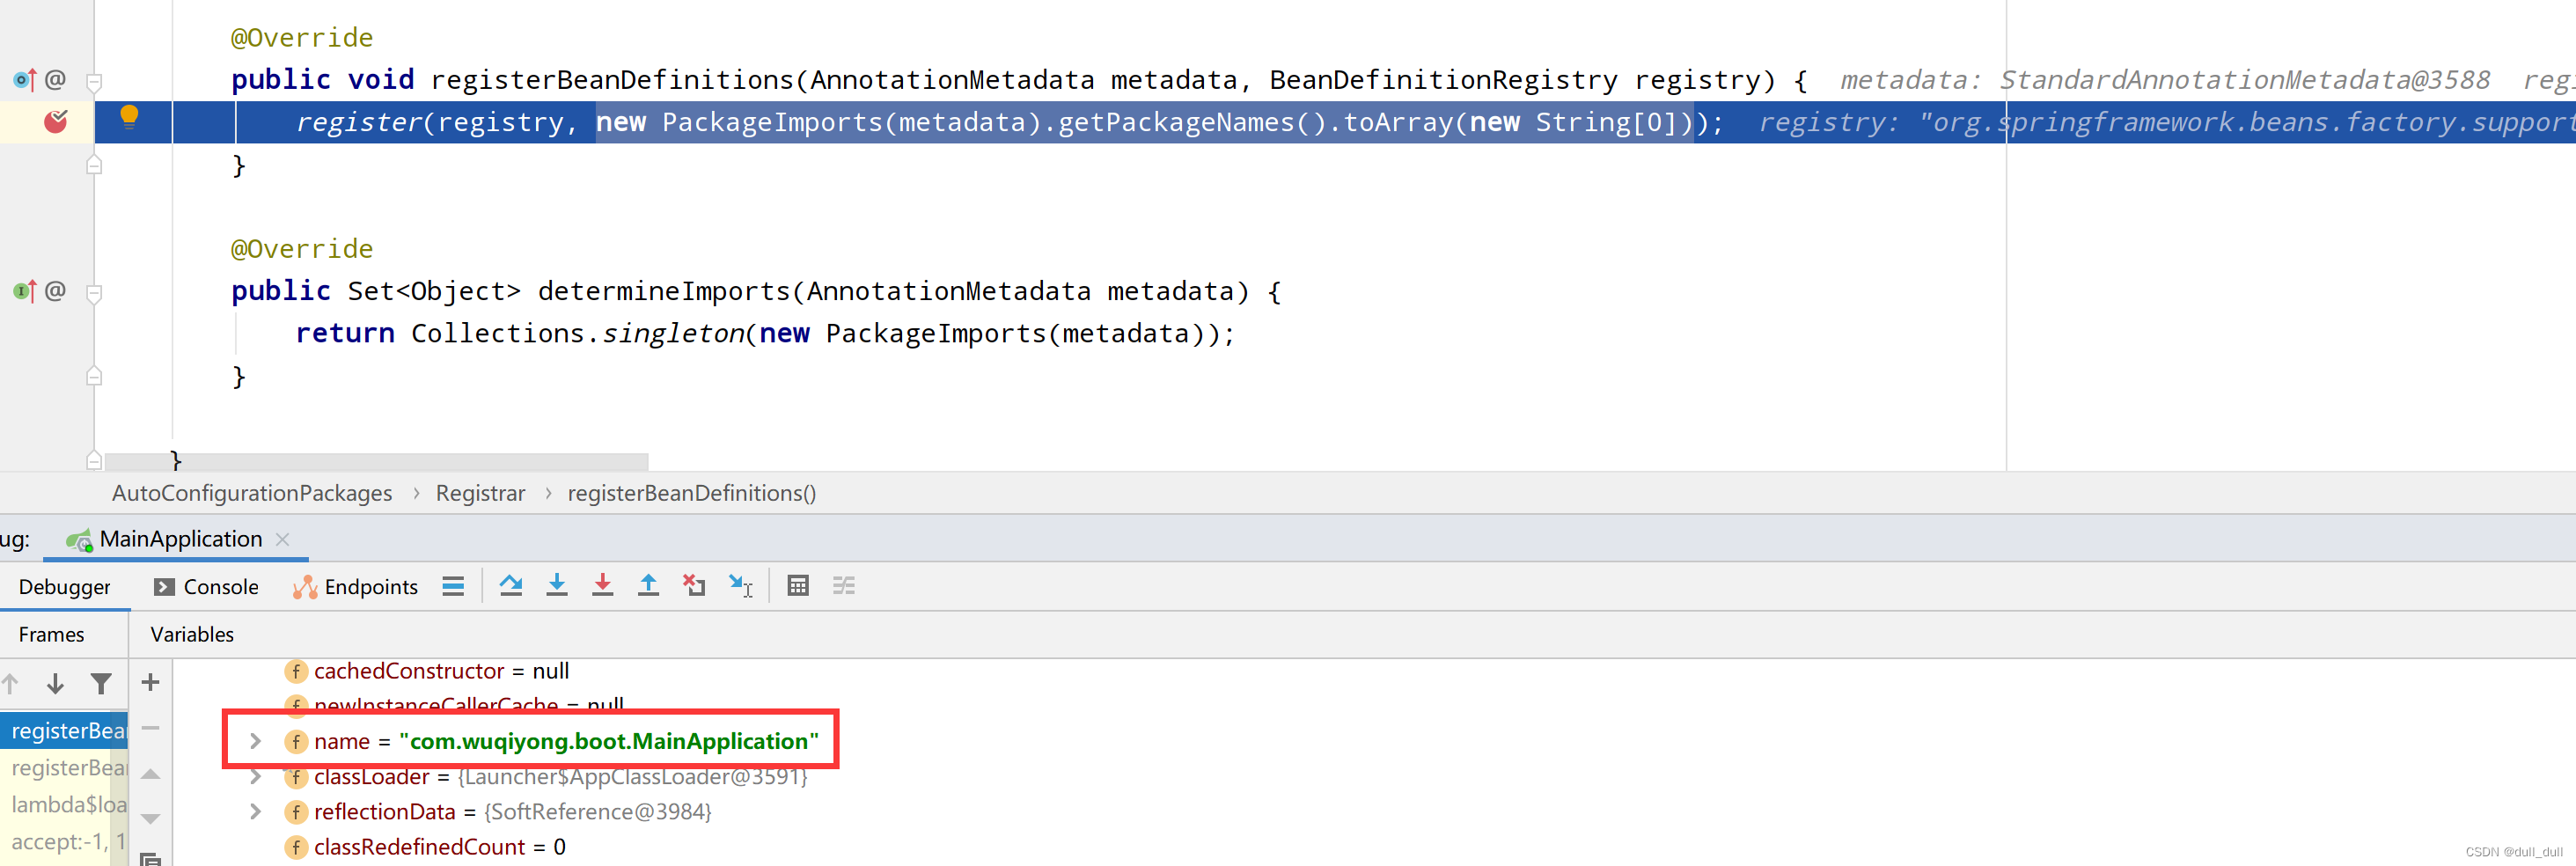

为什么得到这个包名?因为 @EnableAutoConfiguration 注解在主类上,主类在这个包下,使用得到这个包名,然后将这个包名封转成一个数组,将这个包下的全部组件进行注册。
- 所以
@AutoConfigurationPackage的作用是将指定包(主程序类所在的包)下的全部组件进行导入。
所以默认的包路径是主程序类所在的包路径。
(2)@Import(AutoConfigurationImportSelector.class)
@Override
	public String[] selectImports(AnnotationMetadata annotationMetadata) {
		if (!isEnabled(annotationMetadata)) {
			return NO_IMPORTS;
		}
		AutoConfigurationEntry autoConfigurationEntry = getAutoConfigurationEntry(annotationMetadata);
		return StringUtils.toStringArray(autoConfigurationEntry.getConfigurations());
	}
- 利用
getAutoConfigurationEntry(annotationMetadata);给容器中批量导入一些组件 - 调用
List<String> configurations = getCandidateConfigurations(annotationMetadata, attributes)获取到所有需要导入到容器中的配置类 - (重点)利用方法
Map<String, List<String>> loadSpringFactories(@Nullable ClassLoader classLoader);得到所有的组件 - 从
META-INF/spring.factories位置来加载一个文件。- 默认扫描我们当前系统里面所有
META-INF/spring.factories位置的文件 spring-boot-autoconfigure-2.3.4.RELEASE.jar包里面也有META-INF/spring.factories- 文件里面写死了spring-boot一启动就要给容器中加载的所有配置类
- 虽然我们127个场景的所有自动配置启动的时候默认全部加载,但是
xxxxAutoConfiguration按照条件装配规则(@Conditional),最终会按需配置。
- 默认扫描我们当前系统里面所有
SpringBoot默认会在底层配好所有的组件,但是如果用户自己配置了以用户的优先。

(4)自动配置流程
总结:
- SpringBoot先加载所有的自动配置类 xxxxxAutoConfiguration
- 每个自动配置类按照条件进行生效,默认都会绑定配置文件指定的值。(xxxxProperties里面读取,xxxProperties和配置文件进行了绑定)
- 生效的配置类就会给容器中装配很多组件
- 只要容器中有这些组件,相当于这些功能就有了
- 定制化配置
- 用户直接自己@Bean替换底层的组件
- 用户去看这个组件是获取的配置文件什么值就去修改。
xxxxxAutoConfiguration —> 组件 —> xxxxProperties里面拿值 ----> application.properties
SpringBoot应用应该怎么编写
-
引入场景依赖
-
查看自动配置了哪些(选做)
- 自己分析,引入场景对应的自动配置一般都生效了
- 配置文件中添加debug=true开启自动配置报告。
- Negative(不生效)
- Positive(生效)
-
是否需要修改
- 参照文档修改配置项
- 官方文档
- 自己分析。xxxxProperties绑定了配置文件的哪些。
- 自定义加入或者替换组件
- @Bean、@Component…
- 自定义器 XXXXXCustomizer;
- 参照文档修改配置项
开发插件
Lombok
slf4j
有一个自动注入的 log 对象,可以使用 log 对象打印日志
log.info()

@Slf4j
@RestController
public class HelloController {

    @RequestMapping("/hello")
    public String hello() {
        log.info("hello 开始了");
        return "Hello,SpringBoot2!";
    }

}
dev-tools
解决每次修改代码以后需要重启主程序的问题。
(1)引入依赖
<dependencies>
    <dependency>
        <groupId>org.springframework.boot</groupId>
        <artifactId>spring-boot-devtools</artifactId>
        <optional>true</optional>
    </dependency>
</dependencies>
(2)当代码修改以后 使用 Ctrl + [功能键] + F9 进行热更新
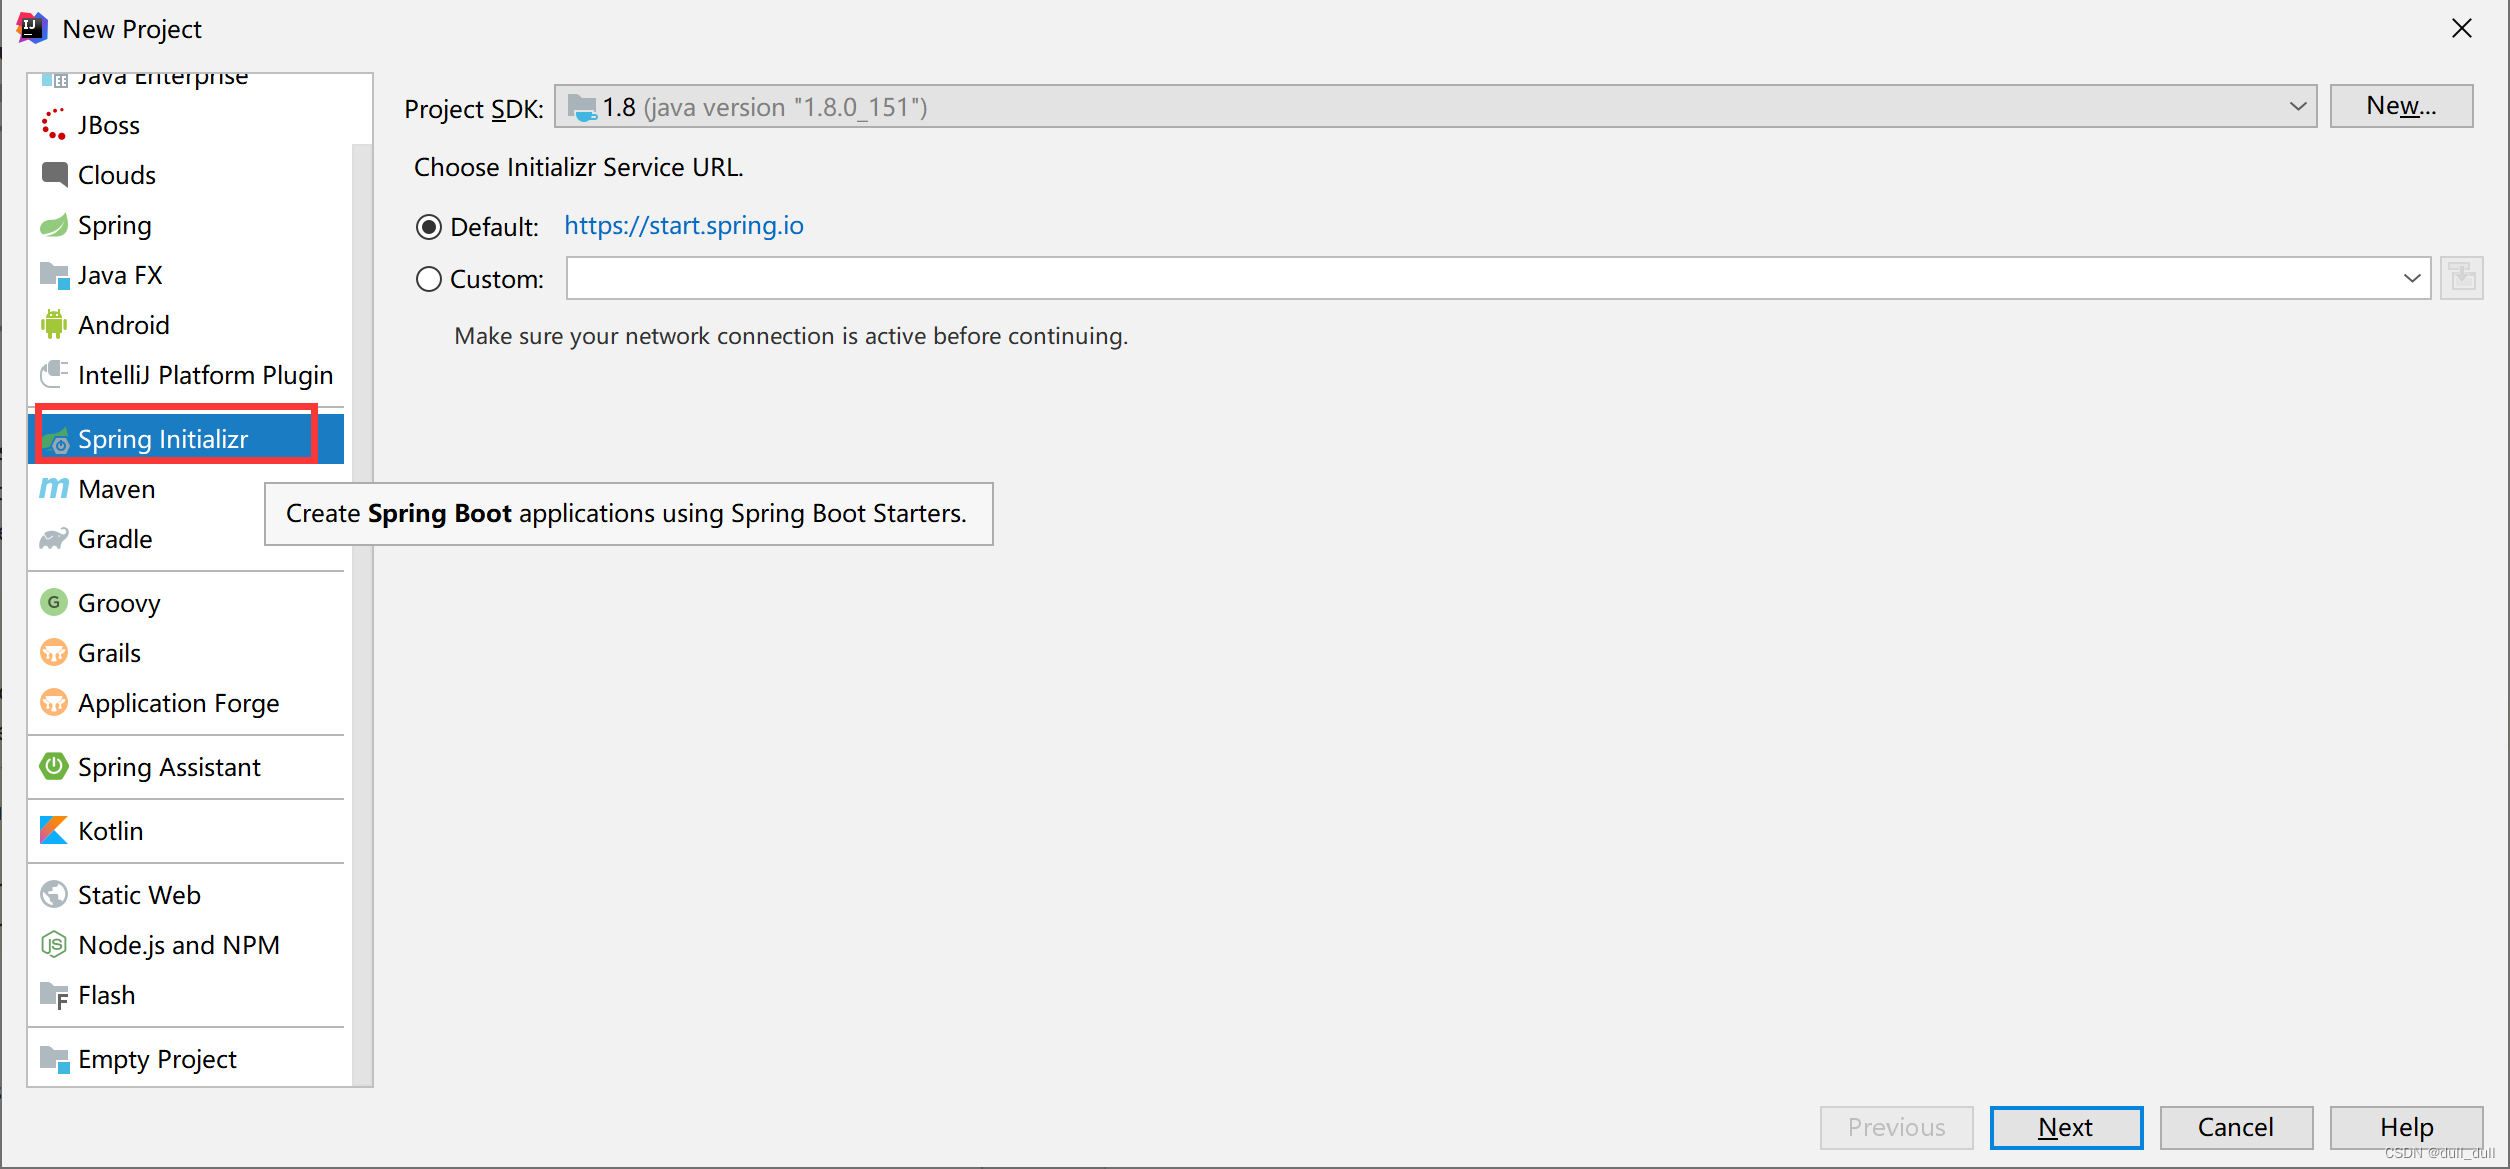
Spring Initailizr(项目初始化向导)
可以帮助我们快速的创建 SpringBoot 应用
开始核心功能篇
配置文件-yaml的用法
和 Properties 的使用方法一样
非常适合用来做以数据为中心的配置文件。
基本语法
- key: value;kv之间有空格
key: value - 大小写敏感
user-name:userName- 使用缩进表示层级关系
- 缩进不允许使用tab,只允许空格
- 缩进的空格数不重要,只要相同层级的元素左对齐即可
#表示注释- 字符串无需加引号,如果要加,单引号
'、双引号"表示字符串内容会被转义、不转义 - 单引号时
'\n'将 \n 作为字符串输出 - 双引号时
"\n"将它作为转义字符输出
数据联系
字面量:单个的、不可再分的值。date、boolean、string、number、null
key: value
对象:键值对的集合。map、hash、set、object
k: {k1: v1,k2: v2,k3: v3}

k:
	k1: v1
	k2: v2
	k3: v3
数组:一组按次序排列的值。array、list、queue
k: [v1,v2,v3]

k:
	- v1
	- v2
	- v3
自定义类绑定的配置提示
将配置文件和类进行绑定,当写配置文件时就有提示信息。
(1)添加依赖以及忽略信息
<dependency>
    <groupId>org.springframework.boot</groupId>
    <artifactId>spring-boot-configuration-processor</artifactId>
    <optional>true</optional>
</dependency>

<build>
    <plugins>
        <plugin>
            <groupId>org.springframework.boot</groupId>
            <artifactId>spring-boot-maven-plugin</artifactId>
            <configuration>
                <excludes>
                    <exclude>
                        <groupId>org.springframework.boot</groupId>
                        <artifactId>spring-boot-configuration-processor</artifactId>
                    </exclude>
                </excludes>
            </configuration>
        </plugin>
    </plugins>
</build>
如果 spring-boot-configuration-processor 爆红,可能是阿里云仓库太老了,更新到最新仓库。
<mirror>
  <id>aliyunmaven</id>
  <mirrorOf>*</mirrorOf>
  <name>阿里云公共仓库</name>
  <url>https://maven.aliyun.com/repository/public</url>
</mirror>
如果没有提示,可以右击 .yaml recompile
使用 SpringBoot 开始 Web 开发
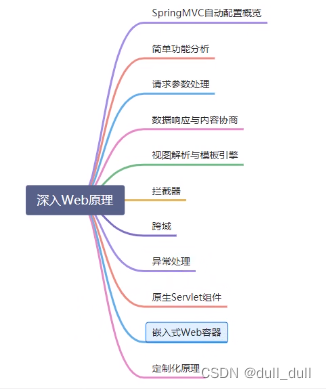
SpringMVC 自动配置概览。
Spring Boot provides auto-configuration for Spring MVC that works well with most applications.(大多场景我们都无需自定义配置)
The auto-configuration adds the following features on top of Spring’s defaults:
-
Inclusion of
ContentNegotiatingViewResolverandBeanNameViewResolverbeans.- 内容协商视图解析器和 BeanName 视图解析器
-
Support for serving static resources, including support for WebJars (covered later in this document)).
- 静态资源(包括webjars)
-
Automatic registration of
Converter,GenericConverter, andFormatterbeans.- 自动注册
Converter,GenericConverter,Formatter
- 自动注册
-
Support for
HttpMessageConverters(covered later in this document).- 支持
HttpMessageConverters(后来我们配合内容协商理解原理)
- 支持
-
Automatic registration of
MessageCodesResolver(covered later in this document).- 自动注册
MessageCodesResolver(国际化用)
- 自动注册
-
Static
index.htmlsupport.- 静态index.html 页支持
-
Custom
Faviconsupport (covered later in this document).- 自定义
Favicon小图标
- 自定义
-
Automatic use of a
ConfigurableWebBindingInitializerbean (covered later in this document).- 自动使用
ConfigurableWebBindingInitializer,(DataBinder负责将请求数据绑定到JavaBean上)
- 自动使用
简单功能分析
静态资源访问
(1)在类路径(resources)下可以作为静态资源目录
/static/public/resources/META-INF/resources
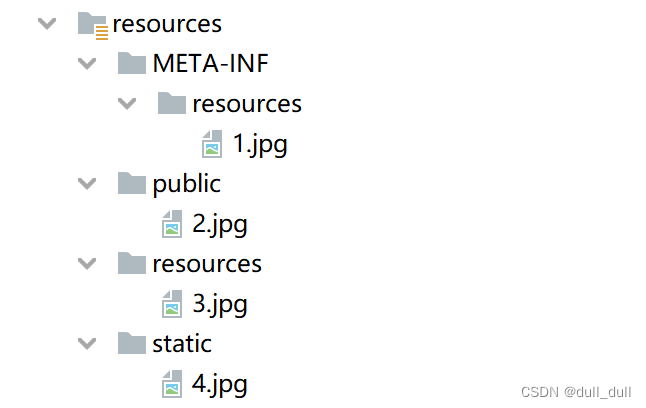
(2)访问 : 当前项目根路径/ + 静态资源名 例如:http://localhost:8080/1.jpg
(3)原理: 静态映射/**。
接收请求后在 Controller 里查看是否匹配,如果不匹配,交给静态资源处理器进行匹配,然后不匹配,响应 404
(4)添加静态资源访问前缀
spring:
  mvc:
    static-path-pattern: /resource/**
此时就需要 http://localhost:8080/resource/1.jpg 才能进行访问,添加了前缀resource,使用场景:不对静态资源进行拦截。
修改以后静态资源的路径为:当前项目 + static-path-pattern + 静态资源名
(5)改变默认的静态资源路径(改变后默认路径失效)
spring:
  resources:
    static-locations: [classpath:/hello/]
webjar
可用jar方式添加css,js等资源文件
欢迎页支持
-
静态资源路径下 index.html。
- 不可以配置静态资源的访问前缀,否则导致 index.html 不能被默认访问
- 注意是静态资源路径下的 index

自定义Favicon(自定义页面图标)
将文件名命名为 favicon.ico 放在静态资源目录下即可。

静态资源原理源码分析
- SpringBoot启动默认加载 xxxAutoConfiguration 类(自动配置类)
- SpringMVC功能的自动配置类
WebMvcAutoConfiguration,生效
@Configuration(proxyBeanMethods = false)
@ConditionalOnWebApplication(type = Type.SERVLET)
@ConditionalOnClass({ Servlet.class, DispatcherServlet.class, WebMvcConfigurer.class })
@ConditionalOnMissingBean(WebMvcConfigurationSupport.class)
@AutoConfigureOrder(Ordered.HIGHEST_PRECEDENCE + 10)
@AutoConfigureAfter({ DispatcherServletAutoConfiguration.class, TaskExecutionAutoConfiguration.class,
		ValidationAutoConfiguration.class })
public class WebMvcAutoConfiguration {}
里面有一个内部类
@Configuration(proxyBeanMethods = false)
@Import(EnableWebMvcConfiguration.class)
@EnableConfigurationProperties({ WebMvcProperties.class, ResourceProperties.class })
@Order(0)
public static class WebMvcAutoConfigurationAdapter implements WebMvcConfigurer {
    ...
}


给容器中配置的内容:
- 配置文件的相关属性的绑定:
WebMvcProperties==spring.mvc、ResourceProperties==spring.resources
配置类只有一个有参构造器
当配置类只有一个有参构造器时,它参数的所有值都会从容器中确定。
请求参数处理
请求映射
-
@xxxMapping -
Rest风格支持(使用HTTP请求方式动词来表示对资源的操作)
-
/user- GET-获取用户
- DELETE-删除用户
- PUT-修改用户
- POST-保存用户
-
核心Filter:
HiddenHttpMethodFilter

使用REST风格
(1)开启表单 REST 功能(选择性开启)
当需要从表单中发送Rest请求时才要开启。
后面大部分都是接收请求,返回json数据,所以是选择性开启。
spring:
  mvc:
    hiddenmethod:
      filter:
        enabled: true

(2)修改表单
提交方式为 post ,创建隐藏域 设置 name = “_method” value = “方式”
(3)Rest 原理(表单提交)
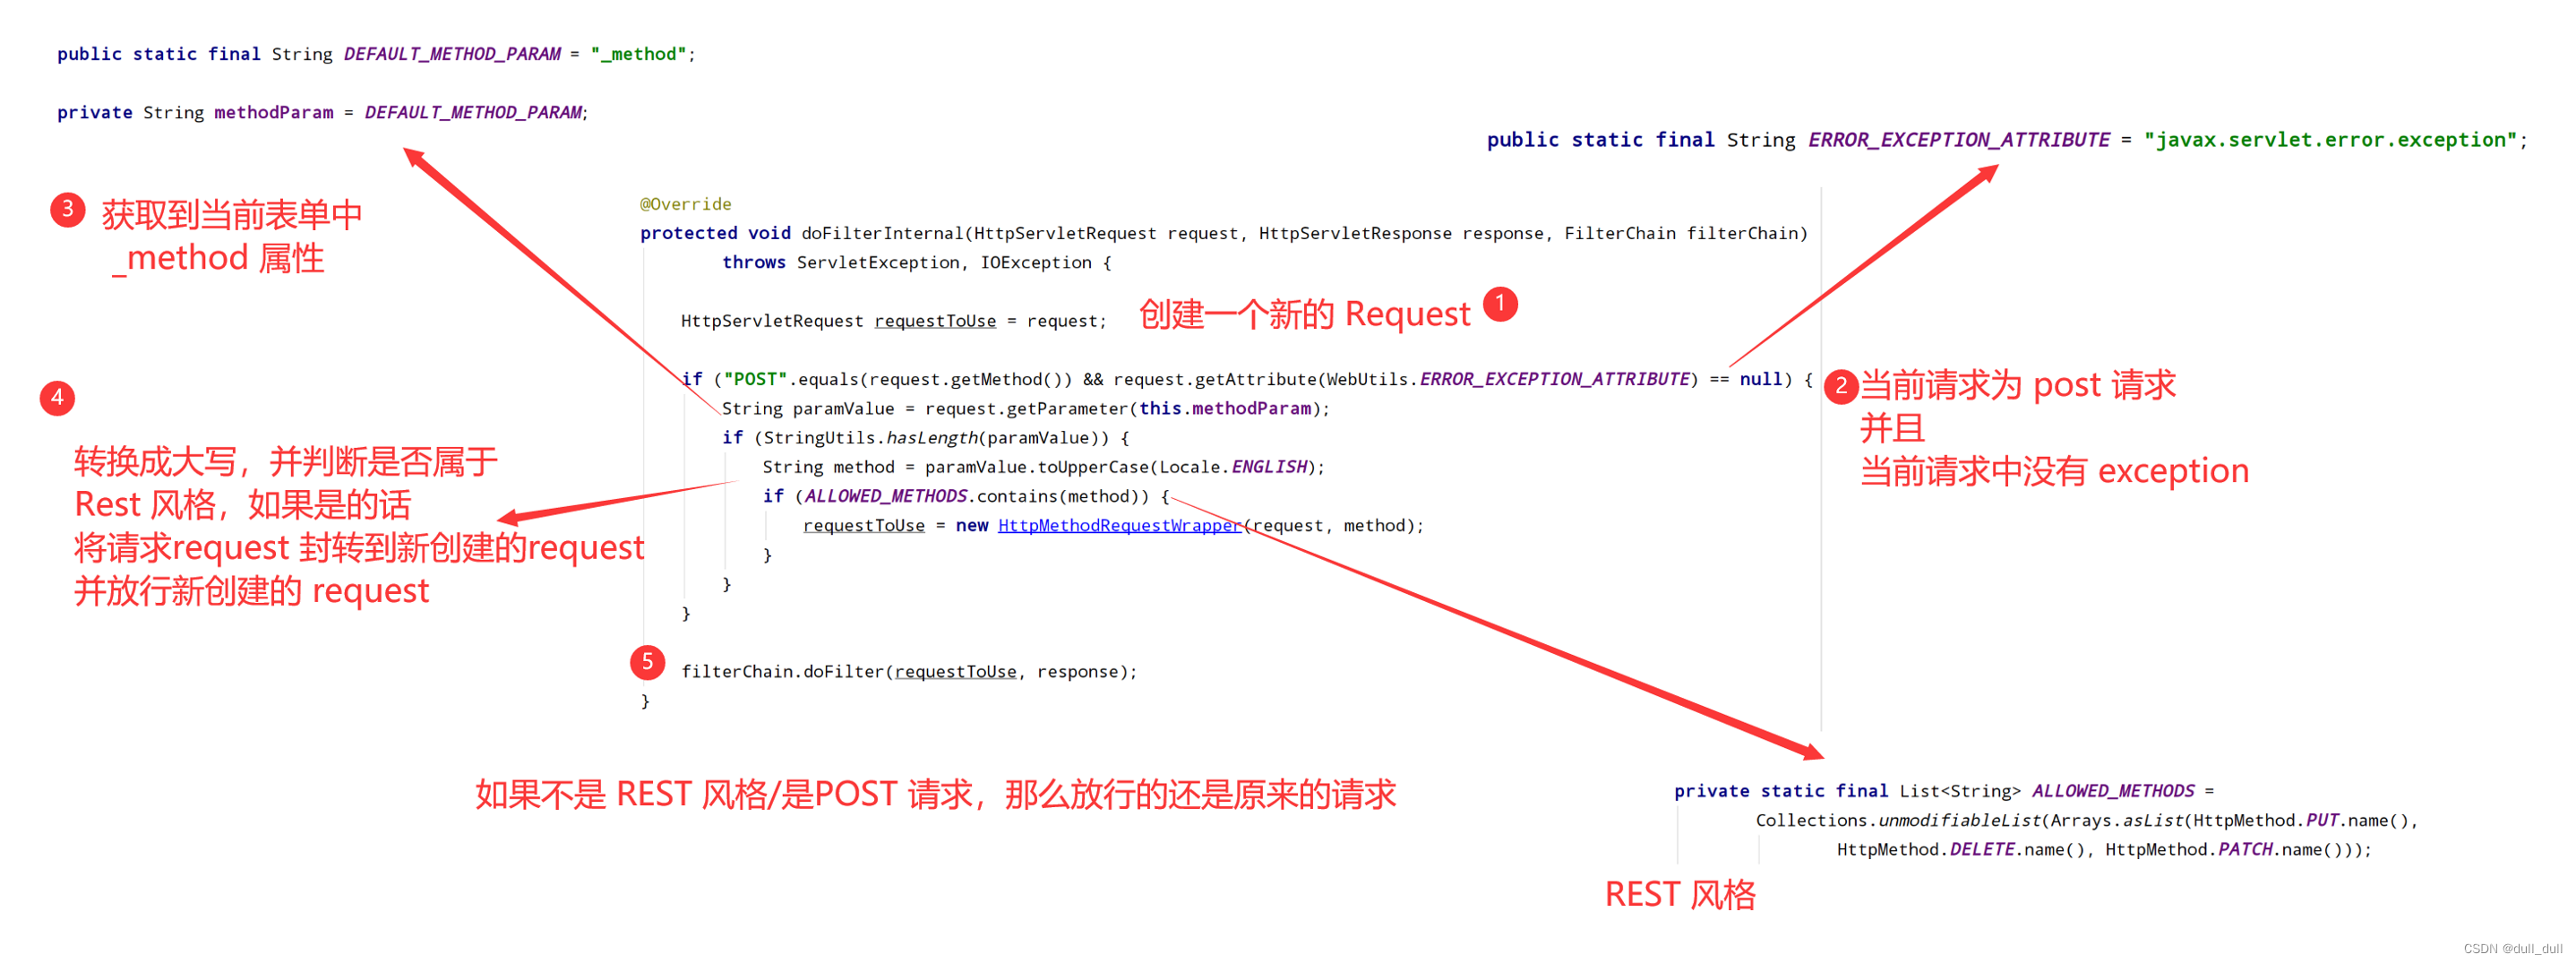
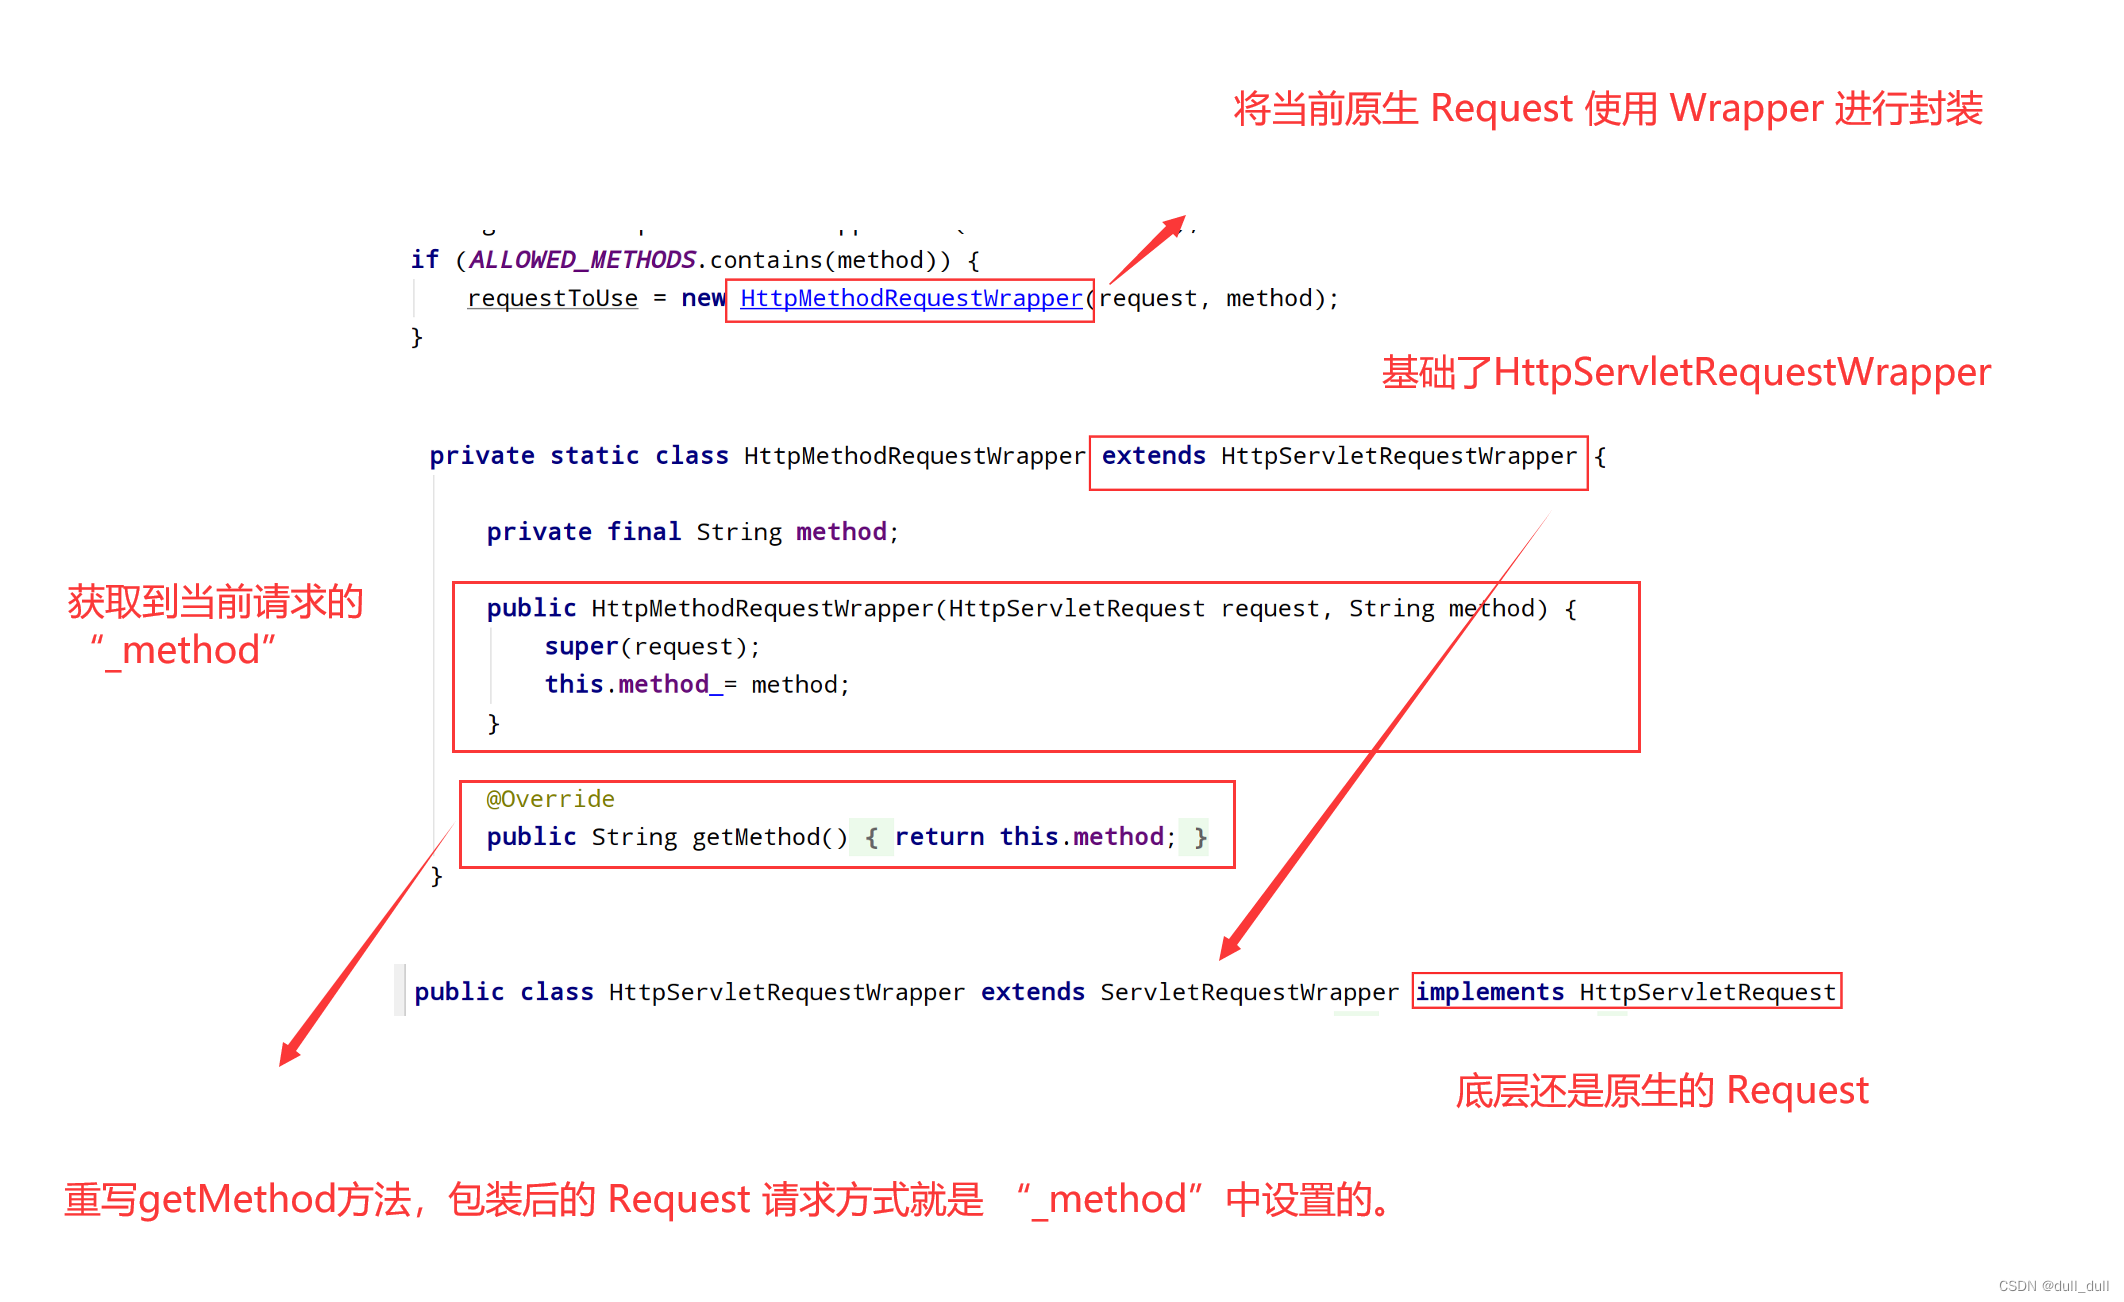
-
包装模式requesWrapper重写了getMethod方法,返回的是传入的值,过滤器链放行的时候新创建的使用Wrapper包装的Request。
-
以后的方法调用getMethod是调用requesWrapper的。
-
Rest使用客户端工具。
- 如PostMan可直接发送put、delete等方式请求,是从HTTP层就发送 REST 风格了。
(4)改变默认的_method(源码分析)
怎么将 _method 改成自己喜欢的名字?
当容器中没有 HiddenHttpMethodFilter 时,使用SpringBoot提供的HiddenHttpMethodFilter ,它是使用 _method 的,那么如果自定义一个 Filter 是不是就可以修改 _method ?
@Configuration(proxyBeanMethods = false)
public class WebConfig {

    @Bean
    public HiddenHttpMethodFilter hiddenHttpMethodFilter() {
        HiddenHttpMethodFilter methodFilter = new HiddenHttpMethodFilter();
        methodFilter.setMethodParam("myMethod");

        return methodFilter;
    }
}
可以接收的请求参数
使用注解接收参数
可以使用 Map<String, String> 获取全部的参数
@PathVariable
@PathVariable路径变量,在路径中使用占位符占位,再使用@PathVariable声明变量,也可以使用@PathVariable将当前的全部参数的键值对放在一个Map<String, String>里面。
@GetMapping("/rest/{id}")
    public Map<String, Object> getUser(@PathVariable("id") Integer id,
                                        @PathVariable Map<String, String> pv) {
        Map<String, Object> map = new HashMap<>();
        map.put("id", id + "");
        map.put("pv", pv);
        return map;
    }
打印:{"pv":{"id":"1"},"id":"1"}
@RequestHeader
可以通过这个注解在方法参数里面将方法头赋值给一个形参
@GetMapping("/rest")
    public Map<String, Object> getUser(@RequestParam("user-Agent") String userAgent,
                                        @RequestParam Map<String, String > header) {
        Map<String, Object> map = new HashMap<>();
        map.put("user-Agent", userAgent);
        map.put("header", header);
        return map;
    }
@RequestParam
使用@RequestParam(“参数名”)将一个参数赋值给一个形参
同时也可以使用 Map<String, String> 获取全部的参数
@RequestParam("age") Integer age,
@RequestParam("inters") List<String> inters,
@RequestParam Map<String,String> params,
@CookieValue
@CookieValue(“Cookie名”) 可以获取到对应的Cookie
可以赋值给String 或者 Cookie 对象
@CookieValue("_ga") String _ga,
@CookieValue("_ga") Cookie cookie
@RequestBody
获取请求体
@PostMapping("/save")
public Map postMethod(@RequestBody String content){
	Map<String,Object> map = new HashMap<>();
	map.put("content",content);
	return map;
}
Servlet API
复杂参数
自定义对象参数
请求映射原理
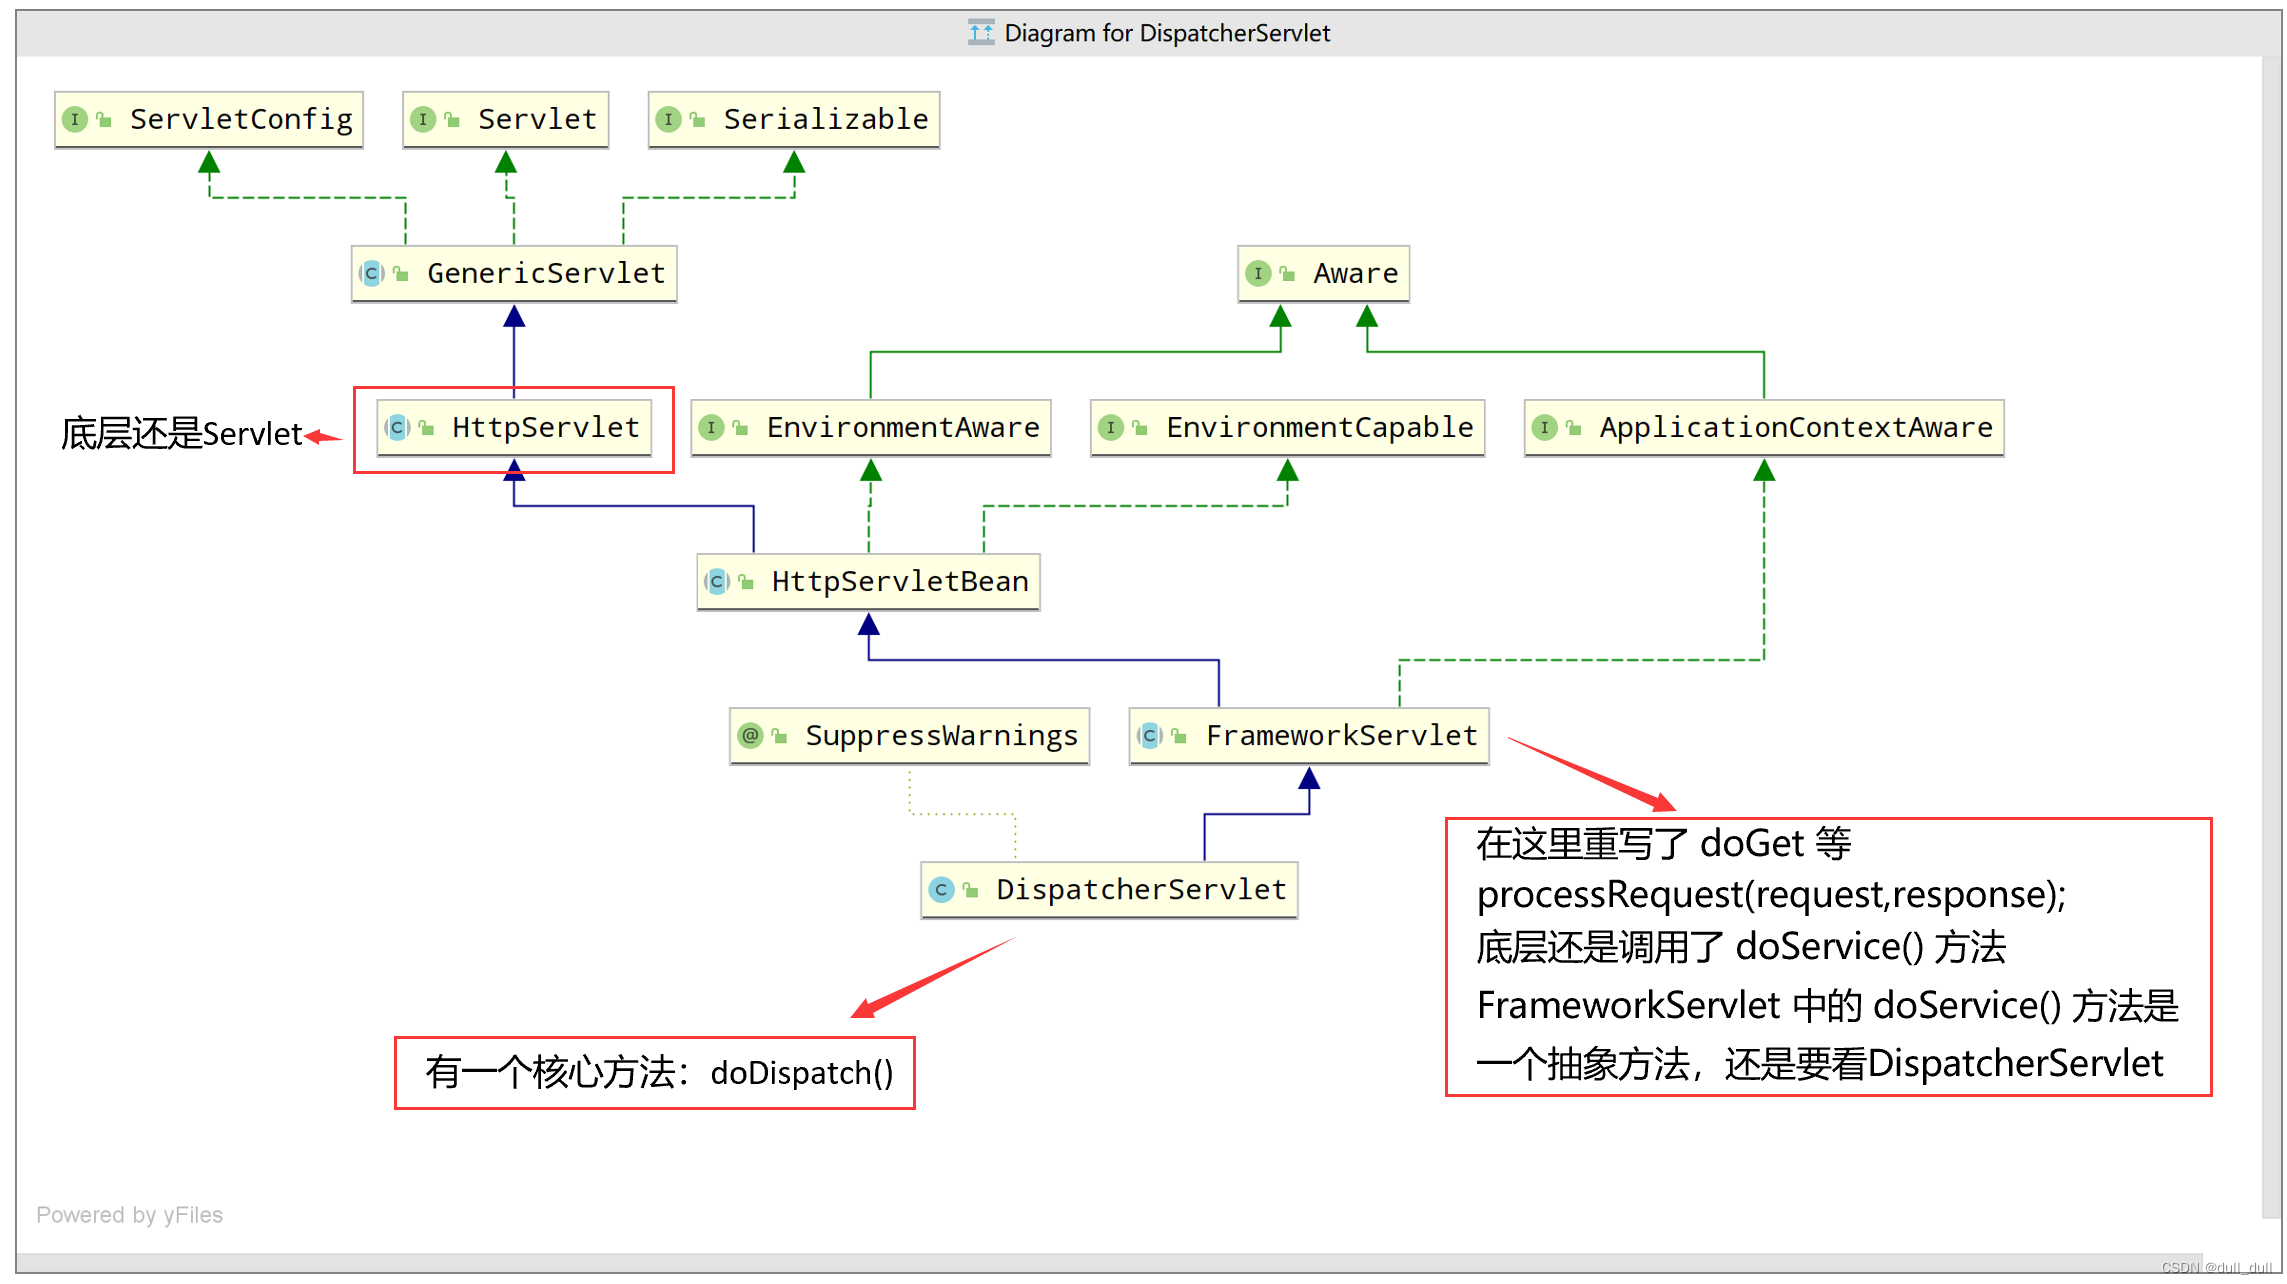
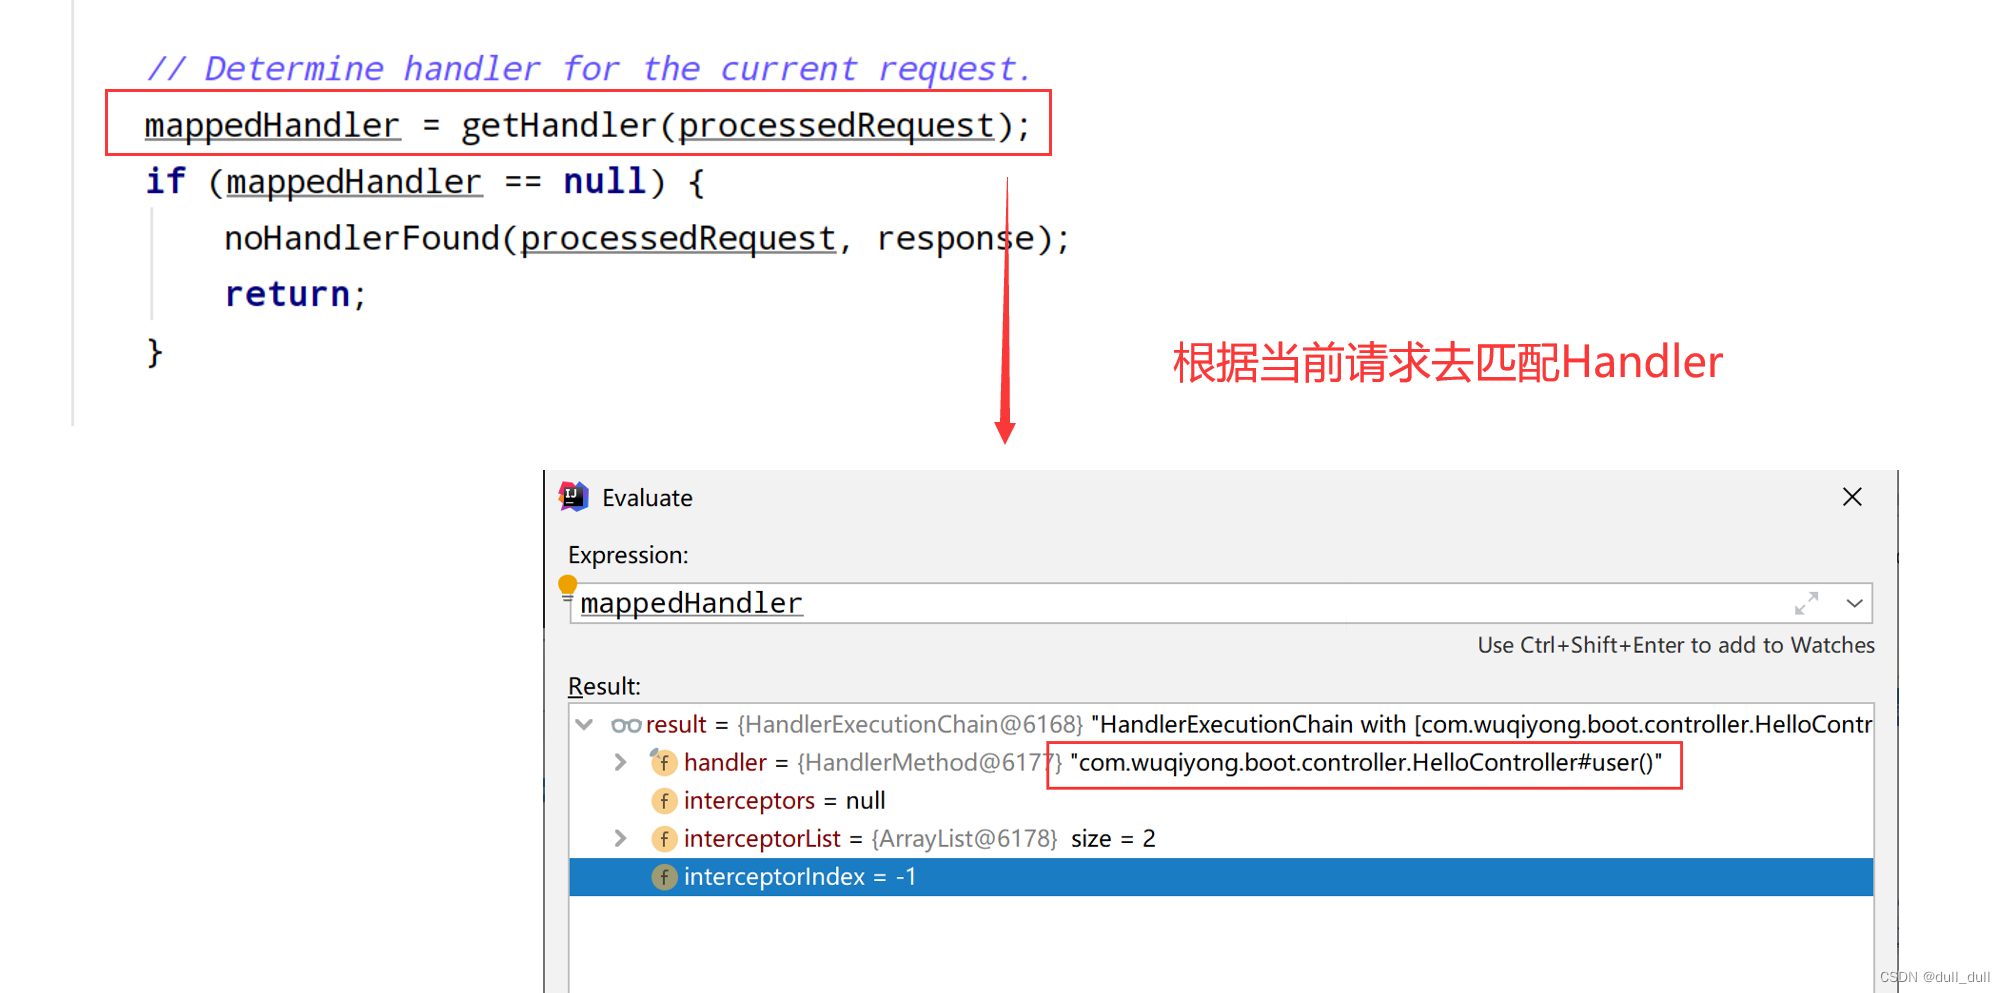

所有的请求映射都在这五个 handlerMappings 中
请求进来,挨个尝试所有的HandlerMapping看是否有请求信息。
- 如果有就找到这个请求对应的handler
- 如果没有就是下一个 HandlerMapping
各种类型参数解析原理
HandlerMapping中找到能处理请求的Handler(Controller.method())。- 为当前Handler 找一个适配器
HandlerAdapter,用的最多的是RequestMappingHandlerAdapter。 - 适配器执行目标方法并确定方法参数的每一个值。

- supports:支持那种Handler
- handle:如果支持那么就调用自己定义的handle
HandlerAdapter


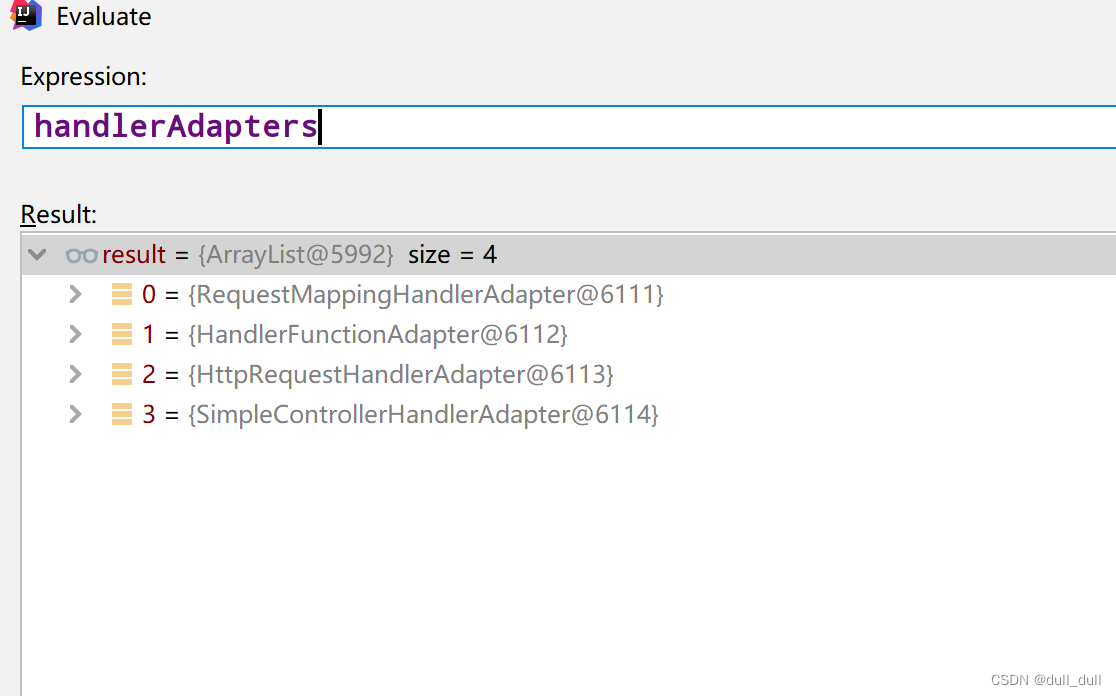
使用的最多的是 RequestMappingHandlerAdapter
- 0:支持方法上标注
@RequestMapping - 1:支持函数式编程的
执行目标代码(ha.handle)
public class DispatcherServlet extends FrameworkServlet {

	protected void doDispatch(HttpServletRequest request, HttpServletResponse response) throws Exception {
        ModelAndView mv = null;

        ...

        // Determine handler for the current request.
        mappedHandler = getHandler(processedRequest);
        if (mappedHandler == null) {
            noHandlerFound(processedRequest, response);
            return;
        }

        // Determine handler adapter for the current request.
        HandlerAdapter ha = getHandlerAdapter(mappedHandler.getHandler());

        ...
		//本节重点
        // Actually invoke the handler.
        mv = ha.handle(processedRequest, response, mappedHandler.getHandler());

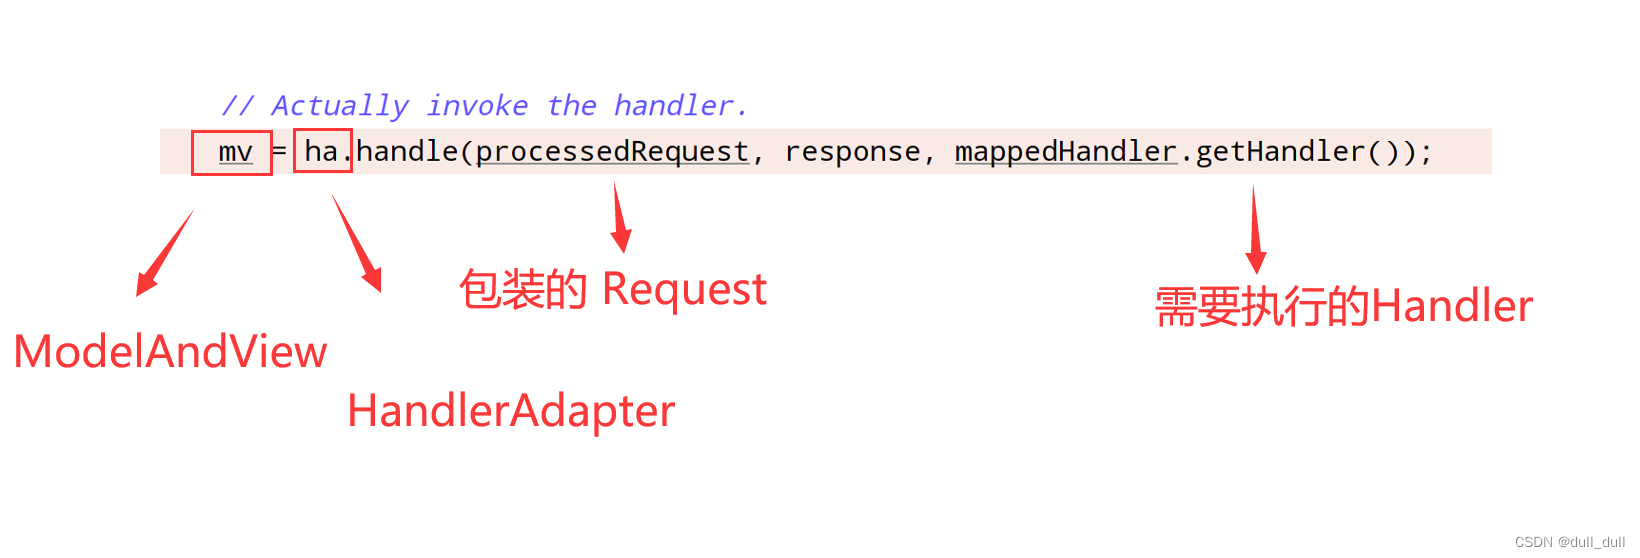
HandlerAdapter接口实现类RequestMappingHandlerAdapter(主要用来处理@RequestMapping)
public class RequestMappingHandlerAdapter extends AbstractHandlerMethodAdapter
		implements BeanFactoryAware, InitializingBean {

    ...

    //AbstractHandlerMethodAdapter类的方法,RequestMappingHandlerAdapter继承AbstractHandlerMethodAdapter
	public final ModelAndView handle(HttpServletRequest request, HttpServletResponse response, Object handler)
        throws Exception {

        return handleInternal(request, response, (HandlerMethod) handler);
    }

	@Override
	protected ModelAndView handleInternal(HttpServletRequest request,
			HttpServletResponse response, HandlerMethod handlerMethod) throws Exception {
    	ModelAndView mav;
        //handleInternal的核心
        mav = invokeHandlerMethod(request, response, handlerMethod);//解释看下节
		//...
		return mav;
    }
}
Thymeleaf
是一个服务端的模板引擎,性能较差
(1)引入Starter
<dependency>
    <groupId>org.springframework.boot</groupId>
    <artifactId>spring-boot-starter-thymeleaf</artifactId>
</dependency>
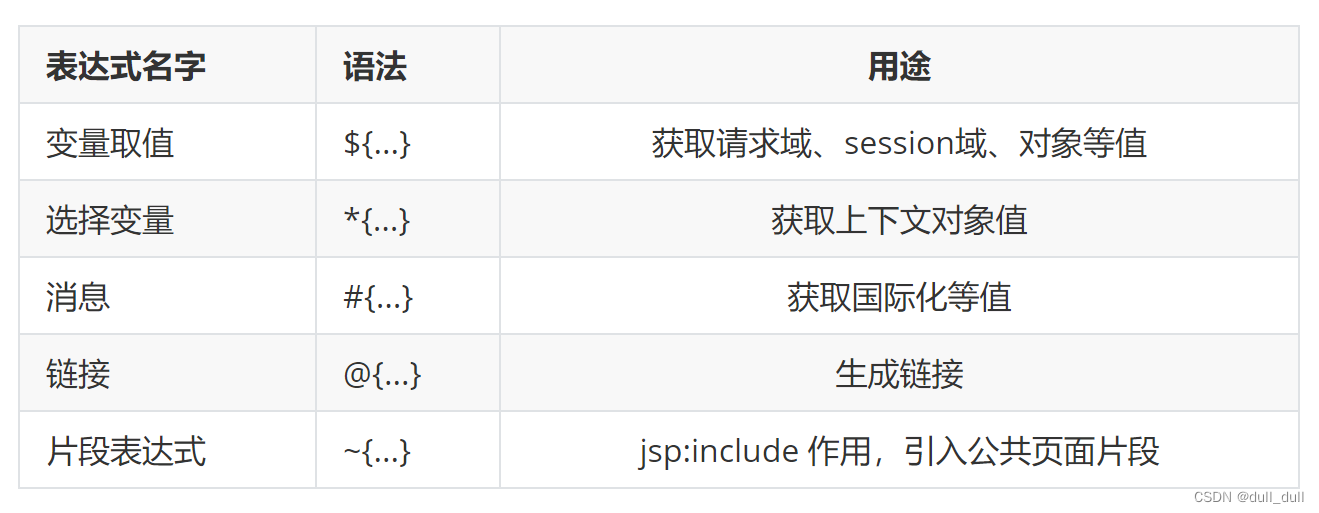
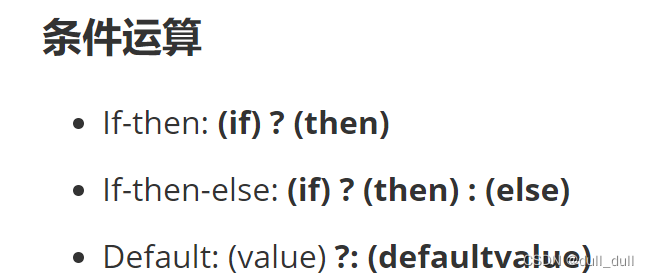
(2)基本语法
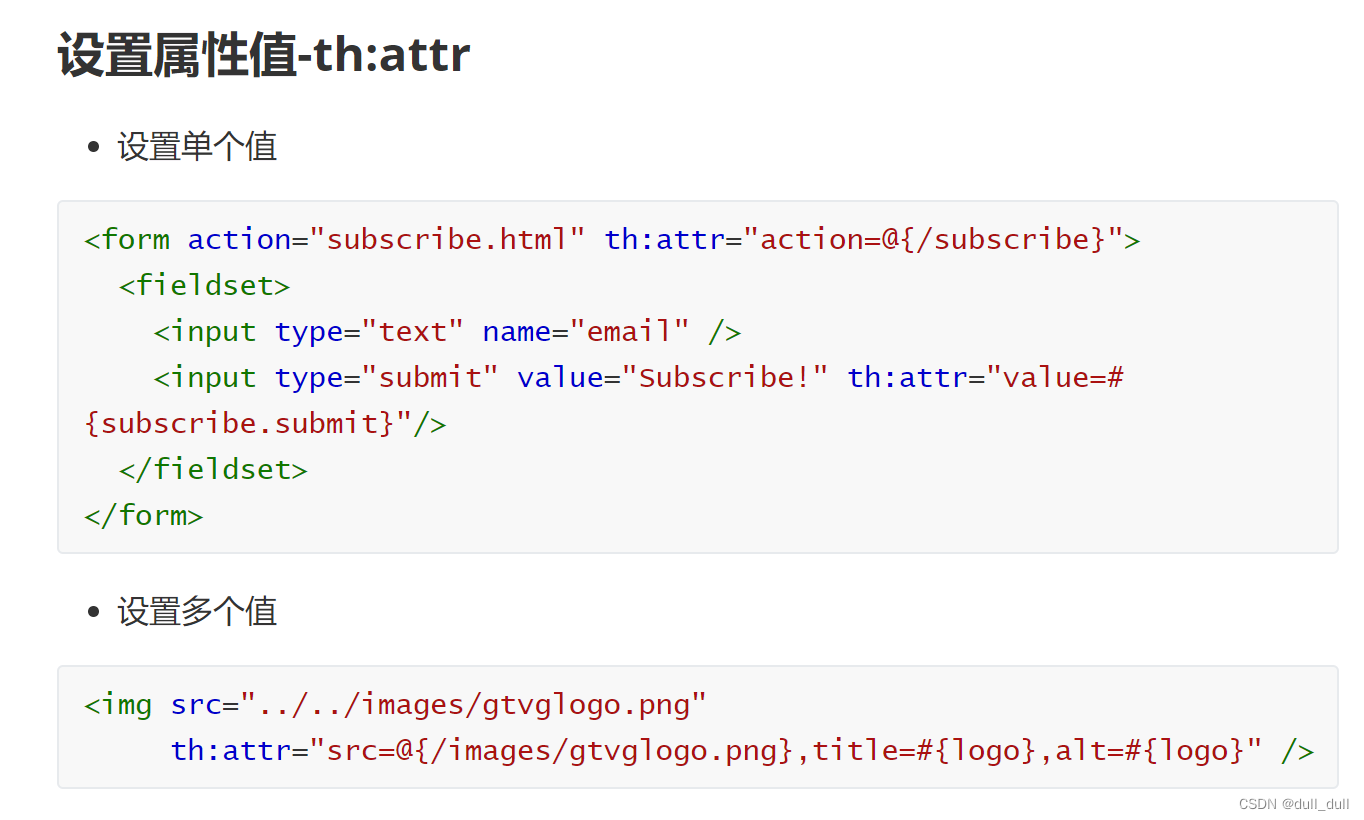
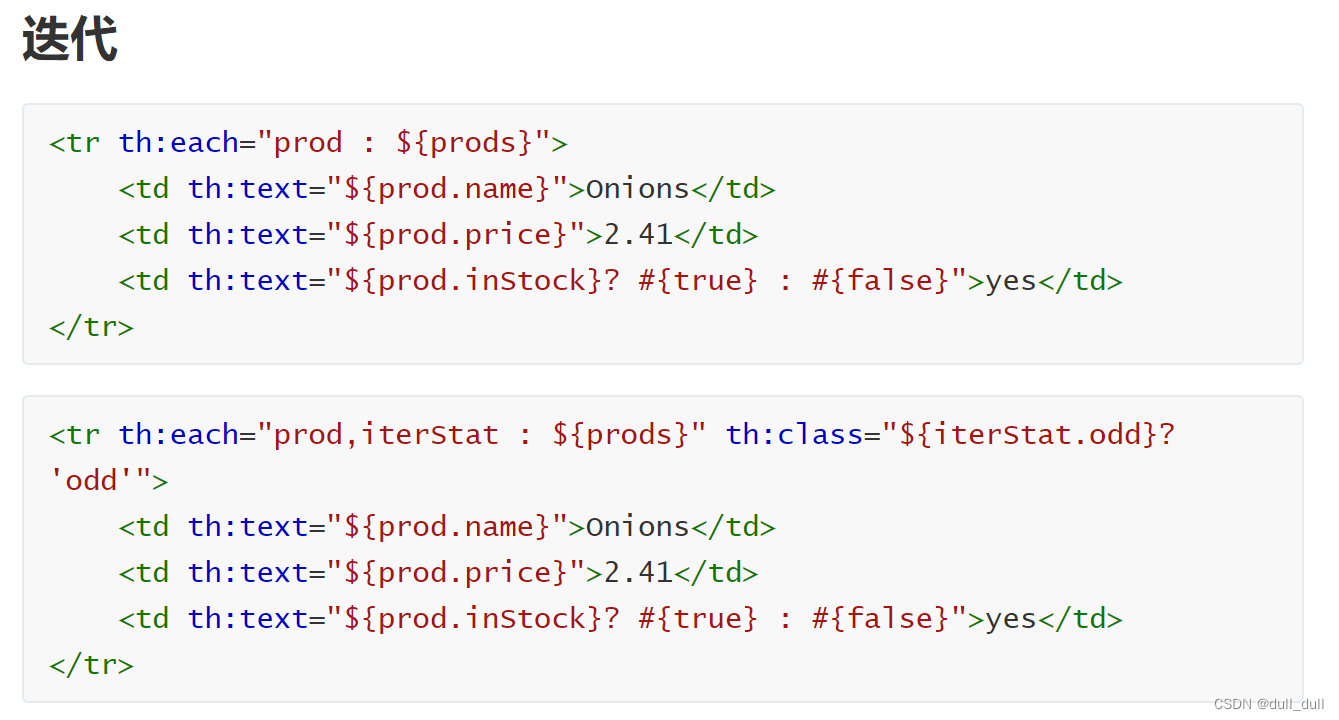
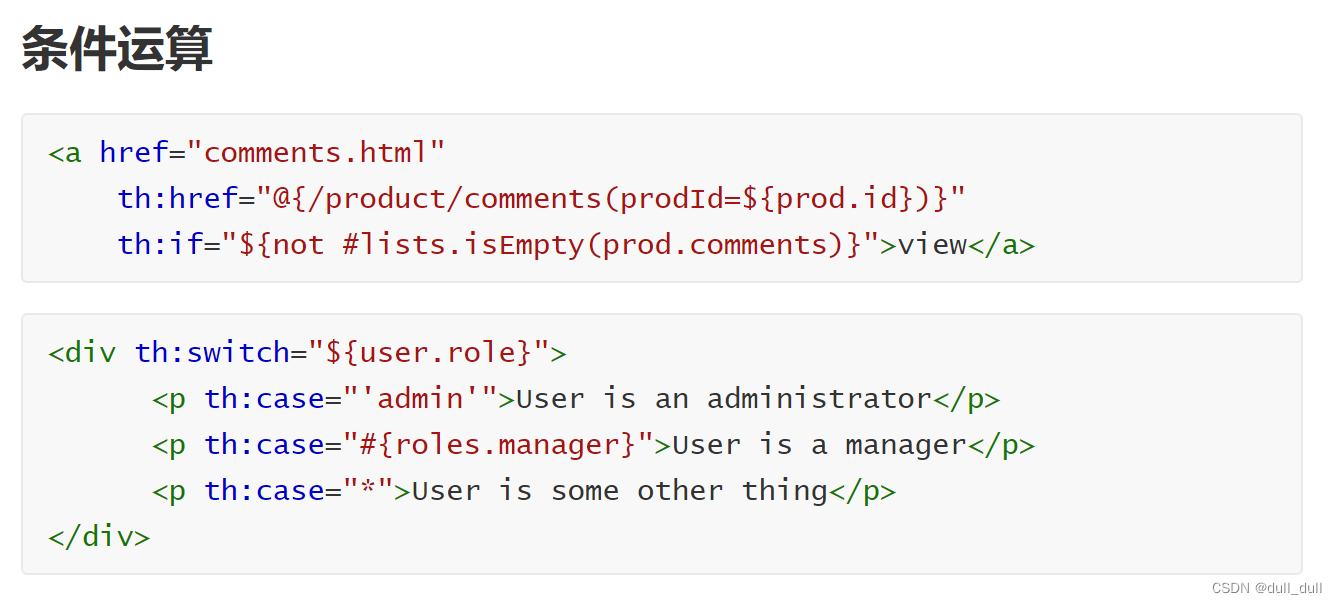
(3)遍历
<tr class="gradeX" th:each="user,stastus : ${userList}">
	<td th:text="${stastus.count}">Trident</td>
	<td th:text="${user.userName}">用户名</td>
	<td>[[${user.password}]]</td>
	<td class="center hidden-phone">4</td>
	<td class="center hidden-phone">X</td>
 </tr>
user,stastus 表示当前元素的状态,可以获取计数,下标等。
构建后台管理系统
处理表单重复提交
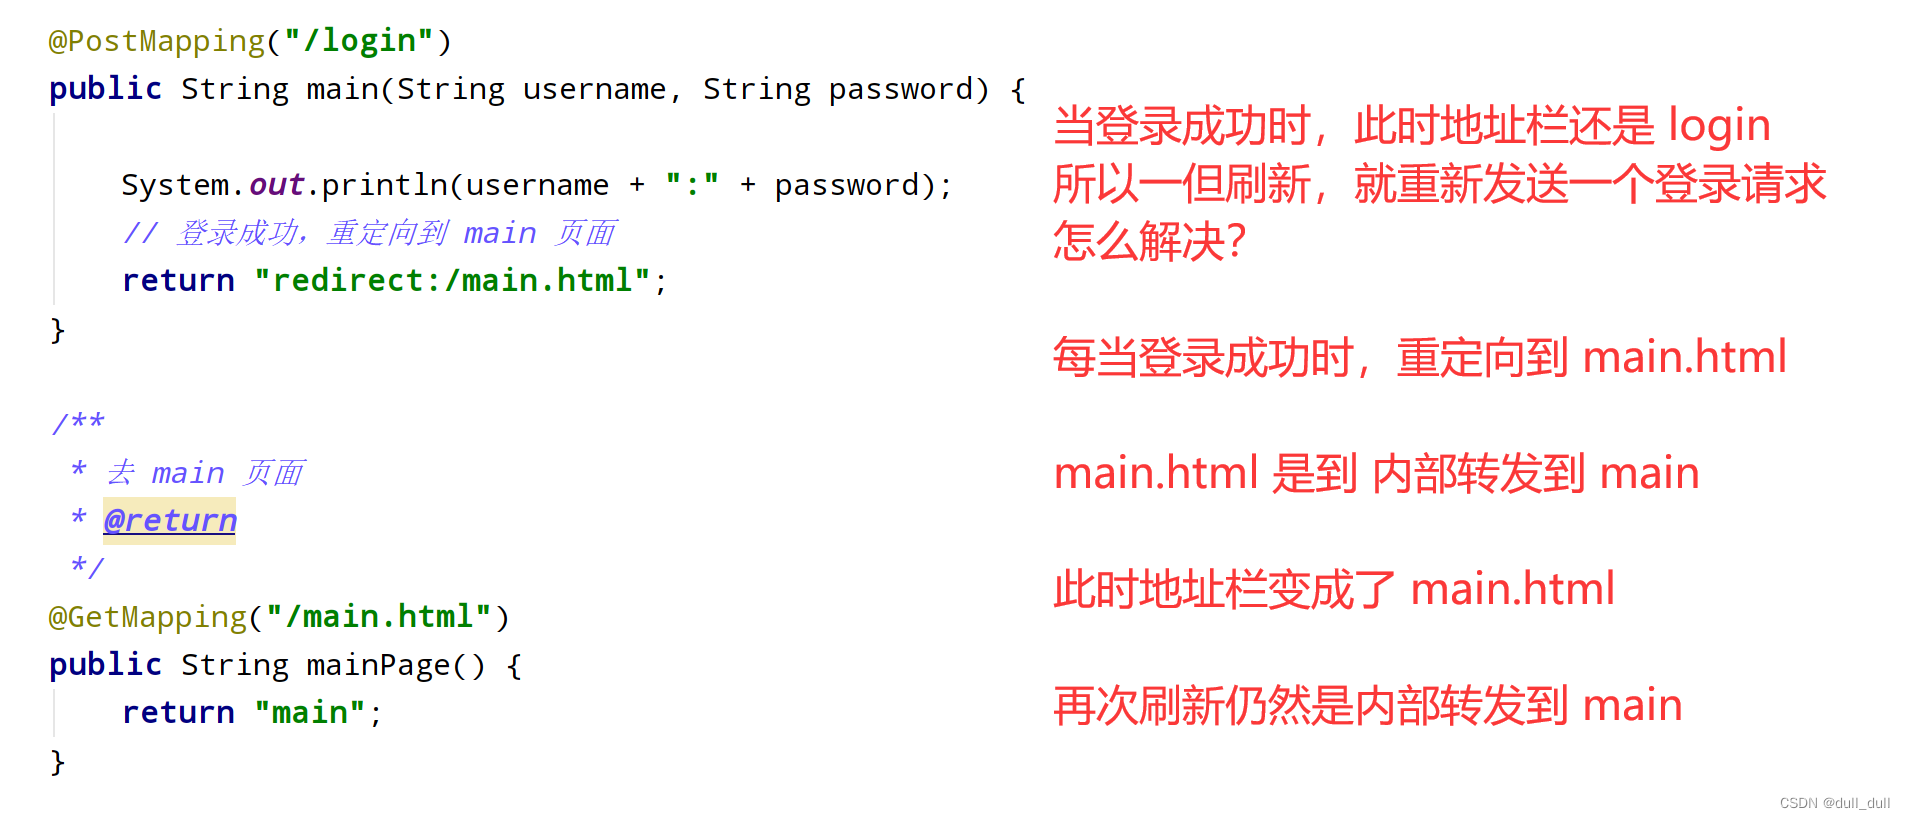 -
- /login 有两个方法都可以处理,当是根据请求方式 post 和 get 可以区分用户地址栏提交,还是表单提交。
此时使用了一个映射来解决刷新需要重复提交表单的问题。
但是新的问题出现了,即没有登录通过地址栏 mian.html 来访问主页面。
可以通过跳转的时候判断当前是否登录(对象不为 null)。
处理发送请求可以直接访问主页的问题
使用一个 session 当 使用 main.html 请求时,判断 session 中是否存在登录对象,如果存在就跳转到 main 否则,跳转到 login 页面。
应该放了过滤器或者拦截器中,此时是为了学习使用。
@PostMapping("/login")
    public String main(User user, HttpSession session, Model model) {

        if (!StringUtils.isEmpty(user.getUserName()) && !StringUtils.isEmpty(user.getPassword())) {
            session.setAttribute("loginUser", user);
            return "redirect:/main.html";
        }
        else {
            model.addAttribute("msg", "账号密码错误");
            return "login";
        }
    }

    /**
     * 内部转发到 main 页面
     * 处理刷新表单重复提交
     * @return
     */
    @GetMapping("/main.html")
    public String mainPage(HttpSession session, Model model) {
        Object user = session.getAttribute("loginUser");
        if (user != null) {
            return "main";
        }
        else {
            model.addAttribute("msg", "请重新登录");
            return "login";
        }
    }
提示错误信息
在前端页面添加标签
<label style="color: red" th:text="${msg}"></label>
Thymeleaf 在标签外使用 Thymeleaf 表达式
[[${session.loginUser.userName}]]
[[Thymeleaf 表达式]]
抽取前端页面公共部分
在 templates 下创建一个 common.html 里面是公共引用,是专门给第三方引用,简化代码的,方便修改的。
th:fragment="片段名" :声明为一个公共片段
th:insert="~{公共页面 :: 判断名}"
<div th:include="~{common::commonHead}"></div>

insert:将公共片段标签插入到当前使用th:insert的标签中间。replace:将公共片段标签替换掉当前使用th:replace的标签include:将公共片段标签里面的内容替换当前使用th:include的标签。

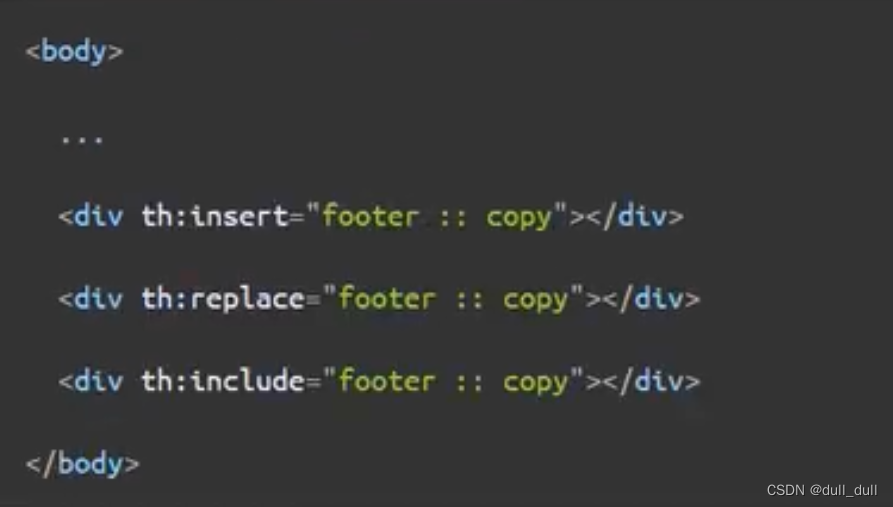
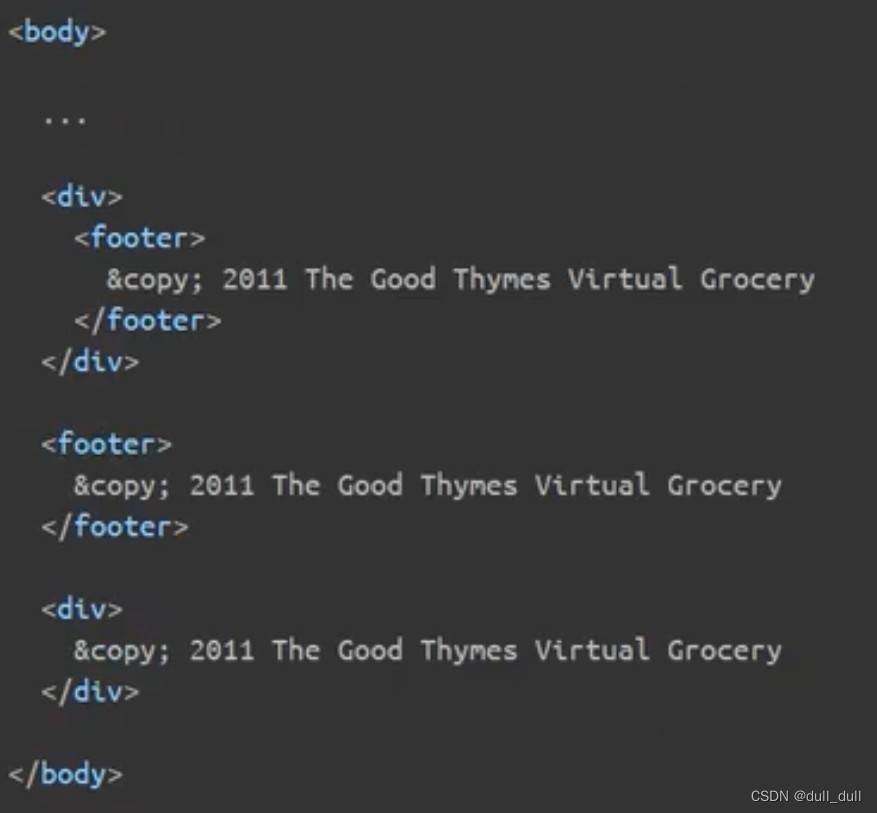
如果不是include不能使用在head标签里面。
拦截器
底层是 HandlerInterceptor 接口
(1)HandlerInterceptor 接口
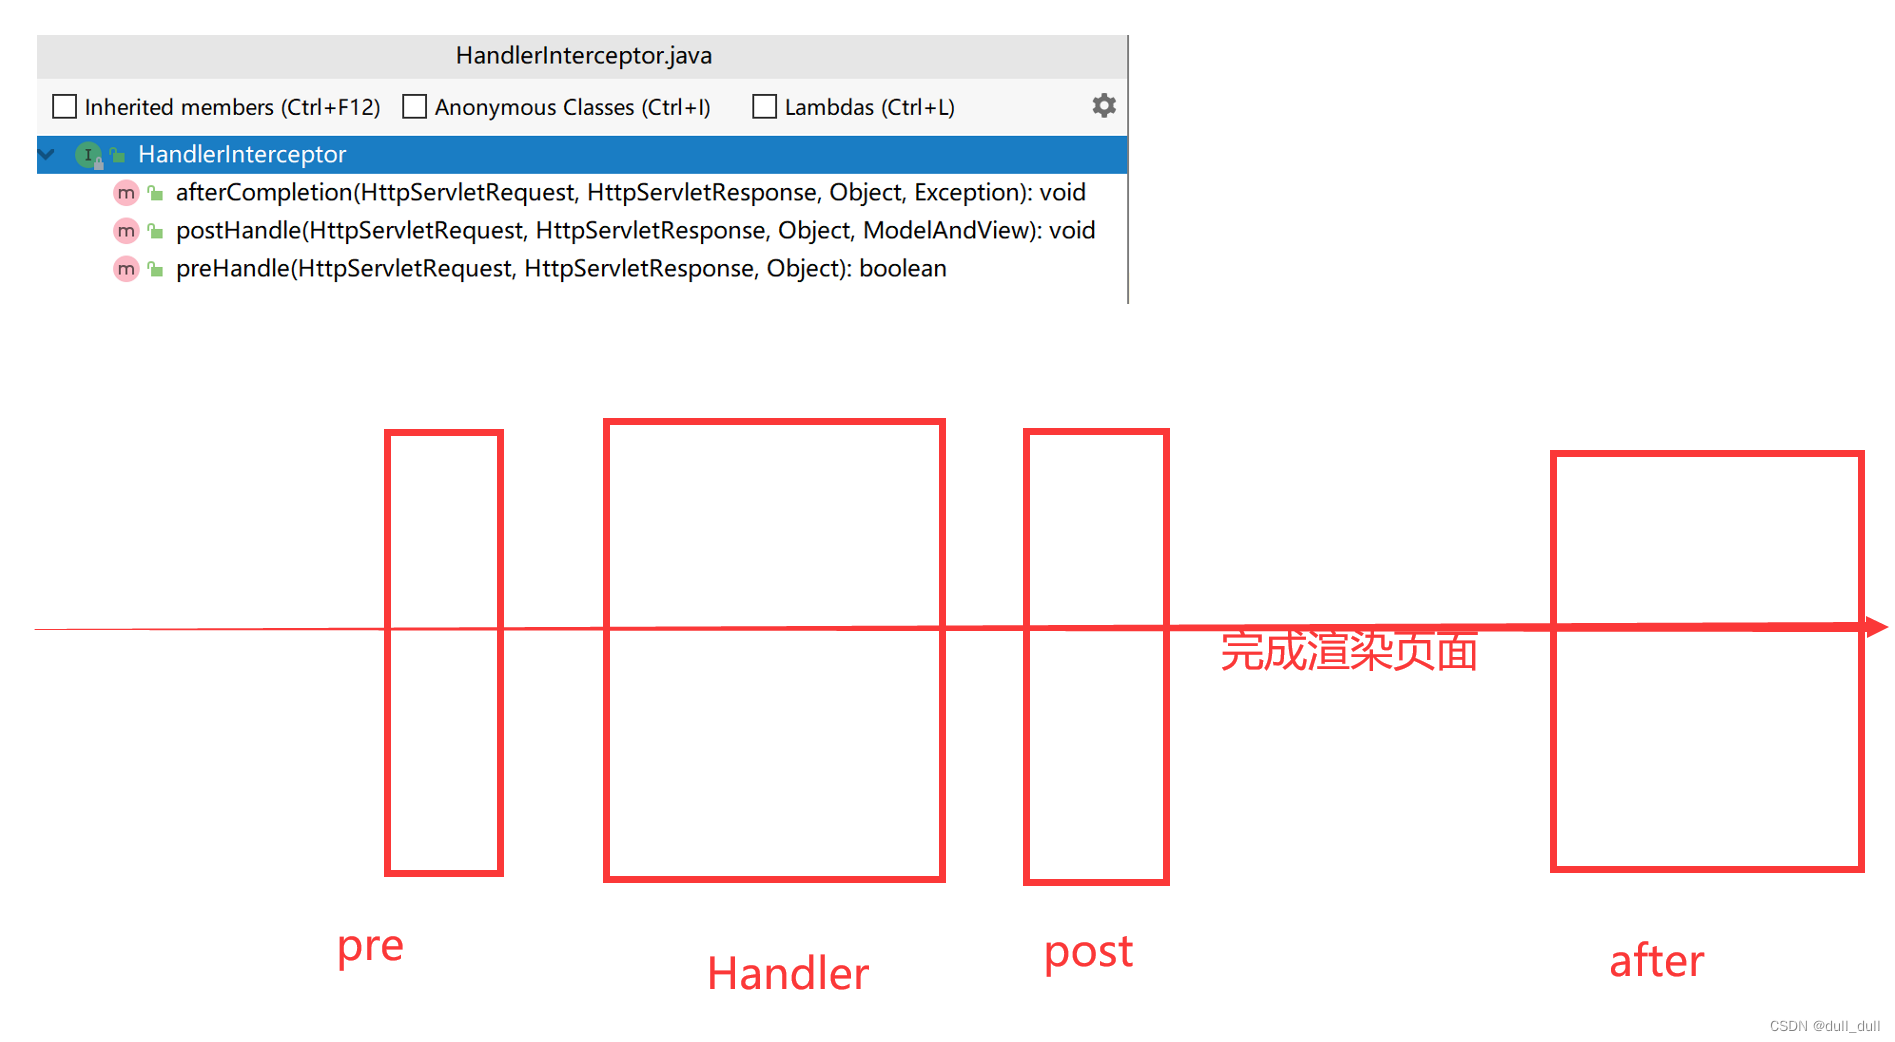
(1.1)编写一个拦截器实现接口,重写三个方法
public class LoginInterceptor implements HandlerInterceptor {
    @Override
    public boolean preHandle(HttpServletRequest request, HttpServletResponse response, Object handler) throws Exception {
        return false;
    }
    @Override
    public void postHandle(HttpServletRequest request, HttpServletResponse response, Object handler, ModelAndView modelAndView) throws Exception {
    }
    @Override
    public void afterCompletion(HttpServletRequest request, HttpServletResponse response, Object handler, Exception ex) throws Exception {
    }
}
(1.2)注册拦截器,指定拦截器规则(注意静态资源)。
@Configuration
public class AdminWebConfig implements WebMvcConfigurer {
    @Override
    public void addInterceptors(InterceptorRegistry registry) {
        registry.addInterceptor(new LoginInterceptor())
                .addPathPatterns("/**")
                .excludePathPatterns("/login", "/");
    }
}
-
registry.addInterceptor(new 拦截器实例)添加拦截器。 -
addPathPatterns()添加拦截器应用的方法。- 当是
/**拦截全部请求,包括静态页面 - 添加
spring.mvc.static-path-pattern=/static/**然后将全部以static作为前缀的文件放行。 - 添加以
css/**js/**等等。
- 当是
-
excludePathPatterns()哪些方法不进行拦截。

文件上传
使用文件上传
 @PostMapping("/upload")
    public String upload(@RequestParam("email") String email,
                         @RequestParam("userName") String userName,
                         @RequestPart("icon") MultipartFile icon,
                         @RequestPart("photos") MultipartFile[] photos) throws IOException {

        log.info("上传信息: email={}, userName={}, iconSize={}, photosLength={}",
                email, userName, icon.getSize(), photos.length);

        if (!icon.isEmpty()) {
            String originalFilename = icon.getOriginalFilename();
            icon.transferTo(new File("C:\\SpringBootTest\\" + originalFilename));
        }

        if (photos.length > 0) {
            for (MultipartFile photo : photos) {
                if (!photo.isEmpty()) {
                    String originalFilename = photo.getOriginalFilename();
                    photo.transferTo(new File("C:\\SpringBootTest\\" + originalFilename));
                }
            }
        }

        return "main";
    }
@RequestPart这个注解用在multipart/form-data表单提交请求的方法上,即从表单中接收一个文件,封转成MultipartFile对象,MultipartFile对象可以获取各种属性,或者直接使用transferTo转移,当有多个对象时,使用MultipartFile数组。- 使用文件上传,表单请求方式必须是
POST并且 表单属性enctype="multipart/form-data"

因为都最大上传限制
@Configuration(proxyBeanMethods = false)
@ConditionalOnClass({ Servlet.class, StandardServletMultipartResolver.class, MultipartConfigElement.class })
@ConditionalOnProperty(prefix = "spring.servlet.multipart", name = "enabled", matchIfMissing = true)
@ConditionalOnWebApplication(type = Type.SERVLET)
@EnableConfigurationProperties(MultipartProperties.class)
public class MultipartAutoConfiguration {}
是以 spring.servlet.multipart 作为前缀的。
所有的属性都会封转到MultipartProperties.class
修改配置
  servlet:
    multipart:
      max-file-size:
        10MB
      max-request-size:
        100MB
文件上传原理
所有的属性都会封转到MultipartProperties.class
MultipartConfigElement (文件上传配置信息)
StandardServletMultipartResolver(文件上传解析器)
只能解析使用Servlet上传的文件
-
@ConditionalOnMissingBean(MultipartResolver.class)当容器中不存在MultipartResolver才进行创建,即如果当前容器中有自定义的文件上传解析器,这个解析器就不会进行创建。 -
@Bean(name = DispatcherServlet.MULTIPART_RESOLVER_BEAN_NAME)创建名为multipartResolver
文件上传是怎么做到的

原理步骤
1、请求进来使用文件上传解析器判断(isMultipart)并封装(resolveMultipart,返回MultipartHttpServletRequest)文件上传请求
2、参数解析器来解析请求中的文件内容封装成MultipartFile
3、将request中文件信息封装为一个Map;MultiValueMap<String, MultipartFile>
FileCopyUtils。实现文件流的拷贝
异常处理
默认规则
- 默认情况下,Spring Boot提供 /error 处理所有错误的映射
- 对于机器客户端,它将生成JSON响应,其中包含错误,HTTP状态和异常消息的详细信息。对于浏览器客户端,响应一个“ whitelabel”错误视图,以HTML格式呈现相同的数据。
机器客户端
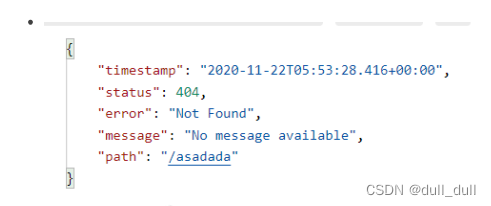
浏览器

自定义错误页面
在 static 或者 template 文件夹下创建 error 文件夹,放入出现异常以后跳转的页面,在这个文件夹下如果有精确的错误状态码页面就匹配精确,没有就找 5xx.html 如果都没有就触发白页

原生组件注入(Servlet、Filter、Listener)
(1)Servlet API
-
需要在主程序类上添加
@ServletComponentScan(要扫描的包):指定Servlet组件存在的包。 -
@WebServlet(urlPatterns = "/my"):直接响应,没有经过spring的拦截器。 -
@WebFilter(urlPatterns={"/css/*","/images/*"}):*是Servlet的写法,**是Spring的写法 -
@WebListener
(2)RegistrationBean
@Configuration
public class MyRegistConfig {

    @Bean
    public ServletRegistrationBean myServlet() {
        MyServlet myServlet = new MyServlet();

        return new ServletRegistrationBean(myServlet, "/my", "/my02");
    }


    @Bean
    public FilterRegistrationBean myFilter() {

        MyFilter myFilter = new MyFilter();
		// return new FilterRegistrationBean(myFilter,myServlet());
        FilterRegistrationBean filterRegistrationBean = new FilterRegistrationBean(myFilter);
        filterRegistrationBean.setUrlPatterns(Arrays.asList("/my", "/css/*"));
        return filterRegistrationBean;
    }

    @Bean
    public ServletListenerRegistrationBean myListener() {
        MySwervletContextListener mySwervletContextListener = new MySwervletContextListener();
        return new ServletListenerRegistrationBean(mySwervletContextListener);
    }
}
DispatchServlet 注册
- 容器中自动配置了 DispatcherServlet 属性绑定到 WebMvcProperties;对应的配置文件配置项是 spring.mvc。
- 通过 ServletRegistrationBean
<DispatcherServlet>把 DispatcherServlet 配置进来。 - 默认映射的是 / 路径。
为什么自定义的Servlet不会被Spring的拦截器拦截。
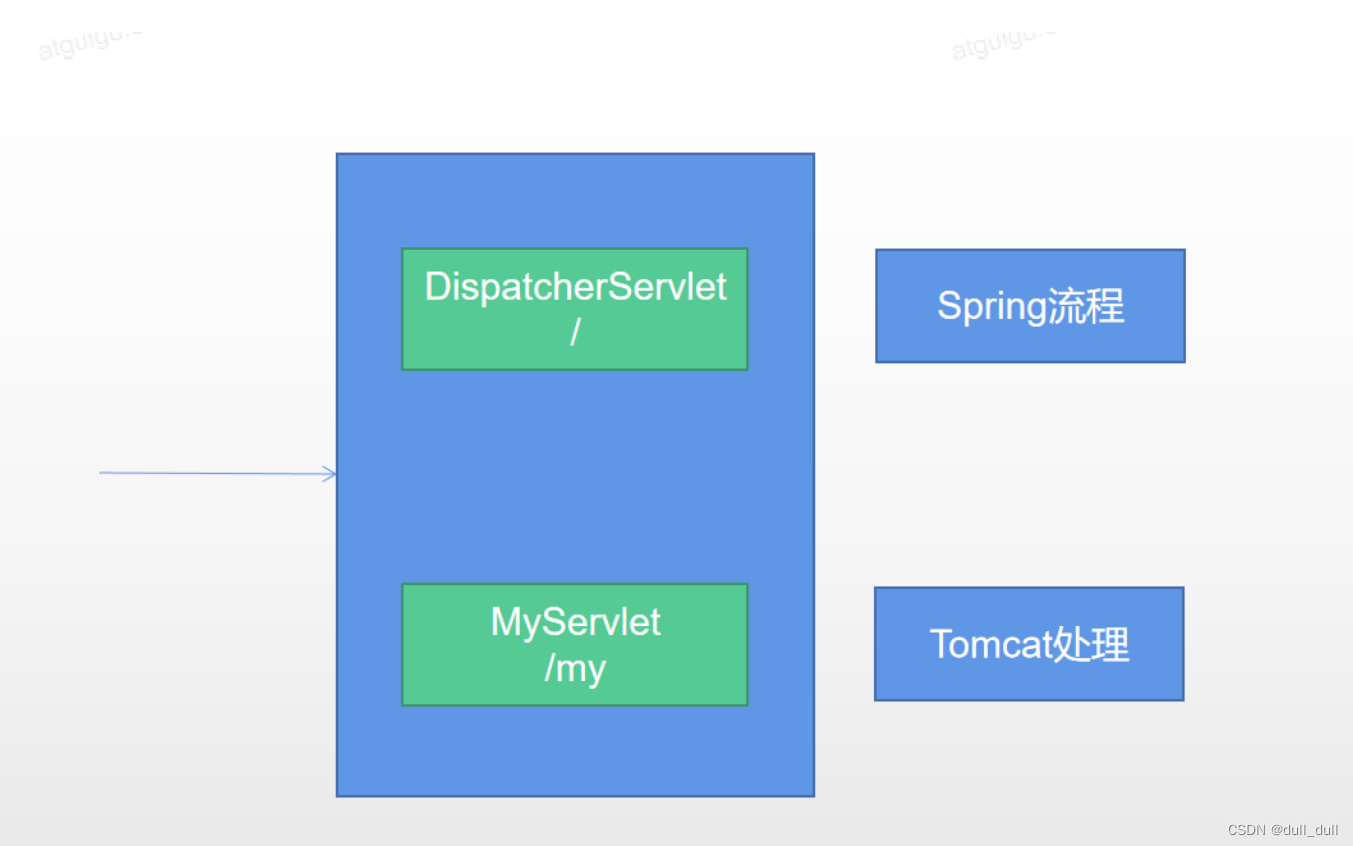
因为处理请求是使用精确优选原则,当添加原生Servlet到容器时,容器中有两个Servlet。
当 spring 拦截 /,原生servlet 接收请求/my
此时发送/my请求,根据精确优选原则,这个请求是TomCat进行处理,而不是由Spring进行处理,所以无法进行拦截。
数据访问
(1)原生JDBC
(1.1)导入场景
<dependency>
	<groupId>org.springframework.boot</groupId>
	<artifactId>spring-boot-starter-data-jdbc</artifactId>
</dependency>
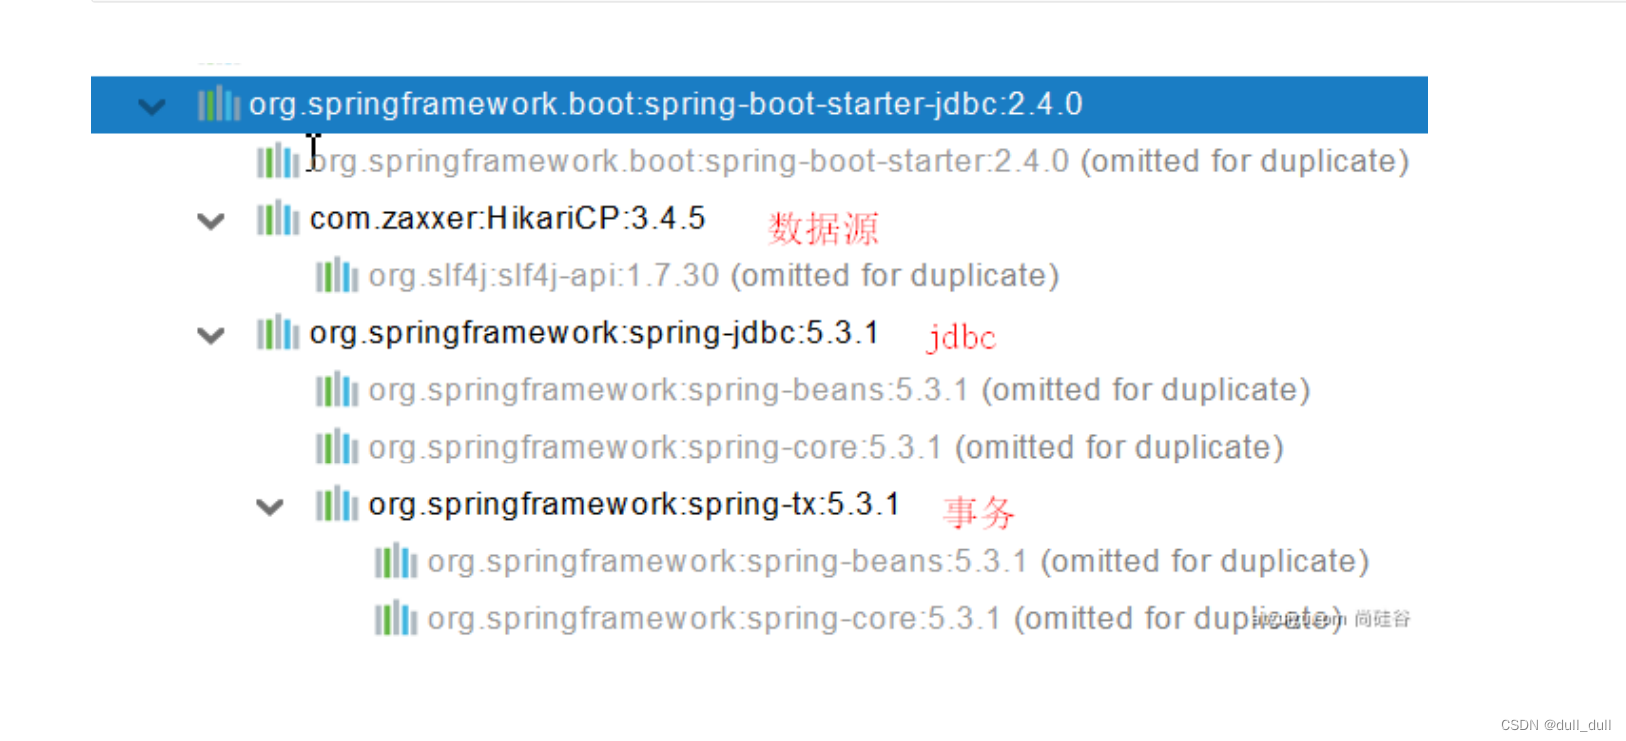
为什么导入数据库驱动?因为spring不知道我们要操作的数据库和数据库版本。
(1.1.1)怎么修改数据库连接版本?
- 直接依赖引入具体版本(maven的就近依赖原则)
- 重新声明版本(maven的属性的就近优先原则)
(1.2)分析自动配置
自动配置的类
DataSourceAutoConfiguration:数据源的自动配置- 修改数据库原相关配置:spring.datasource
- 数据库连接池的配置,是自己容器中没有DataSource才自动配置的吗,即自己没有配置,就使用系统配置
- 底层配置好的连接池是:HikariDataSource
- DataSourceTransactionManagerAutoConfiguration: 事务管理器的自动配置
- JdbcTemplateAutoConfiguration: JdbcTemplate的自动配置,可以来对数据库进行crud
- 可以修改这个配置项@ConfigurationProperties(prefix = “spring.jdbc”) 来修改JdbcTemplate
- @Bean@Primary JdbcTemplate;容器中有这个组件
- JndiDataSourceAutoConfiguration: jndi的自动配置
- XADataSourceAutoConfiguration: 分布式事务相关的
(1.3)修改配置现
  datasource:
    url: jdbc:mysql://localhost:3306/MyBatis?useUnicode=true&characterEncoding=utf8
    username:
    password:
    driver-class-name: com.mysql.jdbc.Driver
整合第三方技术
- 自定义
- 找starter
(2)使用Druid数据源
(2.1)自定义
当容器中没有数据源的时候,spring才会注册系统提供的数据源,所以只需要自己定义一个数据源进行返回,就可以使用自己的数据源了。
@Slf4j
@SpringBootTest
public class JDBCTemplateTest {

    @Autowired
    DruidDataSource druidDataSource;

    @Test
    public void test() {
        try {
            System.out.println(druidDataSource);
            System.out.println(druidDataSource.getConnection());
        } catch (SQLException e) {
            e.printStackTrace();
        }
    }
}


@Configuration
public class MyDataSourceConfig {

    @Bean
    @ConfigurationProperties("spring.datasource")
    public DataSource dataSource(){

        DruidDataSource druidDataSource = new DruidDataSource();

        return druidDataSource;
    }
}
spring:
  datasource:
    username:
    password:
    url: jdbc:mysql://localhost:3306/MyBatis?useUnicode=true&characterEncoding=utf8
    type: com.alibaba.druid.pool.DruidDataSource
(2.1.1)StatFilter
用于统计监控信息;如SQL监控、URI监控
@Bean
    @ConfigurationProperties("spring.datasource")
    public DataSource dataSource() throws SQLException {

        DruidDataSource druidDataSource = new DruidDataSource();

        druidDataSource.setFilters("stat");

        return druidDataSource;
    }
(2.1.2)StatViewServlet(需要配置 StatFilter)
StatViewServlet的用途包括:
- 提供监控信息展示的html页面
- 提供监控信息的JSON API
/**
     * Druid 监控页
     * @return
     */
    @Bean
    public ServletRegistrationBean<StatViewServlet> servletRegistrationBean() {
        StatViewServlet statViewServlet = new StatViewServlet();

        ServletRegistrationBean<StatViewServlet> statViewServletServletRegistrationBean = new ServletRegistrationBean<>(statViewServlet, "/druid/*");
        return statViewServletServletRegistrationBean;
    }

(2.2)starter 场景
(2.2.1)引入druid-starter
 <dependency>
           <groupId>com.alibaba</groupId>
           <artifactId>druid-spring-boot-starter</artifactId>
           <version>1.1.17</version>
</dependency>
(2.2.2)分析starter
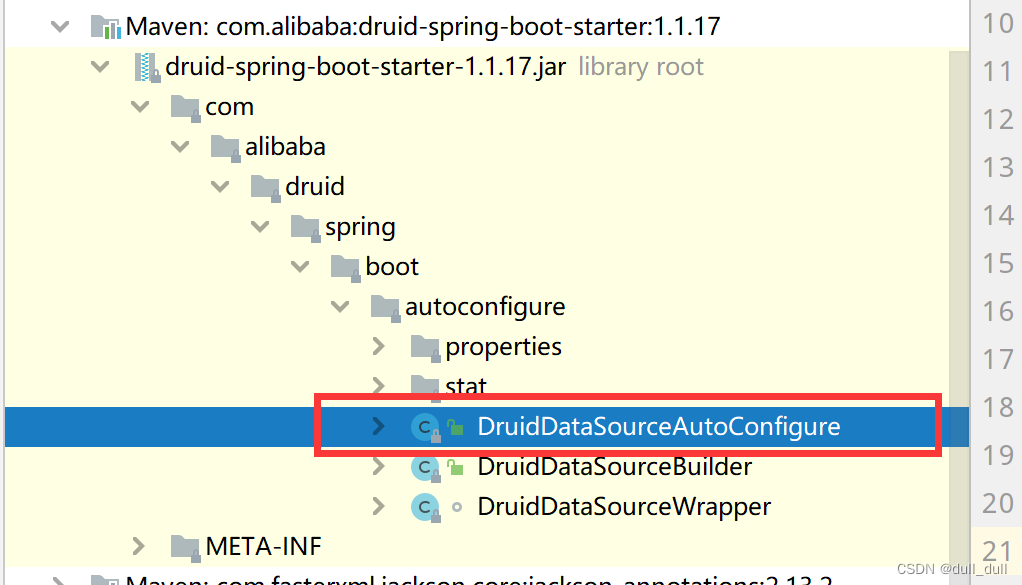
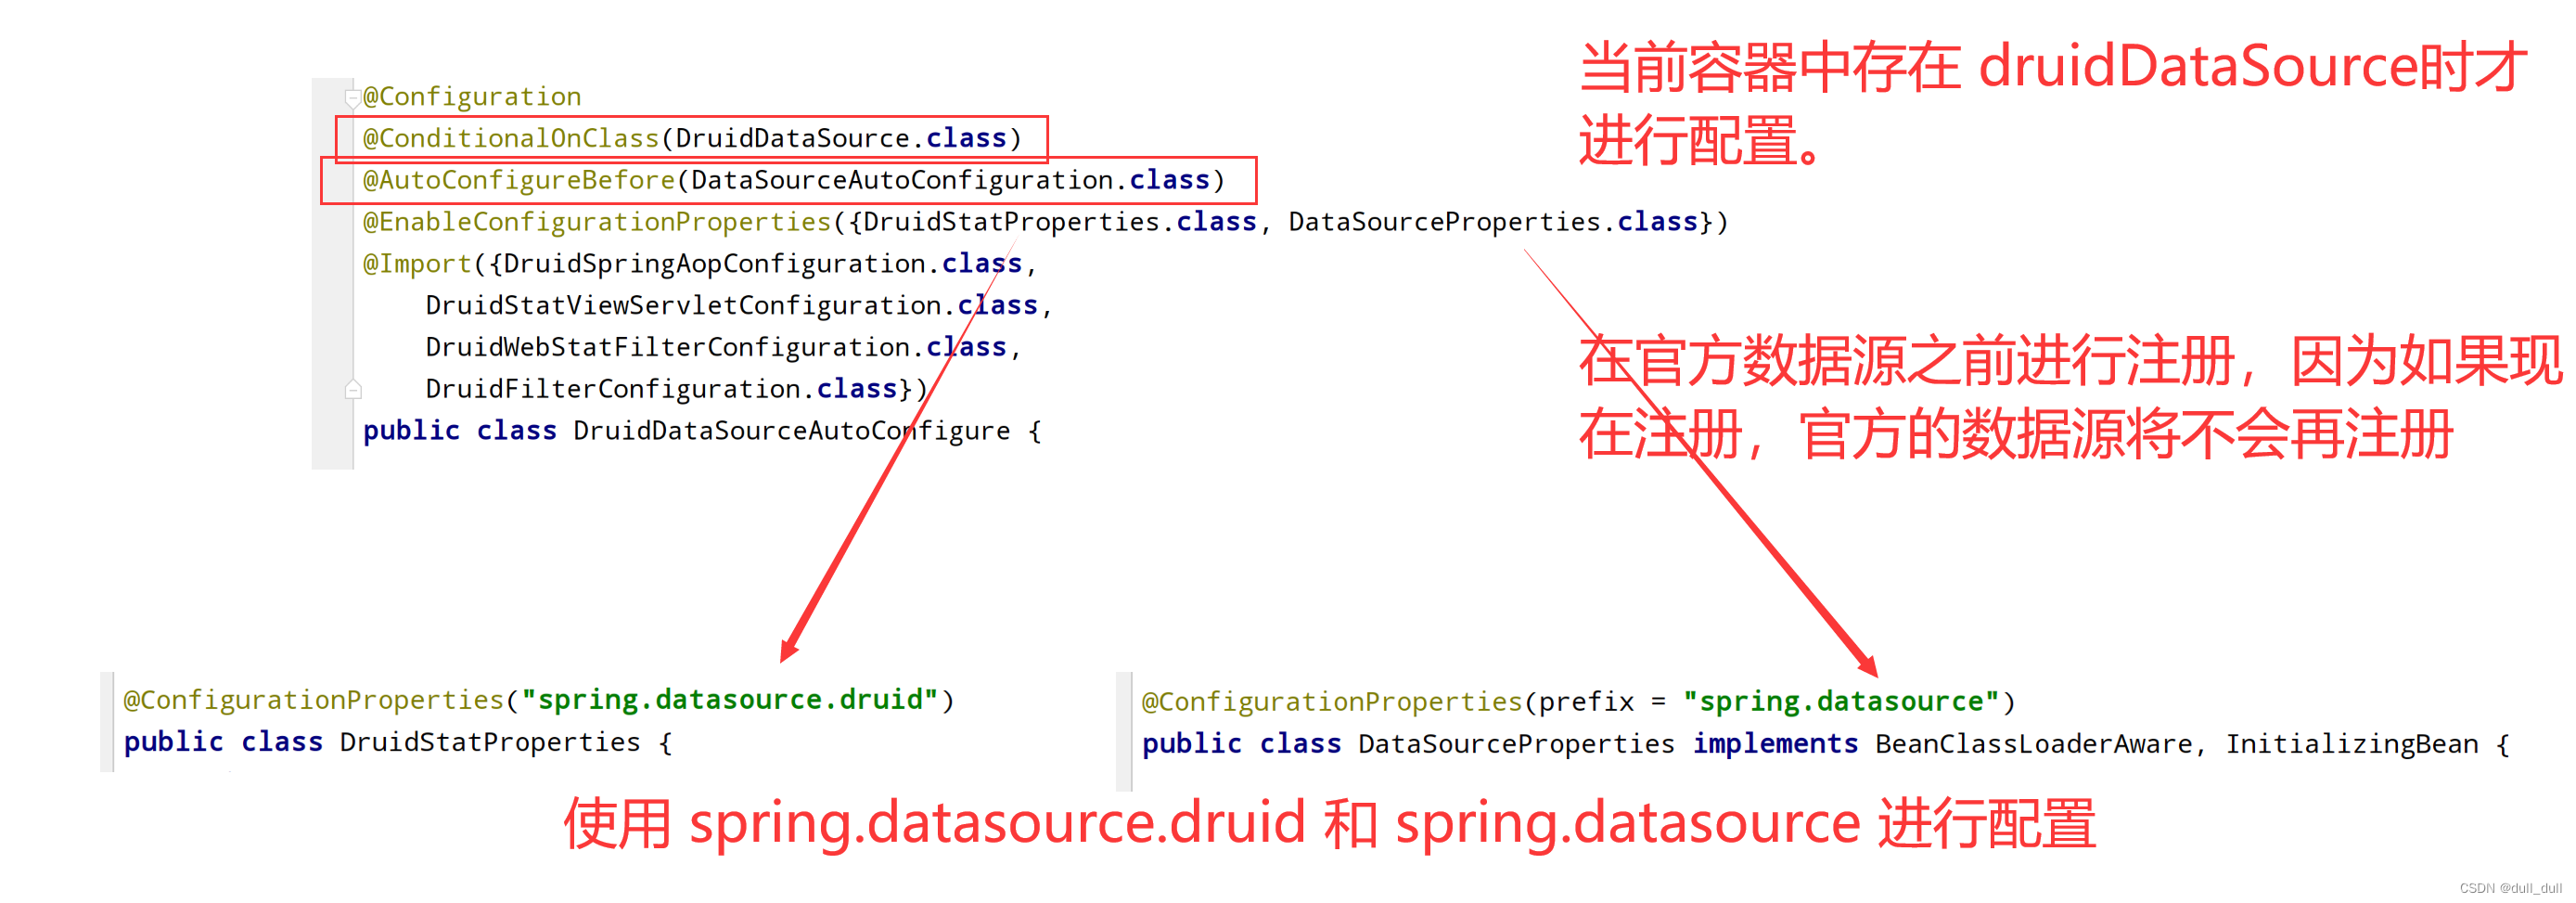
DruidSpringAopConfiguration.class, 监控SpringBean的;配置项:spring.datasource.druid.aop-patterns
DruidStatViewServletConfiguration.class, 监控页的配置:spring.datasource.druid.stat-view-servlet;默认开启
DruidWebStatFilterConfiguration.class, web监控配置;spring.datasource.druid.web-stat-filter;默认开启
DruidFilterConfiguration.class 所有Druid自己filter的配置
(3)整合 MyBatis
https://github.com/mybatis
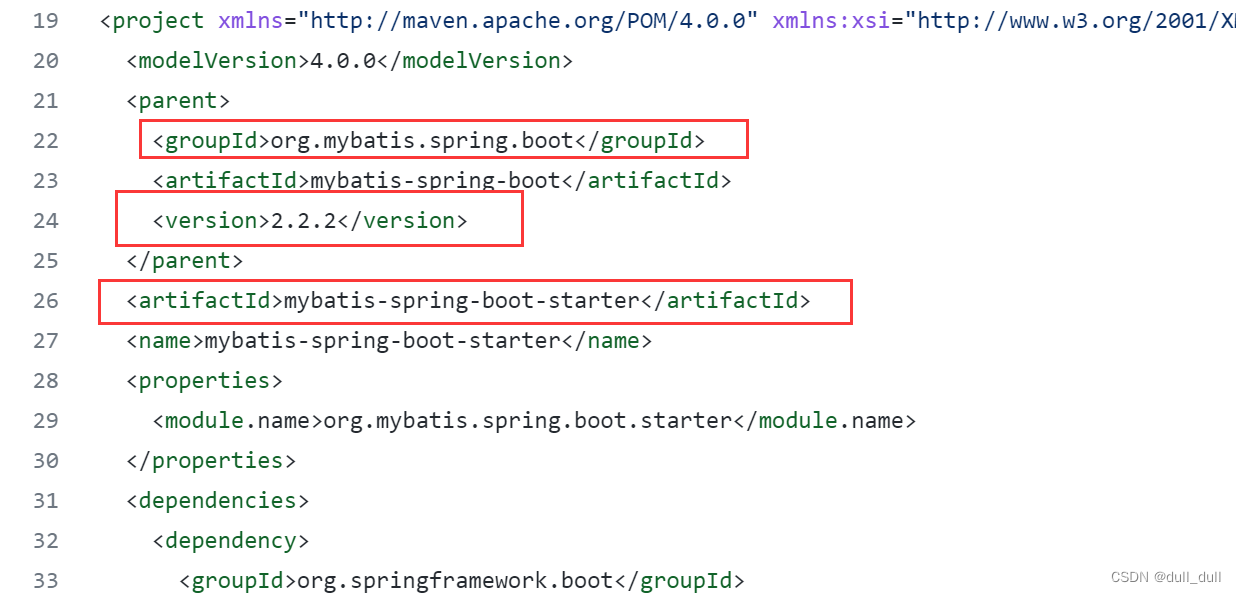
(3.1)自动配置
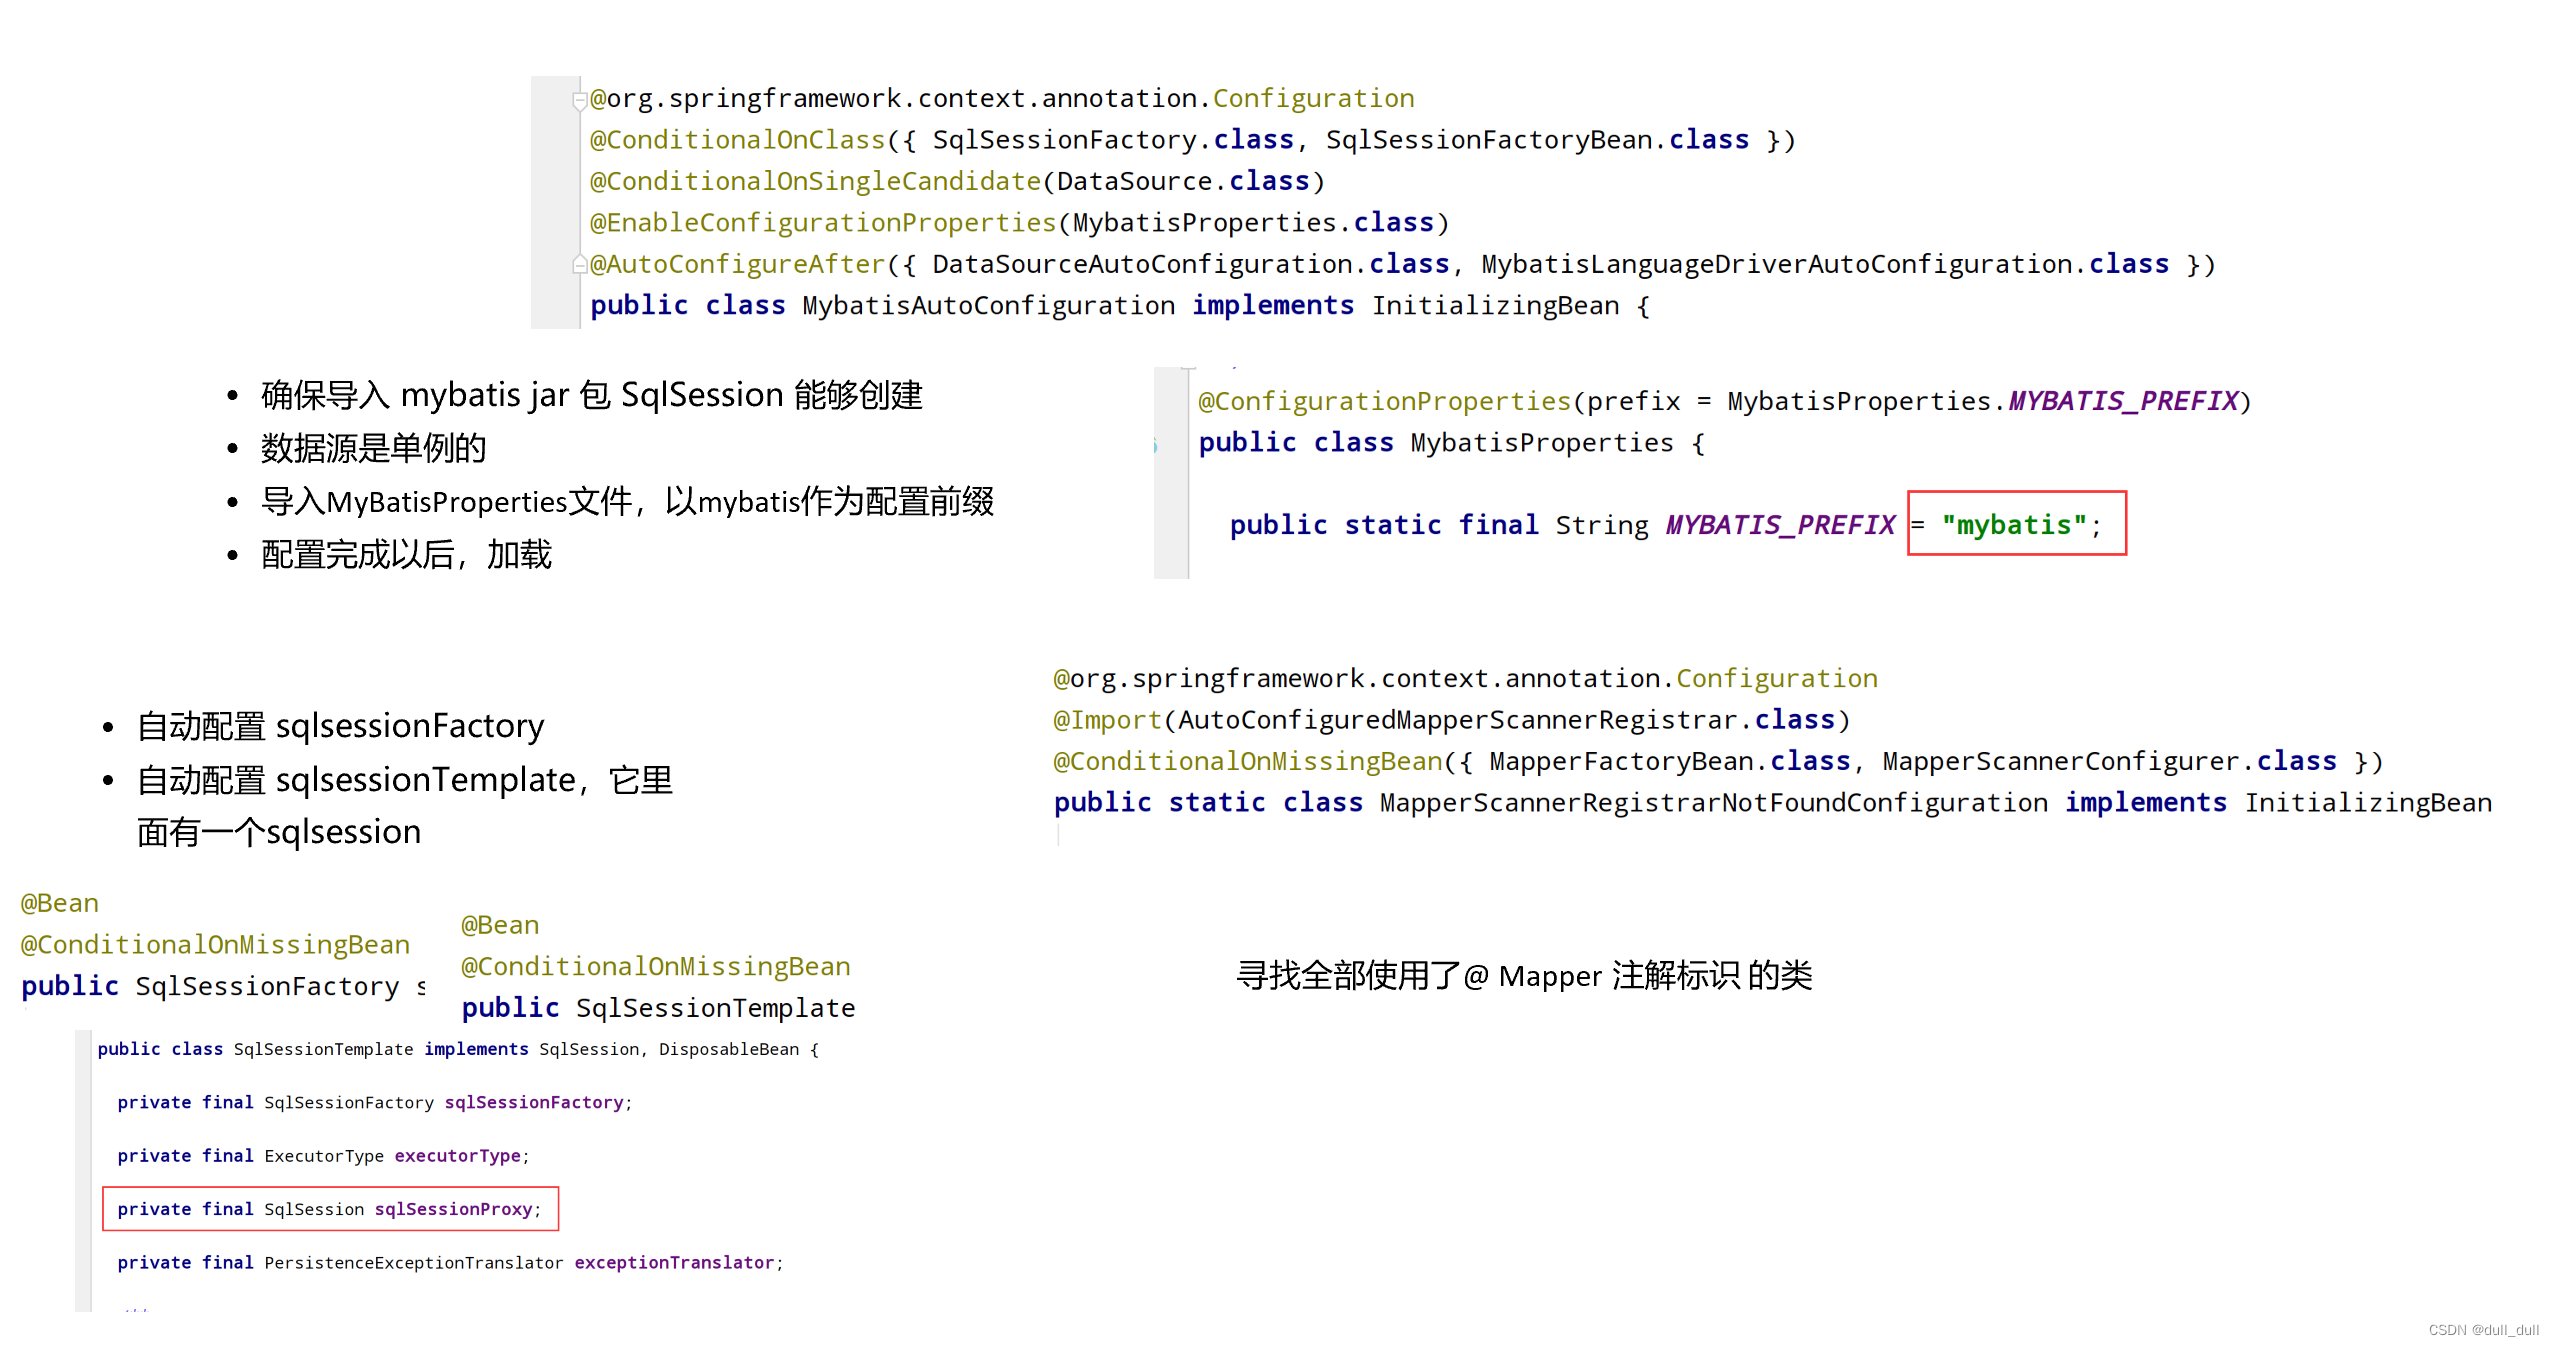
(3.2)配置文件
- 设置全局配置文件:
config-location: classpath:mybatis/mybatis-config.xml - 设置SQL配置文件:
mapper-locations: classpath:mybatis/mapper/*.xml - 当在springBoot配置文件中配置了mybatis配置时,就不能继续使用全局配置文件
mybatis-config.xml - 建议使用
springBoot配置文件
(3.3)注解模式使用MyBatis
- 加入
starter - SpringBoot配置文件声明
mapper-location - 在主程序上使用
@MapperScan(mapper 包名)扫描全部的Mapper,从此不用在每个mappr上使用@Mapper - 在Mapper文件上使用
@select、@insert等,编写简单sql语句,复制语句仍然使用XXXMapper.xml形式 - 使用
@Options传入语句参数
(4)MyBatis-plus
(4.1)导入starter
<dependency>
	<groupId>com.baomidou</groupId>
	<artifactId>mybatis-plus-boot-starter</artifactId>
	<version>3.4.1</version>
</dependency>


在springboot中使用mybatis-plus进行配置

(4.2)使用MyBatis-plus 完成CRUD以及分页
@Service
public class PersonServiceImpl extends ServiceImpl<PersonMapper, Person> implements PersonService {
    @Autowired
    PersonMapper personMapper;
    public List<Person> getPersonList() {
        List<Person> people = personMapper.selectList(null);
        return people;
    }
}
 @GetMapping("/dynamic_table")
    public ModelAndView dynamic_table(@RequestParam(value = "pn", defaultValue = "1") Integer pn) {
        ModelAndView mav = new ModelAndView();

        // 进行分页查询
        Page<Person> personPage = new Page<>(pn, 2);
        // 分页查询的结果
        Page<Person> page = personService.page(personPage, null);

        mav.addObject("page", page);

        mav.setViewName("table/dynamic_table");
        return mav;
    }

此时还是无法获取正确的记录,因为需要添加一个插件来辅助实现。
(4.3)声明表中的属性在表中不存在
@TableField(exist = false) 当前属性在表中不存在。
(4.4)分页插件
@Configuration
public class MybatisPlusConfig {

    /**
     * 新的分页插件,一缓和二缓遵循mybatis的规则
     * 需要设置 MybatisConfiguration#useDeprecatedExecutor = false 避免缓存出现问题(该属性会在旧插件移除后一同移除)
     */
    @Bean
    public MybatisPlusInterceptor mybatisPlusInterceptor() {
        MybatisPlusInterceptor interceptor = new MybatisPlusInterceptor();
        interceptor.addInnerInterceptor(new PaginationInnerInterceptor(DbType.H2));
        return interceptor;
    }

    @Bean
    public ConfigurationCustomizer configurationCustomizer() {
        return configuration -> configuration.setUseDeprecatedExecutor(false);
    }
}
可以使用RedirectAttributes 来保存重定向携带的数据
单元测试 JUnit5
Spring Boot 2.2.0 版本开始引入 JUnit 5 作为单元测试默认库
JUnit 5 = JUnit Platform + JUnit Jupiter + JUnit Vintage
JUnit Platform: Junit Platform是在JVM上启动测试框架的基础,不仅支持Junit自制的测试引擎,其他测试引擎也都可以接入。JUnit Jupiter: JUnit Jupiter提供了JUnit5的新的编程模型,是JUnit5新特性的核心。内部 包含了一个测试引擎,用于在Junit Platform上
运行。JUnit Vintage: 由于JUint已经发展多年,为了照顾老的项目,JUnit Vintage提供了兼容JUnit4.x,Junit3.x的测试引擎。
SpringBoot 2.4 以上版本移除了默认对 Vintage 的依赖。如果需要兼容junit4需要自行引入(不能使用junit4的功能 @Test)
(1.1)引入依赖
 <dependency>
      <groupId>org.springframework.boot</groupId>
      <artifactId>spring-boot-starter-test</artifactId>
      <scope>test</scope>
</dependency>
SpringBoot整合Junit以后。
编写测试方法:@Test标注(注意需要使用junit5版本的注解)
Junit类具有Spring的功能,@Autowired、比如 @Transactional 标注测试方法,测试完成后自动回滚
(1.2)Junit5 常用注解
-
@Test :表示方法是测试方法。但是与JUnit4的@Test不同,他的职责非常单一不能声明任何属性,拓展的测试将会由Jupiter提供额外
测试 -
@ParameterizedTest :表示方法是参数化测试,下方会有详细介绍
-
@RepeatedTest :表示方法可重复执行,下方会有详细介绍
-
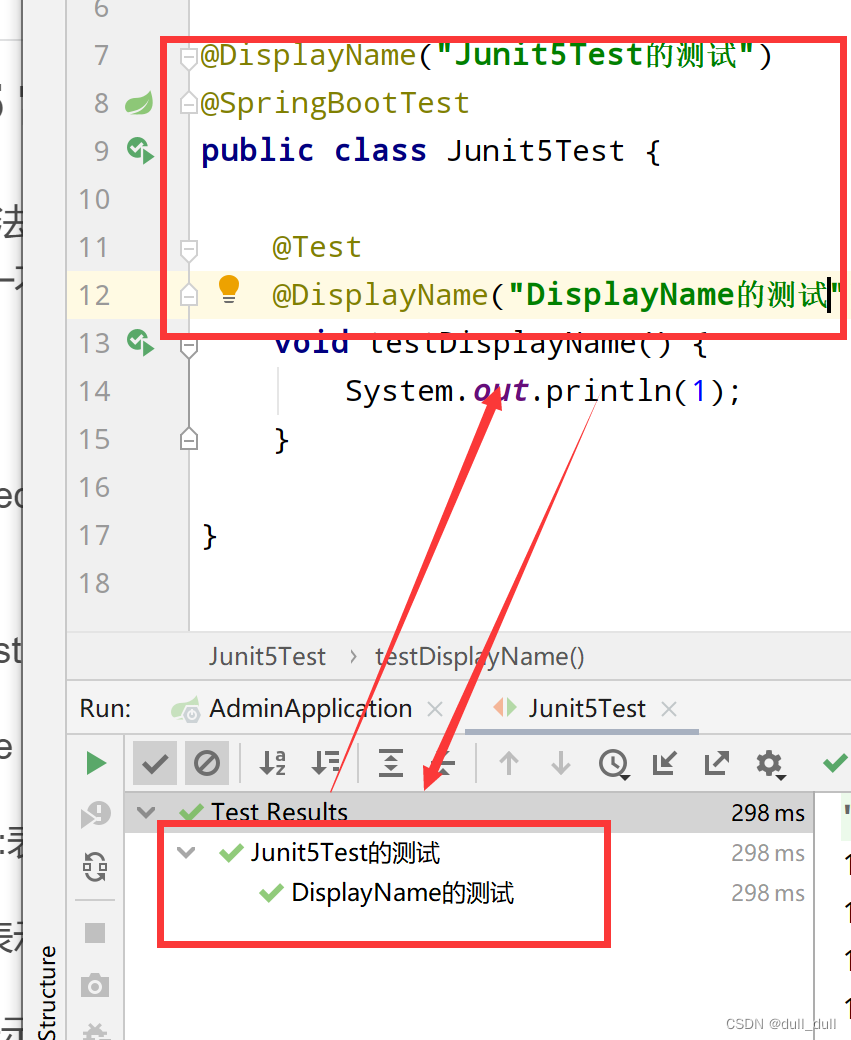
@DisplayName :为测试类或者测试方法设置展示名称
-
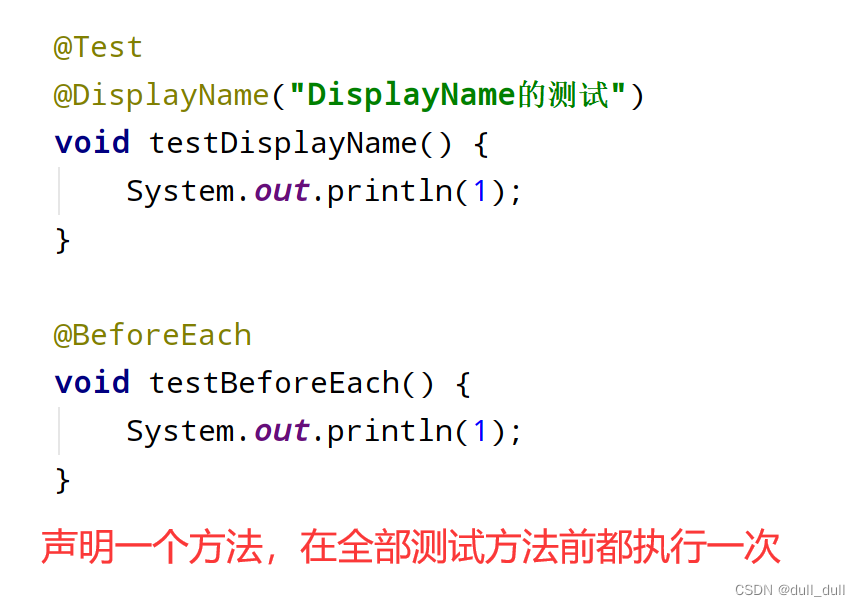
@BeforeEach :表示在每个单元测试之前执行
-
@AfterEach :表示在每个单元测试之后执行
-
@BeforeAll :表示在所有单元测试之前执行,必须是静态方法
-
@AfterAll :表示在所有单元测试之后执行,必须是静态方法
-
@Tag :表示单元测试类别,类似于JUnit4中的@Categories
-
@Disabled :表示测试类或测试方法不执行,类似于JUnit4中的- @Ignore
-
@Timeout :表示测试方法运行如果超过了指定时间将会返回错误
-
@ExtendWith :为测试类或测试方法提供扩展类引用,代替
@runwith -
@RepeatedTest:重复测试
(1.3)断言
断言(assertions)是测试方法中的核心部分,用来对测试需要满足的条件进行验证。这些断言方法都是
org.junit.jupiter.api.Assertions 的静态方法。JUnit 5 内置的断言可以分成如下几个类别:
- 检查业务逻辑返回的数据是否合理。
- 所有的测试运行结束以后,会有一个详细的测试报告;
对全部方法进行断言,批量测试,最后找出没有通过的方法
前一个断言失败,后面的代码将不会继续执行。
(1.3.1)简单断言
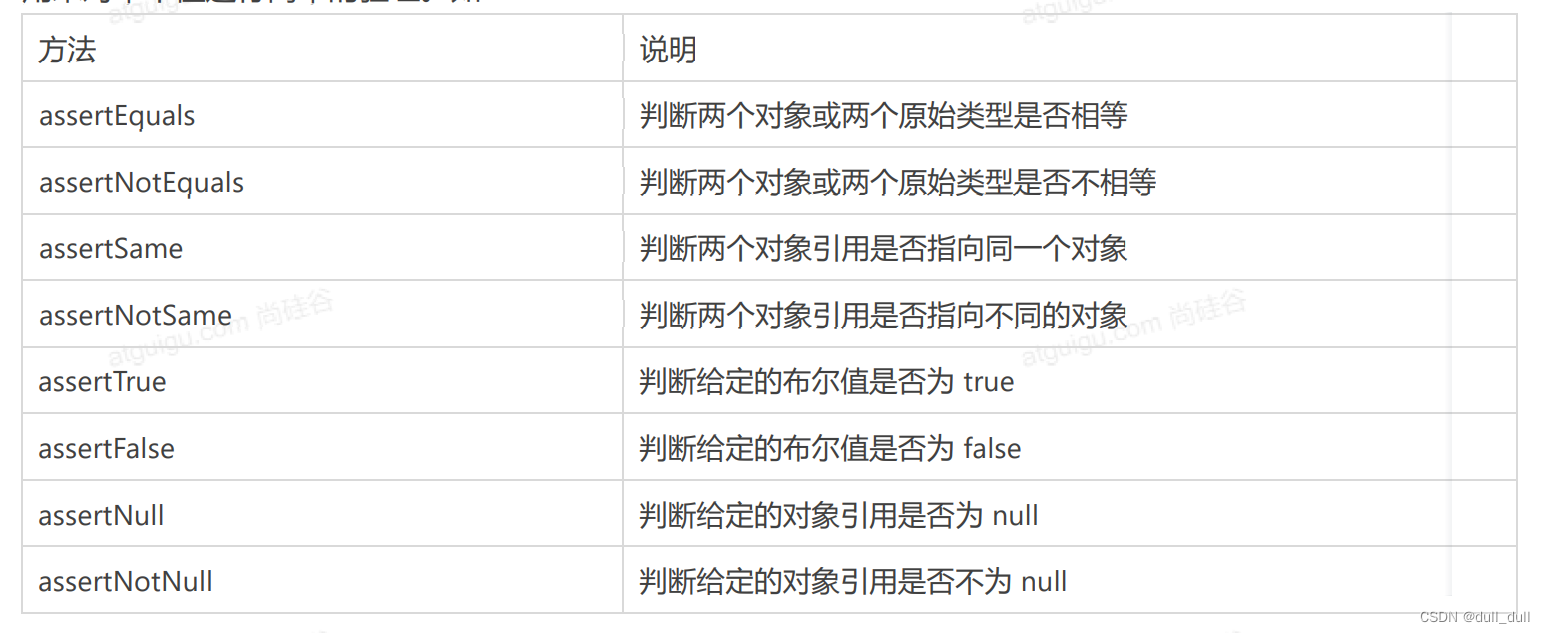
@Test
    @DisplayName("断言测试")
    public void testSimpleAssert() {
        int cal = cal(1, 2);

        Assertions.assertEquals(3, cal, "计算错误");
    }

    int cal(int i, int j) {
        return i + j;
    }
(1.3.2)数组断言
assertArrayEquals 判断的是数组元素
(1.3.3)组合断言
assertAll 方法接受多个 org.junit.jupiter.api.Executable 函数式接口的实例作为要验证的断言,可以通过 lambda 表达式很容易的提供这些断言
@Test
    @DisplayName("assert all")
    public void all() {
        assertAll("Math",
                () -> assertEquals(2, 1 + 1),
                () -> assertTrue(1 > 0)
        );
    }
(1.3.4)断言异常
在JUnit4时期,想要测试方法的异常情况时,需要用@Rule注解的ExpectedException变量还是比较麻烦的。而JUnit5提供了一种新的断言方式Assertions.assertThrows() ,配合函数式编程就可以进行使用。
即断定当前业务会抛出指定异常。
@Test
    @DisplayName("异常断言")
    public void exceptionTest() {
        ArithmeticException arithmeticException = Assertions.assertThrows(ArithmeticException.class, () -> System.out.println(1 / 0));
    }
(1.3.5)超时短言
Duration 可以定义时间的范围
@Test
    @DisplayName("时间断言")
    public void timeout() {
        Assertions.assertTimeout(Duration.ofMillis(100), ()->Thread.sleep(101));
    }
(1.3.6)快速失败
@Test
    @DisplayName("失败")
    public void failTest() {
        fail("失败了");
    }
指导复习的问题
容易犯的错误
- 注意 IDEA 的版本和 Maven 要匹配,使用 IDEA19 应该对应 Maven 3.6.3
- 在整合Druid连接池时,出现了idea报错无法自动注入的问题,但是事实上可以完成自动注入
- 整合mybatis 注意全局配置的冲突
- 如果自己使用
Ctrl + Shift + T创建测试类,需要在测试类上添加@SpringBootTest!!
