SpringVersion:5.2.9
1 关于PropertySourcesPlaceholderConfigurer
如果我们通过xml的方式配置了<context:property-placeholder location="classpath:application.properties"/> 那么Spring在启动时,将加载一个很重要的类:PropertySourcesPlaceholderConfigurer。
Spring通过使用PropertySourcesPlaceholderConfigurer来对Bean定义中的属性值以及@Value中的的${..}占位符进行解析。
1.1 继承关系
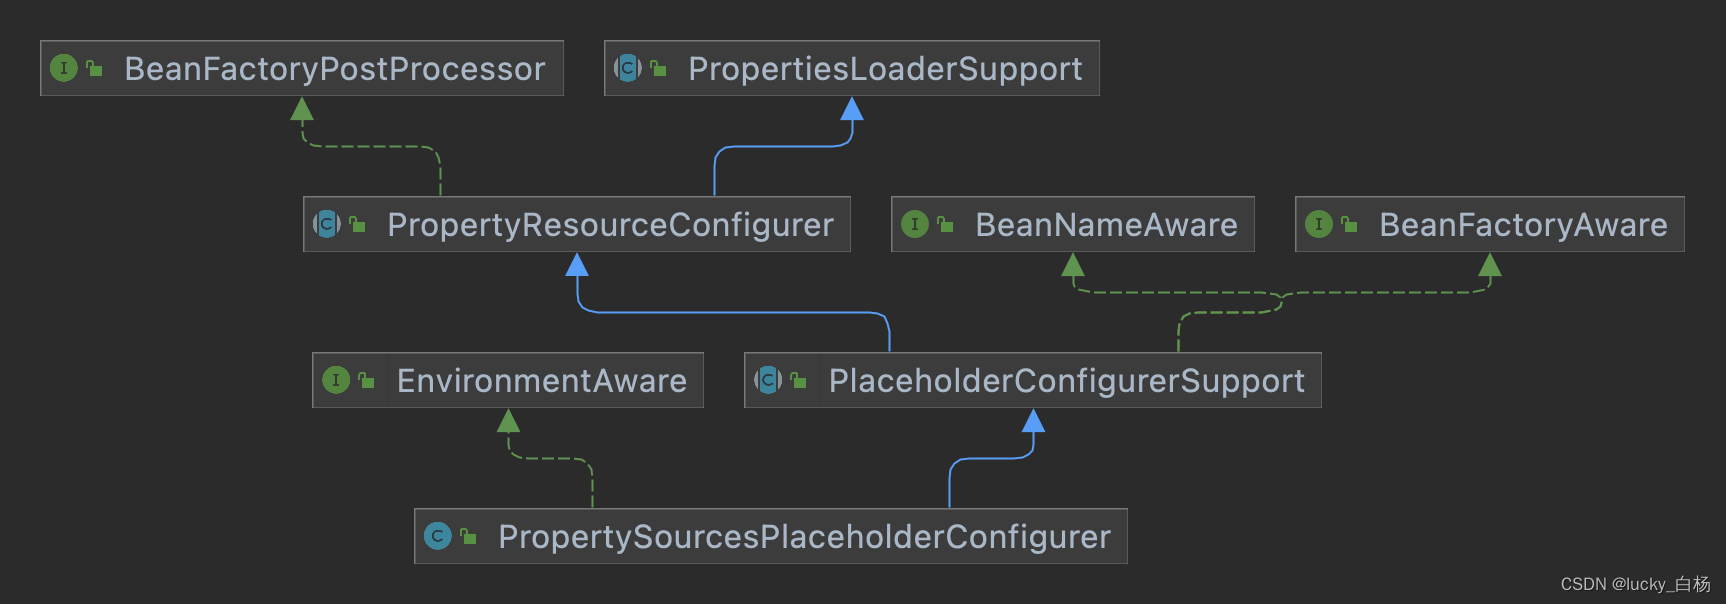
从继承关系来看,PropertySourcesPlaceholderConfigurer类是一个BeanFactoryPostProcessor,所以在BeanFactory准备好之后,将调用PropertySourcesPlaceholderConfigurer#postProcessBeanFactory()方法,所以需要了解该类的处理逻辑,就需要将这个方法作为入口查阅。
另外PropertySourcesPlaceholderConfigurer还实现了一些Aware接口,在实例化该类时,将调用相应的set方法进行设置。
2 属性配置文件的读取与占位符解析
2.1 直奔主题:Spring读取属性文件并解析其值的极简单测试代码
首先我们通过一个极其简单、一目了然的代码来了解下PropertySourcesPlaceholderConfigurer。
首先我们定义一个application.properties文件:
person.name=baiyang
person.sex=man
然后我们直接写个main启动:
import org.springframework.beans.factory.support.DefaultListableBeanFactory;
import org.springframework.context.support.PropertySourcesPlaceholderConfigurer;
import org.springframework.core.io.DefaultResourceLoader;

public class PropertiesTest {

    public static void main(String[] args) {
        //创建一个Bean工厂
        DefaultListableBeanFactory beanFactory = new DefaultListableBeanFactory();
        //创建PropertySourcesPlaceholderConfigurer
        PropertySourcesPlaceholderConfigurer propertySourcesPlaceholderConfigurer = new PropertySourcesPlaceholderConfigurer();
        //设置属性文件路径
        propertySourcesPlaceholderConfigurer.setLocation(new DefaultResourceLoader().getResource("classpath:application.properties"));
        //模拟Spring启动时的工厂后处理器调用
        propertySourcesPlaceholderConfigurer.postProcessBeanFactory(beanFactory);
        //解析属性并打印
        System.out.printf("%15s = \033[1;33m%s\033[0m\n", "person.name", beanFactory.resolveEmbeddedValue("${person.name}"));
        System.out.printf("%15s = \033[1;33m%s\033[0m\n", "person.sex", beanFactory.resolveEmbeddedValue("${person.sex}"));
    }

}
运行上面代码,可以看到结果:

上面的测试代码模拟了Spring对 PropertySourcesPlaceholderConfigurer的调用流程:首先容器在启动时,将创建DefaultListableBeanFactory,然后是实例化所有注册的BeanFactoryPostProcessor,其中就包含了PropertySourcesPlaceholderConfigurer。当DefaultListableBeanFactory准备好之后,将调用工厂后处理器进行后置处理,对于PropertySourcesPlaceholderConfigurer来说,就是对指定的属性文件,进行读取并加载到propertySources,并将创建StringValueResolver对象,添加到BeanFactory#embeddedValueResolvers属性中,便于后续的值解析处理。
而上面的测试代码就是直击核心点的模拟测试,从该测试代码进行入手窥探PropertySourcesPlaceholderConfigurer内部的处理流程会比较容易“下咽”。
2.2 深入源码流程
为了保持简单纯粹直接,我们使用GenericApplicationContext来作为应用上下文,下面是我们的测试代码:
import com.baiyang.bean.Person;
import org.springframework.beans.factory.config.BeanDefinition;
import org.springframework.beans.factory.support.BeanDefinitionBuilder;
import org.springframework.context.support.GenericApplicationContext;
import org.springframework.context.support.PropertySourcesPlaceholderConfigurer;
import org.springframework.core.io.DefaultResourceLoader;

public class PropertiesTest {

    public static void main(String[] args) {
        //创建Spring上下文
        GenericApplicationContext context = new GenericApplicationContext();
        //创建PropertySourcesPlaceholderConfigurer
        PropertySourcesPlaceholderConfigurer propertySourcesPlaceholderConfigurer = new PropertySourcesPlaceholderConfigurer();
        //设置属性文件路径
        propertySourcesPlaceholderConfigurer.setLocation(new DefaultResourceLoader().getResource("classpath:application.properties"));
        //将PropertySourcesPlaceholderConfigurer注册到容器中
        context.addBeanFactoryPostProcessor(propertySourcesPlaceholderConfigurer);

        //注册一个Person的BeanDefinition,并且设置其name属性值为"${person.name}",其值将匹配属性文件中的person.name的值
        context.registerBeanDefinition("person",
                BeanDefinitionBuilder.genericBeanDefinition(Person.class)
                        .setScope(BeanDefinition.SCOPE_SINGLETON)
                        .addPropertyValue("name", "${person.name}")
                        .getBeanDefinition()
        );
        //刷新上下文
        context.refresh();
        //从容器中获取person,并输出
        System.out.println(context.getBean(Person.class));
    }
}
上面的测试类,PropertySourcesPlaceholderConfigurer被注册到上下文中,并且注册了一个Person类的BeanDefinition,然后执行context.refresh();对上下文进行启动刷新,最后从Spring容器中将Person取出并输出去内容。
2.2.1 前期容器启动
接下来就是对源码的流程讲解了。
如果对Spirng容器的启动过程比较了解,可以直接跳到后面的"2.2.2 重点执行PropertySourcesPlaceholderConfigurer后处理流程"子段落。
首先我们进入到refresh()
AbstractApplicationContext#refresh:
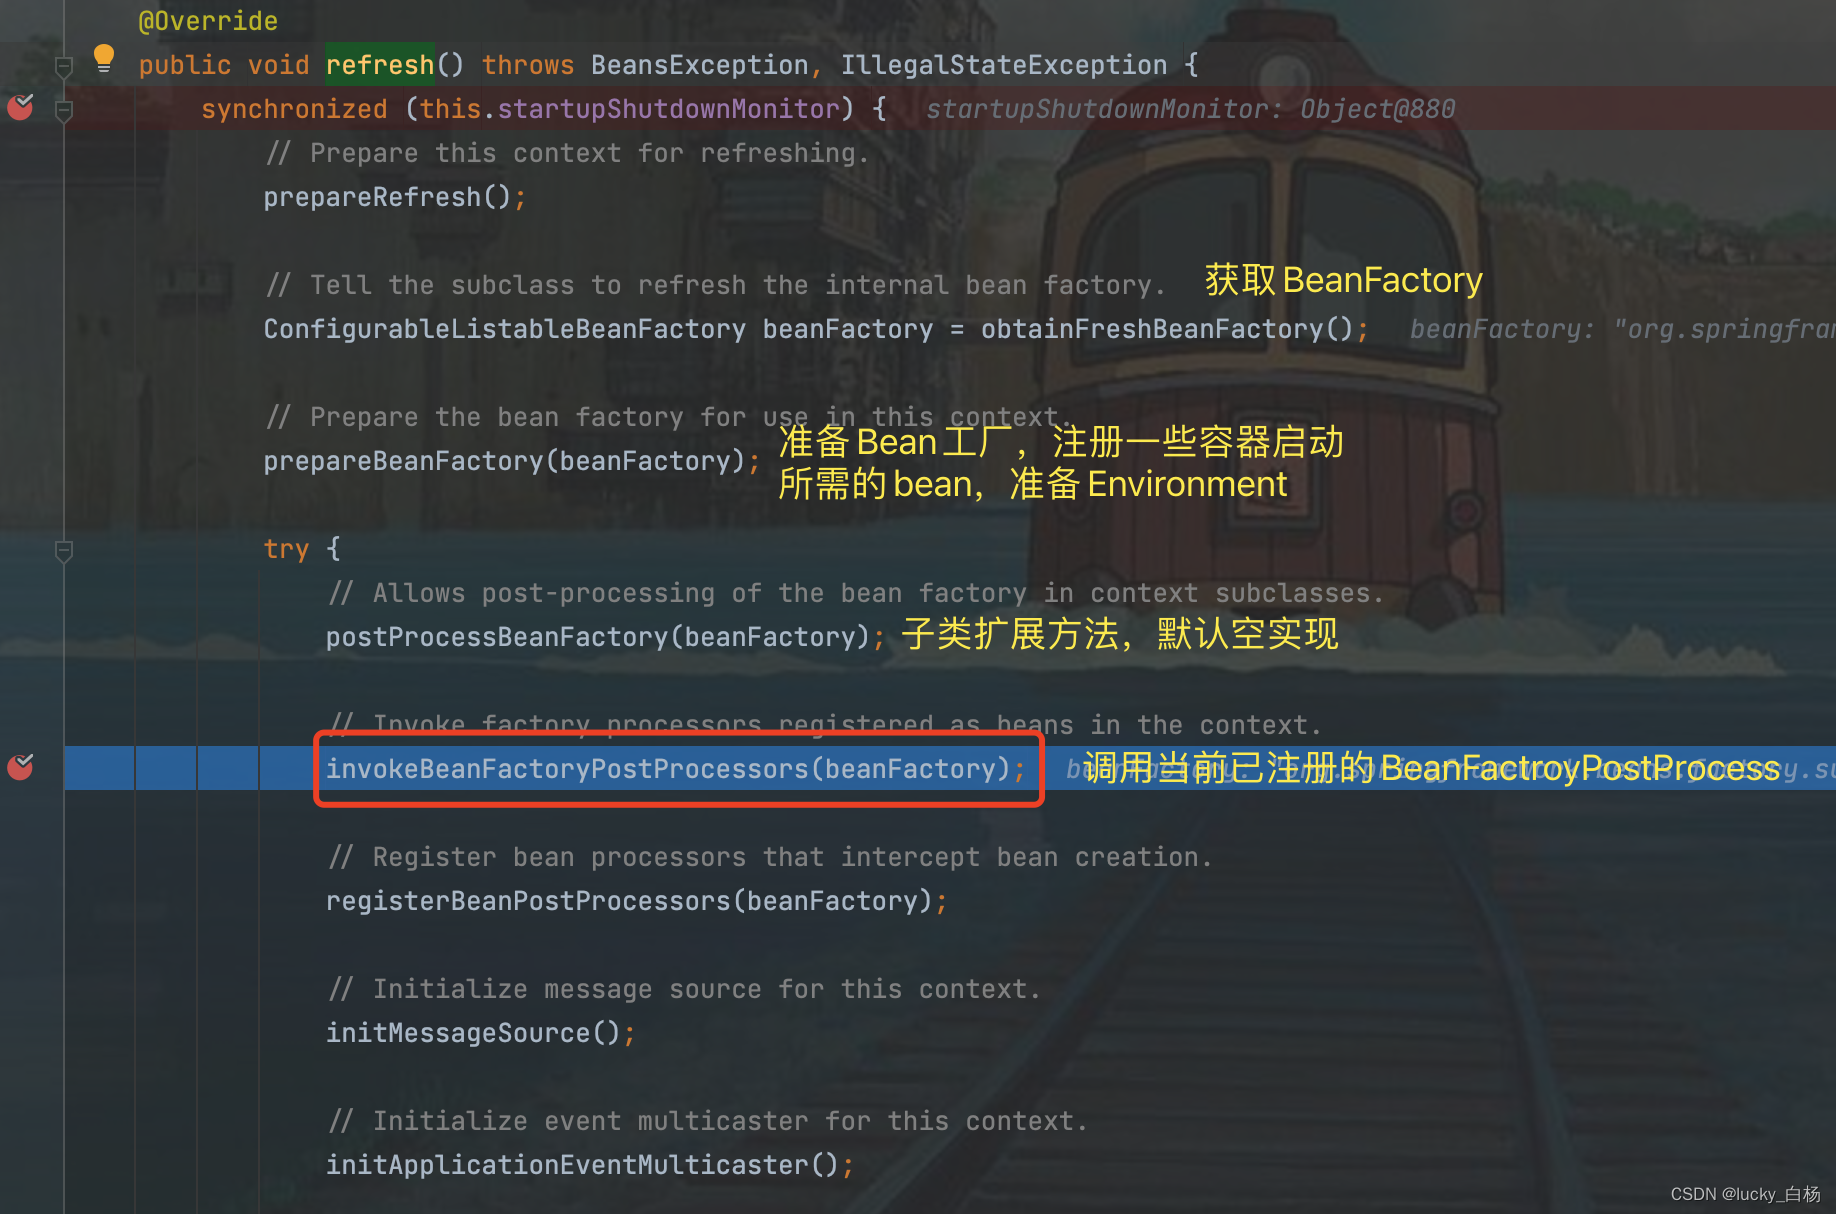
从上面的源码,可以看到整个容器的主要启动流程;在invokeBeanFactoryPostProcessors(beanFactory);这行代码执行之前Spring已经准备好了Bean工厂,并且将调用当前已经注册到Context中的“BFPP”,其中就包含了PropertySourcesPlaceholderConfigurer。
我们继续深入到invokeBeanFactoryPostProcessors(beanFactory);
AbstractApplicationContext#invokeBeanFactoryPostProcessors:

上面看到对BFPP的执行是委托给PostProcessorRegistrationDelegate#invokeBeanFactoryPostProcessors()方法来做的。并且我们的例子中,是通过context.addBeanFactoryPostProcessor(propertySourcesPlaceholderConfigurer);来注册的BFPP,所以上面的getBeanFactoryPostProcessors()可以获取到我们注册的PropertySourcesPlaceholderConfigurer。
继续深入到PostProcessorRegistrationDelegate#invokeBeanFactoryPostProcessors()
由于篇幅问题,和关注核心点的原则,下面的三张源码图可以粗略看。
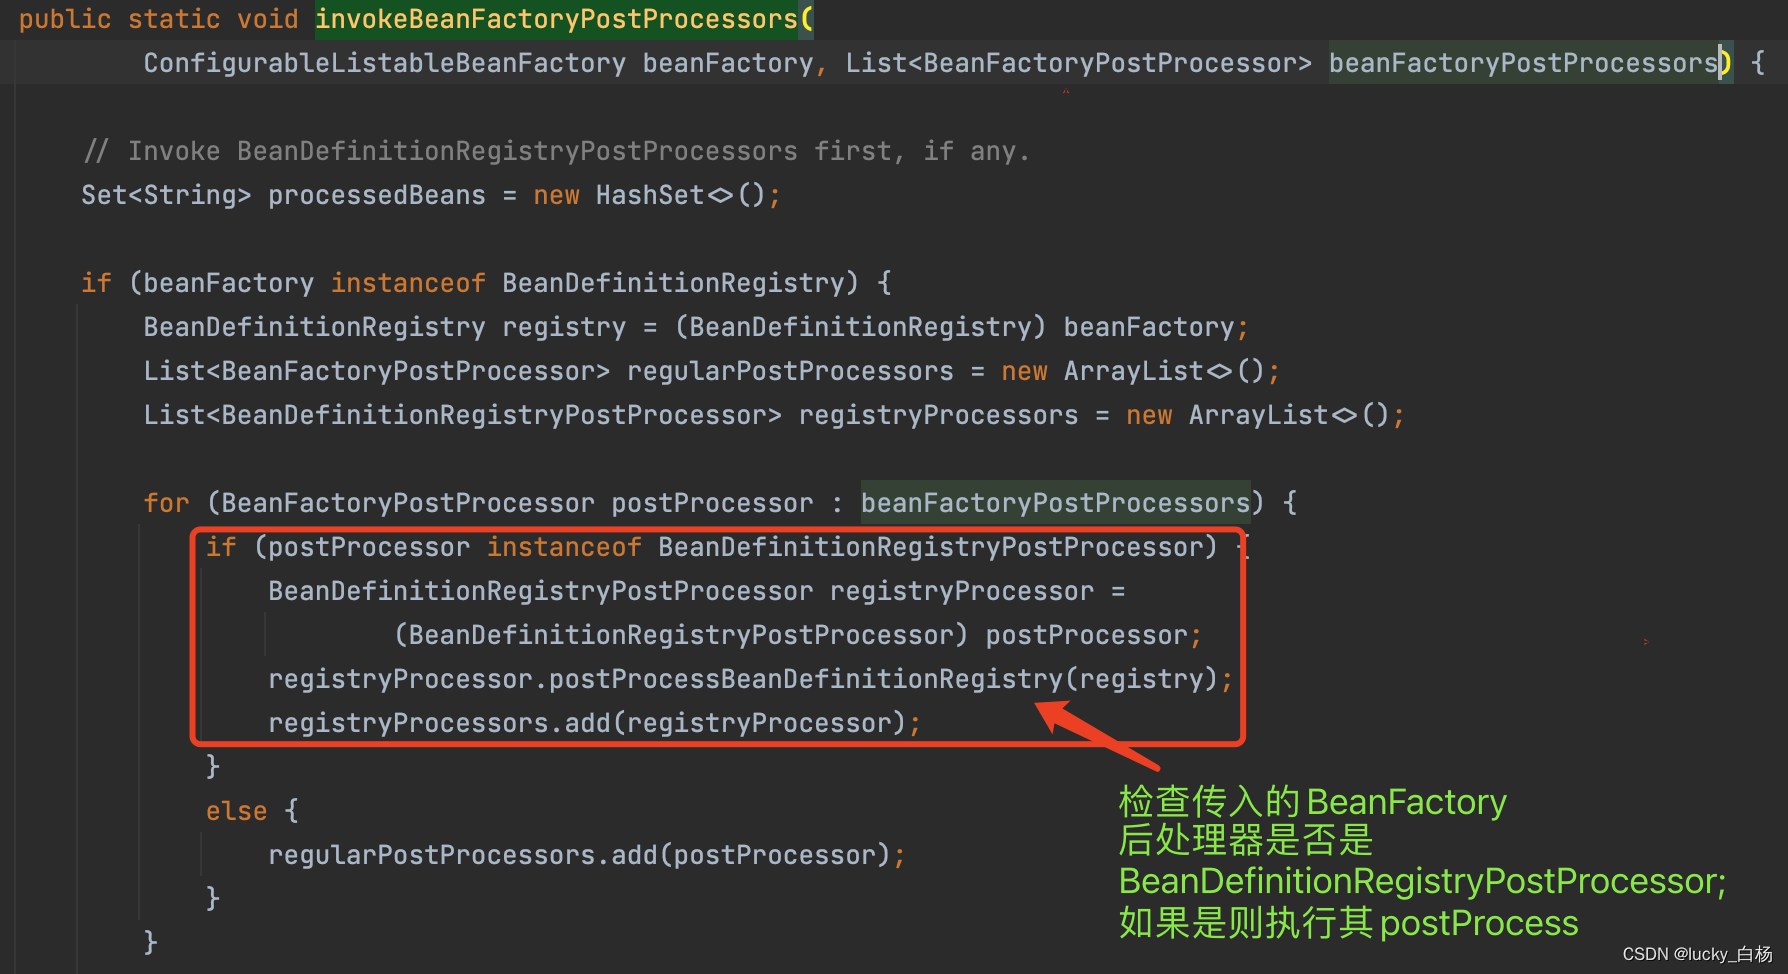
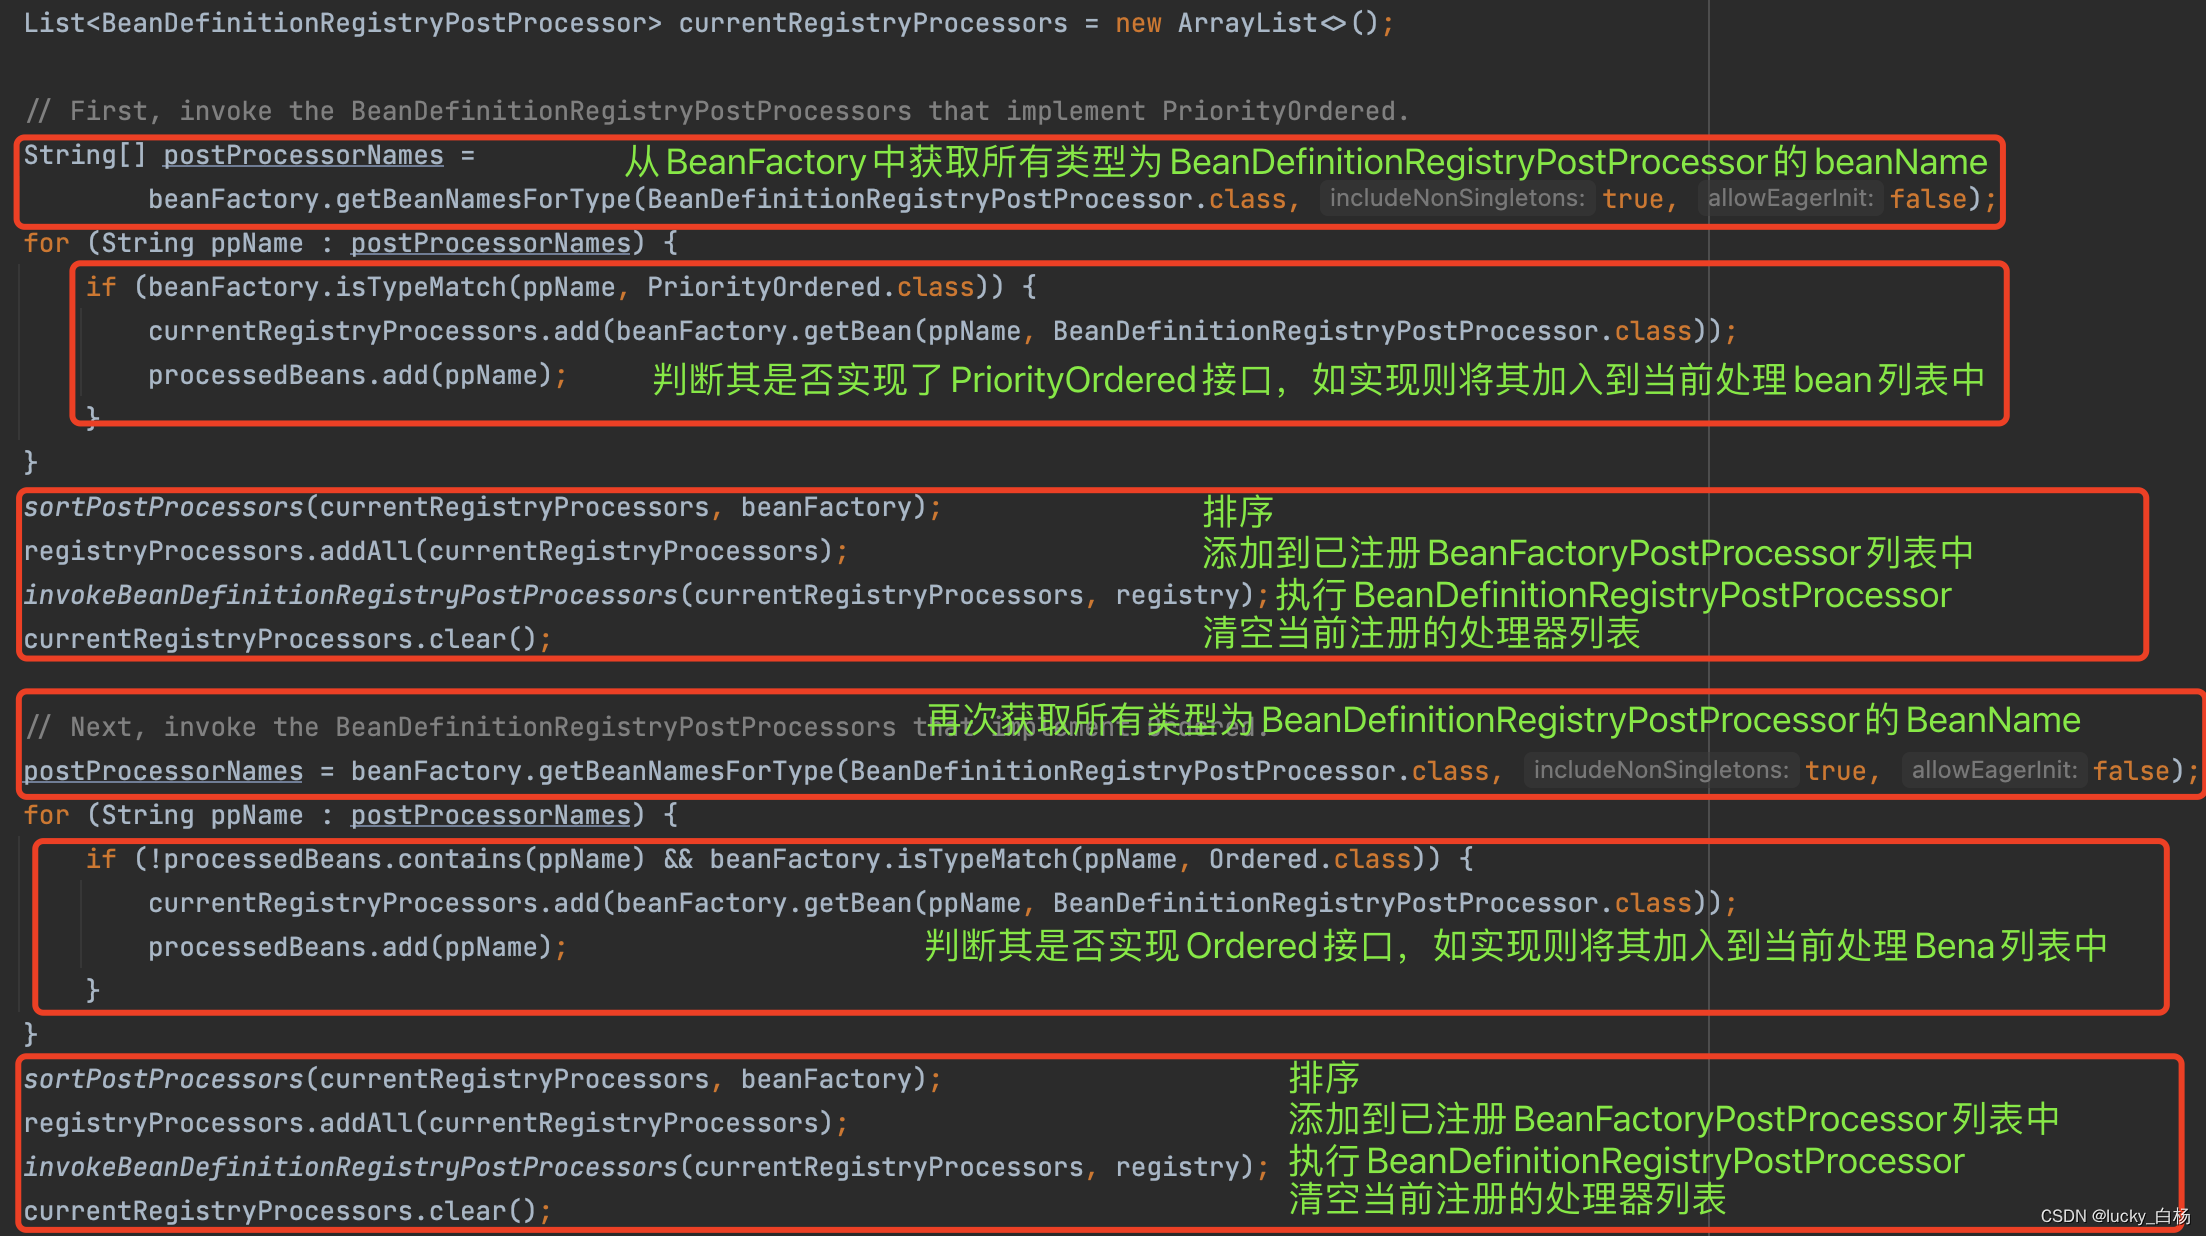
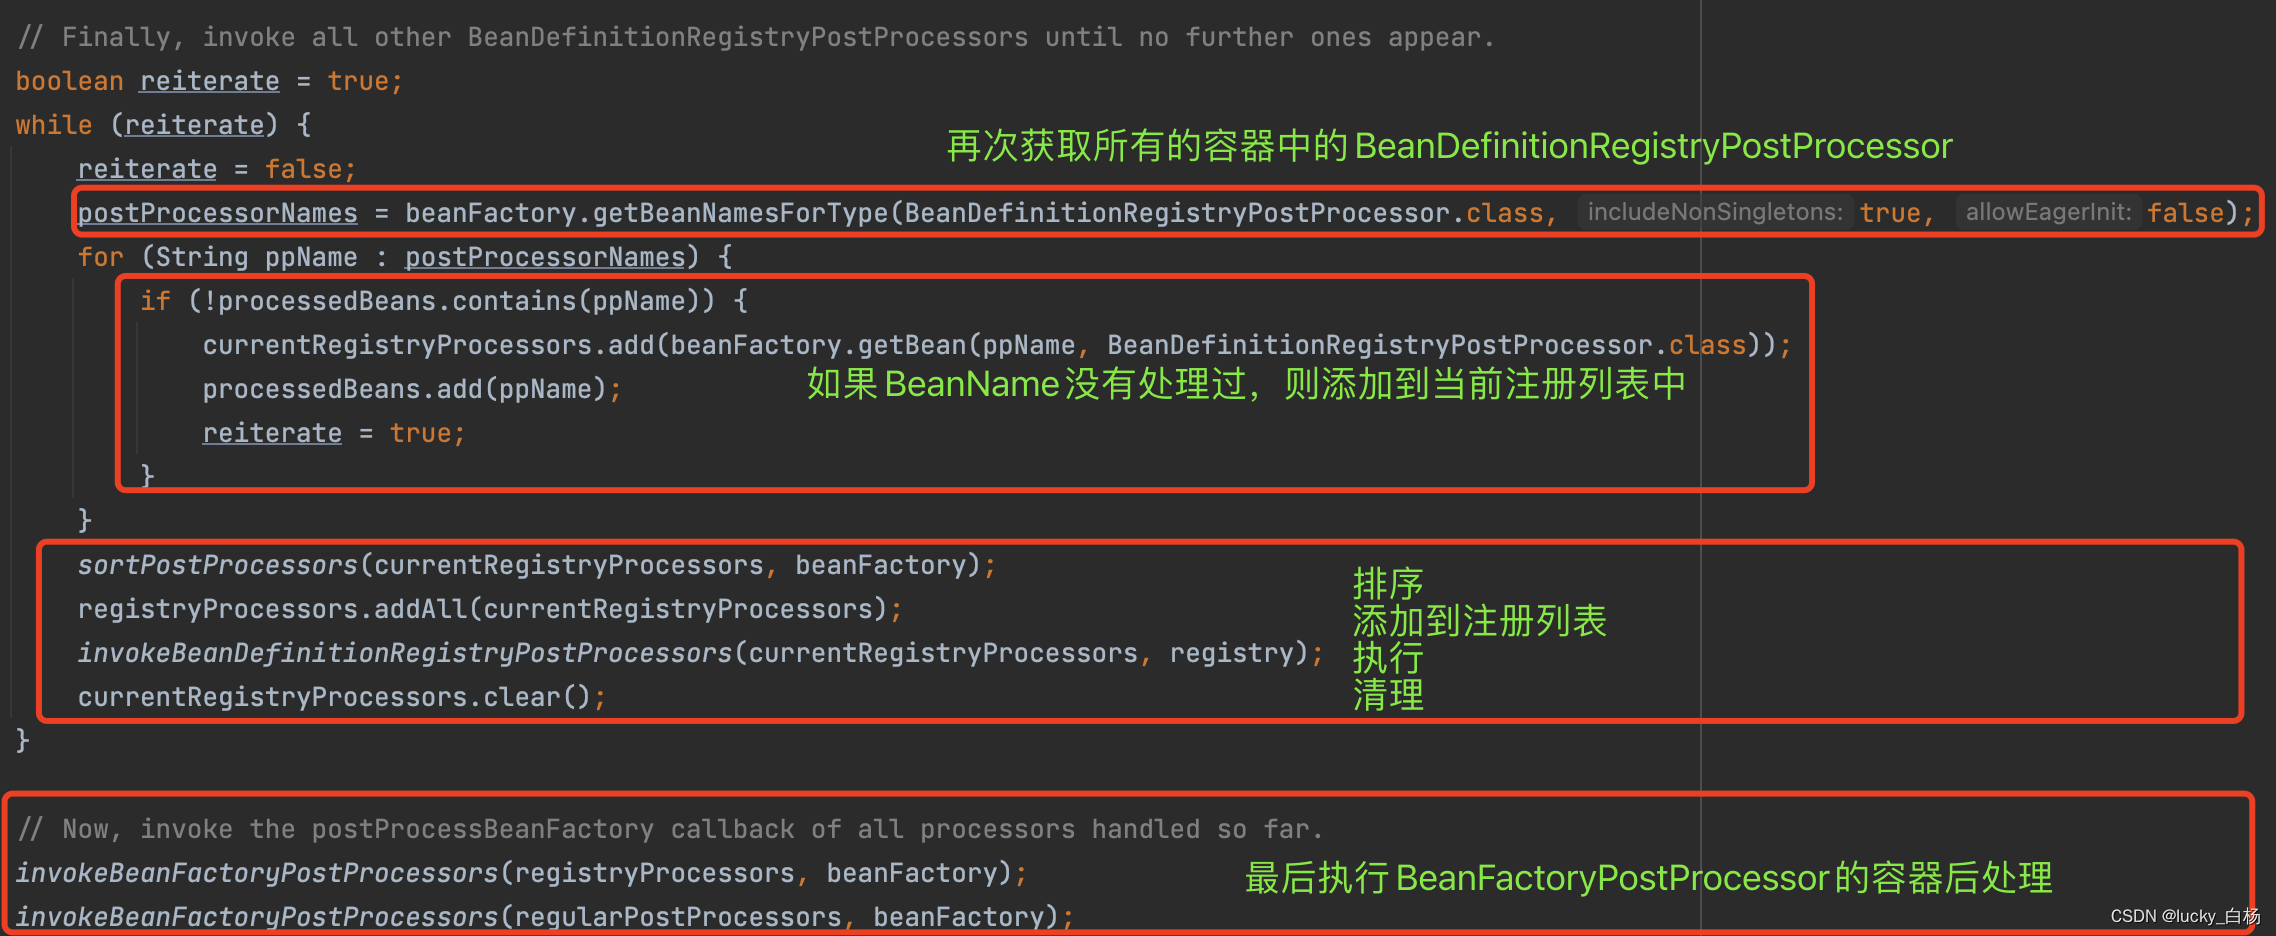
上面展示出来的源代码中包含了对BeanDefinitionRegistryPostProcessor的处理,以及对排序的支持,由于本篇主要讲解的是PropertySourcesPlaceholderConfigurer的执行逻辑,想要详细了解BeanPostProcessor与BeanDefinitionRegistryPostProcessor,请看Spring之容器后处理器BeanFactoryPostProcessor/BeanDefinitionRegistryPostProcessor示例与源码分析
在PostProcessorRegistrationDelegate#invokeBeanFactoryPostProcessors()中,最终会调用:PostProcessorRegistrationDelegate #invokeBeanFactoryPostProcessors();方法来真正对BFPP的postProcessBeanFactory()进行调用:

我们的postProcessor为PropertySourcesPlaceholderConfigurer的时候,就可以进入其postProcessBeanFactory()方法了,也可以事先在其方法内打上断点防止跳过。
2.2.2 重点执行PropertySourcesPlaceholderConfigurer后处理流程
接下来是我们本文重点讲的PropertySourcesPlaceholderConfigurer的处理流程了。
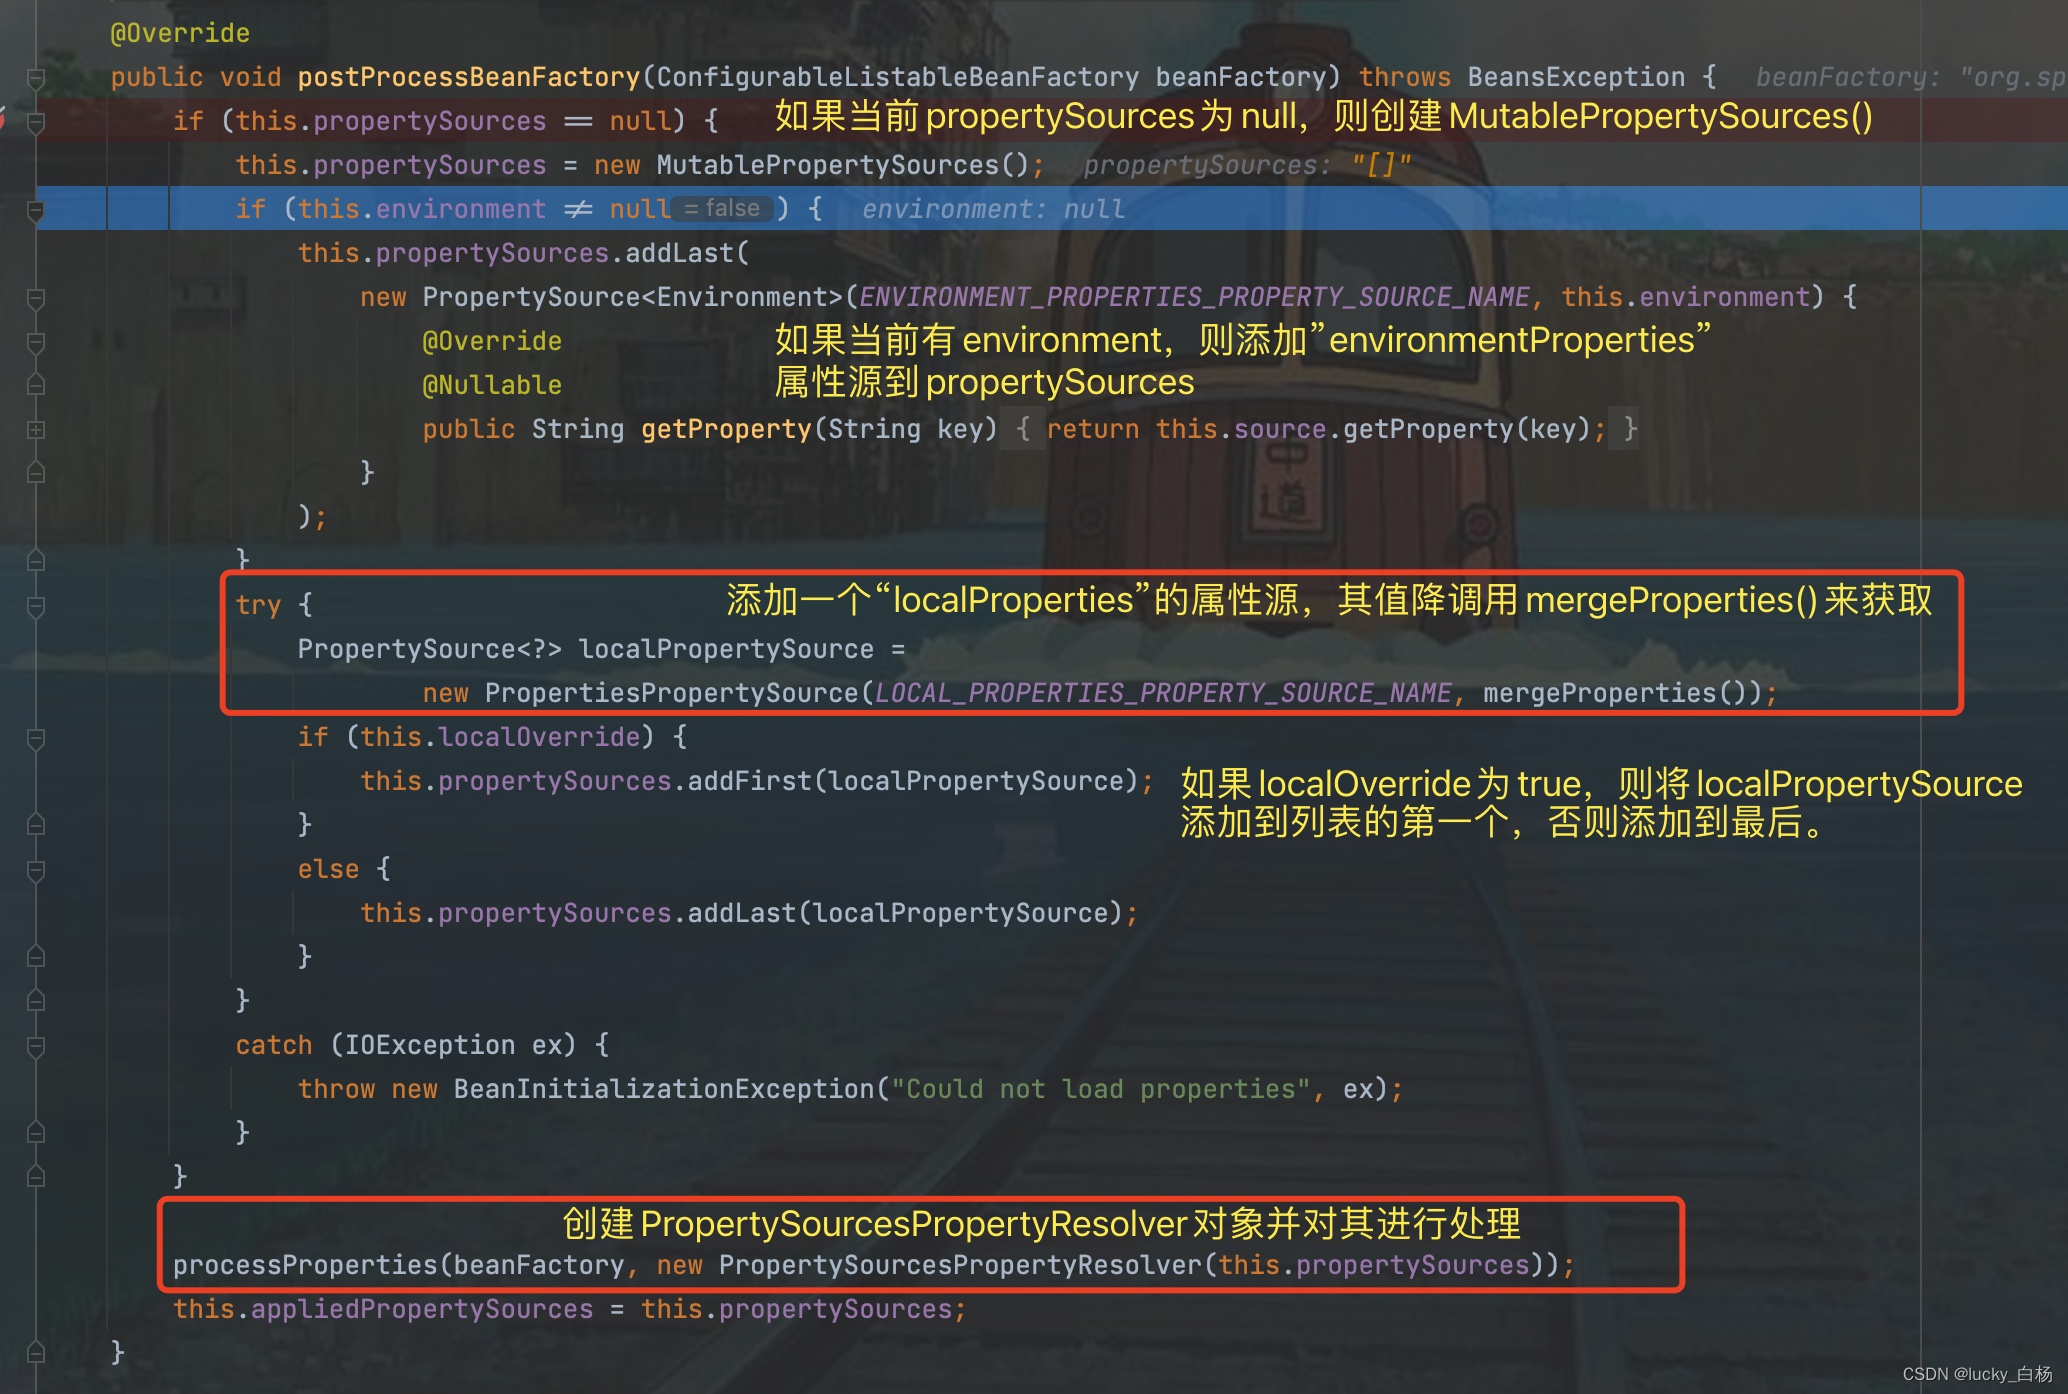
我们先看加入localProperties属性源时的mergeProperties()方法的处理:
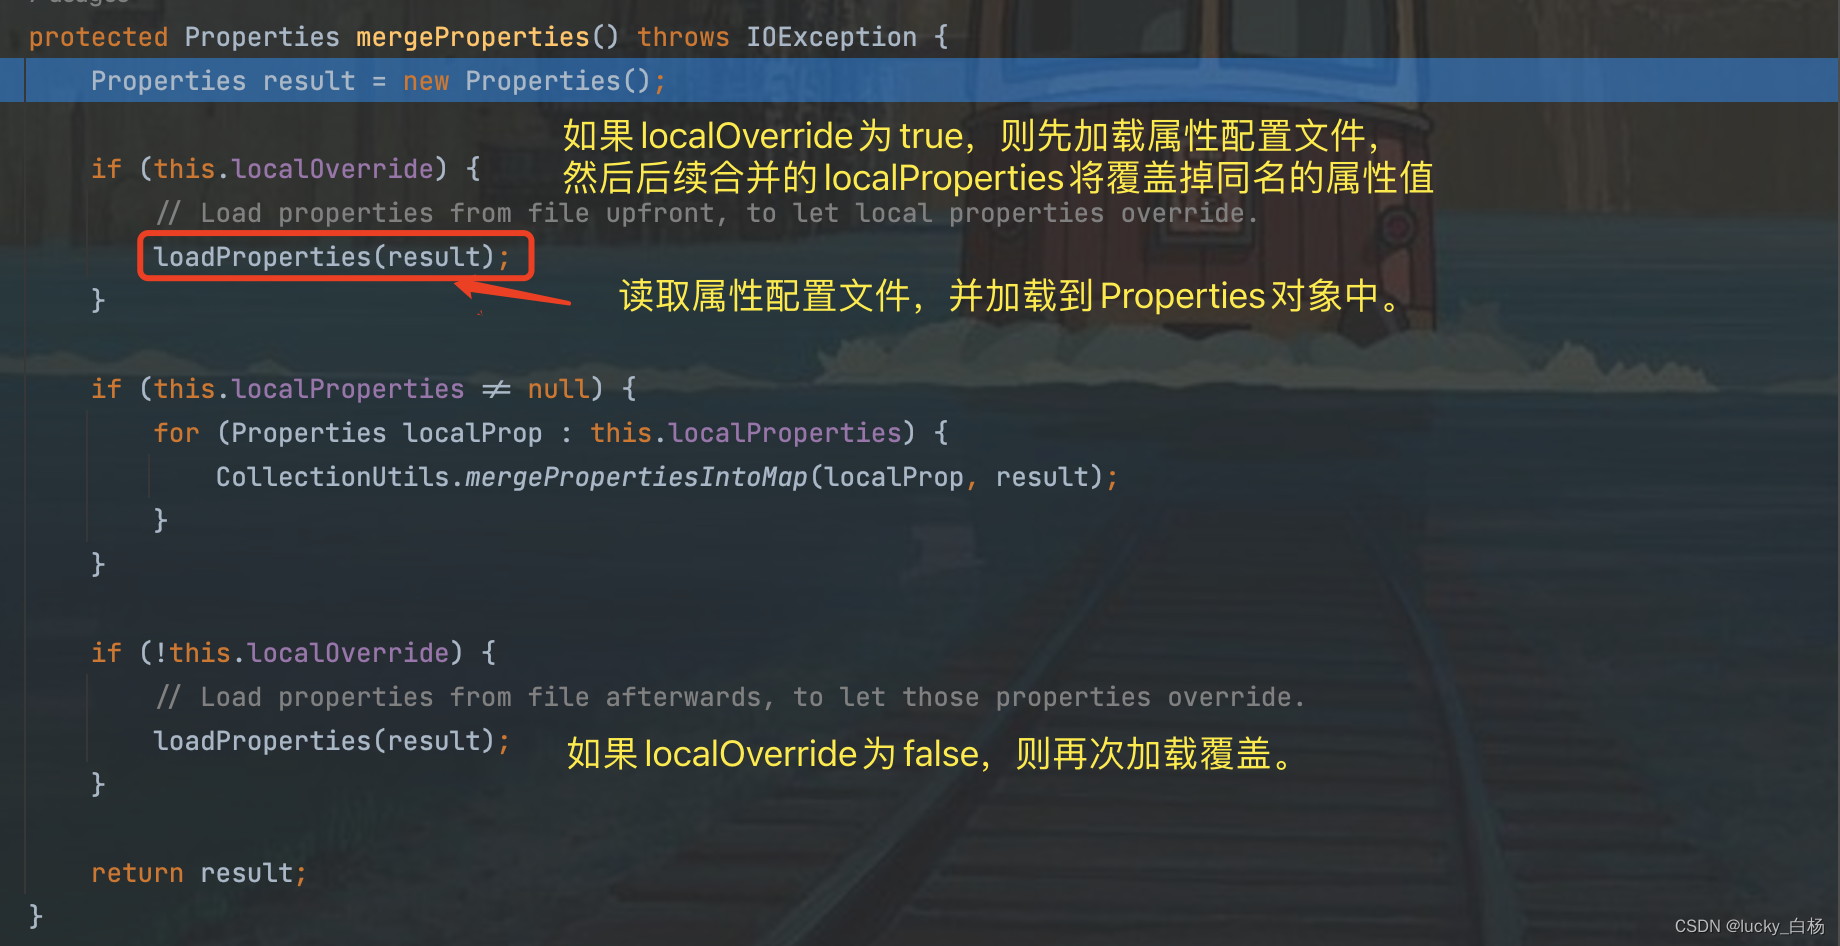
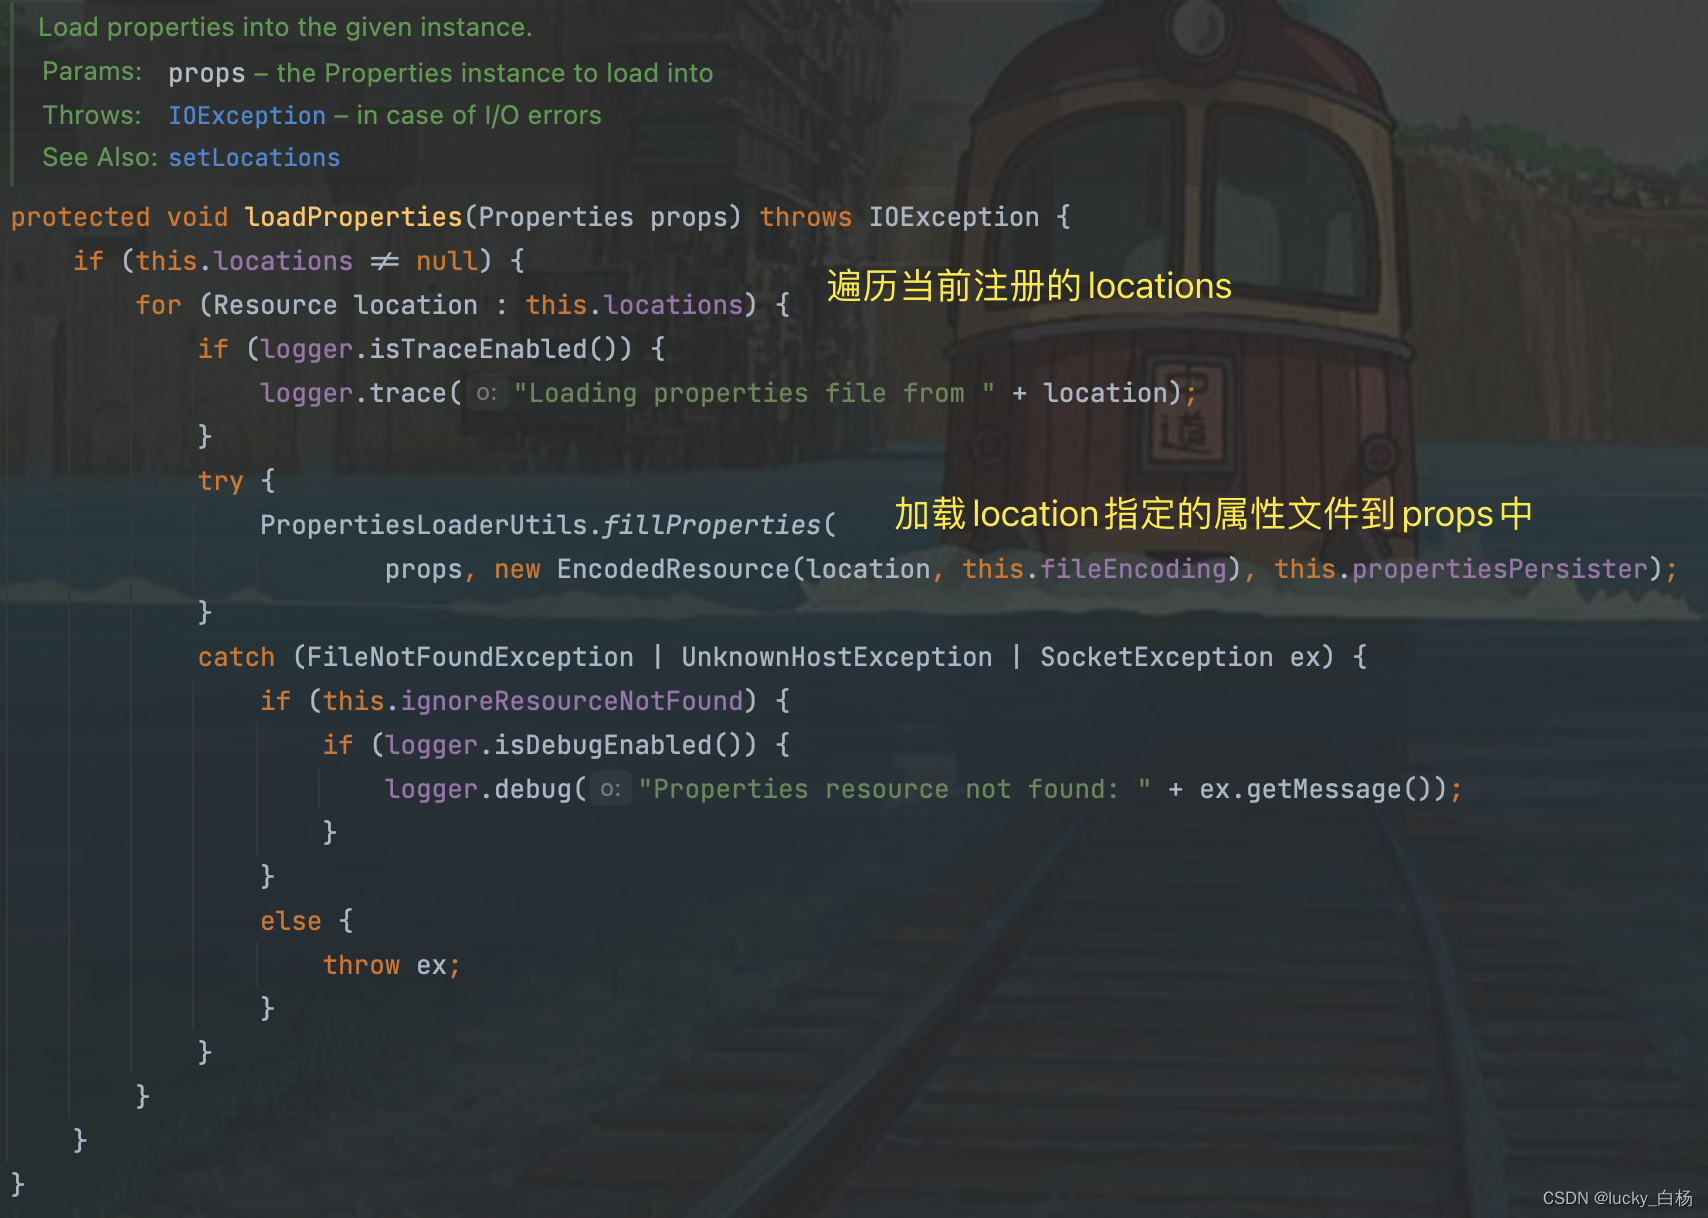
从上面的方法看出,在localProperties属性源时,调用的mergeProperties()将加载到我们事先配置的属性文件,localProperties即我们配置属性文件属性源名。
然后我们进入到PropertySourcesPlaceholderConfigurer#processProperties():
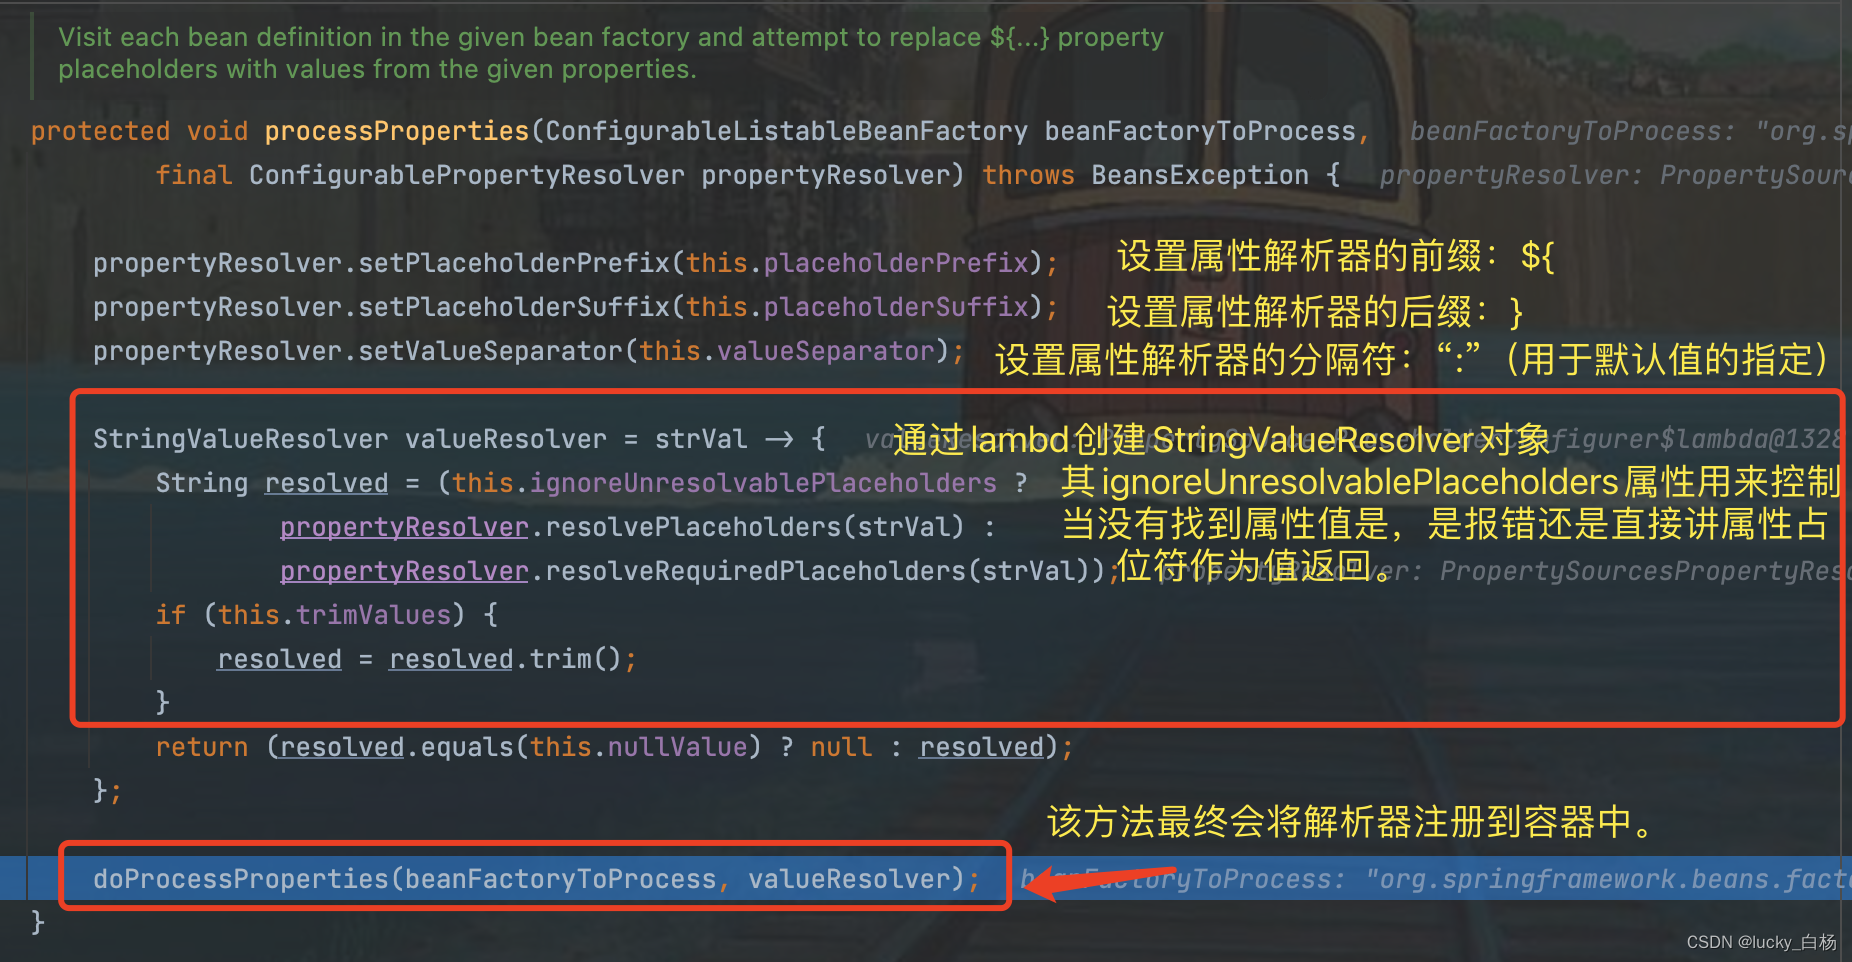
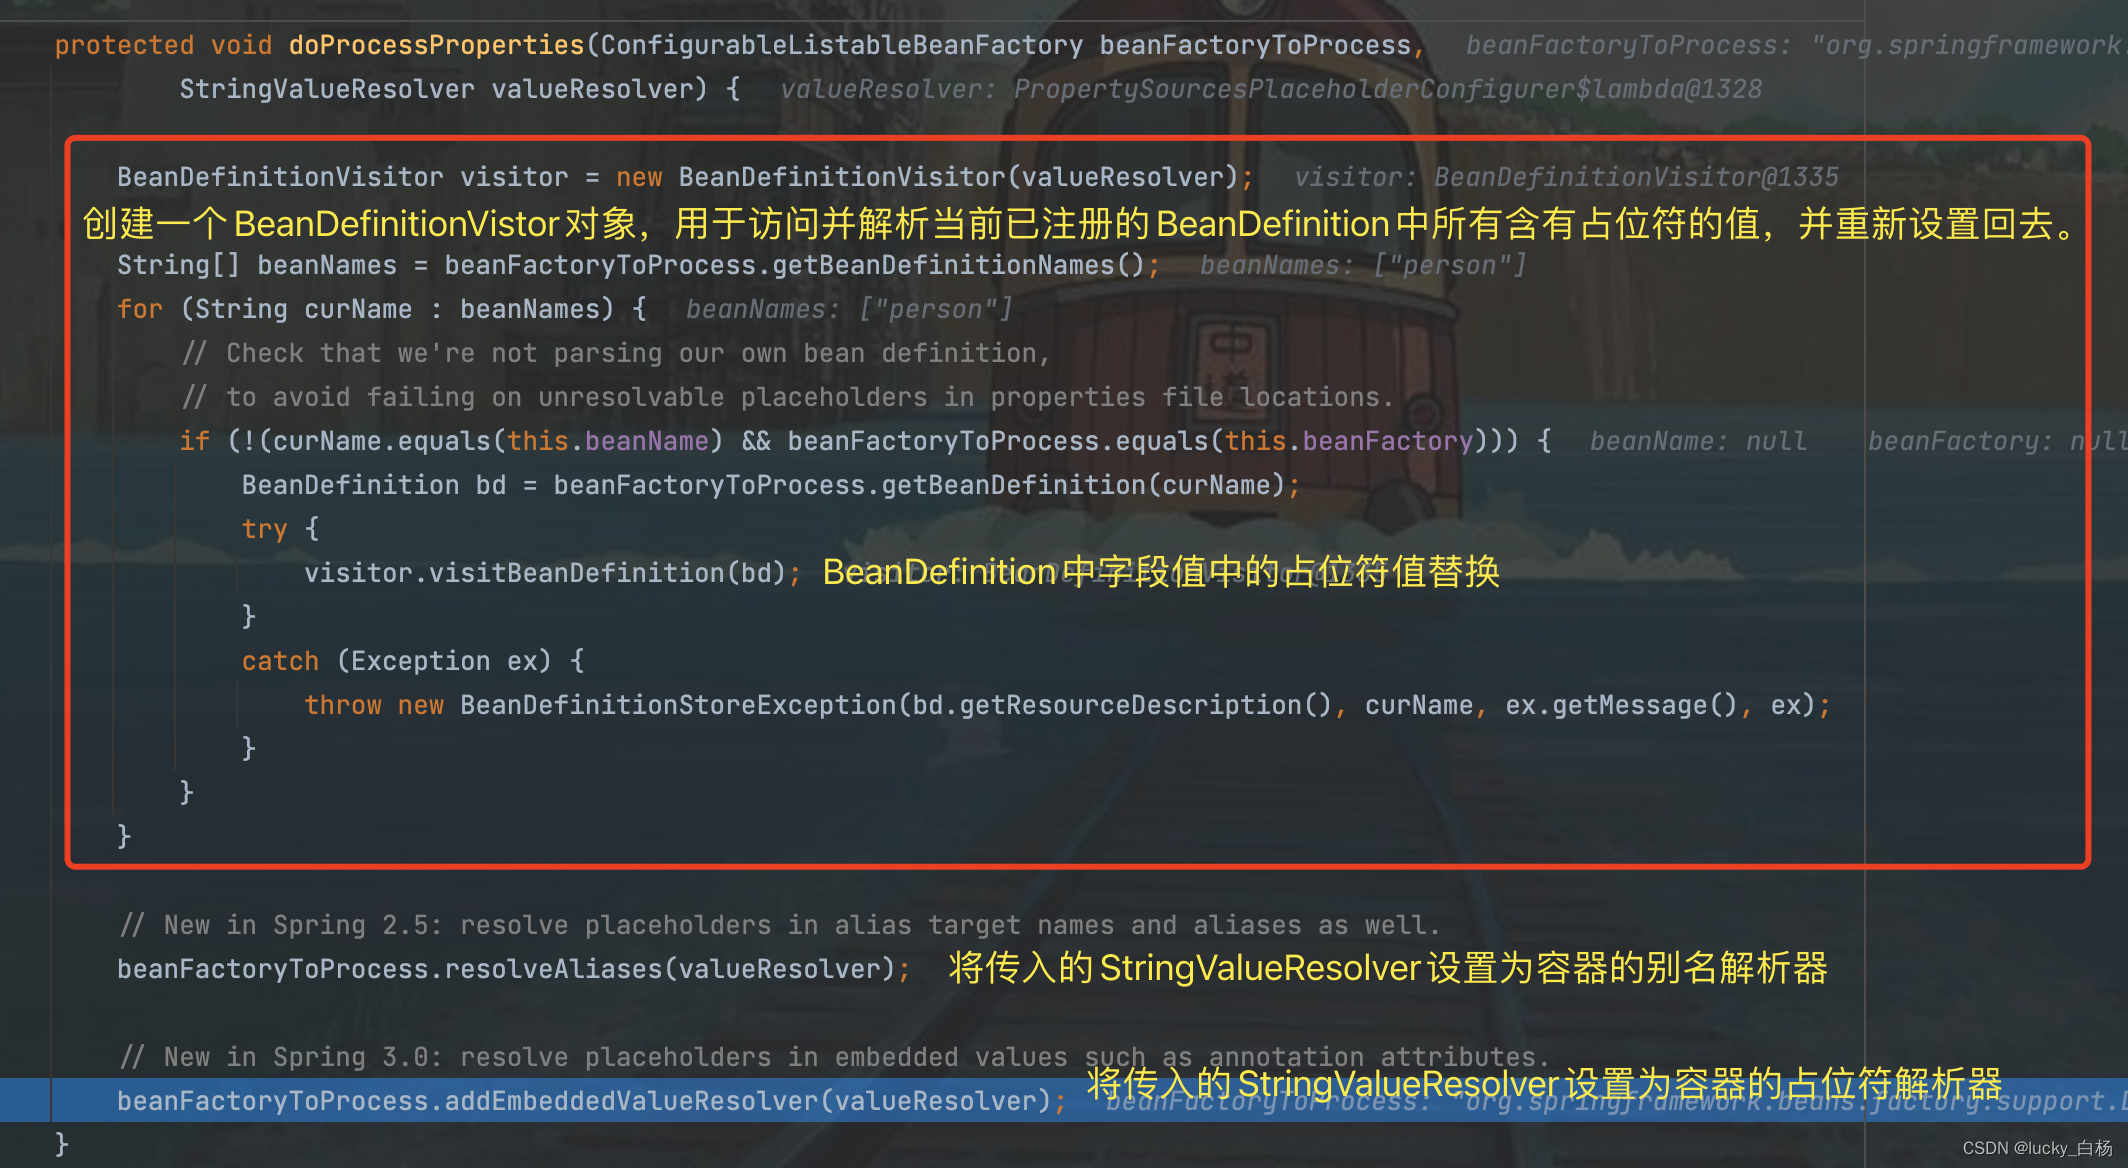
PlaceholderConfigurerSupport#doProcessProperties:
2.2.3 总结
至此,上面PropertySourcesPlaceholderConfigurer的Bean容器后处理流程结束了;其中包含了:
获取当前Enviroment的属性源并设置到当前持有的propertySources属性中;
读取locations指定的属性配置文件并加入到propertySources属性中;
创建PropertySourcesPropertyResolver属性值解析器,并调用BeanFactory的addEmbeddedValueResolver()方法设置值解析器,用于后续的Bean创建过程的属性值解析。
3 对@Value解析流程
3.1 例子
从上文中对PropertySourcesPlaceholderConfigurer在容器后处理的流程,我们知道其主要是对接下来Bean的属性值中出现的占位符的解析工作做准备。所以接下来将对@Value注解处理的核心流程做个讲解。
首先,我们先定义一个Person类,其name属性标注了@Value("${person.name}"),sex属性标注了@Value("${person.sex}"),两个属性将从属性配置文件中获取名为person.name和person.sex的属性值直接注册到Bean中:
package com.baiyang.bean;

import org.springframework.beans.factory.annotation.Value;
import org.springframework.stereotype.Component;


public class Person {
    @Value("${person.name}")
    private String name;
    @Value("${person.sex}")
    private String sex;

    public String getName() {
        return name;
    }

    public void setName(String name) {
        this.name = name;
    }

    public String getSex() {
        return sex;
    }

    public void setSex(String sex) {
        this.sex = sex;
    }

    @Override
    public String toString() {
        return "Person{" +
                "name='" + name + '\'' +
                ", sex='" + sex + '\'' +
                '}';
    }
}
我们的配置文件application.properties:
person.name=baiyang
person.sex=man
然后我们测试代码如下:
import com.baiyang.bean.Person;
import org.springframework.beans.factory.config.BeanDefinition;
import org.springframework.beans.factory.support.BeanDefinitionBuilder;
import org.springframework.context.annotation.AnnotationConfigUtils;
import org.springframework.context.support.GenericApplicationContext;
import org.springframework.context.support.PropertySourcesPlaceholderConfigurer;
import org.springframework.core.io.DefaultResourceLoader;

public class PropertiesTest {

    public static void main(String[] args) {
        //创建一个Bean工厂
        GenericApplicationContext context = new GenericApplicationContext();
        //注册对注解支持的处理器,其中AutowiredAnnotationBeanPostProcessor处理器将对@Autowired和@Value注解进行处理
        AnnotationConfigUtils.registerAnnotationConfigProcessors(context);

        //创建PropertySourcesPlaceholderConfigurer
        PropertySourcesPlaceholderConfigurer propertySourcesPlaceholderConfigurer = new PropertySourcesPlaceholderConfigurer();
        //设置属性文件路径
        propertySourcesPlaceholderConfigurer.setLocation(new DefaultResourceLoader().getResource("classpath:application.properties"));
        //将PropertySourcesPlaceholderConfigurer注册到容器中
        context.addBeanFactoryPostProcessor(propertySourcesPlaceholderConfigurer);

        //注册一个Person的BeanDefinition
        context.registerBeanDefinition("person",
                BeanDefinitionBuilder.genericBeanDefinition(Person.class)
                        .setScope(BeanDefinition.SCOPE_SINGLETON)
                        .getBeanDefinition()
        );
        //刷新容器
        context.refresh();
        //从容器中获取person,并输出
        System.out.println(context.getBean(Person.class));
    }
}
运行后,可到结果: Person{name='baiyang', sex='man’}
3.2 深入源码流程
3.2.1 前言
首先提一下,AutowiredAnnotationBeanPostProcessor是一个Bean后处理器,将对@Autowired和@Value注解进行解析处理。
由于篇幅和不过多的影响主题内容,对源码的流程将只关注核心流程,流程中非关键代码将忽略。
3.2.2 AutowiredAnnotationBeanPostProcessor的继承关系
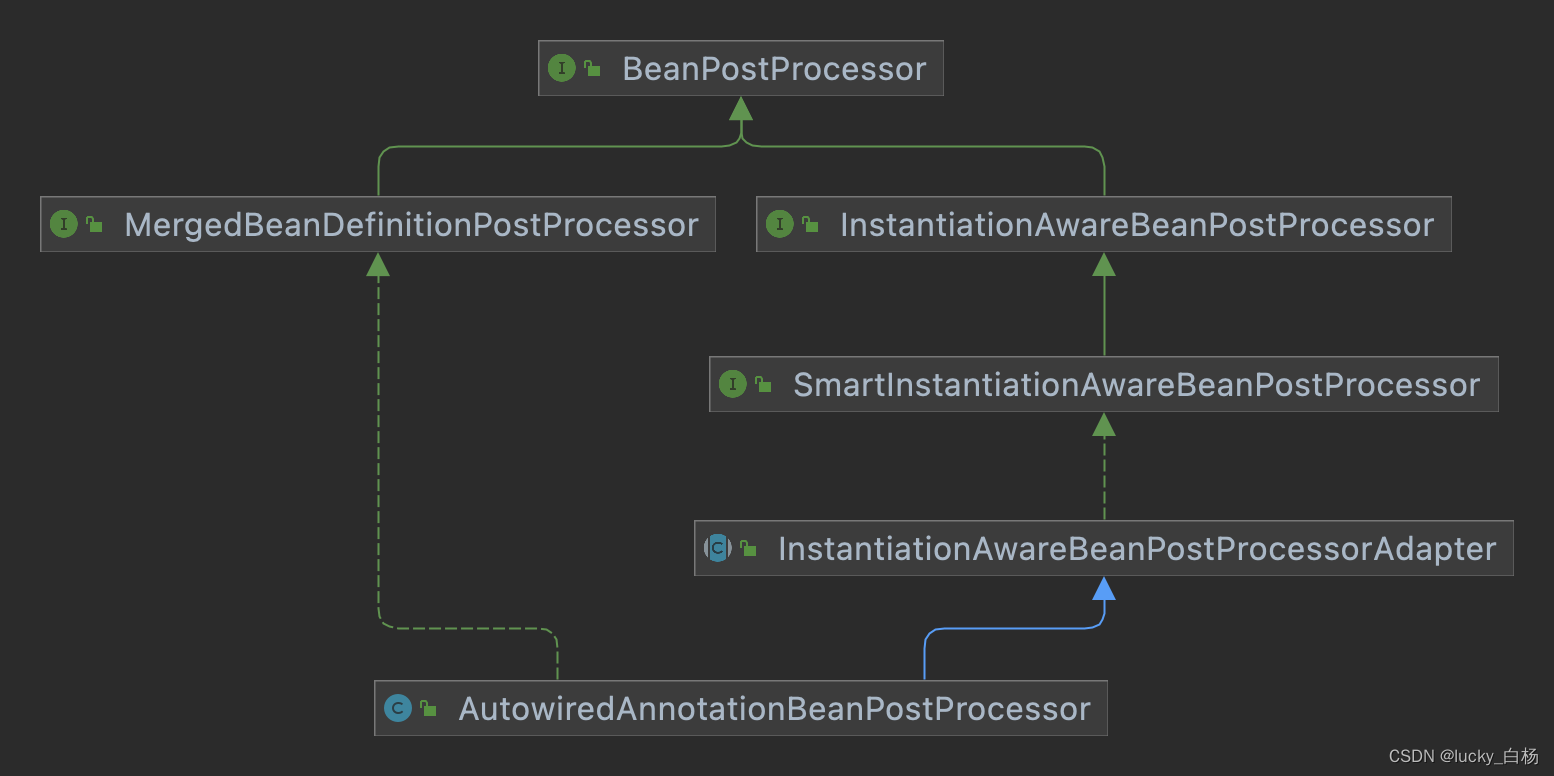
从上面的继承关系可以看出,AutowiredAnnotationBeanPostProcessor是一个BeanPostProcessor实现类,并实现了MergedBeanDefinitionPostProcessor和SmartInstantiationAwareBeanPostProcessor接口。
对MergedBeanDefinitionPostProcessor的介绍可以看《Spring之容器后处理器BeanFactoryPostProcessor/BeanDefinitionRegistryPostProcessor示例与源码分析》;
对InstantiationAwareBeanPostProcessor的介绍可以看《Spring之Bean后处理器——InstantiationAwareBeanPostProcessor的使用与源码解析》;
3.2.3 前期容器启动
首先,从上面的测试代码中,通过AnnotationConfigUtils.registerAnnotationConfigProcessors(context);向上下文中注册了对注解支持的处理器,其中包含了AutowiredAnnotationBeanPostProcessor。
然后我们通过context.addBeanFactoryPostProcessor(propertySourcesPlaceholderConfigurer);添加了PropertySourcesPlaceholderConfigurer用来对占位符的解析。
最后调用refresh()刷新当前上下文。
所以我们先看refresh(),由于PropertySourcesPlaceholderConfigurer的准备过程在上文就已经描述过了,这里就不做介绍了,直接关注到AutowiredAnnotationBeanPostProcessor后处理器的处理流程中:
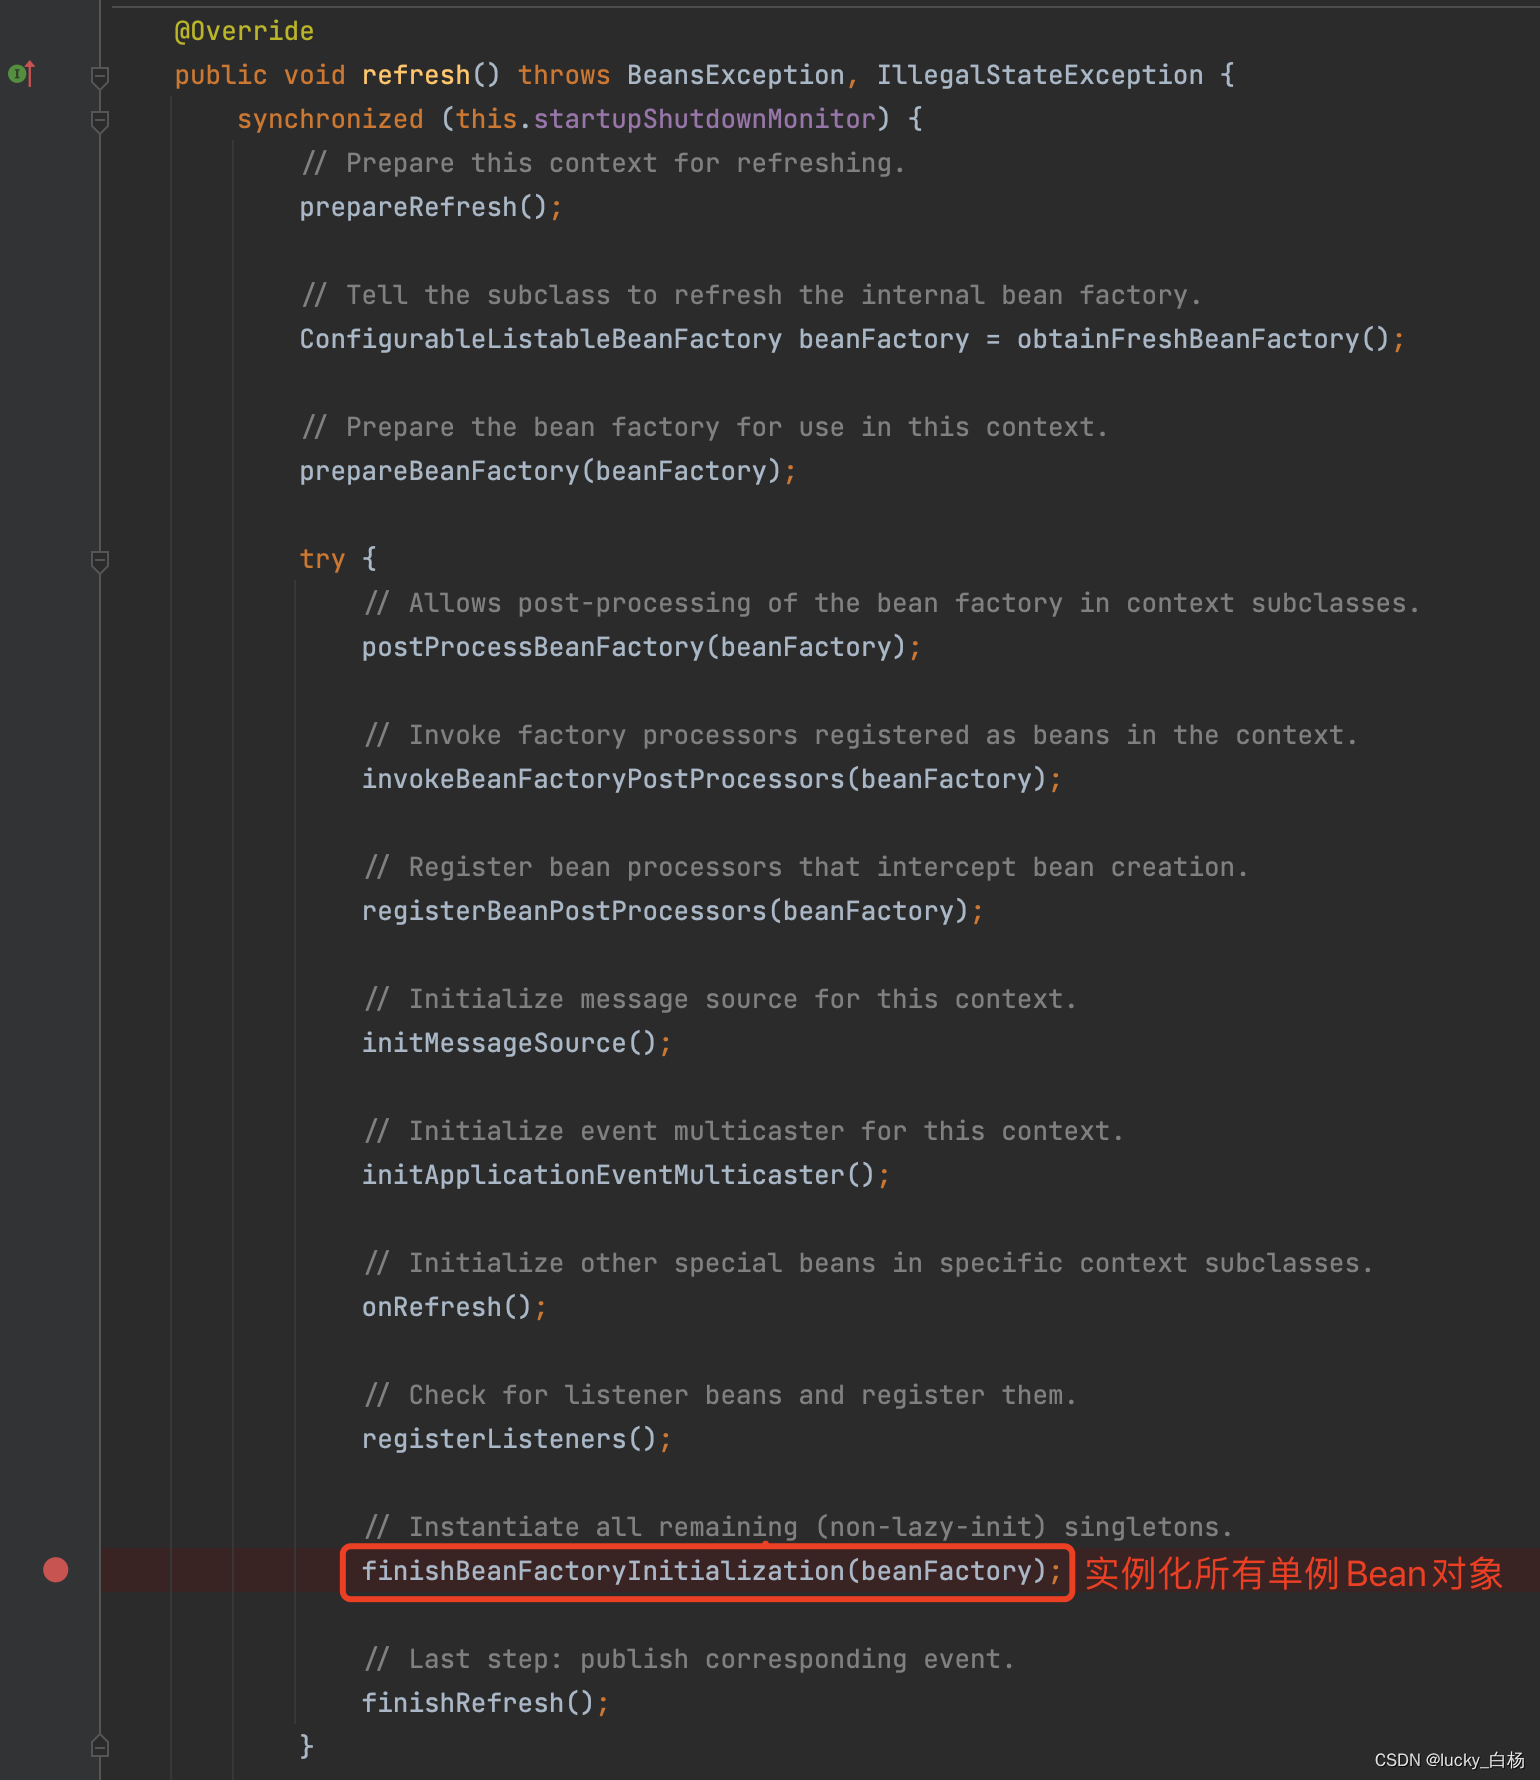
然后调用AbstractApplicationContext所持有的实际BeanFactory(DefaultListableBeanFactory)句柄的preInstantiateSingletons()做Bean容器的初始化工作。
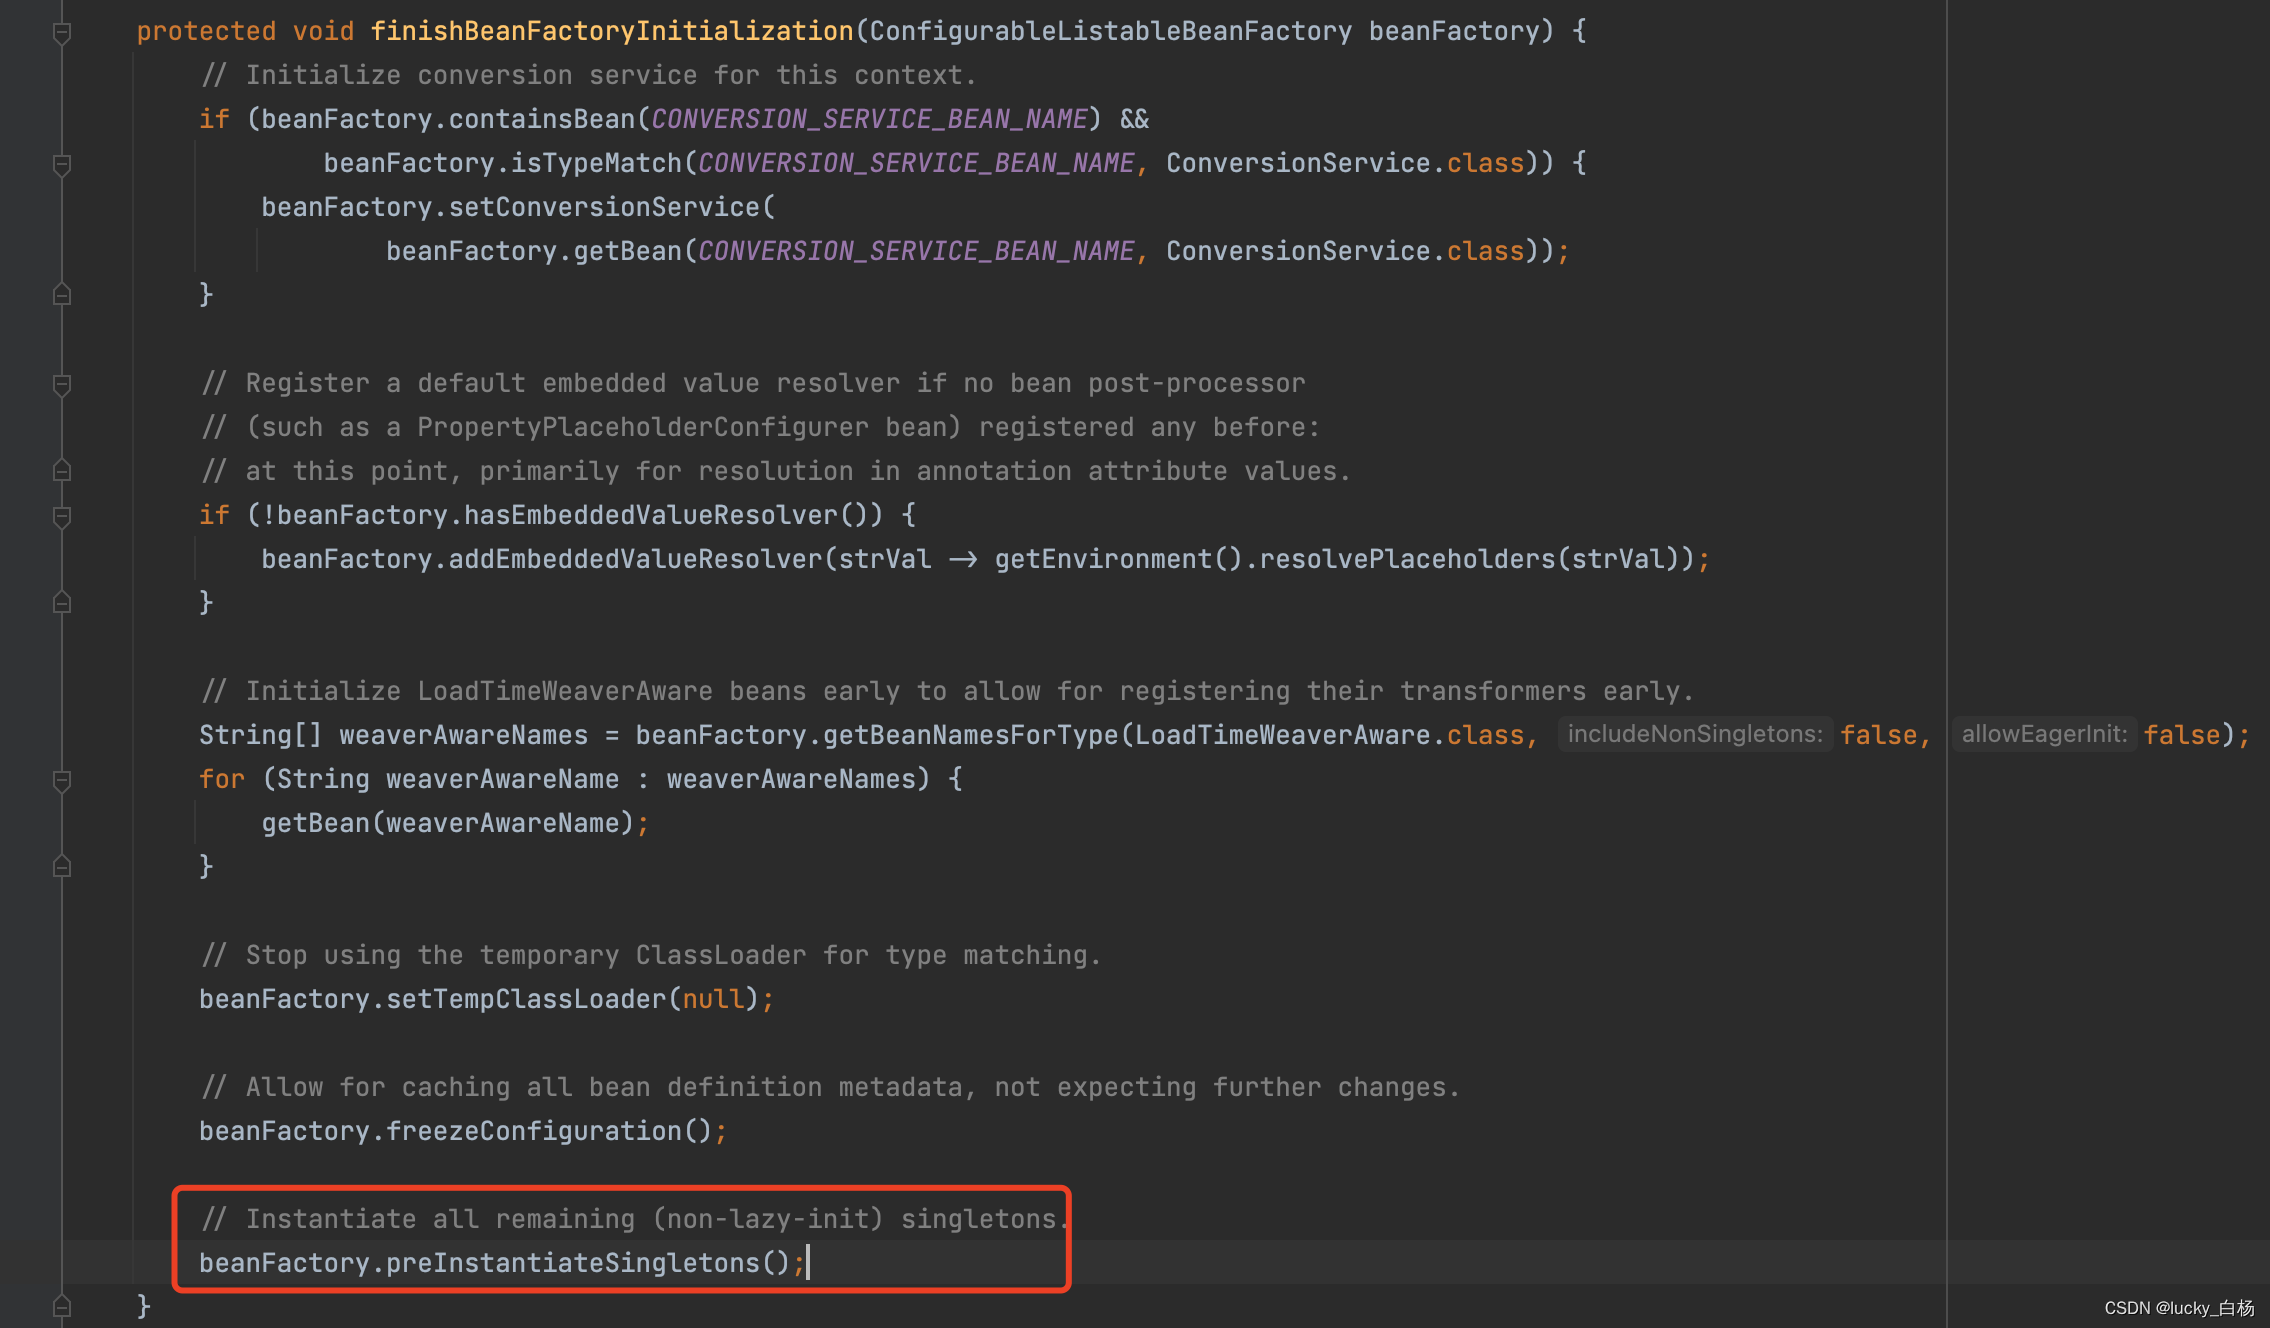
DefaultListableBeanFactory#preInstantiateSingletons:
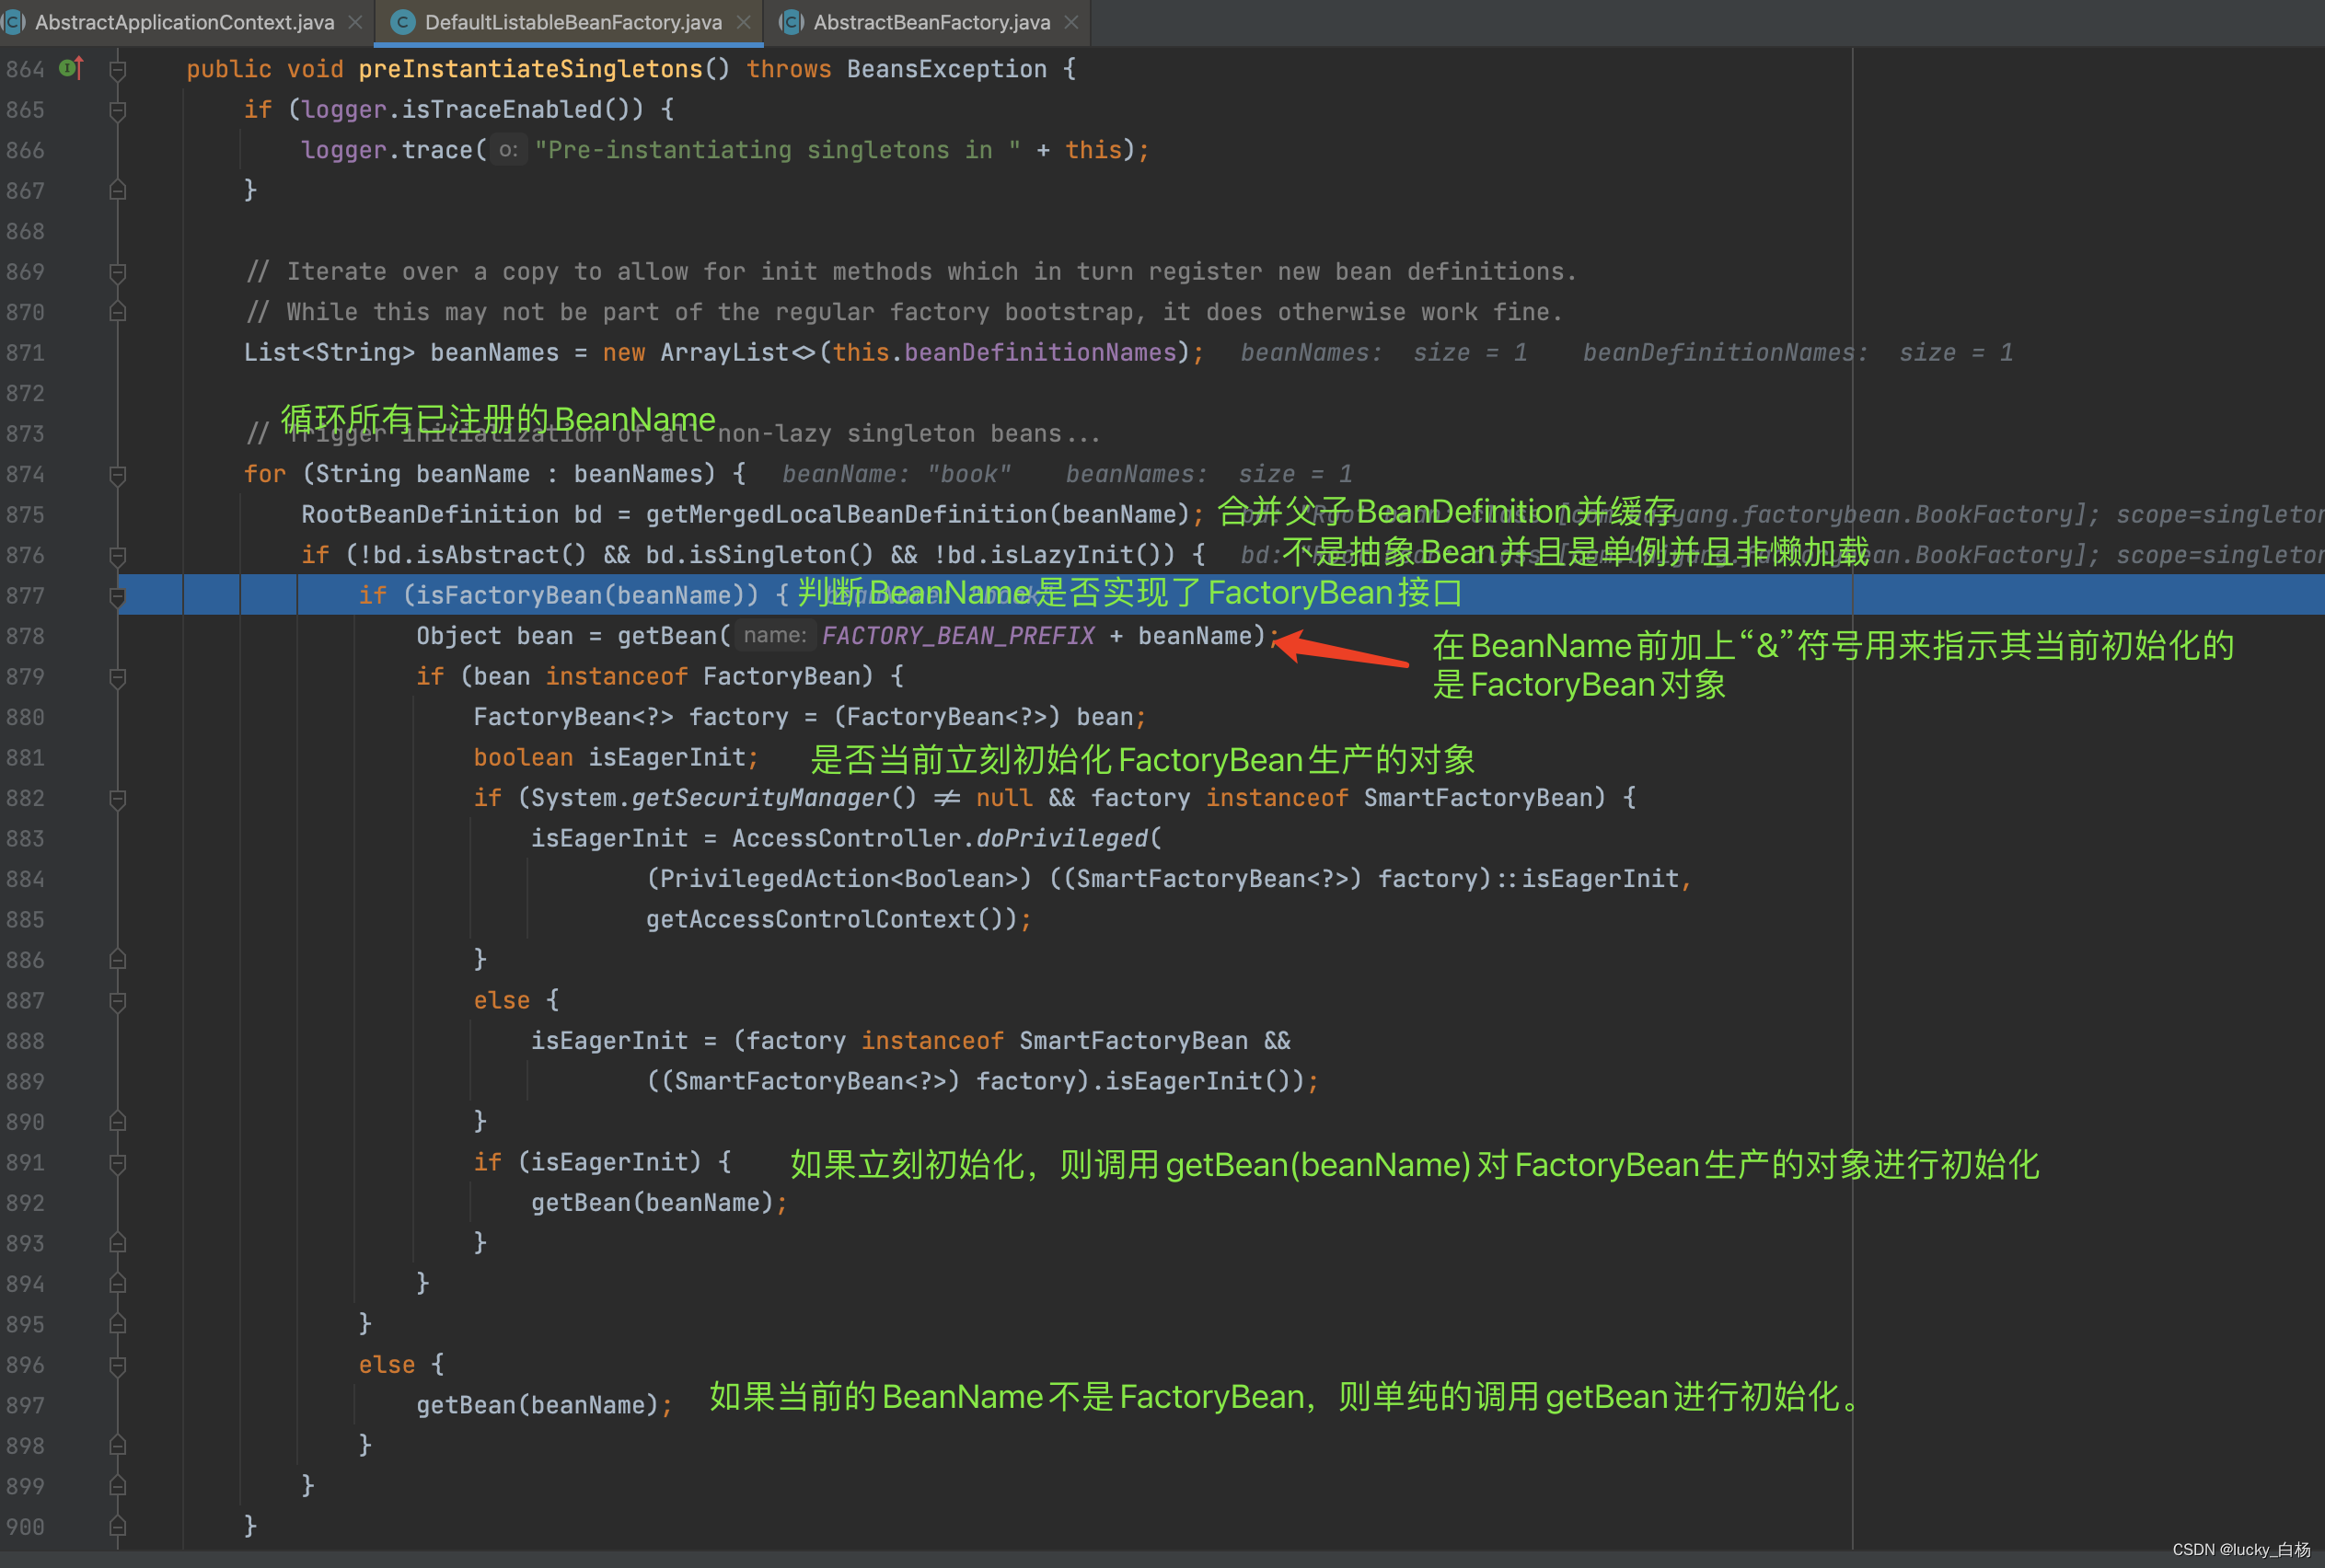
在上面循环遍历beanNames的过程中,我们直接关注beanName为person的加载流程:
进入getBean()方法,由于我们是新创建bean,所以流程将会是getBean()->doGetBean()->createBean()->doCreateBean()的流程,咱们一路DEBUG到doCreateBean():
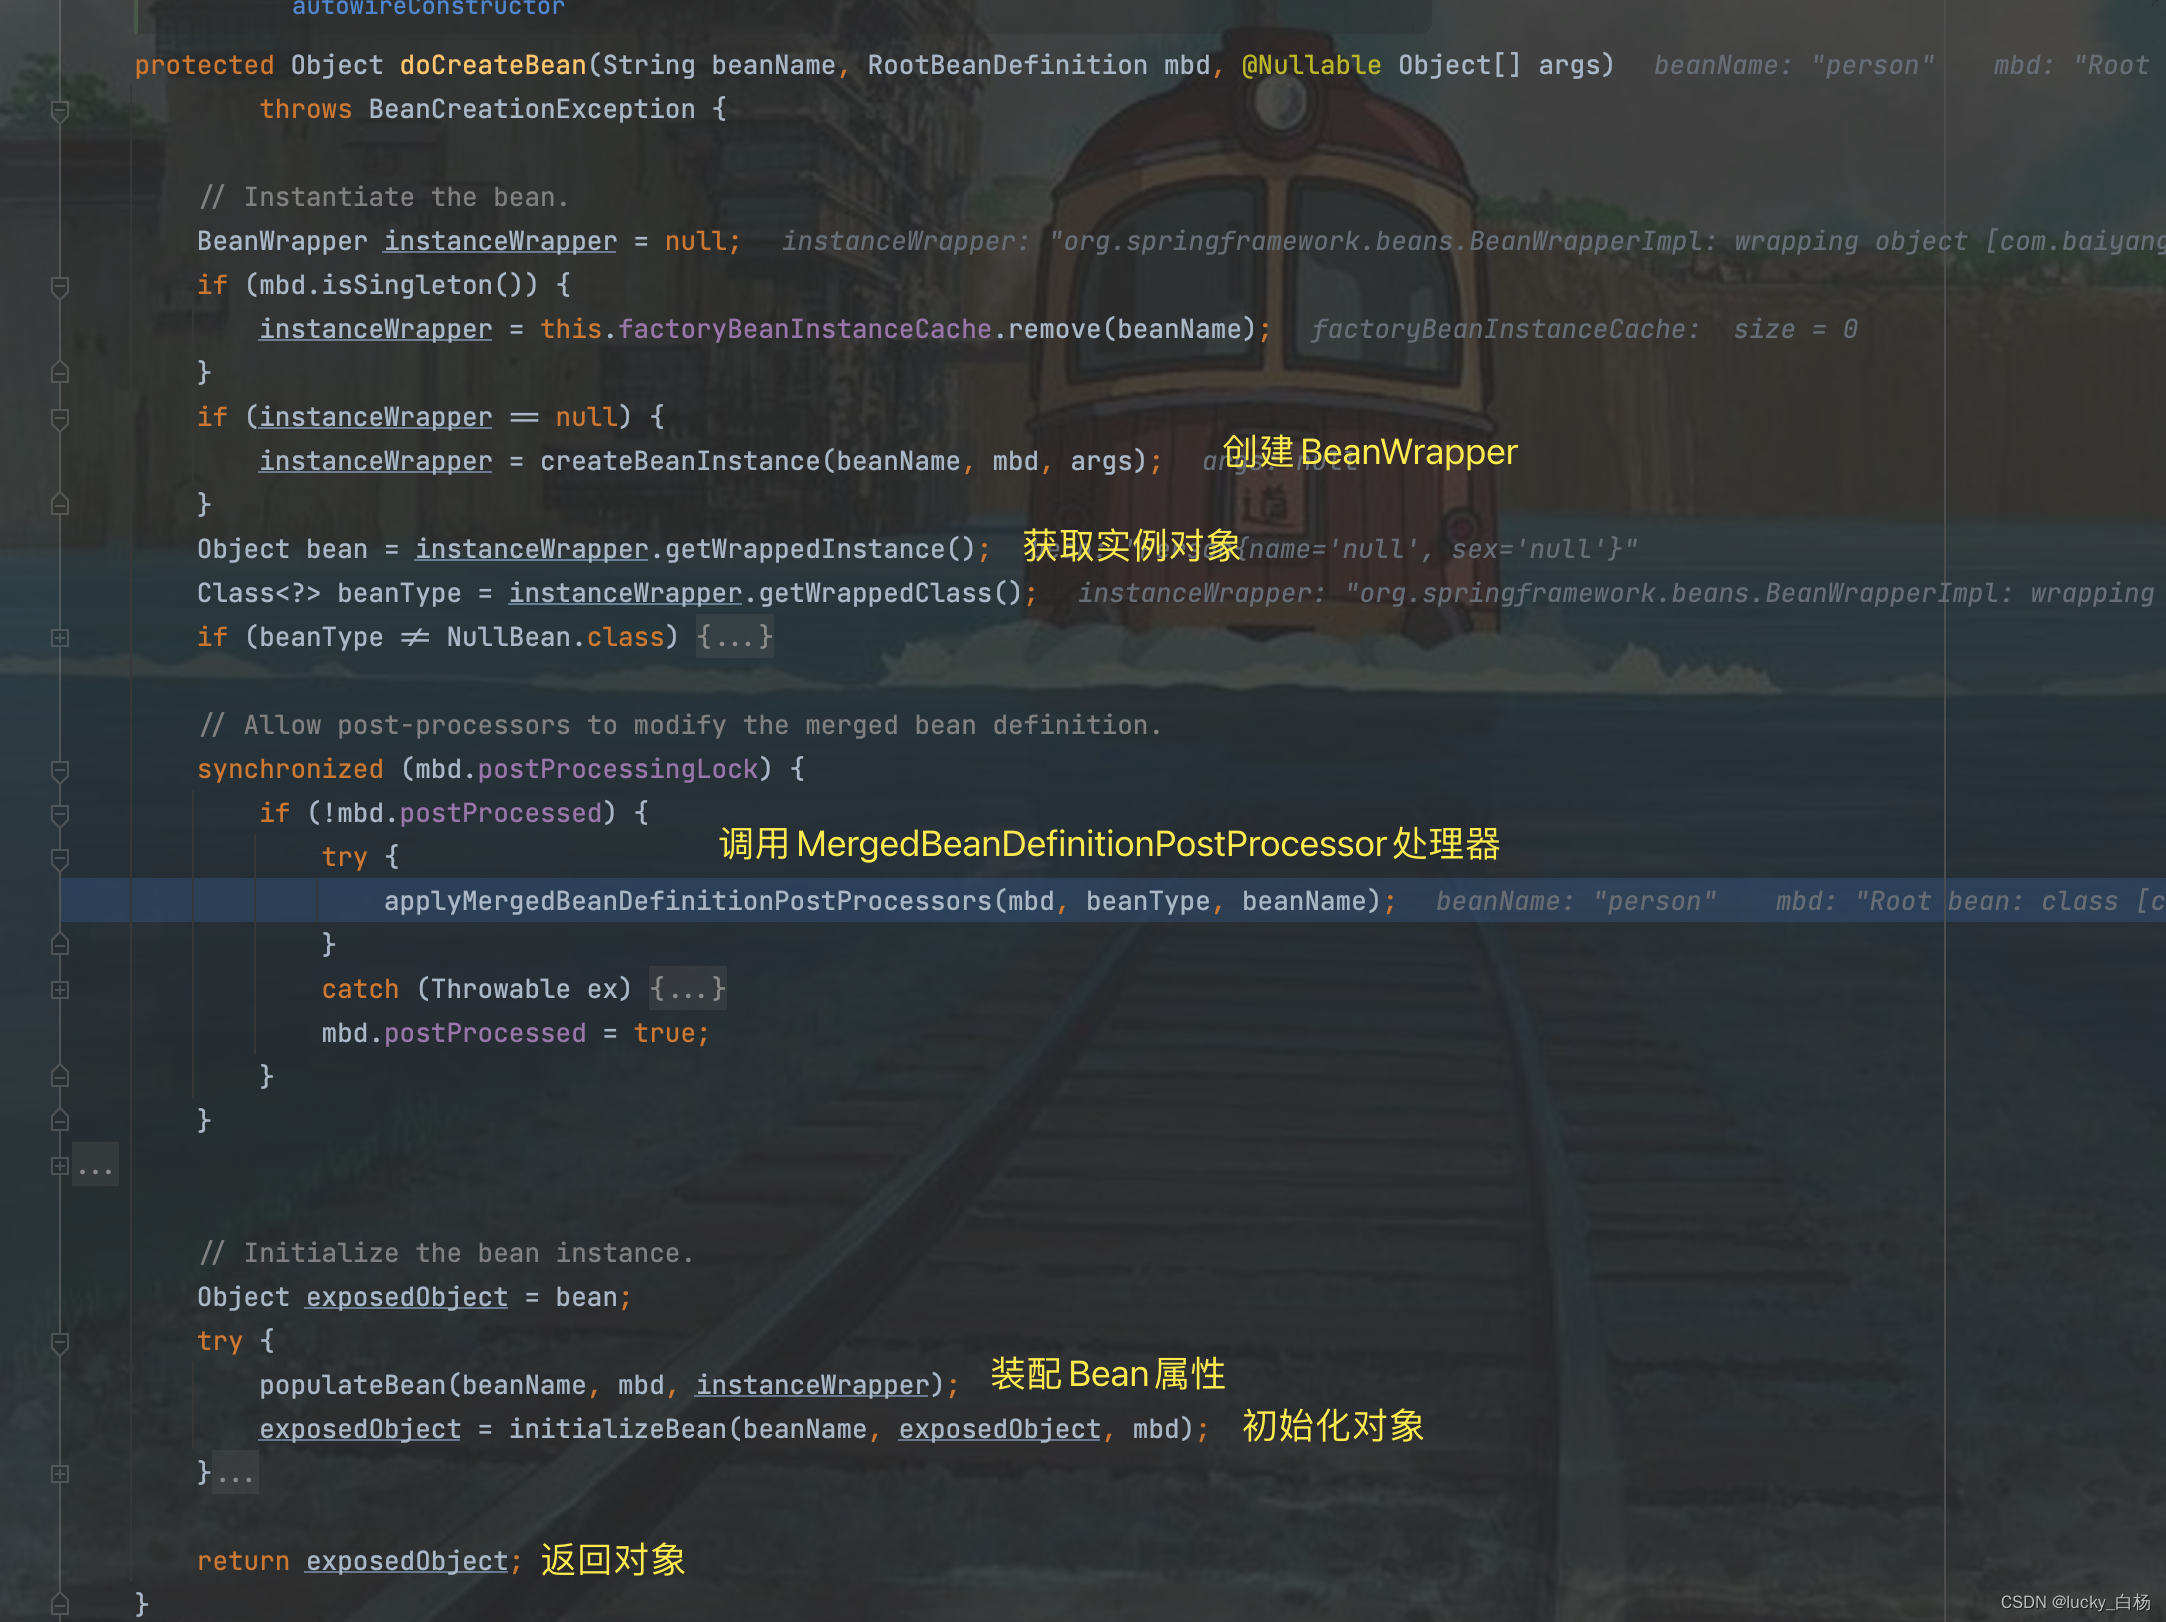
3.2.4 重点执行AutowiredAnnotationBeanPostProcessor
由于AutowiredAnnotationBeanPostProcessor实现了MergedBeanDefinitionPostProcessor接口,所以我们进入到applyMergedBeanDefinitionPostProcessors(mbd, beanType, beanName);这行代码中:

在applyMergedBeanDefinitionPostProcessors()方法中将调用AutowiredAnnotationBeanPostProcessor#postProcessMergedBeanDefinition()方法:

findAutoWiringMetadata()方法内部解析beanType并生成InjectionMetadata对象返回:
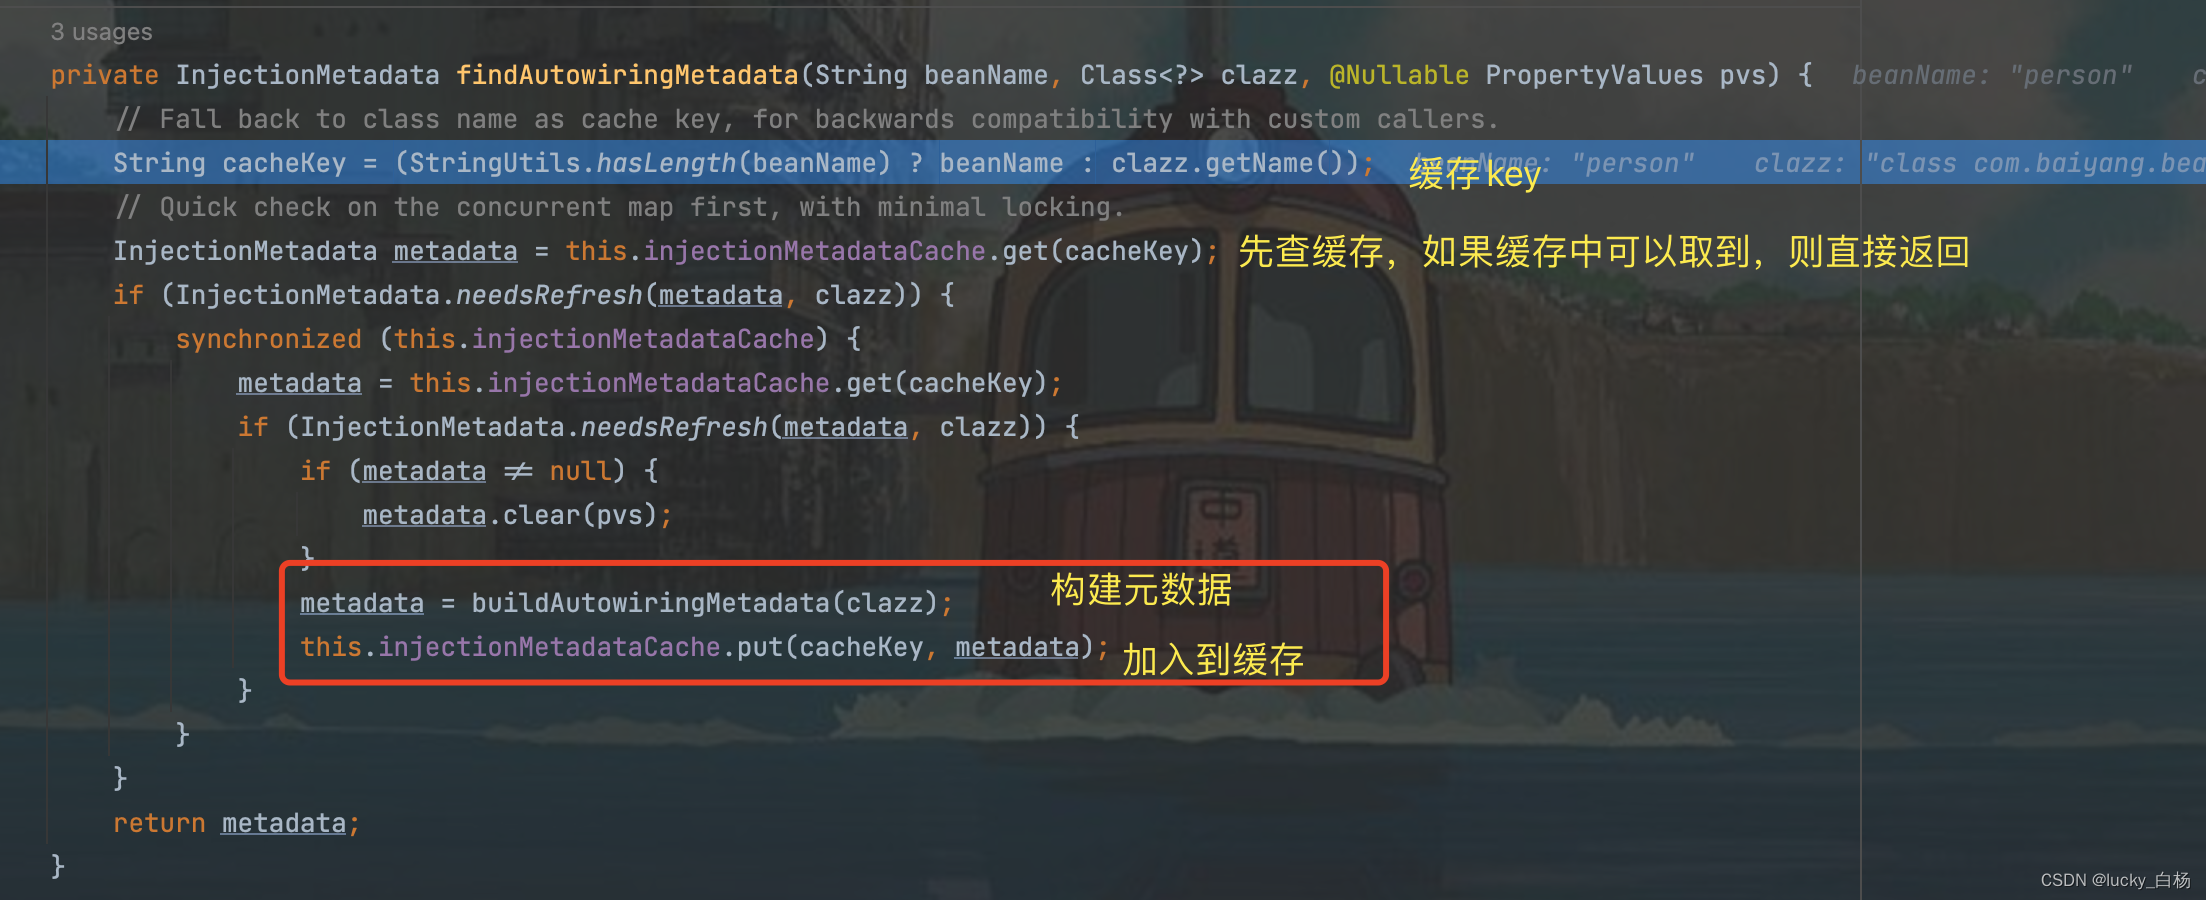
buildAutowiringMetadata(clazz);是真正构建元数据的方法:
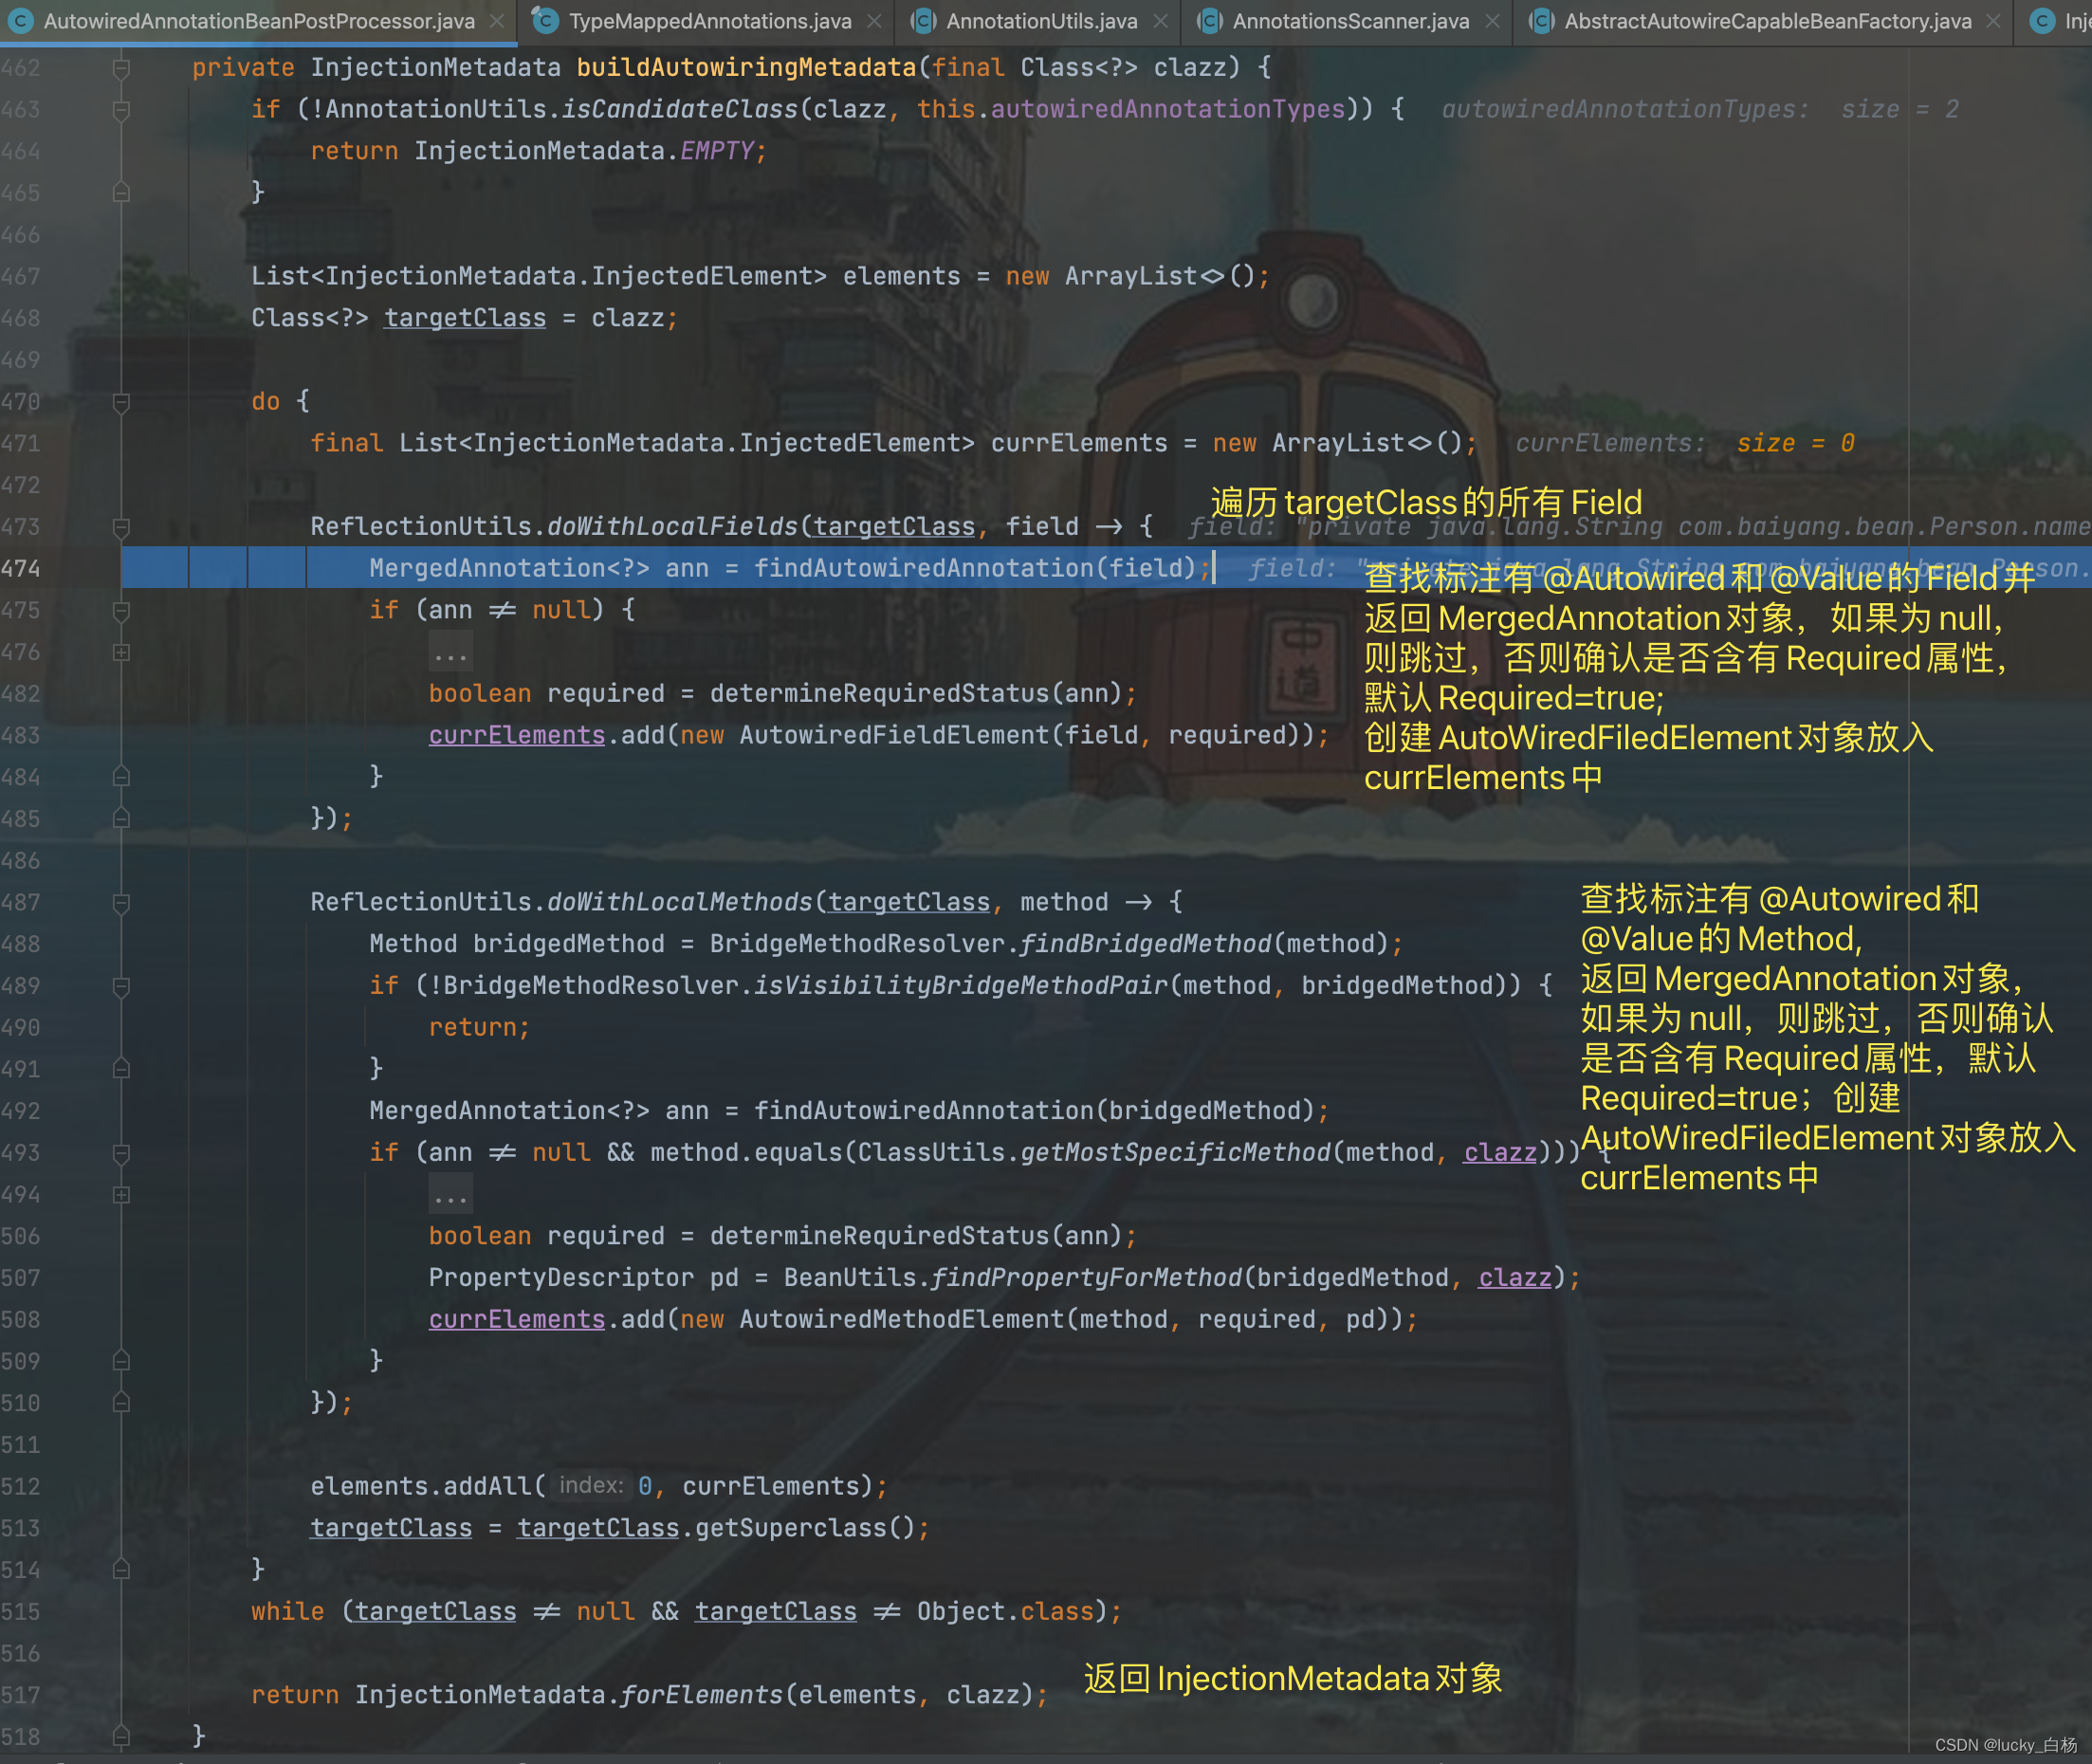
上面代码中通过ReflectionUtils.doWithLocalFields()和ReflectionUtils.doWithLocalMethods()方法来扫描获取标注了@Autowired和@Value的属性和方法并生成元数据返回。
返回元数据之后,会将元数据缓存起来,在后续调用findAutoWiringMetadata()方法,则可以直接从缓存中获取。
至此,AutowiredAnnotationBeanPostProcessor#postProcessMergedBeanDefinition()方法已经执行完毕,其中主要是查找当前Bean类型中所有标注了@Autowired和@Value的属性和方法生成InjectionMetadata元数据对象并缓存起来。
然后进入到属性装配流程:
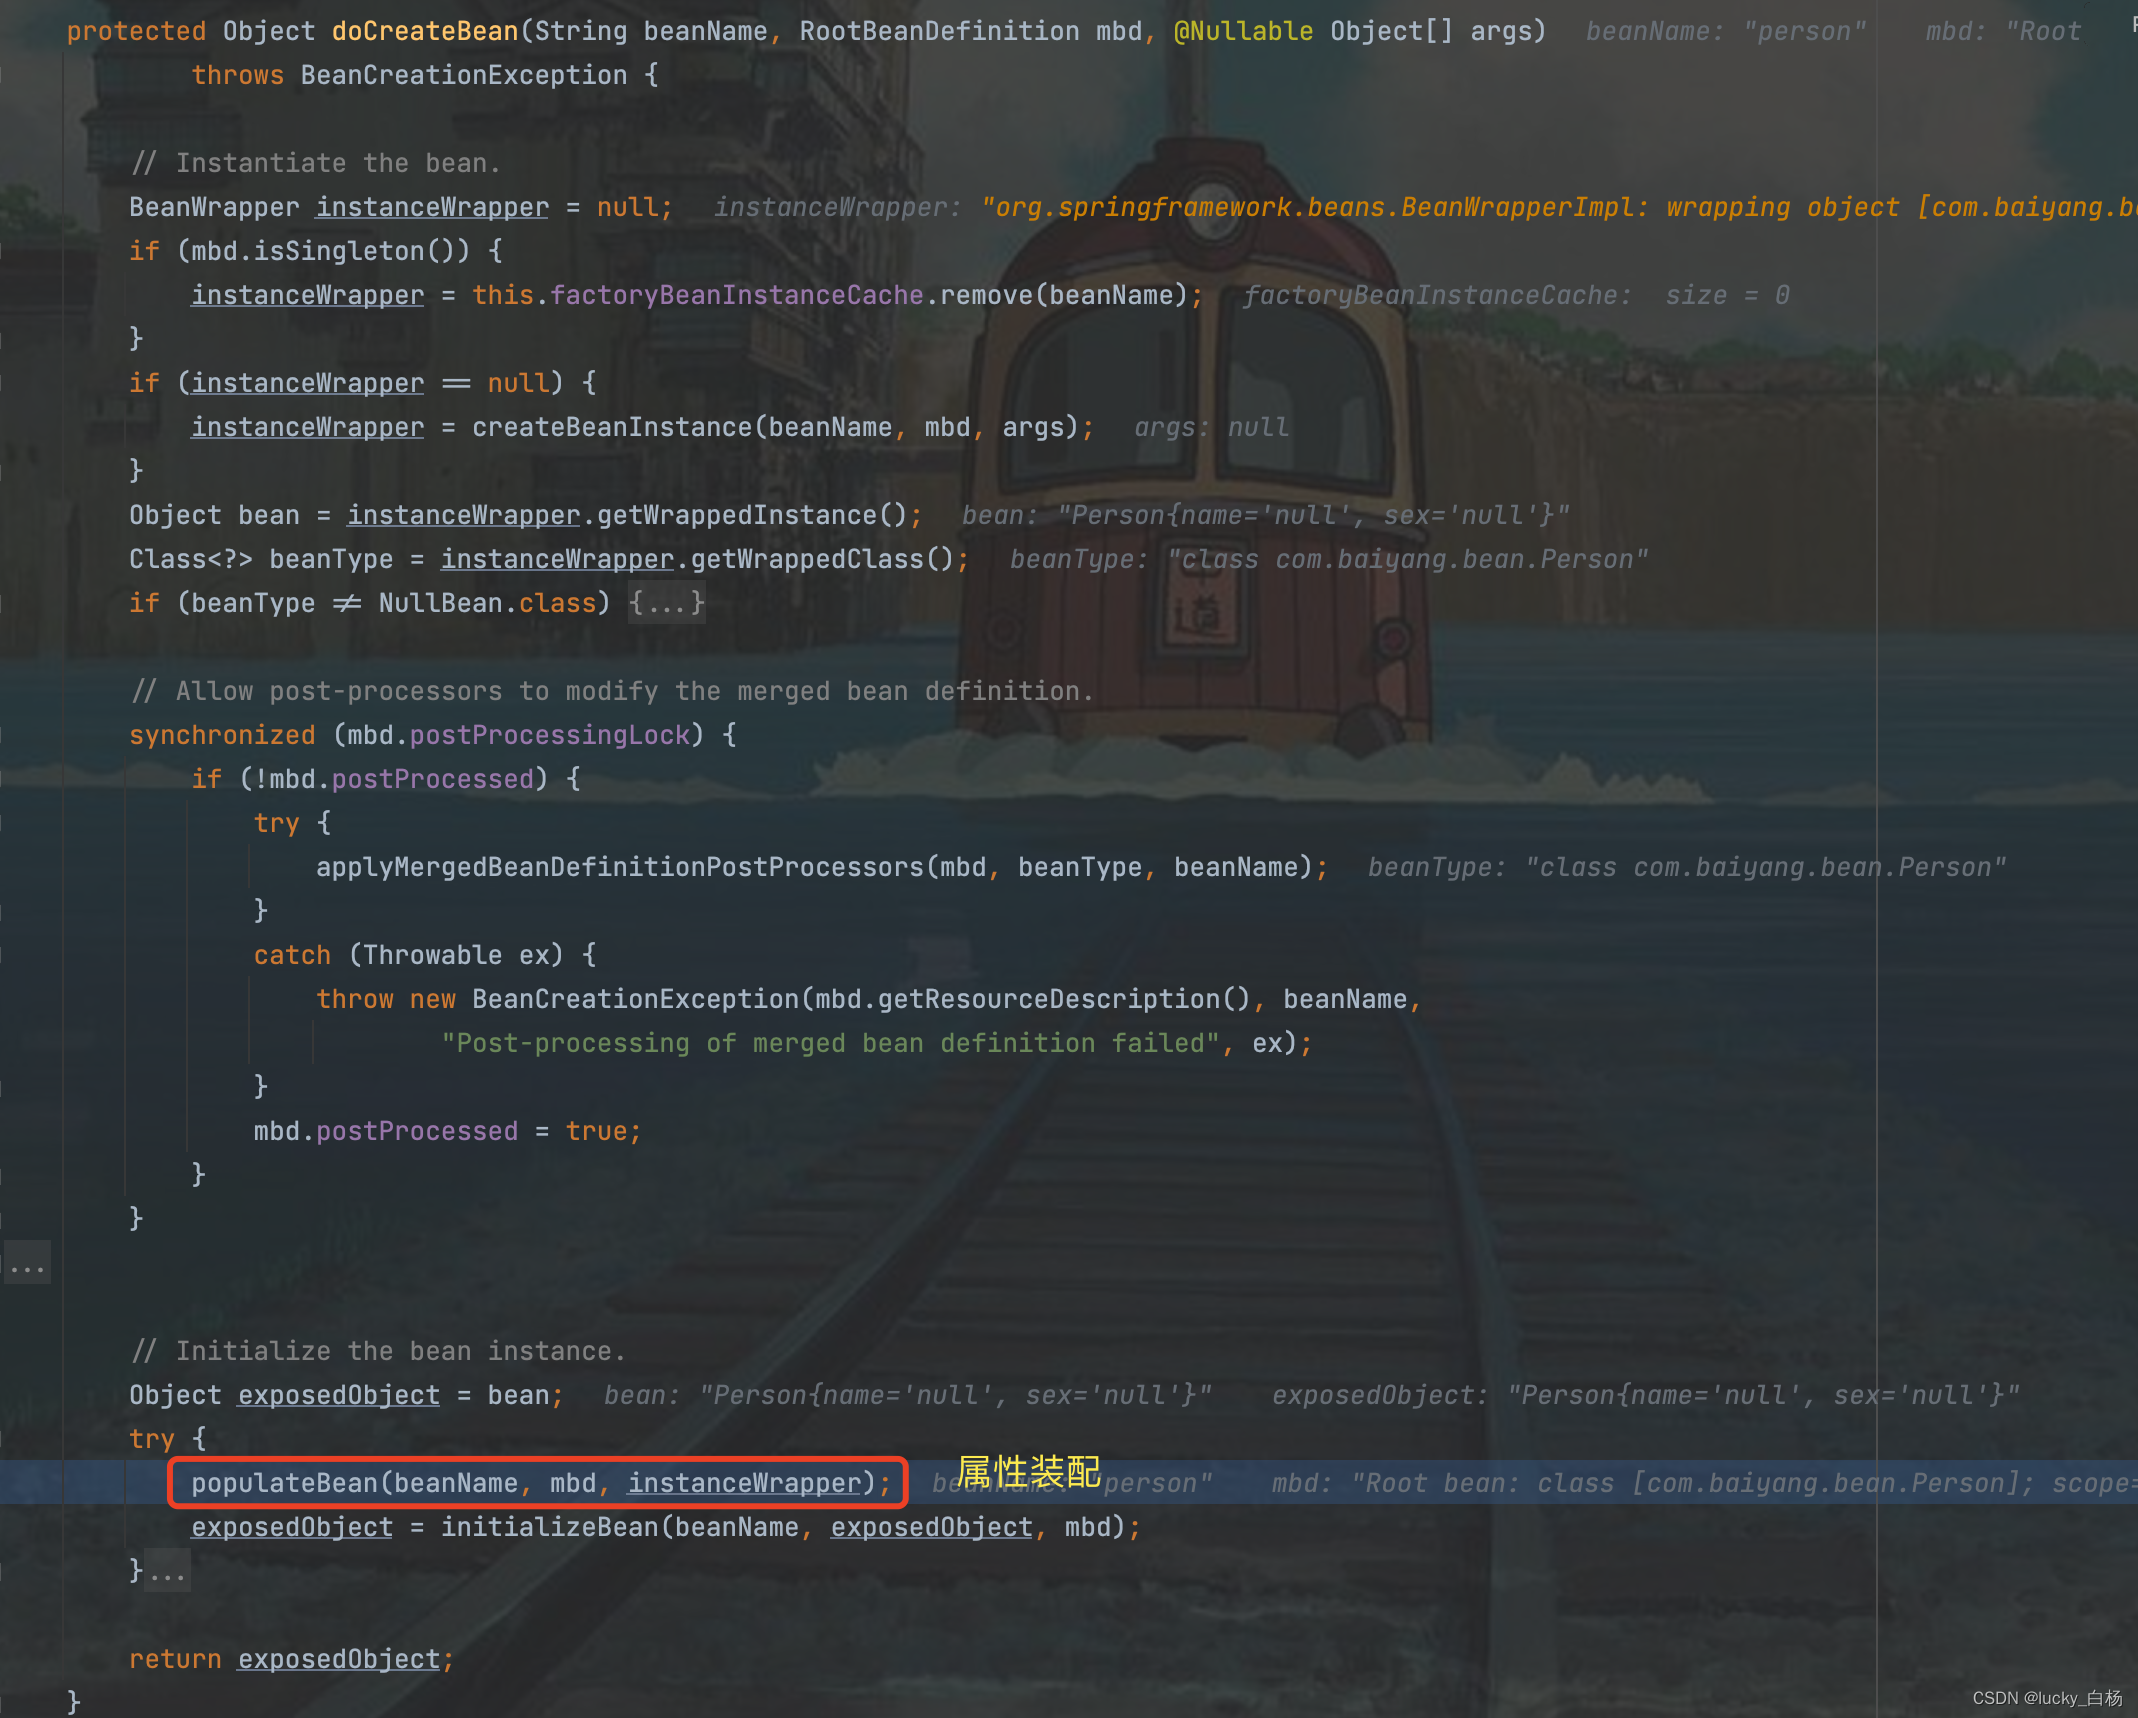
org.springframework.beans.factory.support.AbstractAutowireCapableBeanFactory#populateBean:
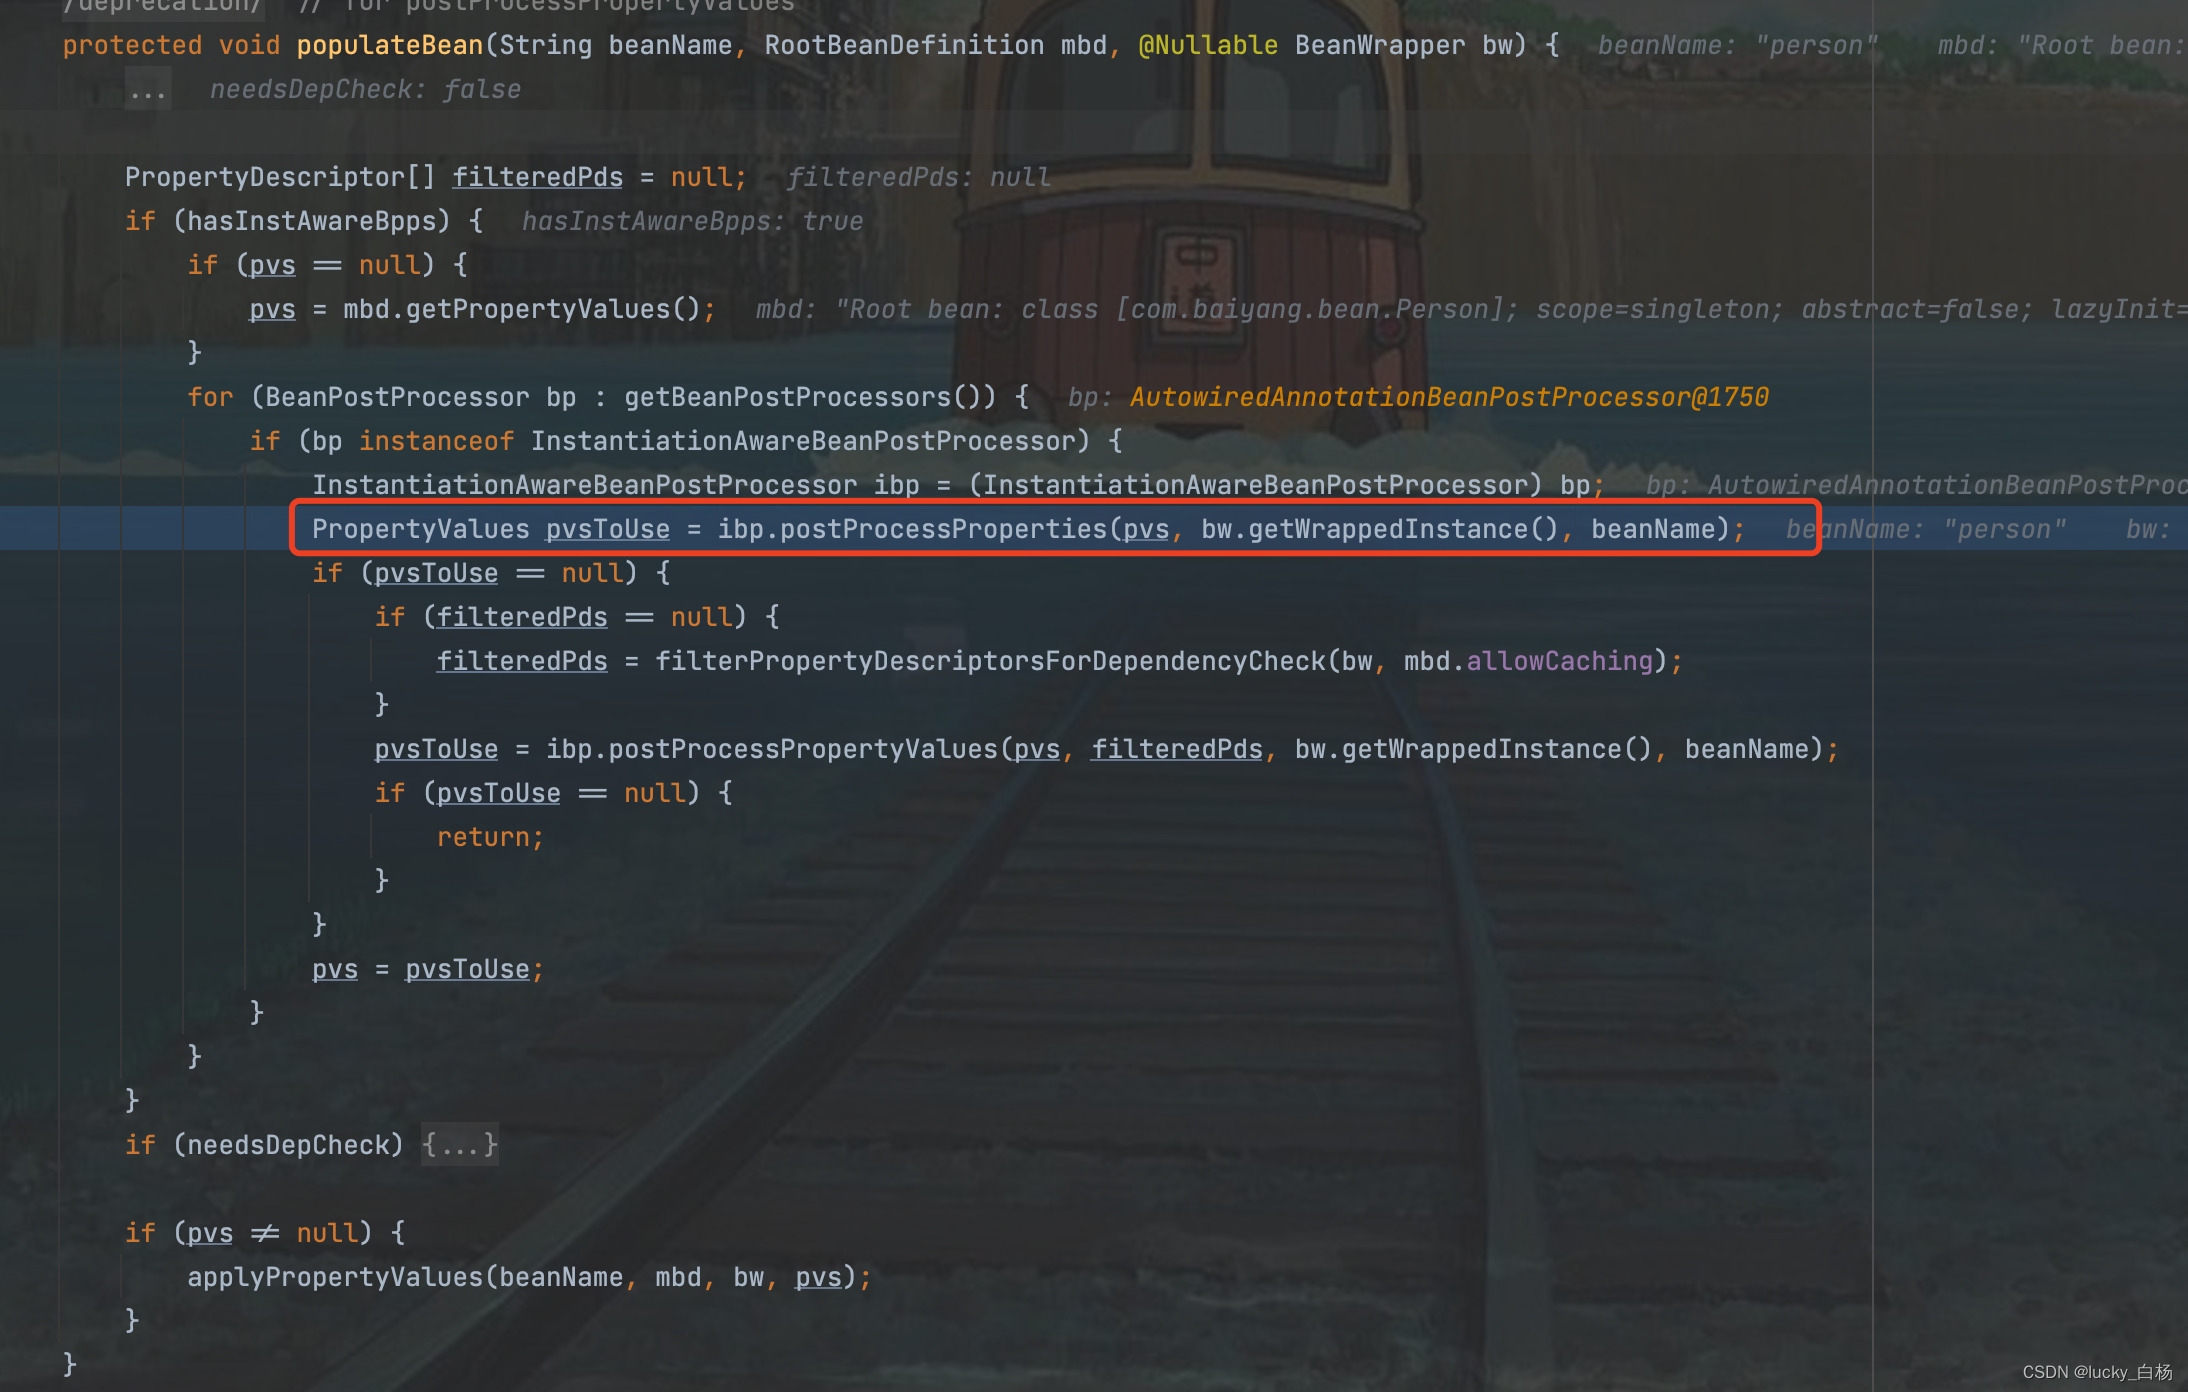
上面的代码将调用AutowiredAnnotationBeanPostProcessor#postProcessProperties()方法:

上面的findAutowiringMetadata()在前面的postProcessMergedBeanDefinition()方法已经调用过了,所以直接从缓存中取出InjectionMetadata对象,然后调用metadata.inject(bean, beanName, pvs);来对属性进行解析并注入:

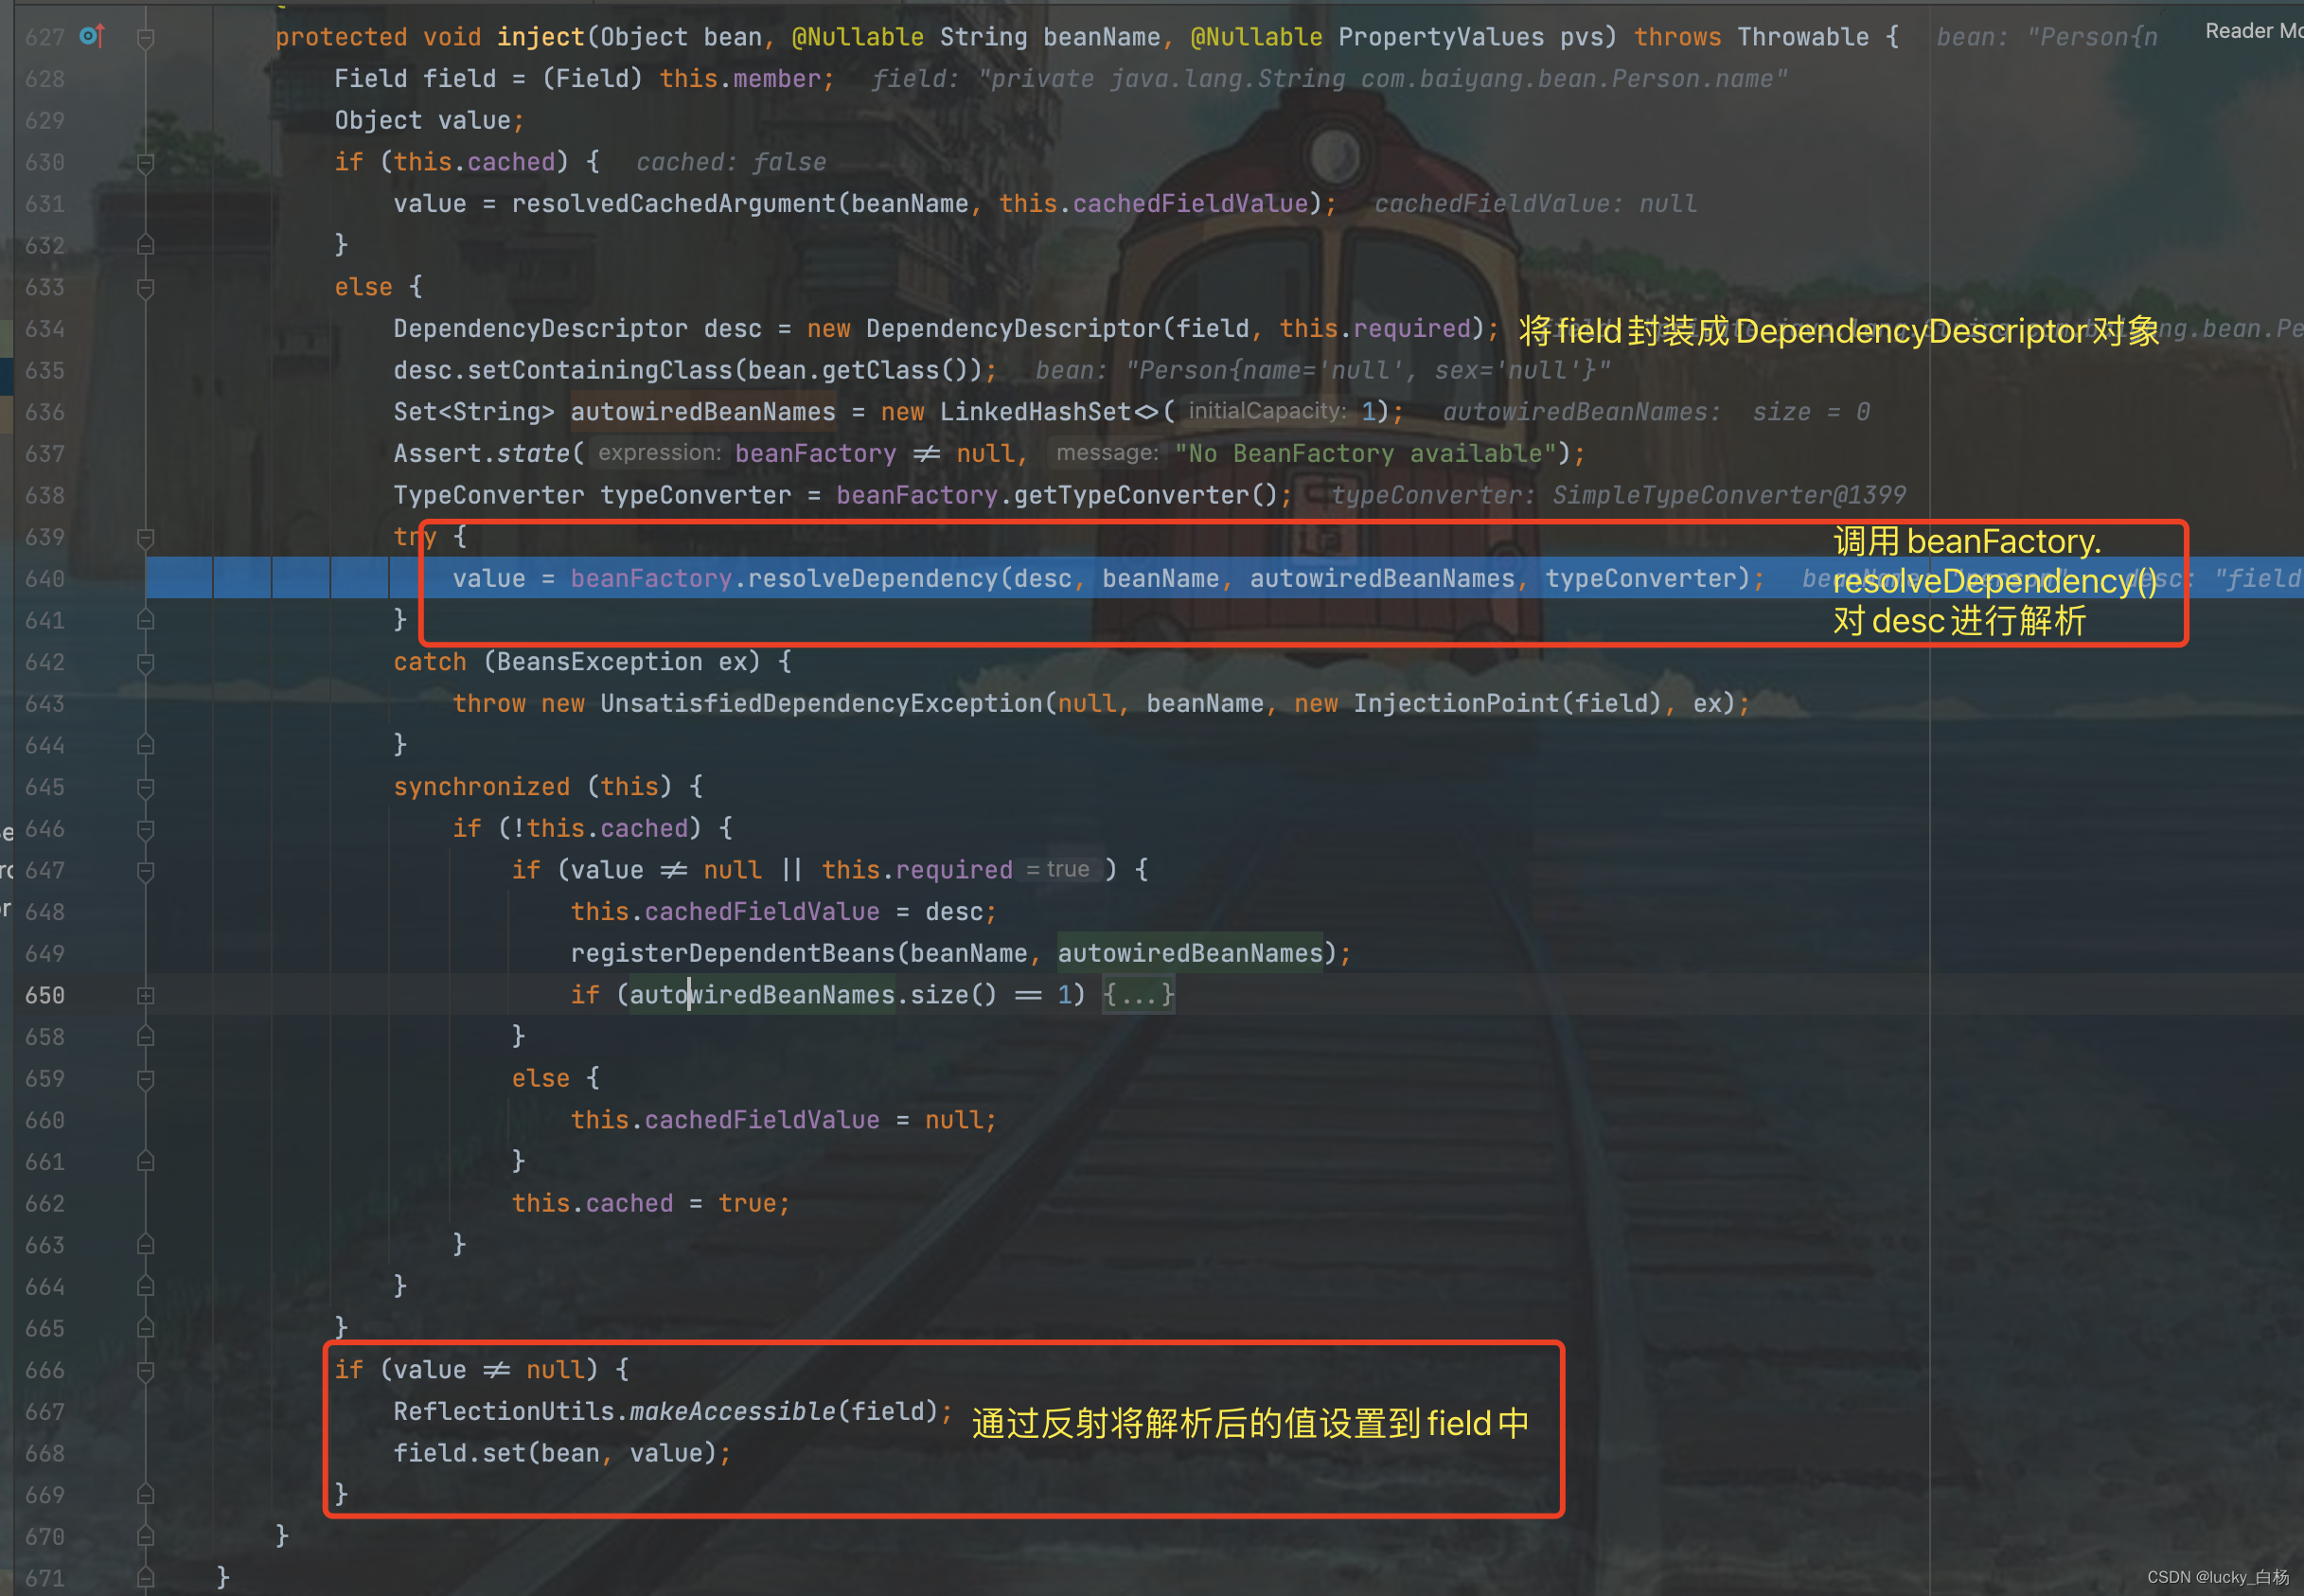
从上面可以看出,调用了beanFactory.resolveDependency()对依赖进行了解析之后,会将解析之后的值通过反射,设置到Field中,所以从这里也可以看出,通过@Autowired和@Value标注的属性,可以不需要set方法,但如果看了BeanWarpperImpl的代码,可以发现其使用的是是Method的反射注入,所以需要set方法才行。
我们前面的"2.1 直奔主题:Spring读取属性文件并解析其值的极简单测试代码"可以知道,如果要解析占位符,那么需要调用beanFactory.resolveEmbeddedValue()方法,所以我们看下beanFactory.resolveDepenency()中是如何做的:
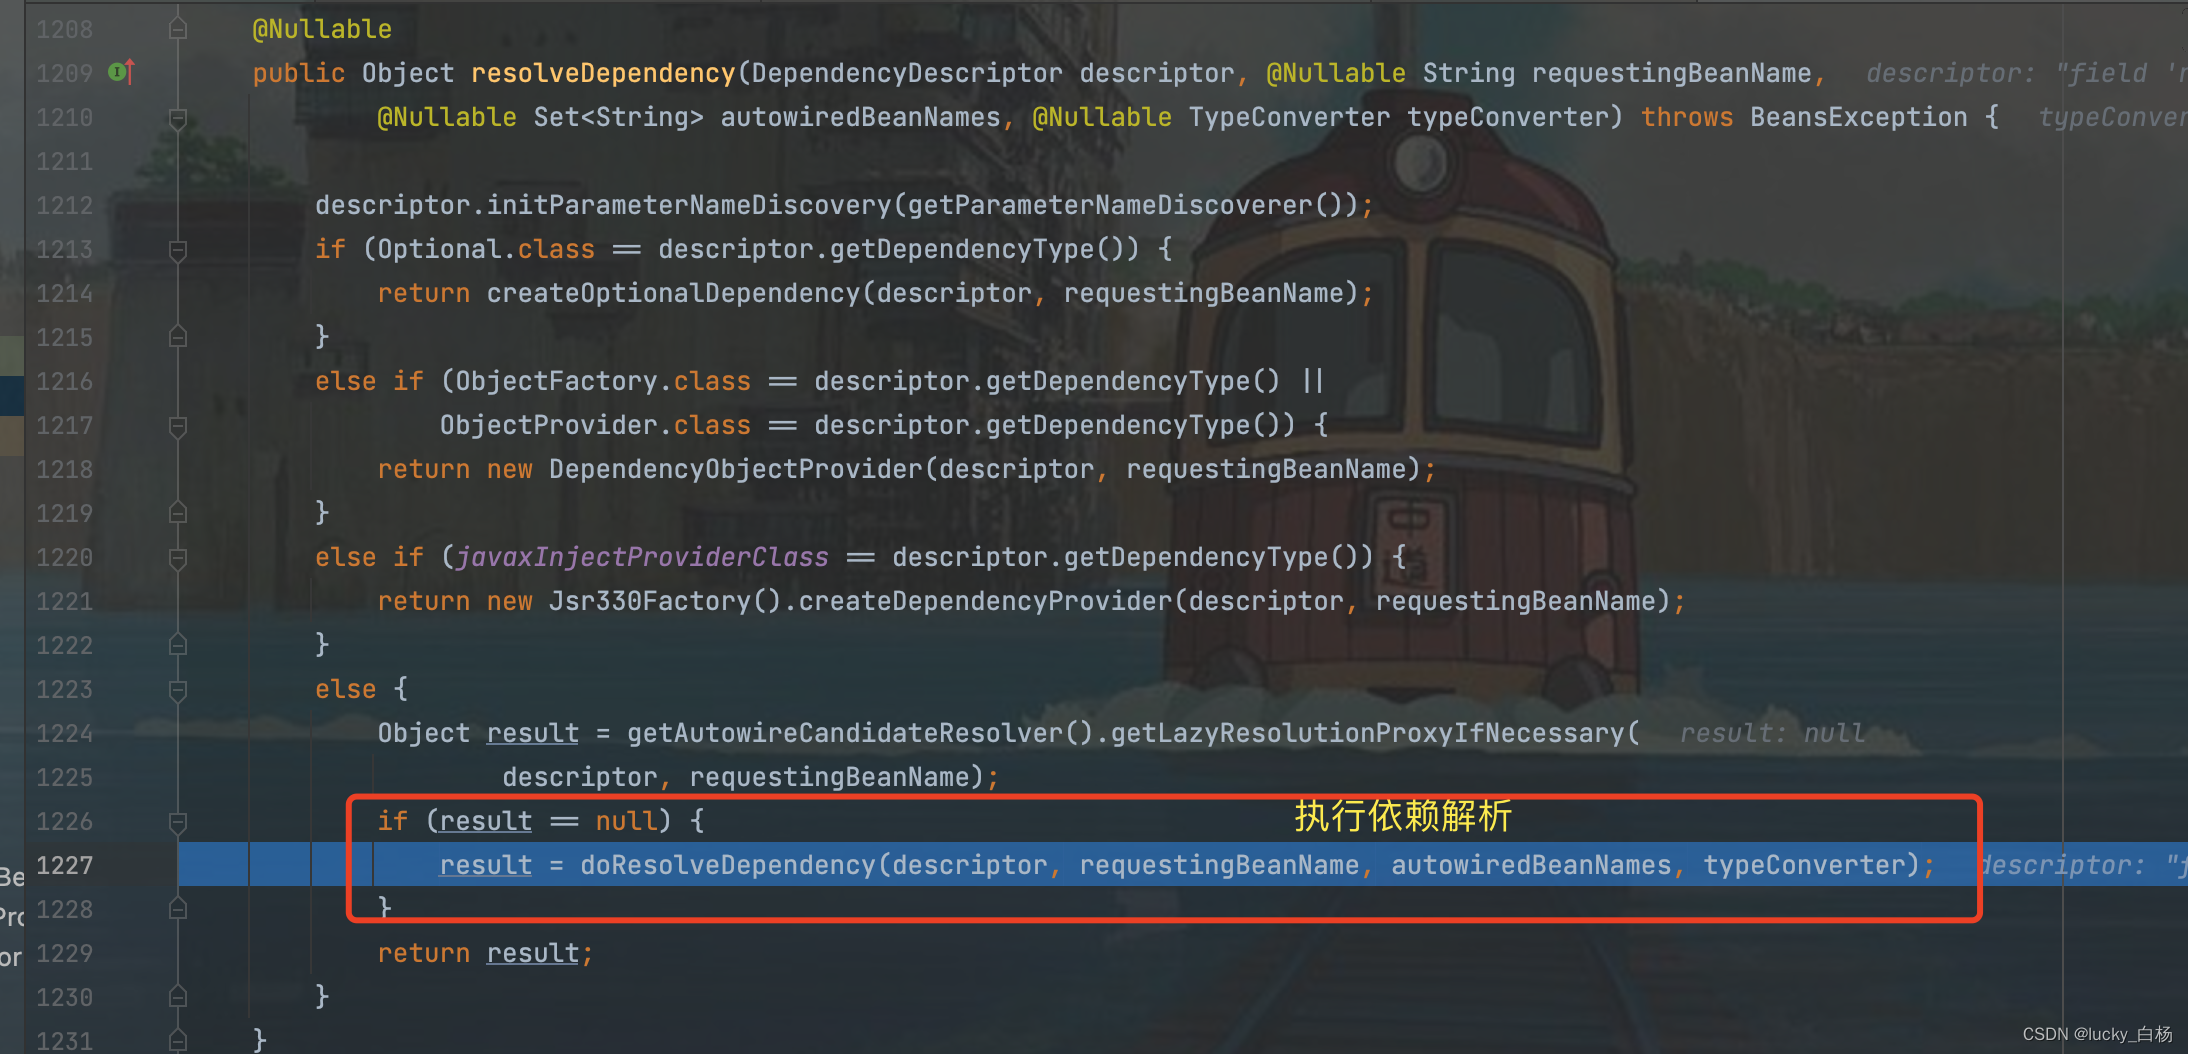
上面由于我们需要解析的Field是字符串类型,所以会进入到doResolveDependency()
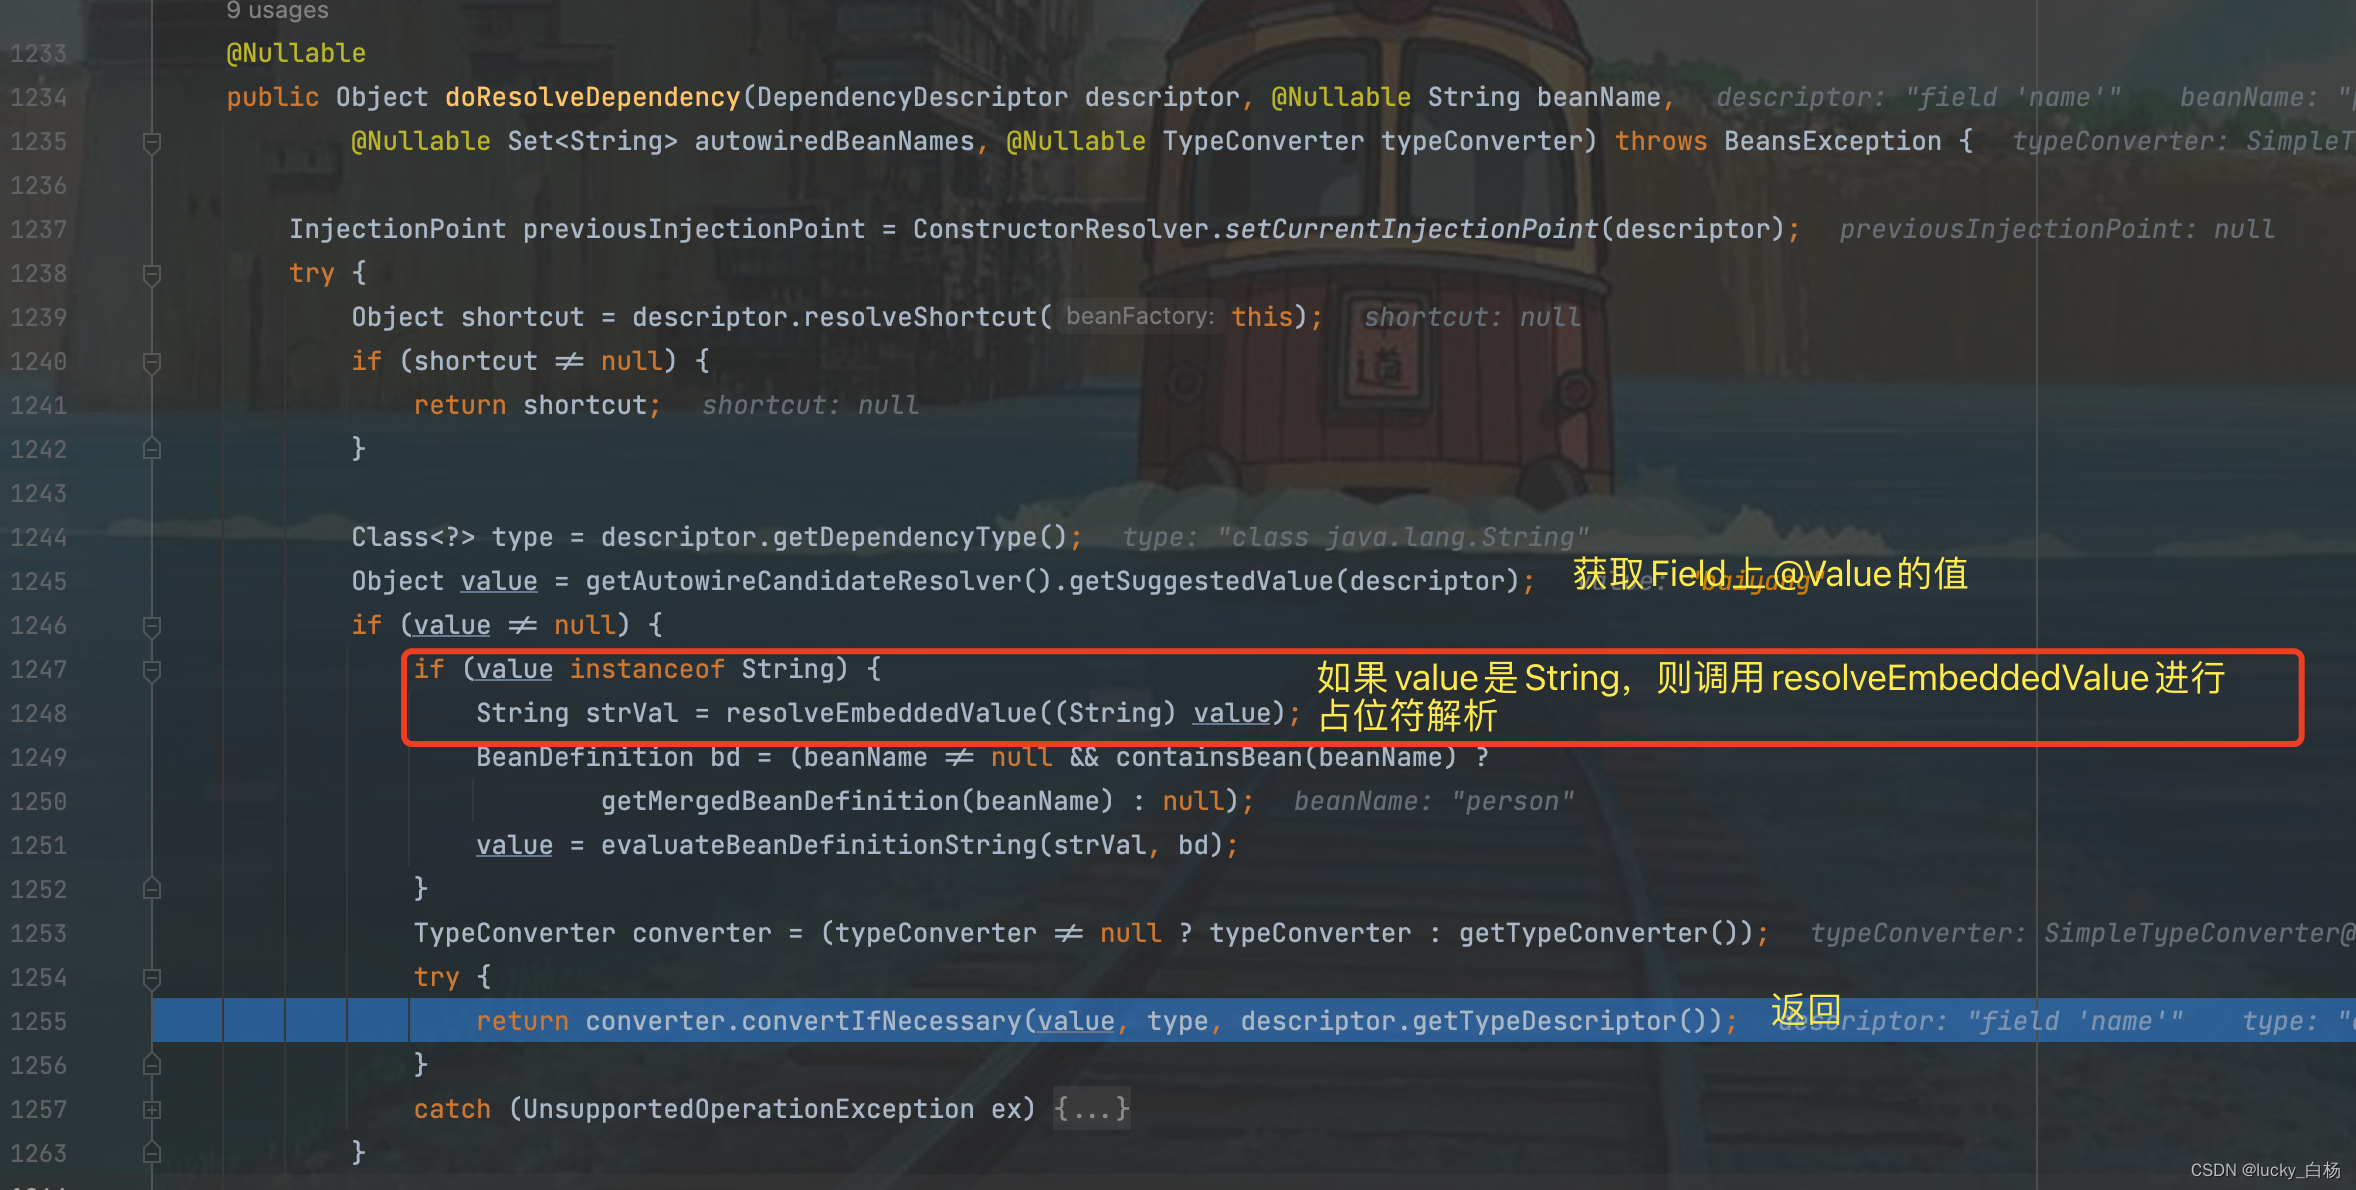
上面可以看到最终调用了beanFactory.resolveEmbeddedValue()方法来对占位符进行解析,并返回。
那么beanFactory.resolveEmbeddedValue()方法里面做了什么?
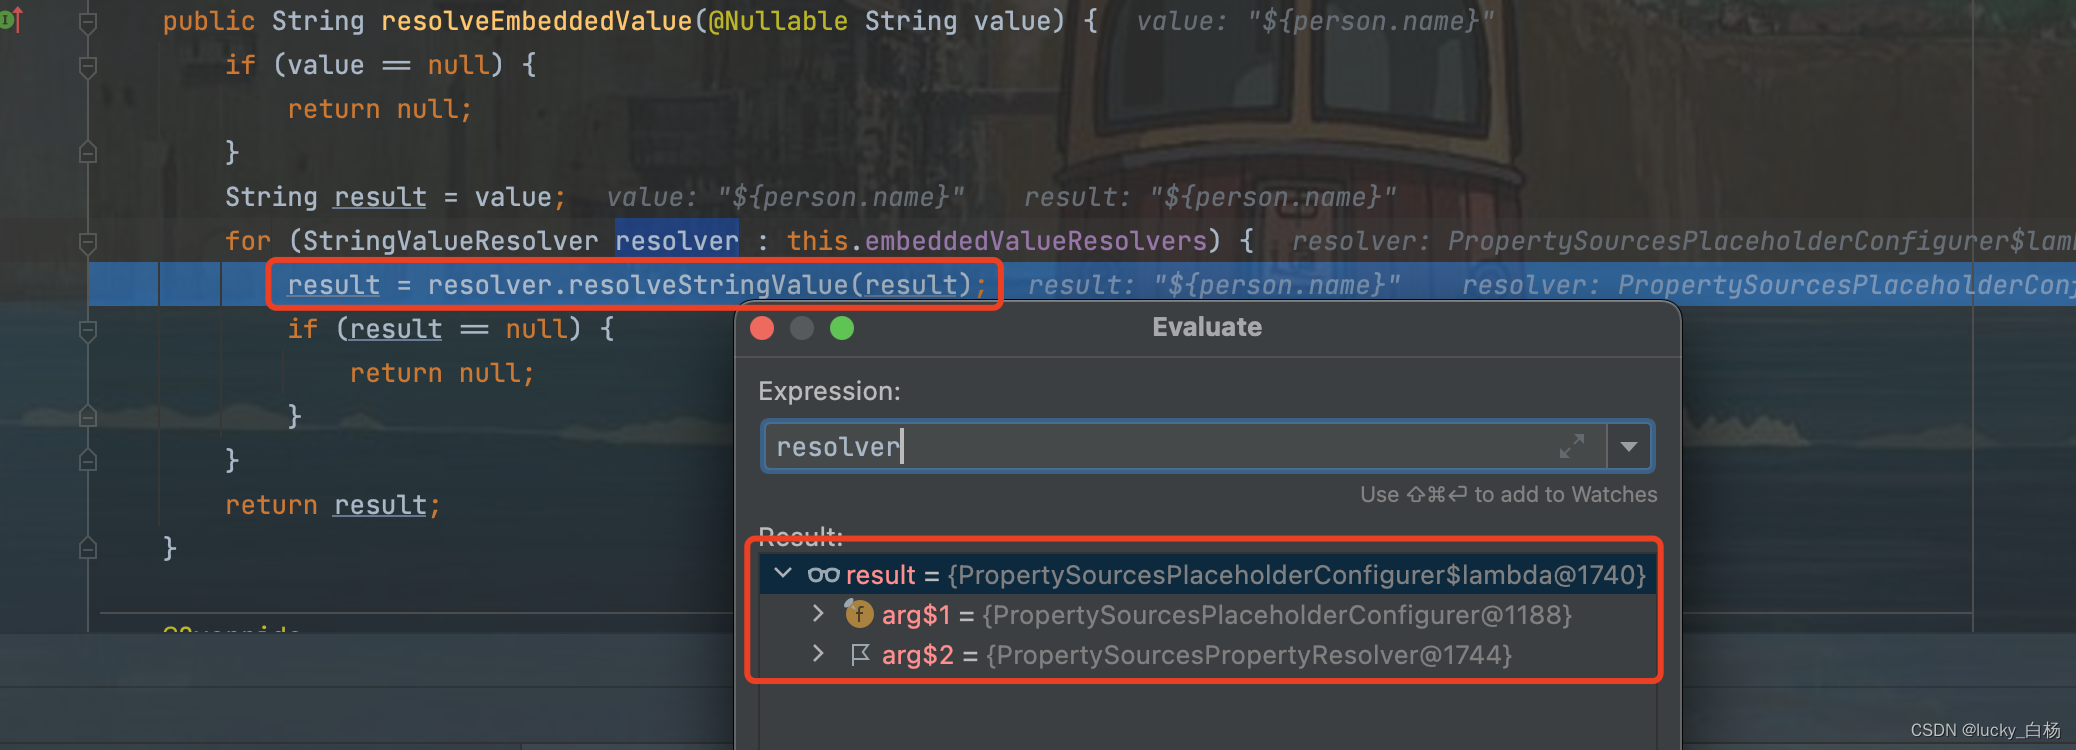
可以看到beanFactory.resolveEmbeddedValue()内部调用的就是我们前面说到的PropertySourcesPlaceholderConfigurer
类的resolveStringValue()方法。
3.2.5 总结
至此,@Value注解的解析流程就说到PropertySourcesPlaceholderConfigurer#resolveStringValue()吧。再往里面的内容,就是真正解析占位符并从属性源中获取key对应的值并返回了。
4 总结
本篇文章,考虑到主要介绍Spring对属性配置文件的加载与占位符的解析流程,所以用例代码舍弃了XML的配置方式以及其它无关代码配置,改为仅流程所需的关键类来达到最小debug走读源码,同时也让读者能感受到属性配置文件和@Value的解析所需要的必要类和流程。
首先介绍了PropertySourcesPlaceholderConfigurer的加载与准备工作,然后介绍了AutowiredAnnotationBeanPostProcessor在Bean属性装配过程中对@Value的解析流程,最终调用PropertySourcesPlaceholderConfigurer#resolveStringValue()对实际值进行解析,达到了闭环讲解。
由于本人精力有限,故有些与主题无关的代码或没有理解的代码,就没有在本文中作讲解,还请见谅!后续如果有涉及到对本篇知识有更多的理解,再做更新。
参考:
Spring之容器后处理器BeanFactoryPostProcessor/BeanDefinitionRegistryPostProcessor示例与源码分析
Spring之Bean后处理器——BeanPostProcessor的使用与源码解析
Spring之Bean后处理器——InstantiationAwareBeanPostProcessor的使用与源码解析
