🍿*★如果文章对你有帮助【关注👍点赞??收藏?】一起努力!★* 🍿
🧑?🎓 个人主页:花棉袄
📖 本章内容:【SpringBoot】📺学习视频推荐🗒?配套代码📝官方文档
?🏻 版权: 本文由【花棉袄】原创💝在CSDN首发💝需要转载请联系博主
🏰SpringBoot概述
?🏰SpringBoot提供了一种快速使用Spring的方式,基于约定优于配置的思想,可以让开发人员不必在配置与逻辑业务之间进行思维的切换,全身心的投入到业务逻辑的代码编写中,从而大大提高开发的效率。
?🏰SpringBoot功能:自动配置 起步依赖
🍵框架部署
🔜 详细解析:第一个 Spring Boot 应用程序
💝创建web工程
💝创建启动器
💝编写配置文件
1??基于Maven创建一个web工程
<parent>
	<groupId>org.springframework.boot</groupId>
	<artifactId>spring-boot-starter-parent</artifactId>
	<version>2.3.4.RELEASE</version>
</parent>

<dependencies>
	<dependency>
		<groupId>org.springframework.boot</groupId>
		<artifactId>spring-boot-starter-web</artifactId>
	</dependency>
</dependencies>
2??创建启动类
import org.springframework.boot.SpringApplication;
import org.springframework.boot.autoconfigure.SpringBootApplication;

@SpringBootApplication(scanBasePackages = "com.springboot")
public class MainApplication {

    public static void main(String[] args) {
        SpringApplication.run(MainApplication.class, args);
    }
}
3??编写业务
import org.springframework.web.bind.annotation.RequestMapping;
import org.springframework.web.bind.annotation.RestController;

@RestController
public class HelloController {
    @RequestMapping("/hello")
    public String handle01(){
        return "Hello, Spring Boot 2!";
    }
}
4??编写配置文件
??maven工程的resource文件夹中创建application.properties文件
# 设置端口号
server:
	port: 8888
?🍵打包部署
<build>
	<plugins>
		<plugin>
			<groupId>org.springframework.boot</groupId>
			<artifactId>spring-boot-maven-plugin</artifactId>
		</plugin>
	</plugins>
</build>
?🍵 运行&测试
- 运行启动类
- 浏览器输入
http://localhost:8888/hello,将会输出Hello, Spring Boot 2!。
🚎SpringBoot特性
🔜 详细解析:starter场景启动器
💝依赖管理特性
💝自动配置特性
1??依赖管理特性
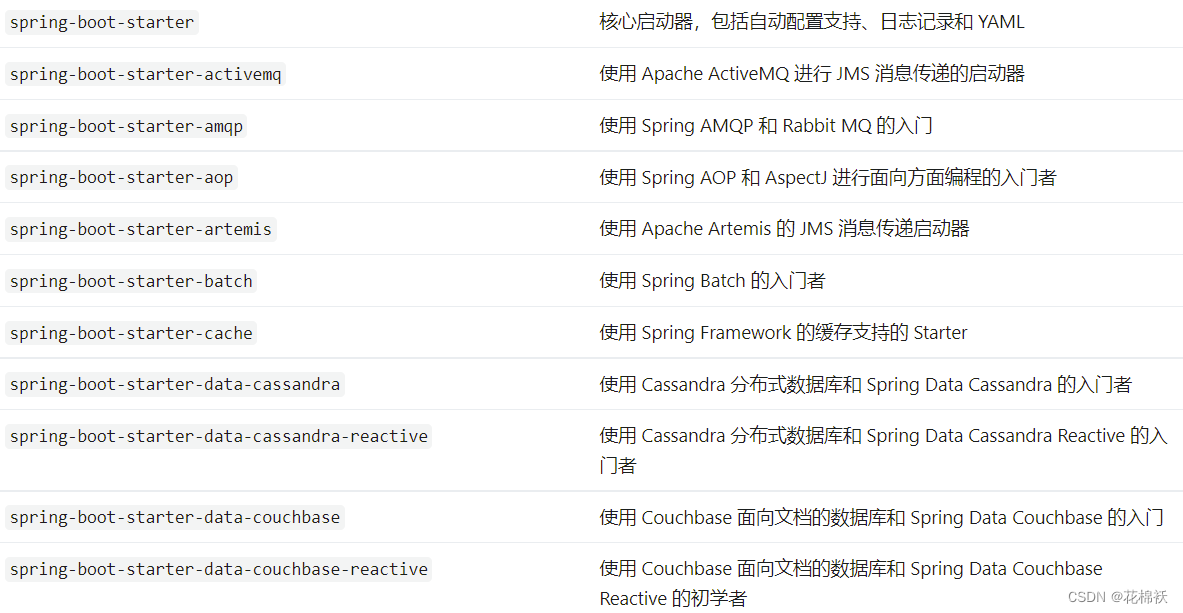
??开发导入starter场景启动器
??💜见到很多spring-boot-starter-* : *就某种场景
??💜只要引入starter,这个场景的所有常规需要的依赖我们都自动引入
??💜 更多SpringBoot所有支持的场景
??💜见到的 *-spring-boot-starter: 第三方提供的简化开发的场景启动器。
2??自动配置特性
??💛自动配好Tomcat
<dependency>
	<groupId>org.springframework.boot</groupId>
	<artifactId>spring-boot-starter-tomcat</artifactId>
	<version>2.3.4.RELEASE</version>
	<scope>compile</scope>
</dependency>
??💛自动配好SpringMVC
???引入SpringMVC全套组件
???自动配好SpringMVC常用组件(功能)
??💛自动配好Web常见功能,如:字符编码问题
???SpringBoot帮我们配置好了所有web开发的常见场景
??💛默认的包结构
???主程序所在包及其下面的所有子包里面的组件都会被默认扫描进来,无需以前的包扫描配置,想要改变扫描路径:
???@SpringBootApplication(scanBasePackages=“com.springboot”)
???@ComponentScan 指定扫描路径
@SpringBootApplication(scanBasePackages="com.springboot")
等同于
@SpringBootConfiguration
@EnableAutoConfiguration
@ComponentScan("com.springboot")
??💛按需加载所有自动配置项
???非常多的starter
???引入了哪些场景这个场景的自动配置才会开启
???SpringBoot所有的自动配置功能都在 spring-boot-autoconfigure 包里面
🛺底层注解
1??@Configuration:声明配置类
??🧡配置类里面使用@Bean标注在方法上给容器注册组件,默认也是单实例的
??🧡配置类本身也是组件
@Configuration(proxyBeanMethods = false)(每个@Bean方法被调用多少次返回的组件都是新创建的)
@Configuration(proxyBeanMethods = true) (保证每个@Bean方法被调用多少次返回的组件都是单实例的)(默认)
??🧡最佳实战
- 配置 类组件之间无依赖关系用Lite模式加速容器启动过程,减少判断
- 配置 类组件之间有依赖关系,方法会被调用得到之前单实例组件,用Full模式(默认)
2??@Import:导入组件
@Bean、@Component、@Controller、@Service、@Repository,它们是Spring的基本标签,在SpringBoot中并未改变它们原来的功能。
@Import({User.class, DBHelper.class})
@Configuration(proxyBeanMethods = false) //告诉SpringBoot这是一个配置类 == 配置文件
public class MyConfig {
}
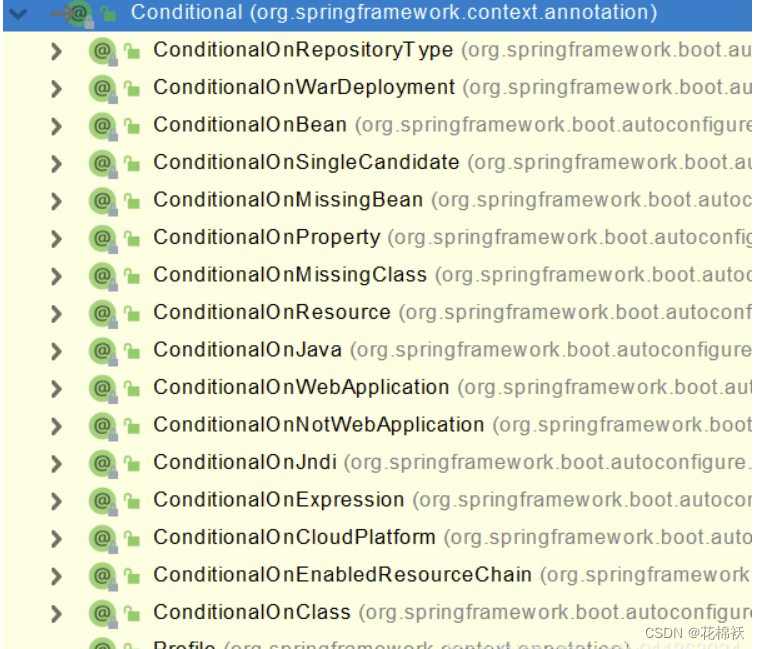
3??@Conditional:条件装配
??条件装配:满足Conditional指定的条件,则进行组件注入

@Configuration(proxyBeanMethods = false)
@ConditionalOnMissingBean(name = "tom")//没有tom名字的Bean时,MyConfig类的Bean才能生效。
public class MyConfig {

    @Bean
    public User user01(){
        User zhangsan = new User("zhangsan", 18);
        zhangsan.setPet(tomcatPet());
        return zhangsan;
    }

    @Bean("tom22")
    public Pet tomcatPet(){
        return new Pet("tomcat");
    }
}
4??@ImportResource:导入Spring配置文件
<?xml version="1.0" encoding="UTF-8"?>
<beans ...">

    <bean id="haha" class="com.lun.boot.bean.User">
        <property name="name" value="zhangsan"></property>
        <property name="age" value="18"></property>
    </bean>

    <bean id="hehe" class="com.lun.boot.bean.Pet">
        <property name="name" value="tomcat"></property>
    </bean>
</beans>
@ImportResource("classpath:beans.xml")
public class MyConfig {
...
}
5??@ConfigurationProperties:配置绑定
??💜Spring Boot一种配置配置绑定:@ConfigurationProperties + @Component
???假设有配置文件application.properties
mycar.brand=BYD
mycar.price=100000
@Component
@ConfigurationProperties(prefix = "mycar")
public class Car {
...
}
??💜Spring Boot另一种配置配置绑定:@EnableConfigurationProperties + @ConfigurationProperties
//开启属性配置功能
@EnableConfigurationProperties(Car.class)
public class MyConfig {
...
}
@ConfigurationProperties(prefix = "mycar")
public class Car {
...
}
🚌自动配置流程
分析下@SpringBootApplication
@Target(ElementType.TYPE)
@Retention(RetentionPolicy.RUNTIME)
@Documented
@Inherited
@SpringBootConfiguration
@EnableAutoConfiguration
@ComponentScan(
    excludeFilters = {@Filter(
    type = FilterType.CUSTOM,
    classes = {TypeExcludeFilter.class}
), @Filter(
    type = FilterType.CUSTOM,
    classes = {AutoConfigurationExcludeFilter.class}
)}
)
public @interface SpringBootApplication {
    ...
}
??🚨重点分析@SpringBootConfiguration,@ComponentScan,@EnableAutoConfiguration
1??@SpringBootConfiguration
??@Configuration:当前类是一个配置类
@Target(ElementType.TYPE)
@Retention(RetentionPolicy.RUNTIME)
@Documented
@Configuration
public @interface SpringBootConfiguration {
    @AliasFor(
        annotation = Configuration.class
    )
    boolean proxyBeanMethods() default true;
}
2??@ComponentScan
??指定扫描哪些Spring注解
3??@EnableAutoConfiguration
@Target(ElementType.TYPE)
@Retention(RetentionPolicy.RUNTIME)
@Documented
@Inherited
@AutoConfigurationPackage
@Import(AutoConfigurationImportSelector.class)
public @interface EnableAutoConfiguration {
    String ENABLED_OVERRIDE_PROPERTY = "spring.boot.enableautoconfiguration";

    Class<?>[] exclude() default {};

    String[] excludeName() default {};
}
??🚨重点分析@AutoConfigurationPackage,@Import(AutoConfigurationImportSelector.class)
1??@AutoConfigurationPackage
@Target(ElementType.TYPE)
@Retention(RetentionPolicy.RUNTIME)
@Documented
@Inherited
@Import(AutoConfigurationPackages.Registrar.class)//给容器中导入一个组件
public @interface AutoConfigurationPackage {
    String[] basePackages() default {};

    Class<?>[] basePackageClasses() default {};
}
- 利用Registrar给容器中导入一系列组件
- 将指定的一个包下的所有组件导入进MainApplication所在包下。
2??@Import(AutoConfigurationImportSelector.class)
1. 利用`getAutoConfigurationEntry(annotationMetadata);`给容器中批量导入一些组件
2. 调用`List<String> configurations = getCandidateConfigurations(annotationMetadata, attributes)`获取到所有需要导入到容器中的配置类
3. 利用工厂加载 `Map<String, List<String>> loadSpringFactories(@Nullable ClassLoader classLoader);`得到所有的组件
4. 从`META-INF/spring.factories`位置来加载一个文件。
   - 默认扫描我们当前系统里面所有`META-INF/spring.factories`位置的文件
   - `spring-boot-autoconfigure-2.3.4.RELEASE.jar`包里面也有`META-INF/spring.factories`
# 文件里面写死了spring-boot一启动就要给容器中加载的所有配置类
# spring-boot-autoconfigure-2.3.4.RELEASE.jar/META-INF/spring.factories
# Auto Configure
org.springframework.boot.autoconfigure.EnableAutoConfiguration=\
org.springframework.boot.autoconfigure.admin.SpringApplicationAdminJmxAutoConfiguration,\
org.springframework.boot.autoconfigure.aop.AopAutoConfiguration,\
...
虽然我们127个场景的所有自动配置启动的时候默认全部加载,但是xxxxAutoConfiguration按照条件装配规则(@Conditional),最终会按需配置。
??自动配置流程
?🚩SpringBoot先加载所有的自动配置类 xxxxxAutoConfiguration
?🚩每个自动配置类按照条件进行生效,默认都会绑定配置文件指定的值。(xxxxProperties里面读取,xxxProperties和配置文件进行了绑定)
?🚩生效的配置类就会给容器中装配很多组件
?🚩只要容器中有这些组件,相当于这些功能就有了
?🚩定制化配置
??用户直接自己@Bean替换底层的组件
??用户去看这个组件是获取的配置文件什么值就去修改。
🌸SpringBoot最佳实践
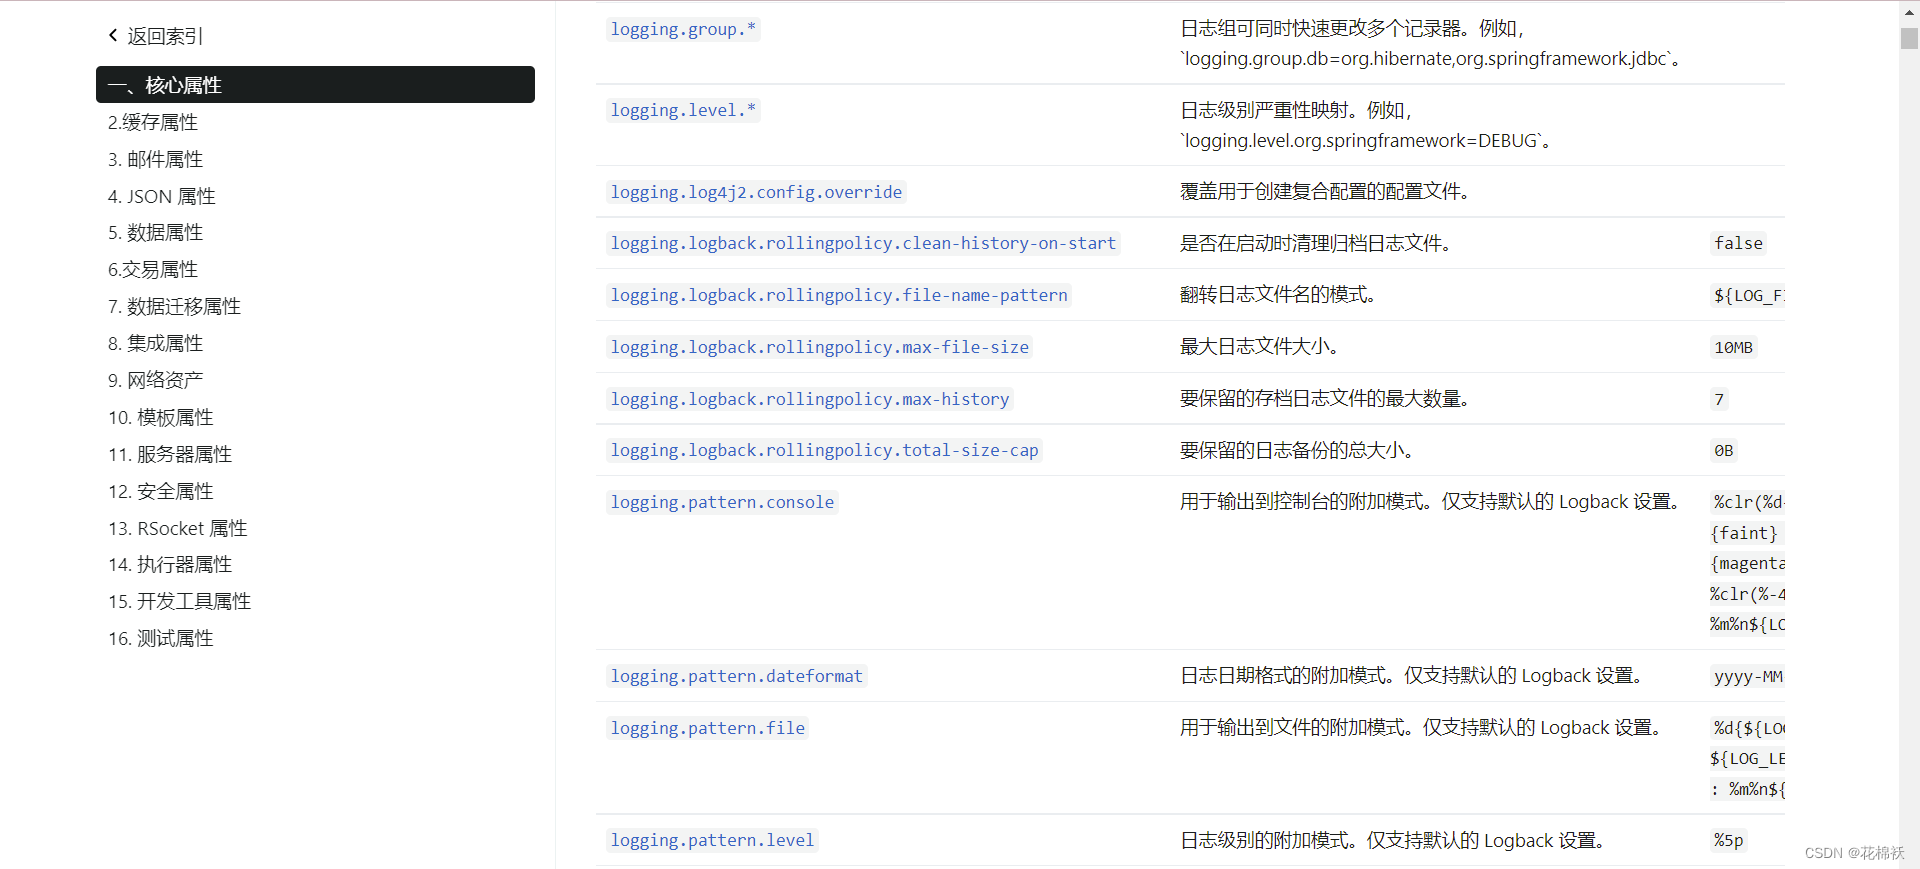
🔜 详细解析:SpringBoot属性配置
💝核心属性
💝缓存属性
💝JSON属性
?🌸引入场景依赖
??🤎官方文档

?🌸查看自动配置了哪些(选做)
??💙自己分析,引入场景对应的自动配置一般都生效了
??💙配置文件中debug=true开启自动配置报告。
???Negative(不生效)
???Positive(生效)
?🌸是否需要修改
??💚参照文档修改配置项
???官方文档
???自己分析。xxxxProperties绑定了配置文件的哪些。

??💚自定义加入或者替换组件
???@Bean、@Component…
??💚自定义器 XXXXXCustomizer;
1??添加banner
?🌸spring.banner.image.location=banner1.txt
${AnsiColor.BRIGHT_YELLOW}
????????????????????????????
📽? CSDN: 天才小狐狸
📽? 公众号: Java设计
🗳? 邮箱:genius.fox@gmail.com
🧫 含泪播种的人一定能含笑收获
????????????????????????????
?🕰?版本:
    🩸Spring Boot Version: ${spring-boot.version}
2??lombok
 <dependency>
     <groupId>org.projectlombok</groupId>
     <artifactId>lombok</artifactId>
</dependency>
3??dev-tools热部署
<dependencies>
    <dependency>
        <groupId>org.springframework.boot</groupId>
        <artifactId>spring-boot-devtools</artifactId>
        <optional>true</optional>
    </dependency>
</dependencies>
??在IDEA中,项目或者页面修改以后:Ctrl+F9。
🍎配置文件
1??properties格式
jdbc.driver=com.mysql.jdbc.Driver
jdbc.url=jdbc:mysql://localhost:3306/ssm
jdbc.username=root
jdbc.password=root
2??yml格式
jdbc:
	driver: com.mysql.jdbc.Driver  #jdbc.driver
	url: jdbc:mysql://localhost:3306/ssm
	password: root
	username: root
?🍎yaml基本语法
🍎大小写敏感,区分大小写
🍎数据值前边必须有空格,作为分隔符
🍎使用缩进表示层级关系
🍎缩进时不允许使用Tab键,只允许使用空格(各个系统 Tab对应的
🍎空格数目可能不同,导致层次混乱)。
🍎缩进的空格数目不重要,只要相同层级的元素左侧对齐即可
🍎’'#" 表示注释,从这个字符一直到行尾,都会被解析器忽略。
?🍎yaml数据格式
??💙字面量:单个的、不可再分的值。date、boolean、string、number、null
k: v
yaml中 字符串默认是无需加引号的
单引号会原样输出
双引号会识别转义符 比如 \n ,输出时会换行
??💙对象:键值对的集合。map、hash、set、object
#行内写法:
k: {k1:v1,k2:v2,k3:v3}

#或
k:
  k1: v1
  k2: v2
  k3: v3
??💙数组:一组按次序排列的值。array、list、queue
#行内写法:

k: [v1,v2,v3]

#或者

k:
 - v1
 - v2
 - v3
3??自定义类绑定的配置提示
<dependency>
    <groupId>org.springframework.boot</groupId>
    <artifactId>spring-boot-configuration-processor</artifactId>
    <optional>true</optional>
</dependency>
??💙下面插件作用是工程打包时,不将spring-boot-configuration-processor打进包内,让其只在编码的时候有用。
<build>
    <plugins>
        <plugin>
            <groupId>org.springframework.boot</groupId>
            <artifactId>spring-boot-maven-plugin</artifactId>
            <configuration>
                <excludes>
                    <exclude>
                        <groupId>org.springframework.boot</groupId>
                        <artifactId>spring-boot-configuration-processor</artifactId>
                    </exclude>
                </excludes>
            </configuration>
        </plugin>
    </plugins>
</build>
🚌Web开发简介
1??不用@EnableWebMvc注解,使用 @Configuration + WebMvcConfigurer 自定义规则
2??声明 WebMvcRegistrations 改变默认底层组件
3??使用 @EnableWebMvc+@Configuration+DelegatingWebMvcConfiguration 全面接管SpringMVC
🚑静态资源规则与定制化
1??静态资源目录
??💙只要静态资源放在类路径下: called /static
??💙(or /public )(or /resources)( or /META-INF/resources)
访问 : 当前项目根路径/ + 静态资源名
原理: 静态映射/**。
请求进来,先去找Controller看能不能处理。不能处理的所有请求又都交给静态资源处理器。静态资源也找不到则响应404页面。
也可以改变默认的静态资源路径,/static,/public,/resources,/META-INF/resources失效
spring:
  resources:
    static-locations: [classpath:/haha/]
2??静态资源访问前缀
??💙当前项目 + static-path-pattern + 静态资源名 = 静态资源文件夹下找
spring:
  mvc:
    static-path-pattern: /res/**
??💙根据上述代码,我们可以同过配置禁止所有静态资源规则
spring:
  resources:
    add-mappings: false   #禁用所有静态资源规则
3??welcome欢迎页支持
??💜静态资源路径下 index.html。
??💜可以配置静态资源路径
??💜但是不可以配置静态资源的访问前缀。否则导致 index.html不能被默认访问
spring:
#  mvc:
#    static-path-pattern: /res/**   这个会导致welcome page功能失效
  resources:
    static-locations: [classpath:/haha/]
??💜controller能处理/index
4??自定义Favicon
??💚指网页标签上的小图标。
??💚favicon.ico 放在静态资源目录下即可。
spring:
#  mvc:
#    static-path-pattern: /res/**   这个会导致 Favicon 功能失效
🚒静态资源原理
??WebMvcAutoConfiguration
??💙SpringBoot启动默认加载 xxxAutoConfiguration 类(自动配置类)
??💙SpringMVC功能的自动配置类WebMvcAutoConfiguration:生效
@Configuration(proxyBeanMethods = false)
@ConditionalOnWebApplication(type = Type.SERVLET)
@ConditionalOnClass({ Servlet.class, DispatcherServlet.class, WebMvcConfigurer.class })
@ConditionalOnMissingBean(WebMvcConfigurationSupport.class)
@AutoConfigureOrder(Ordered.HIGHEST_PRECEDENCE + 10)
@AutoConfigureAfter({ DispatcherServletAutoConfiguration.class, TaskExecutionAutoConfiguration.class,
		ValidationAutoConfiguration.class })
public class WebMvcAutoConfiguration {
    ...
}
1??WebMvcAutoConfigurationAdapter
@Configuration(proxyBeanMethods = false)
@Import(EnableWebMvcConfiguration.class)
@EnableConfigurationProperties({ WebMvcProperties.class, ResourceProperties.class })
@Order(0)
public static class WebMvcAutoConfigurationAdapter implements WebMvcConfigurer {
    ...
}
??💜配置文件的相关属性的绑定:WebMvcProperties==spring.mvc、ResourceProperties==spring.web

@ConfigurationProperties(prefix = "spring.mvc")
public class WebMvcProperties {
	....
}
@ConfigurationProperties("spring.web")
public class WebProperties {
	....
}
??💜配置类只有一个有参构造器,有参构造器所有参数的值都会从容器中确定
    @Import({WebMvcAutoConfiguration.EnableWebMvcConfiguration.class})
    @EnableConfigurationProperties({WebMvcProperties.class, WebProperties.class})
    @Order(0)
    public static class WebMvcAutoConfigurationAdapter implements WebMvcConfigurer, ServletContextAware {
        private static final Log logger = LogFactory.getLog(WebMvcConfigurer.class);
        private final Resources resourceProperties;
        private final WebMvcProperties mvcProperties;
        private final ListableBeanFactory beanFactory;
        private final ObjectProvider<HttpMessageConverters> messageConvertersProvider;
        private final ObjectProvider<DispatcherServletPath> dispatcherServletPath;
        private final ObjectProvider<ServletRegistrationBean<?>> servletRegistrations;
        private final WebMvcAutoConfiguration.ResourceHandlerRegistrationCustomizer resourceHandlerRegistrationCustomizer;
        private ServletContext servletContext;

        public WebMvcAutoConfigurationAdapter(WebProperties webProperties, WebMvcProperties mvcProperties, ListableBeanFactory beanFactory, ObjectProvider<HttpMessageConverters> messageConvertersProvider, ObjectProvider<WebMvcAutoConfiguration.ResourceHandlerRegistrationCustomizer> resourceHandlerRegistrationCustomizerProvider, ObjectProvider<DispatcherServletPath> dispatcherServletPath, ObjectProvider<ServletRegistrationBean<?>> servletRegistrations) {
            this.resourceProperties = webProperties.getResources();
            this.mvcProperties = mvcProperties;
            this.beanFactory = beanFactory;
            this.messageConvertersProvider = messageConvertersProvider;
            this.resourceHandlerRegistrationCustomizer = (WebMvcAutoConfiguration.ResourceHandlerRegistrationCustomizer)resourceHandlerRegistrationCustomizerProvider.getIfAvailable();
            this.dispatcherServletPath = dispatcherServletPath;
            this.servletRegistrations = servletRegistrations;
            this.mvcProperties.checkConfiguration();
        }
- ResourceProperties resourceProperties;获取和spring.resources绑定的所有的值的对象
- WebMvcProperties mvcProperties 获取和spring.mvc绑定的所有的值的对象
- ListableBeanFactory beanFactory Spring的beanFactory
- HttpMessageConverters 找到所有的HttpMessageConverters
- ResourceHandlerRegistrationCustomizer 找到 资源处理器的自定义器。
- DispatcherServletPath
- ServletRegistrationBean 给应用注册Servlet、Filter…
2??资源处理的默认规则
...
public class WebMvcAutoConfiguration {
    ...
	public static class EnableWebMvcConfiguration extends DelegatingWebMvcConfiguration implements ResourceLoaderAware {
        ...
		@Override
		protected void addResourceHandlers(ResourceHandlerRegistry registry) {
			super.addResourceHandlers(registry);
			if (!this.resourceProperties.isAddMappings()) {
				logger.debug("Default resource handling disabled");
				return;
			}
			ServletContext servletContext = getServletContext();
			addResourceHandler(registry, "/webjars/**", "classpath:/META-INF/resources/webjars/");
			addResourceHandler(registry, this.mvcProperties.getStaticPathPattern(), (registration) -> {
				registration.addResourceLocations(this.resourceProperties.getStaticLocations());
				if (servletContext != null) {
					registration.addResourceLocations(new ServletContextResource(servletContext, SERVLET_LOCATION));
				}
			});
		}
        ...

    }
    ...
}
?💝根据上述代码,我们可以同过配置禁止所有静态资源规则
spring:
  resources:
    add-mappings: false   #禁用所有静态资源规则
3??静态资源规则
@ConfigurationProperties(prefix = "spring.resources", ignoreUnknownFields = false)
public class ResourceProperties {

    private static final String[] CLASSPATH_RESOURCE_LOCATIONS = { "classpath:/META-INF/resources/",
            "classpath:/resources/", "classpath:/static/", "classpath:/public/" };

    /**
     * Locations of static resources. Defaults to classpath:[/META-INF/resources/,
     * /resources/, /static/, /public/].
     */
    private String[] staticLocations = CLASSPATH_RESOURCE_LOCATIONS;
    ...
}
4??欢迎页的处理规则
...
public class WebMvcAutoConfiguration {
    ...
	public static class EnableWebMvcConfiguration extends DelegatingWebMvcConfiguration implements ResourceLoaderAware {
        ...
		@Bean
		public WelcomePageHandlerMapping welcomePageHandlerMapping(ApplicationContext applicationContext,
				FormattingConversionService mvcConversionService, ResourceUrlProvider mvcResourceUrlProvider) {
			WelcomePageHandlerMapping welcomePageHandlerMapping = new WelcomePageHandlerMapping(
					new TemplateAvailabilityProviders(applicationContext), applicationContext, getWelcomePage(),
					this.mvcProperties.getStaticPathPattern());
			welcomePageHandlerMapping.setInterceptors(getInterceptors(mvcConversionService, mvcResourceUrlProvider));
			welcomePageHandlerMapping.setCorsConfigurations(getCorsConfigurations());
			return welcomePageHandlerMapping;
		}
??💚WelcomePageHandlerMapping的构造方法如下
WelcomePageHandlerMapping(TemplateAvailabilityProviders templateAvailabilityProviders,
                          ApplicationContext applicationContext, Resource welcomePage, String staticPathPattern) {
    if (welcomePage != null && "/**".equals(staticPathPattern)) {
        //要用欢迎页功能,必须是/**
        logger.info("Adding welcome page: " + welcomePage);
        setRootViewName("forward:index.html");
    }
    else if (welcomeTemplateExists(templateAvailabilityProviders, applicationContext)) {
        //调用Controller /index
        logger.info("Adding welcome page template: index");
        setRootViewName("index");
    }
}
这构造方法内的代码也解释了web场景-welcome与favicon功能中配置static-path-pattern了,welcome页面和小图标失效的问题。
🚚Rest映射原理
1??请求映射
??💜现在: /user
???GET-获取用户?DELETE-删除用户?PUT-修改用户?POST-保存用户
??💜核心Filter;HiddenHttpMethodFilter
???1)开启页面表单的Rest功能
???2)页面 form的属性method=post,隐藏域 _method=put、delete等(如果直接get或post,无需隐藏域)
???3)编写请求映射
spring:
  mvc:
    hiddenmethod:
      filter:
        enabled: true   #开启页面表单的Rest功能
<form action="/user" method="get">
    <input value="REST-GET提交" type="submit" />
</form>

<form action="/user" method="post">
    <input value="REST-POST提交" type="submit" />
</form>

<form action="/user" method="post">
        <input name="_method" type="hidden" value="DELETE"/>
    <input value="REST-DELETE 提交" type="submit"/>
</form>

<form action="/user" method="post">
    <input name="_method" type="hidden" value="PUT" />
    <input value="REST-PUT提交"type="submit" />
<form>
@RequestMapping(value = "/user",method = RequestMethod.GET)
    public String getUser(){
        return "GET-张三";
    }

    @RequestMapping(value = "/user",method = RequestMethod.POST)
    public String saveUser(){
        return "POST-张三";
    }


    @RequestMapping(value = "/user",method = RequestMethod.PUT)
    public String putUser(){
        return "PUT-张三";
    }

    @RequestMapping(value = "/user",method = RequestMethod.DELETE)
    public String deleteUser(){
        return "DELETE-张三";
    }
2??Rest原理
??🤎表单提交会带上\_method=PUT
??🤎请求过来被HiddenHttpMethodFilter拦截
??🤎请求是否正常,并且是POST
???获取到\_method的值。
???兼容以下请求;PUT;DELETE;PATCH
??🤎原生request(都是post请求),包装模式requesWrapper重写了getMethod方法,返回的是传入的值(put delete patch )。
??🤎过滤器链放行的时候用wrapper。以后的方法调用getMethod是调用requesWrapper的。
public class HiddenHttpMethodFilter extends OncePerRequestFilter {

	private static final List<String> ALLOWED_METHODS =
			Collections.unmodifiableList(Arrays.asList(HttpMethod.PUT.name(),
					HttpMethod.DELETE.name(), HttpMethod.PATCH.name()));

	/** Default method parameter: {@code _method}. */
	public static final String DEFAULT_METHOD_PARAM = "_method";

	private String methodParam = DEFAULT_METHOD_PARAM;


	/**
	 * Set the parameter name to look for HTTP methods.
	 * @see #DEFAULT_METHOD_PARAM
	 */
	public void setMethodParam(String methodParam) {
		Assert.hasText(methodParam, "'methodParam' must not be empty");
		this.methodParam = methodParam;
	}

	@Override
	protected void doFilterInternal(HttpServletRequest request, HttpServletResponse response, FilterChain filterChain)
			throws ServletException, IOException {

		HttpServletRequest requestToUse = request;

		if ("POST".equals(request.getMethod()) && request.getAttribute(WebUtils.ERROR_EXCEPTION_ATTRIBUTE) == null) {
			String paramValue = request.getParameter(this.methodParam);
			if (StringUtils.hasLength(paramValue)) {
				String method = paramValue.toUpperCase(Locale.ENGLISH);
				if (ALLOWED_METHODS.contains(method)) {
					requestToUse = new HttpMethodRequestWrapper(request, method);
				}
			}
		}

		filterChain.doFilter(requestToUse, response);
	}


	/**
	 * Simple {@link HttpServletRequest} wrapper that returns the supplied method for
	 * {@link HttpServletRequest#getMethod()}.
	 */
	private static class HttpMethodRequestWrapper extends HttpServletRequestWrapper {

		private final String method;

		public HttpMethodRequestWrapper(HttpServletRequest request, String method) {
			super(request);
			this.method = method;
		}

		@Override
		public String getMethod() {
			return this.method;
		}
	}

}
??🚨Rest使用客户端工具:如PostMan可直接发送put、delete等方式请求,不会走Filter。
??🚨@GetMapping(“/user”) = @RequestMapping(value = “/user”,method = RequestMethod.GET)
3??改变默认的_method
??@ConditionalOnMissingBean(HiddenHttpMethodFilter.class)意味着在没有HiddenHttpMethodFilter时,才执行hiddenHttpMethodFilter()。
@Configuration(proxyBeanMethods = false)
@ConditionalOnWebApplication(type = Type.SERVLET)
@ConditionalOnClass({ Servlet.class, DispatcherServlet.class, WebMvcConfigurer.class })
@ConditionalOnMissingBean(WebMvcConfigurationSupport.class)
@AutoConfigureOrder(Ordered.HIGHEST_PRECEDENCE + 10)
@AutoConfigureAfter({ DispatcherServletAutoConfiguration.class, TaskExecutionAutoConfiguration.class,
		ValidationAutoConfiguration.class })
public class WebMvcAutoConfiguration {

    ...

    @Bean
    @ConditionalOnMissingBean(HiddenHttpMethodFilter.class)
    @ConditionalOnProperty(prefix = "spring.mvc.hiddenmethod.filter", name = "enabled", matchIfMissing = false)
    public OrderedHiddenHttpMethodFilter hiddenHttpMethodFilter() {
        return new OrderedHiddenHttpMethodFilter();
    }

    ...
}
public class HiddenHttpMethodFilter extends OncePerRequestFilter {
    private static final List<String> ALLOWED_METHODS;
    public static final String DEFAULT_METHOD_PARAM = "_method";
    private String methodParam = "_method";

    public HiddenHttpMethodFilter() {
    }

    public void setMethodParam(String methodParam) {
        Assert.hasText(methodParam, "'methodParam' must not be empty");
        this.methodParam = methodParam;
    }
   .....
}
?💥因此,我们可以自定义filter,改变默认的\_method。
@Configuration(proxyBeanMethods = false)
public class Config {
    @Bean
    public HiddenHttpMethodFilter hiddenHttpMethodFilter() {
        HiddenHttpMethodFilter hiddenHttpMethodFilter = new HiddenHttpMethodFilter();
        hiddenHttpMethodFilter.setMethodParam("_firefly");
        return hiddenHttpMethodFilter;
    }
}
将\_method改成_firefly。
<form action="/user" method="post">
    <input name="_firefly" type="hidden" value="DELETE"/>
    <input value="REST-DELETE 提交" type="submit"/>
</form>
🚈请求映射原理

?💓SpringMVC功能分析都从 org.springframework.web.servlet.DispatcherServlet -> doDispatch()
protected void doDispatch(HttpServletRequest request, HttpServletResponse response) throws Exception {
    HttpServletRequest processedRequest = request;
    HandlerExecutionChain mappedHandler = null;
    boolean multipartRequestParsed = false;

    WebAsyncManager asyncManager = WebAsyncUtils.getAsyncManager(request);

    try {
        ModelAndView mv = null;
        Exception dispatchException = null;

        try {
            processedRequest = checkMultipart(request);
            multipartRequestParsed = (processedRequest != request);

            // 找到当前请求使用哪个Handler(Controller的方法)处理
            mappedHandler = getHandler(processedRequest);

            //HandlerMapping:处理器映射。/xxx->>xxxx
    ...
}


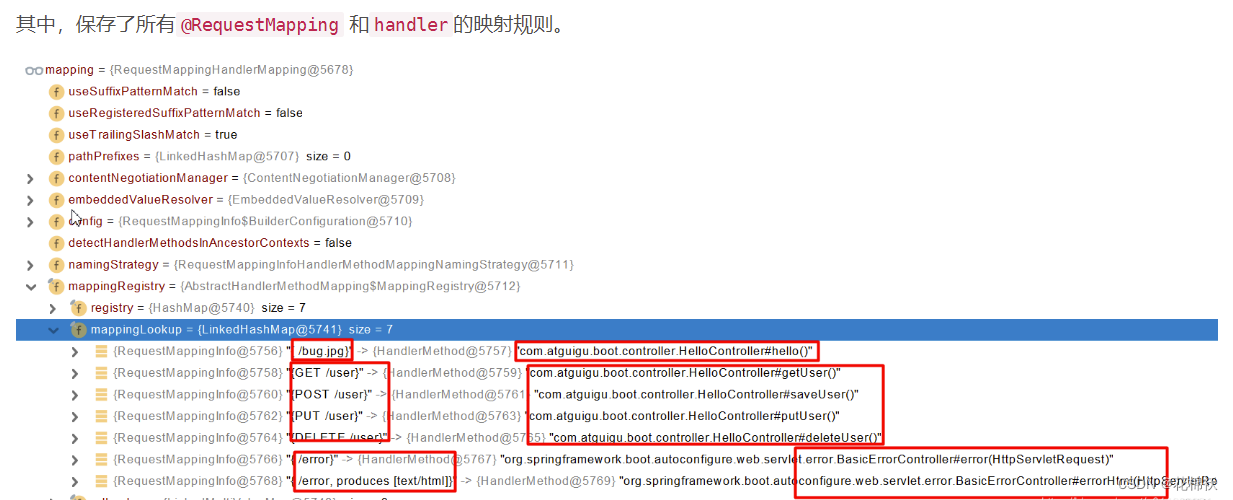
?💓所有的请求映射都在HandlerMapping中:
??💘SpringBoot自动配置欢迎页的 WelcomePageHandlerMapping 。访问 /能访问到index.html;
?💓SpringBoot自动配置了默认 的 RequestMappingHandlerMapping
?💓请求进来,挨个尝试所有的HandlerMapping看是否有请求信息。
??💝如果有就找到这个请求对应的handler
??💝如果没有就是下一个 HandlerMapping
?💓我们需要一些自定义的映射处理,我们也可以自己给容器中放HandlerMapping。自定义 HandlerMapping
🐷常用参数注解
@PathVariable:路径变量@RequestHeader:获取请求头@RequestParam:获取请求参数(指问号后的参数,url?a=1&b=2)@CookieValue:获取Cookie值@RequestAttribute:获取request域属性@RequestBody:获取请求体[POST]@MatrixVariable:矩阵变量@ModelAttribute
1??@RequestAttribute:获取request域属性
@Controller
public class AdoController {
    @GetMapping("/goto")
    public String goToPage(HttpServletRequest request){

        request.setAttribute("msg","成功了...");
        request.setAttribute("code",200);
        return "forward:/success";  //转发到  /success请求
    }
    @ResponseBody
    @GetMapping("/success")
    public Map success(@RequestAttribute(value = "msg",required = false) String msg,
                       @RequestAttribute(value = "code",required = false)Integer code,
                       HttpServletRequest request){
        Object msg1 = request.getAttribute("msg");

        Map<String,Object> map = new HashMap<>();

        map.put("reqMethod_msg",msg1);
        map.put("annotation_msg",msg);
        return map;
    }
2??@MatrixVariable:矩阵变量
??
???🔥语法: 请求路径:
/cars/sell;low=34;brand=byd,audi,yd
?????🔥SpringBoot默认是禁用了矩阵变量的功能
?????🔥手动开启:UrlPathHelper的removeSemicolonContent设置为false,让其支持矩阵变量的。
?????🔥 矩阵变量必须有url路径变量才能被解析
?????🔥 手动开启矩阵变量:
??? 方式一:实现WebMvcConfigurer接口:
@Configuration(proxyBeanMethods = false)
public class WebConfig implements WebMvcConfigurer {
@Override
public void configurePathMatch(PathMatchConfigurer configurer) {
UrlPathHelper urlPathHelper = new UrlPathHelper();
// 不移除;后面的内容。矩阵变量功能就可以生效
urlPathHelper.setRemoveSemicolonContent(false);
configurer.setUrlPathHelper(urlPathHelper);
}
}
```<h4 align=center >🍿*★如果文章对你有帮助【关注👍点赞??收藏?】一起努力!★* 🍿</h4>
> <h6 >🧑?🎓 个人主页:<a href="https://blog.csdn.net/m0_46914264?type=blog"><b>花棉袄</b></a></h6>
>
> 📖 本章内容:【<span ><font color="#ff7500"><b>SpringBoot</b></font></span>】📺[**学习视频推荐**](https://www.bilibili.com/video/BV19K4y1L7MT?p=1)🗒?[**配套代码**](https://download.csdn.net/download/m0_46914264/85320365)📝[**官方文档**](https://docs.spring.io/spring-boot/docs/current/reference/html)
> ?🏻 版权: 本文由【花棉袄】原创💝在CSDN首发💝需要转载请联系博主
# 🏰[SpringBoot概述](https://www.bilibili.com/video/BV19K4y1L7MT?p=1)
 🏰SpringBoot提供了一种快速使用Spring的方式,基于约定优于配置的思想,可以让开发人员不必在配置与逻辑业务之间进行思维的切换,全身心的投入到业务逻辑的代码编写中,从而大大提高开发的效率。
 🏰SpringBoot功能:`自动配置` `起步依赖`
- - -
# 🍵[框架部署](https://www.bilibili.com/video/BV19K4y1L7MT?p=5)
> <h4>🔜 详细解析:<a href="https://docs.spring.io/spring-boot/docs/current/reference/html/getting-started.html#getting-started.first-application">第一个 Spring Boot 应用程序</a></h4>
>
> 💝创建web工程
> 💝创建启动器
> 💝编写配置文件
## 1??基于Maven创建一个web工程
```xml
<parent>
<groupId>org.springframework.boot</groupId>
<artifactId>spring-boot-starter-parent</artifactId>
<version>2.3.4.RELEASE</version>
</parent>
<dependencies>
<dependency>
<groupId>org.springframework.boot</groupId>
<artifactId>spring-boot-starter-web</artifactId>
</dependency>
</dependencies>
2??创建启动类
import org.springframework.boot.SpringApplication;
import org.springframework.boot.autoconfigure.SpringBootApplication;

@SpringBootApplication(scanBasePackages = "com.springboot")
public class MainApplication {

    public static void main(String[] args) {
        SpringApplication.run(MainApplication.class, args);
    }
}
3??编写业务
import org.springframework.web.bind.annotation.RequestMapping;
import org.springframework.web.bind.annotation.RestController;

@RestController
public class HelloController {
    @RequestMapping("/hello")
    public String handle01(){
        return "Hello, Spring Boot 2!";
    }
}
4??编写配置文件
??maven工程的resource文件夹中创建application.properties文件
# 设置端口号
server:
	port: 8888
?🍵打包部署
<build>
	<plugins>
		<plugin>
			<groupId>org.springframework.boot</groupId>
			<artifactId>spring-boot-maven-plugin</artifactId>
		</plugin>
	</plugins>
</build>
?🍵 运行&测试
- 运行启动类
- 浏览器输入
http://localhost:8888/hello,将会输出Hello, Spring Boot 2!。
🚎SpringBoot特性
🔜 详细解析:starter场景启动器
💝依赖管理特性
💝自动配置特性
1??依赖管理特性
??开发导入starter场景启动器
??💜见到很多spring-boot-starter-* : *就某种场景
??💜只要引入starter,这个场景的所有常规需要的依赖我们都自动引入
??💜 更多SpringBoot所有支持的场景
??💜见到的 *-spring-boot-starter: 第三方提供的简化开发的场景启动器。
2??自动配置特性
??💛自动配好Tomcat
<dependency>
	<groupId>org.springframework.boot</groupId>
	<artifactId>spring-boot-starter-tomcat</artifactId>
	<version>2.3.4.RELEASE</version>
	<scope>compile</scope>
</dependency>
??💛自动配好SpringMVC
???引入SpringMVC全套组件
???自动配好SpringMVC常用组件(功能)
??💛自动配好Web常见功能,如:字符编码问题
???SpringBoot帮我们配置好了所有web开发的常见场景
??💛默认的包结构
???主程序所在包及其下面的所有子包里面的组件都会被默认扫描进来,无需以前的包扫描配置,想要改变扫描路径:
???@SpringBootApplication(scanBasePackages=“com.springboot”)
???@ComponentScan 指定扫描路径
@SpringBootApplication(scanBasePackages="com.springboot")
等同于
@SpringBootConfiguration
@EnableAutoConfiguration
@ComponentScan("com.springboot")
??💛按需加载所有自动配置项
???非常多的starter
???引入了哪些场景这个场景的自动配置才会开启
???SpringBoot所有的自动配置功能都在 spring-boot-autoconfigure 包里面
🛺底层注解
1??@Configuration:声明配置类
??🧡配置类里面使用@Bean标注在方法上给容器注册组件,默认也是单实例的
??🧡配置类本身也是组件
@Configuration(proxyBeanMethods = false)(每个@Bean方法被调用多少次返回的组件都是新创建的)
@Configuration(proxyBeanMethods = true) (保证每个@Bean方法被调用多少次返回的组件都是单实例的)(默认)
??🧡最佳实战
- 配置 类组件之间无依赖关系用Lite模式加速容器启动过程,减少判断
- 配置 类组件之间有依赖关系,方法会被调用得到之前单实例组件,用Full模式(默认)
2??@Import:导入组件
@Bean、@Component、@Controller、@Service、@Repository,它们是Spring的基本标签,在SpringBoot中并未改变它们原来的功能。
@Import({User.class, DBHelper.class})
@Configuration(proxyBeanMethods = false) //告诉SpringBoot这是一个配置类 == 配置文件
public class MyConfig {
}
3??@Conditional:条件装配
??条件装配:满足Conditional指定的条件,则进行组件注入

@Configuration(proxyBeanMethods = false)
@ConditionalOnMissingBean(name = "tom")//没有tom名字的Bean时,MyConfig类的Bean才能生效。
public class MyConfig {

    @Bean
    public User user01(){
        User zhangsan = new User("zhangsan", 18);
        zhangsan.setPet(tomcatPet());
        return zhangsan;
    }

    @Bean("tom22")
    public Pet tomcatPet(){
        return new Pet("tomcat");
    }
}
4??@ImportResource:导入Spring配置文件
<?xml version="1.0" encoding="UTF-8"?>
<beans ...">

    <bean id="haha" class="com.lun.boot.bean.User">
        <property name="name" value="zhangsan"></property>
        <property name="age" value="18"></property>
    </bean>

    <bean id="hehe" class="com.lun.boot.bean.Pet">
        <property name="name" value="tomcat"></property>
    </bean>
</beans>
@ImportResource("classpath:beans.xml")
public class MyConfig {
...
}
5??@ConfigurationProperties:配置绑定
??💜Spring Boot一种配置配置绑定:@ConfigurationProperties + @Component
???假设有配置文件application.properties
mycar.brand=BYD
mycar.price=100000
@Component
@ConfigurationProperties(prefix = "mycar")
public class Car {
...
}
??💜Spring Boot另一种配置配置绑定:@EnableConfigurationProperties + @ConfigurationProperties
//开启属性配置功能
@EnableConfigurationProperties(Car.class)
public class MyConfig {
...
}
@ConfigurationProperties(prefix = "mycar")
public class Car {
...
}
🚌自动配置流程
分析下@SpringBootApplication
@Target(ElementType.TYPE)
@Retention(RetentionPolicy.RUNTIME)
@Documented
@Inherited
@SpringBootConfiguration
@EnableAutoConfiguration
@ComponentScan(
    excludeFilters = {@Filter(
    type = FilterType.CUSTOM,
    classes = {TypeExcludeFilter.class}
), @Filter(
    type = FilterType.CUSTOM,
    classes = {AutoConfigurationExcludeFilter.class}
)}
)
public @interface SpringBootApplication {
    ...
}
??🚨重点分析@SpringBootConfiguration,@ComponentScan,@EnableAutoConfiguration
1??@SpringBootConfiguration
??@Configuration:当前类是一个配置类
@Target(ElementType.TYPE)
@Retention(RetentionPolicy.RUNTIME)
@Documented
@Configuration
public @interface SpringBootConfiguration {
    @AliasFor(
        annotation = Configuration.class
    )
    boolean proxyBeanMethods() default true;
}
2??@ComponentScan
??指定扫描哪些Spring注解
3??@EnableAutoConfiguration
@Target(ElementType.TYPE)
@Retention(RetentionPolicy.RUNTIME)
@Documented
@Inherited
@AutoConfigurationPackage
@Import(AutoConfigurationImportSelector.class)
public @interface EnableAutoConfiguration {
    String ENABLED_OVERRIDE_PROPERTY = "spring.boot.enableautoconfiguration";

    Class<?>[] exclude() default {};

    String[] excludeName() default {};
}
??🚨重点分析@AutoConfigurationPackage,@Import(AutoConfigurationImportSelector.class)
1??@AutoConfigurationPackage
@Target(ElementType.TYPE)
@Retention(RetentionPolicy.RUNTIME)
@Documented
@Inherited
@Import(AutoConfigurationPackages.Registrar.class)//给容器中导入一个组件
public @interface AutoConfigurationPackage {
    String[] basePackages() default {};

    Class<?>[] basePackageClasses() default {};
}
- 利用Registrar给容器中导入一系列组件
- 将指定的一个包下的所有组件导入进MainApplication所在包下。
2??@Import(AutoConfigurationImportSelector.class)
1. 利用`getAutoConfigurationEntry(annotationMetadata);`给容器中批量导入一些组件
2. 调用`List<String> configurations = getCandidateConfigurations(annotationMetadata, attributes)`获取到所有需要导入到容器中的配置类
3. 利用工厂加载 `Map<String, List<String>> loadSpringFactories(@Nullable ClassLoader classLoader);`得到所有的组件
4. 从`META-INF/spring.factories`位置来加载一个文件。
   - 默认扫描我们当前系统里面所有`META-INF/spring.factories`位置的文件
   - `spring-boot-autoconfigure-2.3.4.RELEASE.jar`包里面也有`META-INF/spring.factories`
# 文件里面写死了spring-boot一启动就要给容器中加载的所有配置类
# spring-boot-autoconfigure-2.3.4.RELEASE.jar/META-INF/spring.factories
# Auto Configure
org.springframework.boot.autoconfigure.EnableAutoConfiguration=\
org.springframework.boot.autoconfigure.admin.SpringApplicationAdminJmxAutoConfiguration,\
org.springframework.boot.autoconfigure.aop.AopAutoConfiguration,\
...
虽然我们127个场景的所有自动配置启动的时候默认全部加载,但是xxxxAutoConfiguration按照条件装配规则(@Conditional),最终会按需配置。
??自动配置流程
?🚩SpringBoot先加载所有的自动配置类 xxxxxAutoConfiguration
?🚩每个自动配置类按照条件进行生效,默认都会绑定配置文件指定的值。(xxxxProperties里面读取,xxxProperties和配置文件进行了绑定)
?🚩生效的配置类就会给容器中装配很多组件
?🚩只要容器中有这些组件,相当于这些功能就有了
?🚩定制化配置
??用户直接自己@Bean替换底层的组件
??用户去看这个组件是获取的配置文件什么值就去修改。
🌸SpringBoot最佳实践
🔜 详细解析:SpringBoot属性配置
💝核心属性
💝缓存属性
💝JSON属性
?🌸引入场景依赖
??🤎官方文档

?🌸查看自动配置了哪些(选做)
??💙自己分析,引入场景对应的自动配置一般都生效了
??💙配置文件中debug=true开启自动配置报告。
???Negative(不生效)
???Positive(生效)
?🌸是否需要修改
??💚参照文档修改配置项
???官方文档
???自己分析。xxxxProperties绑定了配置文件的哪些。

??💚自定义加入或者替换组件
???@Bean、@Component…
??💚自定义器 XXXXXCustomizer;
1??添加banner
?🌸spring.banner.image.location=banner1.txt
${AnsiColor.BRIGHT_YELLOW}
????????????????????????????
📽? CSDN: 天才小狐狸
📽? 公众号: Java设计
🗳? 邮箱:genius.fox@gmail.com
🧫 含泪播种的人一定能含笑收获
????????????????????????????
?🕰?版本:
    🩸Spring Boot Version: ${spring-boot.version}
2??lombok
 <dependency>
     <groupId>org.projectlombok</groupId>
     <artifactId>lombok</artifactId>
</dependency>
3??dev-tools热部署
<dependencies>
    <dependency>
        <groupId>org.springframework.boot</groupId>
        <artifactId>spring-boot-devtools</artifactId>
        <optional>true</optional>
    </dependency>
</dependencies>
??在IDEA中,项目或者页面修改以后:Ctrl+F9。
🍎配置文件
1??properties格式
jdbc.driver=com.mysql.jdbc.Driver
jdbc.url=jdbc:mysql://localhost:3306/ssm
jdbc.username=root
jdbc.password=root
2??yml格式
jdbc:
	driver: com.mysql.jdbc.Driver  #jdbc.driver
	url: jdbc:mysql://localhost:3306/ssm
	password: root
	username: root
?🍎yaml基本语法
🍎大小写敏感,区分大小写
🍎数据值前边必须有空格,作为分隔符
🍎使用缩进表示层级关系
🍎缩进时不允许使用Tab键,只允许使用空格(各个系统 Tab对应的
🍎空格数目可能不同,导致层次混乱)。
🍎缩进的空格数目不重要,只要相同层级的元素左侧对齐即可
🍎’'#" 表示注释,从这个字符一直到行尾,都会被解析器忽略。
?🍎yaml数据格式
??💙字面量:单个的、不可再分的值。date、boolean、string、number、null
k: v
yaml中 字符串默认是无需加引号的
单引号会原样输出
双引号会识别转义符 比如 \n ,输出时会换行
??💙对象:键值对的集合。map、hash、set、object
#行内写法:
k: {k1:v1,k2:v2,k3:v3}

#或
k:
  k1: v1
  k2: v2
  k3: v3
??💙数组:一组按次序排列的值。array、list、queue
#行内写法:

k: [v1,v2,v3]

#或者

k:
 - v1
 - v2
 - v3
3??自定义类绑定的配置提示
<dependency>
    <groupId>org.springframework.boot</groupId>
    <artifactId>spring-boot-configuration-processor</artifactId>
    <optional>true</optional>
</dependency>
??💙下面插件作用是工程打包时,不将spring-boot-configuration-processor打进包内,让其只在编码的时候有用。
<build>
    <plugins>
        <plugin>
            <groupId>org.springframework.boot</groupId>
            <artifactId>spring-boot-maven-plugin</artifactId>
            <configuration>
                <excludes>
                    <exclude>
                        <groupId>org.springframework.boot</groupId>
                        <artifactId>spring-boot-configuration-processor</artifactId>
                    </exclude>
                </excludes>
            </configuration>
        </plugin>
    </plugins>
</build>
🚌Web开发简介
1??不用@EnableWebMvc注解,使用 @Configuration + WebMvcConfigurer 自定义规则
2??声明 WebMvcRegistrations 改变默认底层组件
3??使用 @EnableWebMvc+@Configuration+DelegatingWebMvcConfiguration 全面接管SpringMVC
🚑静态资源规则与定制化
1??静态资源目录
??💙只要静态资源放在类路径下: called /static
??💙(or /public )(or /resources)( or /META-INF/resources)
访问 : 当前项目根路径/ + 静态资源名
原理: 静态映射/**。
请求进来,先去找Controller看能不能处理。不能处理的所有请求又都交给静态资源处理器。静态资源也找不到则响应404页面。
也可以改变默认的静态资源路径,/static,/public,/resources,/META-INF/resources失效
spring:
  resources:
    static-locations: [classpath:/haha/]
2??静态资源访问前缀
??💙当前项目 + static-path-pattern + 静态资源名 = 静态资源文件夹下找
spring:
  mvc:
    static-path-pattern: /res/**
??💙根据上述代码,我们可以同过配置禁止所有静态资源规则
spring:
  resources:
    add-mappings: false   #禁用所有静态资源规则
3??welcome欢迎页支持
??💜静态资源路径下 index.html。
??💜可以配置静态资源路径
??💜但是不可以配置静态资源的访问前缀。否则导致 index.html不能被默认访问
spring:
#  mvc:
#    static-path-pattern: /res/**   这个会导致welcome page功能失效
  resources:
    static-locations: [classpath:/haha/]
??💜controller能处理/index
4??自定义Favicon
??💚指网页标签上的小图标。
??💚favicon.ico 放在静态资源目录下即可。
spring:
#  mvc:
#    static-path-pattern: /res/**   这个会导致 Favicon 功能失效
🚒静态资源原理
??WebMvcAutoConfiguration
??💙SpringBoot启动默认加载 xxxAutoConfiguration 类(自动配置类)
??💙SpringMVC功能的自动配置类WebMvcAutoConfiguration:生效
@Configuration(proxyBeanMethods = false)
@ConditionalOnWebApplication(type = Type.SERVLET)
@ConditionalOnClass({ Servlet.class, DispatcherServlet.class, WebMvcConfigurer.class })
@ConditionalOnMissingBean(WebMvcConfigurationSupport.class)
@AutoConfigureOrder(Ordered.HIGHEST_PRECEDENCE + 10)
@AutoConfigureAfter({ DispatcherServletAutoConfiguration.class, TaskExecutionAutoConfiguration.class,
		ValidationAutoConfiguration.class })
public class WebMvcAutoConfiguration {
    ...
}
1??WebMvcAutoConfigurationAdapter
@Configuration(proxyBeanMethods = false)
@Import(EnableWebMvcConfiguration.class)
@EnableConfigurationProperties({ WebMvcProperties.class, ResourceProperties.class })
@Order(0)
public static class WebMvcAutoConfigurationAdapter implements WebMvcConfigurer {
    ...
}
??💜配置文件的相关属性的绑定:WebMvcProperties==spring.mvc、ResourceProperties==spring.web

@ConfigurationProperties(prefix = "spring.mvc")
public class WebMvcProperties {
	....
}
@ConfigurationProperties("spring.web")
public class WebProperties {
	....
}
??💜配置类只有一个有参构造器,有参构造器所有参数的值都会从容器中确定
    @Import({WebMvcAutoConfiguration.EnableWebMvcConfiguration.class})
    @EnableConfigurationProperties({WebMvcProperties.class, WebProperties.class})
    @Order(0)
    public static class WebMvcAutoConfigurationAdapter implements WebMvcConfigurer, ServletContextAware {
        private static final Log logger = LogFactory.getLog(WebMvcConfigurer.class);
        private final Resources resourceProperties;
        private final WebMvcProperties mvcProperties;
        private final ListableBeanFactory beanFactory;
        private final ObjectProvider<HttpMessageConverters> messageConvertersProvider;
        private final ObjectProvider<DispatcherServletPath> dispatcherServletPath;
        private final ObjectProvider<ServletRegistrationBean<?>> servletRegistrations;
        private final WebMvcAutoConfiguration.ResourceHandlerRegistrationCustomizer resourceHandlerRegistrationCustomizer;
        private ServletContext servletContext;

        public WebMvcAutoConfigurationAdapter(WebProperties webProperties, WebMvcProperties mvcProperties, ListableBeanFactory beanFactory, ObjectProvider<HttpMessageConverters> messageConvertersProvider, ObjectProvider<WebMvcAutoConfiguration.ResourceHandlerRegistrationCustomizer> resourceHandlerRegistrationCustomizerProvider, ObjectProvider<DispatcherServletPath> dispatcherServletPath, ObjectProvider<ServletRegistrationBean<?>> servletRegistrations) {
            this.resourceProperties = webProperties.getResources();
            this.mvcProperties = mvcProperties;
            this.beanFactory = beanFactory;
            this.messageConvertersProvider = messageConvertersProvider;
            this.resourceHandlerRegistrationCustomizer = (WebMvcAutoConfiguration.ResourceHandlerRegistrationCustomizer)resourceHandlerRegistrationCustomizerProvider.getIfAvailable();
            this.dispatcherServletPath = dispatcherServletPath;
            this.servletRegistrations = servletRegistrations;
            this.mvcProperties.checkConfiguration();
        }
- ResourceProperties resourceProperties;获取和spring.resources绑定的所有的值的对象
- WebMvcProperties mvcProperties 获取和spring.mvc绑定的所有的值的对象
- ListableBeanFactory beanFactory Spring的beanFactory
- HttpMessageConverters 找到所有的HttpMessageConverters
- ResourceHandlerRegistrationCustomizer 找到 资源处理器的自定义器。
- DispatcherServletPath
- ServletRegistrationBean 给应用注册Servlet、Filter…
2??资源处理的默认规则
...
public class WebMvcAutoConfiguration {
    ...
	public static class EnableWebMvcConfiguration extends DelegatingWebMvcConfiguration implements ResourceLoaderAware {
        ...
		@Override
		protected void addResourceHandlers(ResourceHandlerRegistry registry) {
			super.addResourceHandlers(registry);
			if (!this.resourceProperties.isAddMappings()) {
				logger.debug("Default resource handling disabled");
				return;
			}
			ServletContext servletContext = getServletContext();
			addResourceHandler(registry, "/webjars/**", "classpath:/META-INF/resources/webjars/");
			addResourceHandler(registry, this.mvcProperties.getStaticPathPattern(), (registration) -> {
				registration.addResourceLocations(this.resourceProperties.getStaticLocations());
				if (servletContext != null) {
					registration.addResourceLocations(new ServletContextResource(servletContext, SERVLET_LOCATION));
				}
			});
		}
        ...

    }
    ...
}
?💝根据上述代码,我们可以同过配置禁止所有静态资源规则
spring:
  resources:
    add-mappings: false   #禁用所有静态资源规则
3??静态资源规则
@ConfigurationProperties(prefix = "spring.resources", ignoreUnknownFields = false)
public class ResourceProperties {

    private static final String[] CLASSPATH_RESOURCE_LOCATIONS = { "classpath:/META-INF/resources/",
            "classpath:/resources/", "classpath:/static/", "classpath:/public/" };

    /**
     * Locations of static resources. Defaults to classpath:[/META-INF/resources/,
     * /resources/, /static/, /public/].
     */
    private String[] staticLocations = CLASSPATH_RESOURCE_LOCATIONS;
    ...
}
4??欢迎页的处理规则
...
public class WebMvcAutoConfiguration {
    ...
	public static class EnableWebMvcConfiguration extends DelegatingWebMvcConfiguration implements ResourceLoaderAware {
        ...
		@Bean
		public WelcomePageHandlerMapping welcomePageHandlerMapping(ApplicationContext applicationContext,
				FormattingConversionService mvcConversionService, ResourceUrlProvider mvcResourceUrlProvider) {
			WelcomePageHandlerMapping welcomePageHandlerMapping = new WelcomePageHandlerMapping(
					new TemplateAvailabilityProviders(applicationContext), applicationContext, getWelcomePage(),
					this.mvcProperties.getStaticPathPattern());
			welcomePageHandlerMapping.setInterceptors(getInterceptors(mvcConversionService, mvcResourceUrlProvider));
			welcomePageHandlerMapping.setCorsConfigurations(getCorsConfigurations());
			return welcomePageHandlerMapping;
		}
??💚WelcomePageHandlerMapping的构造方法如下
WelcomePageHandlerMapping(TemplateAvailabilityProviders templateAvailabilityProviders,
                          ApplicationContext applicationContext, Resource welcomePage, String staticPathPattern) {
    if (welcomePage != null && "/**".equals(staticPathPattern)) {
        //要用欢迎页功能,必须是/**
        logger.info("Adding welcome page: " + welcomePage);
        setRootViewName("forward:index.html");
    }
    else if (welcomeTemplateExists(templateAvailabilityProviders, applicationContext)) {
        //调用Controller /index
        logger.info("Adding welcome page template: index");
        setRootViewName("index");
    }
}
这构造方法内的代码也解释了web场景-welcome与favicon功能中配置static-path-pattern了,welcome页面和小图标失效的问题。
🚚Rest映射原理
1??请求映射
??💜现在: /user
???GET-获取用户?DELETE-删除用户?PUT-修改用户?POST-保存用户
??💜核心Filter;HiddenHttpMethodFilter
???1)开启页面表单的Rest功能
???2)页面 form的属性method=post,隐藏域 _method=put、delete等(如果直接get或post,无需隐藏域)
???3)编写请求映射
spring:
  mvc:
    hiddenmethod:
      filter:
        enabled: true   #开启页面表单的Rest功能
<form action="/user" method="get">
    <input value="REST-GET提交" type="submit" />
</form>

<form action="/user" method="post">
    <input value="REST-POST提交" type="submit" />
</form>

<form action="/user" method="post">
        <input name="_method" type="hidden" value="DELETE"/>
    <input value="REST-DELETE 提交" type="submit"/>
</form>

<form action="/user" method="post">
    <input name="_method" type="hidden" value="PUT" />
    <input value="REST-PUT提交"type="submit" />
<form>
@RequestMapping(value = "/user",method = RequestMethod.GET)
    public String getUser(){
        return "GET-张三";
    }

    @RequestMapping(value = "/user",method = RequestMethod.POST)
    public String saveUser(){
        return "POST-张三";
    }


    @RequestMapping(value = "/user",method = RequestMethod.PUT)
    public String putUser(){
        return "PUT-张三";
    }

    @RequestMapping(value = "/user",method = RequestMethod.DELETE)
    public String deleteUser(){
        return "DELETE-张三";
    }
2??Rest原理
??🤎表单提交会带上\_method=PUT
??🤎请求过来被HiddenHttpMethodFilter拦截
??🤎请求是否正常,并且是POST
???获取到\_method的值。
???兼容以下请求;PUT;DELETE;PATCH
??🤎原生request(都是post请求),包装模式requesWrapper重写了getMethod方法,返回的是传入的值(put delete patch )。
??🤎过滤器链放行的时候用wrapper。以后的方法调用getMethod是调用requesWrapper的。
public class HiddenHttpMethodFilter extends OncePerRequestFilter {

	private static final List<String> ALLOWED_METHODS =
			Collections.unmodifiableList(Arrays.asList(HttpMethod.PUT.name(),
					HttpMethod.DELETE.name(), HttpMethod.PATCH.name()));

	/** Default method parameter: {@code _method}. */
	public static final String DEFAULT_METHOD_PARAM = "_method";

	private String methodParam = DEFAULT_METHOD_PARAM;


	/**
	 * Set the parameter name to look for HTTP methods.
	 * @see #DEFAULT_METHOD_PARAM
	 */
	public void setMethodParam(String methodParam) {
		Assert.hasText(methodParam, "'methodParam' must not be empty");
		this.methodParam = methodParam;
	}

	@Override
	protected void doFilterInternal(HttpServletRequest request, HttpServletResponse response, FilterChain filterChain)
			throws ServletException, IOException {

		HttpServletRequest requestToUse = request;

		if ("POST".equals(request.getMethod()) && request.getAttribute(WebUtils.ERROR_EXCEPTION_ATTRIBUTE) == null) {
			String paramValue = request.getParameter(this.methodParam);
			if (StringUtils.hasLength(paramValue)) {
				String method = paramValue.toUpperCase(Locale.ENGLISH);
				if (ALLOWED_METHODS.contains(method)) {
					requestToUse = new HttpMethodRequestWrapper(request, method);
				}
			}
		}

		filterChain.doFilter(requestToUse, response);
	}


	/**
	 * Simple {@link HttpServletRequest} wrapper that returns the supplied method for
	 * {@link HttpServletRequest#getMethod()}.
	 */
	private static class HttpMethodRequestWrapper extends HttpServletRequestWrapper {

		private final String method;

		public HttpMethodRequestWrapper(HttpServletRequest request, String method) {
			super(request);
			this.method = method;
		}

		@Override
		public String getMethod() {
			return this.method;
		}
	}

}
??🚨Rest使用客户端工具:如PostMan可直接发送put、delete等方式请求,不会走Filter。
??🚨@GetMapping(“/user”) = @RequestMapping(value = “/user”,method = RequestMethod.GET)
3??改变默认的_method
??@ConditionalOnMissingBean(HiddenHttpMethodFilter.class)意味着在没有HiddenHttpMethodFilter时,才执行hiddenHttpMethodFilter()。
@Configuration(proxyBeanMethods = false)
@ConditionalOnWebApplication(type = Type.SERVLET)
@ConditionalOnClass({ Servlet.class, DispatcherServlet.class, WebMvcConfigurer.class })
@ConditionalOnMissingBean(WebMvcConfigurationSupport.class)
@AutoConfigureOrder(Ordered.HIGHEST_PRECEDENCE + 10)
@AutoConfigureAfter({ DispatcherServletAutoConfiguration.class, TaskExecutionAutoConfiguration.class,
		ValidationAutoConfiguration.class })
public class WebMvcAutoConfiguration {

    ...

    @Bean
    @ConditionalOnMissingBean(HiddenHttpMethodFilter.class)
    @ConditionalOnProperty(prefix = "spring.mvc.hiddenmethod.filter", name = "enabled", matchIfMissing = false)
    public OrderedHiddenHttpMethodFilter hiddenHttpMethodFilter() {
        return new OrderedHiddenHttpMethodFilter();
    }

    ...
}
public class HiddenHttpMethodFilter extends OncePerRequestFilter {
    private static final List<String> ALLOWED_METHODS;
    public static final String DEFAULT_METHOD_PARAM = "_method";
    private String methodParam = "_method";

    public HiddenHttpMethodFilter() {
    }

    public void setMethodParam(String methodParam) {
        Assert.hasText(methodParam, "'methodParam' must not be empty");
        this.methodParam = methodParam;
    }
   .....
}
?💥因此,我们可以自定义filter,改变默认的\_method。
@Configuration(proxyBeanMethods = false)
public class Config {
    @Bean
    public HiddenHttpMethodFilter hiddenHttpMethodFilter() {
        HiddenHttpMethodFilter hiddenHttpMethodFilter = new HiddenHttpMethodFilter();
        hiddenHttpMethodFilter.setMethodParam("_firefly");
        return hiddenHttpMethodFilter;
    }
}
将\_method改成_firefly。
<form action="/user" method="post">
    <input name="_firefly" type="hidden" value="DELETE"/>
    <input value="REST-DELETE 提交" type="submit"/>
</form>
🚈请求映射原理

?💓SpringMVC功能分析都从 org.springframework.web.servlet.DispatcherServlet -> doDispatch()
protected void doDispatch(HttpServletRequest request, HttpServletResponse response) throws Exception {
    HttpServletRequest processedRequest = request;
    HandlerExecutionChain mappedHandler = null;
    boolean multipartRequestParsed = false;

    WebAsyncManager asyncManager = WebAsyncUtils.getAsyncManager(request);

    try {
        ModelAndView mv = null;
        Exception dispatchException = null;

        try {
            processedRequest = checkMultipart(request);
            multipartRequestParsed = (processedRequest != request);

            // 找到当前请求使用哪个Handler(Controller的方法)处理
            mappedHandler = getHandler(processedRequest);

            //HandlerMapping:处理器映射。/xxx->>xxxx
    ...
}


?💓所有的请求映射都在HandlerMapping中:
??💘SpringBoot自动配置欢迎页的 WelcomePageHandlerMapping 。访问 /能访问到index.html;
?💓SpringBoot自动配置了默认 的 RequestMappingHandlerMapping
?💓请求进来,挨个尝试所有的HandlerMapping看是否有请求信息。
??💝如果有就找到这个请求对应的handler
??💝如果没有就是下一个 HandlerMapping
?💓我们需要一些自定义的映射处理,我们也可以自己给容器中放HandlerMapping。自定义 HandlerMapping
🐷常用参数注解
@PathVariable:路径变量@RequestHeader:获取请求头@RequestParam:获取请求参数(指问号后的参数,url?a=1&b=2)@CookieValue:获取Cookie值@RequestAttribute:获取request域属性@RequestBody:获取请求体[POST]@MatrixVariable:矩阵变量@ModelAttribute
1??@RequestAttribute:获取request域属性
@Controller
public class AdoController {
    @GetMapping("/goto")
    public String goToPage(HttpServletRequest request){

        request.setAttribute("msg","成功了...");
        request.setAttribute("code",200);
        return "forward:/success";  //转发到  /success请求
    }
    @ResponseBody
    @GetMapping("/success")
    public Map success(@RequestAttribute(value = "msg",required = false) String msg,
                       @RequestAttribute(value = "code",required = false)Integer code,
                       HttpServletRequest request){
        Object msg1 = request.getAttribute("msg");

        Map<String,Object> map = new HashMap<>();

        map.put("reqMethod_msg",msg1);
        map.put("annotation_msg",msg);
        return map;
    }
2??@MatrixVariable:矩阵变量
??
???🔥语法: 请求路径:
/cars/sell;low=34;brand=byd,audi,yd
?????🔥SpringBoot默认是禁用了矩阵变量的功能
?????🔥手动开启:UrlPathHelper的removeSemicolonContent设置为false,让其支持矩阵变量的。
?????🔥 矩阵变量必须有url路径变量才能被解析
?????🔥 手动开启矩阵变量:
??? 方式一:实现WebMvcConfigurer接口:
@Configuration(proxyBeanMethods = false)
public class WebConfig implements WebMvcConfigurer {
    @Override
    public void configurePathMatch(PathMatchConfigurer configurer) {

        UrlPathHelper urlPathHelper = new UrlPathHelper();
        // 不移除;后面的内容。矩阵变量功能就可以生效
        urlPathHelper.setRemoveSemicolonContent(false);
        configurer.setUrlPathHelper(urlPathHelper);
    }
}
???方式二:创建返回WebMvcConfigurerBean
@Configuration(proxyBeanMethods = false)
public class WebConfig{
    @Bean
    public WebMvcConfigurer webMvcConfigurer(){
        return new WebMvcConfigurer() {
            @Override
            public void configurePathMatch(PathMatchConfigurer configurer) {
                UrlPathHelper urlPathHelper = new UrlPathHelper();
                // 不移除后面的内容,矩阵变量功能就可以生效
                urlPathHelper.setRemoveSemicolonContent(false);
                configurer.setUrlPathHelper(urlPathHelper);
            }
        }
    }
}
?????🔥 @MatrixVariable的用例
@RestController
public class ParameterTestController {

	// /boss/1;age=20/2;age=10
    @GetMapping("/boss/{bossId}/{empId}")
    public Map boss(@MatrixVariable(value = "age",pathVar = "bossId") Integer bossAge,
                    @MatrixVariable(value = "age",pathVar = "empId") Integer empAge){
        Map<String,Object> map = new HashMap<>();
        map.put("bossAge",bossAge);
        map.put("empAge",empAge);
        return map;
    }

    // /cars/sell;low=34;brand=byd,audi,yd
    @GetMapping("/cars/{path}")
    public Map carsSell(@MatrixVariable("low") Integer low,
                        @MatrixVariable("brand") List<String> brand,
                        @PathVariable("path") String path){
        Map<String,Object> map = new HashMap<>();

        map.put("low",low);
        map.put("brand",brand);
        map.put("path",path);
        return map;
    }
}
🚍参数解析原理
??💗HandlerMapping中找到能处理请求的Handler(Controller.method())
??💗为当前Handler找一个适配器 HandlerAdapter,用的最多的是RequestMappingHandlerAdapter
??💗适配器执行目标方法并确定方法参数的每一个值。
public class DispatcherServlet extends FrameworkServlet {

    protected void doDispatch(HttpServletRequest request, HttpServletResponse response) throws Exception {
        HttpServletRequest processedRequest = request;
        HandlerExecutionChain mappedHandler = null;
        boolean multipartRequestParsed = false;

        WebAsyncManager asyncManager = WebAsyncUtils.getAsyncManager(request);

        try {
            ModelAndView mv = null;
            Exception dispatchException = null;

            try {
                processedRequest = checkMultipart(request);
                multipartRequestParsed = (processedRequest != request);

                // Determine handler for the current request.
                mappedHandler = getHandler(processedRequest);
                if (mappedHandler == null) {
                    noHandlerFound(processedRequest, response);
                    return;
                }

                // Determine handler adapter for the current request.
                HandlerAdapter ha = getHandlerAdapter(mappedHandler.getHandler());
                ...
?🚚
🍌
🍿*★如果文章对你有帮助【关注👍点赞??收藏?】一起努力!★* 🍿


🏅 全栈小狐狸的逆袭之路:🔜 Java学习路线
🏅 消息中间件:🔜RabbitMQ
🏅 消息中间件:🔜SpringCloud
🏅 消息中间件:🔜Dubbo
