文章目录
一、概述
1、扫码登录介绍
二维码登录本质上也是一种登录认证方式。既然是登录认证,要做的也就两件事情:告诉系统我是谁,以及向系统证明我是谁。
比如账号密码登录,账号就是告诉系统我是谁, 密码就是向系统证明我是谁; 比如手机验证码登录,手机号就是告诉系统我是谁,验证码就是向系统证明我是谁;
2、扫码登录原理
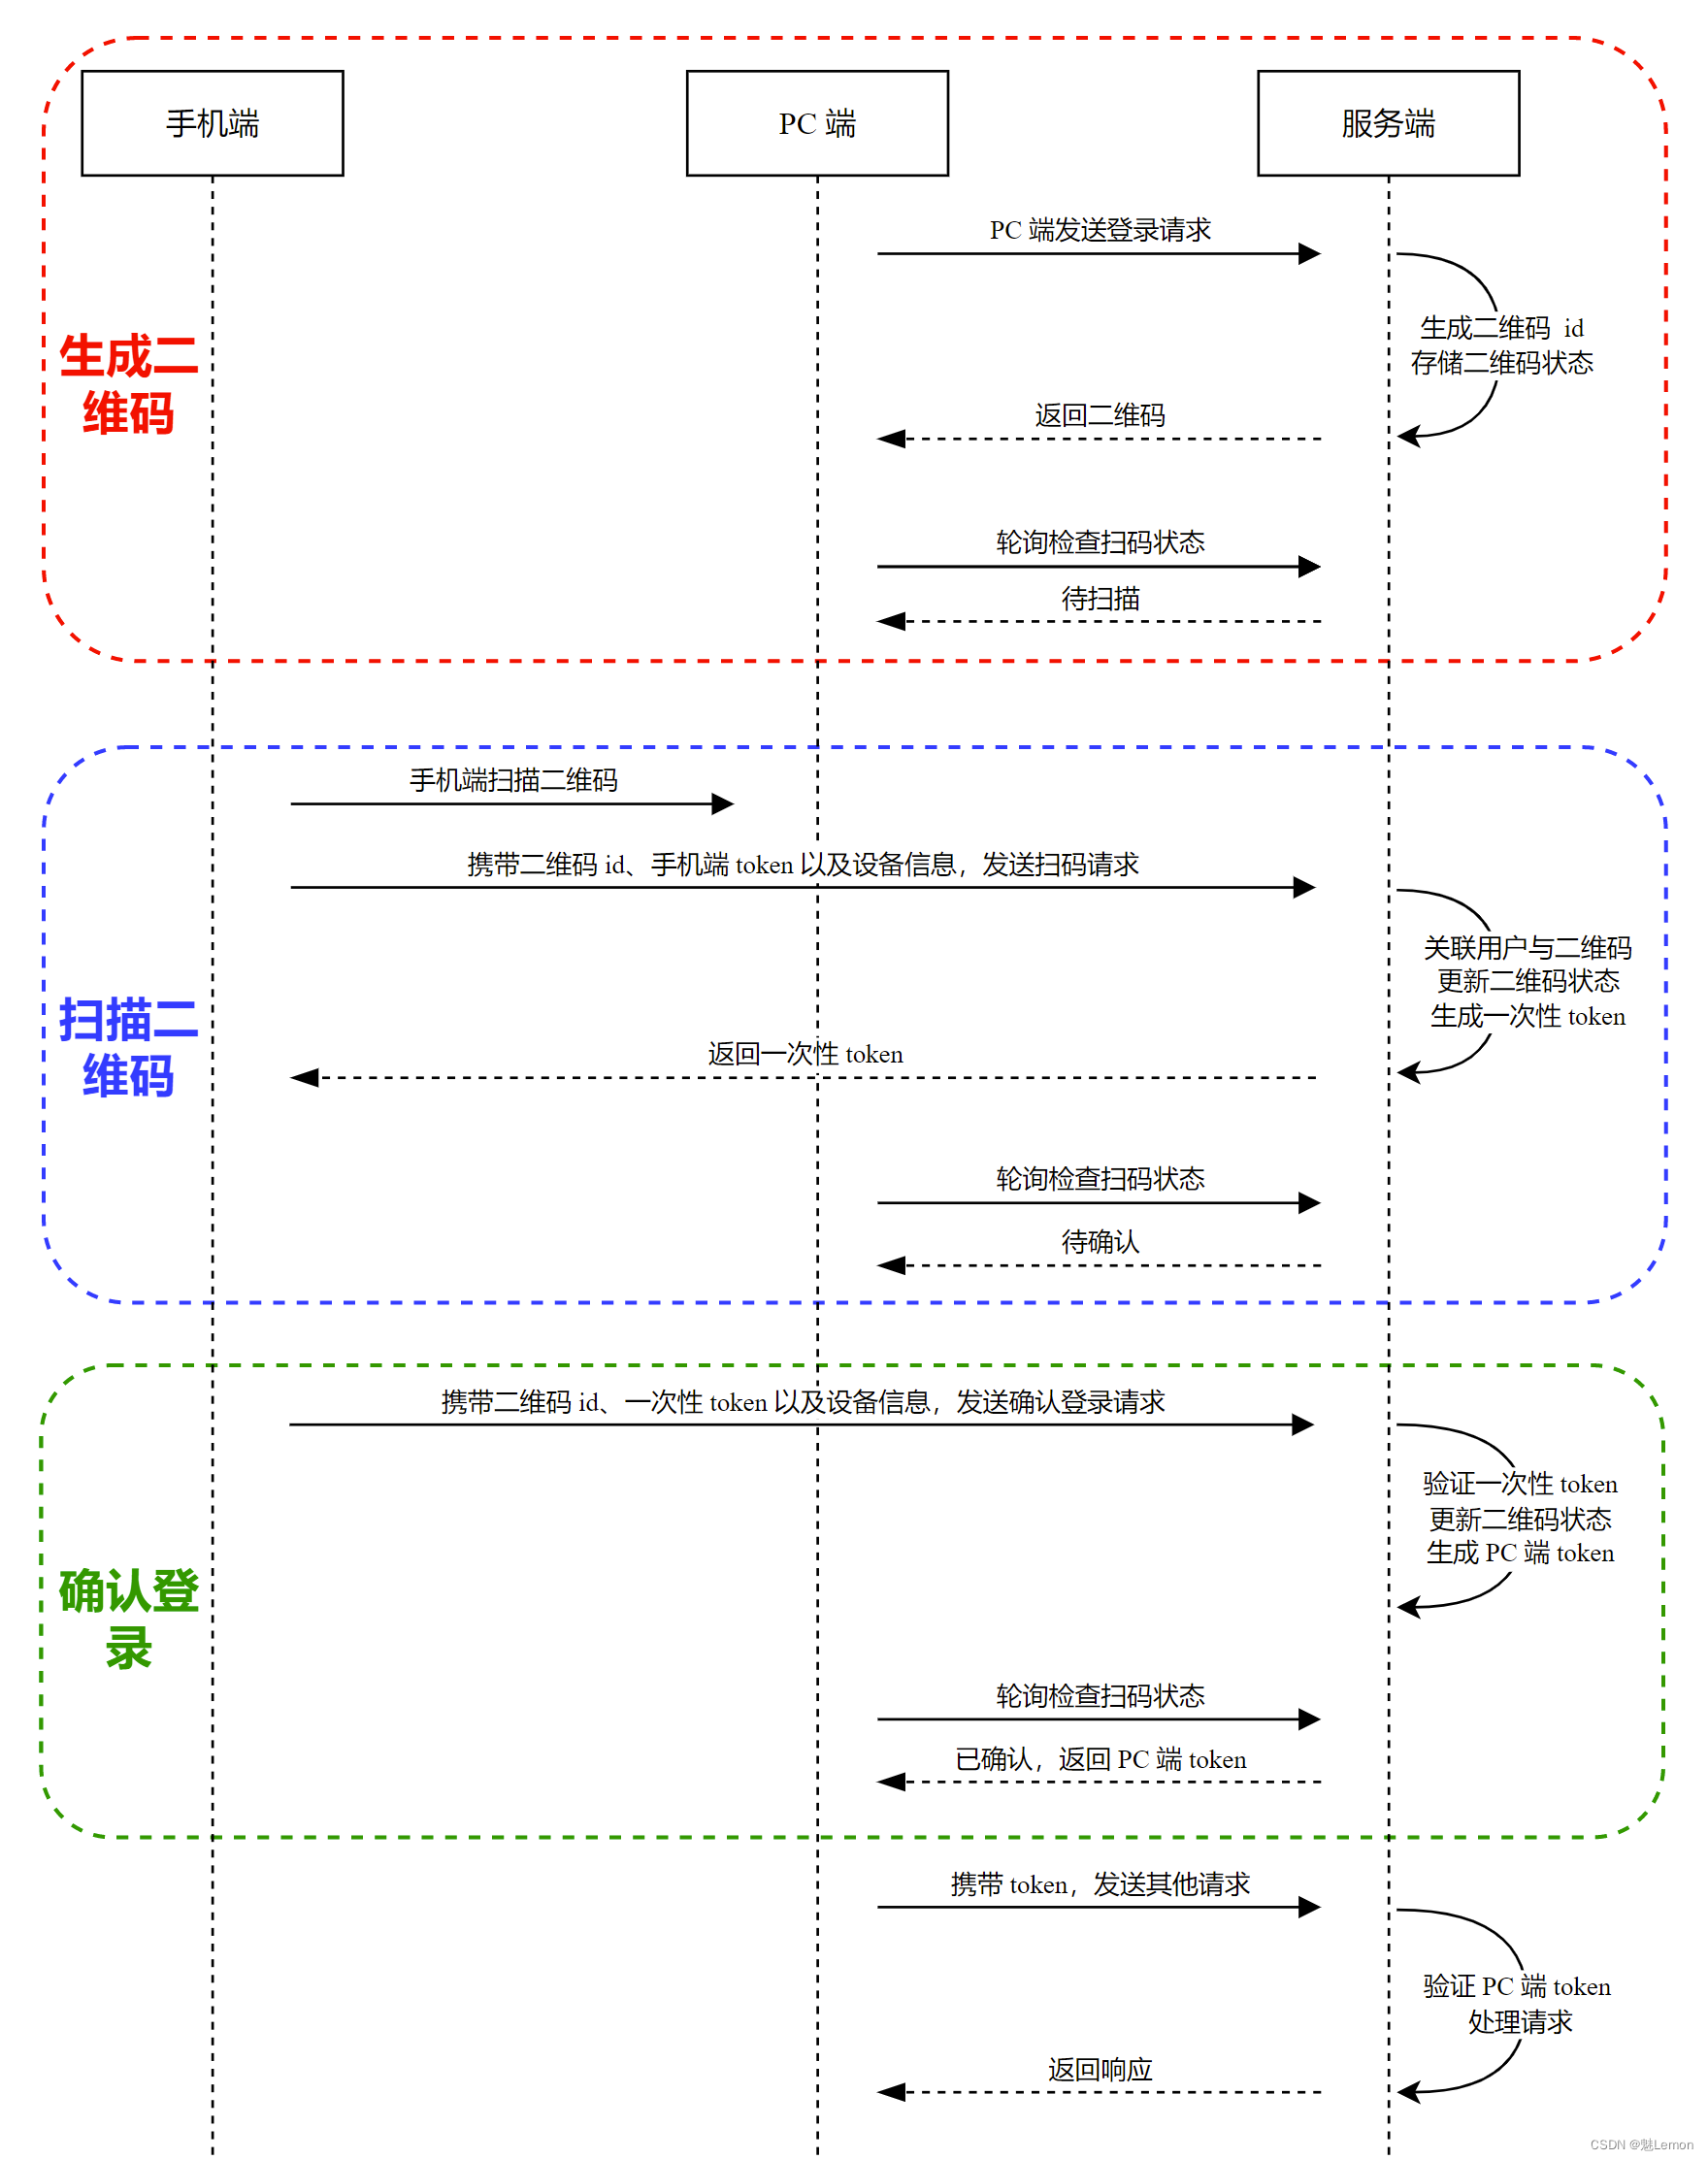
- PC 端发送 “扫码登录” 请求,服务端生成二维码 id,并存储二维码的过期时间、状态等信息
- PC 端获取二维码并显示
- PC 端开始轮询检查二维码的状态,二维码最初为 "待扫描"状态
- 手机端扫描二维码,获取二维码 id
- 手机端向服务端发送 “扫码” 请求,请求中携带二维码 id、手机端 token 以及设备信息
- 服务端验证手机端用户的合法性,验证通过后将二维码状态置为 “待确认”,并将用户信息与二维码关联在一起,之后为手机端生成一个一次性 token,该 token 用作确认登录的凭证
- PC 端轮询时检测到二维码状态为 “待确认”
- 手机端向服务端发送 “确认登录” 请求,请求中携带着二维码 id、一次性 token 以及设备信息
- 服务端验证一次性 token,验证通过后将二维码状态置为 “已确认”,并为 PC 端生成 PC 端 token
- PC 端轮询时检测到二维码状态为 “已确认”,并获取到了 PC 端 token,之后 PC 端不再轮询
- PC 端通过 PC 端 token 访问服务端

二、扫码登录实战(轮询版)
1、环境准备
- SpringBoot
- Lombok
- Redis
2、RedisTemplate序列化
//序列化RedisTemplate
@Configuration
public class RedisConfig {
    // 编写自己的RedisTemplate
    @Bean
    @SuppressWarnings("all")
    public RedisTemplate<String, Object> redisTemplate(RedisConnectionFactory redisConnectionFactory) {
        RedisTemplate<String, Object> template = new RedisTemplate<>();
        template.setConnectionFactory(redisConnectionFactory);
        //序列化配置
        Jackson2JsonRedisSerializer jackson2JsonRedisSerializer = new Jackson2JsonRedisSerializer<>(Object.class);
        ObjectMapper om = new ObjectMapper();
        // 指定要序列化的域,field,get和set,以及修饰符范围,ANY是都有包括private和public
        om.setVisibility(PropertyAccessor.ALL, JsonAutoDetect.Visibility.ANY);
        // 指定序列化输入的类型,类必须是非final修饰的,final修饰的类,比如String,Integer等会跑出异常
        // 序列化时会自动增加类类型,否则无法反序列化
        om.enableDefaultTyping(ObjectMapper.DefaultTyping.NON_FINAL);
        jackson2JsonRedisSerializer.setObjectMapper(om);
        //String的序列化
        StringRedisSerializer stringRedisSerializer = new StringRedisSerializer();
        // key采用String的序列化方式
        template.setKeySerializer(stringRedisSerializer);
        // hash采用String序列方式
        template.setHashKeySerializer(stringRedisSerializer);
        // value采用jackson
        template.setValueSerializer(jackson2JsonRedisSerializer);
        // hash的value采用jackson
        template.setHashValueSerializer(jackson2JsonRedisSerializer);
        template.afterPropertiesSet();
        return template;
    }
}
3、Token工具类
/**
 * token的工具类
 * 使用jwt生成/验证token(jwt JSON Web Token)
 * jwt由三部分组成: 头部(header).载荷(payload).签证(signature)
 * <p>
 * 1.header头部承载两部分信息:
 * {
 *   “type”: “JWT”, 声明类型,这里是jwt
 *   “alg”: “HS256” 声明加密的算法 通常直接使用 HMAC SHA256
 * }
 * 将头部进行base64加密, 构成了第一部分
 * <p>
 * 2.payload载荷就是存放有效信息的地方
 *  (1).标准中注册的声明
 *  (2).公共的声明 (一般不建议存放敏感信息)
 *  (3).私有的声明 (一般不建议存放敏感信息)
 * 将其进行base64加密,得到Jwt的第二部分
 * <p>
 * 3.signature签证信息由三部分组成:
 * (1).header (base64后的)
 * (2).payload (base64后的)
 * (3).secret
 * 需要base64加密后的header和base64加密后的payload连接组成的字符串,
 * 然后通过header中声明的加密方式进行加盐secret组合加密,构成了jwt的第三部分
 */
@Slf4j
public class TokenUtil {
    /**
     * token的失效时间:25天
     */
    private final static long TIME_OUT = 25 * 24 * 60 * 60 *1000L;

    /**
     * token的密钥
     */
    private final static String SECRET = "shawn222";

    /**
     * 生成token
     *
     * @return String
     */
    public static String token(String userId) {
        String token = null;
        try {
            Date date = new Date(System.currentTimeMillis() + TIME_OUT);
            Algorithm algorithm = Algorithm.HMAC256(SECRET);
            Map<String, Object> headers = new HashMap<>();
            headers.put("type", "jwt");
            headers.put("alg", "HS256");
            token = JWT.create()
                    .withClaim("account", userId)
                    .withExpiresAt(date)
                    .withHeader(headers)
                    .sign(algorithm);
        } catch (IllegalArgumentException | JWTCreationException e) {
            e.printStackTrace();
        }
        return token;
    }

    /**
     * token验证
     *
     * @param token token
     * @return String
     */
    public static boolean verify(String token) {
        try {
            Algorithm algorithm = Algorithm.HMAC256(SECRET);
            JWTVerifier jwtVerifier = JWT.require(algorithm).build();
            DecodedJWT decodedJWT = jwtVerifier.verify(token);
            // 客户端可以解密 所以一般不建议存放敏感信息
            log.info("account:" + decodedJWT.getClaim("account").asString());
            return true;
        } catch (IllegalArgumentException | JWTVerificationException e) {
            e.printStackTrace();
            return false;
        }

    }
4、定义扫码状态
public enum CodeStatus {

    /**
     * 过期
     */
    EXPIRE,

    /**
     * 未使用的二维码
     */
    UNUSED,

    /**
     * 已扫码, 等待确认
     */
    CONFIRMING,

    /**
     * 确认登录成功
     */
    CONFIRMED

}
5、定义返回类
@Data
@NoArgsConstructor
public class CodeVO<T> {

    /**
     * 二维码状态
     */
    private CodeStatus codeStatus;

    /**
     * 提示消息
     */
    private String message;

    /**
     * 正式 token
     */
    private T token;

    public CodeVO(CodeStatus codeStatus) {
        this.codeStatus = codeStatus;
    }

    public CodeVO(CodeStatus codeStatus,String message) {
        this.codeStatus = codeStatus;
        this.message = message;
    }

    public CodeVO(CodeStatus codeStatus,String message,T token) {
        this.codeStatus = codeStatus;
        this.message = message;
        this.token=token;
    }

}
6、定义二维码工具类
/**
 * 二维码工具类
 */
public class CodeUtil {

    /**
     * 获取过期二维码存储信息
     *
     * @return 二维码值对象
     */
    public static CodeVO getExpireCodeInfo() {
        return new CodeVO(CodeStatus.EXPIRE,"二维码已更新");
    }

    /**
     * 获取未使用二维码存储信息
     *
     * @return 二维码值对象
     */
    public static CodeVO getUnusedCodeInfo() {
        return new CodeVO(CodeStatus.UNUSED,"二维码等待扫描");
    }

    /**
     * 获取已扫码二维码存储信息
     */
    public static CodeVO getConfirmingCodeInfo() {
        return new CodeVO(CodeStatus.CONFIRMING,"二维码扫描成功,等待确认");
    }

    /**
     * 获取已扫码确认二维码存储信息
     * @return 二维码值对象
     */
    public static CodeVO getConfirmedCodeInfo(String token) {
        return new CodeVO(CodeStatus.CONFIRMED, "二维码已确认",token);
    }

}
7、编写相应方法
@Slf4j
@Service
public class LoginService {

    @Resource
    RedisTemplate<String, Object> redisTemplate;

     /**
     * 生成uuid
     */
    public CommonResult<String> generateUUID(){
        try{
            String uuid = UUID.randomUUID().toString();
            redisTemplate.opsForValue().set(RedisKeyUtil.getScanUUID(uuid),
                    CodeUtil.getUnusedCodeInfo(),RedisKeyUtil.getTimeOut(), TimeUnit.MINUTES);
            return new CommonResult<>(uuid);
        }catch (Exception e){
            log.warn("redis二维码生成异常{}",e.getMessage());
        }

        return new CommonResult("二维码异常,请重新扫描",400);

    }

    /**
     * uuid状态信息
     */
    public CommonResult<CodeVO> getInfoUUID(String uuid) {

        Object object = redisTemplate.opsForValue().get(RedisKeyUtil.getScanUUID(uuid));
        if(object==null){
            return new CommonResult("二维码不存在或者已过期",400);
        }
        return new CommonResult<>((CodeVO)object);
    }


    /**
     * 扫描登录,去确认二维码
     */
    public CommonResult scanQrLogin(String uuid, String account) {
        try {
            Object o = redisTemplate.opsForValue().get(RedisKeyUtil.getScanUUID(uuid));
            if(null==o){
                return new CommonResult<>("二维码异常,请重新扫描",400);
            }
            CodeVO codeVO = (CodeVO) o;
            //获取状态
            CodeStatus codeStatus = codeVO.getCodeStatus();
            // 如果未使用
            if(codeStatus==CodeStatus.UNUSED){
                redisTemplate.opsForValue().set(RedisKeyUtil.getScanUUID(uuid),
                        CodeUtil.getConfirmingCodeInfo(),RedisKeyUtil.getTimeOut(), TimeUnit.MINUTES);
                //你的逻辑

                return new CommonResult<>("请确认登录",200,null);
            }
        }catch (Exception e){
            log.warn("二维码异常{}",e.getMessage());
            return new CommonResult<>("内部错误",500);
        }
        return new CommonResult<>("二维码异常,请重新扫描",400);
    }

    /**
     * 确认登录,返回学生token以及对应信息
     * @param uuid
     * @param id 学生id
     * @return
     */
    public CommonResult confirmQrLogin(String uuid, String id) {

        try{
            CodeVO codeVO = (CodeVO) redisTemplate.opsForValue().get(RedisKeyUtil.getScanUUID(uuid));
            if(null==codeVO){
                return new CommonResult<>("二维码已经失效,请重新扫描",400);
            }
            //获取状态
            CodeStatus codeStatus = codeVO.getCodeStatus();
            // 如果正在确认中,查询学生信息
            if(codeStatus==CodeStatus.CONFIRMING){
                //你的逻辑

                // 生成token
                String token = TokenUtil.token(studentLoginVO.getAccount());

                //redis二维码状态修改,PC可以获取到
                redisTemplate.opsForValue().set(RedisKeyUtil.getScanUUID(uuid),
                        CodeUtil.getConfirmedCodeInfo(token),RedisKeyUtil.getTimeOut(), TimeUnit.MINUTES);


                return new CommonResult<>("登陆成功",200);
            }
            return new CommonResult<>("二维码异常,请重新扫描",400);
        }
        catch (Exception e){
            log.error("确认二维码异常{}",e);
            return new CommonResult<>("内部错误",500);
        }
    }
}
三、扫码登录(长连接版)
当然不仅仅包括短轮训,还有SSE(Server-Send Events,可以用WebFlux实现)以及WebSocket长连接实现,可以参考:Spring Boot + Web Socket 实现扫码登录
参考文章:
Java 语言实现简易版扫码登录
