一.前言:
? ? ?在我们开发过程中,尤其对于Java程序员,随着插件,中间件使用越来越多,Maven依赖冲突变成了一个日益严重的问题,有时还真的令人头大,因为版本不对,冲突这些问题还会导致项目直接起不起来,Emmm,那为了规避这些问题,下面提供了比较好的管理jar版本的方式和jar包冲突的解决方法.
maven官方文档:官网地址
二.前置知识:
1.传递性:
? ? ?A依赖B,B依赖C.A能使用C中的类或代码吗?
? ? ? 可以,但是只能使用依赖范围是compile的.也就是说非compile范围的依赖不能传递.
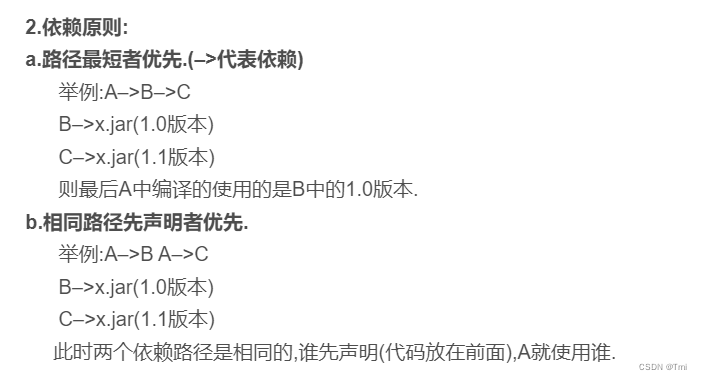
2.依赖原则:
a.路径最短者优先.(–>代表依赖)
? ? ? 举例:A–>B–>C
? ? ? B–>x.jar(1.0版本)
? ? ? C–>x.jar(1.1版本)
? ? ? 则最后A中编译的使用的是B中的1.0版本.
b.相同路径先声明者优先.
? ? ? 举例:A–>B A–>C
? ? ? B–>x.jar(1.0版本)
? ? ? C–>x.jar(1.1版本)
? ? ?此时两个依赖路径是相同的,谁先声明(代码放在前面),A就使用谁.
3.maven中的依赖标签
-
dependencyManagement
dependencyManagement中定义的只是依赖的声明,并不实现引入,因此一般只用于依赖管理. -
type
依赖的类型,一般就是依赖的文件类型,默认是jar,还有比如说这些值
<code>jar</code>, <code>war</code>, <code>ejb-client</code> and <code>test-jar</code>
在依赖管理中通常会用到pom,其实就相当于引入了一个pom文件 我们引入了这个pom,其实就相当于在项目中导入了这个pom中的所有依赖 -
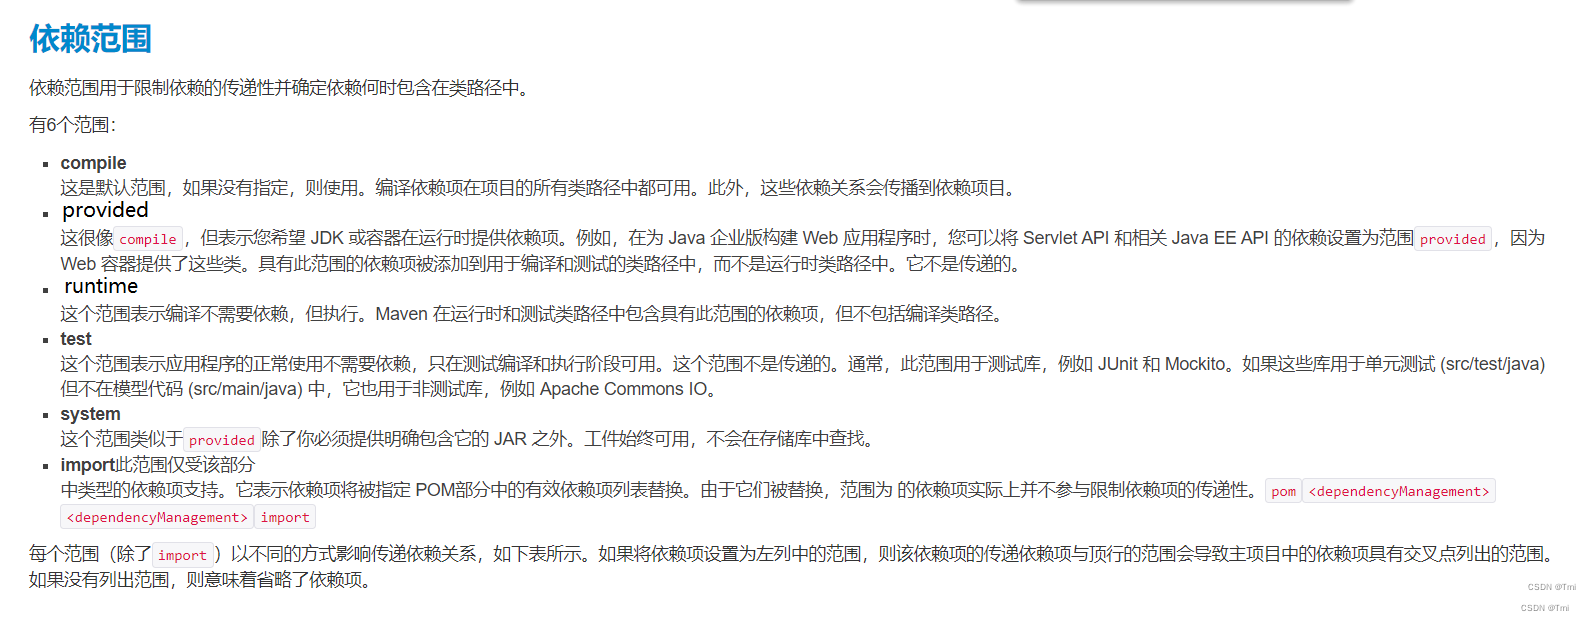
scope
依赖的范围, 可以限制依赖的传递性和依赖什么时候会被使用,通常有以下几个值.

? ? ?这里需要注意这样一个值import,import仅仅支持用于节点中依赖类型是pom的依赖,并且该依赖项会被引入中的pom所代替,因此不存在依赖传递.
? ? ?假如我们不用import,那么被引入的pom中的所有依赖都将具有传递性.即使子模块没有声明也会被引用.官网说明如下:

三.jar包版本管理方式
1.自己建立父工程.
? ? ?这是最常见也是最实用的管理版本方式,比如当我们服务拆分成几个单独模块变成微服务时,建立父工程去管理pom就最合适了
注意父工程中仅仅只有一个pom.
样例:
父工程pom
<?xml version="1.0" encoding="UTF-8"?>

<project xmlns="http://maven.apache.org/POM/4.0.0" xmlns:xsi="http://www.w3.org/2001/XMLSchema-instance"
  xsi:schemaLocation="http://maven.apache.org/POM/4.0.0 http://maven.apache.org/xsd/maven-4.0.0.xsd">
  <modelVersion>4.0.0</modelVersion>

  <groupId>com.wind.springcloud</groupId>
  <artifactId>cloud2020</artifactId>
  <version>1.0-SNAPSHOT</version>
<!--  mvn的聚合,可以将子模块都加入到里面,这样就可以一键实现编译打包这些操作.-->
  <modules>
    <module>Cloud-provider-payment8001</module>
    <module>cloud-consumer-order80</module>
    <module>cloud-api-commons</module>
    <module>cloud-euraka-server7001</module>
    <module>Cloud-provider-payment8004</module>
    <module>cloud-consumerzk-order80</module>
    <module>cloud-consumer-feign-order80</module>
    <module>cloud-provider-hystrix-payment8001</module>
    <module>cloud-consumer-feign-hystrix-order80</module>
    <module>cloud-consumer-hystrix-dashboard9001</module>
    <module>cloud-gateway-gateway9527</module>
    <module>cloud-config-center-3344</module>
  </modules>

<!--  如果你的父工程只是用来管理版本,那么打包方式一定要设置为pom-->
  <packaging>pom</packaging>


  <!--统一管理jar包版本,在这里统一指定-->
  <properties>
    <project.build.sourceEncoding>UTF-8</project.build.sourceEncoding>
    <maven.compiler.source>1.8</maven.compiler.source>
    <maven.compiler.target>1.8</maven.compiler.target>
    <junit.version>4.12</junit.version>
    <log4j.version>1.2.17</log4j.version>
    <lombok.version>1.16.18</lombok.version>
    <mysql.version>8.0.19</mysql.version>
    <druid.version>1.1.16</druid.version>
    <spring.boot.version>2.2.2.RELEASE</spring.boot.version>
    <spring.cloud.version>Hoxton.SR1</spring.cloud.version>
    <spring.cloud.alibaba.version>2.1.0.RELEASE</spring.cloud.alibaba.version>
    <mybatis.spring.boot.version>1.3.0</mybatis.spring.boot.version>
  </properties>

  <!--子模块继承后,提供作用:锁定版本+子module不用groupId和version-->
  <!--dependencyManagement中定义的只是依赖的声明,并不实现引入,因此子项目需要显式的声明需要用的依赖。-->
  <dependencyManagement>
    <dependencies>
      <!--springboot 2.2.2-->
      <dependency>
        <groupId>org.springframework.boot</groupId>
        <artifactId>spring-boot-dependencies</artifactId>
        <version>${spring.boot.version}</version>
		<!--依赖的类型,一般就是依赖的文件类型,默认是jar,这里给的pom,其实就相当于引入了一个pom文件,在这个pom文件中指定了几乎所有org.springframework.boot中的组件版本
        我们引入了这个pom,其实就相当于在项目中导入了这个pom中的所有依赖-->
        <type>pom</type>
		<!--通常和<type>pom</type>一起使用,表示引入pom中的依赖并且这些依赖不具有传递性-->
        <scope>import</scope>
      </dependency>
      <!--Spring cloud Hoxton.SR1-->
      <dependency>
        <groupId>org.springframework.cloud</groupId>
        <artifactId>spring-cloud-dependencies</artifactId>
        <version>${spring.cloud.version}</version>
        <type>pom</type>
        <scope>import</scope>
      </dependency>
      <!--Spring cloud alibaba 2.1.0.RELEASE-->
      <!--spring cloud alibaba 2.1.0.RELEASE-->
      <dependency>
        <groupId>com.alibaba.cloud</groupId>
        <artifactId>spring-cloud-alibaba-dependencies</artifactId>
        <version>${spring.cloud.alibaba.version}</version>
        <type>pom</type>
        <scope>import</scope>
      </dependency>
      <dependency>
        <groupId>mysql</groupId>
        <artifactId>mysql-connector-java</artifactId>
        <version>${mysql.version}</version>
      </dependency>
      <dependency>
        <groupId>com.alibaba</groupId>
        <artifactId>druid</artifactId>
        <version>${druid.version}</version>
      </dependency>
      <dependency>
        <groupId>org.projectlombok</groupId>
        <artifactId>lombok</artifactId>
        <version>${lombok.version}</version>
      </dependency>
      <dependency>
        <groupId>org.mybatis.spring.boot</groupId>
        <artifactId>mybatis-spring-boot-starter</artifactId>
        <version>${mybatis.spring.boot.version}</version>
      </dependency>
    </dependencies>
  </dependencyManagement>

  <build>
    <plugins>
      <plugin>
        <groupId>org.springframework.boot</groupId>
        <artifactId>spring-boot-maven-plugin</artifactId>
        <version>2.4.11</version>
        <configuration>
          <fork>true</fork>
          <addResources>true</addResources>
        </configuration>
      </plugin>
    </plugins>
  </build>

  <!--第三方maven私服-->
  <repositories>
    <repository>
      <id>nexus-aliyun</id>
      <name>Nexus aliyun</name>
      <url>http://maven.aliyun.com/nexus/content/groups/public</url>
      <releases>
        <enabled>true</enabled>
      </releases>
      <snapshots>
        <enabled>false</enabled>
      </snapshots>
    </repository>
  </repositories>

</project>
子工程pom:
<?xml version="1.0" encoding="UTF-8"?>
<project xmlns="http://maven.apache.org/POM/4.0.0" xmlns:xsi="http://www.w3.org/2001/XMLSchema-instance"
         xsi:schemaLocation="http://maven.apache.org/POM/4.0.0 http://maven.apache.org/xsd/maven-4.0.0.xsd">
<!--继承父工程,版本管理都在父工程中,这里只需要引入即可.-->
    <parent>
        <artifactId>cloud2020</artifactId>
        <groupId>com.wind.springcloud</groupId>
        <version>1.0-SNAPSHOT</version>
    </parent>
    <modelVersion>4.0.0</modelVersion>

    <artifactId>cloudalibaba-provider-payment9001</artifactId>
    <dependencies>
    <dependency>
        <groupId>com.alibaba.cloud</groupId>
        <artifactId>spring-cloud-starter-alibaba-nacos-discovery</artifactId>
    </dependency>
    <dependency>
        <groupId>org.springframework.boot</groupId>
        <artifactId>spring-boot-starter-web</artifactId>
    </dependency>
    <dependency>
        <groupId>org.springframework.boot</groupId>
        <artifactId>spring-boot-starter-actuator</artifactId>
    </dependency>
    <dependency>
        <groupId>org.springframework.boot</groupId>
        <artifactId>spring-boot-devtools</artifactId>
        <scope>runtime</scope>
        <optional>true</optional>
    </dependency>
    <dependency>
        <groupId>org.projectlombok</groupId>
        <artifactId>lombok</artifactId>
        <optional>true</optional>
    </dependency>
    <dependency>
        <groupId>org.springframework.boot</groupId>
        <artifactId>spring-boot-starter-test</artifactId>
        <scope>test</scope>
    </dependency>
    </dependencies>


</project>
2.引入Springboot父工程
? ? ? 如果我们的项目只有单独的一个模块,并且是Springboot项目,可以直接引入Springboot帮我们构建好的模块,如下:
<parent>
        <groupId>org.springframework.boot</groupId>
        <artifactId>spring-boot-starter-parent</artifactId>
        <version>2.2.2.RELEASE</version>
        <relativePath/> <!-- //从子文件pom.xml找父文件pom.xml的相对路径.-->
    </parent>
? ? ?我们打开这个文件看,可以直接的看到就是一个pom.也就是说我们所有引入的父工程都只是引入一个pom而已,
这也是为什么在前面我们自己构建父工程的时候,打包方式需要设置成pom

???我们直接打开spring-boot-starter-parent的pom文件看一下(如下),其实主要有几部分作用.
1.继承自spring-boot-dependencies依赖,在这个父pom中使用<dependencyManagement>管理了很多的Springboot项目需要的依赖,这也是为什么我们引入了Springboot的parent依赖之后,很多Springboot的组件就不需要指定版本了.

2.指定jdk,字符集等编码.

3.一些打包时的配置

3.直接在自己pom中进行版本管理
举例:
         <!-- 统一声明版本 -->
          <properties>
            <spring.version>4.3.17.RELEASE</spring.version>
          </properties>
         <!-- 然后用el表达式引用即可 -->
          <dependency>
            <groupId>org.springframework</groupId>
            <artifactId>spring-core</artifactId>
            <version>${spring.version}</version>
          </dependency>
          <dependency>
            <groupId>org.springframework</groupId>
            <artifactId>spring-context</artifactId>
            <version>${spring.version}</version>
         </dependency>
四.解决依赖冲突
主要有两个步骤
1.找到冲突的jar包.
使用mvn命令找到冲突jar包
mvn -Dverbose dependency:tree
输入之后会有下面的内容
[INFO] org.example:hello:jar:1.0-SNAPSHOT
[INFO] +- org.springframework:spring-context:jar:5.2.7.RELEASE:compile
[INFO] |  +- (org.springframework:spring-aop:jar:5.2.7.RELEASE:compile - omitted for conflict with 5.2.0.RELEASE)
[INFO] |  +- org.springframework:spring-beans:jar:5.2.7.RELEASE:compile
[INFO] |  |  \- (org.springframework:spring-core:jar:5.2.7.RELEASE:compile - omitted for duplicate)
[INFO] |  +- org.springframework:spring-core:jar:5.2.7.RELEASE:compile
[INFO] |  |  \- org.springframework:spring-jcl:jar:5.2.7.RELEASE:compile
[INFO] |  \- org.springframework:spring-expression:jar:5.2.7.RELEASE:compile
[INFO] |     \- (org.springframework:spring-core:jar:5.2.7.RELEASE:compile - omitted for duplicate)
[INFO] \- org.springframework:spring-aop:jar:5.2.0.RELEASE:compile
[INFO]    +- (org.springframework:spring-beans:jar:5.2.0.RELEASE:compile - omitted for conflict with 5.2.7.RELEASE)
[INFO]    \- (org.springframework:spring-core:jar:5.2.0.RELEASE:compile - omitted for conflict with 5.2.7.RELEASE)
???其中omitted for duplicate表示有jar包被重复依赖,最后写着omitted for conflict with xxx的,说明和别的jar包版本冲突了,而该行的jar包不会被引入。比如上面有一行最后写着omitted for conflict with 5.2.7.RELEASE,表示spring-core 5.2.0版本不会被项目引用,而spring-core 5.2.7版本会被项目引用
2.统一版本
主要有以下三种方式:
-
利用依赖原则统一
就是前面所提到的利用最短路径和优先声明的原则进行统一版本
-
将多余的依赖进行排除
          <exclusions>
                <exclusion>
                    <groupId></groupId>
                    <artifactId></artifactId>
                </exclusion>
            </exclusions>
- 第三种方式就是前面提到的利用jar包版本管理方式进行版本统一化.
