nacos安装
nacos下载
解压之后是个nacos文件夹
启动方式:
方式1:bin目录下startup.cmd双击—>成功“nacos is starting with standalone”
方式2:bin目录下使用命令行添加启动模式 startup -m standalone—>成功“nacos is starting with standalone”
成功之后浏览器输入http://localhost:8848/nacos
QA:不要关闭窗口!不要关闭窗口!不要关闭窗口!
------------------------------------------nacos注册中心-----------------------------------------------------
创建nacos项目
1、新建Module - cloudalibaba-provider-payment9001
2、改pom
【1】父pom
<dependencies>
        <!--spring cloud alibaba 2.1.0.RELEASE-->
        <dependency>
            <groupId>com.alibaba.cloud</groupId>
            <artifactId>spring-cloud-alibaba-dependencies</artifactId>
            <version>2.1.0.RELEASE</version>
            <type>pom</type>
            <scope>import</scope>
        </dependency>
    </dependencies>
【2】子pom
 <dependencies>
        <!--SpringCloud ailibaba nacos -->
        <dependency>
            <groupId>com.alibaba.cloud</groupId>
            <artifactId>spring-cloud-starter-alibaba-nacos-discovery</artifactId>
        </dependency>
        <!-- SpringBoot整合Web组件 -->
        <dependency>
            <groupId>org.springframework.boot</groupId>
            <artifactId>spring-boot-starter-web</artifactId>
        </dependency>
        <dependency>
            <groupId>org.springframework.boot</groupId>
            <artifactId>spring-boot-starter-actuator</artifactId>
        </dependency>
        <!--日常通用jar包配置-->
        <dependency>
            <groupId>org.springframework.boot</groupId>
            <artifactId>spring-boot-devtools</artifactId>
            <scope>runtime</scope>
            <optional>true</optional>
        </dependency>
        <dependency>
            <groupId>org.projectlombok</groupId>
            <artifactId>lombok</artifactId>
            <optional>true</optional>
        </dependency>
        <dependency>
            <groupId>org.springframework.boot</groupId>
            <artifactId>spring-boot-starter-test</artifactId>
            <scope>test</scope>
        </dependency>
    </dependencies>
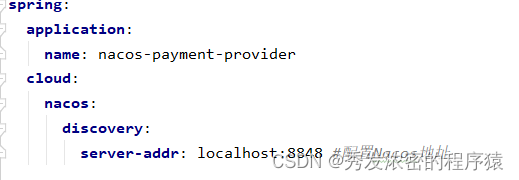
3、创建application.yml
server:
  port: 9001

spring:
  application:
    name: nacos-payment-provider
  cloud:
    nacos:
      discovery:
        server-addr: localhost:8848 #配置Nacos地址

management:
  endpoints:
    web:
      exposure:
        include: '*'
4、启动类
import org.springframework.boot.SpringApplication;
import org.springframework.boot.autoconfigure.SpringBootApplication;
import org.springframework.cloud.client.discovery.EnableDiscoveryClient;

@EnableDiscoveryClient
@SpringBootApplication
public class PaymentMain9001 {
    public static void main(String[] args) {
            SpringApplication.run(PaymentMain9001.class, args);
    }
}
5、业务类
6、controller
import org.springframework.beans.factory.annotation.Value;
import org.springframework.web.bind.annotation.GetMapping;
import org.springframework.web.bind.annotation.PathVariable;
import org.springframework.web.bind.annotation.RestController;

@RestController
public class PaymentController {
    @Value("${server.port}")
    private String serverPort;

    @GetMapping(value = "/payment/nacos/{id}")
    public String getPayment(@PathVariable("id") Integer id) {
        return "nacos registry, serverPort: "+ serverPort+"\t id"+id;
    }
}
测试
nacos控制台
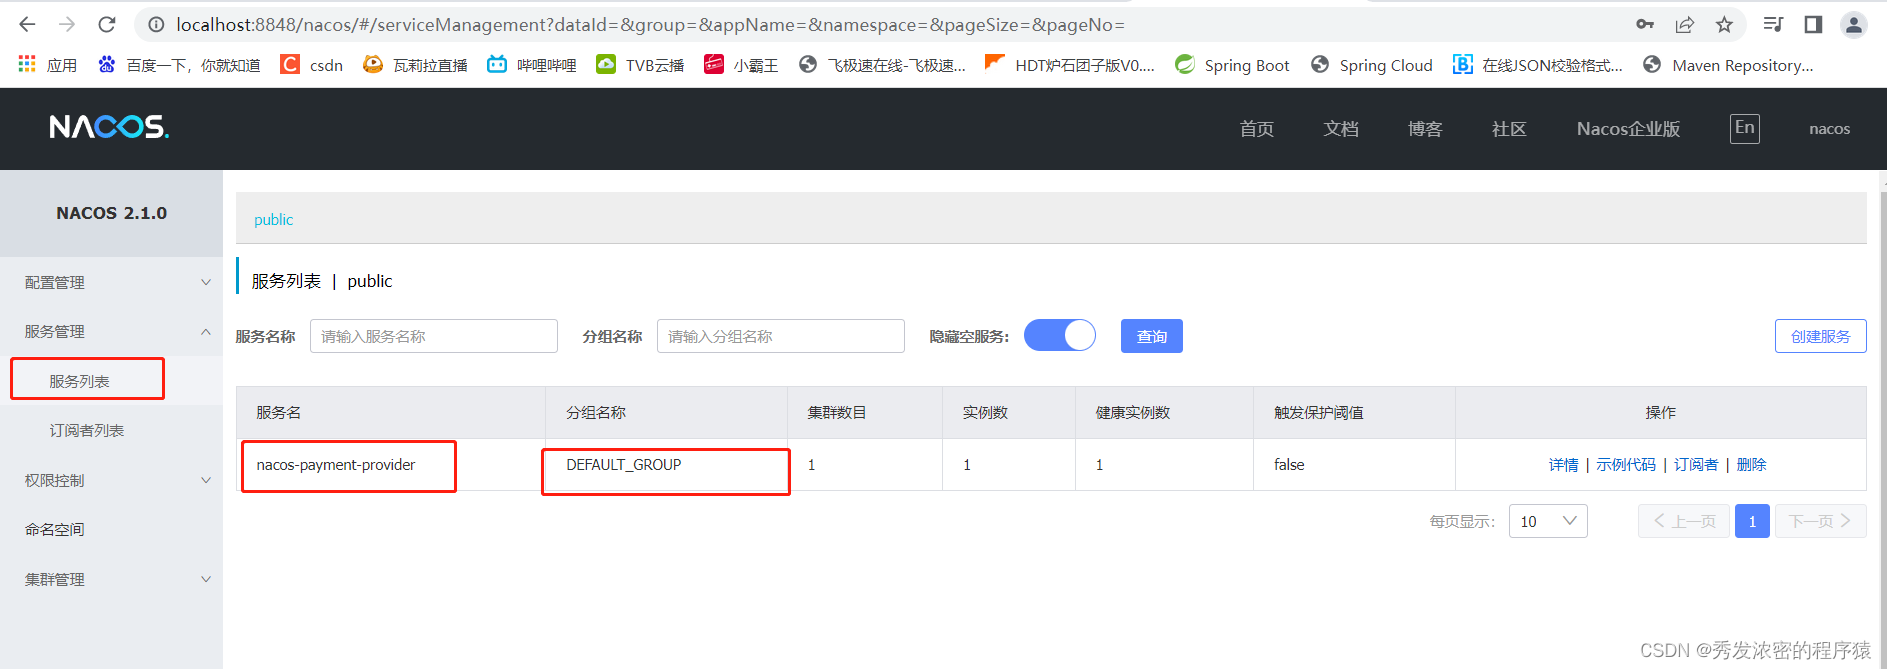
为了下一章节演示nacos的负载均衡,参照9001新建cloudalibaba-provider-payment9002
------------------------------------------nacos负载均衡-----------------------------------------------------
Nacos之服务消费者注册和负载
1.新建Module - cloudalibaba-consumer-nacos-order83
2.pom.xml
<dependencies>
        <!--SpringCloud ailibaba nacos -->
        <dependency>
            <groupId>com.alibaba.cloud</groupId>
            <artifactId>spring-cloud-starter-alibaba-nacos-discovery</artifactId>
        </dependency>
        <!-- 引入自己定义的api通用包,可以使用Payment支付Entity -->
        <dependency>
            <groupId>com.lun.springcloud</groupId>
            <artifactId>cloud-api-commons</artifactId>
            <version>1.0.0-SNAPSHOT</version>
        </dependency>
        <!-- SpringBoot整合Web组件 -->
        <dependency>
            <groupId>org.springframework.boot</groupId>
            <artifactId>spring-boot-starter-web</artifactId>
        </dependency>
        <dependency>
            <groupId>org.springframework.boot</groupId>
            <artifactId>spring-boot-starter-actuator</artifactId>
        </dependency>
        <!--日常通用jar包配置-->
        <dependency>
            <groupId>org.springframework.boot</groupId>
            <artifactId>spring-boot-devtools</artifactId>
            <scope>runtime</scope>
            <optional>true</optional>
        </dependency>
        <dependency>
            <groupId>org.projectlombok</groupId>
            <artifactId>lombok</artifactId>
            <optional>true</optional>
        </dependency>
        <dependency>
            <groupId>org.springframework.boot</groupId>
            <artifactId>spring-boot-starter-test</artifactId>
            <scope>test</scope>
        </dependency>
    </dependencies>
为什么nacos支持负载均衡?因为spring-cloud-starter-alibaba-nacos-discovery内含netflix-ribbon包。
3.application.yml
server:
  port: 83

spring:
  application:
    name: nacos-order-consumer
  cloud:
    nacos:
      discovery:
        server-addr: localhost:8848

#消费者将要去访问的微服务名称(注册成功进nacos的微服务提供者)
service-url:
  nacos-user-service: http://nacos-payment-provider
4.启动类
import org.springframework.boot.SpringApplication;
import org.springframework.boot.autoconfigure.SpringBootApplication;
import org.springframework.cloud.client.discovery.EnableDiscoveryClient;


@EnableDiscoveryClient
@SpringBootApplication
public class OrderNacosMain83
{
    public static void main(String[] args)
    {
        SpringApplication.run(OrderNacosMain83.class,args);
    }
}
5.service
ApplicationContextConfig
import org.springframework.cloud.client.loadbalancer.LoadBalanced;
import org.springframework.context.annotation.Bean;
import org.springframework.context.annotation.Configuration;
import org.springframework.web.client.RestTemplate;

@Configuration
public class ApplicationContextConfig
{
    @Bean
    @LoadBalanced
    public RestTemplate getRestTemplate()
    {
        return new RestTemplate();
    }
}
6.controller
import lombok.extern.slf4j.Slf4j;
import org.springframework.beans.factory.annotation.Value;
import org.springframework.web.bind.annotation.GetMapping;
import org.springframework.web.bind.annotation.PathVariable;
import org.springframework.web.bind.annotation.RestController;
import org.springframework.web.client.RestTemplate;

import javax.annotation.Resource;

@RestController
@Slf4j
public class OrderNacosController {

    @Resource
    private RestTemplate restTemplate;

    @Value("${service-url.nacos-user-service}")
    private String serverURL;

    @GetMapping(value = "/consumer/payment/nacos/{id}")
    public String paymentInfo(@PathVariable("id") Long id)
    {
        return restTemplate.getForObject(serverURL+"/payment/nacos/"+id,String.class);
    }

}
测试
启动nacos控制台
我们可以看到生产者包括9001和9002,消费者包括83具体测试结果如下:
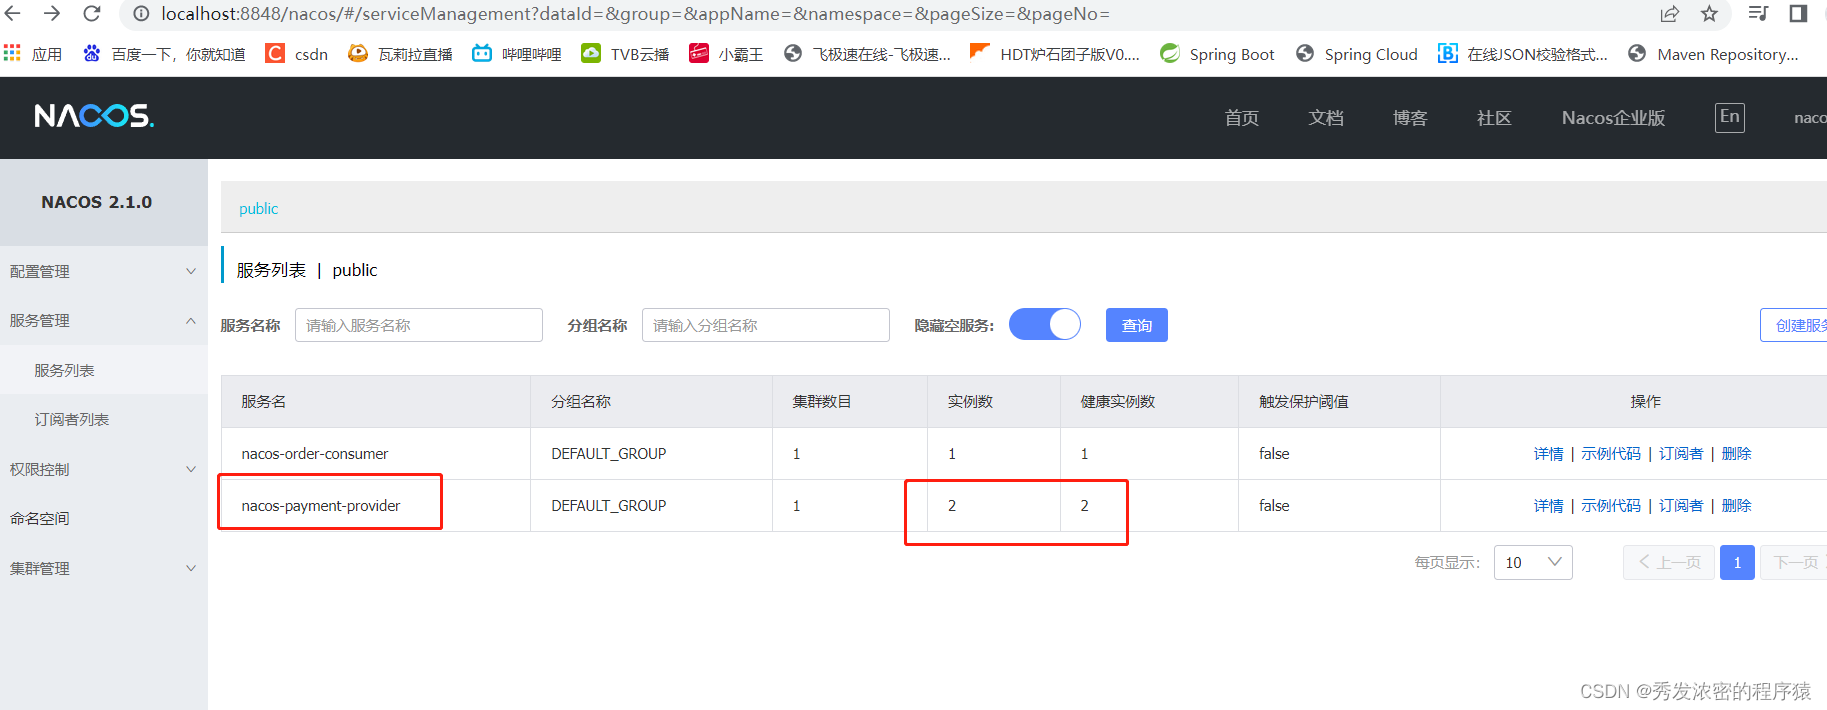
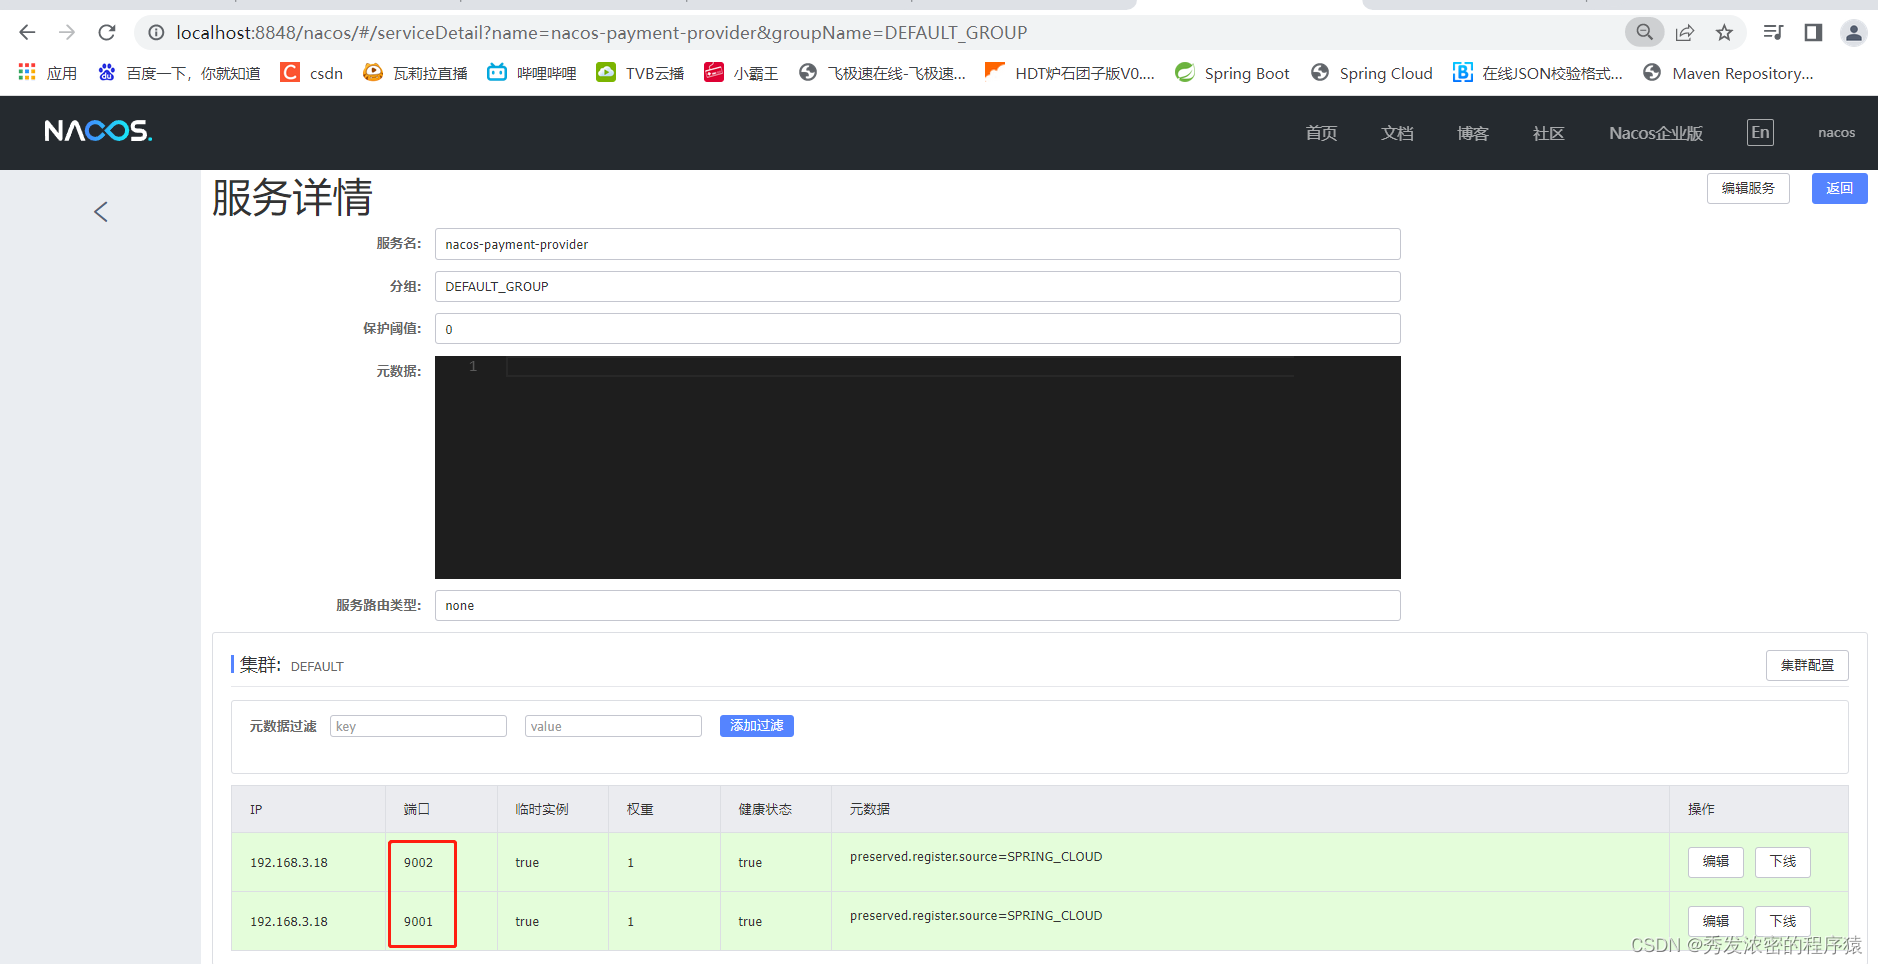
http://localhost:83/consumer/payment/nacos/1
83访问9001/9002,轮询负载OK
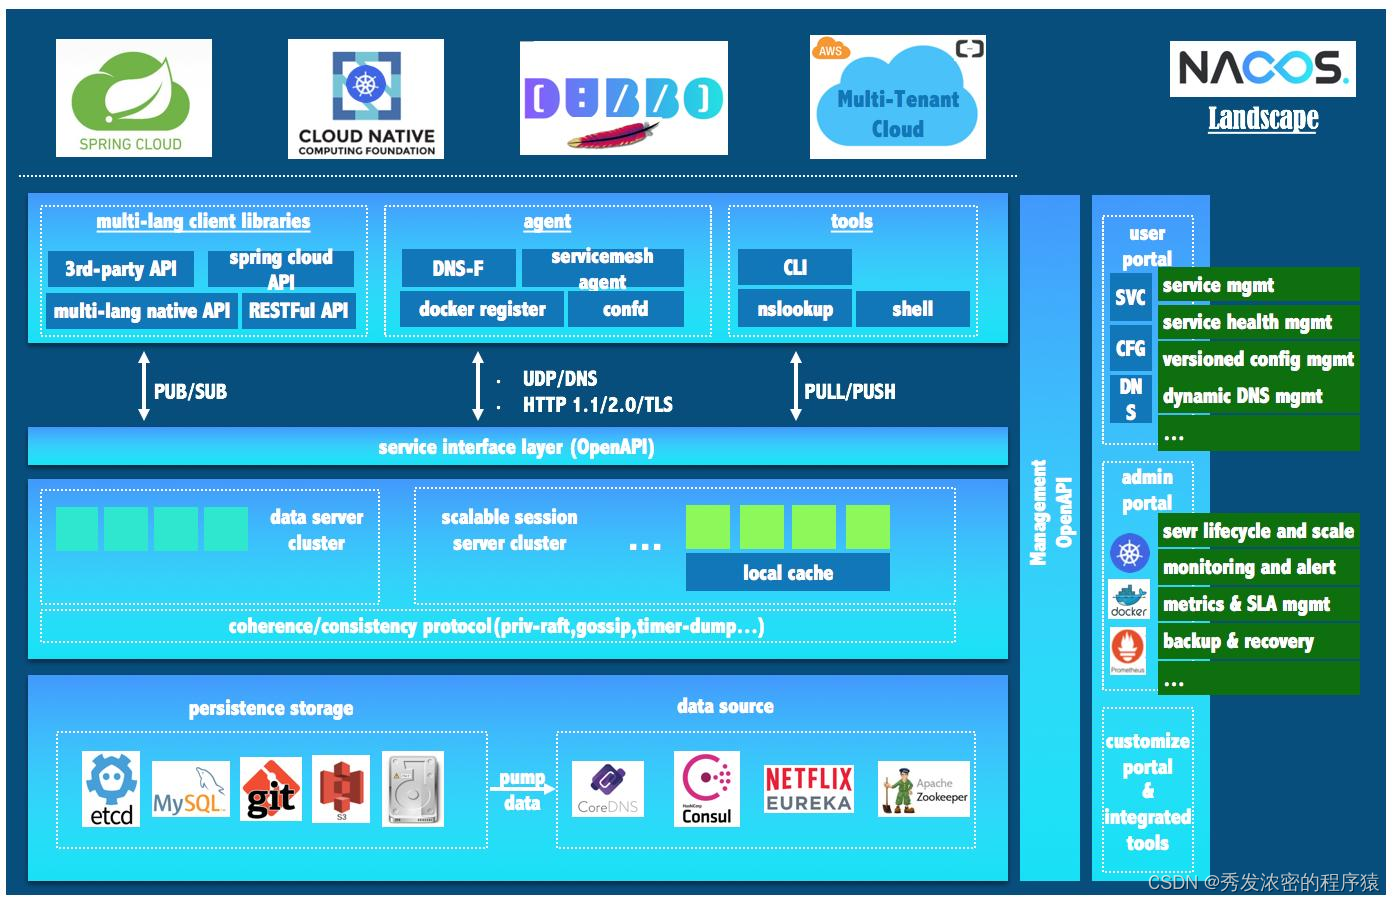
Nacos全景图
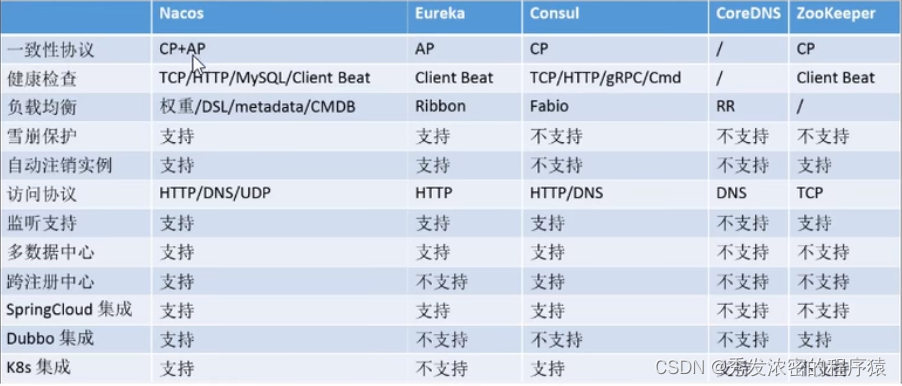
Nacos和CAP
Nacos与其他注册中心特性对比
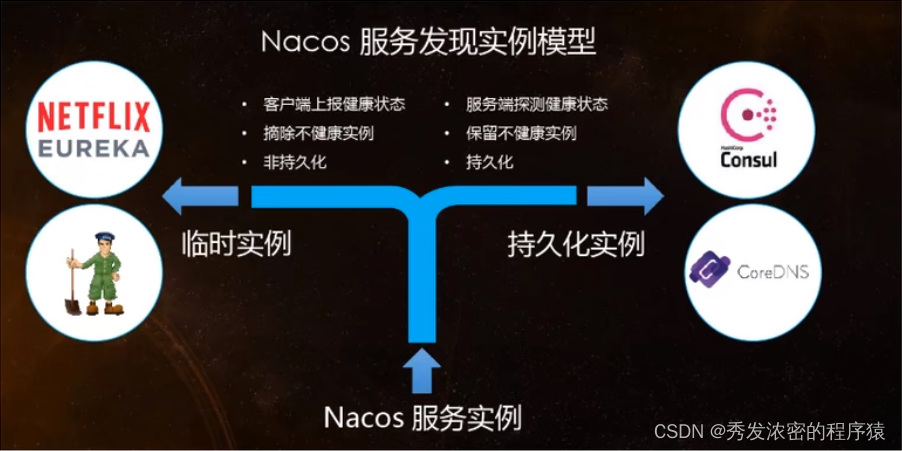
Nacos服务发现实例模型
Nacos支持AP和CP模式的切换
C是所有节点在同一时间看到的数据是一致的;而A的定义是所有的请求都会收到响应。
何时选择使用何种模式?
—般来说,如果不需要存储服务级别的信息且服务实例是通过nacos-client注册,并能够保持心跳上报,那么就可以选择AP模式。当前主流的服务如Spring cloud和Dubbo服务,都适用于AP模式,AP模式为了服务的可能性而减弱了一致性,因此AP模式下只支持注册临时实例。
如果需要在服务级别编辑或者存储配置信息,那么CP是必须,K8S服务和DNS服务则适用于CP模式。CP模式下则支持注册持久化实例,此时则是以Raft协议为集群运行模式,该模式下注册实例之前必须先注册服务,如果服务不存在,则会返回错误。
切换命令:curl -X PUT '$NACOS_SERVER:8848/nacos/v1/ns/operator/switches?entry=serverMode&value=CP
----------------------------------------------Nacos之服务配置中心-------------------------------------------------
1.新建cloudalibaba-config-nacos-client3377
2.pom
<dependencies>
        <!--nacos-config-->
        <dependency>
            <groupId>com.alibaba.cloud</groupId>
            <artifactId>spring-cloud-starter-alibaba-nacos-config</artifactId>
        </dependency>
        <!--nacos-discovery-->
        <dependency>
            <groupId>com.alibaba.cloud</groupId>
            <artifactId>spring-cloud-starter-alibaba-nacos-discovery</artifactId>
        </dependency>
        <!--web + actuator-->
        <dependency>
            <groupId>org.springframework.boot</groupId>
            <artifactId>spring-boot-starter-web</artifactId>
        </dependency>
        <dependency>
            <groupId>org.springframework.boot</groupId>
            <artifactId>spring-boot-starter-actuator</artifactId>
        </dependency>
        <!--一般基础配置-->
        <dependency>
            <groupId>org.springframework.boot</groupId>
            <artifactId>spring-boot-devtools</artifactId>
            <scope>runtime</scope>
            <optional>true</optional>
        </dependency>
        <dependency>
            <groupId>org.projectlombok</groupId>
            <artifactId>lombok</artifactId>
            <optional>true</optional>
        </dependency>
        <dependency>
            <groupId>org.springframework.boot</groupId>
            <artifactId>spring-boot-starter-test</artifactId>
            <scope>test</scope>
        </dependency>
    </dependencies>
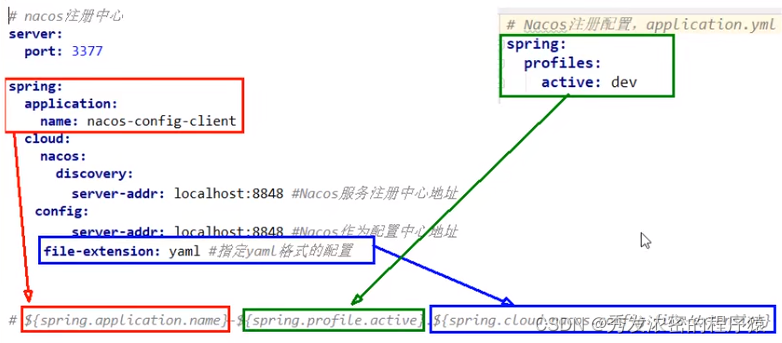
3.yml
Nacos同springcloud-config一样,在项目初始化时,要保证先从配置中心进行配置拉取,拉取配置之后,才能保证项目的正常启动。
springboot中配置文件的加载是存在优先级顺序的,bootstrap优先级高于application
bootstrap.yml
# nacos配置
server:
  port: 3377

spring:
  application:
    name: nacos-config-client
  cloud:
    nacos:
      discovery:
        server-addr: localhost:8848 #Nacos服务注册中心地址
      config:
        server-addr: localhost:8848 #Nacos作为配置中心地址
        file-extension: yaml #指定yaml格式的配置
        group: DEV_GROUP
        namespace: 7d8f0f5a-6a53-4785-9686-dd460158e5d4


# ${spring.application.name}-${spring.profile.active}.${spring.cloud.nacos.config.file-extension}
# nacos-config-client-dev.yaml

# nacos-config-client-test.yaml   ----> config.info
application.yml
spring:
  profiles:
    active: dev # 表示开发环境
    #active: test # 表示测试环境
    #active: info
4.启动类
import org.springframework.boot.SpringApplication;
import org.springframework.boot.autoconfigure.SpringBootApplication;
import org.springframework.cloud.client.discovery.EnableDiscoveryClient;


@EnableDiscoveryClient
@SpringBootApplication
public class NacosConfigClientMain3377
{
    public static void main(String[] args) {
        SpringApplication.run(NacosConfigClientMain3377.class, args);
    }
}
5.service
6.controller
import org.springframework.beans.factory.annotation.Value;
import org.springframework.cloud.context.config.annotation.RefreshScope;
import org.springframework.web.bind.annotation.GetMapping;
import org.springframework.web.bind.annotation.RestController;

@RestController
@RefreshScope //支持Nacos的动态刷新功能。
public class ConfigClientController
{
    @Value("${config.info}")
    private String configInfo;

    @GetMapping("/config/info")
    public String getConfigInfo() {
        return configInfo;
    }
}
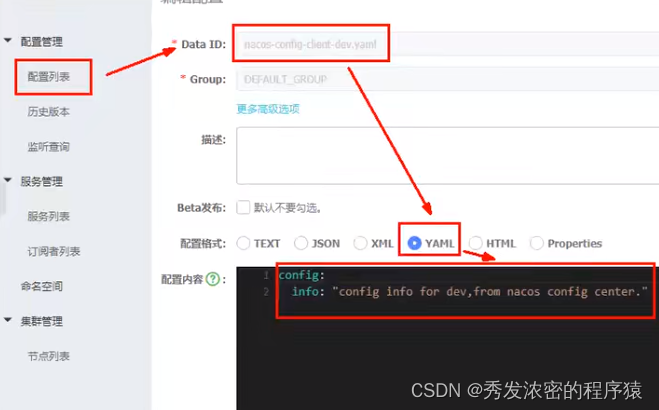
在Nacos中添加配置信息
Nacos中的dataid的组成格式及与SpringBoot配置文件中的匹配规则
说明:之所以需要配置spring.application.name,是因为它是构成Nacos配置管理dataId 字段的一部分。
在 Nacos Spring Cloud中,dataId的完整格式如下:${prefix}-${spring-profile.active}.${file-extension}
prefix默认为spring.application.name的值,也可以通过配置项spring.cloud.nacos.config.prefix来配置。
spring.profile.active即为当前环境对应的 profile,详情可以参考 Spring Boot文档。注意:当spring.profile.active为空时,对应的连接符 - 也将不存在,datald 的拼接格式变成${prefix}.${file-extension}
file-exetension为配置内容的数据格式,可以通过配置项spring .cloud.nacos.config.file-extension来配置。目前只支持properties和yaml类型。
通过Spring Cloud 原生注解@RefreshScope实现配置自动更新
nacos配置新增

Nacos界面配置对应 - 设置DataId
配置小结
