文章目录
SpringBootCRUD
集成 Druid
Druid 简介
Github地址:https://github.com/alibaba/druid/
Java程序很大一部分要操作数据库,为了提高性能操作数据库的时候,又不得不使用数据库连接池。
Druid 是阿里巴巴开源平台上一个数据库连接池实现,结合了 C3P0、DBCP 等 DB 池的优点,同时加入 了日志监控。
Druid 可以很好的监控 DB 池连接和 SQL 的执行情况,天生就是针对监控而生的 DB 连接池。 Druid已经在阿里巴巴部署了超过600个应用,经过一年多生产环境大规模部署的严苛考验。
Spring Boot 2.0 以上默认使用 Hikari 数据源,可以说 Hikari 与 Driud 都是当前 Java Web 上最优秀的 数据源,我们来重点介绍 Spring Boot 如何集成 Druid 数据源,如何实现数据库监控。
com.alibaba.druid.pool.DruidDataSource 基本配置参数参考博客:Druid参数配置详解
配置数据源
1、添加上 Druid 数据源依赖。
<!-- https://mvnrepository.com/artifact/com.alibaba/druid -->
 <dependency>
    <groupId>com.alibaba</groupId>
    <artifactId>druid-spring-boot-starter</artifactId>
    <version>1.2.9</version>
</dependency>
2、切换数据源;通过 spring.datasource.type 指定数据源。
spring:
  datasource:
    username: root
    password: 123456
    url: jdbc:mysql://localhost:3306/springboot?
serverTimezone=UTC&useUnicode=true&characterEncoding=utf-8
    driver-class-name: com.mysql.cj.jdbc.Driver
    type: com.alibaba.druid.pool.DruidDataSource # 自定义数据源
3、数据源切换之后,在测试类中注入 DataSource,然后获取到它,输出一看便知是否成功切换;
4、切换成功!就可以设置数据源连接初始化大小、最大连接数、等待时间、最小连接数等设置项。
spring:
  datasource:
    # 数据源基本配置
    username: root
    password: zxcvbnm0720
    url: jdbc:mysql://localhost:3306/online_exam?serverTimezone=UTC&useUnicode=true&characterEncoding=utf-8
    driver-class-name: com.mysql.cj.jdbc.Driver
    type: com.alibaba.druid.pool.DruidDataSource # 自定义数据源
    druid:
      #初始化时建立物理连接的个数
      initialSize: 5
      #最小连接池数量
      min-idle: 5
      #最大连接池数量 maxIdle已经不再使用
      maxActive: 18
      # 配置获取连接等待超时的时间
      max-wait: 60000
      # 配置间隔多久才进行一次检测,检测需要关闭的空闲连接,单位是毫秒
      time-between-eviction-runs-millis: 60000
      # 配置一个连接在池中最小生存的时间,单位是毫秒
      min-evictable-idle-time-millis: 300000
      validation-query: SELECT 1 FROM DUAL
      #申请连接的时候检测,如果空闲时间大于timeBetweenEvictionRunsMillis,执行validationQuery检测连接是否有效
      test-while-idle: true
      test-on-borrow: false
      test-on-return: false
      # 打开PSCache,并且指定每个连接上PSCache的大小
      pool-prepared-statements: true
      #   配置监控统计拦截的filters,去掉后监控界面sql无法统计,'wall'用于防火墙
      max-pool-prepared-statement-per-connection-size: 20
      filters: stat,wall,log4j2
      # 合并多个DruidDataSource的监控数据
      useGlobalDataSourceStat: true
      # 通过connectProperties属性来打开mergeSql功能;慢SQL记录
      connect-properties: druid.stat.mergeSql=true;druid.stat.slowSqlMillis=5000
      #监控配置
      stat-view-servlet:
        enabled: true
        login-username: root
        login-password: 123456
        allow:
        deny:
        url-pattern: /druid/*
5、导入Log4j2 的依赖; 具体可参考该博客:配置Log4j2.yml
<dependency>
    <groupId>org.springframework.boot</groupId>
    <artifactId>spring-boot-starter-web</artifactId>
    <exclusions>
        <exclusion>
            <groupId>org.springframework.boot</groupId>
            <artifactId>spring-boot-starter-logging</artifactId>
        </exclusion>
    </exclusions>
</dependency>
<dependency>
    <groupId>org.springframework.boot</groupId>
    <artifactId>spring-boot-starter-log4j2</artifactId>
</dependency>
<!-- 增加识别yaml格式依赖,加上这个才能辨认到log4j2.yml文件 -->
<dependency>
    <groupId>com.fasterxml.jackson.dataformat</groupId>
    <artifactId>jackson-dataformat-yaml</artifactId>
</dependency>
6、application.yml 配置文件中若有druid:则会自动绑定。若没有则需按如下操作:
为 DruidDataSource 绑定全局配置文件中的参数,再添加到容器中;我们需要自己添加 DruidDataSource 组件到容器中,并绑定属性;
@Configuration  // 声明一个类作为配置类,代替xml文件
public class DruidConfig {
    /*
    将自定义的 Druid数据源添加到容器中,不再让 Spring Boot 自动创建
    绑定全局配置文件中的 druid 数据源属性到
    com.alibaba.druid.pool.DruidDataSource从而让它们生效
    @ConfigurationProperties(prefix = "spring.datasource"):作用就是将 全局
    配置文件中
    前缀为 spring.datasource的属性值注入到
    com.alibaba.druid.pool.DruidDataSource 的同名参数中
    */
    @ConfigurationProperties(prefix = "spring.datasource")
    @Bean
    public DataSource druidDataSource() {
    	return new DruidDataSource();
    }
}
7、去测试类中测试一下;看是否成功
@SpringBootTest
class SpringbootDataJdbcApplicationTests {
    //DI注入数据源
    @Autowired
    DataSource dataSource;
    @Test
    public void contextLoads() throws SQLException {
        //看一下默认数据源
        System.out.println(dataSource.getClass());
        //获得连接
        Connection connection = dataSource.getConnection();
        System.out.println(connection);
        DruidDataSource druidDataSource = (DruidDataSource) dataSource;
        System.out.println("druidDataSource 数据源最大连接数:" +
        druidDataSource.getMaxActive());
        System.out.println("druidDataSource 数据源初始化连接数:" +
        druidDataSource.getInitialSize());
        //关闭连接
        connection.close();
    }
}
配置数据源监控
Druid 数据源具有监控的功能,并提供了一个 web 界面方便用户查看,类似安装 路由器时,人家也提 供了一个默认的 web 页面。
所以第一步需要设置 Druid 的后台管理页面,比如登录账号、密码等;配置后台管理;
//配置 Druid 监控管理后台的Servlet;
//内置 Servlet 容器时没有web.xml文件,所以使用 Spring Boot 的注册 Servlet 方式
@Bean
public ServletRegistrationBean statViewServlet() {
    ServletRegistrationBean bean = new ServletRegistrationBean(new
    StatViewServlet(), "/druid/*");
    // 这些参数可以在 com.alibaba.druid.support.http.StatViewServlet
    // 的父类 com.alibaba.druid.support.http.ResourceServlet 中找到
    Map<String, String> initParams = new HashMap<>();
    initParams.put("loginUsername", "admin"); //后台管理界面的登录账号
    initParams.put("loginPassword", "123456"); //后台管理界面的登录密码
    //后台允许谁可以访问
    //initParams.put("allow", "localhost"):表示只有本机可以访问
    //initParams.put("allow", ""):为空或者为null时,表示允许所有访问
    initParams.put("allow", "");
    //deny:Druid 后台拒绝谁访问
    //initParams.put("kuangshen", "192.168.1.20");表示禁止此ip访问
    //设置初始化参数
    bean.setInitParameters(initParams);
    return bean;
}
配置完毕后,我们可以选择访问 : http://localhost:8080/druid/login.html
配置 Druid web 监控 filter 过滤器
//WebStatFilter:用于配置Web和Druid数据源之间的管理关联监控统计
@Bean
public FilterRegistrationBean webStatFilter() {
    FilterRegistrationBean bean = new FilterRegistrationBean();
    bean.setFilter(new WebStatFilter());
    //exclusions:设置哪些请求进行过滤排除掉,从而不进行统计
    Map<String, String> initParams = new HashMap<>();
    initParams.put("exclusions", "*.js,*.css,/druid/*,/jdbc/*");
    bean.setInitParameters(initParams);
    //"/*" 表示过滤所有请求
    bean.setUrlPatterns(Arrays.asList("/*"));
    return bean;
}
平时在工作中,按需求进行配置即可,主要用作监控!
整合MyBatis
官方文档:http://mybatis.org/spring-boot-starter/mybatis-spring-boot-autoconfigure/
Maven仓库地址:https://mvnrepository.com/artifact/org.mybatis.spring.boot/mybatis-spring-boot-starter/2.1.1
整合测试
1、导入 MyBatis 所需要的依赖
 <!-- springboot - 集成 mybatis -->
<dependency>
    <groupId>org.mybatis.spring.boot</groupId>
    <artifactId>mybatis-spring-boot-starter</artifactId>
    <version>2.2.2</version>
</dependency>
 <!-- springboot - 集成分页插件 -->
<dependency>
    <groupId>com.github.pagehelper</groupId>
    <artifactId>pagehelper-spring-boot-starter</artifactId>
    <version>1.4.2</version>
</dependency>
<!-- springboot - mysql 连接 -->
<dependency>
    <groupId>mysql</groupId>
    <artifactId>mysql-connector-java</artifactId>
    <scope>runtime</scope>
</dependency>
2、配置数据库连接信息(druid的不变)
mybatis:
  # 指定myBatis的核心配置文件与Mapper映射文件
  mapper-locations: classpath:mapper/*.xml
  # 注意:对应实体类的路径
  type-aliases-package: cn.flyboy.entity
  configuration:
    # 全局启用或禁用延迟加载
    lazy-loading-enabled: true
    # 全局的映射器启用或禁用缓存
    cache-enabled: true
    multiple-result-sets-enabled: true
    default-executor-type: reuse
    default-statement-timeout: 25000
3、创建实体类,导入 Lombok
@Data
@NoArgsConstructor
@AllArgsConstructor
public class Teacher implements Serializable {
	private static final long serialVersionUID = 1L;
	private String t_username;
	private String t_pwd;
	private String t_name;
	private int t_manager;
}
4、创建mapper目录以及对应的 Mapper 接口
//@Mapper : 表示本类是一个 MyBatis 的 Mapper
@Mapper  // 也可以在Application中加@MapperScan("com.kuang.mapper") 扫描整个包
@Repository
public interface TeacherMapper {
	List<Teacher> selByManager(Integer id);
	List<Teacher> selAllTeachers();
}
5、对应的Mapper映射文件 (位于资源目录下)
<?xml version="1.0" encoding="UTF-8" ?>
<!DOCTYPE mapper PUBLIC "-//mybatis.org//DTD Mapper 3.0//EN" "http://mybatis.org/dtd/mybatis-3-mapper.dtd">
<mapper namespace="cn.flyboy.mapper.TeacherMapper">
    <select id="selAllTeachers" resultType="cn.flyboy.entity.Teacher">
        select * from teacher
    </select>
    <select id="selByManager" resultType="cn.flyboy.entity.Teacher" parameterType="int">
        select * from teacher where t_manager=#{id}
    </select>
</mapper>
6、maven配置资源过滤问题
<resources>
    <resource>
        <directory>src/main/java</directory>
        <includes>
            <include>**/*.xml</include>
            </includes>
        <filtering>true</filtering>
    </resource>
</resources>
7、编写部门的 DepartmentController 进行测试
@RestController
public class DepartmentController {

    @Autowired
    TeacherMapper teacherMapper;

    @GetMapping("/getAll")
    public List<Teacher> getAllTeachers(){
        return teacherMapper.selAllTeachers();
    }

    @GetMapping("/getDepartment/{id}")
    public List<Teacher> getAllTeacher(@PathVariable("id") Integer id){
        return teacherMapper.selByManager(id);
    }
}
![[外链图片转存失败,源站可能有防盗链机制,建议将图片保存下来直接上传(img-meAuSULv-1655040368843)(C:/Users/%E5%88%98%E6%B4%AA%E5%85%86/AppData/Roaming/Typora/typora-user-images/image-20220612131206152.png)]](https://img-blog.csdnimg.cn/d68d699da1e84b5184d7407da79cbfed.png)
Mybatis分页
添加相关配置
在 application.yml 配置文件中添加分页插件有关的配置。
# pagehelper
pagehelper:
    helperDialect: mysql
    reasonable: true
    supportMethodsArguments: true
    offsetAsPageNum: true
    rowBoundsWithCount: true
    params: count=countSql
实体类以及mapper类不变。service层添加如下代码实例:
TeacherService:
    //分页查询接口
     PageResult findPage(Integer pageNum,Integer pageSize);

TeacherServiceImpl:
	 @Override
    public PageResult findPage(Integer pageNum,Integer pageSize) {
        return PageUtils.getPageResult(pageNum,pageSize, getPageInfo(pageNum,pageSize));
    }

    // 调用分页插件完成分页
    private PageInfo<Teacher> getPageInfo(Integer pageNum,Integer pageSize) {
        PageHelper.startPage(pageNum, pageSize);
        List<Teacher> lists = teacherMapper.selAllTeachers();
        return new PageInfo<Teacher>(lists);
    }
封装结果集 PageResult.java
@Data
public class PageResult {
    // 当前页码
    private int pageNum;
    // 每页数量
    private int pageSize;
    // 记录总数
    private long totalSize;
    // 页码总数
    private int totalPages;
    // 数据模型
    private List<?> content;
}
分页查询相关工具类:PageUtils.java
public class PageUtils {

    // 将分页信息封装到统一的接口
    public static PageResult getPageResult(Integer pageNum,Integer pageSize, PageInfo<?> pageInfo) {
        PageResult pageResult = new PageResult();
        pageResult.setPageNum(pageInfo.getPageNum());
        pageResult.setPageSize(pageInfo.getPageSize());
        pageResult.setTotalSize(pageInfo.getTotal());
        pageResult.setTotalPages(pageInfo.getPages());
        pageResult.setContent(pageInfo.getList());
        return pageResult;
    }
}
请求的数据:
![[外链图片转存失败,源站可能有防盗链机制,建议将图片保存下来直接上传(img-2RaLtzTw-1655040368844)(C:/Users/%E5%88%98%E6%B4%AA%E5%85%86/AppData/Roaming/Typora/typora-user-images/image-20220612164126775.png)]](https://img-blog.csdnimg.cn/4748158471814ab6b1d4fe59f99b1daf.png)
入了门,也连接了数据库,可以CRUD了,那静态资源呢?页面呢?
处理静态资源
静态资源映射规则
SpringBoot中,SpringMVC 的 web 配置都在 WebMvcAutoConfiguration 这个配置类里面;
我们可以去看看 WebMvcAutoConfigurationAdapter 中有很多配置方法;
有一个方法: addResourceHandlers 添加资源处理。(idea 中Ctrl+F是在本页查找,Ctrl+Shift+F是全局查找)
通过阅读源码(关键是 resourceProperties 这个类),可以得出结论,以下四个目录存放的静态资源可以被识别:
"classpath:/META-INF/resources/"
"classpath:/resources/"
"classpath:/static/"
"classpath:/public/"
我们可以在resources根目录下新建对应的文件夹,都可以存放我们的静态文件。一般静态资源直接放在默认生成的 static下。
![[外链图片转存失败,源站可能有防盗链机制,建议将图片保存下来直接上传(img-jhuKbcHd-1655040368845)(C:/Users/%E5%88%98%E6%B4%AA%E5%85%86/AppData/Roaming/Typora/typora-user-images/image-20220612181402331.png)]](https://img-blog.csdnimg.cn/685a8b57c45a4f5eb468b18fb83b4b40.png)
自定义静态资源路径
我们也可以自己通过配置文件来指定一下,哪些文件夹是我们放静态资源文件的,在 application.properties中配置;
spring.resources.static-locations=classpath:/coding/,classpath:/kuang/
一旦自己定义了静态文件夹的路径,原来的自动配置就都会失效了!
首页处理
静态资源文件夹说完后,我们继续向下看源码!可以看到一个欢迎页的映射,就是我们的首页!
@Bean
public WelcomePageHandlerMapping
    welcomePageHandlerMapping(ApplicationContext applicationContext,
    FormattingConversionService mvcConversionService,
    ResourceUrlProvider mvcResourceUrlProvider) {
    WelcomePageHandlerMapping welcomePageHandlerMapping = new
    WelcomePageHandlerMapping(
    new TemplateAvailabilityProviders(applicationContext),
    applicationContext, getWelcomePage(), // getWelcomePage 获得欢迎页
    this.mvcProperties.getStaticPathPattern());
    welcomePageHandlerMapping.setInterceptors(getInterceptors(mvcConversionServ
    ice, mvcResourceUrlProvider));
    return welcomePageHandlerMapping;
}
点进去继续看
private Optional<Resource> getWelcomePage() {
    String[] locations =
    getResourceLocations(this.resourceProperties.getStaticLocations());
    // ::是java8 中新引入的运算符
    // Class::function的时候function是属于Class的,应该是静态方法。
    // this::function的funtion是属于这个对象的。
    // 简而言之,就是一种语法糖而已,是一种简写
    return
    Arrays.stream(locations).map(this::getIndexHtml).filter(this::isReadable).fi
    ndFirst();
    }
    // 欢迎页就是一个location下的的 index.html 而已
    private Resource getIndexHtml(String location) {
    return this.resourceLoader.getResource(location + "index.html");
}
欢迎页,静态资源文件夹下的所有 index.html 页面;被 /** 映射。
比如访问 http://localhost:8080/ ,就会找静态资源文件夹下的 index.html
补充
关于网站图标说明:
与其他静态资源一样,Spring Boot在配置的静态内容位置中查找 favicon.ico。如果存在这样的文件, 它将自动用作应用程序的favicon。
1、关闭SpringBoot默认图标
#关闭默认图标
spring.mvc.favicon.enabled=false
2、自己放一个图标在静态资源目录下,放在 public 目录下即可。
Thymeleaf
Thymeleaf 官网:https://www.thymeleaf.org/
Thymeleaf 在Github 的主页:https://github.com/thymeleaf/thymeleaf
Spring官方文档: 找到我们对应的版本 https://docs.spring.io/spring-boot/docs/2.2.5.RELEASE/reference/htmlsingle/#using-boot-starter
模板引擎
前端交给我们的页面,是html页面。如果是以前开发,我们需要把他们转成jsp页面,jsp好处就是当我们查出一些数据转发到JSP页面以后,我们可以用jsp轻松实现数据的显示及交互等。 jsp支持非常强大的功能,包括能写Java代码,但是呢,我们现在的这种情况,SpringBoot这个项目首先是以jar的方式,不是war。第二,我们用的还是嵌入式的Tomcat,所以呢,他现在默认是不支持jsp 的。
SpringBoot推荐使用模板引擎:Thymeleaf。
Thymeleaf简介
Thymeleaf 是一个跟 FreeMarker 类似的模板引擎,它可以完全替代 JSP 。相较与其他的模板引擎,它有如下特点:
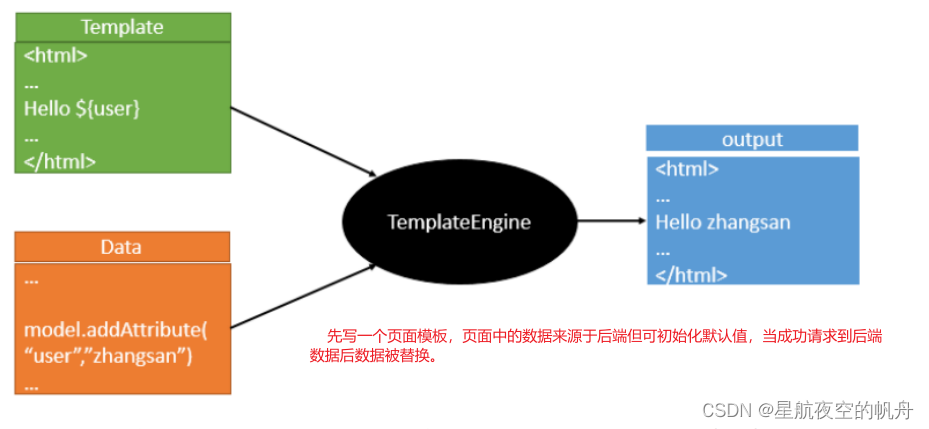
动静结合:
Thymeleaf 在有网络和无网络的环境下皆可运行,无网络显示静态内容,有网络用后台得到数据替换静态内容。springboot默认整合thymeleaf。
核心思想如下图:

Thymeleaf配置
1、添加 Thymeleaf 依赖。
<!-- springboot - thymeleaf -->
<dependency>
    <groupId>org.springframework.boot</groupId>
    <artifactId>spring-boot-starter-thymeleaf</artifactId>
</dependency>
2、配置视图解析器
Thymeleaf 默认前缀为: classpath:/templates/ 默认后缀为: .html
开发中一般无需修改,直接按默认的来就行。
3、application.yml 中配置 Thymeleaf
spring:
  thymeleaf:
    # 关闭模板缓存
    cache: false
Thymeleaf语法
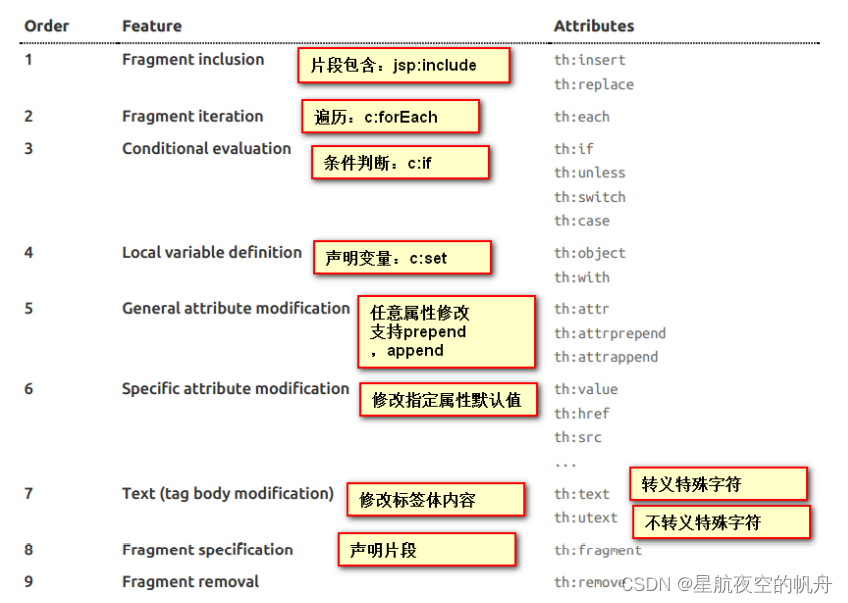
要学习语法,还是参考官网文档最为准确。
Thymeleaf 官网:https://www.thymeleaf.org/ 。

1、简单表达式
| 语法 | 描述 | 作用 |
|---|---|---|
| ${…} | 变量表达式 | 取出上下文变量的值 |
| *{…} | 选择变量表达式 | 取出选择的对象的属性值 |
| #{…} | 消息表达式 | 使文字消息国际化,i18N |
| @{…} | 链接表达式 | 用于表示各种超链接地址 |
| ~{…} | 片段表达式 | 引用一段公共的代码片段 |
2、常用标签
| 标签 | 作用 | 示例 |
|---|---|---|
| th:id | 替换id | <input th:id="${user.id}"/> |
| th:text | 文本替换 | <p th:text="${user.name}">bigsai</p> |
| th:utext | 支持html的文本替换 | <p th:utext="${htmlcontent}">content</p> |
| th:object | 替换对象 | <div th:object="${user}"></div> |
| th:value | 替换值 | <input th:value="${user.name}" > |
| th:each | 迭代 | <tr th:each="student:${user}" > |
| th:href | 替换超链接 | <a th:href="@{index.html}">超链接</a> |
| th:src | 替换资源 | <script type="text/javascript" th:src="@{index.js}"></script> |
链接表达式: @{…}
引入css:
	<link rel="stylesheet" th:href="@{index.css}">
引入JavaScript:
	<script type="text/javascript" th:src="@{index.js}"></script>
超链接:
	<a th:href="@{index.html}">超链接</a>
表单提交:
	<form class="form-signin" th:action="@{/user/login}" method="post">
		//这里面的所有表单标签都需要加上一个name属性
	</form>
变量表达式: ${…}
取JavaBean对象
${对象名.对象属性} 或者 ${对象名[‘对象属性’]}来取值,除此之外,如果该JavaBean如果写了get方法,咱们也可以通过get方法取值例如 ?${对象.get方法名}完整代码如下:
<h2>JavaBean对象</h2>
<table bgcolor="#ffe4c4" border="1">
    <tr>
        <td>介绍</td>
        <td th:text="${user.name}"></td>
    </tr>
    <tr>
        <td>年龄</td>
        <td th:text="${user['age']}"></td>
    </tr>
    <tr>
        <td>介绍</td>
        <td th:text="${user.getDetail()}"></td>
    </tr>
</table>
取List集合(each)
因为List集合是个有序列表,里面内容可能不止一个,你需要遍历List对其中对象取值,而遍历需要用到标签:th:each,具体使用为,其中item就相当于遍历每一次的对象名,在下面的作用域可以直接使用,而userlist就是你在Model中储存的List的名称。完整的代码为:
<h2>List取值</h2>
<table bgcolor="#ffe4c4" border="1">
    <tr th:each="item:${userlist}">
        <td th:text="${item}"></td>
    </tr>
</table>
直接取Map
${Map名['key']},也可以通过${Map名.key}取值,当然你也可以使用${map.get('key')}(java语法)来取值,完整代码如下:
<h2>Map取值</h2>
<table bgcolor="#8fbc8f" border="1">
    <tr>
        <td>place:</td>
        <td th:text="${map.get('place')}"></td>
    </tr>
    <tr>
        <td>feeling:</td>
        <td th:text="${map['feeling']}"></td>
    </tr>
</table>
遍历Map
th:each="item:${Map名}"进行遍历,在下面只需使用item.key和item.value即可获得值。完整代码如下:
<h2>Map遍历</h2>
<table bgcolor="#ffe4c4" border="1">
    <tr th:each="item:${map}">
        <td th:text="${item.key}"></td>
        <td th:text="${item.value}"></td>
    </tr>
</table>
选择变量表达式: *{…}
变量表达式不仅可以写成${…},而且还可以写成*{…}。
两者有一个重要的区别:只要没有选定的对象,美元(${…})和星号(*{...})的语法就完全一样。
<div th:object="${user}">
    <p>Name: <span th:text="*{name}">赛</span>.</p>
    <p>Age: <span th:text="*{age}">18</span>.</p>
    <p>Detail: <span th:text="*{detail}">好好学习</span>.</p>
</div>
消息表达: #{…}
文本外部化是从模板文件中提取模板代码的片段,以便可以将它们保存在单独的文件(通常是.properties文件)中,文本的外部化片段通常称为“消息”。通俗易懂的来说#{…}语法就是用来读取配置文件中数据的。在Thymeleaf你可以使用#{…}语法获取消息,具体实例代码如下:
首先在templates目录下建立home.properties中写入以下内容:
bigsai.nane=bigsai
bigsai.age=22
province=Jiang Su
在application.properties中加入以下内容:
spring.messages.basename=templates/home
这样我们就可以在Thymeleaf中读取配置的文件了,完整代码如下:
<h2>消息表达</h2>
<table bgcolor="#ffe4c4" border="1">
    <tr>
    <td>name</td>
    <td th:text="#{bigsai.name}"></td>
    </tr>
    <tr>
    <td>年龄</td>
    <td th:text="#{bigsai.age}"></td>
    </tr>
    <tr>
    <td>province</td>
    <td th:text="#{province}"></td>
    </tr>
</table>
片段表达~{…}
片段表达式~{ }可以用来引用一段公共的 HTML 代码片段。
| 语法 | 描述 |
|---|---|
| ~{templatename} | 引用整个模板文件的代码片段 |
| ~{templatename :: selector} | selector 可以是 th:fragment 指定的名称或其他选择器。 如类选择器、ID选择器等。 |
| ~{::selector} | 相当于 ~{this :: selector},表示引用当前模板定义的代码片段。 |
在 Thymeleaf 模板文件中,你可以使用 th:fragment 属性来定义一段公共的代码片段,然后你可以通过使用 th:insert、th:replace、th:include 属性来将这些公共的代码片段引入到模板文件中来。
src/main/resources/templates/base.html,通过th:fragment属性定义一段公共的代码片段:
<div id="footer" th:fragment="footerFragment">© 2017 fanlychie</div>
src/main/resources/templates/index.html,通过th:insert属性引用一段公共的代码片段:
<div th:insert="~{base :: footerFragment}"></div>
其中,~{ }是可选的,我们可以去掉这层的包裹:
<div th:insert="base :: footerFragment"></div>
若 index.html 与 base.html 不在同级目录,如 templates/commons/base.html:
<div th:insert="~{commons/base :: footerFragment}"></div>
使用th:fragment属性定义代码片段时,你还可以声明一组参数:
<div th:fragment="crumbs(parent, child)">
    <i th:text="${parent}"></i> <i th:text="${child}"></i>
</div>
<!--
<i>用户中心</i>
<i>我的订单</i>
-->
<div th:insert="::crumbs('用户中心', '我的订单')"></div>
此外,我们还可以通过类选择器、ID选择器等来引用公共的代码片段:
<div th:insert="~{base :: #footer}"></div>
除了th:insert属性th:replace也可以用来引用公共的代码片段。不同的是,th:insert是直接将代码片段插入到标签体内,而th:replace则是用代码片段直接替换标签体内容。
<!--
<div>
    <div id="footer">? 2017 fanlychie</div>
</div>
-->
<div th:insert="~{base :: footerFragment}"></div>

<!--
<div id="footer">? 2017 fanlychie</div>
-->
<div th:replace="~{base :: footerFragment}"></div>
Thymeleaf详细参考博客:Thymeleaf 教程