spring cloud day(7)config+buss
一、分布式面临的配置问题
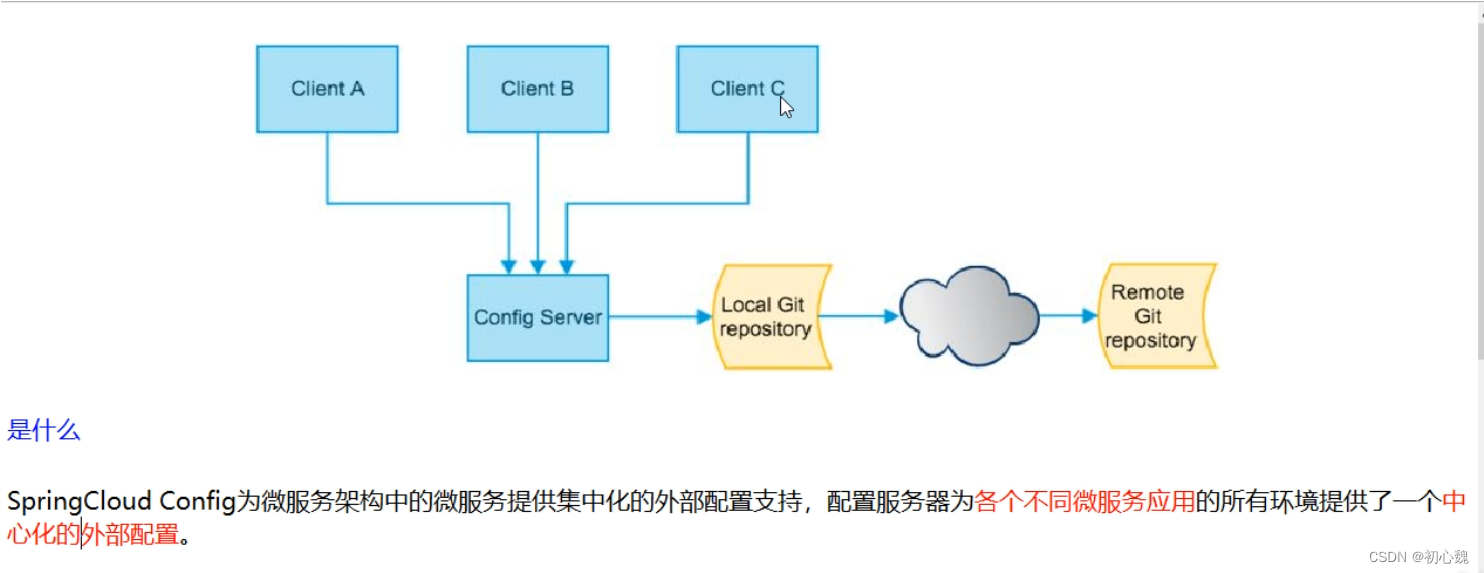
1.1 Spring cloud config

1.2 config服务端和客户端

1.3 配置文件说明
- application.yml是用户级的资源配置项
- bootstrap.yml是系统级,优先级更高

1.4 rabbitmq
- 15672是ui界面端口
- 5672是client访问接口
二、操作
2.1 config Server服务端3344的配置
- pom
    <dependencies>

        <!--添加消息总线RabbitMQ支持-->
        <dependency>
            <groupId>org.springframework.cloud</groupId>
            <artifactId>spring-cloud-starter-bus-amqp</artifactId>
        </dependency>

        <!--        Config服务端-->
        <dependency>
            <groupId>org.springframework.cloud</groupId>
            <artifactId>spring-cloud-config-server</artifactId>
        </dependency>
        <dependency>
            <groupId>org.springframework.cloud</groupId>
            <artifactId>spring-cloud-starter-netflix-eureka-client</artifactId>
        </dependency>
        <dependency>
            <groupId>com.atguigu.springcloud</groupId>
            <artifactId>cloud-api-commons</artifactId>
            <version>${project.version}</version>
        </dependency>
        <dependency>
            <groupId>org.springframework.boot</groupId>
            <artifactId>spring-boot-starter-web</artifactId>
        </dependency>

        <dependency>
            <groupId>org.springframework.boot</groupId>
            <artifactId>spring-boot-starter-actuator</artifactId>
        </dependency>

        <!--        <dependency>-->
        <!--            <groupId>org.springframework.boot</groupId>-->
        <!--            <artifactId>spring-boot-devtools</artifactId>-->
        <!--            <scope>runtime</scope>-->
        <!--            <optional>true</optional>-->
        <!--        </dependency>-->

        <dependency>
            <groupId>org.projectlombok</groupId>
            <artifactId>lombok</artifactId>
            <optional>true</optional>
        </dependency>
        <dependency>
            <groupId>org.springframework.boot</groupId>
            <artifactId>spring-boot-starter-test</artifactId>
            <scope>test</scope>
        </dependency>
    </dependencies>
- configBoot启动类
package com.pack.configU;

@SpringBootApplication
@EnableConfigServer
@ServletComponentScan("com.atguigu.springcloud.filter")
public class configBoot {

    public static void main(String[] args) {
        SpringApplication.run(configBoot.class, args);
        System.out.println("启动成功");

    }

}
- yml配置文件
server:
  port: 3344

spring:
  application:
    name: cloud-config-center #注册进Eureka服务器的微服务名
  cloud:
    config:
      server:
        git:
          uri: https://gitee.com/ybx1/springccloud-config #gitee上面的git仓库名字
          search-paths: /** #搜索目录
         username: 401129864@qq.com
         password: wyjlllwsgsy666
      label: master #读取分支
      #启动成功后访问的路径 http://ip:3344/{label}/{application}-{profile}.yml 能访问的配置文件 就表示成功了

eureka:
  client:
    service-url:
      defaultZone: http://localhost:7001/eureka
2.2 Config中心端读取gitee上配置文件
- 2.1 的配置步骤配置
- 仓库设置为开源
- yml中加入gitee的用户名和密码,也可以不加
- 注意搜索目录的配置
- web端进行访问
http://localhost:3344/master/config-dev.yml

2.3 config 客户端3355配置
- pom
 <dependencies>
        <!--添加消息总线RabbitMQ支持-->
        <dependency>
            <groupId>org.springframework.cloud</groupId>
            <artifactId>spring-cloud-starter-bus-amqp</artifactId>
        </dependency>

        <dependency>
            <groupId>org.springframework.cloud</groupId>
            <artifactId>spring-cloud-starter-config</artifactId>
        </dependency>
        <dependency>
            <groupId>org.springframework.cloud</groupId>
            <artifactId>spring-cloud-starter-netflix-eureka-client</artifactId>
        </dependency>
        <dependency>
            <groupId>org.springframework.boot</groupId>
            <artifactId>spring-boot-starter-web</artifactId>
        </dependency>

        <dependency>
            <groupId>org.springframework.boot</groupId>
            <artifactId>spring-boot-starter-actuator</artifactId>
        </dependency>
        <dependency>
            <groupId>org.example</groupId>
            <artifactId>CommModule</artifactId>
            <version>${project.version}</version>
        </dependency>

        <!--        <dependency>-->
        <!--            <groupId>org.springframework.boot</groupId>-->
        <!--            <artifactId>spring-boot-devtools</artifactId>-->
        <!--            <scope>runtime</scope>-->
        <!--            <optional>true</optional>-->
        <!--        </dependency>-->

        <dependency>
            <groupId>org.projectlombok</groupId>
            <artifactId>lombok</artifactId>
            <optional>true</optional>
        </dependency>
        <dependency>
            <groupId>org.springframework.boot</groupId>
            <artifactId>spring-boot-starter-test</artifactId>
            <scope>test</scope>
        </dependency>


    </dependencies>
- yml
server:
  port: 3355

spring:
  application:
    name: config-client
  cloud:
    config:
      label: master  #分支名称
      name: config  #配置文件名称
      profile: dev  #读取后缀名称   上述三个综合http://localhost:3344/master/config-dev.yml
      uri: http://localhost:3344  #配置中心的地址
#服务注册到eureka地址
eureka:
  client:
    service-url:
      #设置与eureka server交互的地址查询服务和注册服务都需要依赖这个地址
      defaultZone: http://localhost:7001/eureka #单机版
- 启动类
package com.pack.configui.controller;

import org.springframework.beans.factory.annotation.Value;
import org.springframework.cloud.context.config.annotation.RefreshScope;
import org.springframework.web.bind.annotation.GetMapping;
import org.springframework.web.bind.annotation.RestController;

@RestController
@RefreshScope
public class configController {

    @Value("${config.info}")
    private String configInfo;

    @GetMapping("/configInfo")
    public String getConfigInfo() {
        return configInfo;
    }
}
- 业务类
package com.pack.configui.controller;

import org.springframework.beans.factory.annotation.Value;
import org.springframework.cloud.context.config.annotation.RefreshScope;
import org.springframework.web.bind.annotation.GetMapping;
import org.springframework.web.bind.annotation.RestController;

@RestController
@RefreshScope
public class configController {

    @Value("${config.info}")
    private String configInfo;

    @GetMapping("/configInfo")
    public String getConfigInfo() {
        return configInfo;
    }
}
- gitee上被读取配置文件的内容
config:
       info:this is a file from gitee
- 读取出错
gitee上的配置文件的内容必须严格按照yml的格式进行
- web访问

2.4 客户端动态读取gitee中的配置
- 修改gitee中配置文件的内容
发现配置中心读取的配置数据变化了,但是客户端的没有变化 - 3355重启可以获取新的gitee上的配置
- 3355添加新的yml配置
- yml添加的配置
# 暴露监控端点 否则 curl -X POST "http://localhost:3355/actuator/refresh" 不可使用
management:
  endpoints:
    web:
      exposure:
        include: "*"
- 3355启动类添加@RefreshScope
- 运维人员发送Post请求刷新3355
curl -X POST "http://localhost:3355/actuator/refresh"
- actuator依赖需要加入pom中,只有gateway不需要加actuator
我这里报错,问题未解决
2.5 每次修改gitee配置,广播通知
- spring-cloud bus
三、Spring Cloud Bus
3.1 需要改进的地方
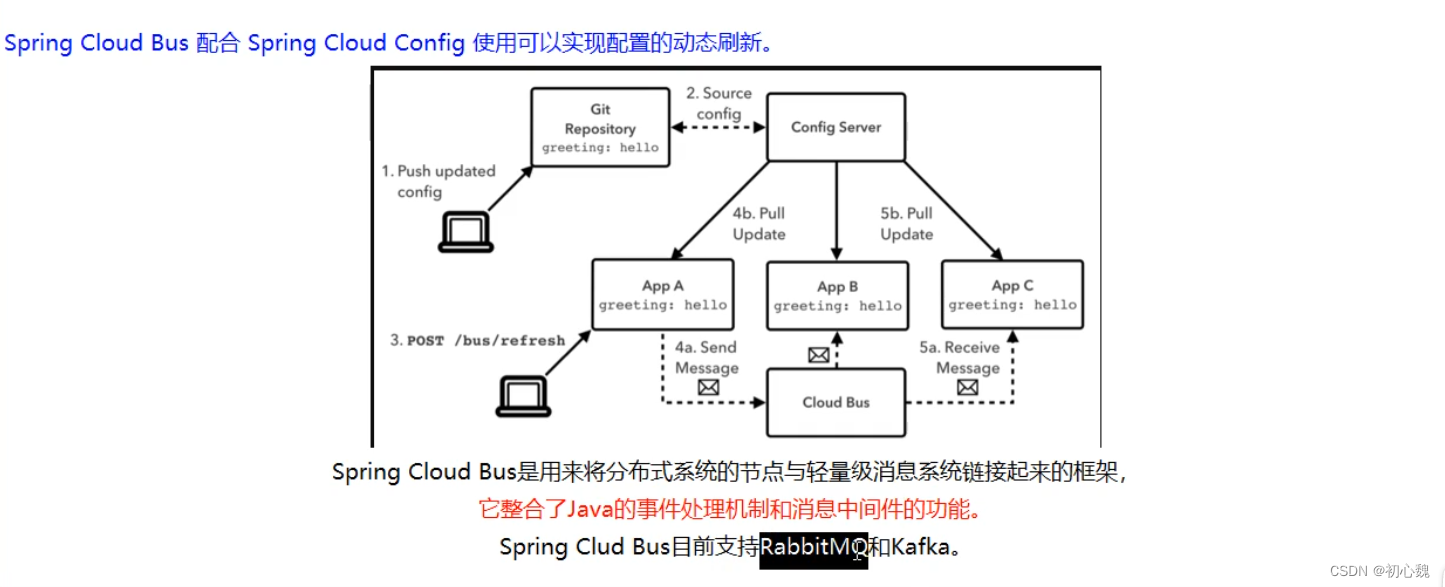
- spring cloud bus 配合Spring cloud Config使用实现配置的动态刷新
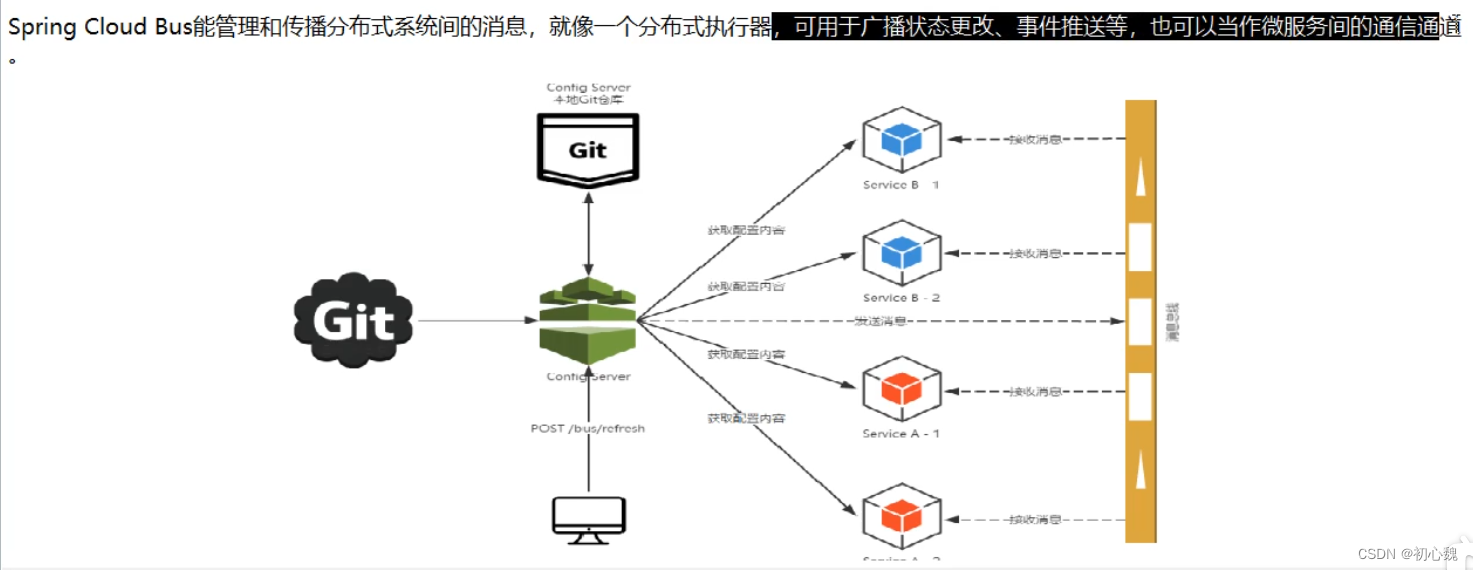
3.2 Bus


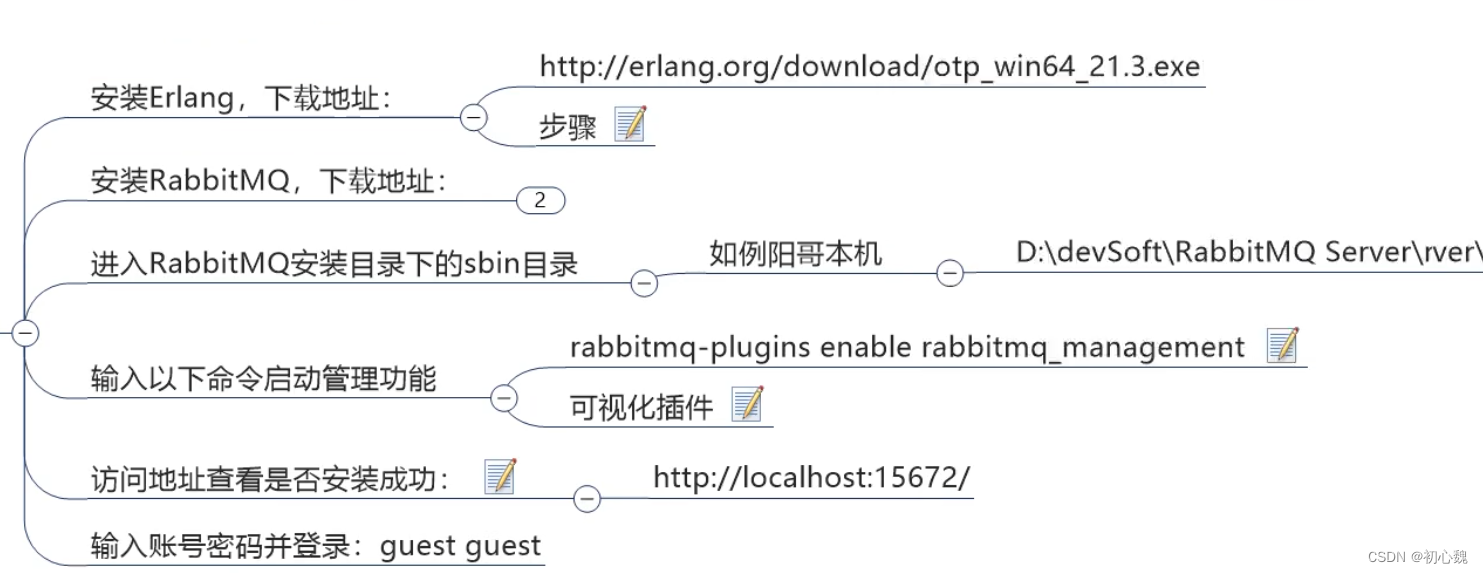
3.3 RabbitMq 安装
- abbitmq-plugins enable rabbitmq_management
- http://localhost:15672/

3.4 config-client-3366
- pom
<dependencies>
        <dependency>
            <groupId>org.example</groupId>
            <artifactId>CommModule</artifactId>
            <version>${project.version}</version>
        </dependency>
        <!--添加消息总线RabbitMQ支持-->
        <dependency>
            <groupId>org.springframework.cloud</groupId>
            <artifactId>spring-cloud-starter-bus-amqp</artifactId>
        </dependency>
        <dependency>
            <groupId>org.springframework.cloud</groupId>
            <artifactId>spring-cloud-starter-config</artifactId>
        </dependency>
        <dependency>
            <groupId>org.springframework.cloud</groupId>
            <artifactId>spring-cloud-starter-netflix-eureka-client</artifactId>
        </dependency>
        <dependency>
            <groupId>org.springframework.boot</groupId>
            <artifactId>spring-boot-starter-web</artifactId>
        </dependency>

        <dependency>
            <groupId>org.springframework.boot</groupId>
            <artifactId>spring-boot-starter-actuator</artifactId>
        </dependency>

        <!--        <dependency>-->
        <!--            <groupId>org.springframework.boot</groupId>-->
        <!--            <artifactId>spring-boot-devtools</artifactId>-->
        <!--            <scope>runtime</scope>-->
        <!--            <optional>true</optional>-->
        <!--        </dependency>-->

        <dependency>
            <groupId>org.projectlombok</groupId>
            <artifactId>lombok</artifactId>
            <optional>true</optional>
        </dependency>
        <dependency>
            <groupId>org.springframework.boot</groupId>
            <artifactId>spring-boot-starter-test</artifactId>
            <scope>test</scope>
        </dependency>
    </dependencies>
- yml
server:
  port: 3355

spring:
  application:
    name: config-client
  cloud:
    config:
      label: master  #分支名称
      name: config  #配置文件名称
      profile: dev  #读取后缀名称   上述三个综合http://localhost:3344/master/config-dev.yml
      uri: http://localhost:3344  #配置中心的地址
#服务注册到eureka地址
eureka:
  client:
    service-url:
      #设置与eureka server交互的地址查询服务和注册服务都需要依赖这个地址
      defaultZone: http://localhost:7001/eureka #单机版

# 暴露监控端点 否则 curl -X POST "http://localhost:3355/actuator/refresh" 不可使用
management:
  endpoints:
    web:
      exposure:
        include: "*"
#SpringCloud Bus动态刷新定点通知 公式:http://localhost:配置中心的端口号/actuator/bus-refresh/{destination}
#例如 只通知3355,curl -X POST "http://localhost:3344/actuator/bus-refresh/config-client:3355"
##rabbitmq相关配置,暴露bus刷新配置的端点
rabbitmq:
  host: localhost
  port: 15672
  username: guest
  password: guest
- 主启动类
package com.pack.configUi;

import org.springframework.boot.SpringApplication;
import org.springframework.boot.autoconfigure.SpringBootApplication;
import org.springframework.cloud.netflix.eureka.EnableEurekaClient;


/**
 * @author lixiaolong
 */
@SpringBootApplication
@EnableEurekaClient
public class clientBoot {
    public static void main(String[] args) {
        SpringApplication.run(clientBoot.class, args);
        System.out.println("启动成功");
    }
}
- controller类
package com.pack.configUi.controller;

import org.springframework.beans.factory.annotation.Value;
import org.springframework.cloud.context.config.annotation.RefreshScope;
import org.springframework.web.bind.annotation.GetMapping;
import org.springframework.web.bind.annotation.RestController;

/**
 * @author lixiaolong
 */
@RestController
@RefreshScope
public class clientController {

    @Value("${server.port}")
    private String serverPort;

    @Value("${config.info}")
    private String configInfo;


    @GetMapping("/configInfo")
    public String getConfigInfo() {
        return "serverPort:" + serverPort + "\t\n\n configInfo: " + configInfo;
    }
}
3.5 设计思想
- 采用方案2,通知总控中心,再通知客户端

- 总控3344加入pom
   <dependency>
            <groupId>org.springframework.cloud</groupId>
            <artifactId>spring-cloud-starter-bus-amqp</artifactId>
        </dependency>
- 3344加入新的yml
#rabbitmq相关配置
spring:
  rabbitmq:
    host: localhost
    port: 15672
    username: guest
    password: guest
management:
  endpoints: #暴露bus刷新配置的端点
    web:
      exposure:
        include: 'bus-refresh'
- 3355,3366加入pom,yml和3344一致
3.6 测试
- 3344访问
http://localhost:3344/config-dev.yml
- 3355访问
http://localhost:3355/configInfo
- 3366访问
http://localhost:3366/configInfo
- github修改配置文件
config:
       info: this is a file from gitee, version 4
- 运维人员cmd运行总控refresh命令
-X POST "http://localhost:3344/actuator/bus-refresh"
此处与3344yml配置对应
###rabbitmq相关配置,暴露bus刷新配置的端点 SpringCloud Bus动态刷新全局广播
management:
  endpoints: #暴露bus刷新配置的端点
    web:
      exposure:
        include: 'bus-refresh'
- 刷新3355,3366就可以得到最新的配置文件
3.7 3355完整yml
server:
  port: 3366

spring:
  application:
    name: config-client
  cloud:
    config:
      label: master  #分支名称
      name: config  #配置文件名称
      profile: dev  #读取后缀名称   上述三个综合http://localhost:3344/master/config-dev.yml
      uri: http://localhost:3344  #配置中心的地址
  rabbitmq:
    host: localhost
    port: 15672
    username: guest
    password: guest

#服务注册到eureka地址
eureka:
  client:
    service-url:
      #设置与eureka server交互的地址查询服务和注册服务都需要依赖这个地址
      defaultZone: http://localhost:7001/eureka #单机版

## 暴露监控端点 否则 curl -X POST "http://localhost:3355/actuator/refresh" 不可使用
#management:
#  endpoints:
#    web:
#      exposure:
#        include: "*"
##SpringCloud Bus动态刷新定点通知 公式:http://localhost:配置中心的端口号/actuator/bus-refresh/{destination}
##例如 只通知3355,curl -X POST "http://localhost:3344/actuator/bus-refresh/config-client:3355"
##rabbitmq相关配置,暴露bus刷新配置的端点
- 定点通知,只通知3355,不通知3366
curl -X POST "http://localhost:3344/actuator/bus-refresh/localhost:3355"