参考文献:
狂神说
【狂神Spring笔记】Spring整理笔记(附代码)(共13章)
Spring简介
Spring就是一个轻量级的控制反转(IOC)和面向切面编程(AOP)的框架!
IOC
控制反转 IOC是一种通过描述(XML或注解)并通过第三方去生产或获取特定对象的方式。在Spring中实现控制反转的是IoC容器,其实现方法是依赖注入(Dependency Injection,Dl)。
1、第一个Spring程序(helloword)
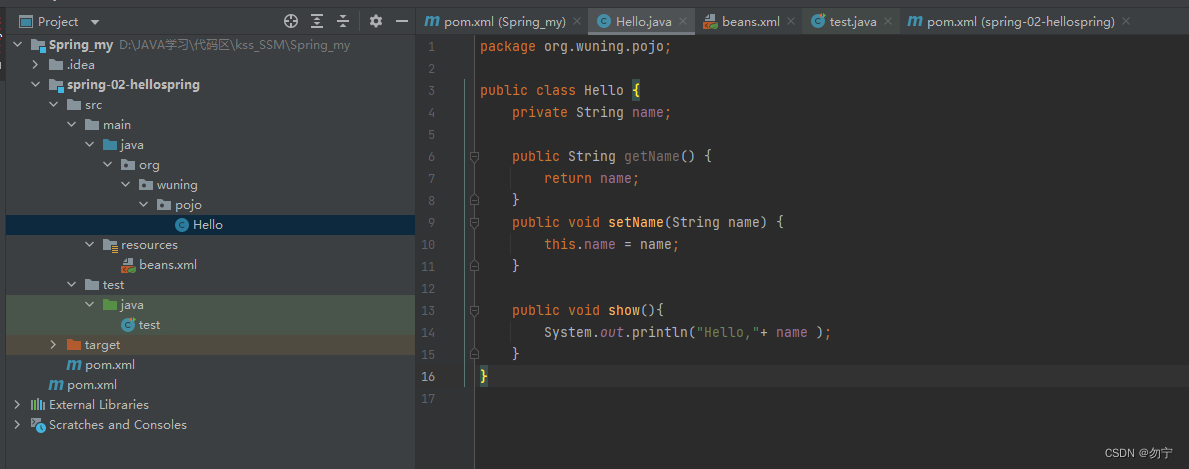
文件结构如下图所示

- 1、导入配置文件
    <dependencies>
        <dependency>
            <groupId>org.springframework</groupId>
            <artifactId>spring-webmvc</artifactId>
            <version>5.1.10.RELEASE</version>
        </dependency>
        <dependency>
            <groupId>junit</groupId>
            <artifactId>junit</artifactId>
            <version>4.12</version>
            <scope>test</scope>
        </dependency>
    </dependencies>
- 2、创建实例对象
public class Hello {
    private String name;

    public String getName() {
        return name;
    }
    public void setName(String name) {
        this.name = name;
    }

    public void show(){
        System.out.println("Hello,"+ name );
    }
}
- 3、编写我们的spring文件 , 这里我们命名为beans.xml
<?xml version="1.0" encoding="UTF-8"?>
<beans xmlns="http://www.springframework.org/schema/beans"
       xmlns:xsi="http://www.w3.org/2001/XMLSchema-instance"
       xsi:schemaLocation="http://www.springframework.org/schema/beans
       http://www.springframework.org/schema/beans/spring-beans.xsd">

    <!--bean就是java对象 , 由Spring创建和管理-->
    <bean id="hello" class="org.wuning.pojo.Hello">
        <property name="name" value="Spring"/>
    </bean>

</beans>
- 4、测试
public class test {
    @Test
    public void test(){
        //解析beans.xml文件 , 生成管理相应的Bean对象
        ApplicationContext context = new ClassPathXmlApplicationContext("beans.xml");
        //getBean : 参数即为spring配置文件中bean的id .
        Hello hello = (Hello) context.getBean("hello");
        hello.show();
    }
}
2、 IOC创建对象方式
2.1、无参
   <!--bean就是java对象 , 由Spring创建和管理-->
   <bean id="user" class="com.kuang.pojo.User">
       <property name="name" value="kuangshen"/>
   </bean>
2.2、有参
<!-- 第一种根据index参数下标设置 -->
<bean id="userT" class="com.kuang.pojo.UserT">
   <!-- index指构造方法 , 下标从0开始 -->
   <constructor-arg index="0" value="kuangshen2"/>
</bean>
<!-- 第二种根据参数名字设置 -->
<bean id="userT" class="com.kuang.pojo.UserT">
   <!-- name指参数名 -->
   <constructor-arg name="name" value="kuangshen2"/>
</bean>
<!-- 第三种根据参数类型设置 -->
<bean id="userT" class="com.kuang.pojo.UserT">
   <constructor-arg type="java.lang.String" value="kuangshen2"/>
</bean>
3、依赖注入
3.1、常量注入
<bean id="student" class="com.kuang.pojo.Student">
     <property name="name" value="小明"/>
 </bean>
3.2、Bean注入
 <bean id="addr" class="com.kuang.pojo.Address">
     <property name="address" value="重庆"/>
 </bean>

 <bean id="student" class="com.kuang.pojo.Student">
     <property name="name" value="小明"/>
     <property name="address" ref="addr"/>
 </bean>
3.3、数组注入
 <bean id="student" class="com.kuang.pojo.Student">
     <property name="name" value="小明"/>
     <property name="address" ref="addr"/>
     <property name="books">
         <array>
             <value>西游记</value>
             <value>红楼梦</value>
             <value>水浒传</value>
         </array>
     </property>
 </bean>
3.4、List注入
 <property name="hobbys">
     <list>
         <value>听歌</value>
         <value>看电影</value>
         <value>爬山</value>
     </list>
 </property>
3.5、Map注入
<property name="card">
     <map>
         <entry key="中国邮政" value="456456456465456"/>
         <entry key="建设" value="1456682255511"/>
     </map>
 </property>
3.6、Set注入
 <property name="games">
     <set>
         <value>LOL</value>
         <value>BOB</value>
         <value>COC</value>
     </set>
 </property>
3.7、NULL注入
<property name="wife"><null/></property>
3.8、Properties注入
 <property name="info">
     <props>
         <prop key="学号">20190604</prop>
         <prop key="性别">男</prop>
         <prop key="姓名">小明</prop>
     </props>
 </property>
3.9、Bean的作用域
<bean id="ServiceImpl" class="cn.csdn.service.ServiceImpl" scope="singleton">
Singleton
Prototype
Request
Session
4、自动装配
Spring的自动装配需要从两个角度来实现,或者说是两个操作:
-
组件扫描(component scanning):spring会自动发现应用上下文中所创建的bean;
-
自动装配(autowiring):spring自动满足bean之间的依赖,也就是我们说的IoC/DI;
4.1、在xml中显式配置
1、创建需要的实体类
public class Cat {
    public void shout() {
        System.out.println("miao~");
    }
}
public class Dog {
    public void shout() {
        System.out.println("wang~");
    }
}
public class User {
    private Cat cat;
    private Dog dog;
    private String str;
}
2、配置文件
<?xml version="1.0" encoding="UTF-8"?>
<beans xmlns="http://www.springframework.org/schema/beans"
       xmlns:xsi="http://www.w3.org/2001/XMLSchema-instance"
       xsi:schemaLocation="http://www.springframework.org/schema/beans
        http://www.springframework.org/schema/beans/spring-beans.xsd">

    <bean id="dog" class="com.kuang.pojo.Dog"/>
    <bean id="cat" class="com.kuang.pojo.Cat"/>
    <bean id="user" class="com.kuang.pojo.User">
        <property name="cat" ref="cat"/>
        <property name="dog" ref="dog"/>
        <property name="str" value="qinjiang"/>
    </bean>
</beans>
3、测试
public class MyTest {
    @Test
    public void testMethodAutowire() {
        ApplicationContext context = new ClassPathXmlApplicationContext("beans.xml");
        User user = (User) context.getBean("user");
        user.getCat().shout();
        user.getDog().shout();
    }
}
4.2、autowire byName (按名称自动装配)
<bean id="user" class="com.kuang.pojo.User" autowire="byName">
    <property name="str" value="qinjiang"/>
</bean>
4.3、autowire byType (按类型自动装配)
<bean id="user" class="com.kuang.pojo.User" autowire="byType">
    <property name="str" value="qinjiang"/>
</bean>
4.4、注解
1、在spring配置文件中引入context文件头
xmlns:context="http://www.springframework.org/schema/context"

http://www.springframework.org/schema/context
http://www.springframework.org/schema/context/spring-context.xsd
2、开启属性注解支持!
<context:annotation-config/>

<bean id="dog" class="com.kuang.pojo.Dog"/>
<bean id="cat" class="com.kuang.pojo.Cat"/>
<bean id="user" class="com.kuang.pojo.User"/>
3、@Autowired注解
public class User {
    @Autowired
    private Cat cat;
    @Autowired
    private Dog dog;
    private String str;

    public Cat getCat() {
        return cat;
    }
    public Dog getDog() {
        return dog;
    }
    public String getStr() {
        return str;
    }
}
@Autowired(required=false)
说明:false,对象可以为null;true,对象必须存对象,不能为null。
@Qualifier
@Autowired是根据类型自动装配的,加上@Qualifier则可以根据byName的方式自动装配
@Qualifier不能单独使用。
@Autowired
@Qualifier(value = "cat2")
private Cat cat;
4、@Resource
-
@Resource如有指定的name属性,先按该属性进行byName方式查找装配;
-
其次再进行默认的byName方式进行装配;
-
如果以上都不成功,则按byType的方式自动装配。
-
都不成功,则报异常。
public class User {
    //如果允许对象为null,设置required = false,默认为true
    @Resource(name = "cat2")
    private Cat cat;
    @Resource
    private Dog dog;
    private String str;
}
5、@Autowired与@Resource异同:
-
1、@Autowired与@Resource都可以用来装配bean。都可以写在字段上,或写在setter方法上。
-
2、@Autowired默认按类型装配(属于spring规范),默认情况下必须要求依赖对象必须存在,如果要允许null 值,可以设置它的required属性为false,如:@Autowired(required=false) ,如果我们想使用名称装配可以结合@Qualifier注解进行使用
-
3、@Resource(属于J2EE复返),默认按照名称进行装配,名称可以通过name属性进行指定。如果没有指定name属性,当注解写在字段上时,默认取字段名进行按照名称查找,如果注解写在setter方法上默认取属性名进行装配。当找不到与名称匹配的bean时才按照类型进行装配。但是需要注意的是,如果name属性一旦指定,就只会按照名称进行装配。
它们的作用相同都是用注解方式注入对象,但执行顺序不同。@Autowired先byType,@Resource先byName。
5、使用注解开发
5.1、@Component
@Component("user")
public class User {
    public String name;
    @Value("秦疆")
    public void setName(String name) {
        this.name = name;
    }
}
5.2、@Controller;@Service;@Repository
- @Controller:web层
- @Service:service层
- @Repository:dao层
5.3、@scope 作用域
-
singleton:默认的,Spring会采用单例模式创建这个对象。关闭工厂 ,所有的对象都会销毁。
-
prototype:多例模式。关闭工厂 ,所有的对象不会销毁。内部的垃圾回收机制会回收
@Controller("user")
@Scope("prototype")
public class User {
    @Value("秦疆")
    public String name;
}
6、Java的方式配置Spring(用配置类代替xml配置)
6.1、编写一个实体类,Dog
@Component  //将这个类标注为Spring的一个组件,放到容器中!
public class Dog {
    public String name = "dog";
}
6.2、新建一个config配置包,编写一个MyConfig配置类
@Configuration  //代表这是一个配置类
public class MyConfig {
    @Bean //通过方法注册一个bean,这里的返回值就Bean的类型,方法名就是bean的id!
    public Dog dog(){
        return new Dog();
    }
}
6.3、测试
@Test
public void test2(){
    ApplicationContext applicationContext =
            new AnnotationConfigApplicationContext(MyConfig.class);
    Dog dog = (Dog) applicationContext.getBean("dog");
    System.out.println(dog.name);
}
6.4、导入其他配置
@Configuration
@Import(MyConfig2.class)  //导入合并其他配置类,类似于配置文件中的 inculde 标签
public class MyConfig {
    @Bean
    public Dog dog(){
        return new Dog();
    }
}
7、静态/动态代理模式
代理模式:在不改变原来的代码的情况下,实现了对原有功能的增强
7.1、静态代理
7.1.1、接口和类、
//抽象角色:租房
public interface Rent {
    public void rent();
}
//真实角色: 房东,房东要出租房子
public class Host implements Rent{
    public void rent() {
        System.out.println("房屋出租");
    }
}
7.1.2、代理对象
//代理角色:中介
public class Proxy implements Rent {

    private Host host;
    public Proxy() { }
    public Proxy(Host host) {
        this.host = host;
    }

    //租房
    public void rent(){
        seeHouse();
        host.rent();
        fare();
    }
    //看房
    public void seeHouse(){
        System.out.println("带房客看房");
    }
    //收中介费
    public void fare(){
        System.out.println("收中介费");
    }
}
7.1.3、客户测试
//客户类,一般客户都会去找代理!
public class Client {
    public static void main(String[] args) {
        //房东要租房
        Host host = new Host();
        //中介帮助房东
        Proxy proxy = new Proxy(host);
        //你去找中介!
        proxy.rent();
    }
}
7.2、动态代理
7.2.1、动态代理涉及知识
InvocationHandler 是由代理实例的调用处理程序实现的接口(调用处理程序并返回结果)
Proxy 生成动态代理类
7.2.2、代理对象(这部分代码基本不动,使用时套模板)
public class ProxyInvocationHandler implements InvocationHandler {
    private Rent rent;

    public void setRent(Rent rent) {
        this.rent = rent;
    }

    //生成代理类,重点是第二个参数,获取要代理的抽象角色!之前都是一个角色,现在可以代理一类角色
    public Object getProxy(){
        return Proxy.newProxyInstance(this.getClass().getClassLoader(),
                rent.getClass().getInterfaces(),this);
    }

    // proxy : 代理类 method : 代理类的调用处理程序的方法对象.
    // 处理代理实例上的方法调用并返回结果
    @Override
    public Object invoke(Object proxy, Method method, Object[] args) throws Throwable {
        seeHouse();
        //核心:本质利用反射实现!
        Object result = method.invoke(rent, args);
        fare();
        return result;
    }

    //看房
    public void seeHouse(){
        System.out.println("带房客看房");
    }
    //收中介费
    public void fare(){
        System.out.println("收中介费");
    }

}
7.2.3、客户测试
//租客
public class Client {

    public static void main(String[] args) {
        //真实角色
        Host host = new Host();
        //代理实例的调用处理程序,代理角色,不存在
        ProxyInvocationHandler pih = new ProxyInvocationHandler();
        pih.setRent(host); //将真实角色放置进去!
        Rent proxy = (Rent)pih.getProxy(); //动态生成对应的代理类!
        proxy.rent();
    }

}
7.3.4、动态代理优点
-
可以使得我们的真实角色更加纯粹 . 不再去关注一些公共的事情 .
-
公共的业务由代理来完成 . 实现了业务的分工 ,
-
公共业务发生扩展时变得更加集中和方便 .
-
一个动态代理 , 一般代理某一类业务
-
一个动态代理可以代理多个类,代理的是接口!
8、AOP 面向切面编程
对业务逻辑的各个部分进行隔离,从而使得业务逻辑各部分之间的耦合度降低,提高程序的可重用性,同时提高了开发的效率。
xml实现跳过
8.1、注解实现
8.1.1、编写一个注解实现的增强类
package com.kuang.config;

import org.aspectj.lang.ProceedingJoinPoint;
import org.aspectj.lang.annotation.After;
import org.aspectj.lang.annotation.Around;
import org.aspectj.lang.annotation.Aspect;
import org.aspectj.lang.annotation.Before;

@Aspect
public class AnnotationPointcut {
    @Before("execution(* com.kuang.service.UserServiceImpl.*(..))")
    public void before(){
        System.out.println("---------方法执行前---------");
    }

    @After("execution(* com.kuang.service.UserServiceImpl.*(..))")
    public void after(){
        System.out.println("---------方法执行后---------");
    }

    @Around("execution(* com.kuang.service.UserServiceImpl.*(..))")
    public void around(ProceedingJoinPoint jp) throws Throwable {
        System.out.println("环绕前");
        System.out.println("签名:"+jp.getSignature());
        //执行目标方法proceed
        Object proceed = jp.proceed();
        System.out.println("环绕后");
        System.out.println(proceed);
    }
}
8.1.2、在Spring配置文件中,注册bean,并增加支持注解的配置
    <!--注册bean-->
    <!--第三种方式:注解实现-->
    <bean id="userService" class="org.wuning.pojo.UserServiceImpl"/>
    <bean id="annotationPointcut" class="org.wuning.pojo.AnnotationPointcut"/>
    <aop:aspectj-autoproxy/>
通过aop命名空间的<aop:aspectj-autoproxy />声明自动为spring容器中那些配置@aspectJ切面的bean创建代理,织入切面。当然,spring 在内部依旧采用AnnotationAwareAspectJAutoProxyCreator进行自动代理的创建工作,但具体实现的细节已经被<aop:aspectj-autoproxy />隐藏起来了
<aop:aspectj-autoproxy />有一个proxy-target-class属性,默认为false,表示使用jdk动态代理织入增强,当配为<aop:aspectj-autoproxy poxy-target-class=“true”/>时,表示使用CGLib动态代理技术织入增强。不过即使proxy-target-class设置为false,如果目标类没有声明接口,则spring将自动使用CGLib动态代理。
8.1.3、测试
    @Test
    public void test(){
        ApplicationContext context = new ClassPathXmlApplicationContext("bean.xml");
        System.out.println(context);
        UserService userService =(UserService)context.getBean("userService");
        userService.search();

    }
9、整合Mybatis
实际应用中,采用springboot去配置,更加方便,暂时跳过
https://blog.csdn.net/qq_33369905/article/details/105828922
10、声明式事务
暂时跳过
https://blog.csdn.net/qq_33369905/article/details/105828921