本篇文章主要记录SpringCloud使用Consul作为服务注册发现中心,通过服务提供者和消费者为例,来真正掌握Consul注册中心!
目录
注:本篇文章主要参考周阳老师讲解的cloud进行整理的!
一、前言
本篇文章采用了maven聚合工程,搭建父工程这些我就不记录了,完全是基于https://blog.csdn.net/weixin_43888891/article/details/125267683文章的项目进行开发的,具体参考这一篇文章!
cloud官网:https://docs.spring.io/spring-cloud-consul/docs/current
要激活 Consul 服务发现,请使用带有 group为org.springframework.cloud和 artifact id的 starter spring-cloud-starter-consul-discovery。
<dependency>
    <groupId>org.springframework.cloud</groupId>
    <artifactId>spring-cloud-starter-consul-discovery</artifactId>
</dependency>
二、搭建服务提供者
1. 创建cloud-provider-payment8004项目

2. 修改配置
修改pom:
<dependencies>
    <!--SpringCloud consul-server -->
    <dependency>
        <groupId>org.springframework.cloud</groupId>
        <artifactId>spring-cloud-starter-consul-discovery</artifactId>
    </dependency>
    <!-- SpringBoot整合Web组件 -->
    <dependency>
        <groupId>org.springframework.boot</groupId>
        <artifactId>spring-boot-starter-web</artifactId>
    </dependency>
    <dependency>
        <groupId>org.springframework.boot</groupId>
        <artifactId>spring-boot-starter-actuator</artifactId>
    </dependency>
    <!--日常通用jar包配置-->
    <dependency>
        <groupId>org.springframework.boot</groupId>
        <artifactId>spring-boot-devtools</artifactId>
        <scope>runtime</scope>
        <optional>true</optional>
    </dependency>
    <dependency>
        <groupId>org.projectlombok</groupId>
        <artifactId>lombok</artifactId>
        <optional>true</optional>
    </dependency>
    <dependency>
        <groupId>org.springframework.boot</groupId>
        <artifactId>spring-boot-starter-test</artifactId>
        <scope>test</scope>
    </dependency>
</dependencies>
添加 application.yml
server:
  port: 8006

spring:
  application:
    name: consul-provider-payment
  ####consul注册中心地址
  cloud:
    consul:
      host: localhost
      port: 8500
      discovery:
        # 是否注册(默认为true)
        register: true
        # 服务名称
        service-name: ${spring.application.name}
        # 展示实例的ip(默认是false)
        prefer-ip-address: true
        # 实例id名称(默认是${spring.application.name}:comma,separated,profiles:${server.port})
        instance-id: ${spring.application.name}
3. 添加主启动类
import org.springframework.boot.SpringApplication;
import org.springframework.boot.autoconfigure.SpringBootApplication;
import org.springframework.cloud.client.discovery.EnableDiscoveryClient;

@SpringBootApplication
@EnableDiscoveryClient // 该注解用于向使用consul或者zookeeper作为注册中心时注册服务
public class PaymentMain8006 {
    public static void main(String[] args) {
        SpringApplication.run(PaymentMain8006.class, args);
    }
}
4. 添加controller
import org.springframework.beans.factory.annotation.Value;
import org.springframework.web.bind.annotation.GetMapping;
import org.springframework.web.bind.annotation.RestController;

import java.util.UUID;

@RestController
public class PaymentController {

    @Value("${server.port}")
    private String serverPort;

    @GetMapping("/payment/consul")
    public String paymentInfo() {
        return "springcloud with consul: " + serverPort + "\t\t" + UUID.randomUUID().toString();
    }
}
5.启动测试
访问:http://localhost:8006/payment/consul

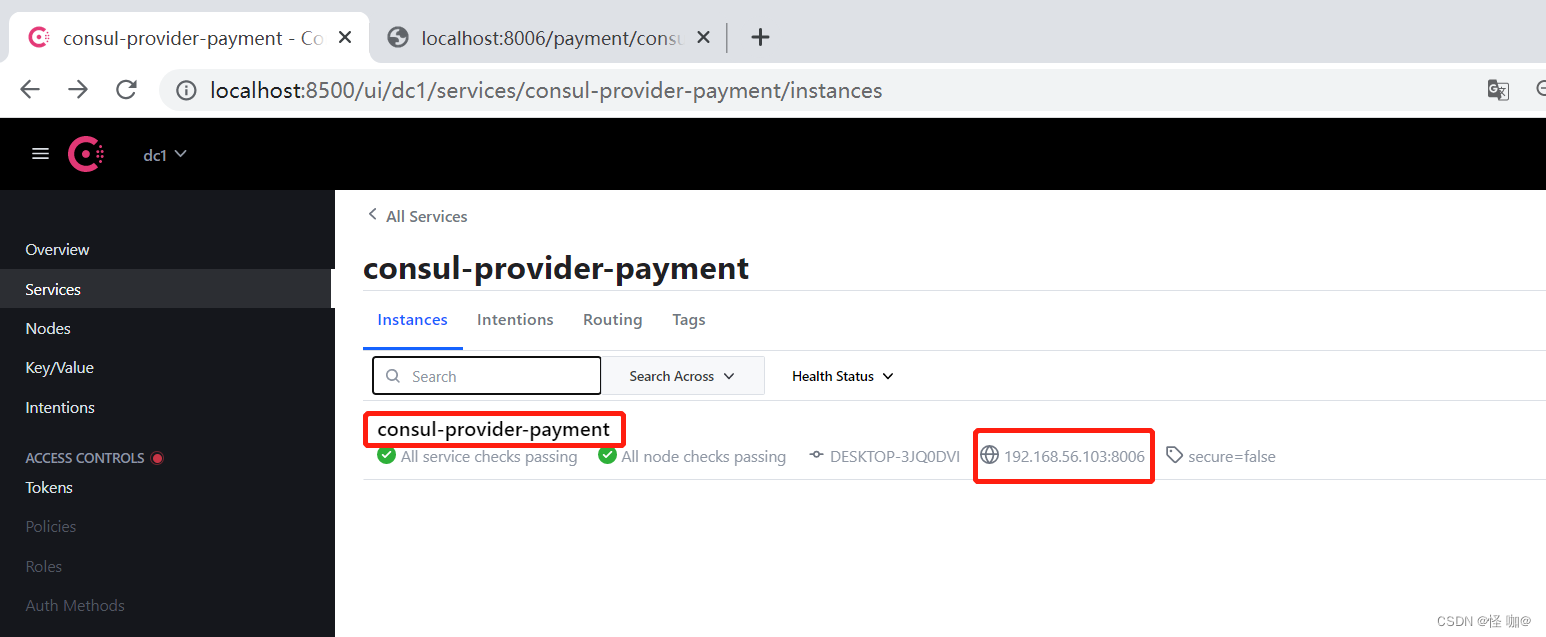
访问注册中心: 这时候会发现注册中心已经存在了我们注册的服务
通过这个配置可以修改下图当中展示的服务名称:这个服务名称很重要,消费者在调用提供者的时候也需要根据名称来调用,假如提供者有多个是集群的形式,那么这个服务名称也是一样的。
spring.cloud.consul.discovery.service-name=${spring.application.name}
下图当中的1 instance就是代表这个服务有一个实例

点击服务名称进去之后就是展示的实例,一个服务名称可以对应多个实例,所谓的多个实例也就是我们所说的微服务集群。
默认情况下,consul 实例注册的 ID 等于其 Spring Application Context ID。默认情况下,Spring 应用程序上下文 ID 是${spring.application.name}:comma,separated,profiles:${server.port}在大多数情况下,这将允许一项服务的多个实例在一台机器上运行。如果需要进一步的唯一性,使用 Spring Cloud,通过这个配置可以修改下图当中展示的实例名称:
spring.cloud.consul.discovery.instance-id=${spring.application.name}

从上图可以发现我们是可以看到实例ip的,默认是看不到的,通过下面配置就可以看到了(多个实例的时候,可以根据这个就可以快速找到实例对应的服务器地址):
spring.cloud.consul.discovery.prefer-ip-address=true
三、搭建服务消费者
1. 创建cloud-consumerzk-order80项目
2. 修改配置
修改pom:
<dependencies>
     <!--SpringCloud consul-server -->
    <dependency>
        <groupId>org.springframework.cloud</groupId>
        <artifactId>spring-cloud-starter-consul-discovery</artifactId>
    </dependency>
    <!-- SpringBoot整合Web组件 -->
    <dependency>
        <groupId>org.springframework.boot</groupId>
        <artifactId>spring-boot-starter-web</artifactId>
    </dependency>
    <dependency>
        <groupId>org.springframework.boot</groupId>
        <artifactId>spring-boot-starter-actuator</artifactId>
    </dependency>
    <!--日常通用jar包配置-->
    <dependency>
        <groupId>org.springframework.boot</groupId>
        <artifactId>spring-boot-devtools</artifactId>
        <scope>runtime</scope>
        <optional>true</optional>
    </dependency>
    <dependency>
        <groupId>org.projectlombok</groupId>
        <artifactId>lombok</artifactId>
        <optional>true</optional>
    </dependency>
    <dependency>
        <groupId>org.springframework.boot</groupId>
        <artifactId>spring-boot-starter-test</artifactId>
        <scope>test</scope>
    </dependency>
</dependencies>
添加 application.yml
server:
  port: 80

spring:
  application:
    name: cloud-consumer-order
  # consul注册中心相关配置
  cloud:
    consul:
      host: localhost
      port: 8500
      discovery:
        # 是否注册(默认为true)
        register: true
        # 服务名称
        service-name: ${spring.application.name}
        # 展示实例的ip(默认是false)
        prefer-ip-address: true
        # 实例id名称(默认是${spring.application.name}:comma,separated,profiles:${server.port})
        instance-id: ${spring.application.name}
3. 添加主启动类
import org.springframework.boot.SpringApplication;
import org.springframework.boot.autoconfigure.SpringBootApplication;
import org.springframework.cloud.client.discovery.EnableDiscoveryClient;

@SpringBootApplication
@EnableDiscoveryClient // 该注解用于向使用consul或者zookeeper作为注册中心时注册服务
public class OrderConsulMain80 {
    public static void main(String[] args) {
        SpringApplication.run(OrderConsulMain80.class, args);
    }
}
4. 添加配置类
import org.springframework.cloud.client.loadbalancer.LoadBalanced;
import org.springframework.context.annotation.Bean;
import org.springframework.context.annotation.Configuration;
import org.springframework.web.client.RestTemplate;

@Configuration
public class ApplicationContextBean {

    @Bean
    @LoadBalanced // 用于负载均衡访问
    public RestTemplate restTemplate() {
        return new RestTemplate();
    }
}
5. 添加业务类
这里使用服务名称进行远程调用,正常我们使用ip+端口也是能调用的,之所以用服务名称调用就是为了,假如集群情况下,可以负载均衡访问。这也是注册中心的用途之一,其次使用注册中心可以更直观的来查看集群的每个节点的情况。
import org.springframework.beans.factory.annotation.Autowired;
import org.springframework.web.bind.annotation.GetMapping;
import org.springframework.web.bind.annotation.RestController;
import org.springframework.web.client.RestTemplate;

@RestController
public class OrderConsulController {

    public static final String INVOKE_URL = "http://consul-provider-payment"; //consul-provider-payment

    @Autowired
    private RestTemplate restTemplate;

    @GetMapping(value = "/consumer/payment/consul")
    public String paymentInfo() {
        String result = restTemplate.getForObject(INVOKE_URL + "/payment/consul", String.class);
        System.out.println("消费者调用支付服务(consule)--->result:" + result);
        return result;
    }
}
6.启动测试
访问:http://localhost/consumer/payment/consul

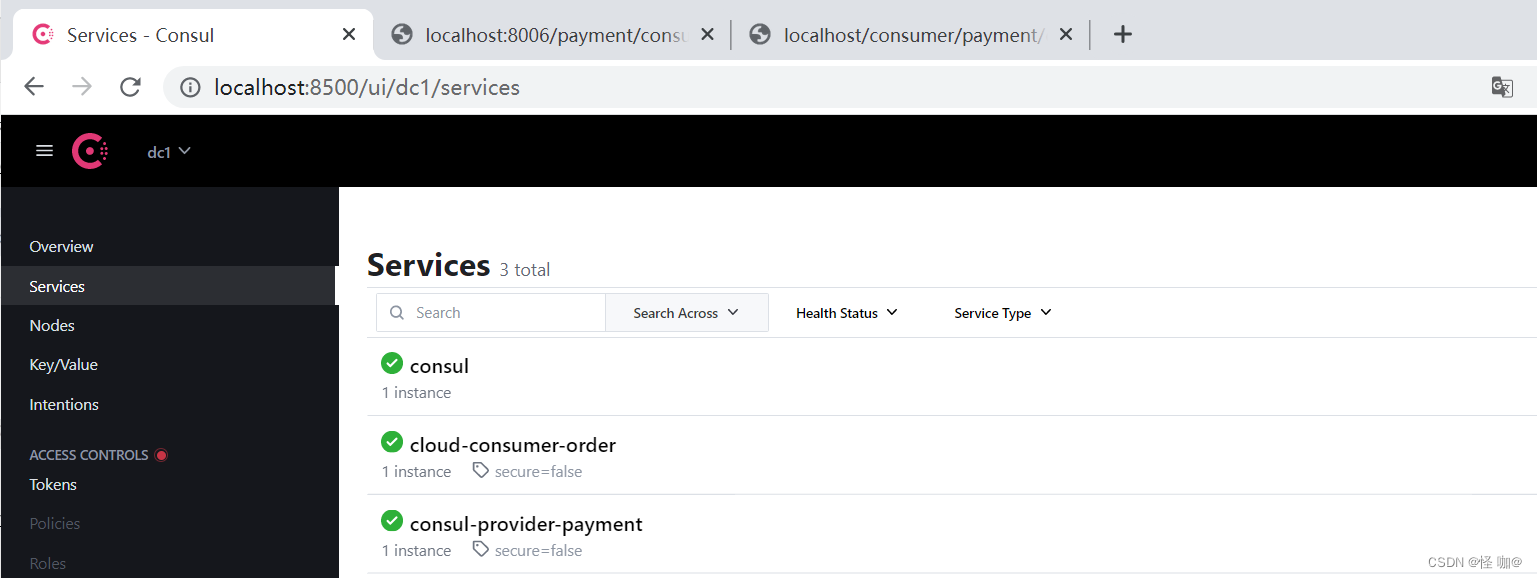
观察注册中心:这时候注册中心就已经有了两个服务

git源码:https://gitee.com/gzl_com/spring-cloud.git
四、健康检查
当客户端向 Consul 注册时,它会提供有关自身的元数据,例如主机和端口、id、名称和标签。默认情况下会创建一个 HTTP检查,Consul/actuator/health每 10 秒访问一次端点。如果健康检查失败,服务实例被标记为critical(可能有危险的)。

Consul 实例的健康检查默认为“/actuator/health”,这是 Spring Boot Actuator 应用程序中健康端点的默认位置。如果您使用非默认上下文路径或 servlet 路径(例如spring.servlet.context-path=/consul)或管理端点路径(例如management.server.servlet.context-path=/admin)。
例如:设置context-path应用servlet 路径,也就是该服务任何请求前面都需要加这个地址,否则404
server:
  port: 8006
  servlet:
    context-path: /consul
您需要更改下面这一点,否则项目可以启动成功,但是注册中心服务注册不成功!
spring:
  cloud:
    consul:
      discovery:
        healthCheckPath: ${server.servlet.context-path}/actuator/health
        healthCheckInterval: 15s
并且消费者调用提供者的地址也需要更改:
public static final String INVOKE_URL = "http://consul-provider-payment/consul";
Consul 用来检查健康端点的时间间隔也可以配置。“10s”和“1m”分别代表10秒和1分钟。
spring:
  cloud:
    consul:
      discovery:
        healthCheckInterval: 15s
您可以通过设置完全禁用 HTTP 健康检查(默认是开启的):
spring:
  cloud:
    consul:
        # 禁用 HTTP 健康检查(默认是开启的)
        register-health-check: false
ConsulHealthIndicator(指示器来验证ConsulClient):
默认情况下,它会检索 Consul 领导节点状态和所有注册的服务。在具有许多注册服务的部署中,在每次运行状况检查时检索所有服务的成本可能很高。跳过服务检索,只检查领导节点状态集
spring.cloud.consul.health-indicator.include-services-query=false。
五、查找服务
1、使用负载均衡器
Spring Cloud 支持Feign(一个 REST 客户端构建器),还支持SpringRestTemplate 使用逻辑服务名称/id 而不是物理 URL 来查找服务。Feign 和发现感知的 RestTemplate 都使用Spring Cloud LoadBalancer进行客户端负载平衡。
如果您想使用 RestTemplate 访问服务,只需声明:
@Configuration
public class ApplicationContextBean {

    @Bean
    @LoadBalanced // 用于负载均衡访问
    public RestTemplate restTemplate() {
        return new RestTemplate();
    }
}
并像这样使用它(注意我们如何使用来自 Consul 的 服务名称/ID,而不是完全限定的域名):
import org.springframework.beans.factory.annotation.Autowired;
import org.springframework.web.bind.annotation.GetMapping;
import org.springframework.web.bind.annotation.RestController;
import org.springframework.web.client.RestTemplate;

@RestController
public class OrderConsulController {

    public static final String INVOKE_URL = "http://consul-provider-payment"; //consul-provider-payment

    @Autowired
    private RestTemplate restTemplate;

    @GetMapping(value = "/consumer/payment/consul")
    public String paymentInfo() {
        String result = restTemplate.getForObject(INVOKE_URL + "/payment/consul", String.class);
        System.out.println("消费者调用支付服务(consule)--->result:" + result);
        return result;
    }
}
如果您在多个数据中心中拥有 Consul 集群,并且您想访问另一个数据中心中的服务,则仅服务名称/ID 是不够的。在这种情况下,您使用属性spring.cloud.consul.discovery.datacenters.STORES=dc-west 其中STORES是服务名称/id, dc-west是STORES服务所在的数据中心。
2、使用 DiscoveryClient
你也可以使用org.springframework.cloud.client.discovery.Discoveryclient,它为发现客户端提供了一个简单的API,而不是Netflix特有的。
@Autowired
private DiscoveryClient discoveryClient;

public String serviceUrl() {
    List<ServiceInstance> list = discoveryClient.getInstances("STORES");
    if (list != null && list.size() > 0 ) {
        return list.get(0).getUri();
    }
    return null;
}