引入依赖
        <dependency>
            <groupId>io.springfox</groupId>
            <artifactId>springfox-swagger2</artifactId>
            <version>2.7.0</version>
        </dependency>
        <dependency>
            <groupId>io.springfox</groupId>
            <artifactId>springfox-swagger-ui</artifactId>
            <version>2.7.0</version>
</dependency>本人的springboot版本是最新的2.6.1,swagger版本是2.7.0,按着网上的步骤进行环境配置,但在运行时却会出现Failed to start bean ‘documentationPluginsBootstrapper’的问题,在排查了多方原因后,我发现是springboot的版本更新,导致的swagger2的异常
解决方法:
spring:
  mvc:
    pathmatch:
      matching-strategy: ant_path_matcher
springboot2.6.0中将SpringMVC 默认路径匹配策略从AntPathMatcher 更改为PathPatternParser,导致出错,解决办法是切换回原先的AntPathMatcher?
配置类
@Configuration
@EnableSwagger2
public class SwaggerConfig {
    /**
     * 创建API应用
     * apiInfo() 增加API相关信息
     * 通过select()函数返回一个ApiSelectorBuilder实例,用来控制哪些接口暴露给Swagger来展现,
     * 本例采用指定扫描的包路径来定义指定要建立API的目录。
     *
     * @return
     */
    @Bean
    public Docket restApi() {
        return new Docket(DocumentationType.SWAGGER_2)
                .groupName("接口1")//进行分组
                .apiInfo(apiInfo("Spring Boot中使用Swagger2构建RESTful APIs", "1.0"))
                .useDefaultResponseMessages(true)
                .forCodeGeneration(false)
                .select()
                .apis(RequestHandlerSelectors.basePackage("com.jane.controller"))//controller
                .paths(PathSelectors.any())
                .build();
    }

    /**
     * 接口在两个不同的包,可以再加一个bean
     *
     * @return
     */
    @Bean
    public Docket restApi2() {
        return new Docket(DocumentationType.SWAGGER_2)
                .groupName("接口2")
                .apiInfo(apiInfo("Spring Boot中使用Swagger2构建RESTful APIs", "1.0"))
                .useDefaultResponseMessages(true)
                .forCodeGeneration(false)
                .select()
                .apis(RequestHandlerSelectors.basePackage("com.jane.other"))//修改controller
                .paths(PathSelectors.regex("/other.*"))    //匹配路径带/other
                .build();
    }


    /**
     * 创建该API的基本信息(这些基本信息会展现在文档页面中)
     * 访问地址:http://ip:port/swagger-ui.html
     *
     * @return
     */
    private ApiInfo apiInfo(String title, String version) {
        return new ApiInfoBuilder()
                .title(title)
                .description("更多请关注: 简瑞茵")
                .termsOfServiceUrl("https://blog.csdn.net/")
                .contact(new Contact("jane", "https://blog.csdn.net/kanseui", "1220667599@qq.com"))
                .version(version)
                .build();
    }
}
Controller层?
@Api()和@ApiOperation()最重要
@RestController
@RequestMapping("/api")
@Api(tags = "示范接口")
public class HelloController {
    @GetMapping("/hellp")
    @ApiOperation(value = "测试hello接口",notes = "示范一下下")
    String hello(){
        return "hello world";
    }
}
ui访问界面

进阶:
@ApiImplicitParams 请求参数的注解
@ApiResponses 结果响应
paramType=“xxx” 代表:
header : 请求参数的获取:@RequestHeader
query : 请求参数的获取:@RequestParam
path : 请求参数的获取:@PathVariable
body : 请求参数的获取:@RequestBody
form : 不常用
@ApiOperation(value = "1.根据全局变量获得author")
@ApiImplicitParams({
            @ApiImplicitParam(name = "name", value = "名称", required = true, paramType = "query", dataType = "String")
    })

@ApiResponses({
        @ApiResponse(code=200,message="请求成功"),
        @ApiResponse(code=500,message="系统异常")
})
@GetMapping("/user")
public String getUsers(String name){
    return "User-Messege";
}
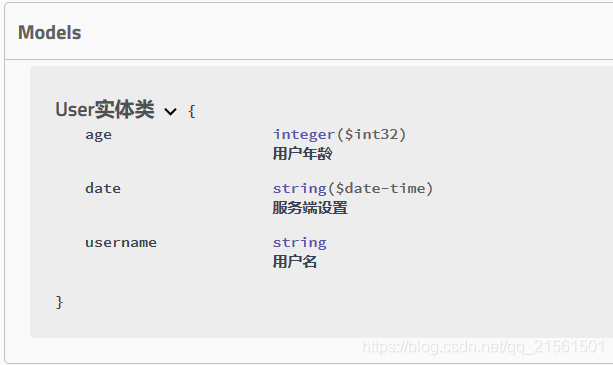
给实体类Model加注释
重要的是@ApiModel和? ? @ApiModelProperty("用户名")
@Data
@NoArgsConstructor
@AllArgsConstructor
@ApiModel("User实体类")
public class User {

    @ApiModelProperty("用户名")
    private String username;
    @ApiModelProperty("用户年龄")
    private int age;
    @ApiModelProperty("服务端设置")
    private Date date;
}
ui界面
 ?
?
?