有道无术,术尚可求,有术无道,止于术。
本系列Spring Boot版本2.7.0
文章目录
前言
紧接上文创建、准备上下文之后,还需要进一步处理才能正常使用,下一步就是刷新上下文:
this.refreshContext(context);
刷新的核心方法,调用的是AbstractApplicationContext的refresh方法,该方法中又调用了十多个方法,这是刷新上下文的核心代码,总的流程如下:
    public void refresh() throws BeansException, IllegalStateException {
        synchronized(this.startupShutdownMonitor) {
        	// 1. 开启上下文刷新步骤 spring.context.refresh
            StartupStep contextRefresh = this.applicationStartup.start("spring.context.refresh");
            // 2. 准备刷新
            this.prepareRefresh();
            // 3.  获取 Bean 工厂
            ConfigurableListableBeanFactory beanFactory = this.obtainFreshBeanFactory();
            // 4. 准备 Bean 工厂
            this.prepareBeanFactory(beanFactory);
            try {
            	// 5. Bean 工厂后置处理
                this.postProcessBeanFactory(beanFactory);
                // 开启新步骤,spring.context.beans.post-process
                StartupStep beanPostProcess = this.applicationStartup.start("spring.context.beans.post-process");
                // 6. 执行Bean 工厂后置处理
                this.invokeBeanFactoryPostProcessors(beanFactory);
                // 7. 注册Bean 后置处理器
                this.registerBeanPostProcessors(beanFactory);
                beanPostProcess.end(); // 步骤结束
                // 8. 国际化配置
                this.initMessageSource();
                // 9. 注册事件发布器
                this.initApplicationEventMulticaster();
                // 10. 通知子类刷新刷新容器,创建WebServer
                this.onRefresh();
                // 11. 注册监听器
                this.registerListeners();
                // 12.  完成beanFactory初始化, 实例化所有非延迟加载的bean
                this.finishBeanFactoryInitialization(beanFactory);
                // 13. 完成刷新 finishRefresh()
                this.finishRefresh();
            } catch (BeansException var10) {
                if (this.logger.isWarnEnabled()) {
                    this.logger.warn("Exception encountered during context initialization - cancelling refresh attempt: " + var10);
                }

                this.destroyBeans();
                this.cancelRefresh(var10);
                throw var10;
            } finally {
                this.resetCommonCaches();
                contextRefresh.end();
            }

        }
    }
核心类
SpringApplicationShutdownHook
SpringApplicationShutdownHook名字上看是一个应用程序关闭的钩子,当程序关闭时,将调用该类,作用就是执行 Spring Boot 应用程序的正常关闭。
该类实现了Runnable 接口:
class SpringApplicationShutdownHook implements Runnable {}
run方法中,调用了一些关闭和释放资源的方法:
    public void run() {
        Class var4 = SpringApplicationShutdownHook.class;
        LinkedHashSet contexts;
        LinkedHashSet closedContexts;
        LinkedHashSet actions;
        synchronized(SpringApplicationShutdownHook.class) {
            this.inProgress = true;
            contexts = new LinkedHashSet(this.contexts);
            closedContexts = new LinkedHashSet(this.closedContexts);
            actions = new LinkedHashSet(this.handlers.getActions());
        }
		// 关闭上下文
        contexts.forEach(this::closeAndWait);
        // 已关闭的上下文
        closedContexts.forEach(this::closeAndWait);
        // 调用子任务
        actions.forEach(Runnable::run);
    }
BeanFactoryPostProcessor
源码注释:该接口允许自定义修改应用程序上下文的bean定义,调整上下文底层bean工厂的bean属性值。
这是Spring 为我们提供的扩展点之一,可以通过该接口在BeanFactory初始化之后修改程序上下文的内部Bean工厂,此时的 Bean Definition 都已经被加载了,但是Bean并未实例化。
@FunctionalInterface
public interface BeanFactoryPostProcessor {
    void postProcessBeanFactory(ConfigurableListableBeanFactory var1) throws BeansException;
}
该接口的子类BeanDefinitionRegistryPostProcessor 可以看到就是对 Bean Definition 进行自定义扩展支持。
public interface BeanDefinitionRegistryPostProcessor extends BeanFactoryPostProcessor {
    void postProcessBeanDefinitionRegistry(BeanDefinitionRegistry var1) throws BeansException;
}
它有一个子类ConfigurationClassPostProcessor非常重要,它可以将@Configuration、@Component、@Bean、@Import等注解标识的类,解析为Bean Definition放在容器中。

BeanPostProcessor
BeanPostProcessor接口也是Spring 为我们提供的扩展点,一般叫做Bean后置处理器,该接口提供了两个方法,用于在bean初始化之前和之后进行Bean 增强处理:
public interface BeanPostProcessor {
    @Nullable
    default Object postProcessBeforeInitialization(Object bean, String beanName) throws BeansException {
        return bean;
    }

    @Nullable
    default Object postProcessAfterInitialization(Object bean, String beanName) throws BeansException {
        return bean;
    }
}
MessageSource
MessageSource 是spring-context模块提供的接口,它的作用是提供信息的国际化和包含参数的信息的替换,还提供了HierarchicalMessageSource接口,可以分层次地解析消息。
public interface MessageSource {
	// 解析code对应的信息进行返回,如果对应的code不能被解析则返回默认信息defaultMessage。
    @Nullable
    String getMessage(String code, @Nullable Object[] args, @Nullable String defaultMessage, Locale locale);
	// 解析code对应的信息进行返回,如果对应的code不能被解析则抛出异常NoSuchMessageException
    String getMessage(String code, @Nullable Object[] args, Locale locale) throws NoSuchMessageException;
	// 通过传递的MessageSourceResolvable对应来解析对应的信息
    String getMessage(MessageSourceResolvable resolvable, Locale locale) throws NoSuchMessageException;
}
WebServer
顾名思义,Web Server 就是提供 Web 功能的服务,比如Tomcat , 我们知道Spring Boot 内置了很多类型的Web 服务器,所以定义了一个WebServer 接口,声明了启动和停止的方法。
public interface WebServer {
    void start() throws WebServerException;

    void stop() throws WebServerException;

    int getPort();

    default void shutDownGracefully(GracefulShutdownCallback callback) {
        callback.shutdownComplete(GracefulShutdownResult.IMMEDIATE);
    }
}
可以看到很多Web 服务器都实现了该接口:

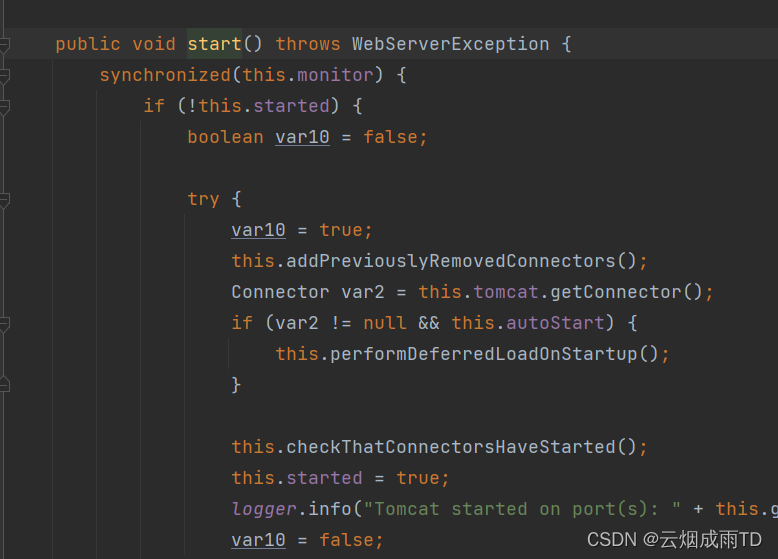
比如TomcatWebServer的启动方法,可以看到启动了Tomcat ,以此实现了内嵌Web 服务器的功能:

1. 注册应用关闭钩子
刷新下上文步骤首先会注册应用关闭钩子,应用关闭时,钩子会开启线程去执行一些关闭和释放资源的任务。
    private void refreshContext(ConfigurableApplicationContext context) {
    	// 默认 TRUE
        if (this.registerShutdownHook) {
        	// 钩子处理
            shutdownHook.registerApplicationContext(context);
        }
        // 继续刷新
        this.refresh(context);
    }
    void registerApplicationContext(ConfigurableApplicationContext context) {
    	// Runtime.getRuntime().addShutdownHook
    	// 在JVM中增加一个关闭的钩子,将SpringApplicationShutdownHook 放进去
        this.addRuntimeShutdownHookIfNecessary();
        Class var2 = SpringApplicationShutdownHook.class;
        synchronized(SpringApplicationShutdownHook.class) {
        	//  Assert.state 判断当前任务是否已经运行,刚创建,肯定是未运行
            this.assertNotInProgress();
            // 调用ApplicationContextClosedListener 应用关闭监听器
            context.addApplicationListener(this.contextCloseListener);
            // 将当前上下文设置到当前对象中
            this.contexts.add(context);
        }
    }
2. 准备刷新
在第二步prepareRefresh准备刷新方法主要作用就是初始化一些状态和属性,为后面的工作做准备。
进入到准备刷新this.prepareRefresh()方法,首先会清理扫描器缓存,再继续调用父类AbstractApplicationContext的准备刷新方法:
    protected void prepareRefresh() {
    	// 1. ClassPathBeanDefinitionScanner 扫描器清理缓存
        this.scanner.clearCache();
        // 2. 调用父类的prepareRefresh
        super.prepareRefresh();
    }
在super.prepareRefresh会设置一些状态,打印一些日志,检验一些属性:
    protected void prepareRefresh() {
    	// 开始时间
        this.startupDate = System.currentTimeMillis();
        // 设置关闭状态为FALSE
        this.closed.set(false);
        // 设置激活状态为 TRUE
        this.active.set(true);
        // 打印DEBUG 日志
        if (this.logger.isDebugEnabled()) {
            if (this.logger.isTraceEnabled()) {
                this.logger.trace("Refreshing " + this);
            } else {
                this.logger.debug("Refreshing " + this.getDisplayName());
            }
        }
		// 初始化一些属性资源
        this.initPropertySources();
        // 查看属性解析器是否配置了必须配置的属性,如果有设置,又在属性源中没配置,则会抛出 MissingRequiredPropertiesException
        this.getEnvironment().validateRequiredProperties();
        if (this.earlyApplicationListeners == null) {
        	// 所有的监听器(16个)赋值给 earlyApplicationListeners
            this.earlyApplicationListeners = new LinkedHashSet(this.applicationListeners);
        } else {
        	// 存在则清理完再添加
            this.applicationListeners.clear();
            this.applicationListeners.addAll(this.earlyApplicationListeners);
        }
		// 所有的事件初始化为空
        this.earlyApplicationEvents = new LinkedHashSet();
    }
3. 获取工厂
第三步obtainFreshBeanFactory,只是将DefaultListableBeanFactory Bean 工厂刷新状态为已刷新,设置一个ID,然后返回等待进行下一步处理:
   protected ConfigurableListableBeanFactory obtainFreshBeanFactory() {
   		// DefaultListableBeanFactory 设置状态和ID
        this.refreshBeanFactory();
        // 直接返回
        return this.getBeanFactory();
    }
   protected final void refreshBeanFactory() throws IllegalStateException {
   		// 更新this.refreshed字段为true, 表示已刷新
        if (!this.refreshed.compareAndSet(false, true)) {
            throw new IllegalStateException("GenericApplicationContext does not support multiple refresh attempts: just call 'refresh' once");
        } else {
        	//  设置一个 ID =》 this.getId()为应用名(比如:app-service001)给Bean 工厂
            this.beanFactory.setSerializationId(this.getId());
        }
    }
4. 准备Bean 工厂
获取到Bean 工厂后,第四步开始准备Bean 工厂,主要是进行功能扩展,逻辑如下所示:
    protected void prepareBeanFactory(ConfigurableListableBeanFactory beanFactory) {
    	// 1. 设置类加载器:存在则直接设置/不存在则新建一个默认类加载器
        beanFactory.setBeanClassLoader(this.getClassLoader());
        // 2. 设置SPEL 表达式解析器
        if (!shouldIgnoreSpel) {
            beanFactory.setBeanExpressionResolver(new StandardBeanExpressionResolver(beanFactory.getBeanClassLoader()));
        }
		// 3. 设置属性注册解析器PropertyEditor
        beanFactory.addPropertyEditorRegistrar(new ResourceEditorRegistrar(this, this.getEnvironment()));
        // 4. 将上下文赋值给ApplicationContextAwareProcessor ,
        beanFactory.addBeanPostProcessor(new ApplicationContextAwareProcessor(this));
        // 5. 设置忽略自动装配的接口
        beanFactory.ignoreDependencyInterface(EnvironmentAware.class);
        beanFactory.ignoreDependencyInterface(EmbeddedValueResolverAware.class);
        beanFactory.ignoreDependencyInterface(ResourceLoaderAware.class);
        beanFactory.ignoreDependencyInterface(ApplicationEventPublisherAware.class);
        beanFactory.ignoreDependencyInterface(MessageSourceAware.class);
        beanFactory.ignoreDependencyInterface(ApplicationContextAware.class);
        beanFactory.ignoreDependencyInterface(ApplicationStartupAware.class);
        // 6. 设置可以自动装配的接口
        beanFactory.registerResolvableDependency(BeanFactory.class, beanFactory);
        beanFactory.registerResolvableDependency(ResourceLoader.class, this);
        beanFactory.registerResolvableDependency(ApplicationEventPublisher.class, this);
        beanFactory.registerResolvableDependency(ApplicationContext.class, this);
        // 7. 添加Bean 后置处理器 ApplicationListenerDetector=》
        beanFactory.addBeanPostProcessor(new ApplicationListenerDetector(this));
        // 8. LoadTimeWeaver AOP 处理,增加 AspectJ 的支持
        if (!NativeDetector.inNativeImage() && beanFactory.containsBean("loadTimeWeaver")) {
            beanFactory.addBeanPostProcessor(new LoadTimeWeaverAwareProcessor(beanFactory));
            beanFactory.setTempClassLoader(new ContextTypeMatchClassLoader(beanFactory.getBeanClassLoader()));
        }
		// 9. 将environment、systemProperties、systemEnvironment、applicationStartup 注册到工厂中
        if (!beanFactory.containsLocalBean("environment")) {
            beanFactory.registerSingleton("environment", this.getEnvironment());
        }
		// .........
    }
5. Bean 工厂后置处理
在postProcessBeanFactory方法中,主要是添加了一个BeanPostProcessor以及注册作用域。
    protected void postProcessBeanFactory(ConfigurableListableBeanFactory beanFactory) {
    	// 调用父类的后置处理,
    	// 1. 添加用于处理WebApplicationContextServletContextAware接口的processor
    	// 2. 注册了web的scope作用域,这里有request、session
        super.postProcessBeanFactory(beanFactory);
        // basePackages  annotatedClasses 都为NULL ,跳过
        if (this.basePackages != null && this.basePackages.length > 0) {
            this.scanner.scan(this.basePackages);
        }
        if (!this.annotatedClasses.isEmpty()) {
            this.reader.register(ClassUtils.toClassArray(this.annotatedClasses));
        }
    }
6. 执行 Bean工厂后置处理器
第六步invokeBeanFactoryPostProcessors从字面上理解是执行Bean 工厂后置处理器的意思,这里和Spring 核心功能有关,执行逻辑非常多。
    protected void invokeBeanFactoryPostProcessors(ConfigurableListableBeanFactory beanFactory) {
    	// 调用PostProcessorRegistrationDelegate
        PostProcessorRegistrationDelegate.invokeBeanFactoryPostProcessors(beanFactory, this.getBeanFactoryPostProcessors());
        // 存在 loadTimeWeaver 时,添加临时的类加载器
        if (beanFactory.getTempClassLoader() == null && beanFactory.containsBean("loadTimeWeaver")) {
            beanFactory.addBeanPostProcessor(new LoadTimeWeaverAwareProcessor(beanFactory));
            beanFactory.setTempClassLoader(new ContextTypeMatchClassLoader(beanFactory.getBeanClassLoader()));
        }
    }
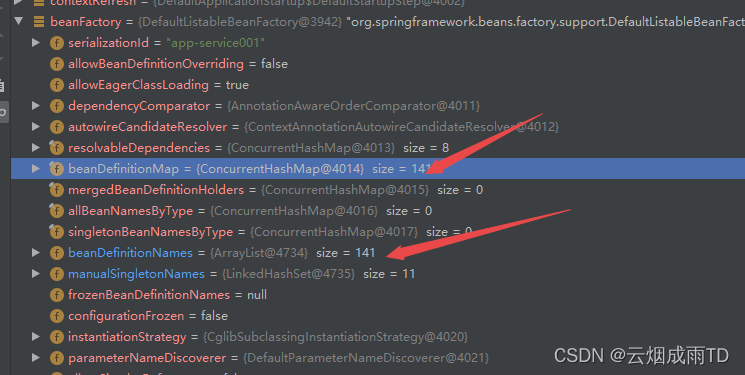
整个过程需要复杂,是属于Spring IOC 的范畴,这里只需要记住ConfigurationClassPostProcessor即可,可以看到经过该方法处理过,加载了很多beanDefinition。

7. 注册Bean 后置处理器
接着PostProcessorRegistrationDelegate.registerBeanPostProcessors方法注册Bean 后置处理器,主要是将这些后置处理器进行分类,并添加到Bean 工厂中。
    public static void registerBeanPostProcessors(ConfigurableListableBeanFactory beanFactory, AbstractApplicationContext applicationContext) {
    	// 获取BeanPostProcessor 实例中的所有名称
        String[] postProcessorNames = beanFactory.getBeanNamesForType(BeanPostProcessor.class, true, false);
        int beanProcessorTargetCount = beanFactory.getBeanPostProcessorCount() + 1 + postProcessorNames.length;
        beanFactory.addBeanPostProcessor(new PostProcessorRegistrationDelegate.BeanPostProcessorChecker(beanFactory, beanProcessorTargetCount));
        // 分类存放
        // 实现了PriorityOrdered接口
        List<BeanPostProcessor> priorityOrderedPostProcessors = new ArrayList();
        // 实现了MergedBeanDefinitionPostProcessor接口
        List<BeanPostProcessor> internalPostProcessors = new ArrayList();
        // 实现了Ordered接口
        List<String> orderedPostProcessorNames = new ArrayList();
        // 没有实现排序接口
        List<String> nonOrderedPostProcessorNames = new ArrayList();
        String[] var8 = postProcessorNames;
        int var9 = postProcessorNames.length;

        String ppName;
        BeanPostProcessor pp;
        // 进行分类处理
        for(int var10 = 0; var10 < var9; ++var10) {
            ppName = var8[var10];
            if (beanFactory.isTypeMatch(ppName, PriorityOrdered.class)) {
                pp = (BeanPostProcessor)beanFactory.getBean(ppName, BeanPostProcessor.class);
                priorityOrderedPostProcessors.add(pp);
                if (pp instanceof MergedBeanDefinitionPostProcessor) {
                    internalPostProcessors.add(pp);
                }
            } else if (beanFactory.isTypeMatch(ppName, Ordered.class)) {
                orderedPostProcessorNames.add(ppName);
            } else {
                nonOrderedPostProcessorNames.add(ppName);
            }
        }

        sortPostProcessors(priorityOrderedPostProcessors, beanFactory);
        registerBeanPostProcessors(beanFactory, (List)priorityOrderedPostProcessors);
        List<BeanPostProcessor> orderedPostProcessors = new ArrayList(orderedPostProcessorNames.size());
        Iterator var14 = orderedPostProcessorNames.iterator();

        while(var14.hasNext()) {
            String ppName = (String)var14.next();
            BeanPostProcessor pp = (BeanPostProcessor)beanFactory.getBean(ppName, BeanPostProcessor.class);
            orderedPostProcessors.add(pp);
            if (pp instanceof MergedBeanDefinitionPostProcessor) {
                internalPostProcessors.add(pp);
            }
        }
		// 排序
        sortPostProcessors(orderedPostProcessors, beanFactory);
        // 添加到Bean 工厂
        registerBeanPostProcessors(beanFactory, (List)orderedPostProcessors);
        List<BeanPostProcessor> nonOrderedPostProcessors = new ArrayList(nonOrderedPostProcessorNames.size());
        Iterator var17 = nonOrderedPostProcessorNames.iterator();
		// 处理其他类型并添加
        while(var17.hasNext()) {
            ppName = (String)var17.next();
            pp = (BeanPostProcessor)beanFactory.getBean(ppName, BeanPostProcessor.class);
            nonOrderedPostProcessors.add(pp);
            if (pp instanceof MergedBeanDefinitionPostProcessor) {
                internalPostProcessors.add(pp);
            }
        }

        registerBeanPostProcessors(beanFactory, (List)nonOrderedPostProcessors);
        sortPostProcessors(internalPostProcessors, beanFactory);
        registerBeanPostProcessors(beanFactory, (List)internalPostProcessors);
        beanFactory.addBeanPostProcessor(new ApplicationListenerDetector(applicationContext));
    }
8. 国际化
接着进入initMessageSource进行国际化处理,这里没有配置国际化,所以默认使用的是DelegatingMessageSource 。
    protected void initMessageSource() {
        ConfigurableListableBeanFactory beanFactory = this.getBeanFactory(); //获取BeanFactory
        // 1. 是否包含了 MessageSource类型的 Bean
        if (beanFactory.containsLocalBean("messageSource")) {
        	// 2. 将 MessageSource 实例赋值给上下文对象
            this.messageSource = (MessageSource)beanFactory.getBean("messageSource", MessageSource.class);
            // 3. 如果设计了父级容器,并且 MessageSource是 HierarchicalMessageSource类型
            if (this.parent != null && this.messageSource instanceof HierarchicalMessageSource) {
                HierarchicalMessageSource hms = (HierarchicalMessageSource)this.messageSource;
                if (hms.getParentMessageSource() == null) {
                	// 4. 如果 HierarchicalMessageSource 没有父级消息源,则设置
                    hms.setParentMessageSource(this.getInternalParentMessageSource());
                }
        } else {
        	// 5. 不包含,MessageSource类型的 Bean ,创建一个DelegatingMessageSource
            DelegatingMessageSource dms = new DelegatingMessageSource();
            // 6. 设置父级消息源
            dms.setParentMessageSource(this.getInternalParentMessageSource());
            this.messageSource = dms;
            // 7. 将 messageSource注册到IOC中
            beanFactory.registerSingleton("messageSource", this.messageSource);
        }
    }
9. 注册事件发布器
接着到第九步initApplicationEventMulticaster,先查看是否有自己注册ApplicationEventMulticaster 类型的Bean 定义,没有的话,注册一个默认的。
    protected void initApplicationEventMulticaster() {
        ConfigurableListableBeanFactory beanFactory = getBeanFactory();
        // 先判断容器beanFactory中是否有applicationEventMulticaster bean定义
        if (beanFactory.containsLocalBean(APPLICATION_EVENT_MULTICASTER_BEAN_NAME)) {
            // 存在的话, 获取bean实例
            this.applicationEventMulticaster =
                    beanFactory.getBean(APPLICATION_EVENT_MULTICASTER_BEAN_NAME, ApplicationEventMulticaster.class);
            if (logger.isTraceEnabled()) {
                logger.trace("Using ApplicationEventMulticaster [" + this.applicationEventMulticaster + "]");
            }
        }
        else {
            // 容器中不存在的话, 实例化一个SimpleApplicationEventMulticaster
            // 手工注册一个单例bean
            this.applicationEventMulticaster = new SimpleApplicationEventMulticaster(beanFactory);
            beanFactory.registerSingleton(APPLICATION_EVENT_MULTICASTER_BEAN_NAME, this.applicationEventMulticaster);
            if (logger.isTraceEnabled()) {
                logger.trace("No '" + APPLICATION_EVENT_MULTICASTER_BEAN_NAME + "' bean, using " +
                        "[" + this.applicationEventMulticaster.getClass().getSimpleName() + "]");
            }
        }
    }
ApplicationEventMulticaster是事件发布器,由它进行事件的派发。
10. 创建WebServer
在onRefresh()方法中,主要是创建并启动 Web 服务。
    protected void onRefresh() {
    	// 提供对名为’themeSource’ 的特殊Bean的支持,该Bean类型为 themeSource
        super.onRefresh();
		// 创建 Web 服务
        try {
            this.createWebServer();
        } catch (Throwable var2) {
            throw new ApplicationContextException("Unable to start web server", var2);
        }
    }
    private void createWebServer() {
    	// 这里初始都为NULL
        WebServer webServer = this.webServer;
        ServletContext servletContext = this.getServletContext();
        if (webServer == null && servletContext == null) {
            StartupStep createWebServer = this.getApplicationStartup().start("spring.boot.webserver.create");
            // 获取 TomcatServletWebServerFactory
            ServletWebServerFactory factory = this.getWebServerFactory();
            createWebServer.tag("factory", factory.getClass().toString());
            // 获取 TomcatWebServer,实例化Tomcat
            this.webServer = factory.getWebServer(new ServletContextInitializer[]{this.getSelfInitializer()});
            createWebServer.end();
            // 注册 Bean
            this.getBeanFactory().registerSingleton("webServerGracefulShutdown", new WebServerGracefulShutdownLifecycle(this.webServer));
            this.getBeanFactory().registerSingleton("webServerStartStop", new WebServerStartStopLifecycle(this, this.webServer));
        } else if (servletContext != null) {
            try {
                this.getSelfInitializer().onStartup(servletContext);
            } catch (ServletException var5) {
                throw new ApplicationContextException("Cannot initialize servlet context", var5);
            }
        }
		// 加载Servlet 属性源
        this.initPropertySources();
    }
11. 注册监听器
registerListeners()主要是将监听器注册到ApplicationEventMulticaster事件发布器中:
    protected void registerListeners() {
    	// 获取监听器,13 个
        Iterator var1 = this.getApplicationListeners().iterator();
		// 添加到事件发布器中applicationEventMulticaster
        while(var1.hasNext()) {
            ApplicationListener<?> listener = (ApplicationListener)var1.next();
            this.getApplicationEventMulticaster().addApplicationListener(listener);
        }

        String[] listenerBeanNames = this.getBeanNamesForType(ApplicationListener.class, true, false);
        String[] var7 = listenerBeanNames;
        int var3 = listenerBeanNames.length;
		// 将注入的listener bean维护到applicationEventMulticaster中
        for(int var4 = 0; var4 < var3; ++var4) {
            String listenerBeanName = var7[var4];
            this.getApplicationEventMulticaster().addApplicationListenerBean(listenerBeanName);
        }
		// earlyApplicationEvents
        Set<ApplicationEvent> earlyEventsToProcess = this.earlyApplicationEvents;
        this.earlyApplicationEvents = null;
        if (!CollectionUtils.isEmpty(earlyEventsToProcess)) {
            Iterator var9 = earlyEventsToProcess.iterator();

            while(var9.hasNext()) {
                ApplicationEvent earlyEvent = (ApplicationEvent)var9.next();
                this.getApplicationEventMulticaster().multicastEvent(earlyEvent);
            }
        }

    }
12. 初始化非延迟加载Bean
finishBeanFactoryInitialization最重要的功能是实例化所有非延迟加载的bean。
public abstract class AbstractApplicationContext extends DefaultResourceLoader
        implements ConfigurableApplicationContext {
    protected void finishBeanFactoryInitialization(ConfigurableListableBeanFactory beanFactory) {
        // 初始化ConversionService的实例化
        // 然后赋值给beanFactory.conversionService实例
        if (beanFactory.containsBean(CONVERSION_SERVICE_BEAN_NAME) &&
                beanFactory.isTypeMatch(CONVERSION_SERVICE_BEAN_NAME, ConversionService.class)) {
            beanFactory.setConversionService(
                    beanFactory.getBean(CONVERSION_SERVICE_BEAN_NAME, ConversionService.class));
        }

        // 如果beanFactory中没有@Value解析器
        if (!beanFactory.hasEmbeddedValueResolver()) {
            beanFactory.addEmbeddedValueResolver(strVal -> getEnvironment().resolvePlaceholders(strVal));
        }

        // 类加载期间织入的切面
        String[] weaverAwareNames = beanFactory.getBeanNamesForType(LoadTimeWeaverAware.class, false, false);
        for (String weaverAwareName : weaverAwareNames) {
            //实例化所有LoadTimeWeaverAware类型的bean
            getBean(weaverAwareName);
        }

        //停止使用临时ClassLoader
        beanFactory.setTempClassLoader(null);

        //冻结配置,不再允许改变
        beanFactory.freezeConfiguration();

        //实例化所有非延迟加载的bean
        beanFactory.preInstantiateSingletons();
    }
}
可以看到在Bean 工厂中,就有了很多Bean :

13. 完成刷新
最后一步,完成刷新:
    protected void finishRefresh() {
    	// 清理资源缓存
        this.clearResourceCaches();
        // 初始化LifecycleProcessor 生命周期处理器=》DefaultLifecycleProcessor
        // 在启动或结束的时候处理Bean
        this.initLifecycleProcessor();
        // DefaultLifecycleProcessor.startBeans
        this.getLifecycleProcessor().onRefresh();
        // 发布ContextRefreshedEvent
        this.publishEvent((ApplicationEvent)(new ContextRefreshedEvent(this)));
        // 如果配置了"spring.liveBeansView.mbeanDomain"的系统属性,制定了MBeanServer,
        // 那么会将ApplicationContext注册到MBeanServer中,
        // 可以通过MBeanServer,对spring容器中的bean,进行实时的查看和管理
        LiveBeansView.registerApplicationContext(this);
    }
可以看到执行刷新之后,内嵌的Tomcat 已经启动了:
