一、概念
1.私服简介
私服是一种特殊的远程仓库,它是架设在局域网内的仓库服务,私服代理广域网上的远程仓库,供局域网内的Maven用户使用。当Maven需要下载构件的时候,它从私服请求,如果私服上不存在该构件,则从外部的远程仓库下载,缓存在私服上之后,再为Maven的下载请求提供服务。我们还可以把一些无法从外部仓库下载到的构件上传到私服上。
2.私服的好处
-
加速maven构件的下载速度
-
节省宽带,加速项目构建速度
-
方便部署自己的构件以供他人使用
-
提高maven的稳定性,中央仓库需要本机能够访问外网,而如果采用私服的方式,只需要本机访问内网私服就可以了。
3.搭建私服的开源仓库管理软件
(1)Apache基金会的archiva
http://archiva.apache.org/
(2)JFrog的Artifactory
https://jfrog.com/artifactory/
(3)Sonatype的Nexus
https://my.sonatype.com/
这些都是开源的私服软件,都可以自由使用。用的最多的是第三种Nexus,本文我们主要以这个来讲解.。
二、使用Nexus搭建Maven私服(Windows环境)
nexus是java开发的,所以运行的时候需要有java环境的支持。
1.安装jdk
确保使用系统中安装了jdk,若没有进行下载安装。
2.下载即安装Nexus
2.1 下载
Nexus官方下载地址:https://help.sonatype.com/repomanager3/download
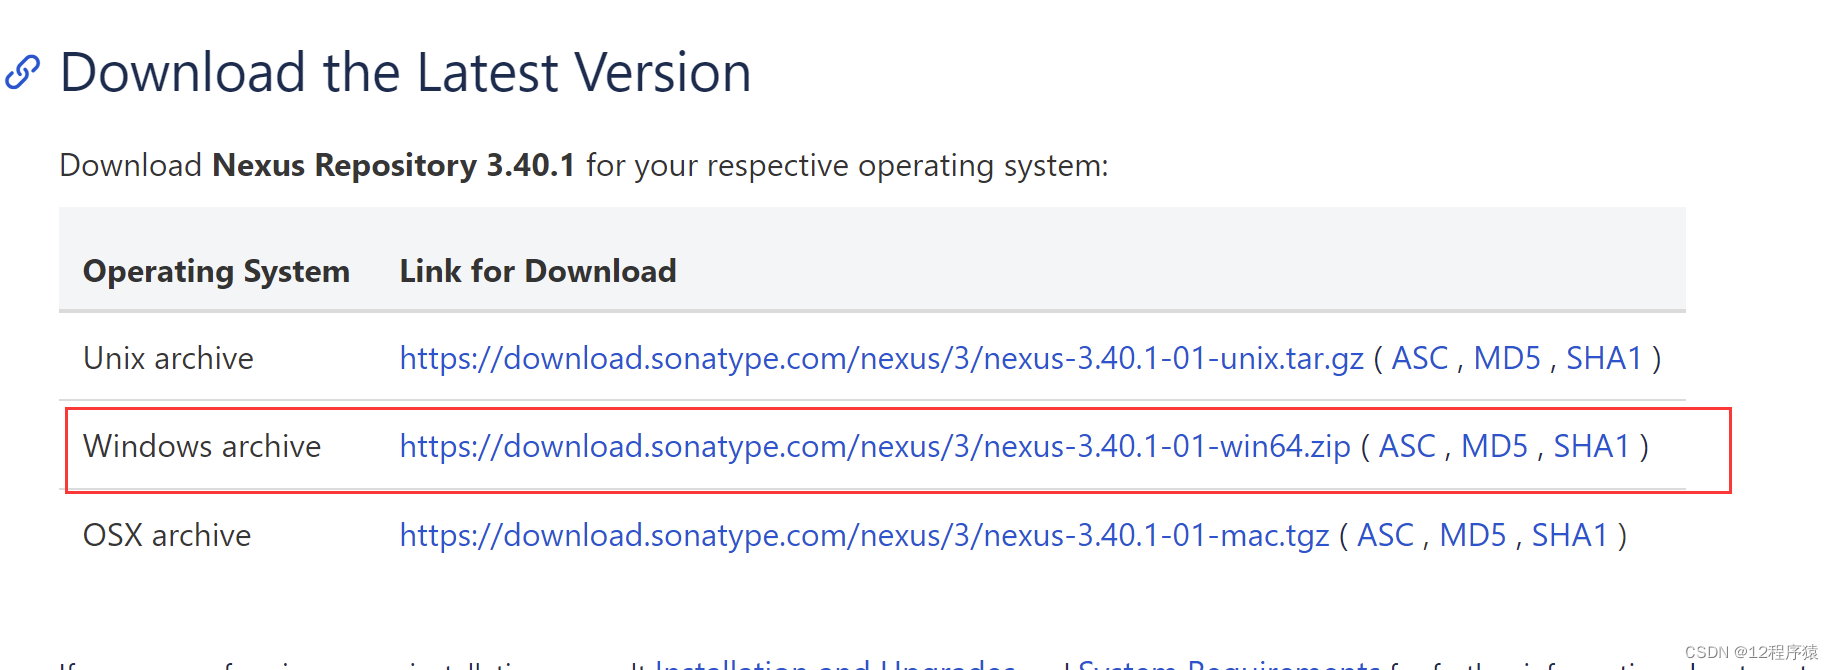
点击复制下载链接,使用迅雷方式下载,下载速度比较快。
2.2 下载完成后进行解压


2.3.启动nexus
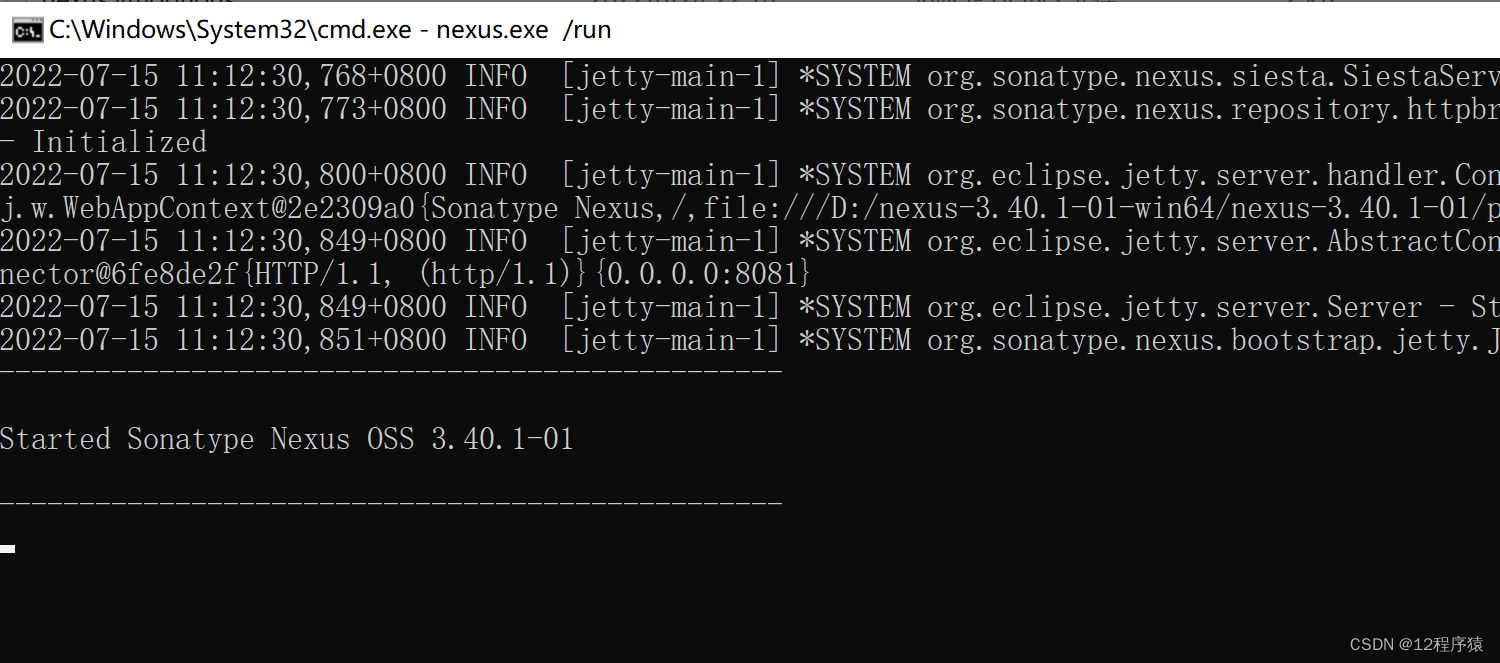
启动服务:切换到D:\nexus-3.40.1-01-win64\nexus-3.40.1-01\bin目录下,输入 nexus.exe /run

如下信息表示安装成功:
2.4.访问nexus首页
浏览器打开,输入 http://localhost:8081/
效果如下:
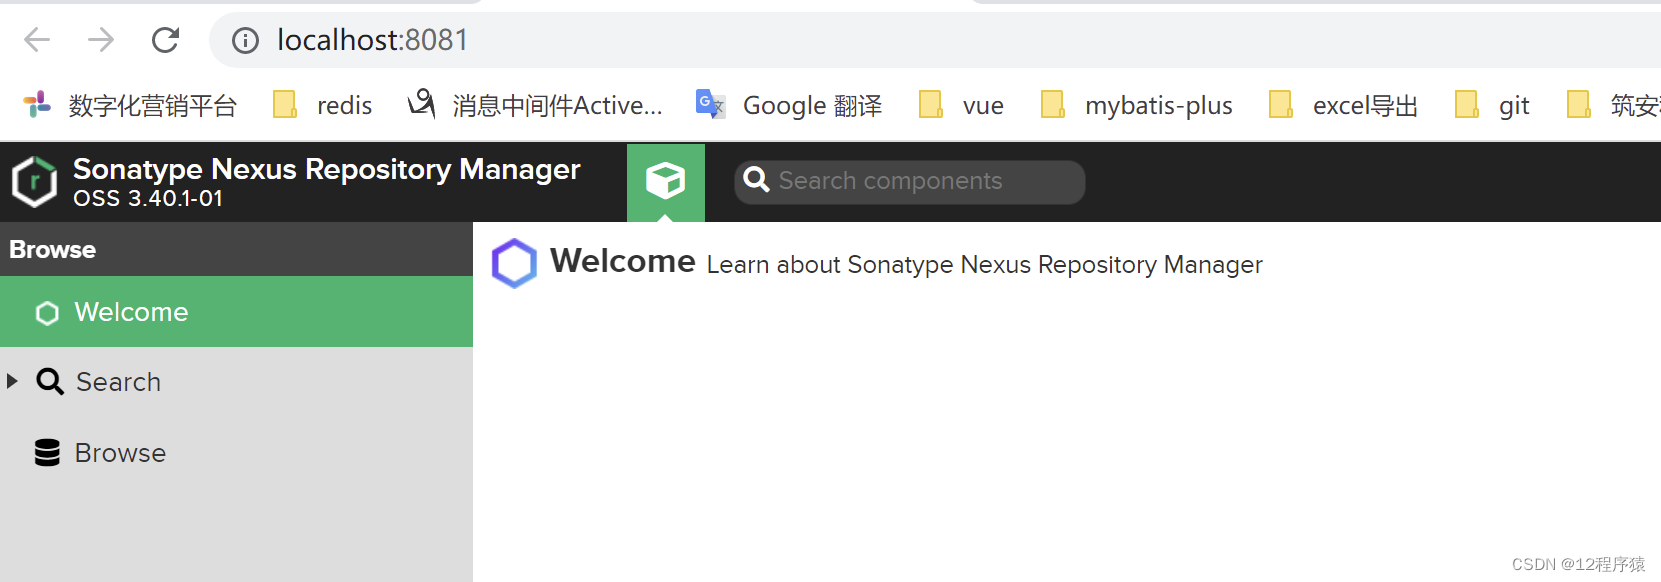
注意:如果服务器的8081端口没有放开,则访问不了 nexus 首页;比如阿里云服务器需要在安全组里面打开 8081 端口。
3.初始设置
3.1 登录Nexus
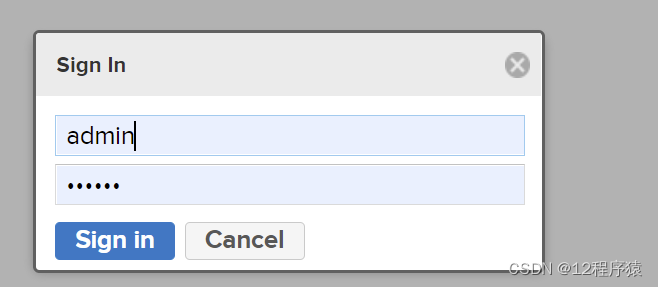
点击右上角的 Sign in,输入用户名和密码。nexus默认用户名是admin。
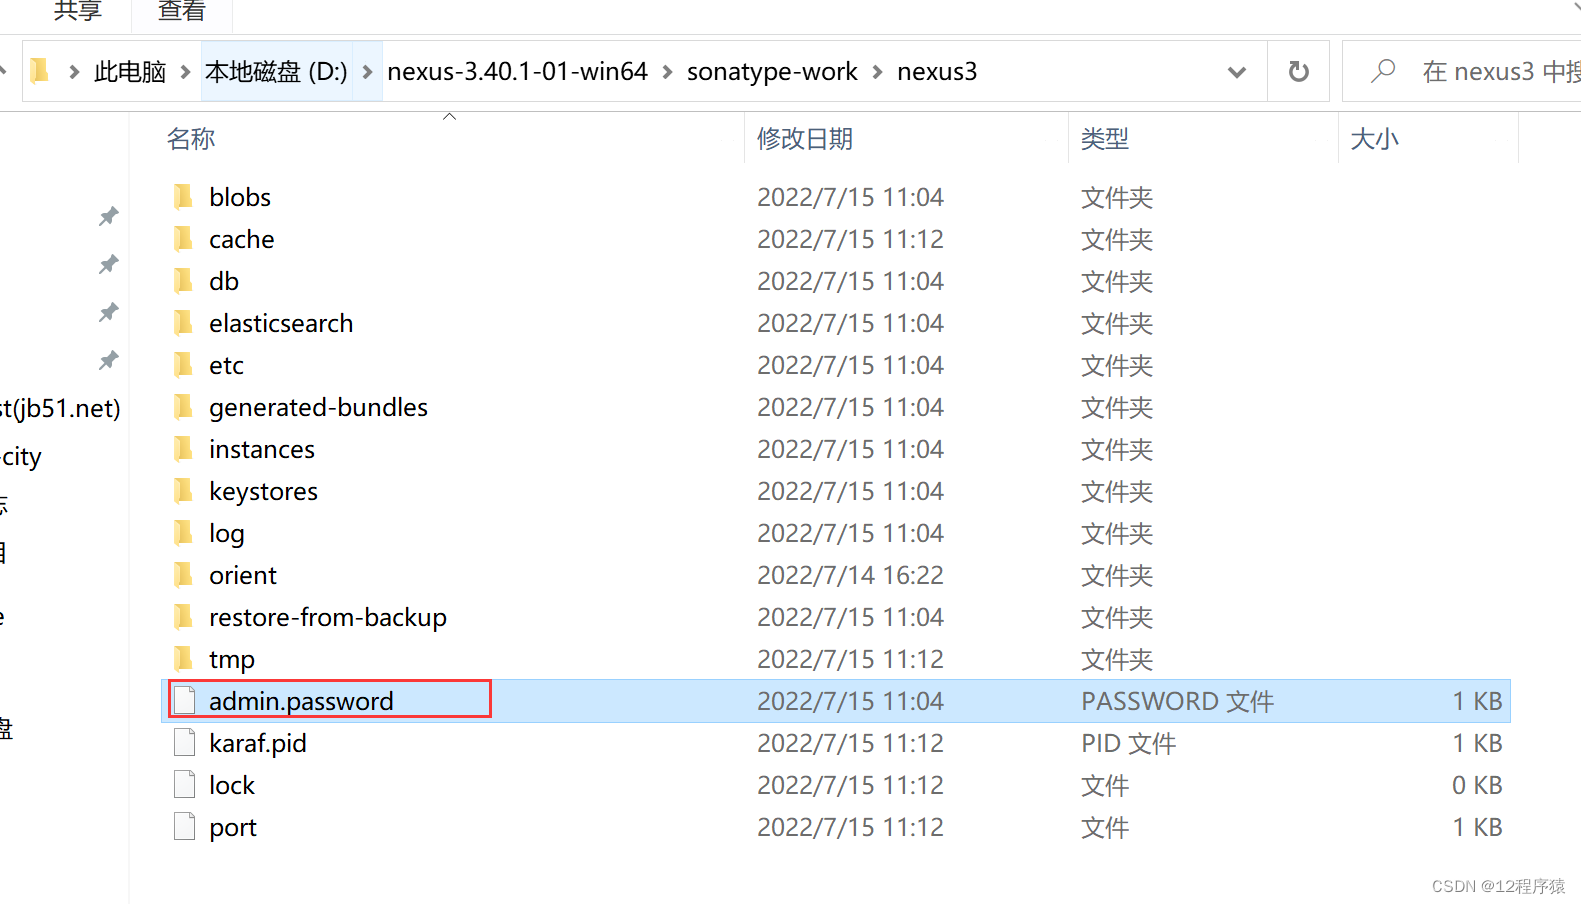
nexus密码是第一次启动的时候生成的,密码位于下面的文件中:
D:\nexus-3.40.1-01-win64\sonatype-work\nexus3\admin.password
3.2 初始设置
登录成功后会弹出一些设置,如下:
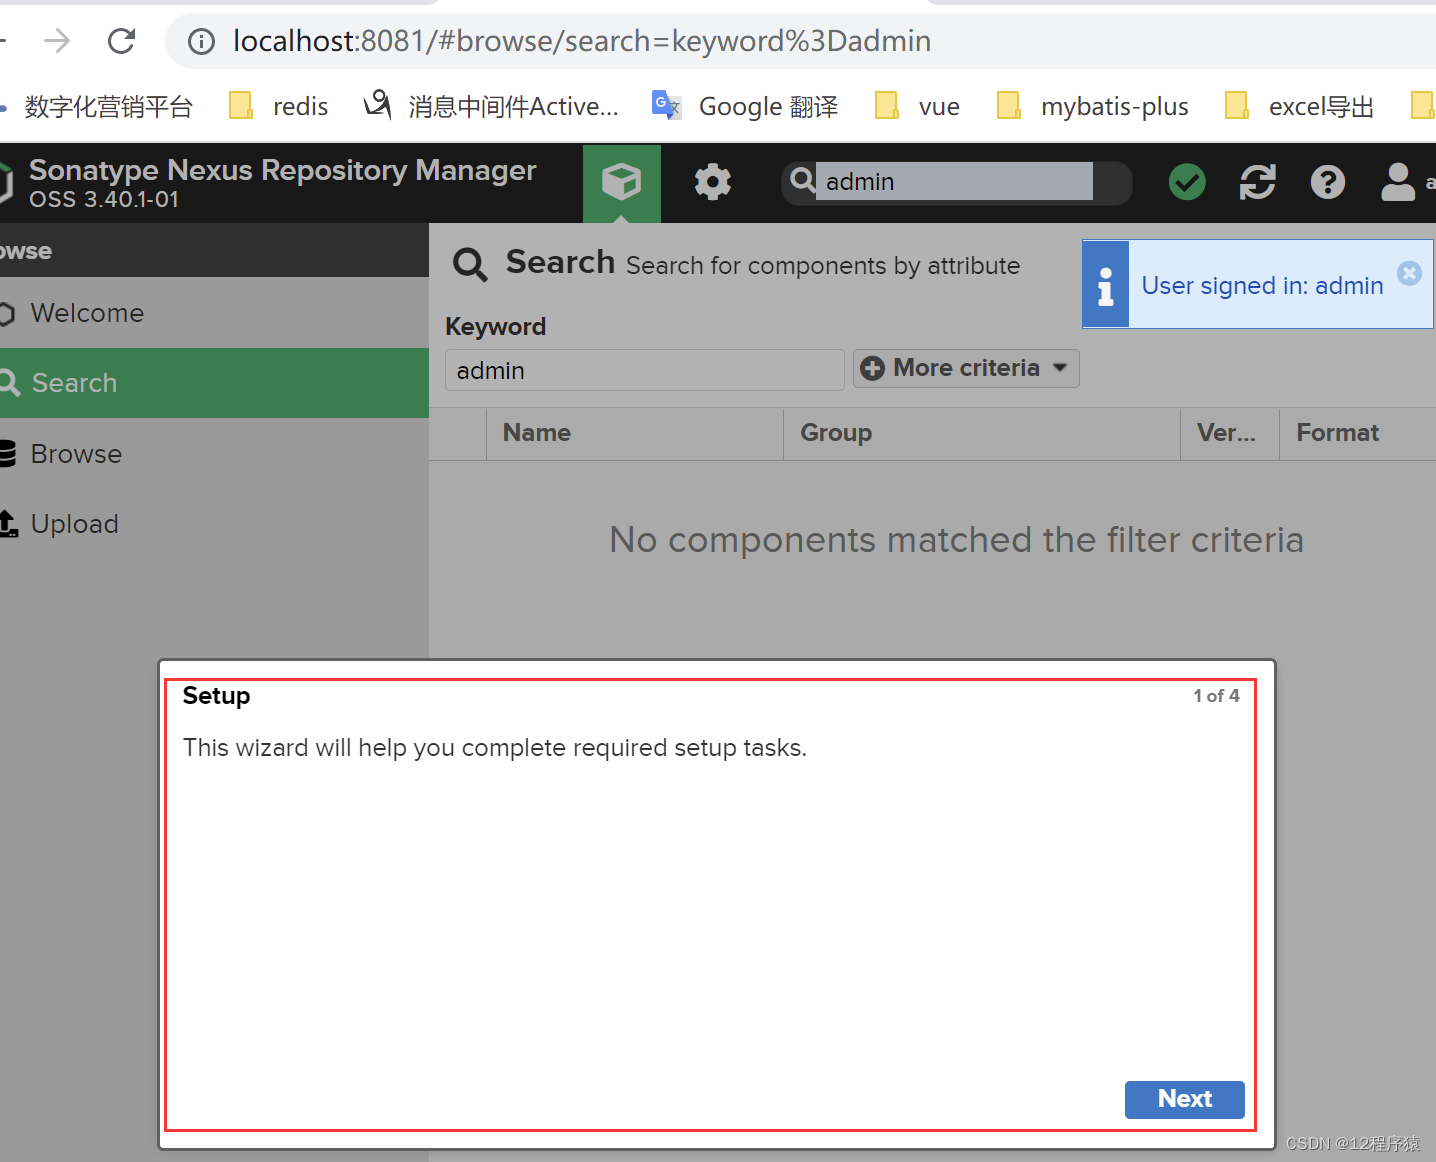
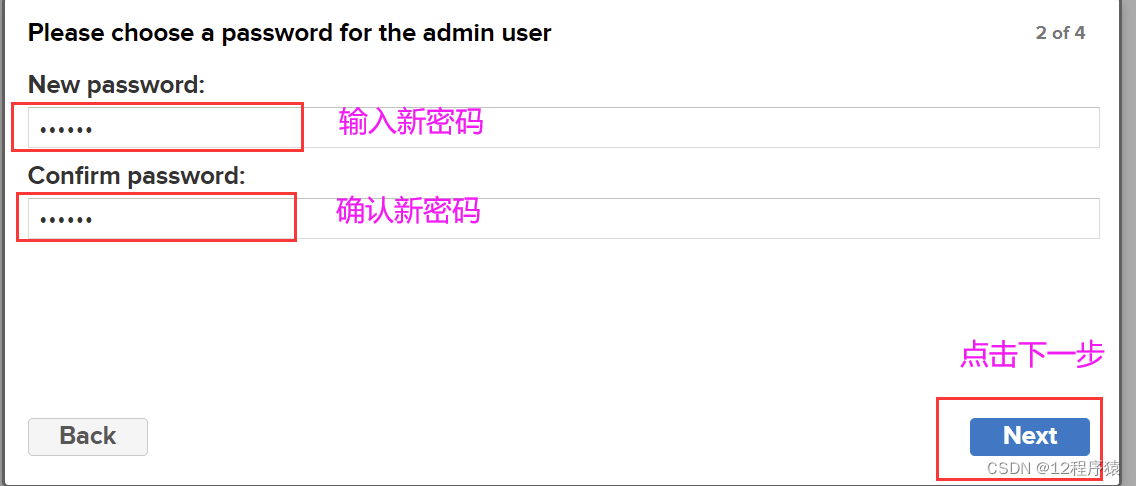
点击Next,设置新的登录密码(新密码要保存好),如下:
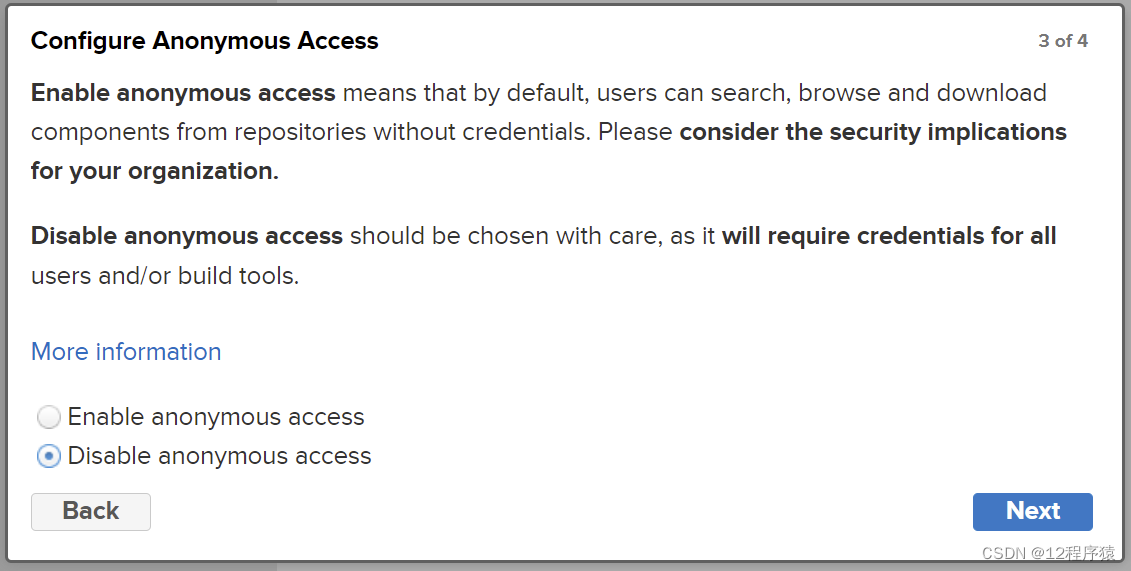
启用或禁用匿名登陆:
区别:
启用匿名登录则在使用该 nexus 时,不需要账号密码;
禁用匿名登录则在使用该 nexus 时,需要账号密码。
也就是 maven 的 settings.xml 文件中,配置使用该 nexus 时,是否需要配置账号密码信息。
点击FInish,完成设置:
三、Nexus中的仓库分类
用户可以通过nexus去访问远程仓库,可以将本地的构件发布到nexus中,nexus是如何支撑这些操作的呢?
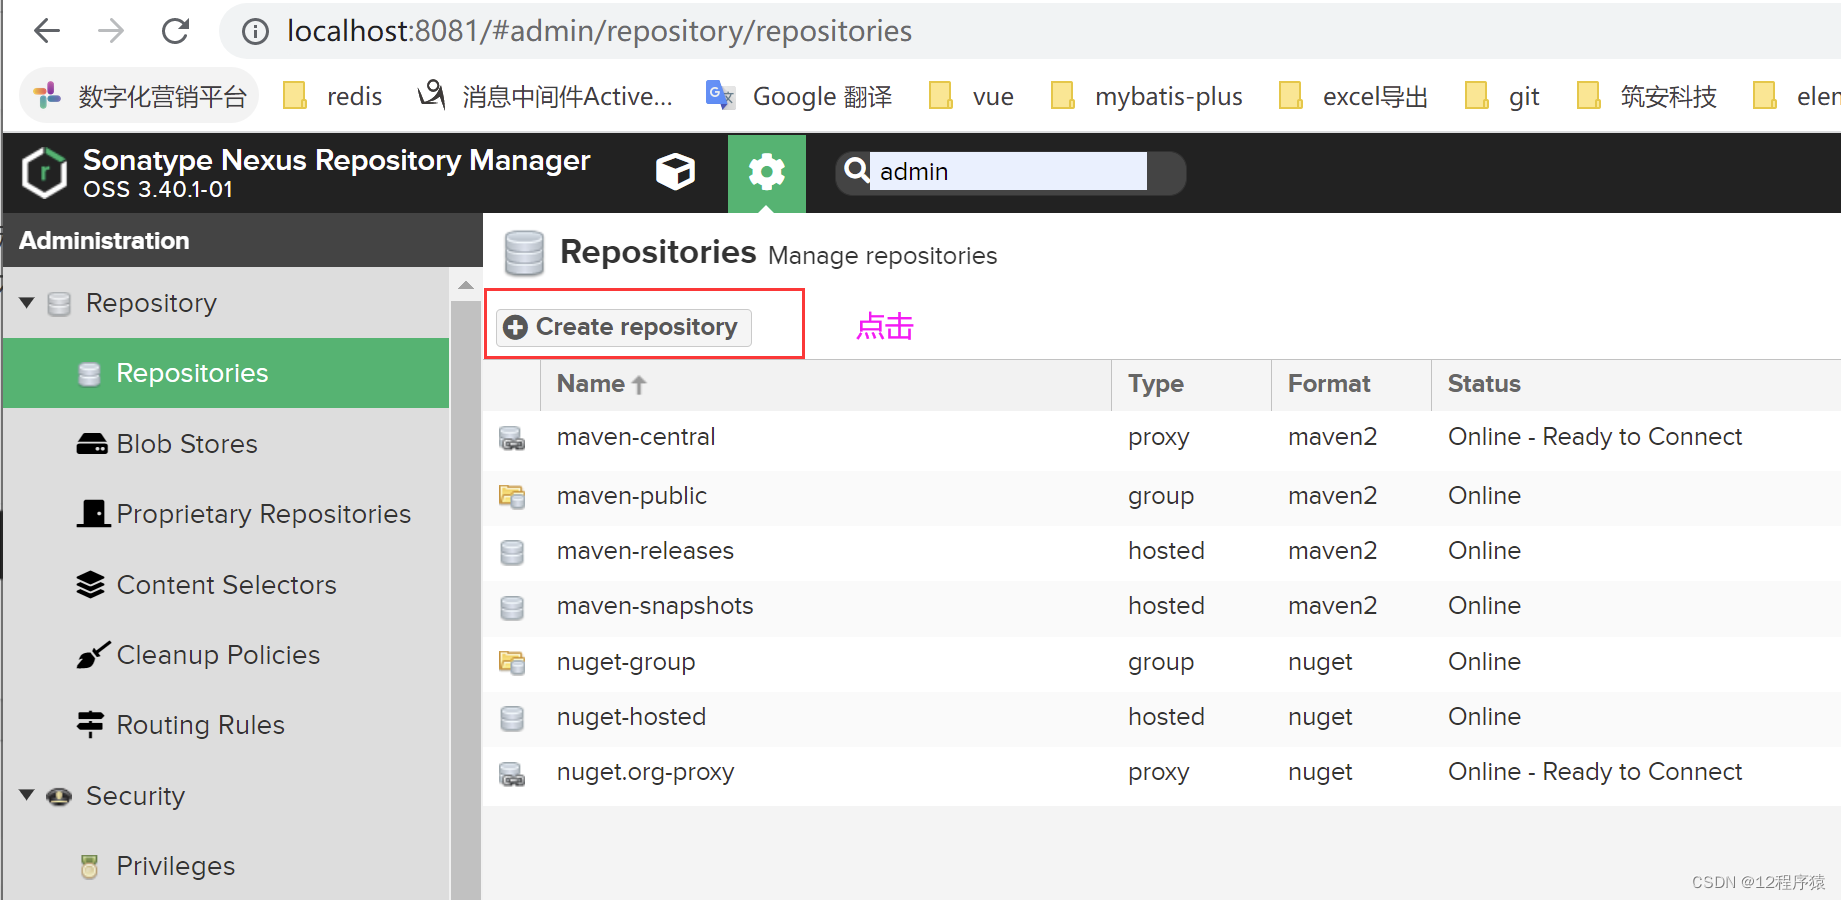
nexus中有个仓库列表,里面包含了各种各样的仓库,如下图:

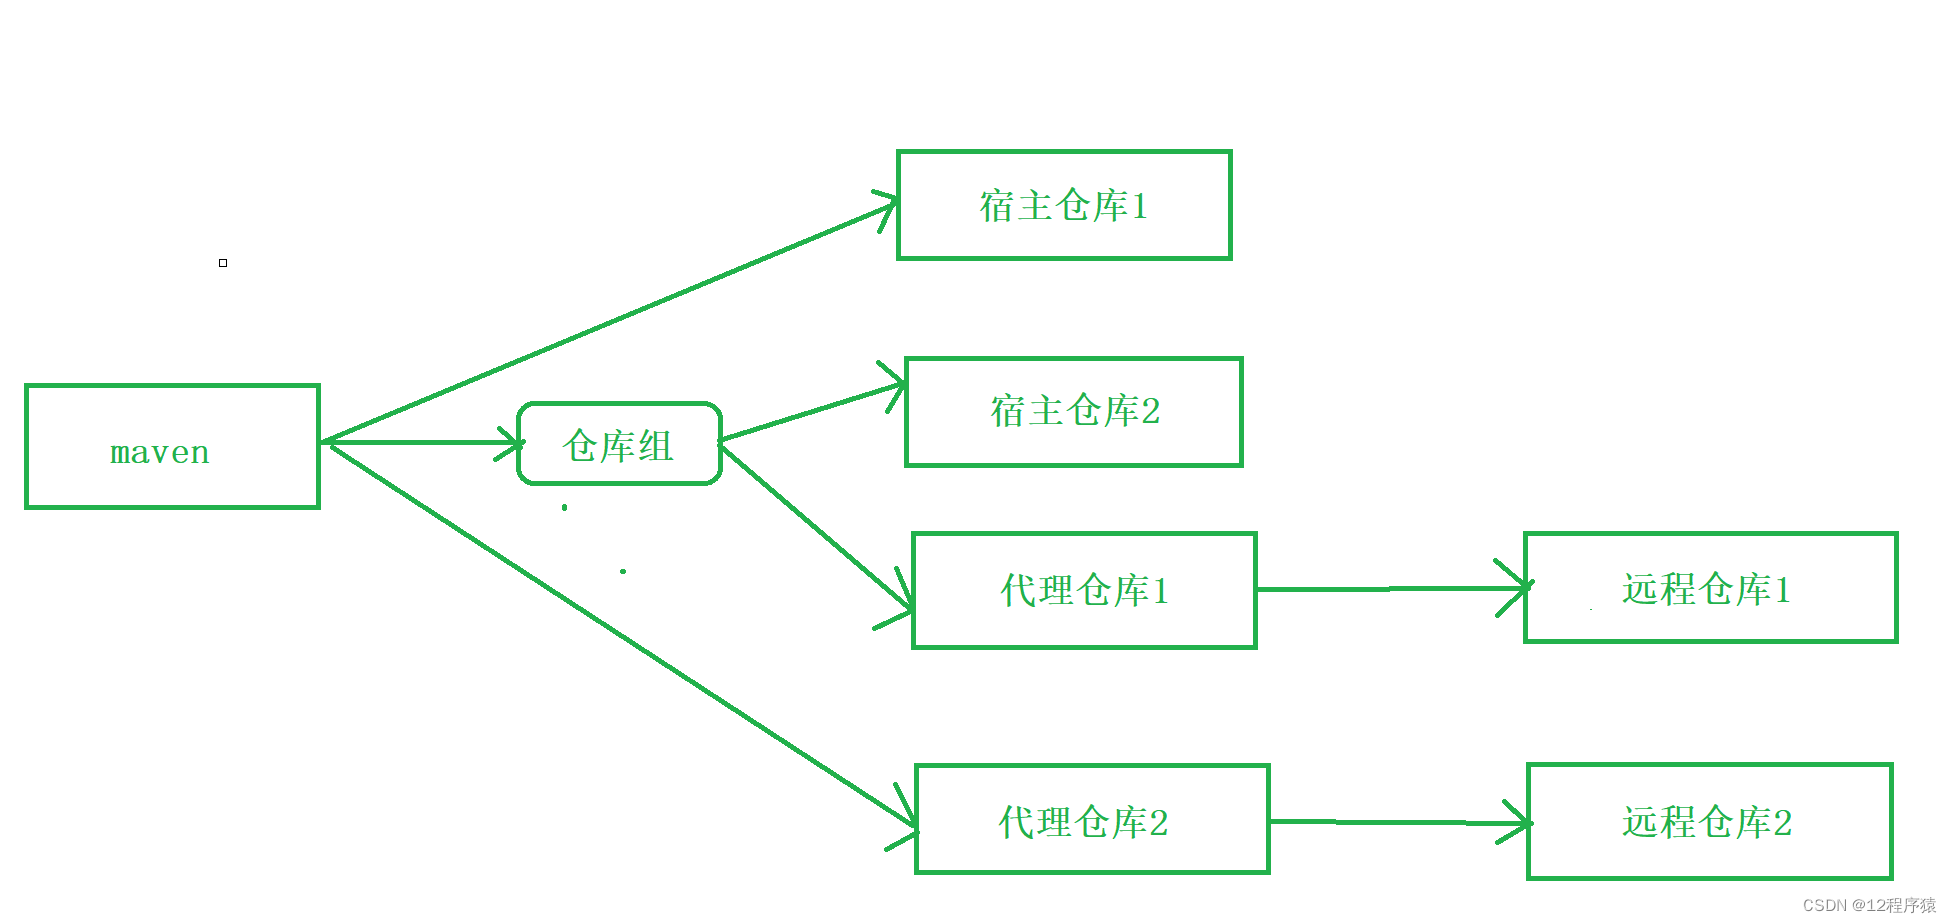
上图中是nexus安装好默认自带的仓库列表,主要有3种类型:
-
代理仓库:代理公共的远程仓库
-
宿主仓库:主要用于部署无法从公共仓库获取的构件(如 oracle 的 JDBC 驱动)以及自己或第三方的项目构件
-
仓库组:Nexus 通过仓库组的概念统一管理多个仓库,这样我们在项目中直接请求仓库组即可请求到仓库组管理的多个仓库
1.代理仓库
1.1 概念
代理仓库主要是让使用者通过代理仓库来间接的访问外部的第三方远程仓库的,如通过代理仓库访问maven中央仓库、阿里的maven仓库等等。代理仓库会从被代理的仓库中下载构件,缓存在代理仓库中以供maven用户使用。
2.创建代理仓库
(1)在仓库列表页面,点击“Create repository”按钮,如下:
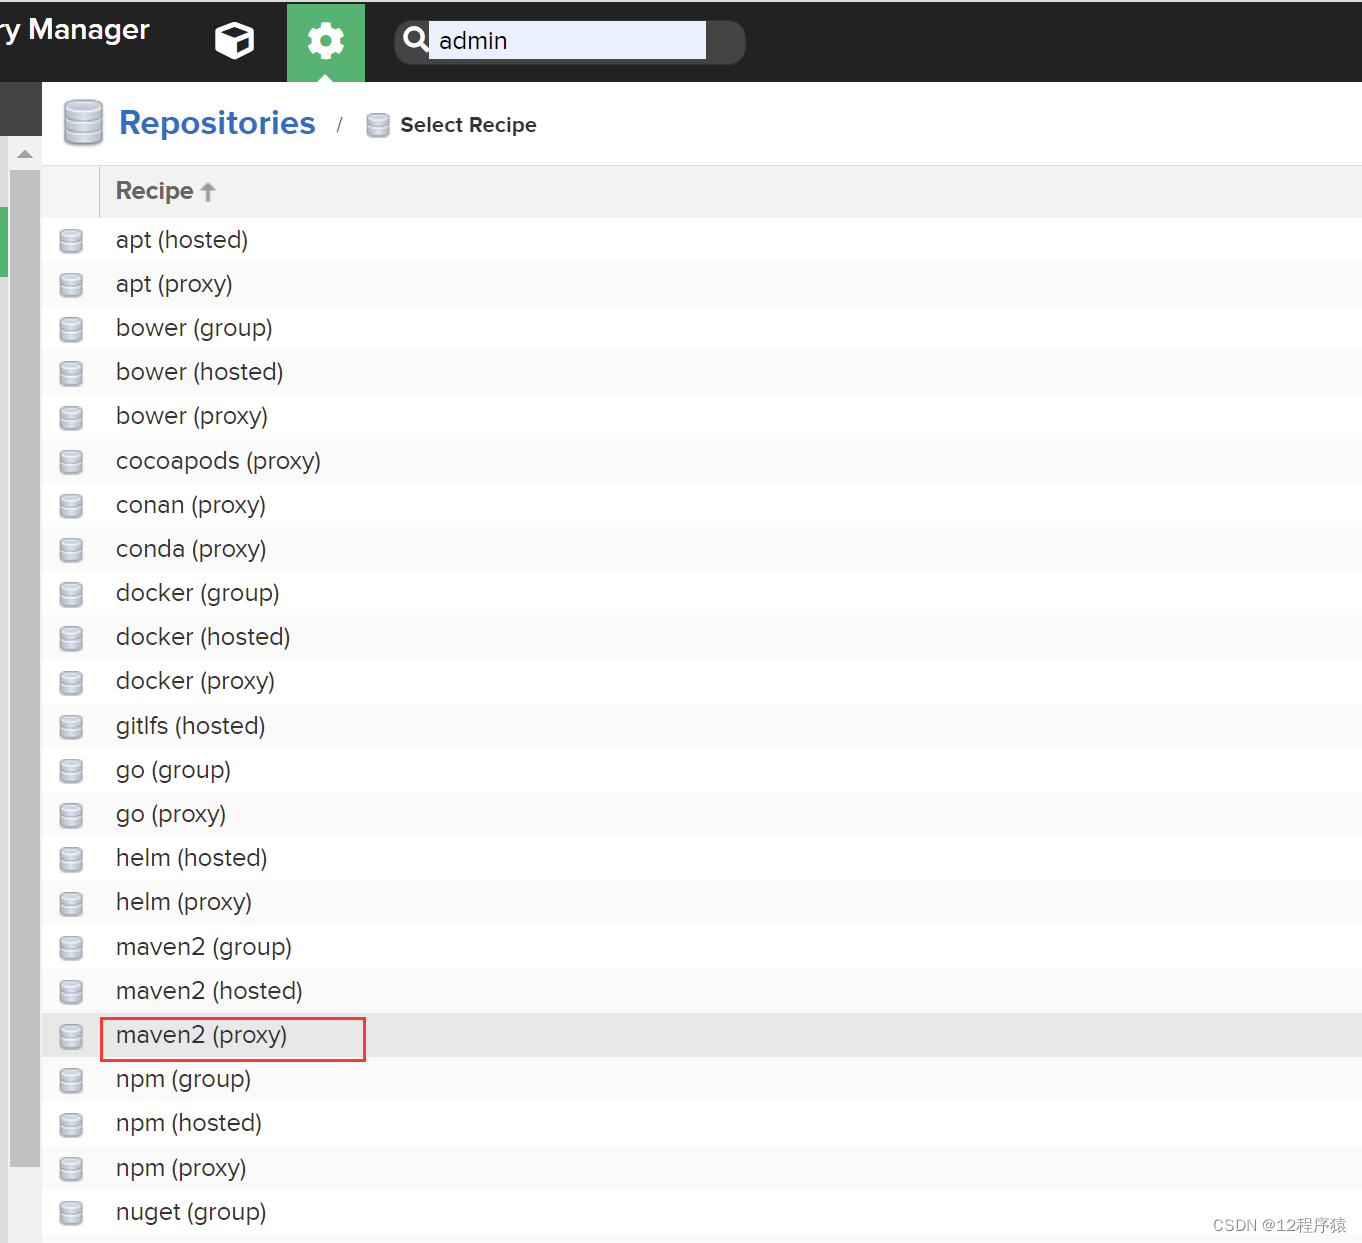
进入添加页面,选择maven2(proxy),这个表示代理仓库,如下图:
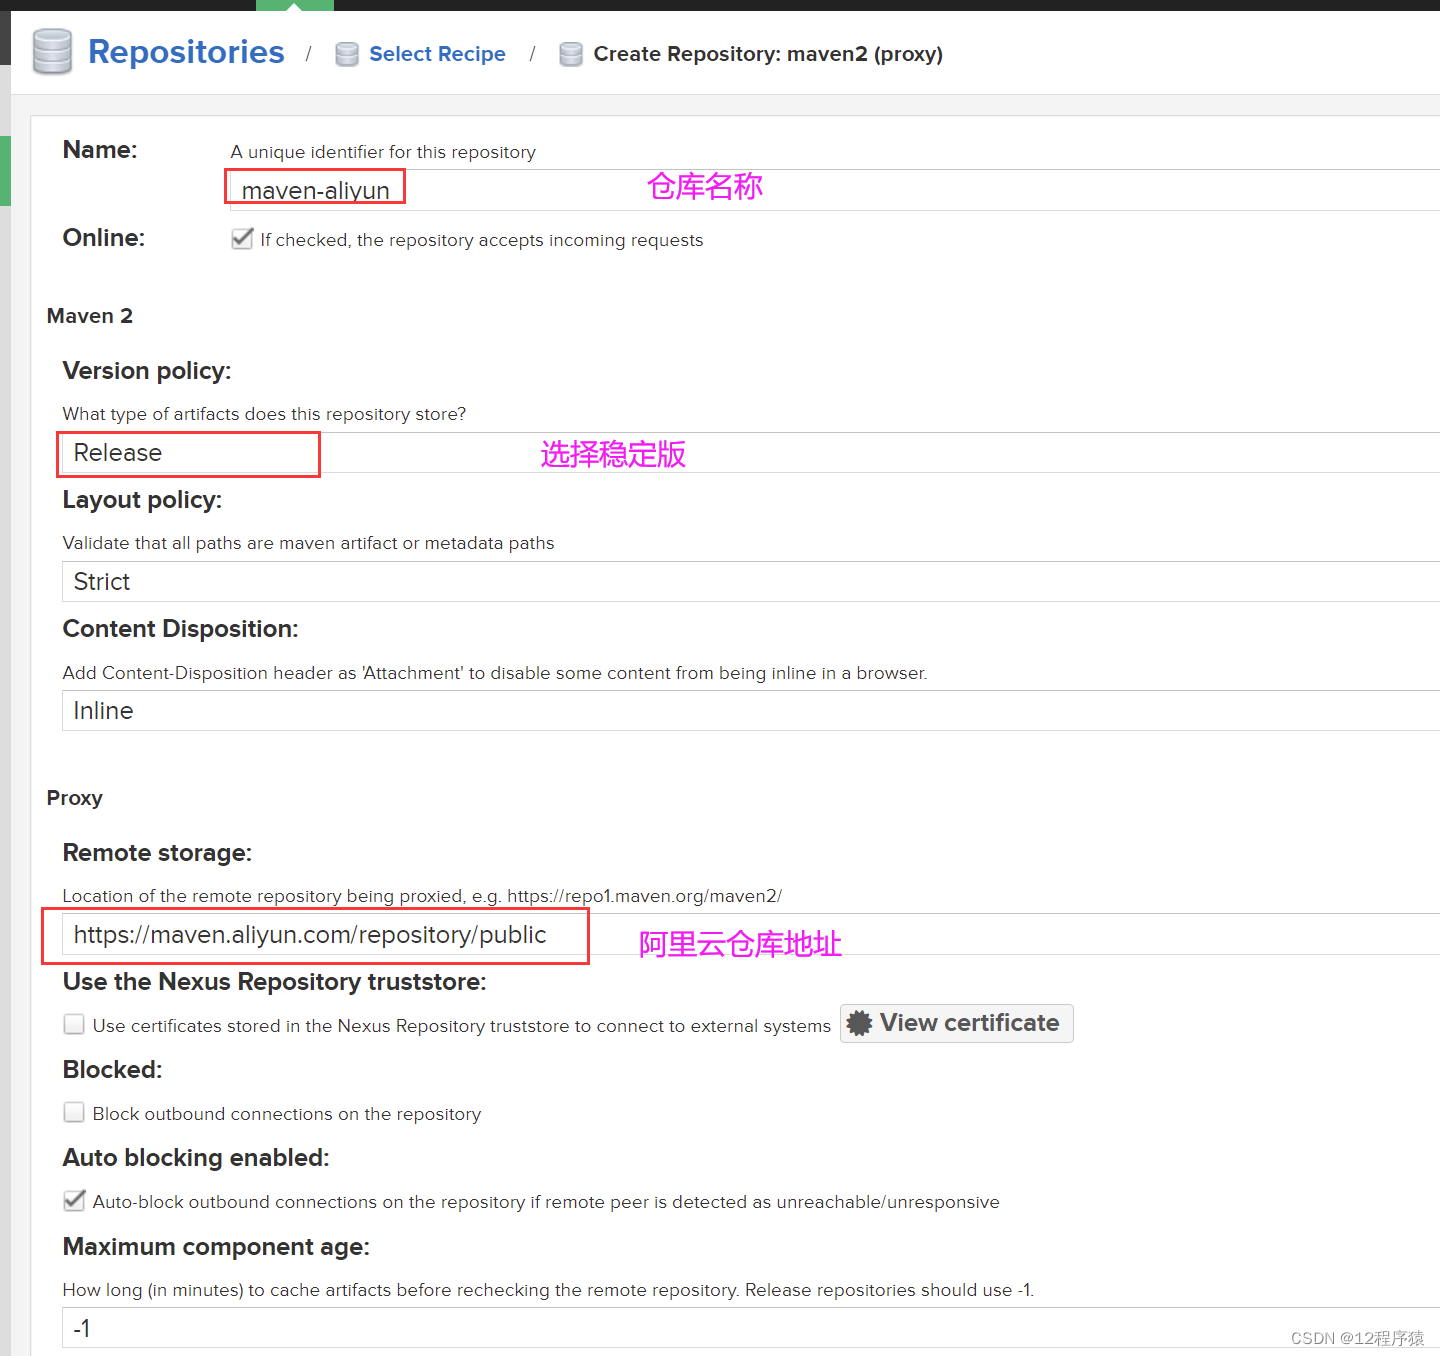
输入远程仓库的信息,如下:
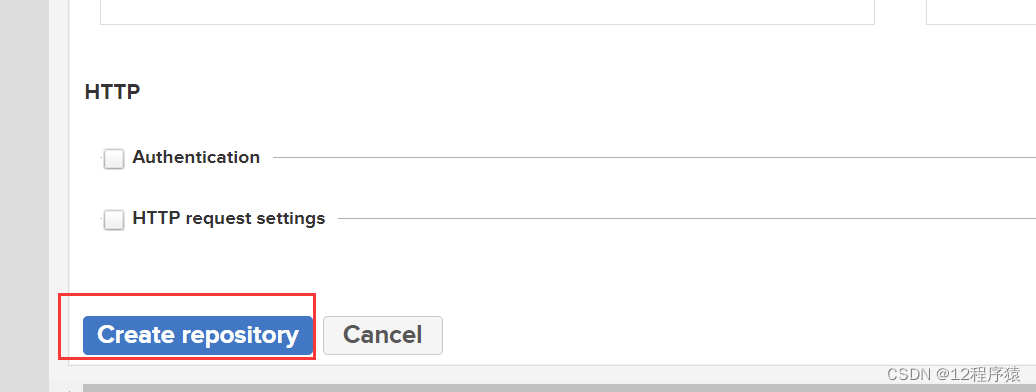
点击底部的‘Create repository",创建完成,如下:
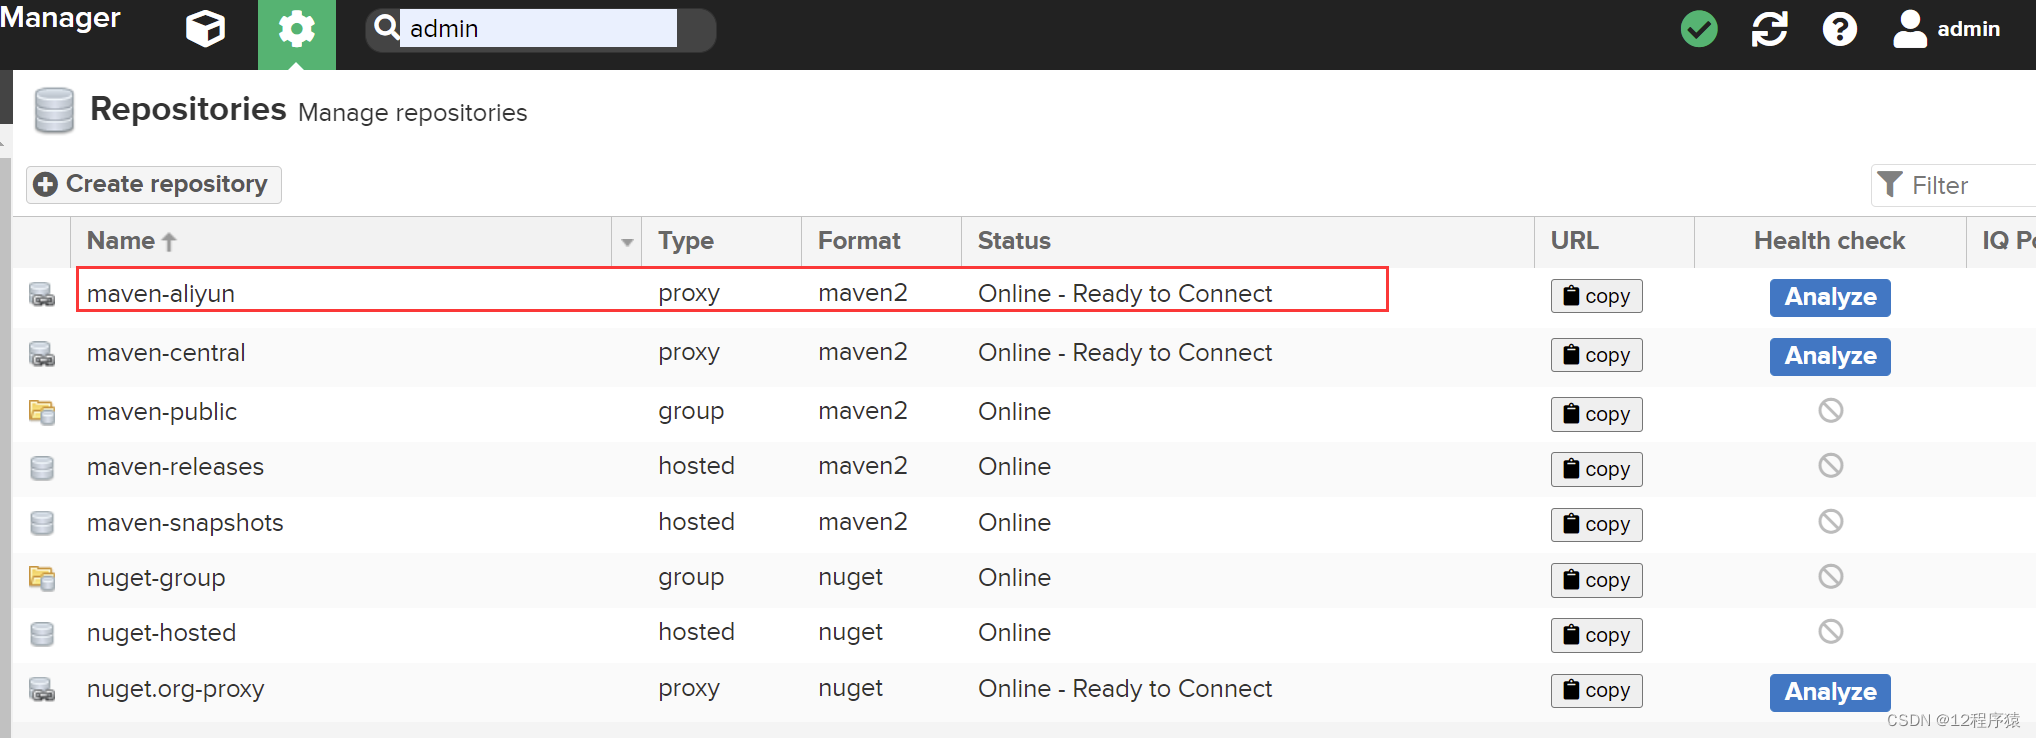
在仓库列表中可以看到创建的仓库:
2.宿主仓库
宿主仓库主要是给我们自己用的,主要有2点作用:
-
将私有的一些构件通过nexus中网页的方式上传到宿主仓库中给其他同事使用
-
将自己开发好一些构件发布到nexus的宿主仓库中以供其他同事使用
3.仓库组
maven用户可以从代理仓库和宿主仓库中下载构件至本地仓库,为了方便从多个代理仓库和宿主仓库下载构件,maven提供了仓库组。
仓库组中可以有多个代理仓库和宿主仓库,而maven用户只用访问一个仓库组就可以间接的访问这个组内所有的仓库,仓库组中多个仓库是有顺序的,当maven用户从仓库组下载构件时,仓库组会按顺序依次在组内的仓库中查找组件,查找到了立即返回给本地仓库,所以一般情况我们会将速度快的放在前面。
仓库组内部实际上是没有构件内容的,他只是起到一个请求转发的作用,将maven用户下载构件的请求转发给组内的其他仓库处理。
nexus默认有个仓库组maven-public,如下:
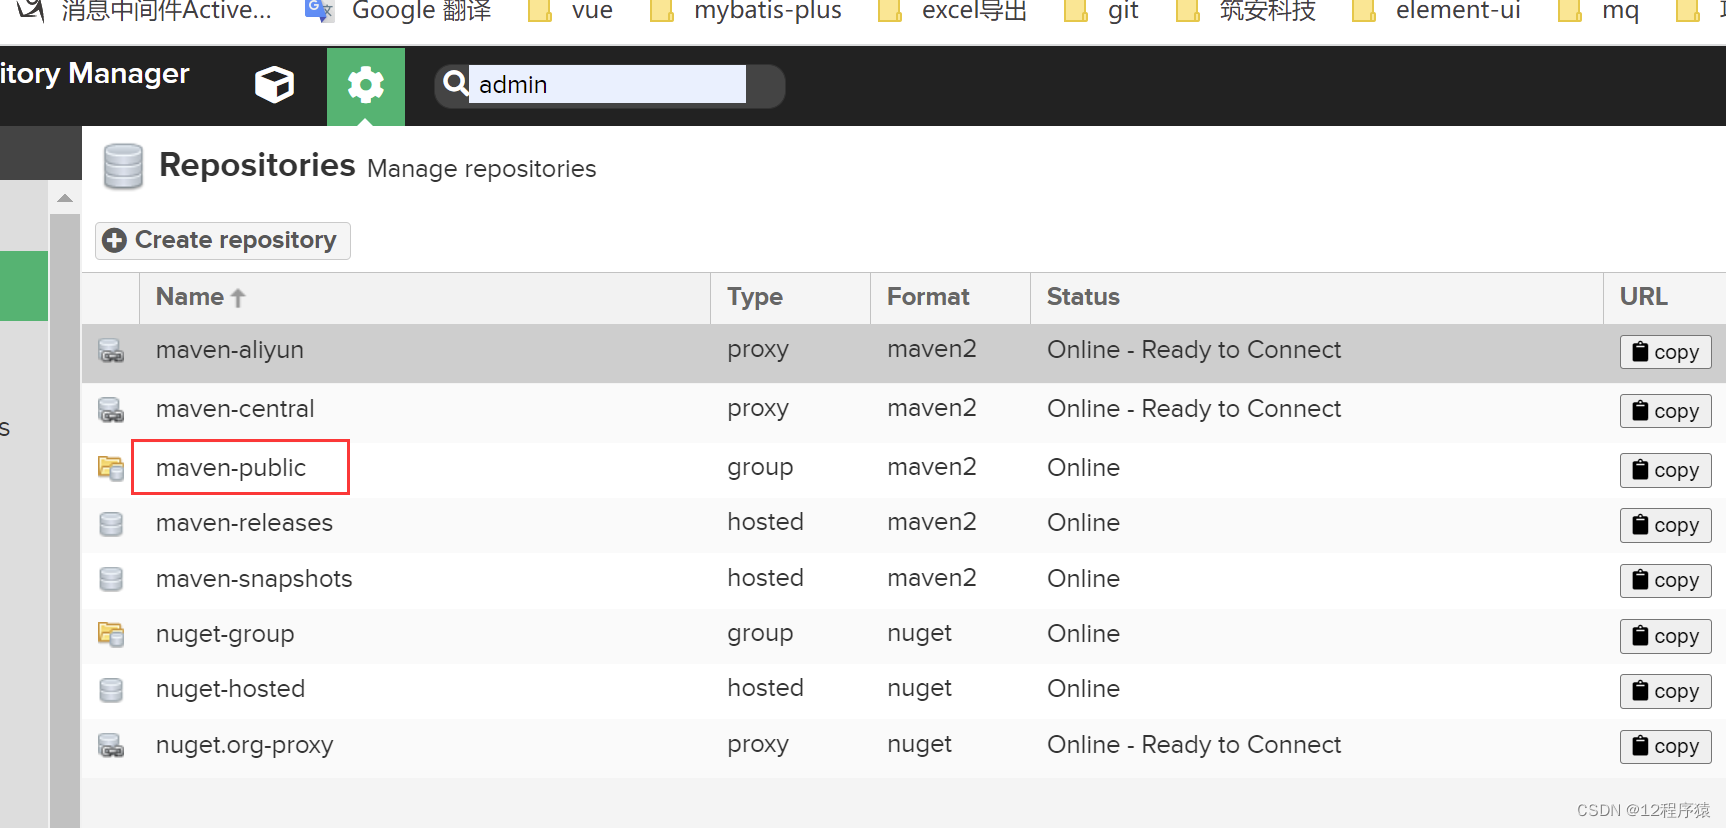
点击一下maven-public这行记录,进去看一下,如下:
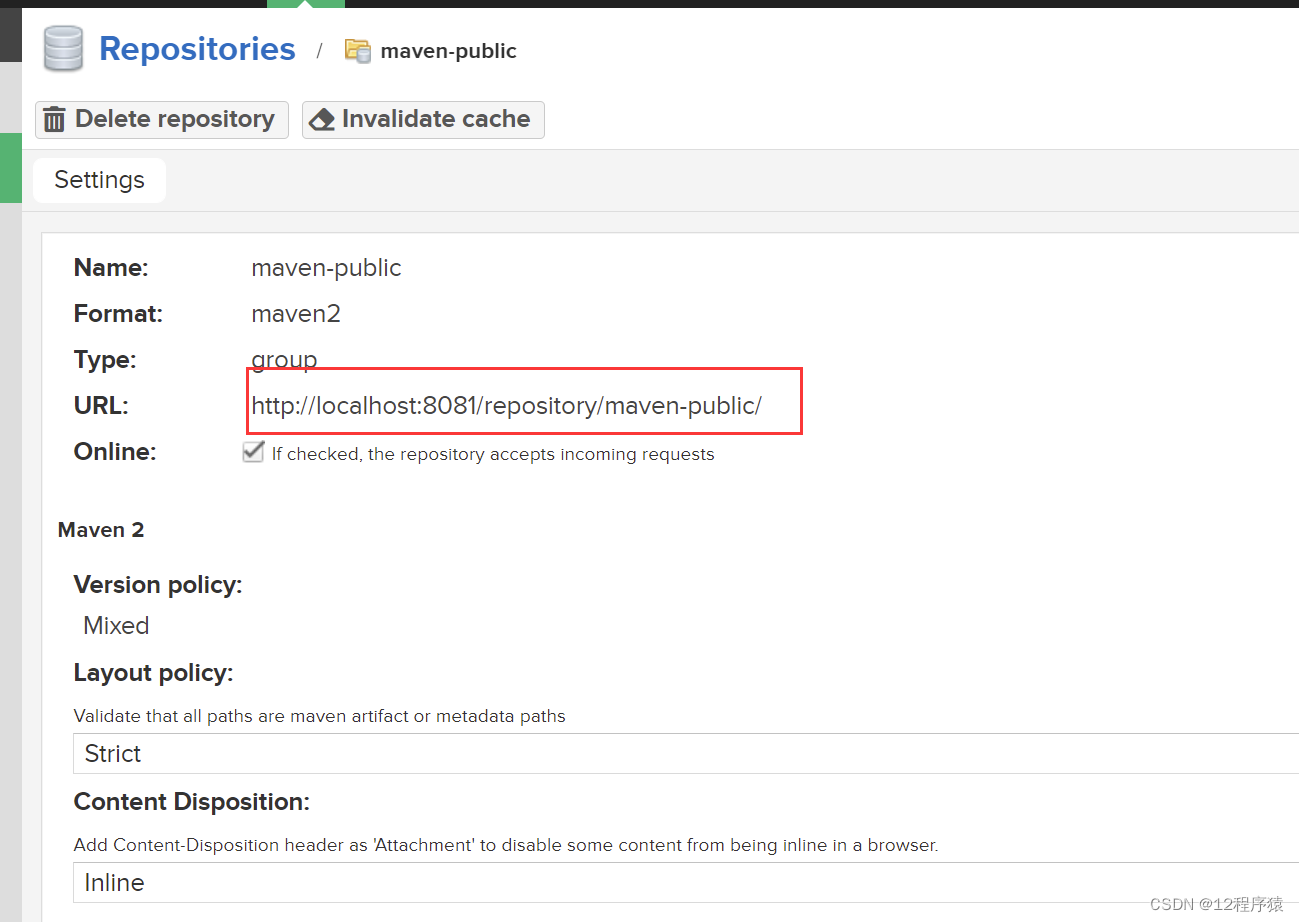
上面的URL是 仓库组对外的一个url,我们本地的maven可以通过这个url来从仓库组中下载构件至本地仓库。
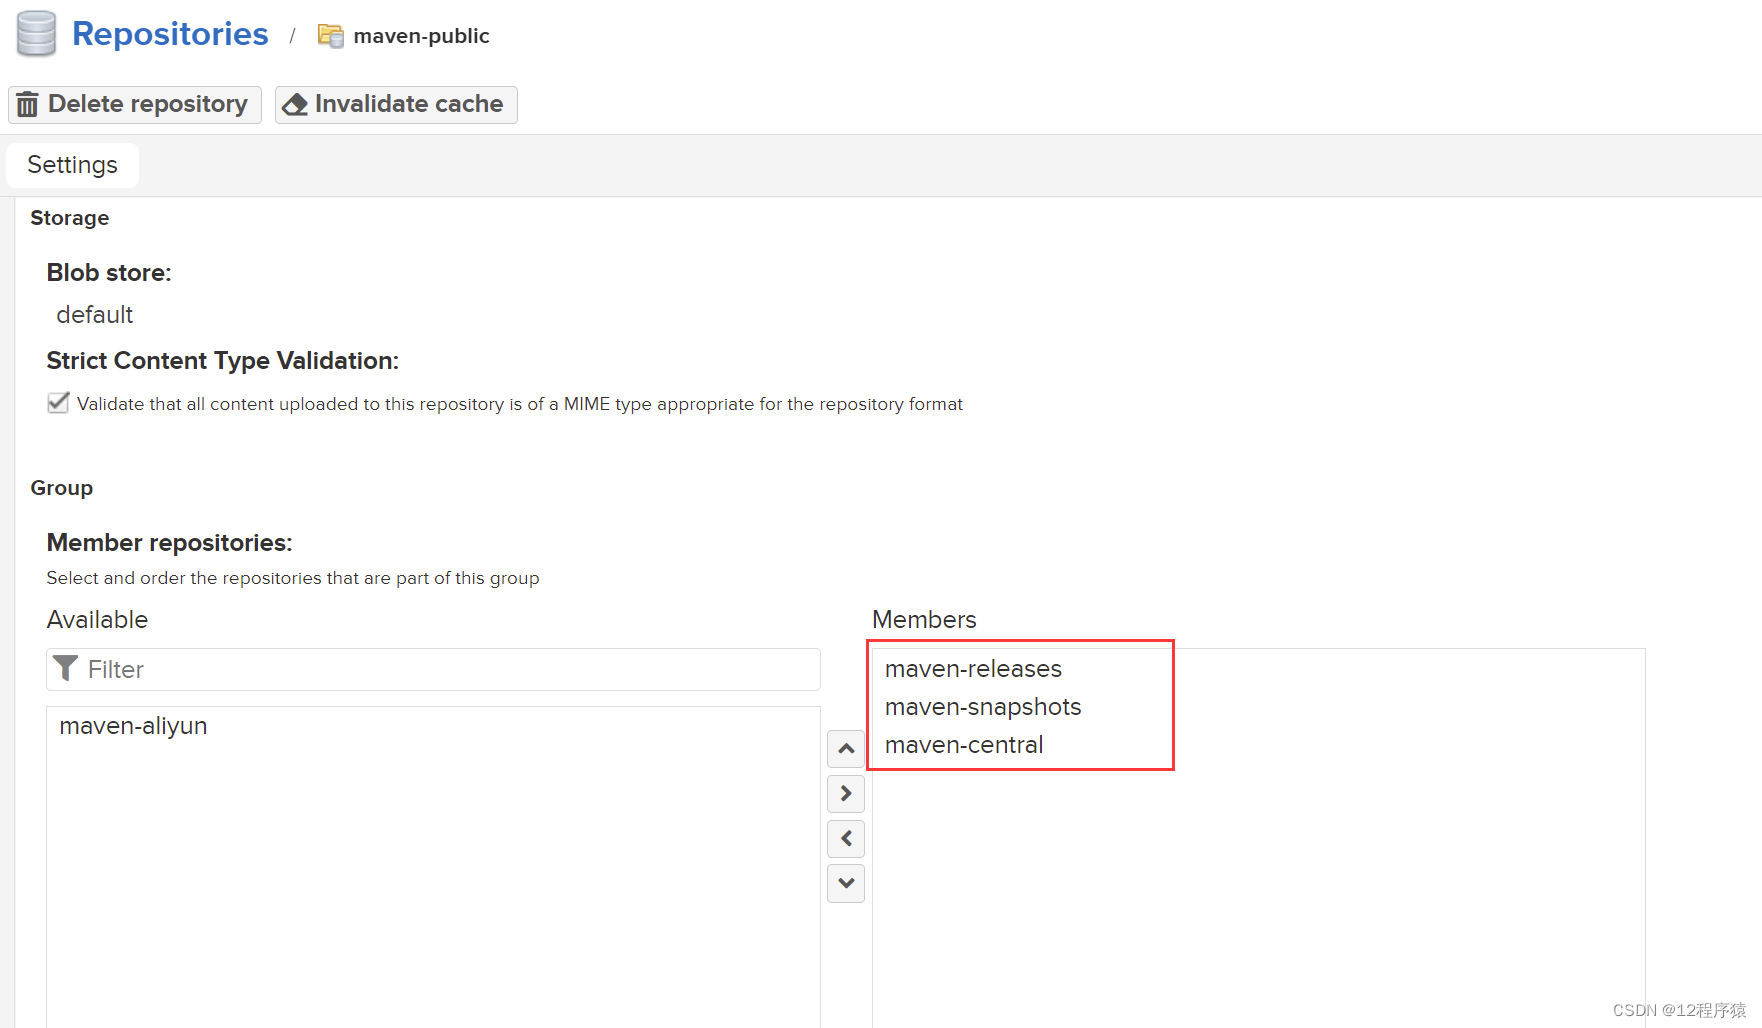
上面的红框中是仓库组中的成员,目前包含了3个仓库,第1个是宿主的releases版本仓库,第2个是宿主快照版本的仓库,第3个是代理仓库(maven社区中央仓库的代理)。
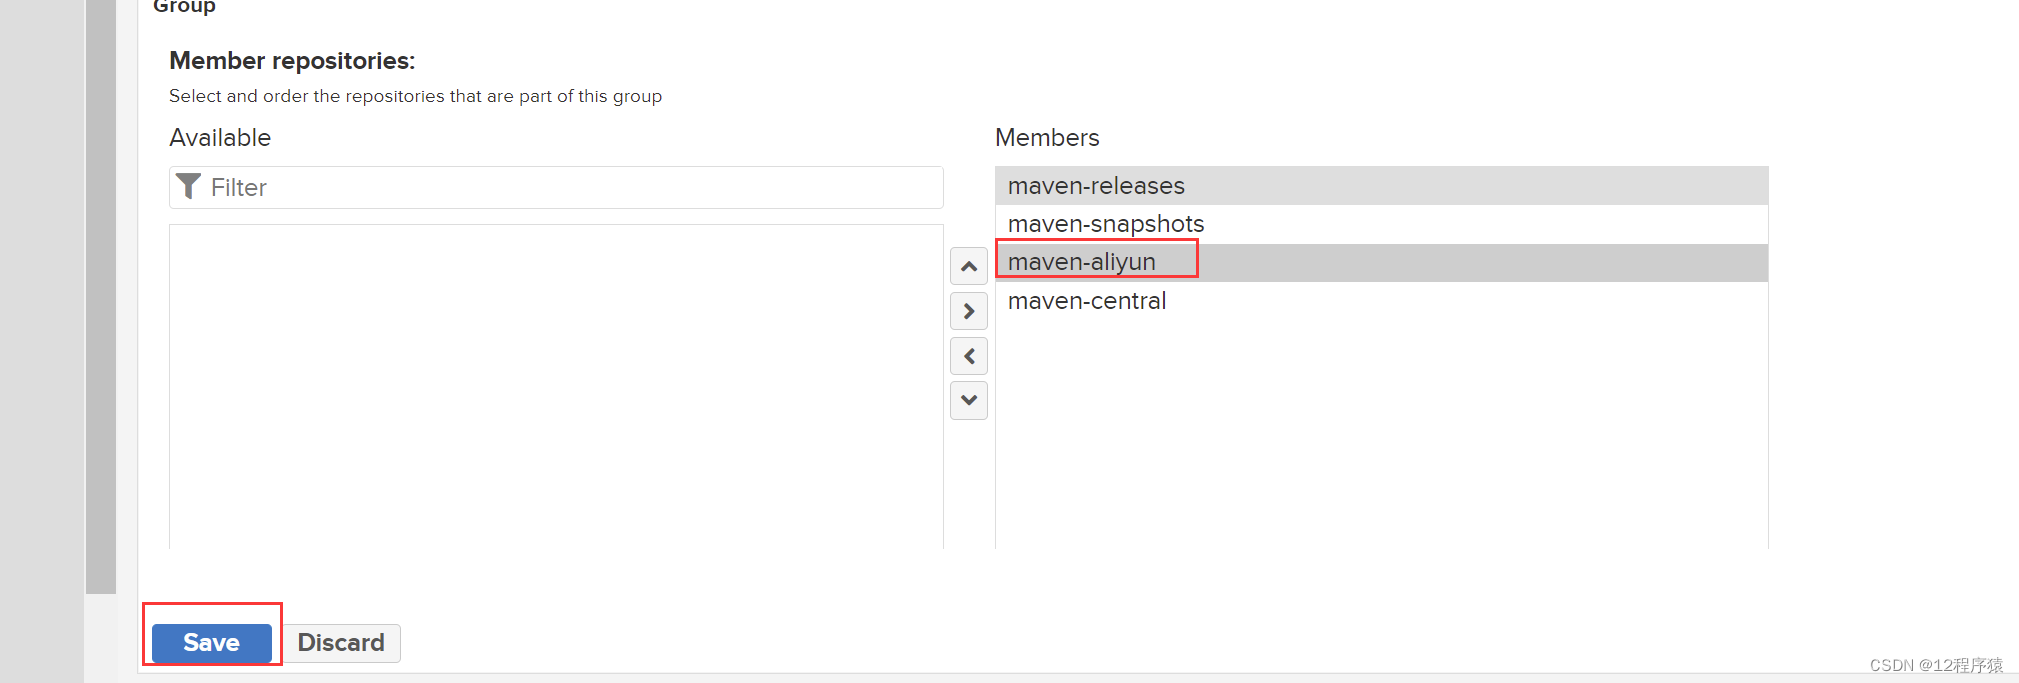
刚才我们新增的maven-aliyun在左边,我们将其也加到右边的仓库成员(Members)列表,然后将maven-aliyun这个仓库放在第3个位置,这个仓库的速度比maven-central要快一些,能加速我们下载maven构件的速度,如下图:
四、配置本地maven从nexus下载构件
从 Nexus 私服下载构件的配置方法共有三种
1.方式1:pom.xml方式
以 从nexus默认仓库组中下载构件,先获取仓库组对外的地址,点击下图中的copy按钮,获取仓库组的地址:
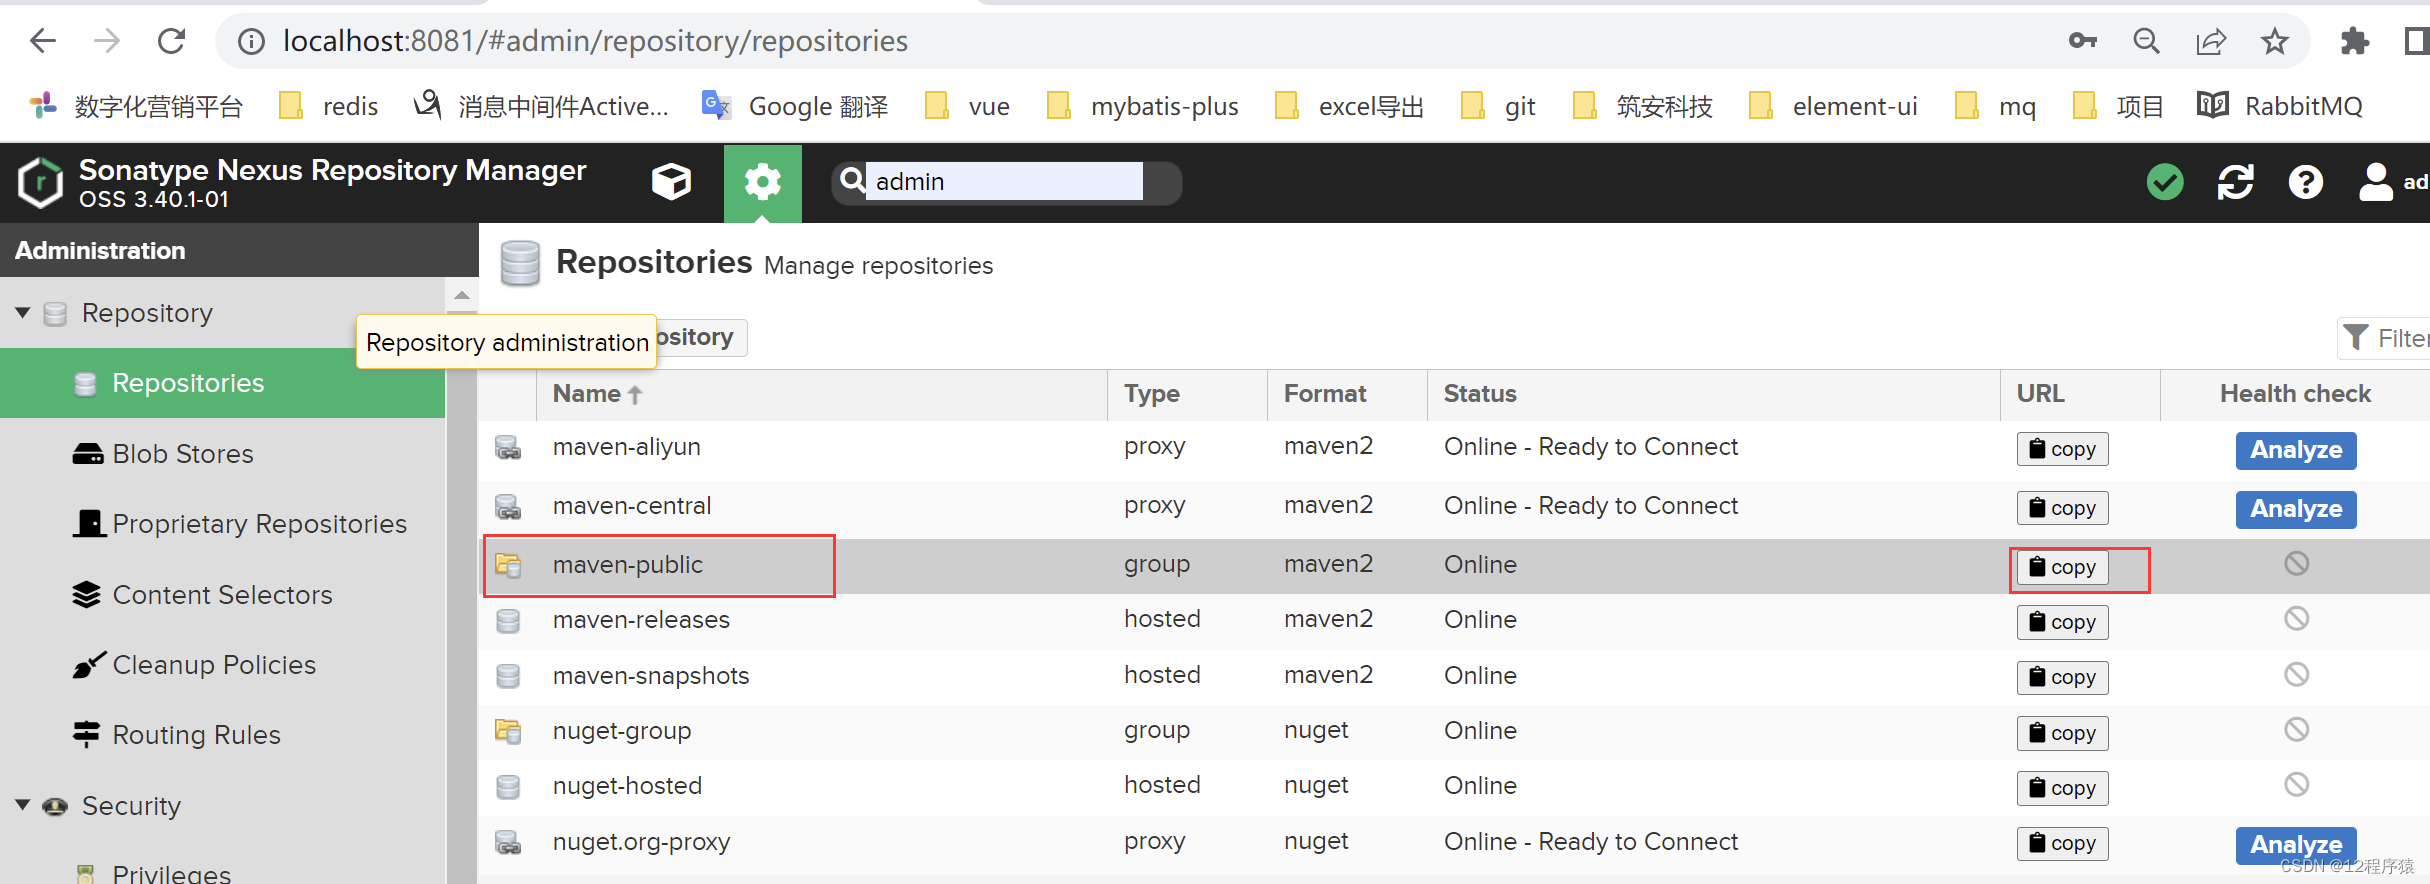

修改项目中的pom.xml,加入如下内容:
<!--配置仓库-->
<repositories>
    <repository>
        <id>maven-nexus</id>
        <!--maven私服仓库组的地址-->
        <url>http://localhost:8081/repository/maven-public/</url>
        <releases>
            <enabled>true</enabled>
        </releases>
        <snapshots>
            <enabled>true</enabled>
        </snapshots>
    </repository>
</repositories>
<!--配置插件仓库-->
<pluginRepositories>
	<pluginRepository>
		<id>maven-nexus</id>
		<!--maven私服仓库组的地址-->
		<url>http://localhost:8081/repository/maven-public/</url>
		<releases>
			<enabled>true</enabled>
		</releases>
		<snapshots>
			<enabled>true</enabled>
		</snapshots>
	</pluginRepository>
</pluginRepositories>
注意:分别配置仓库和插件仓库
由于nexus私服需要有用户名和密码登录才能访问,所以需要有凭证,凭证需要在settings.xml文件中配置,在~.m2\settings.xml文件中的servers元素中加入如下内容:

<server>
  <id>maven-nexus</id>
  <username>admin</username>
  <password>123456</password>
</server>
注意:
上面的server->id的值和pom.xml中repository->id的值一致,通过这个id关联找到凭证的。
server元素中的username和password你们根据自己的去编辑,我这边密码设置的是123456
2.方式1示例
idea创建SpringBoot项目:
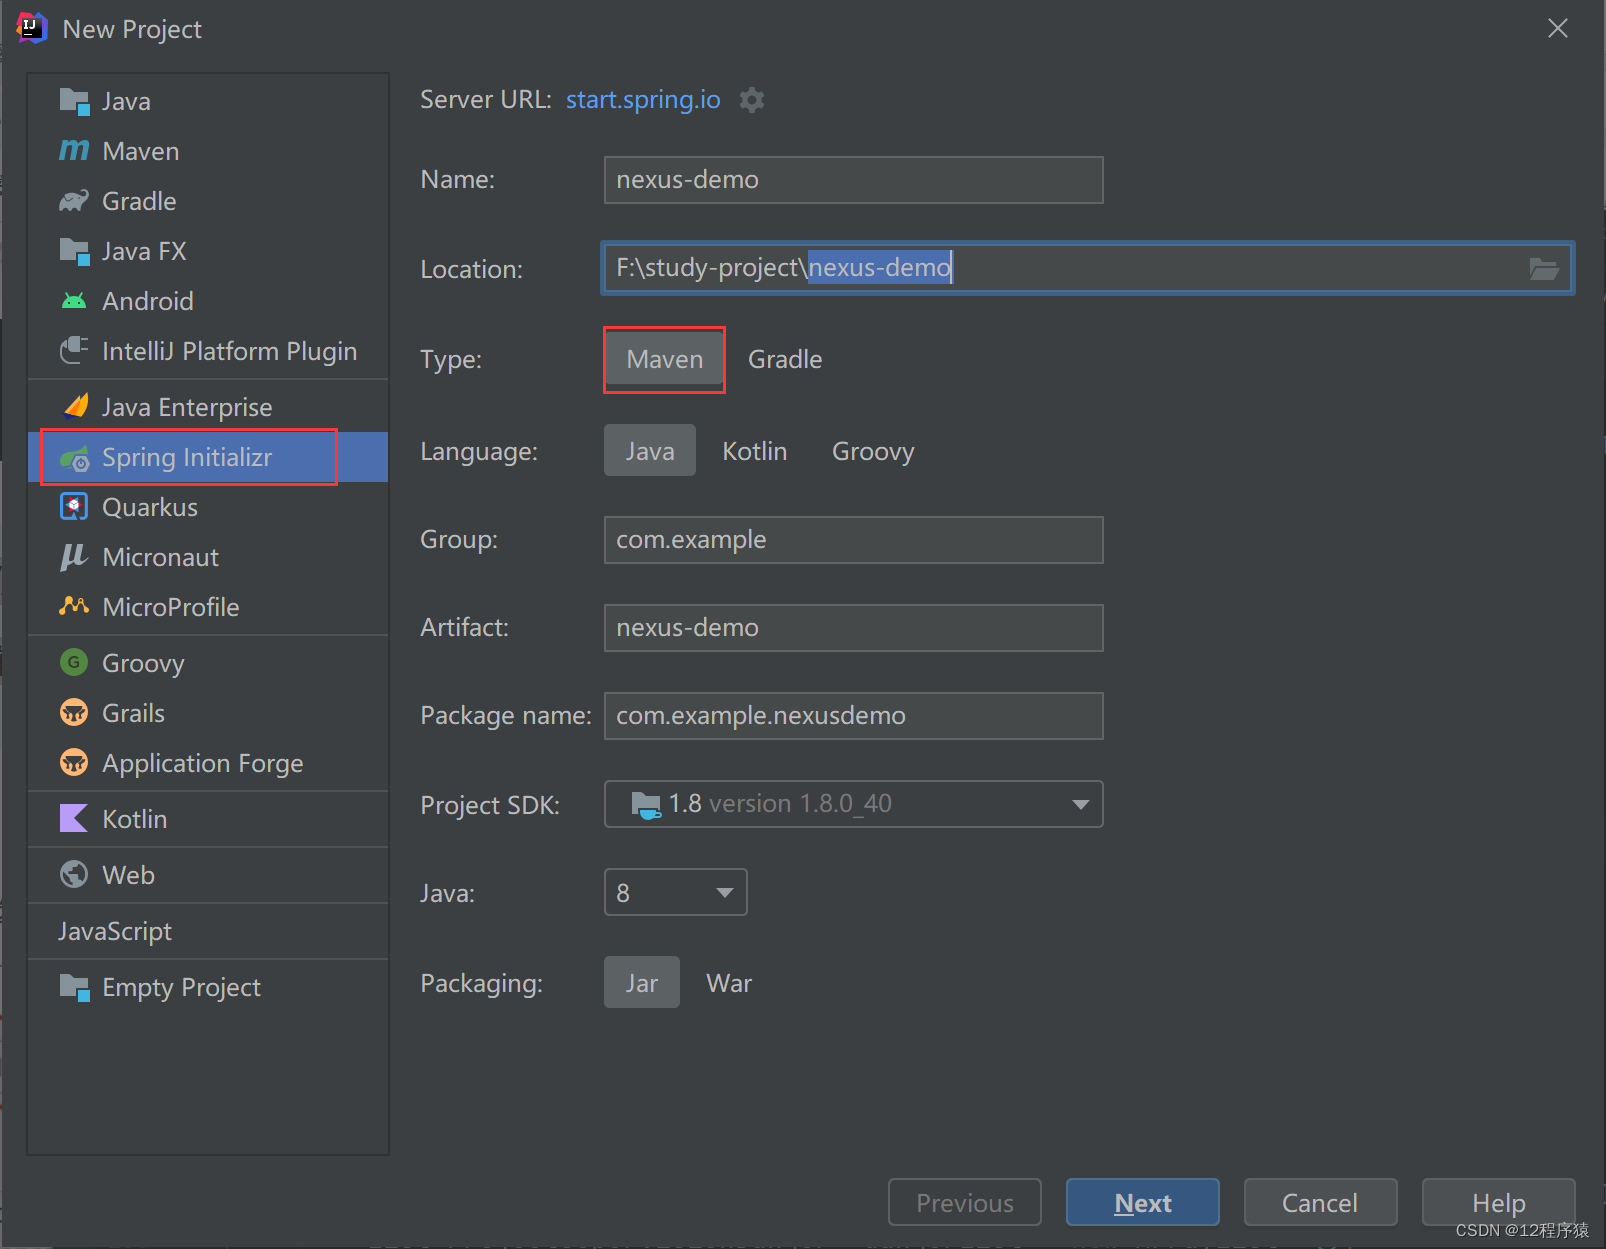
点击Next,选择所需依赖,点击FInish。
配置项目的maven:
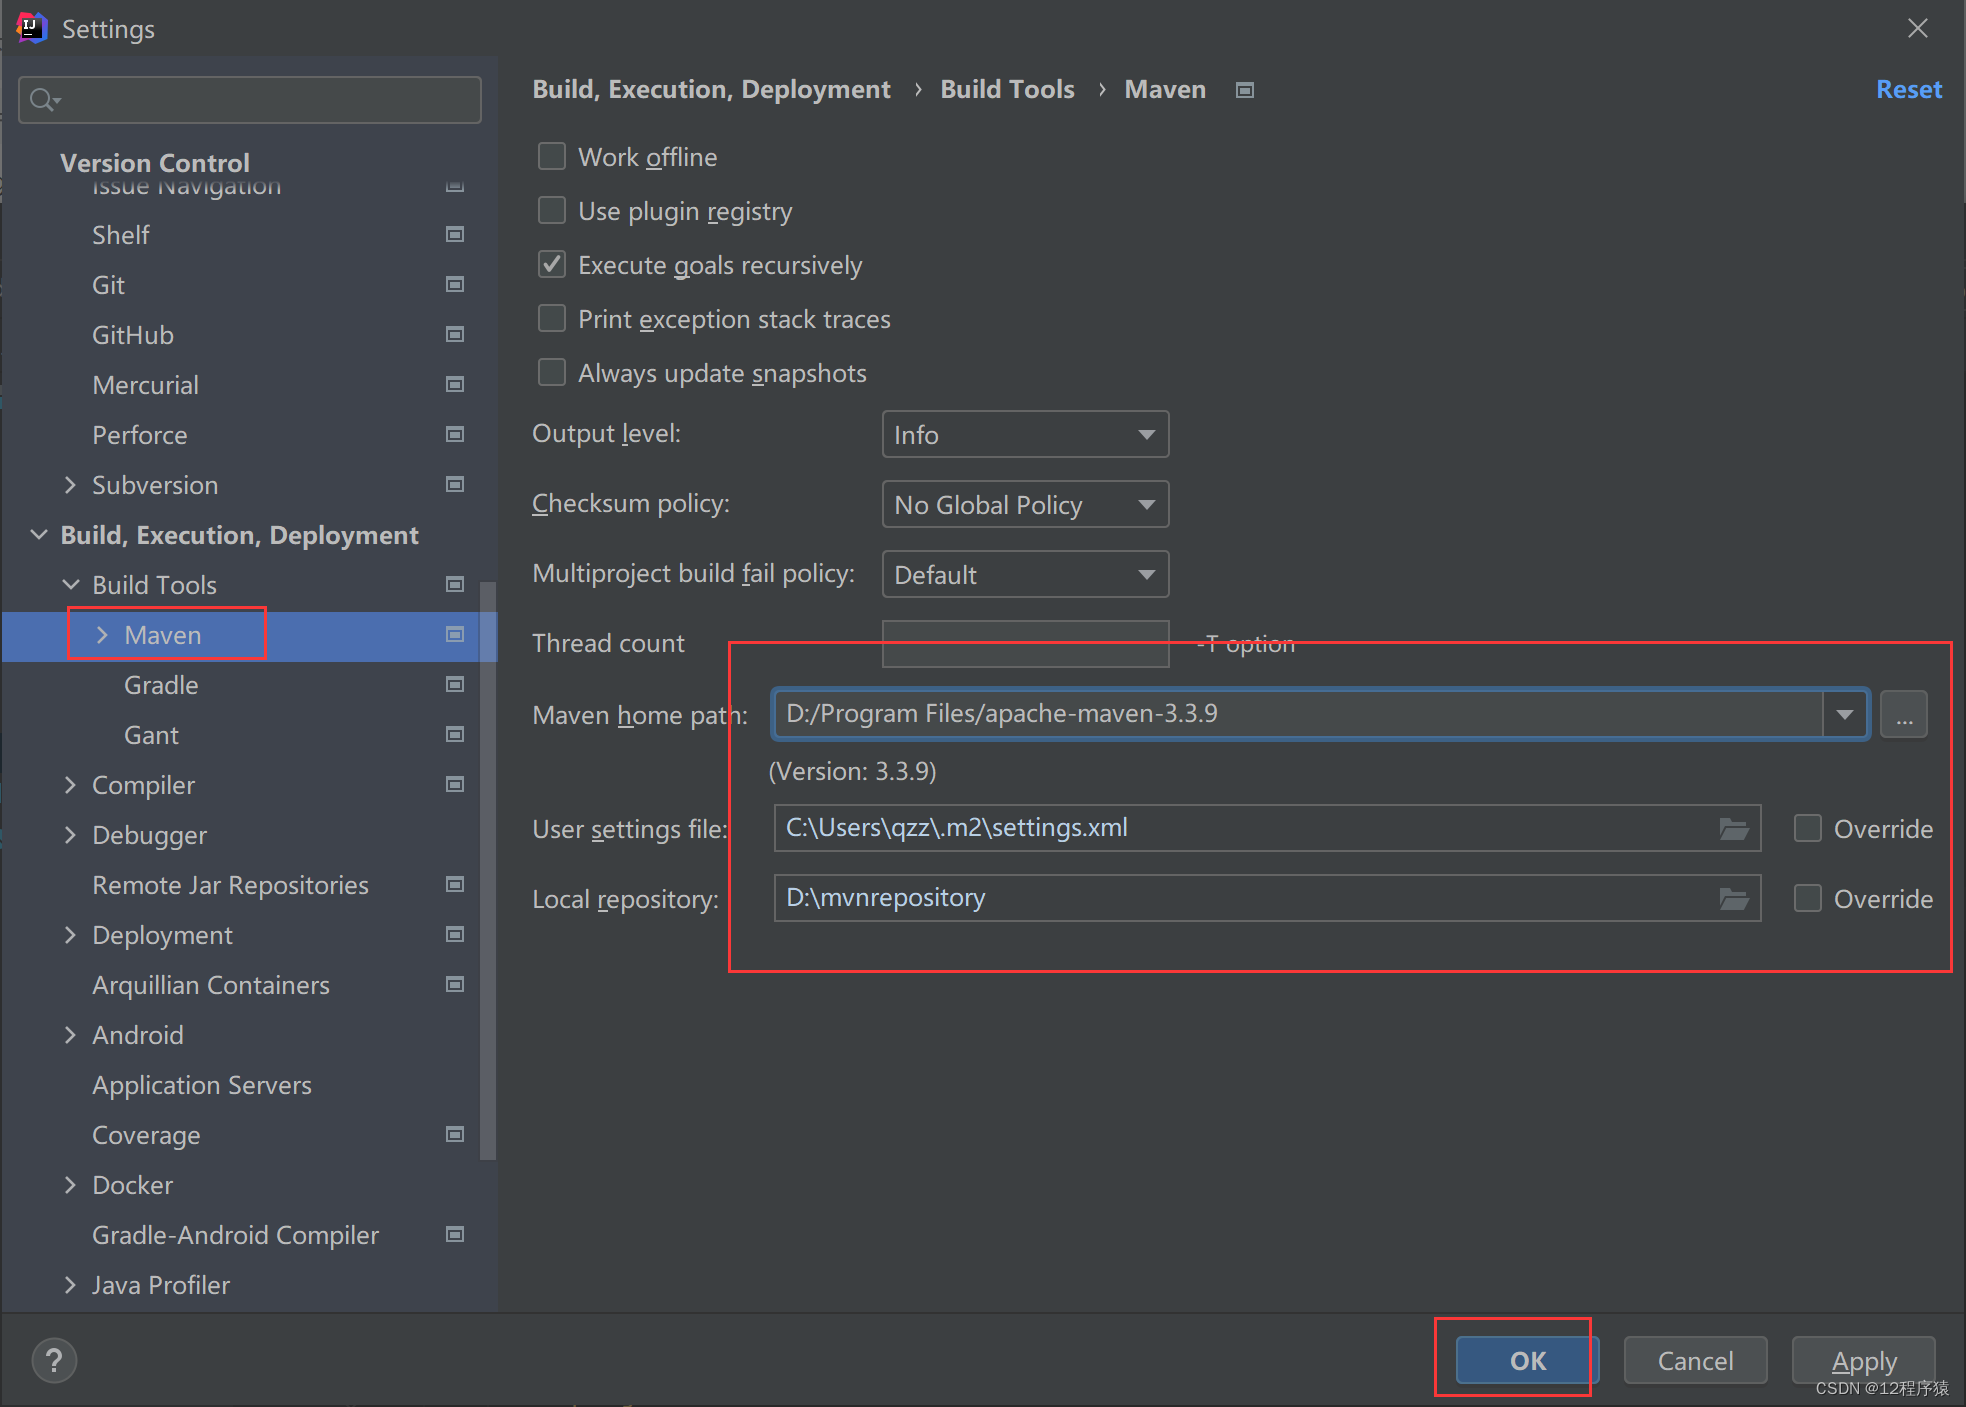
点击上面的OK完成配置。
修改上面idea项目中的pom.xml文件,内容如下:
<?xml version="1.0" encoding="UTF-8"?>
<project xmlns="http://maven.apache.org/POM/4.0.0" xmlns:xsi="http://www.w3.org/2001/XMLSchema-instance"
	xsi:schemaLocation="http://maven.apache.org/POM/4.0.0 https://maven.apache.org/xsd/maven-4.0.0.xsd">
	<modelVersion>4.0.0</modelVersion>
	<parent>
		<groupId>org.springframework.boot</groupId>
		<artifactId>spring-boot-starter-parent</artifactId>
		<version>2.7.0</version>
		<relativePath/> <!-- lookup parent from repository -->
	</parent>
	<groupId>com.example</groupId>
	<artifactId>nexus-demo</artifactId>
	<version>0.0.1-SNAPSHOT</version>
	<name>nexus-demo</name>
	<description>Demo project for Spring Boot</description>
	<properties>
		<java.version>1.8</java.version>
	</properties>
	<dependencies>
		<dependency>
			<groupId>org.springframework.boot</groupId>
			<artifactId>spring-boot-starter-web</artifactId>
		</dependency>
		<dependency>
			<groupId>org.springframework.boot</groupId>
			<artifactId>spring-boot-starter-test</artifactId>
			<scope>test</scope>
		</dependency>
        <!--Json工具类-->
        <dependency>
            <groupId>com.alibaba</groupId>
            <artifactId>fastjson</artifactId>
            <version>1.2.68</version>
        </dependency>
	</dependencies>

	<build>
		<plugins>
			<plugin>
				<groupId>org.springframework.boot</groupId>
				<artifactId>spring-boot-maven-plugin</artifactId>
			</plugin>
		</plugins>
	</build>

    <!--配置仓库-->
    <repositories>
        <repository>
            <id>maven-nexus</id>
            <!--maven私服仓库组的地址-->
            <url>http://localhost:8081/repository/maven-public/</url>
            <releases>
                <enabled>true</enabled>
            </releases>
            <snapshots>
                <enabled>true</enabled>
            </snapshots>
        </repository>
    </repositories>
	<!--配置插件仓库-->
	<pluginRepositories>
		<pluginRepository>
			<id>maven-nexus</id>
			<!--maven私服仓库组的地址-->
			<url>http://localhost:8081/repository/maven-public/</url>
			<releases>
				<enabled>true</enabled>
			</releases>
			<snapshots>
				<enabled>true</enabled>
			</snapshots>
		</pluginRepository>
	</pluginRepositories>

</project>
删除本地仓库中以下几个目录:
D:\mvnrepository\com\alibaba

在 nexus-demo终端下输入如下命令:
mvn compile
编译结果如下:
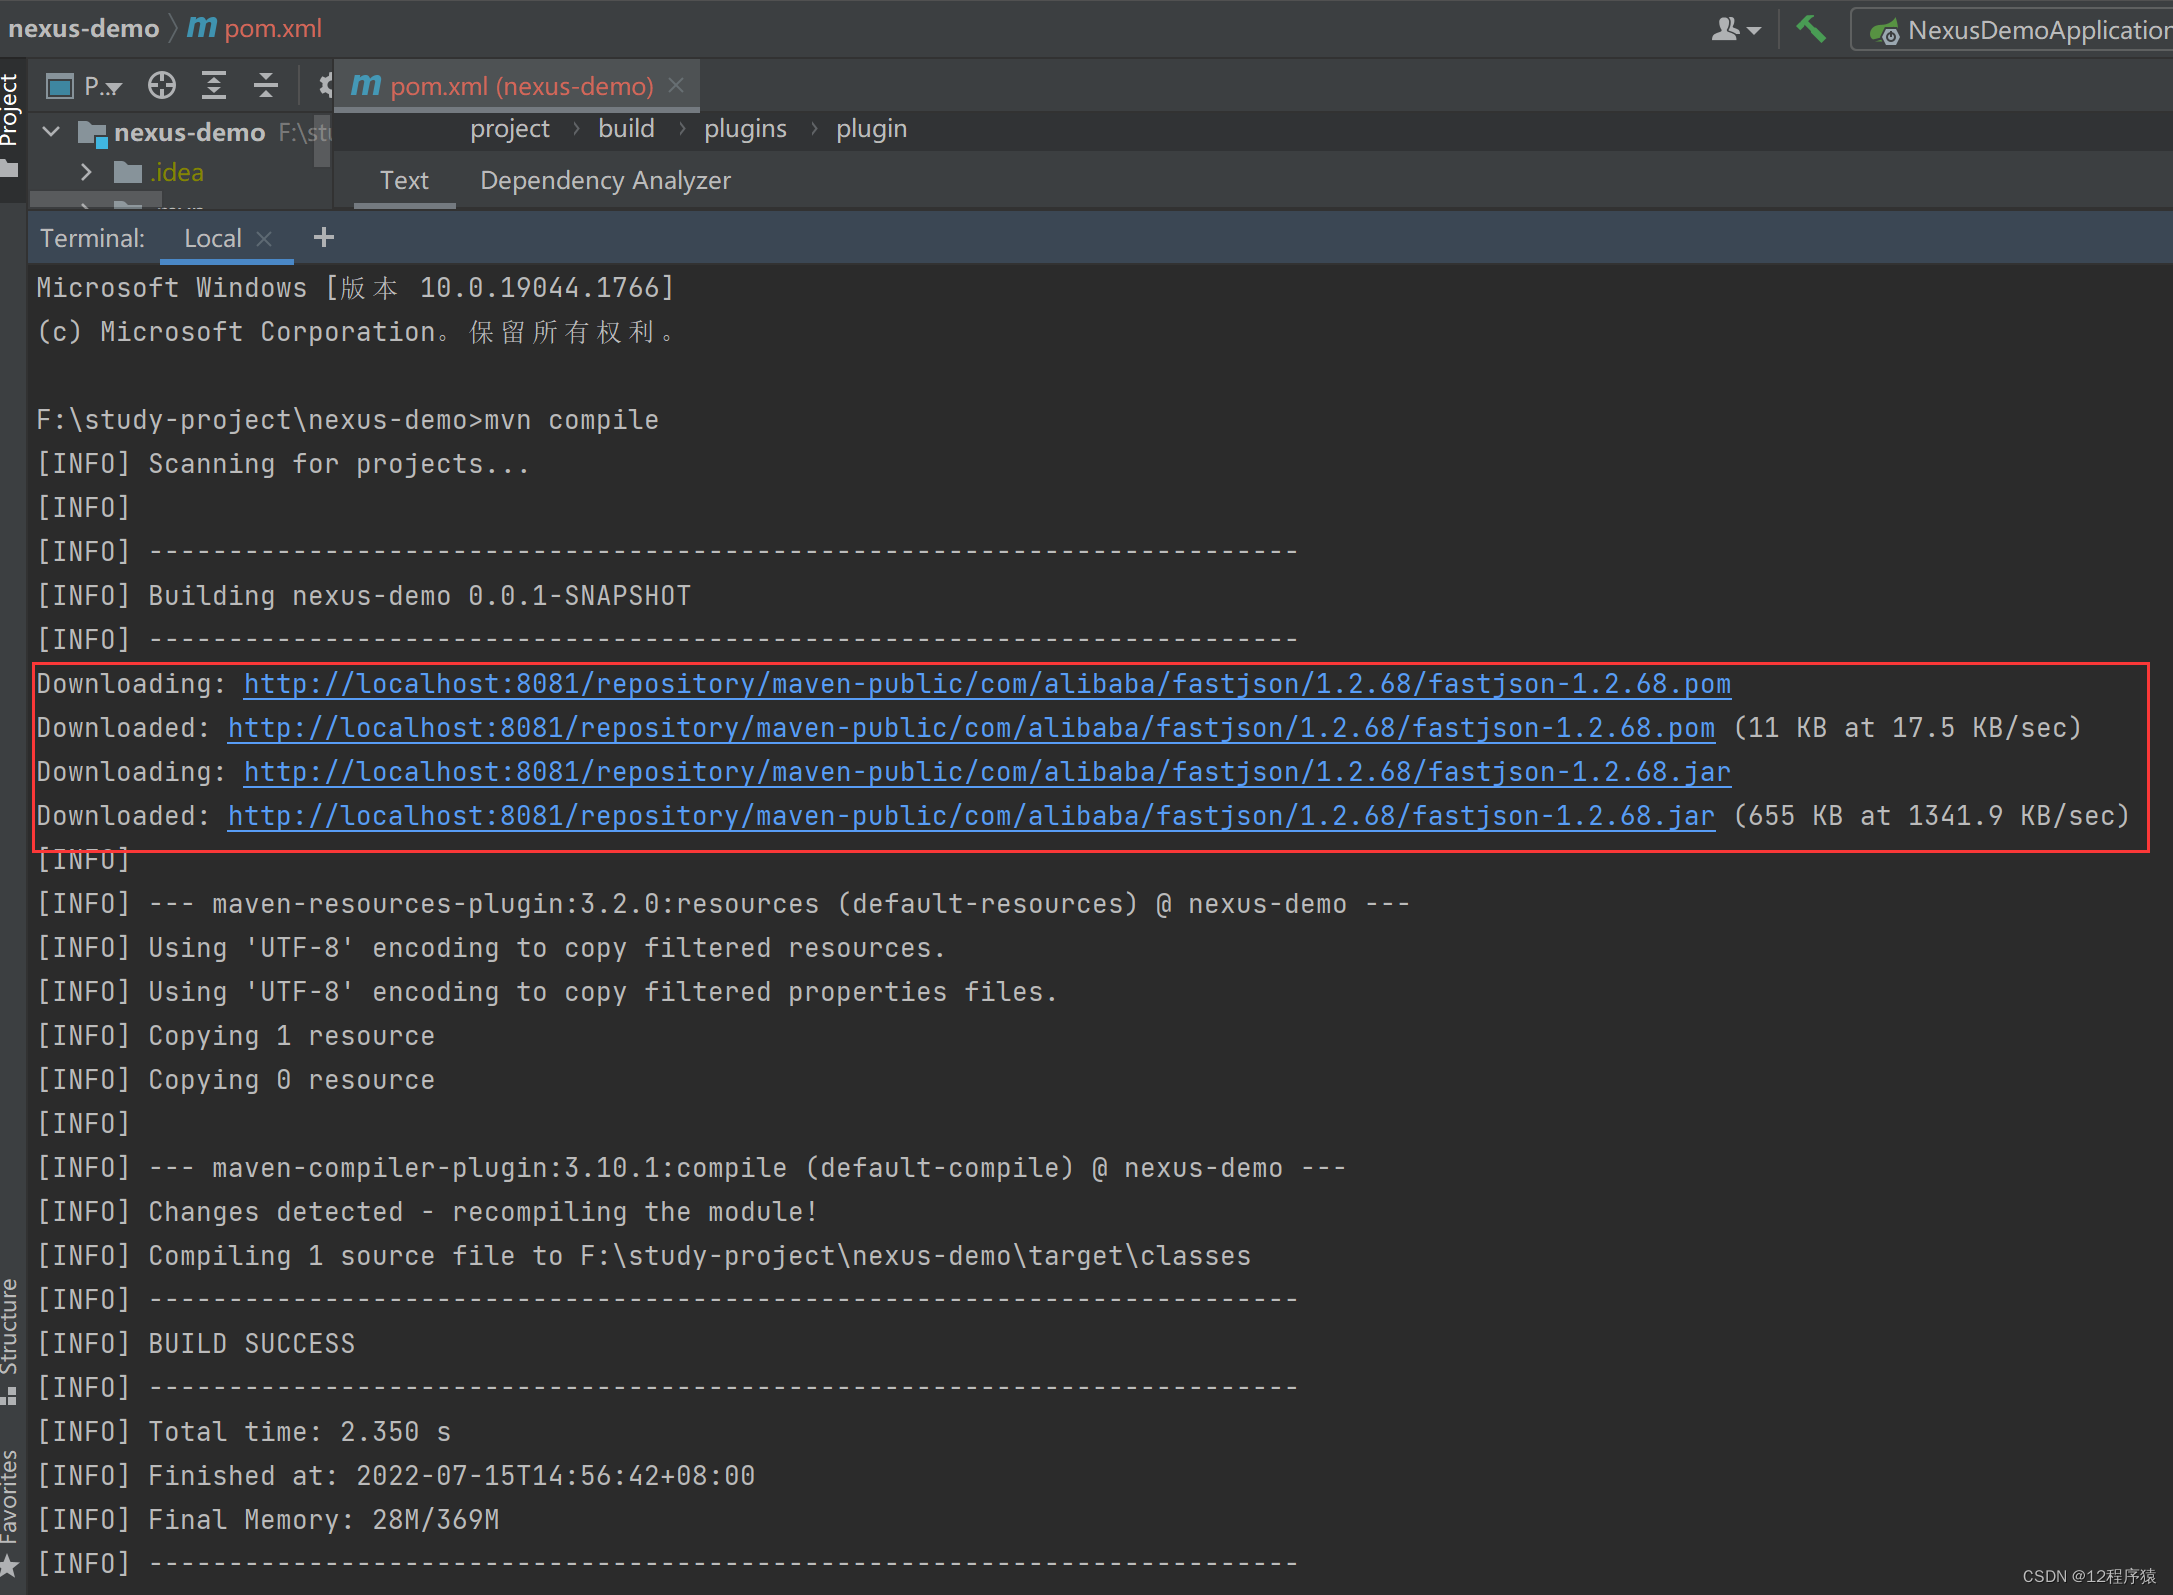
从输出中可以看出fastjson这个jar包从maven-nexus中下载了,下载地址正是我们nexus私服中的那个地址。
mvn compile的作用:编译命令,maven会自动下载依赖jar
3.方式2:settings配置profiles 、activeProfile
(1)在 settings.xml 的 profiles 标签中添加如下内容
<profile>
    <id>nexus</id>
    <!--配置仓库 -->
    <repositories>
      <repository>
        <id>nexus</id>
        <name>maven-nexus</name>
        <url>http://localhost:8081/repository/maven-public/</url>
  <releases>
    <enable>true</enable>
  </releases>
  <snapshots>
    <enable>true</enable>
  </snapshots>
      </repository>
    </repositories>
 <!--配置插件仓库 -->
  <pluginRepositories>
      <pluginRepository>
        <id>nexus</id>
        <name>maven-nexus</name>
        <url>http://localhost:8081/repository/maven-public/</url>
  <releases>
    <enable>true</enable>
  </releases>
  <snapshots>
    <enable>true</enable>
  </snapshots>
      </pluginRepository>
    </pluginRepositories>

  </profile>
注:使用 id 为 nexus 的 profile 分别配置仓库和插件仓库
(2)在 settings.xml 的 activeProfiles标签中添加activeProfile:
  <!-- 激活上面配置的 nexus profile -->
  <activeProfiles>
	<activeProfile>nexus</activeProfile>
  </activeProfiles>
(3)由于nexus的url是需要用户名和密码才可以访问的,所以需要配置访问凭证,在servers标签中加入如下内容:
<server>
	<id>nexus</id>
	<username>admin</username>
	<password>123456</password>
</server>
4.方式2示例
和方式1示例同样的方式创建 nexus-demo-two项目,其项目pom.xml如下:
<?xml version="1.0" encoding="UTF-8"?>
<project xmlns="http://maven.apache.org/POM/4.0.0" xmlns:xsi="http://www.w3.org/2001/XMLSchema-instance"
         xsi:schemaLocation="http://maven.apache.org/POM/4.0.0 https://maven.apache.org/xsd/maven-4.0.0.xsd">
    <modelVersion>4.0.0</modelVersion>
    <parent>
        <groupId>org.springframework.boot</groupId>
        <artifactId>spring-boot-starter-parent</artifactId>
        <version>2.7.1</version>
        <relativePath/> <!-- lookup parent from repository -->
    </parent>
    <groupId>com.example</groupId>
    <artifactId>nexus-demo-two</artifactId>
    <version>0.0.1-SNAPSHOT</version>
    <name>nexus-demo-two</name>
    <description>Demo project for Spring Boot</description>
    <properties>
        <java.version>1.8</java.version>
    </properties>
    <dependencies>
        <dependency>
            <groupId>org.springframework.boot</groupId>
            <artifactId>spring-boot-starter-web</artifactId>
        </dependency>

        <dependency>
            <groupId>org.springframework.boot</groupId>
            <artifactId>spring-boot-starter-test</artifactId>
            <scope>test</scope>
        </dependency>
        <!--Json工具类-->
        <dependency>
            <groupId>com.alibaba</groupId>
            <artifactId>fastjson</artifactId>
            <version>1.2.68</version>
        </dependency>
    </dependencies>

    <build>
        <plugins>
            <plugin>
                <groupId>org.springframework.boot</groupId>
                <artifactId>spring-boot-maven-plugin</artifactId>
            </plugin>
        </plugins>
    </build>

</project>
删除本地仓库中的以下几个目录:
D:\mvnrepository\com\alibaba
在该项目终端下输入编译命令:
mvn compile
编译结果:
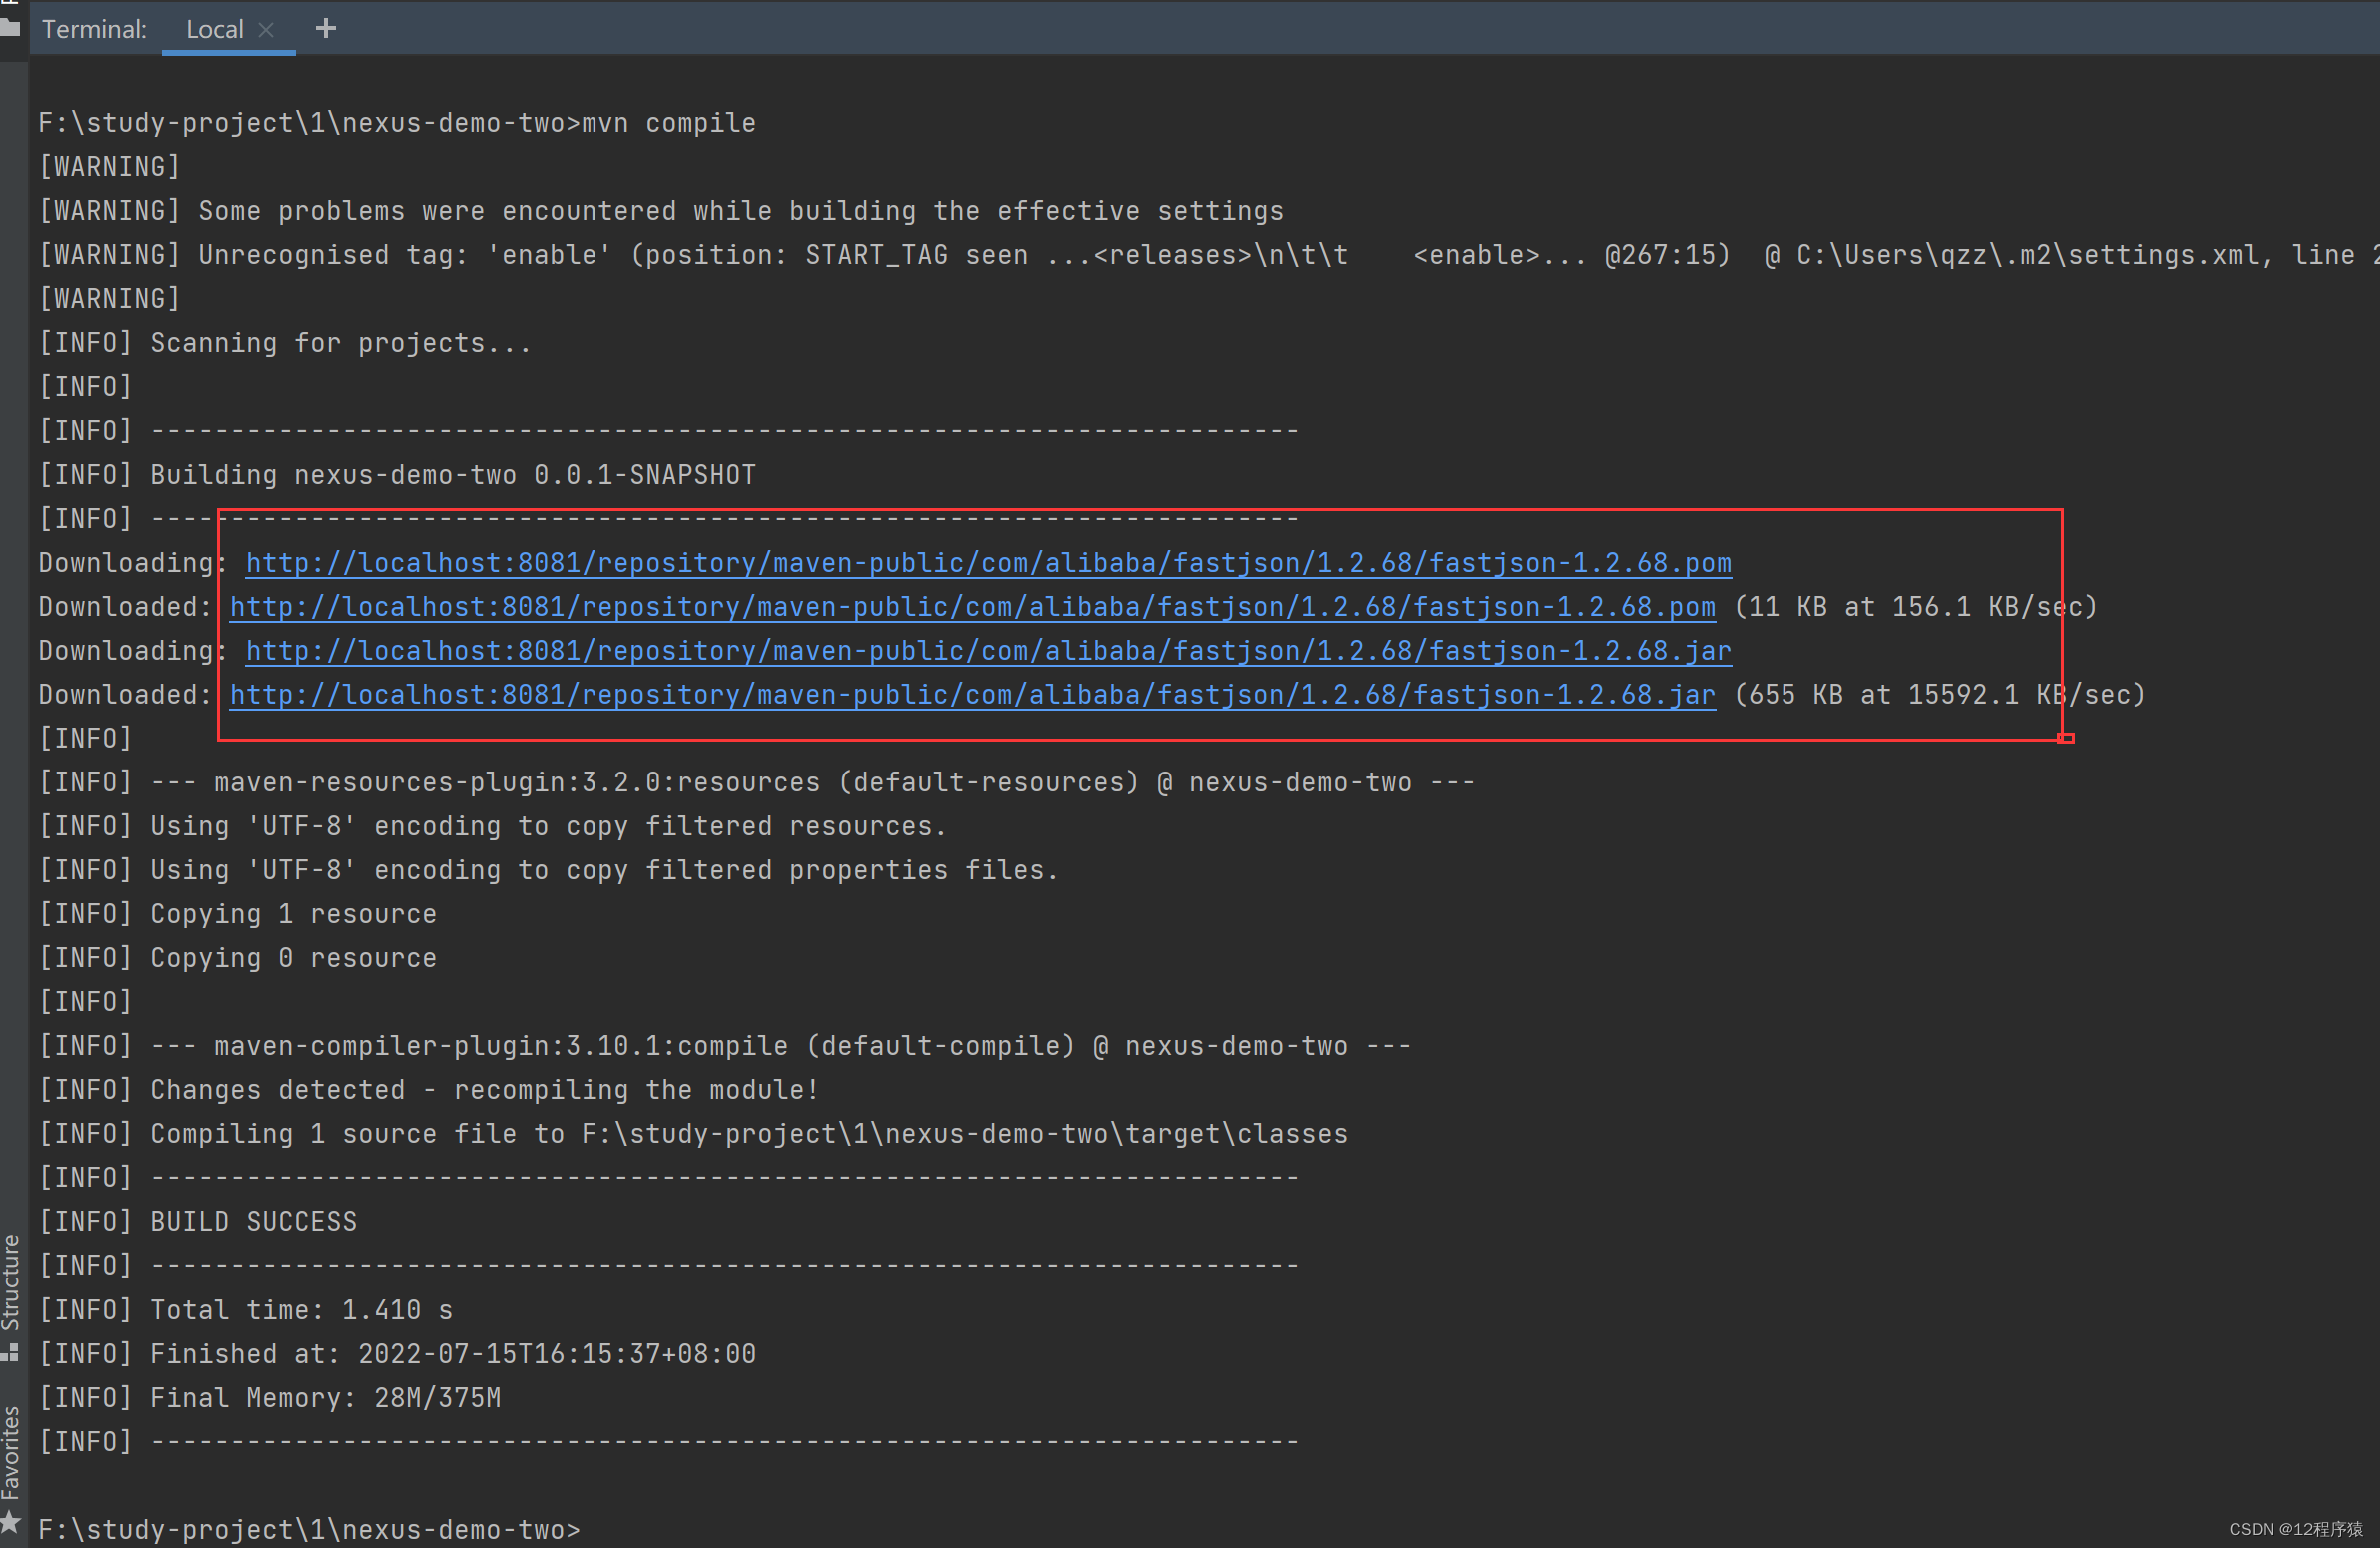
从输出中可以看出fastjson这个jar包从maven-nexus中下载了,下载地址正是我们nexus私服中的那个地址。
3.方式3:镜像方式(推荐)
(1)在settings.xml的mirrors标签中添加如下内容:
<mirror>
    <!-- id:可自定义 -->
    <id>nexus</id>
    <!-- name:可自定义 -->
    <name>nexus maven</name>
    <!-- mirrorOf:配置成 * 表示通过 nexus 访问网路上所有的远程仓库;配置成central,表示访问 nexus 的central仓库; -->
    <mirrorOf>*</mirrorOf>
    <!-- url:仓库地址 -->
    <url>http://localhost:8081/repository/maven-public/</url>
</mirror>
注:配置一个匹配任何仓库的镜像,其地址为 Nexus 私服
(2)在 settings.xml 的 profiles 标签中添加如下内容
<profile>
  <id>nexus</id>
  <!--配置仓库 -->
  <repositories>
    <repository>
      <id>center</id>
      <name>center</name>
      <url>http://center</url>
	  <releases>
	    <enable>true</enable>
	  </releases>
	  <snapshots>
	    <enable>true</enable>
	  </snapshots>
      </repository>
    </repositories>
 <!--配置插件仓库 -->
  <pluginRepositories>
      <pluginRepository>
        <id>center</id>
        <name>center</name>
        <url>http://center</url>
	  <releases>
	    <enable>true</enable>
	  </releases>
	  <snapshots>
	    <enable>true</enable>
	  </snapshots>
      </pluginRepository>
    </pluginRepositories>
  </profile>
注:使用 id 为 nexus 的 profile 分别配置仓库和插件仓库,但仓库和插件仓库的 id 都为 central,这将覆盖超级 POM中央仓库的配置,而 url 已无关紧要,因为所有的请求都会通过镜像访问私服地址
配置仓库和插件仓库的主要目的是开启对快照版本构件下载的支持
(3)由于nexus的url是需要用户名和密码才可以访问的,所以需要配置访问凭证,在servers标签中加入如下内容:
<server>
	<id>nexus</id>
	<username>admin</username>
	<password>123456</password>
</server>
5.方式3示例
删除本地仓库中的以下几个目录:
D:\mvnrepository\com\alibaba
在上面的 nexus-demo-two项目的终端下输入编译命令:
mvn compile
编译结果:
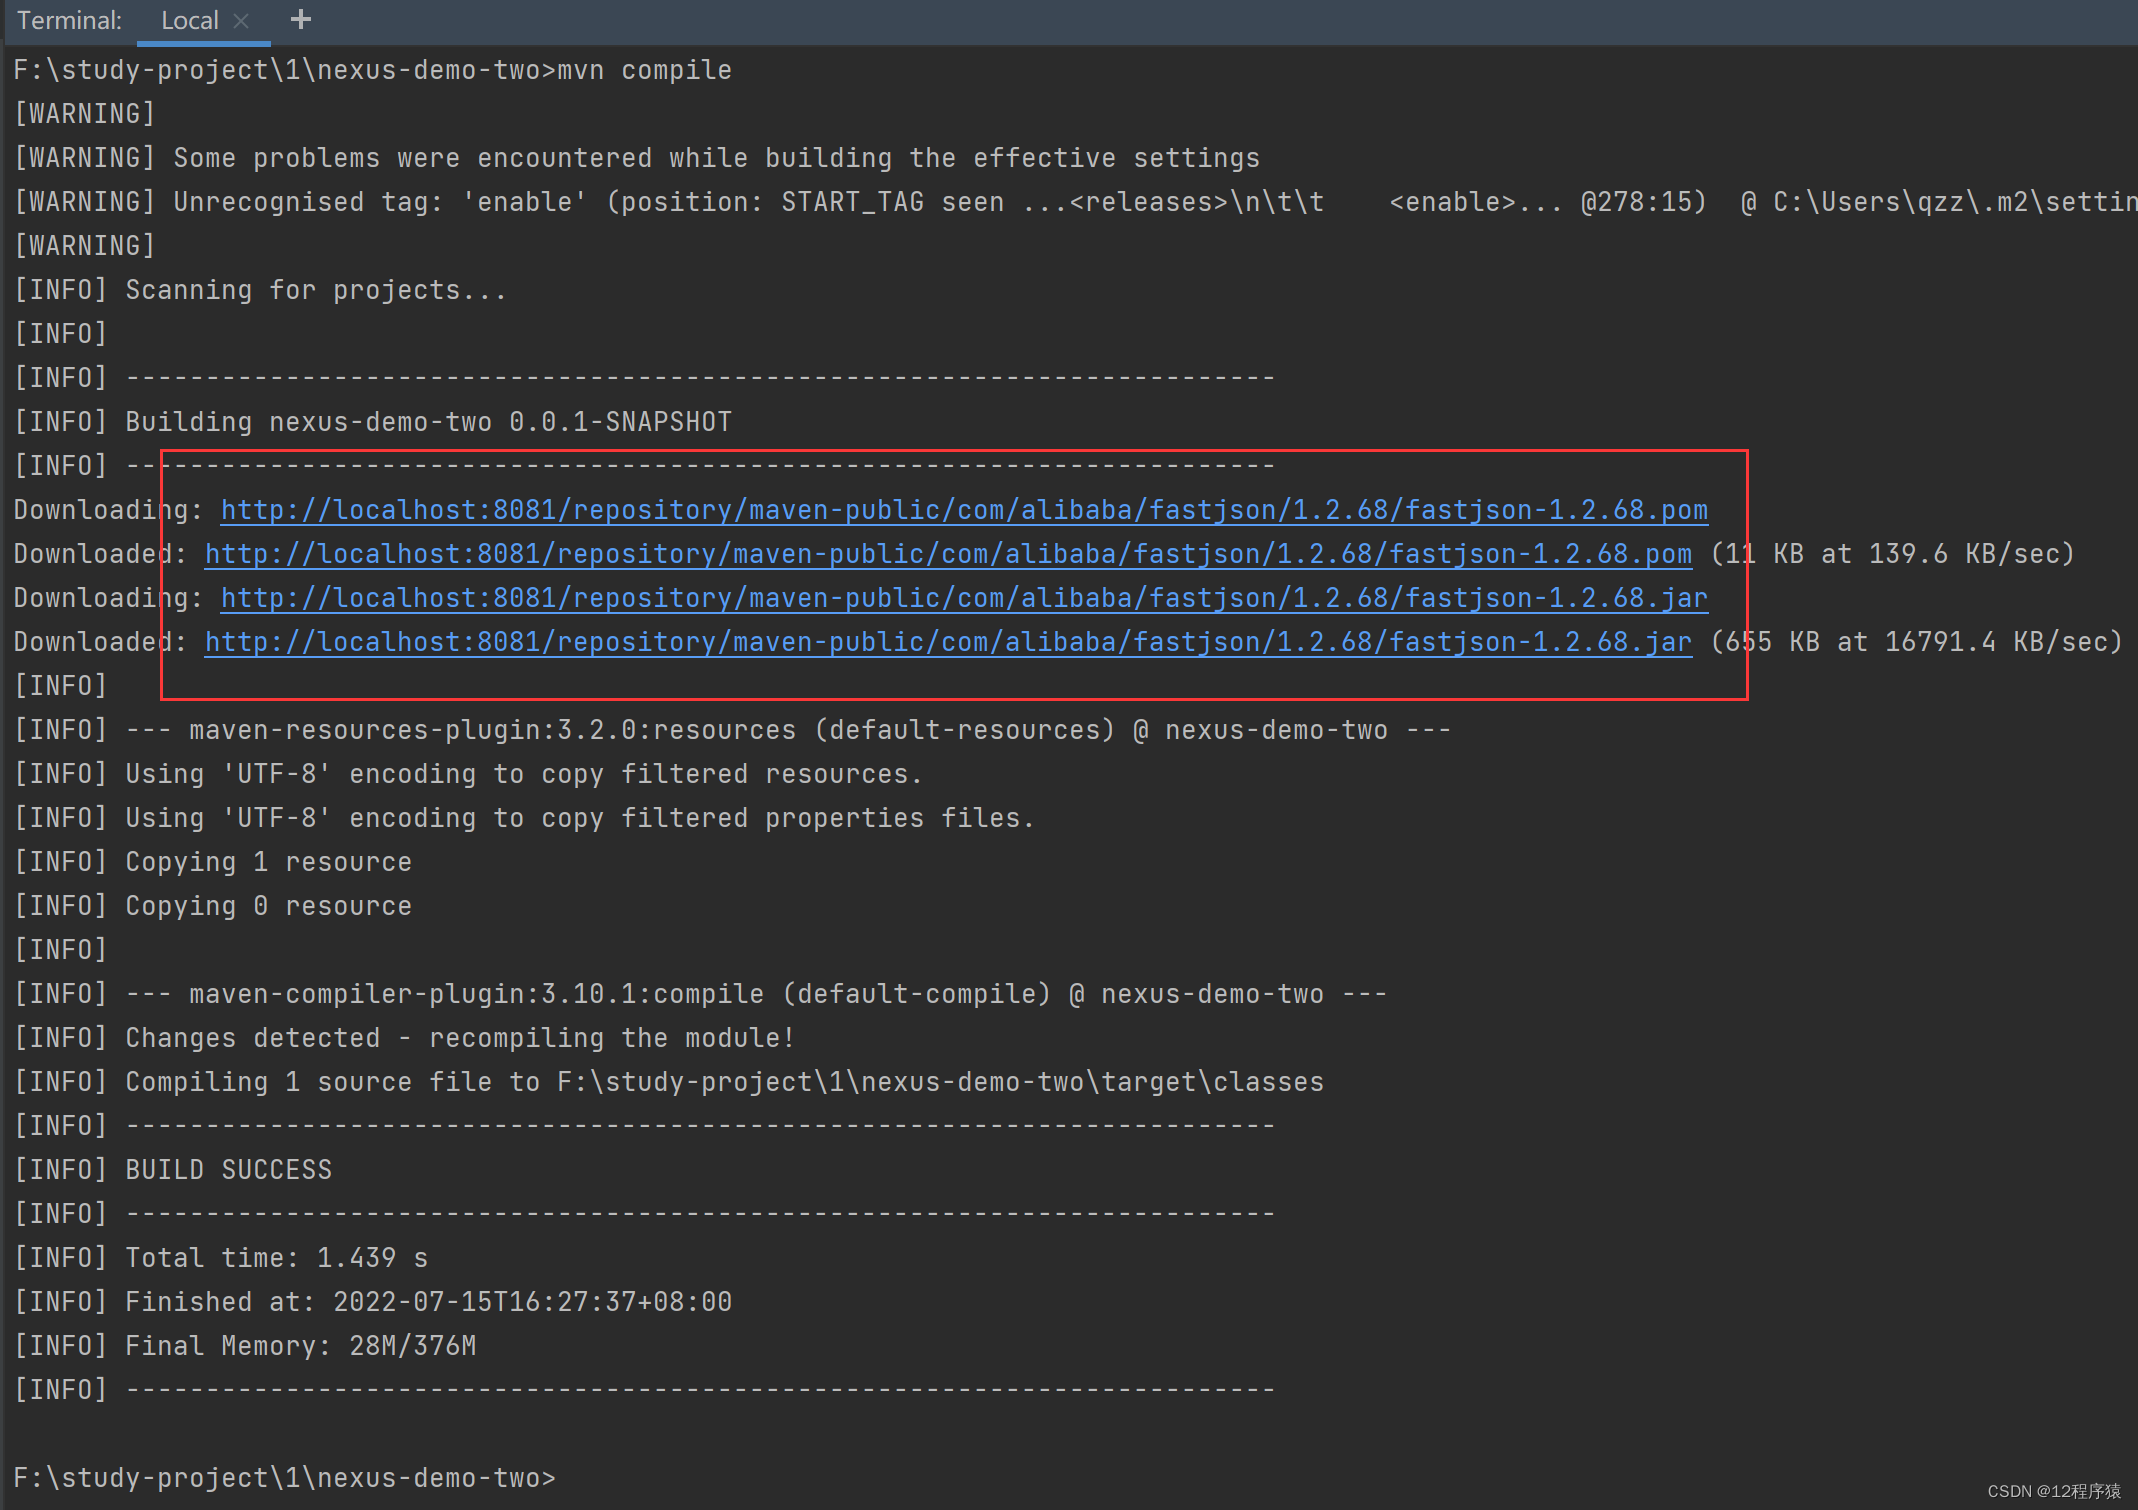
从输出中可以看出fastjson这个jar包从maven-nexus中下载了,下载地址正是我们nexus私服中的那个地址。
总结:
| 方法 | 功能 |
|---|---|
| 方法一 | 针对当前 Maven 项目 |
| 方法二 | 针对所有 Maven 项目 |
| 方法三 | 针对所有 Maven 项目 |
注意:方法二和方法三虽然都可以一劳永逸,但方法二除了从 Nexus 私服下载构件之外,还会不时访问中央仓库
我们希望的是所有 Maven 下载请求都仅仅通过 Nexus 私服,以全面发挥私服的作用,而方法三刚好做到了这点
五、本地构件发布到私服
常用的方法有两种:
1.使用maven部署构件到nexus私服
2.手动部署第三方构件到nexus私服:比如SqlServer的 JDBC 驱动,这个包远程仓库是不存在的,我们要把这个包上传到私服供所有开发使用
1.使用maven部署构件到nexus私服
我们创建maven项目的时候,会有一个pom.xml文件,里面有个version元素,这个是这个构件的版本号,可以去看一下上面我们刚创建的nexus-demo-two,默认是0.0.1-SNAPSHOT,这个以-SNAPSHOT结尾的表示是个快照版本,叫做SNAPSHOT版本,快照版本一般是不稳定的,会反复发布、测试、修改、发布。而最终会有一个稳定的可以发布的版本,是没有-SNAPSHOT后缀的,这个叫做release版本。
而nexus私服中存储用户的构件是使用的宿主仓库,这个我们上面也有说过,nexus私服中提供了两个默认的宿主仓库分别用来存放SNAPSHOT版本和release版本,如下图:
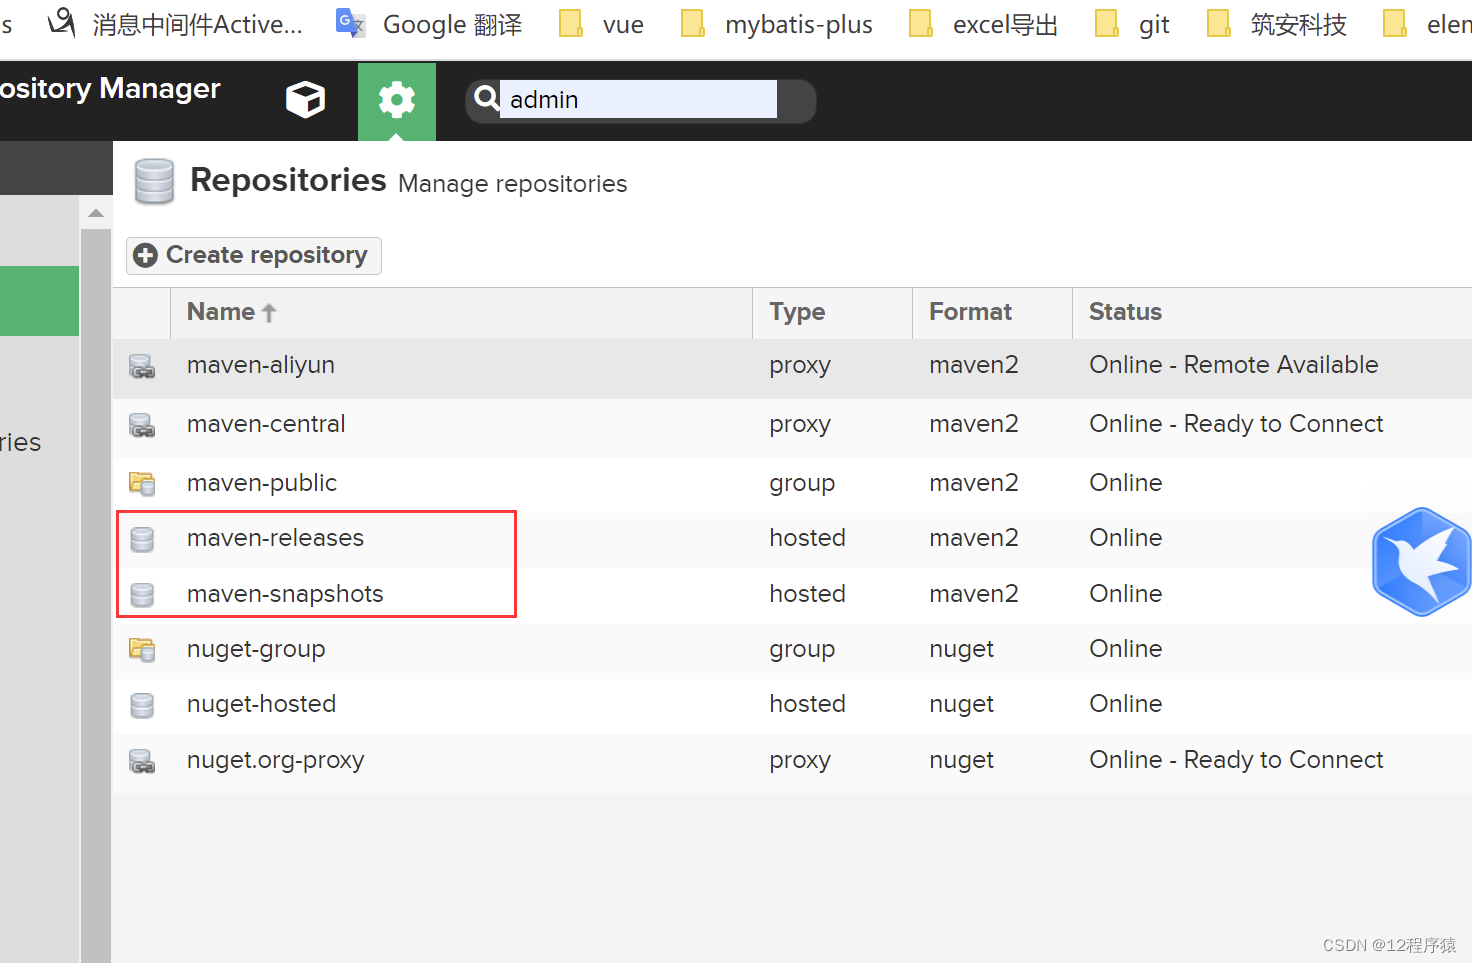
maven-releases宿主仓库用来存放用户自己release版本的构件
maven-snapshots宿主仓库用来存放用户snapshot版本的构件
使用maven部署构件到nexus私服的步骤如下:
(1)修改pom.xml
修改项目版本为SNAPSHOT/RELEASE,并发布到指定maven私服地址
    <!--要部署的maven私服地址-->
    <distributionManagement>
        <repository>
            <id>nexus-releases</id>
            <url>http://localhost:8081/repository/maven-releases/</url>
            <name>nexus私服中宿主仓库->存放/下载稳定版本的构件</name>
        </repository>
        <snapshotRepository>
            <id>nexus-snapshots</id>
            <url>http://localhost:8081/repository/maven-releases/</url>
            <name>nexus私服中宿主仓库->存放/下载快照版本的构件</name>
        </snapshotRepository>
    </distributionManagement>
(2)修改maven配置文件settings.xml
上面地址需要登录才可以访问,所以需要配置凭证,这个需要在settings.xml的servers元素中加入:
<server>
    <!--此id要和pom.xml对应部署中设置的ID一致 -->
    <id>nexus-releases</id>
	<username>admin</username>
	<password>123456</password>
</server>
<server>
    <!--此id要和pom.xml对应部署中设置的ID一致 -->
    <id>nexus-snapshots</id>
	<username>admin</username>
	<password>123456</password>
</server>
(3)上传项目jar包到maven私服(IDEA)
在项目终端中输入如下命令:
mvn deploy
mvn deploy的作用:会对构件进行打包,然后上传到私服中
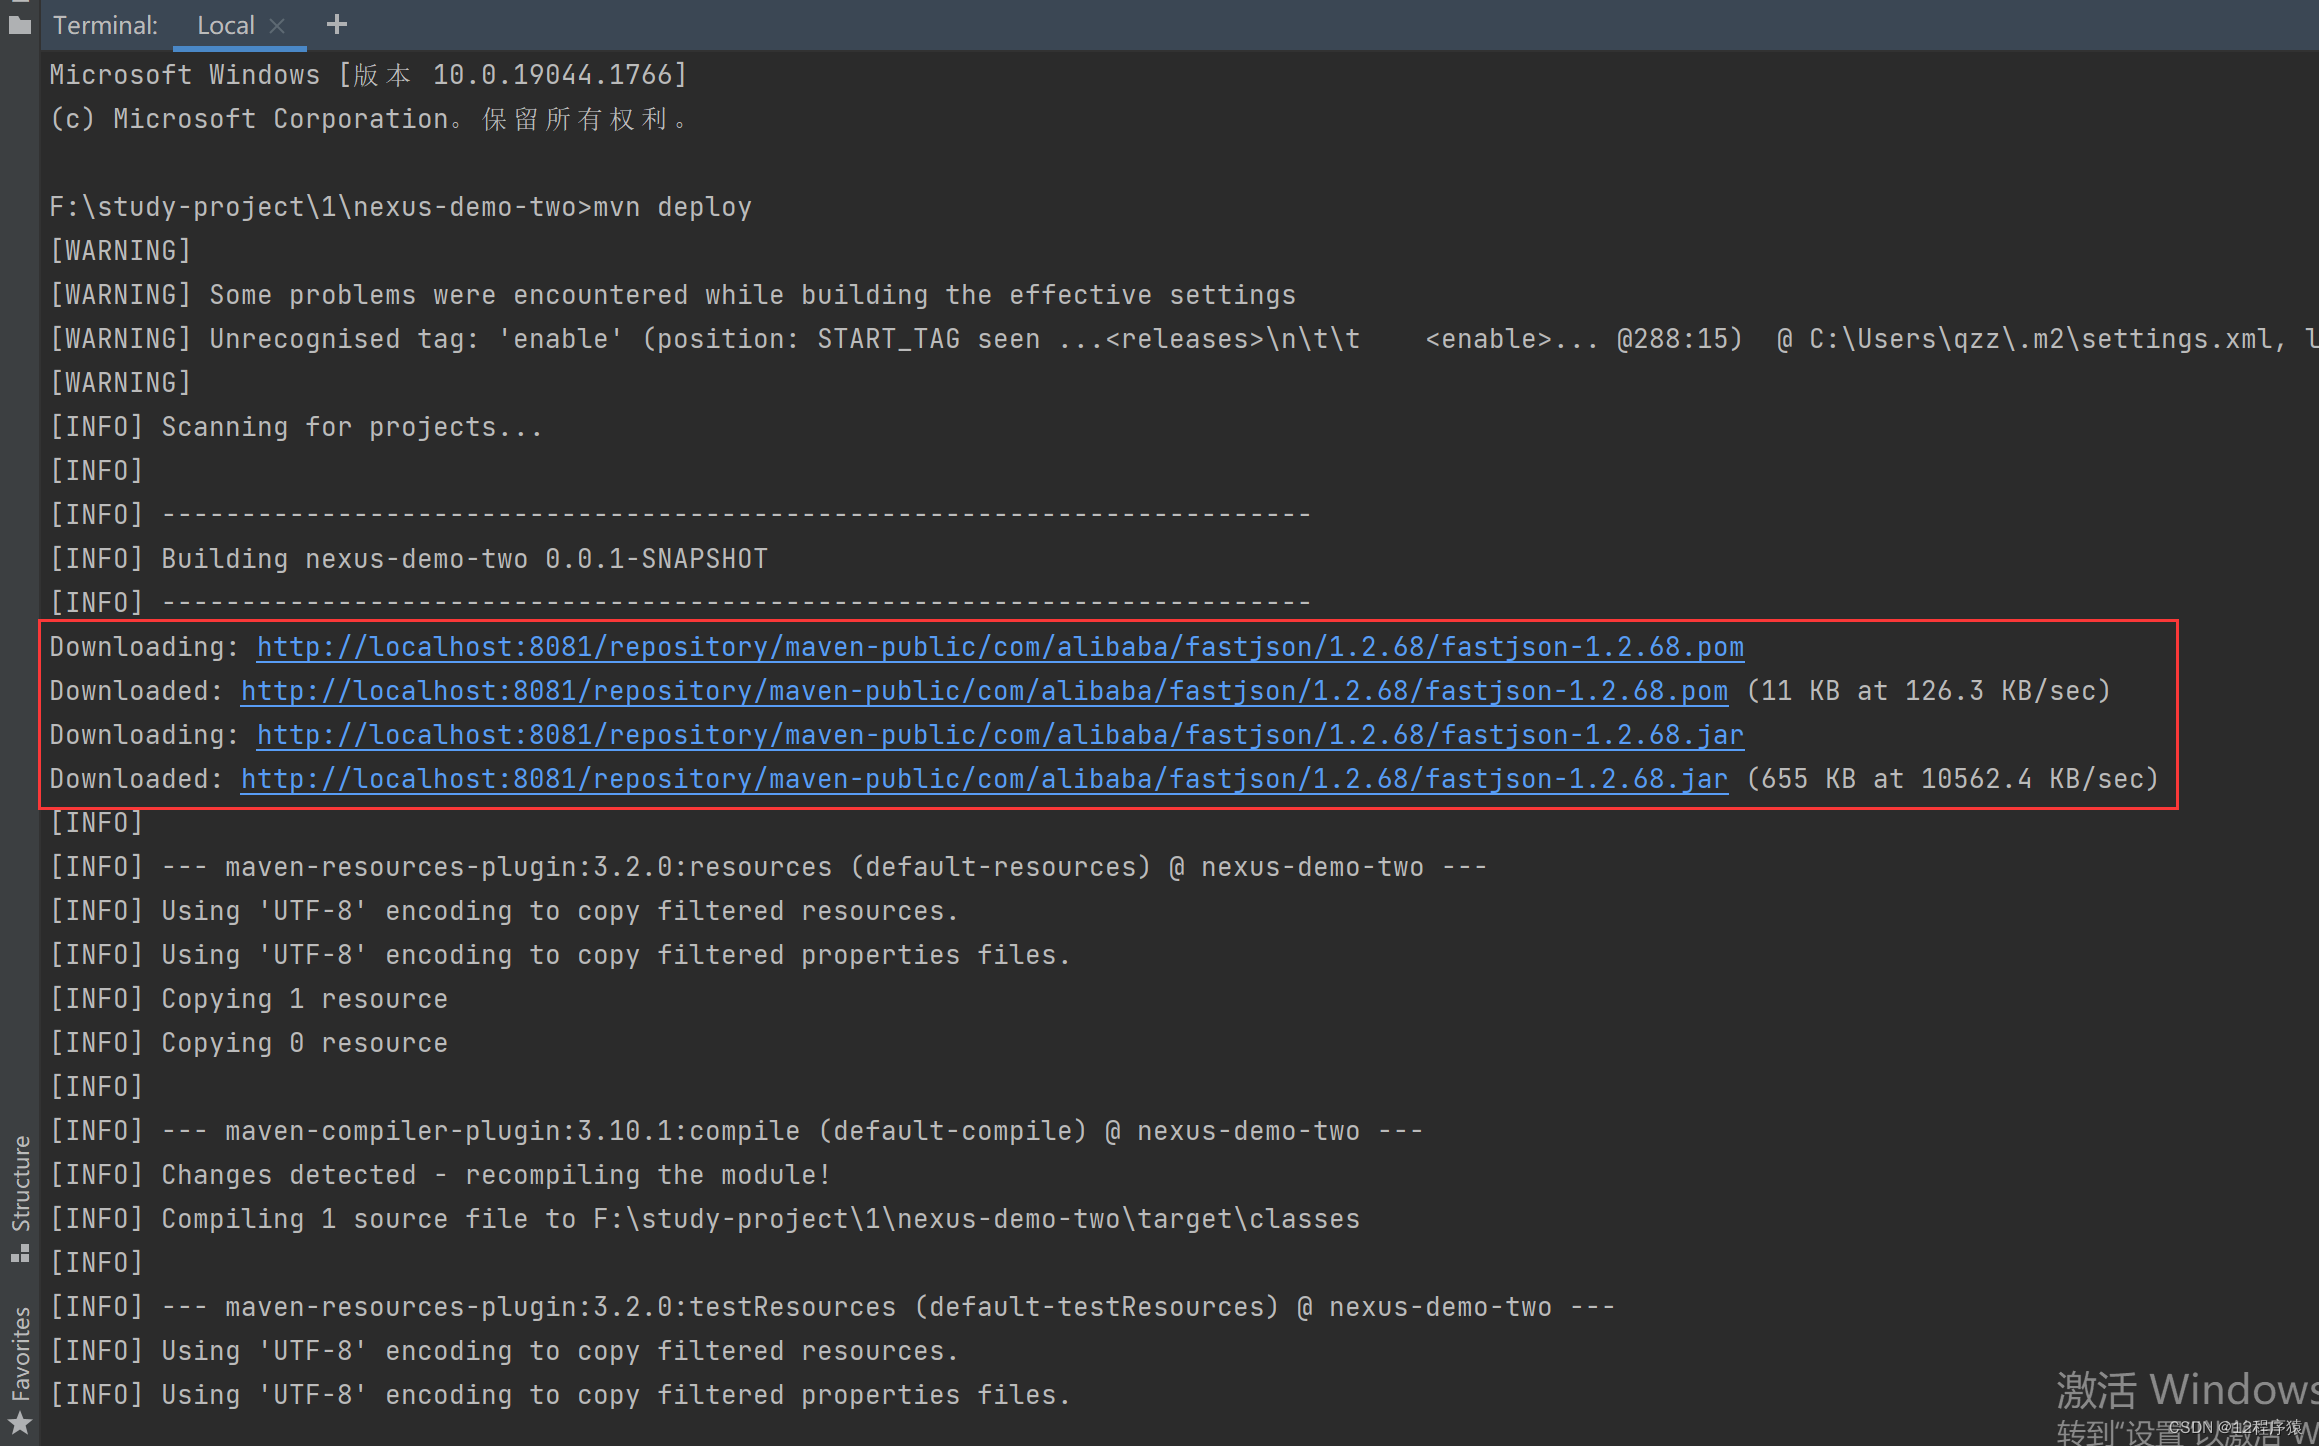
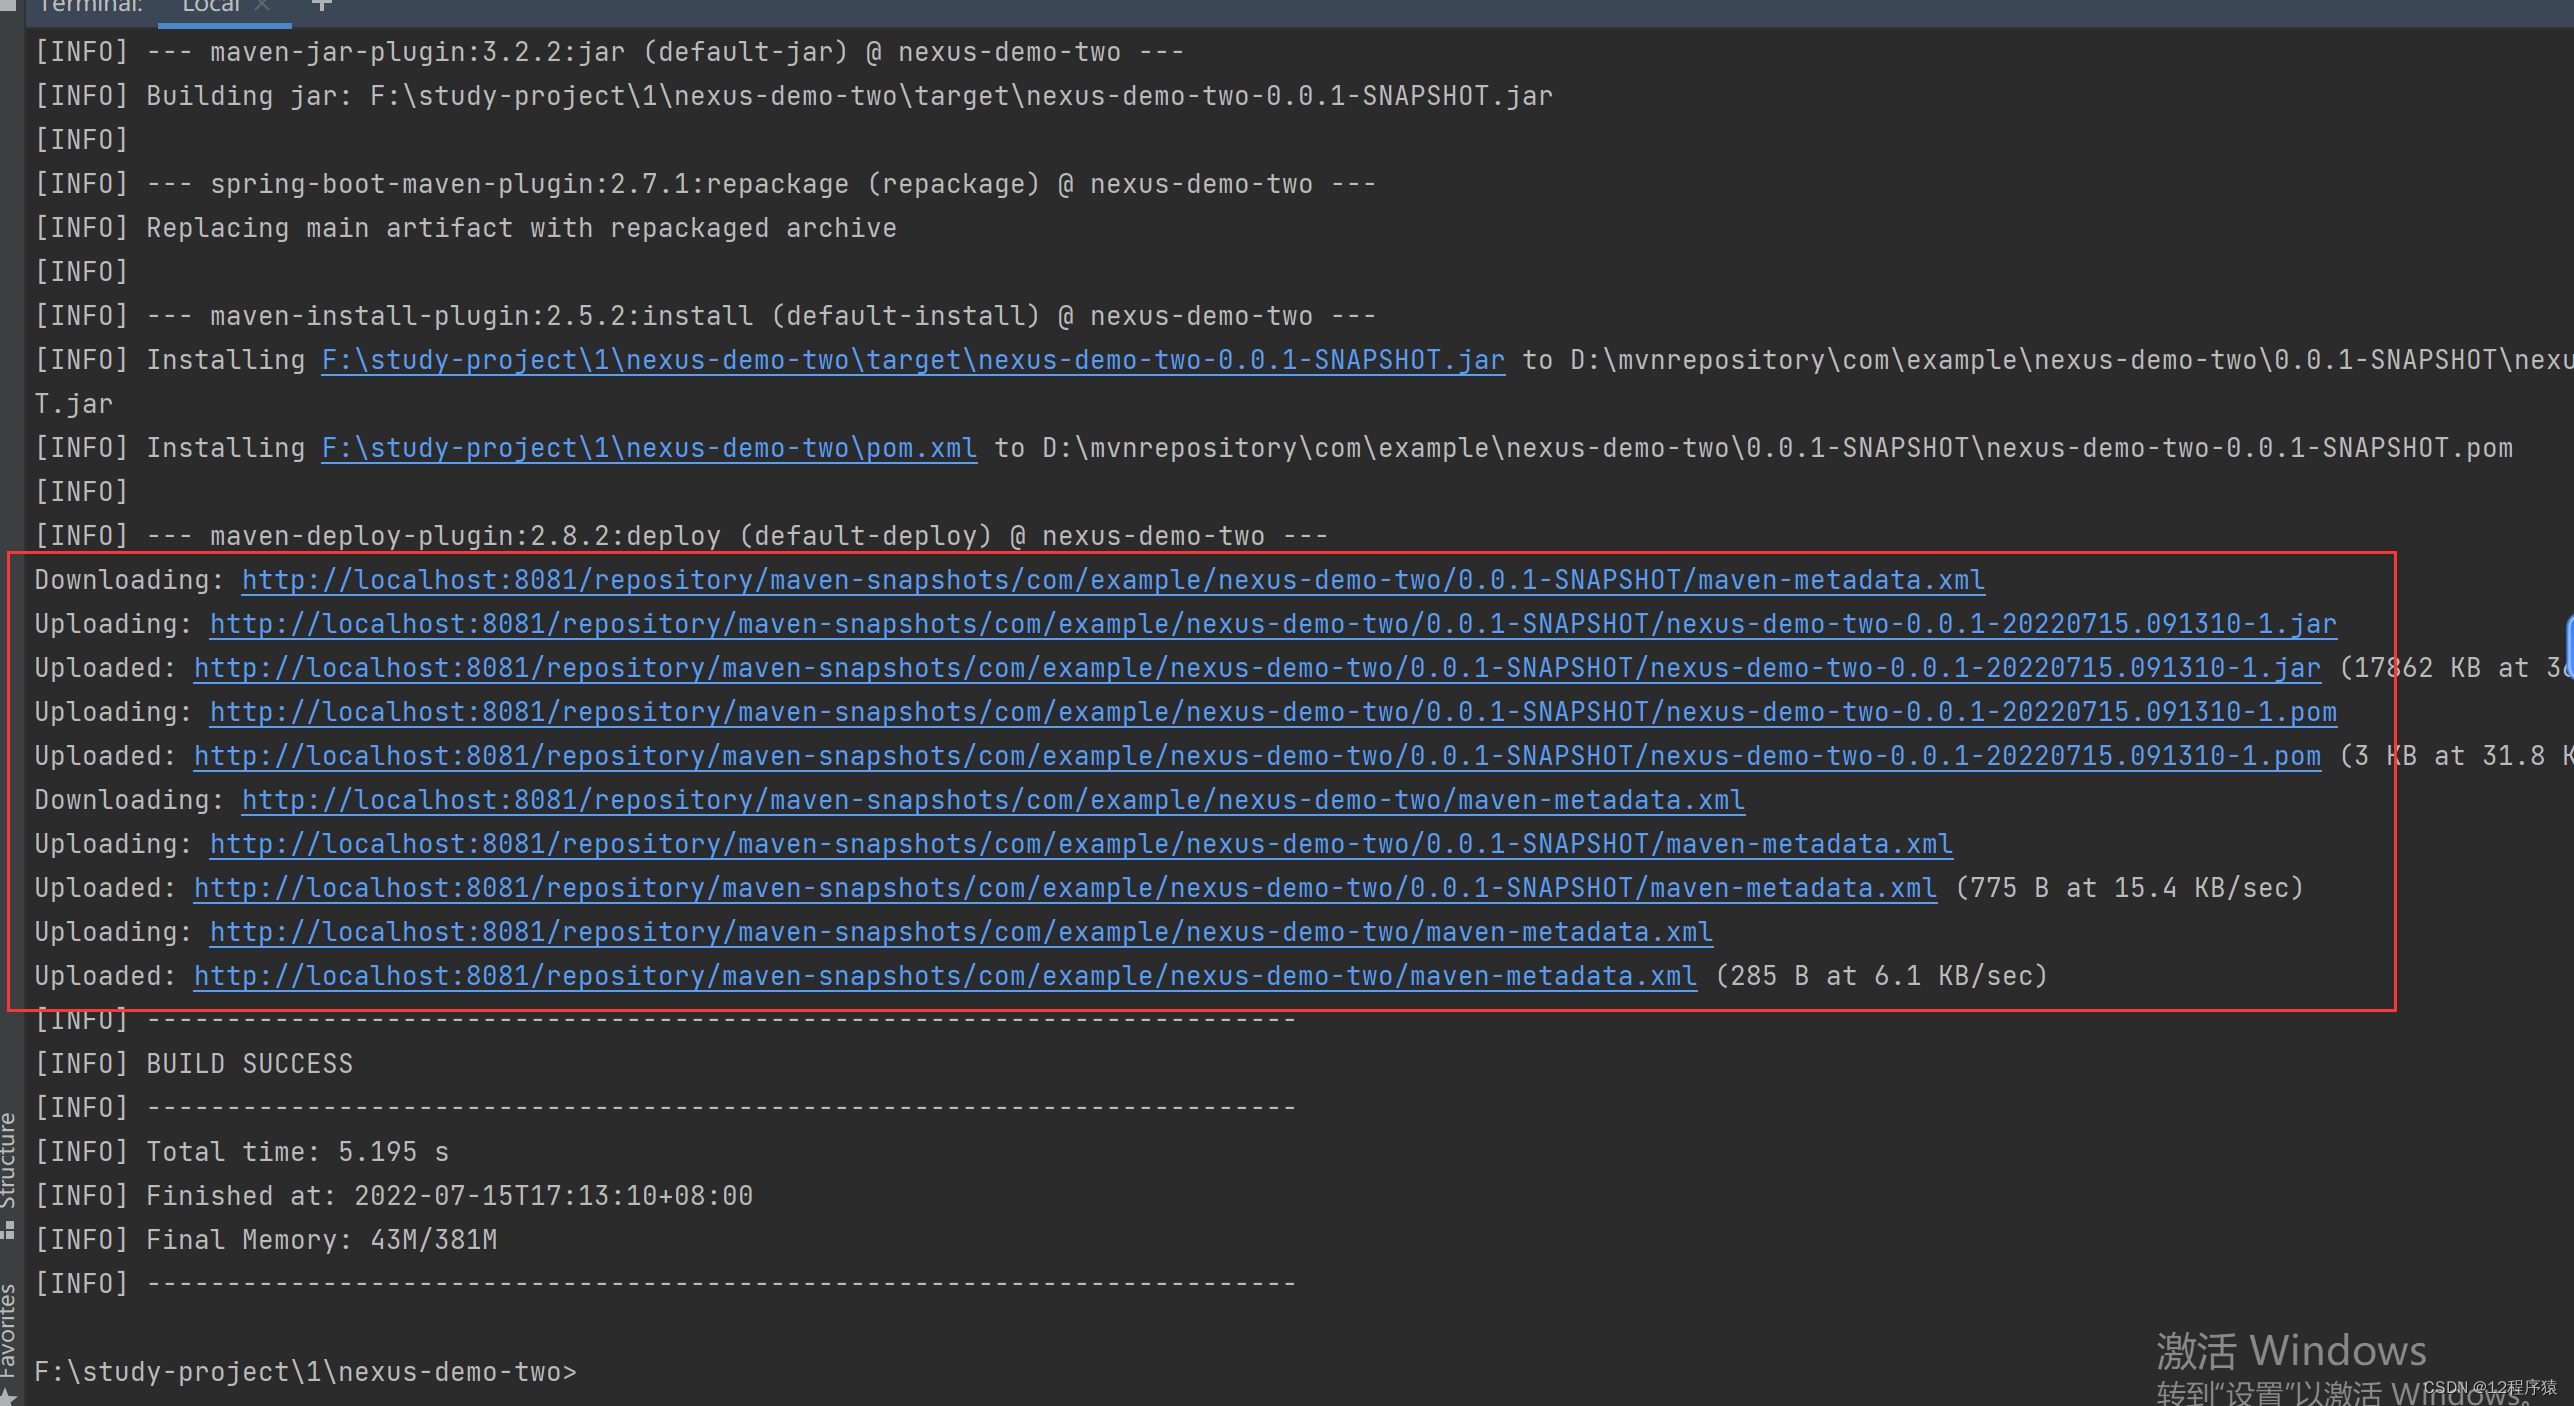
输出内容中有Uploading 正是我们在pom.xml配置的快照版本的地址,上面输出内容中有具体的地址,和快照的地址也是一样的,上传成功了。
我们去nexus私服中看一下,访问nexus私服中快照版本仓库的地址:
http://localhost:8081/repository/maven-snapshots/
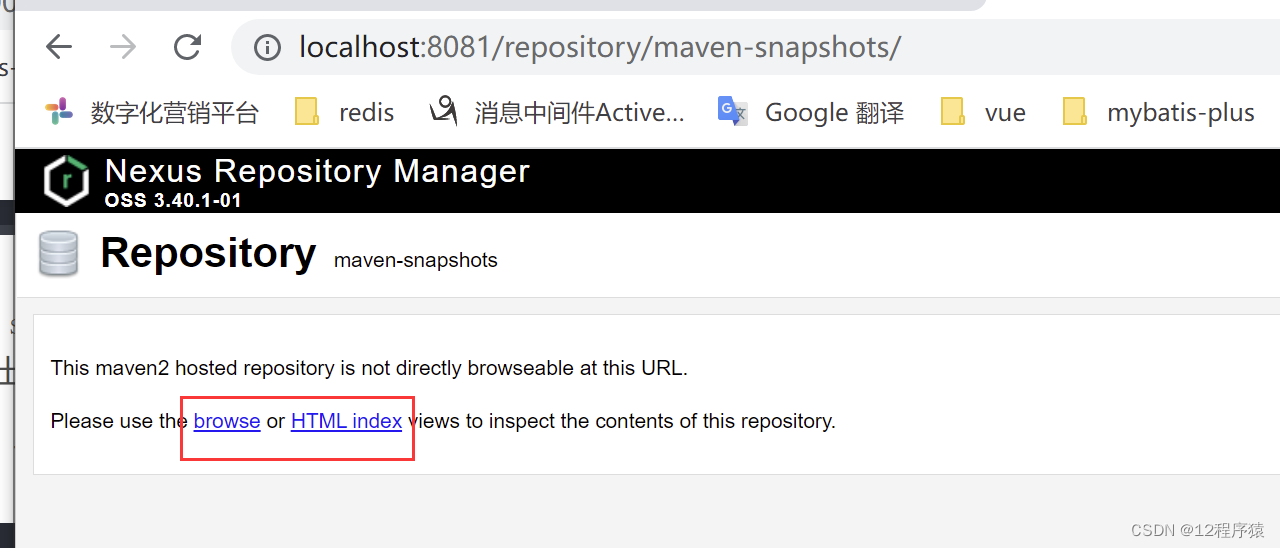
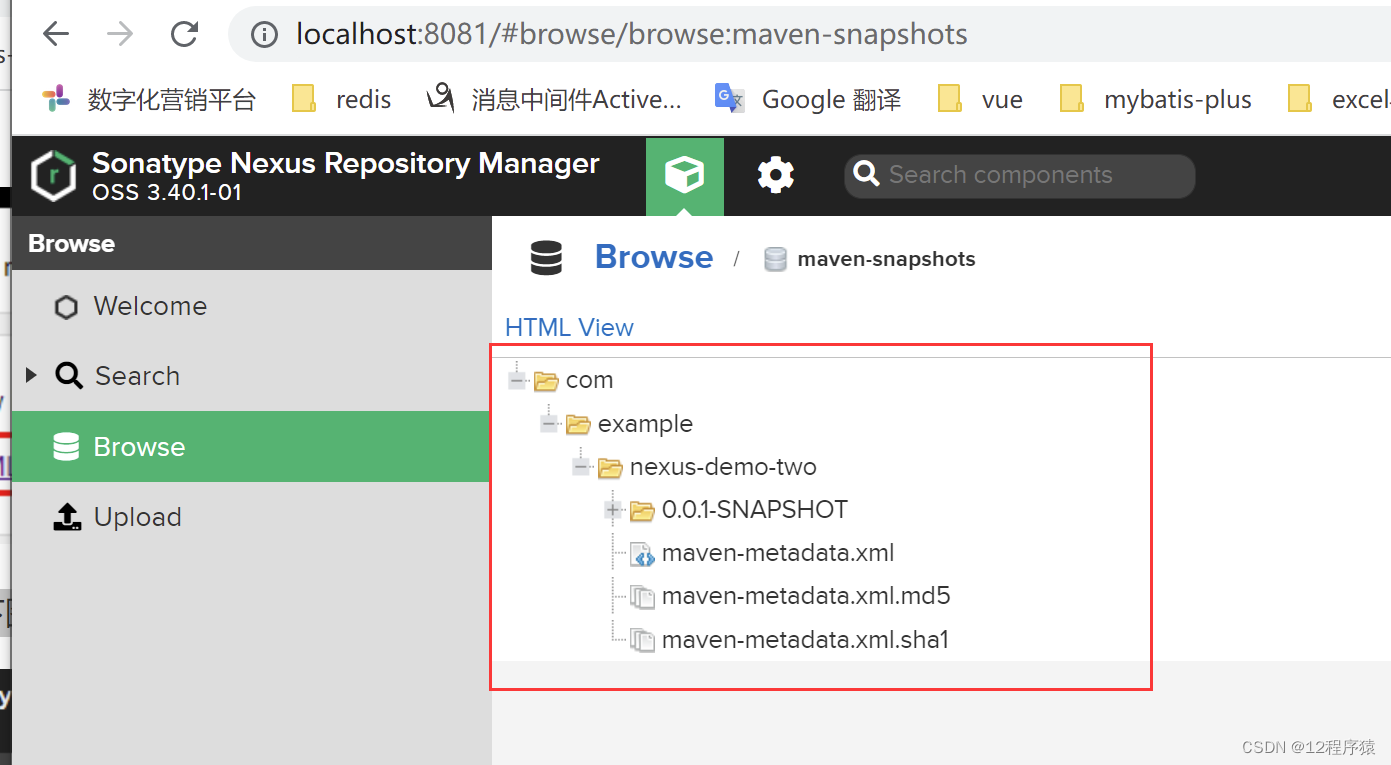
点击上面的bowse连接,如下图,我们的构件上传成功了:
如果其他同事需要使用上面这个构件,只需要点击下图中的pom文件,右边会显示构件的坐标,然后可以拿去使用了,如下图
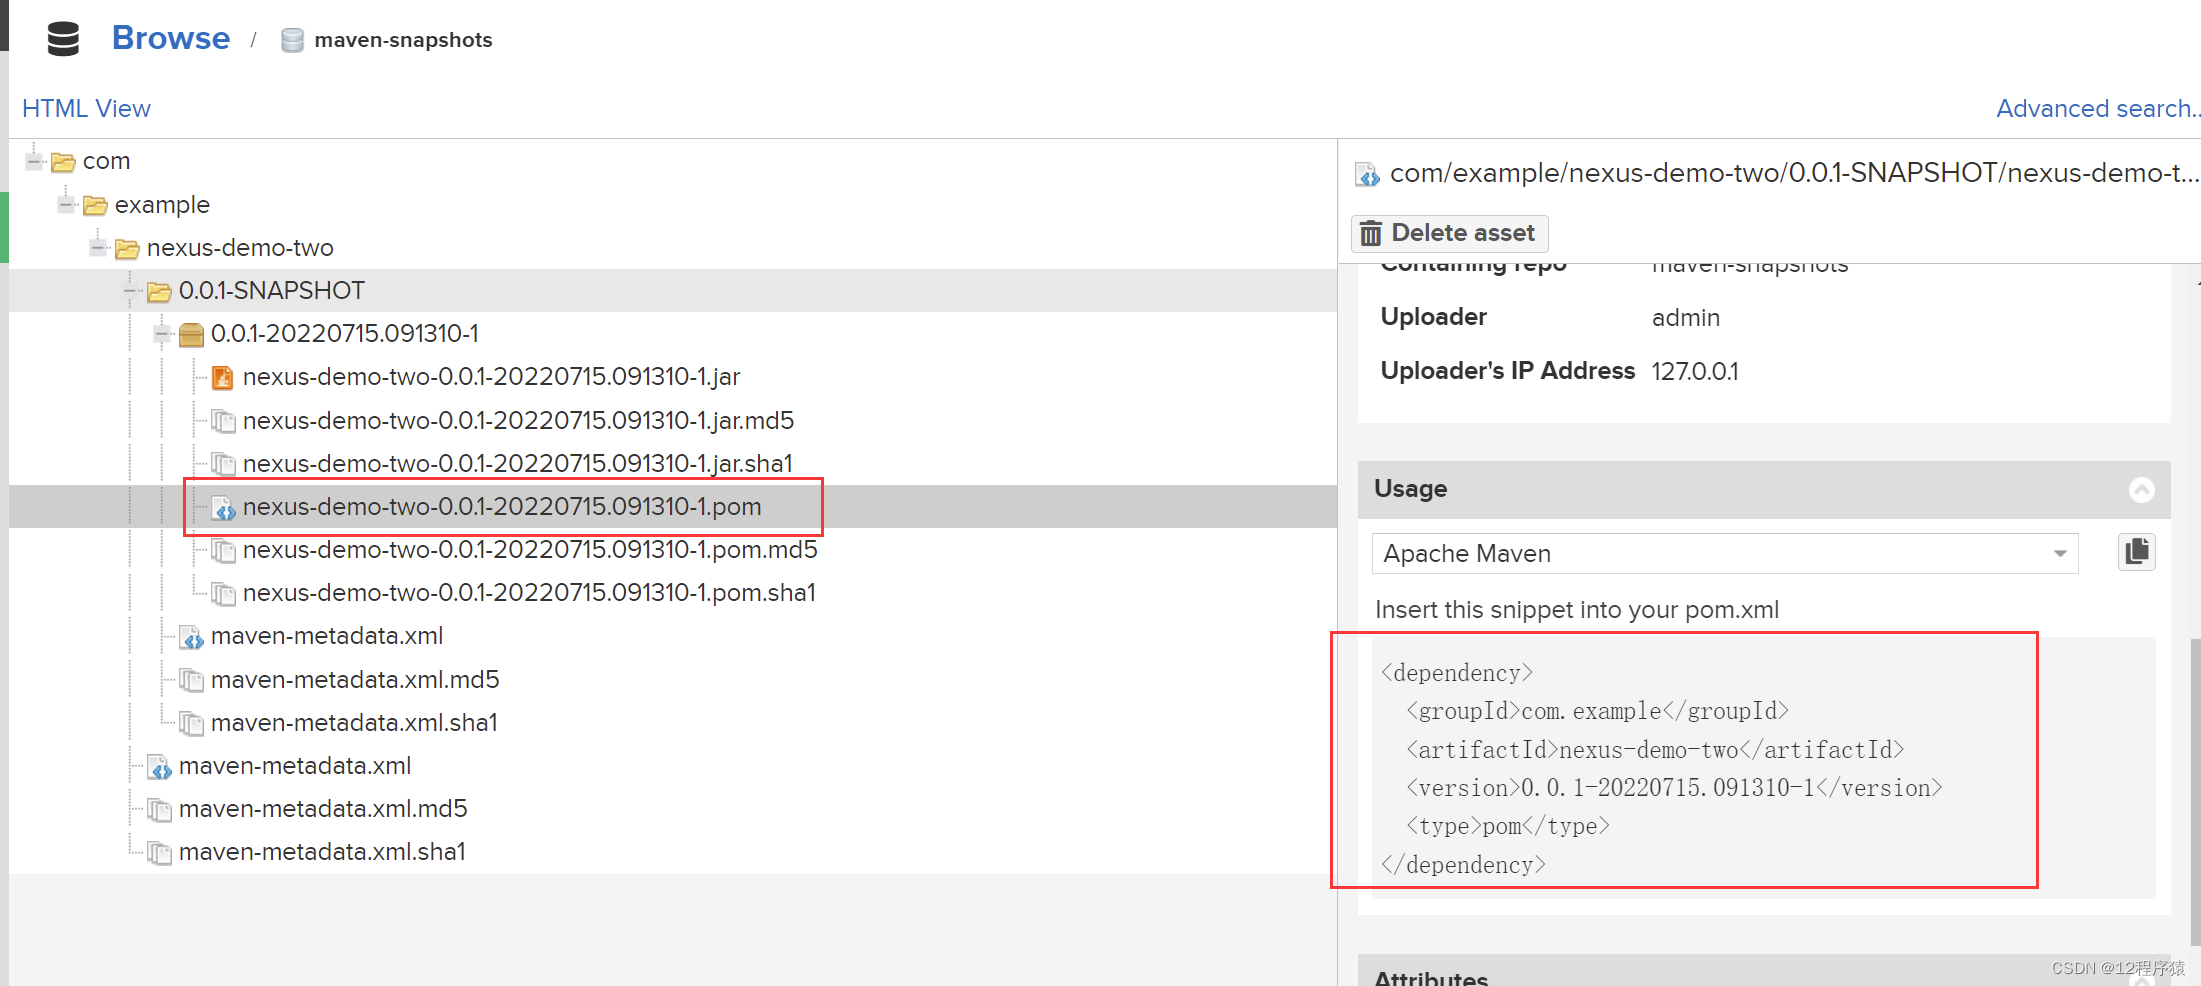
上面是将快照版本的发布到了nexus私服的快照宿主仓库。
要想将release稳定版本的发布到nexus私服,只需要修改nexus-demo-two项目的version版本号:将-SNAPSHOT后缀去掉。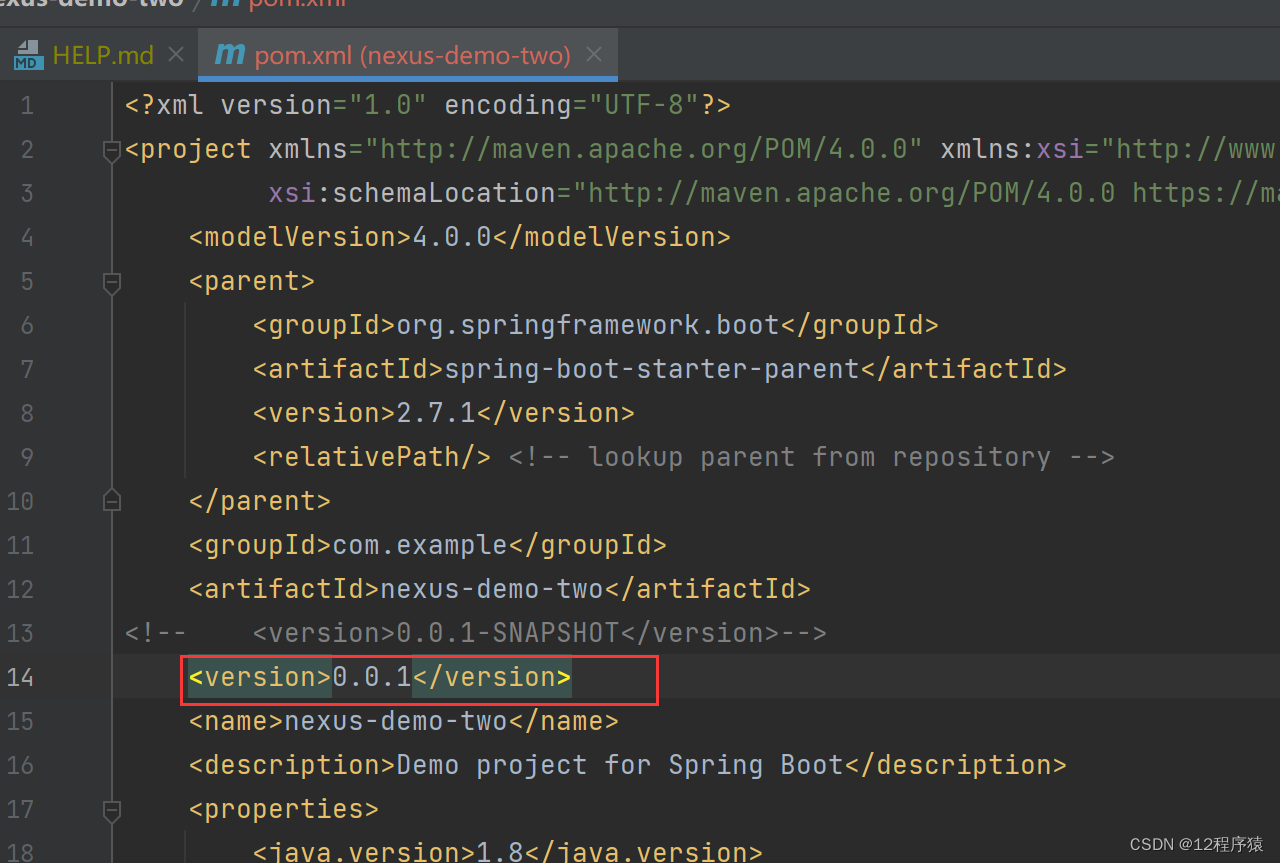
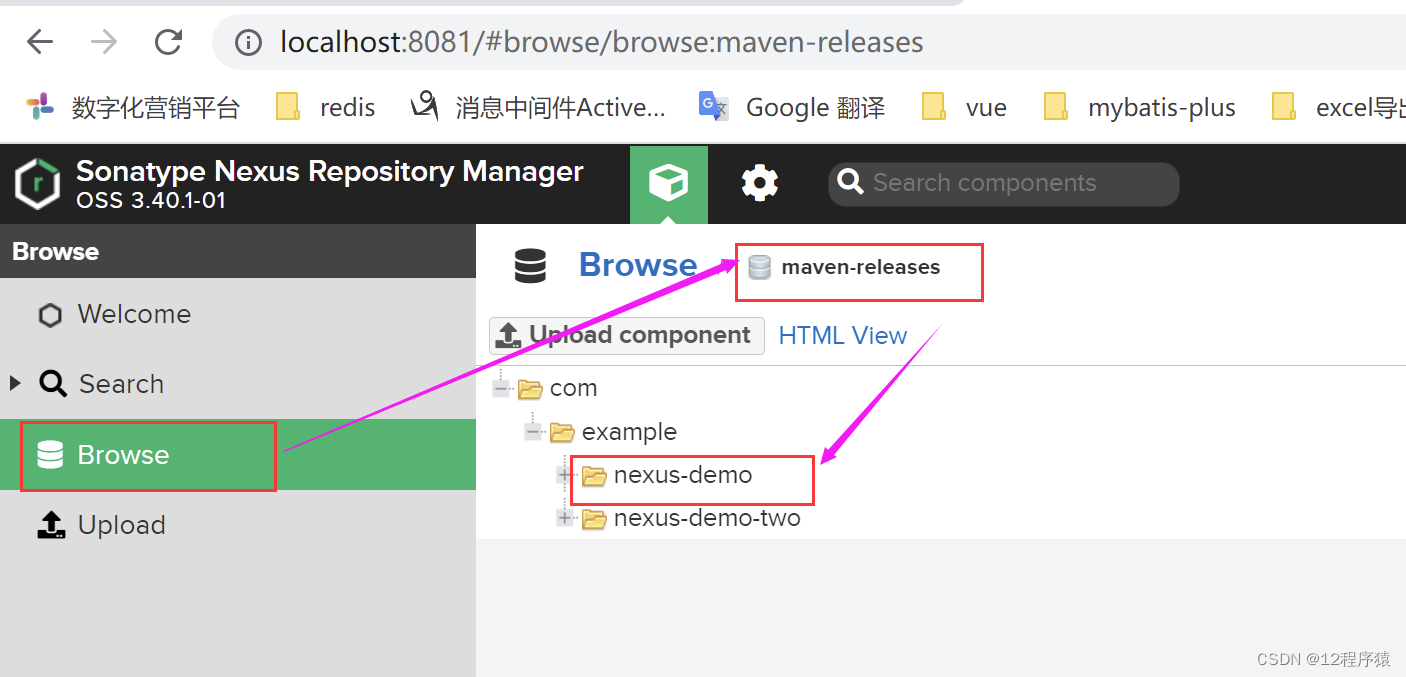
然后重新执行 mvn deploy就行了。执行成功之后,访问 nexus私服中稳定版本仓库的地址:
http://localhost:8081/repository/maven-releases/
,然后在出现的页面点击bowse连接即可看到上传的构件。
2.手动部署第三方构件到nexus私服
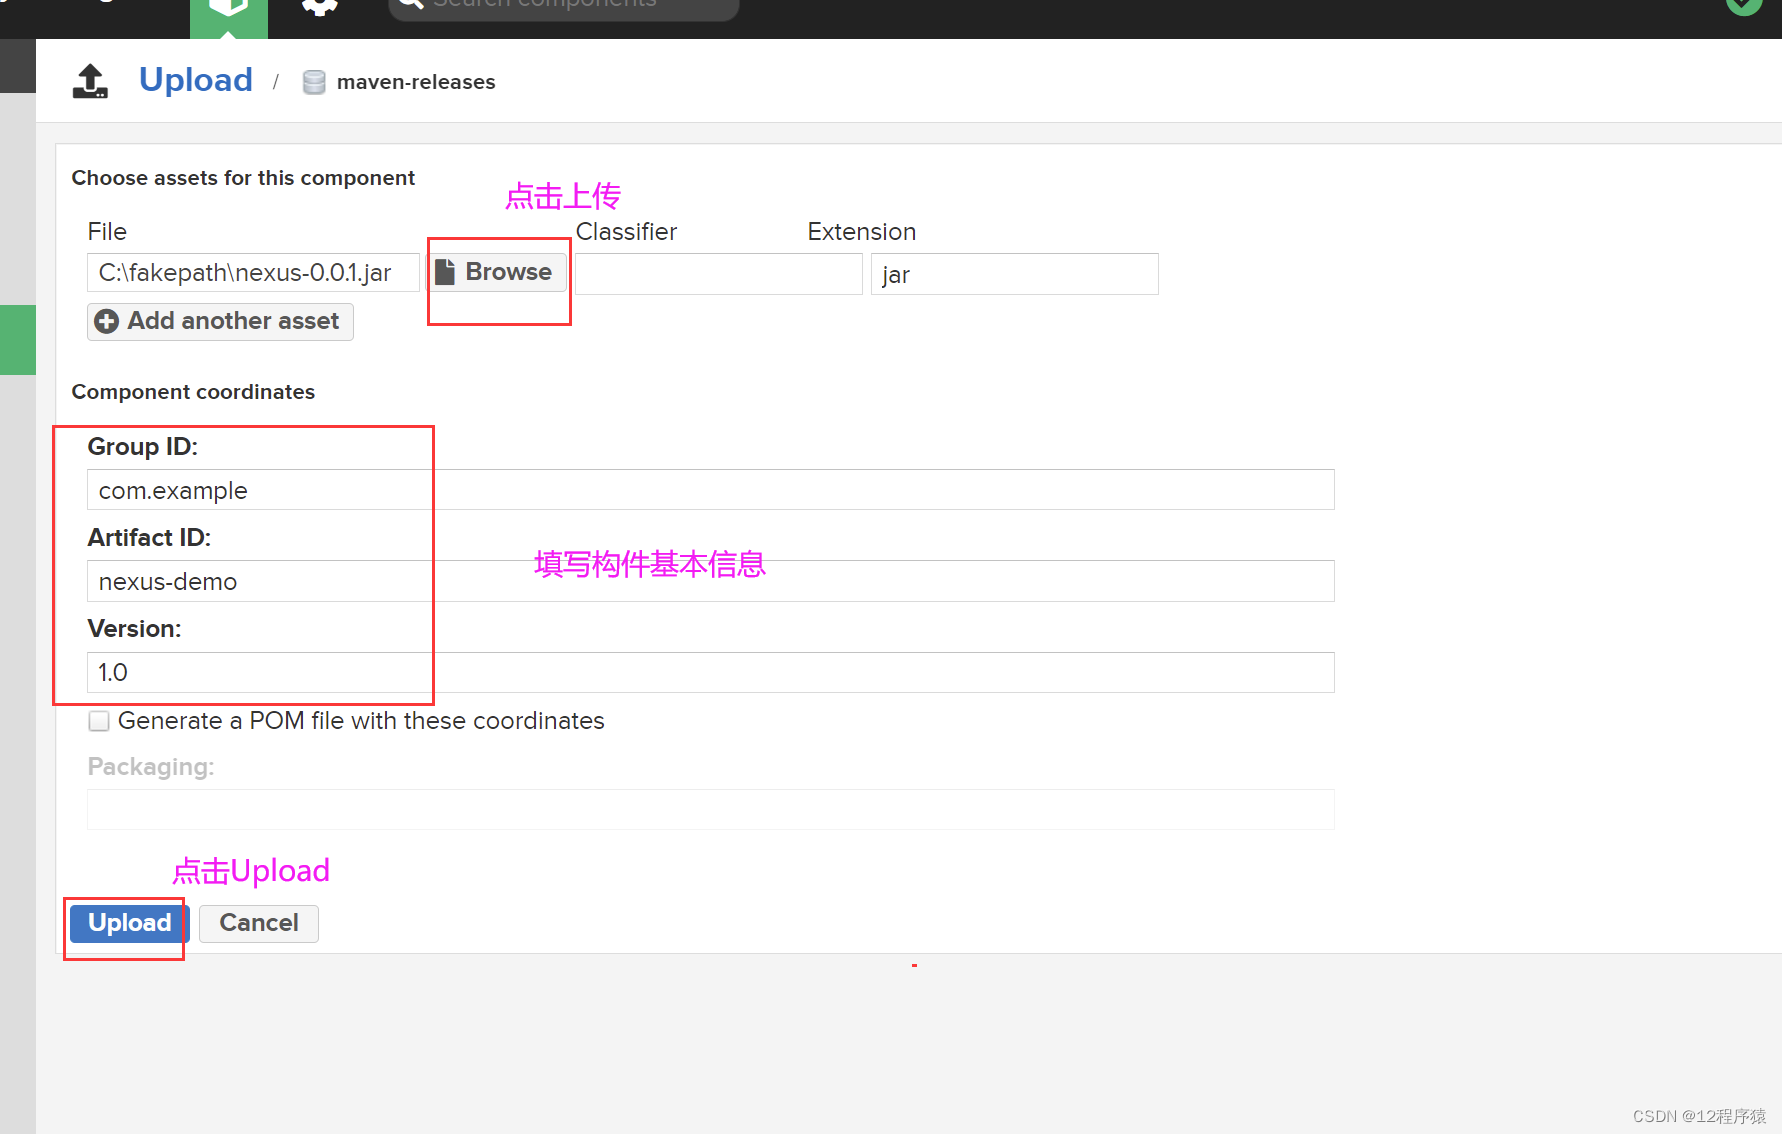
手动上传只支持发布稳定版本的构件,操作过程如下图:
登录nexus,按图操作:
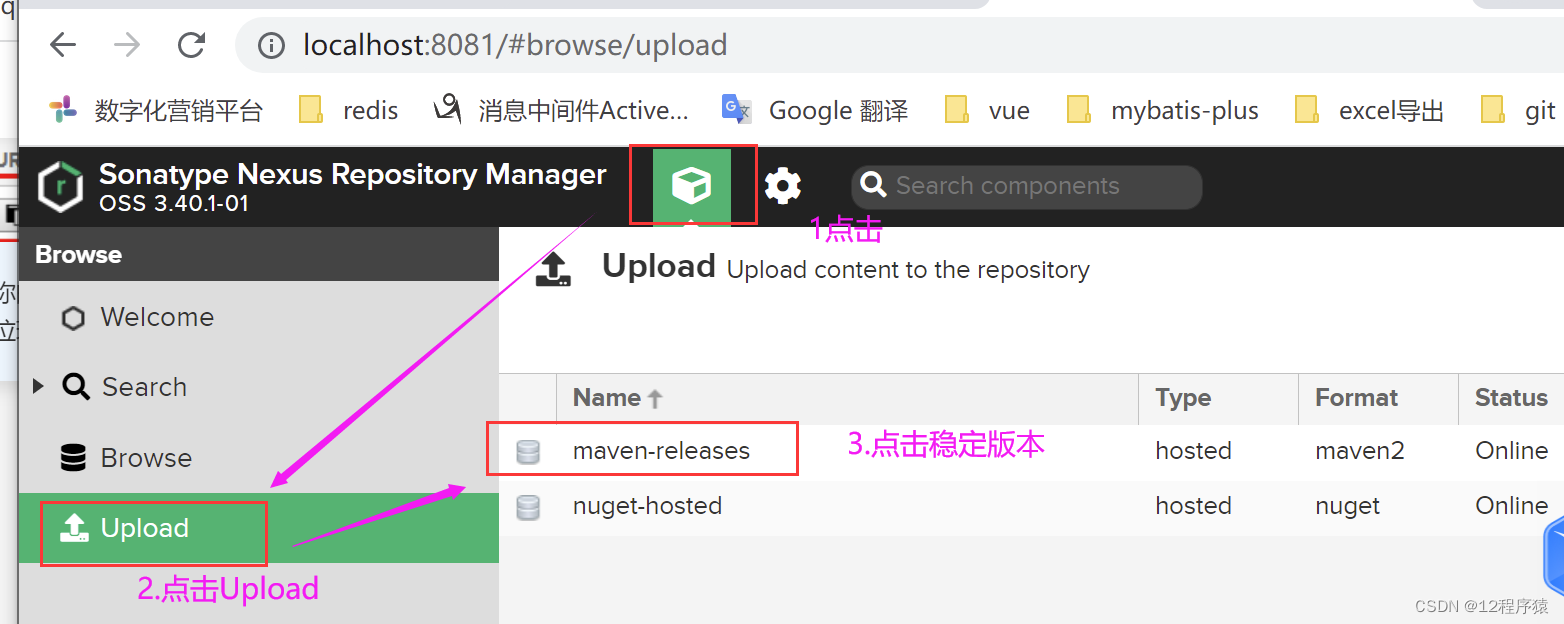
进入上传页面:点击Browse选择本地的构件,然后输入其他坐标信息,点击Upload完成上传操作
上传成功。
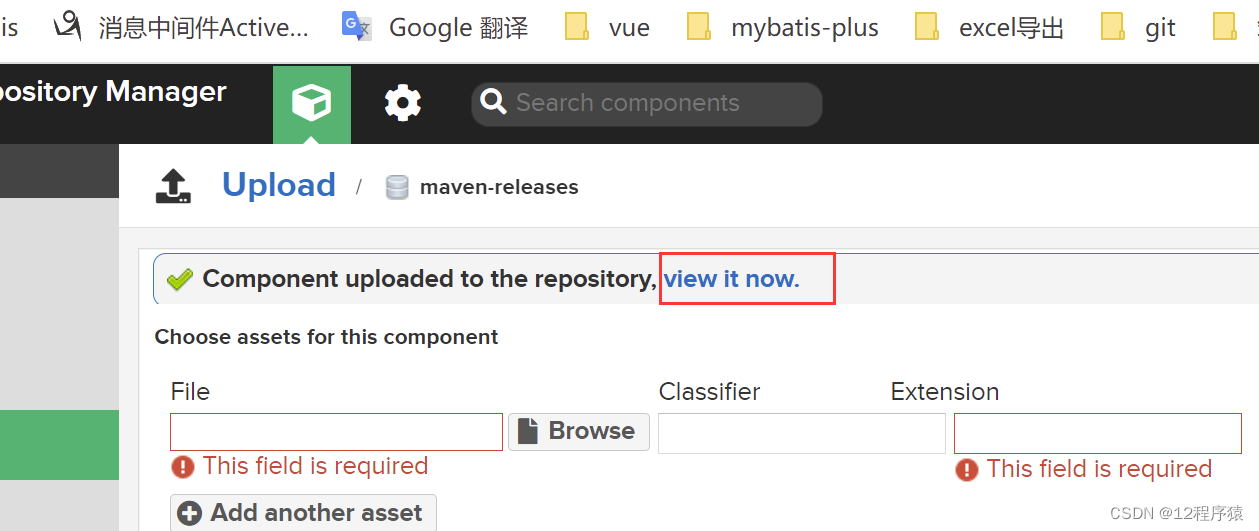
可点击“view it now”查看:
也可通过“http://localhost:8081/#browse/browse:maven-releases”地址进行访问:
参考资料:https://blog.csdn.net/weixin_30730151/article/details/95249098