1:首先我们先创建springboot项目并配置好环境:
(1)pom.xml:
<?xml version="1.0" encoding="UTF-8"?>
<project xmlns="http://maven.apache.org/POM/4.0.0"
xmlns:xsi="http://www.w3.org/2001/XMLSchema-instance"
xsi:schemaLocation="http://maven.apache.org/POM/4.0.0
http://maven.apache.org/xsd/maven-4.0.0.xsd">
<modelVersion>4.0.0</modelVersion>
<parent>
<groupId>org.springframework.boot</groupId>
<artifactId>spring-boot-starter-parent</artifactId>
<version>2.6.6</version>
</parent>
<groupId>com.manong</groupId>
<artifactId>authority-system</artifactId>
<version>1.0</version>
<properties>
<java.version>1.8</java.version>
<jwt.version>0.9.1</jwt.version>
<mybatis-plus.version>3.5.1</mybatis-plus.version>
<fastjson.version>1.2.80</fastjson.version>
</properties>
<dependencies>
<dependency>
<groupId>org.springframework.boot</groupId>
<artifactId>spring-boot-starter-web</artifactId>
</dependency>
<dependency>
<groupId>mysql</groupId>
<artifactId>mysql-connector-java</artifactId>
<scope>runtime</scope>
</dependency>
<dependency>
<groupId>com.baomidou</groupId>
<artifactId>mybatis-plus-boot-starter</artifactId>
<version>${mybatis-plus.version}</version>
</dependency>
<dependency>
<groupId>org.projectlombok</groupId>
<artifactId>lombok</artifactId>
<optional>true</optional>
</dependency>
<dependency>
<groupId>org.springframework.boot</groupId>
<artifactId>spring-boot-devtools</artifactId>
<scope>runtime</scope>
<optional>true</optional>
</dependency>
<dependency>
<groupId>org.springframework.boot</groupId>
<artifactId>spring-boot-starter-test</artifactId>
<scope>test</scope>
</dependency>
<dependency>
<groupId>com.alibaba</groupId>
<artifactId>fastjson</artifactId>
<version>${fastjson.version}</version>
</dependency>
<dependency>
<groupId>io.jsonwebtoken</groupId>
<artifactId>jjwt</artifactId>
<version>${jwt.version}</version>
</dependency>
<dependency>
<groupId>org.springframework.boot</groupId>
<artifactId>spring-boot-starter-data-redis</artifactId>
</dependency>
<dependency>
<groupId>com.baomidou</groupId>
<artifactId>mybatis-plus-generator</artifactId>
<version>3.4.1</version>
</dependency>
<dependency>
<groupId>org.apache.velocity</groupId>
<artifactId>velocity-engine-core</artifactId>
<version>2.0</version>
</dependency>
<dependency>
<groupId>org.slf4j</groupId>
<artifactId>slf4j-api</artifactId>
</dependency>
<dependency>
<groupId>org.slf4j</groupId>
<artifactId>slf4j-log4j12</artifactId>
</dependency>
<dependency>
<groupId>org.springframework.boot</groupId>
<artifactId>spring-boot-starter-security</artifactId>
<version>2.5.5</version>
</dependency>
</dependencies>
<build>
<plugins>
<plugin>
<groupId>org.springframework.boot</groupId>
<artifactId>spring-boot-maven-plugin</artifactId>
</plugin>
</plugins>
</build>
</project>
(2) application.properties:
#设置端口号
server.port=8888
#数据库驱动
spring.datasource.driver-class-name=com.mysql.cj.jdbc.Driver
#数据库连接地址
spring.datasource.url=jdbc:mysql://localhost:3306/db_authority_system?useUnicode=true&characterEncoding=UTF-8&serverTimezone=Asia/Shanghai
#数据库用户名
spring.datasource.username=root
#数据库密码
spring.datasource.password=root
#加载映射文件
mybatis-plus.mapper-locations=classpath*:/mapper*.xml
#设置别名
mybatis-plus.type-aliases-package=com.ftz.entity
#关闭驼峰命名映射
#mybatis-plus.configuration.map-underscore-to-camel-case=false
#显示日志
logging.level.com.manong.dao=debug
#JSON日期格式化
spring.jackson.date-format= yyyy-MM-dd
#JSON日期格式化设置时区为上海
spring.jackson.time-zone=Asia/Shanghai
#日期格式化
spring.mvc.format.date=yyyy-MM-dd
spring.mvc.format.date-time=yyyy-MM-dd HH:mm:ss
#jwt配置
#密钥
jwt.secret=com.ftz
#过期时间
jwt.expiration=1800000
2:然后就是一个springboot项目的基本框架,我们这里由于用到了spring-security,所以我们的实体类User需要继承UserDetails类,然后新字段:
3:首先说一下 Spring Security认证步骤:
-
1. 自定UserDetails类:当实体对象字段不满足时需要自定义UserDetails,一般都要自定义UserDetails。 -
2. 自定义UserDetailsService类,主要用于从数据库查询用户信息。 -
3. 创建登录认证成功处理器,认证成功后需要返回JSON数据,菜单权限等。 -
4. 创建登录认证失败处理器,认证失败需要返回JSON数据,给前端判断。 -
5. 创建匿名用户访问无权限资源时处理器,匿名用户访问时,需要提示JSON。 -
6. 创建认证过的用户访问无权限资源时的处理器,无权限访问时,需要提示JSON。 -
7. 配置Spring Security配置类,把上面自定义的处理器交给Spring Security。
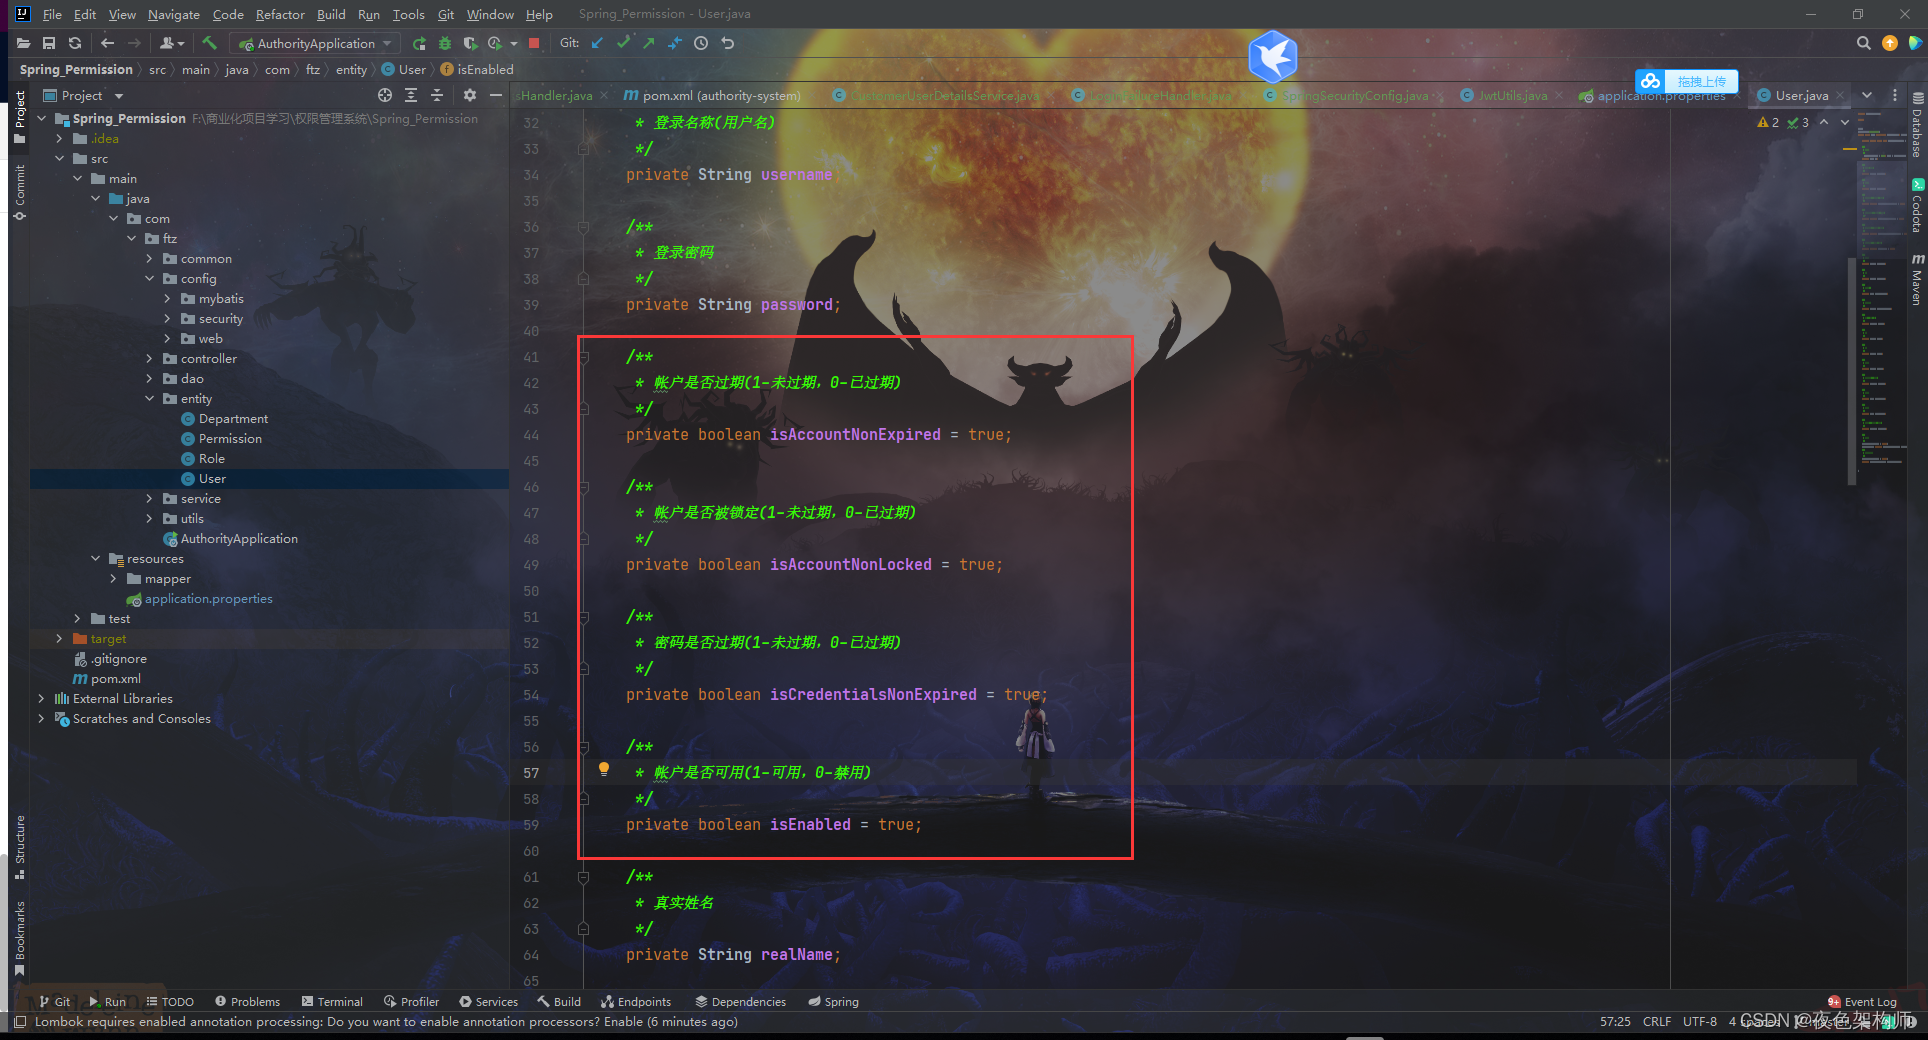
3.1:自定UserDetails类:当实体对象字段不满足时需要自定义UserDetails,一般都要自定义UserDetails。如同上图所示,:所以我们自己创建用户实体类的时候要继承UserDetails并查看其源码实现他的属性
package com.ftz.entity;
import com.baomidou.mybatisplus.annotation.TableField;
import com.baomidou.mybatisplus.annotation.TableName;
import com.baomidou.mybatisplus.annotation.IdType;
import com.baomidou.mybatisplus.annotation.TableId;
import java.time.LocalDateTime;
import java.io.Serializable;
import java.util.Collection;
import java.util.Date;
import java.util.List;
import lombok.Data;
import lombok.EqualsAndHashCode;
import org.springframework.security.core.GrantedAuthority;
import org.springframework.security.core.userdetails.UserDetails;
@Data
@TableName("sys_user")
public class User implements Serializable, UserDetails {
private static final long serialVersionUID = 1L;
@TableId(value = "id", type = IdType.AUTO)
private Long id;
private String username;
private String password;
private boolean isAccountNonExpired = true;
private boolean isAccountNonLocked = true;
private boolean isCredentialsNonExpired = true;
private boolean isEnabled = true;
private String realName;
private String nickName;
private Long departmentId;
private String departmentName;
private Integer gender;
private String phone;
private String email;
private String avatar;
private Integer isAdmin;
private Date createTime;
private Date updateTime;
private Integer isDelete;
@TableField(exist = false)
Collection<? extends GrantedAuthority> authorities;
@TableField(exist = false)
private List<Permission> permissionList;
}
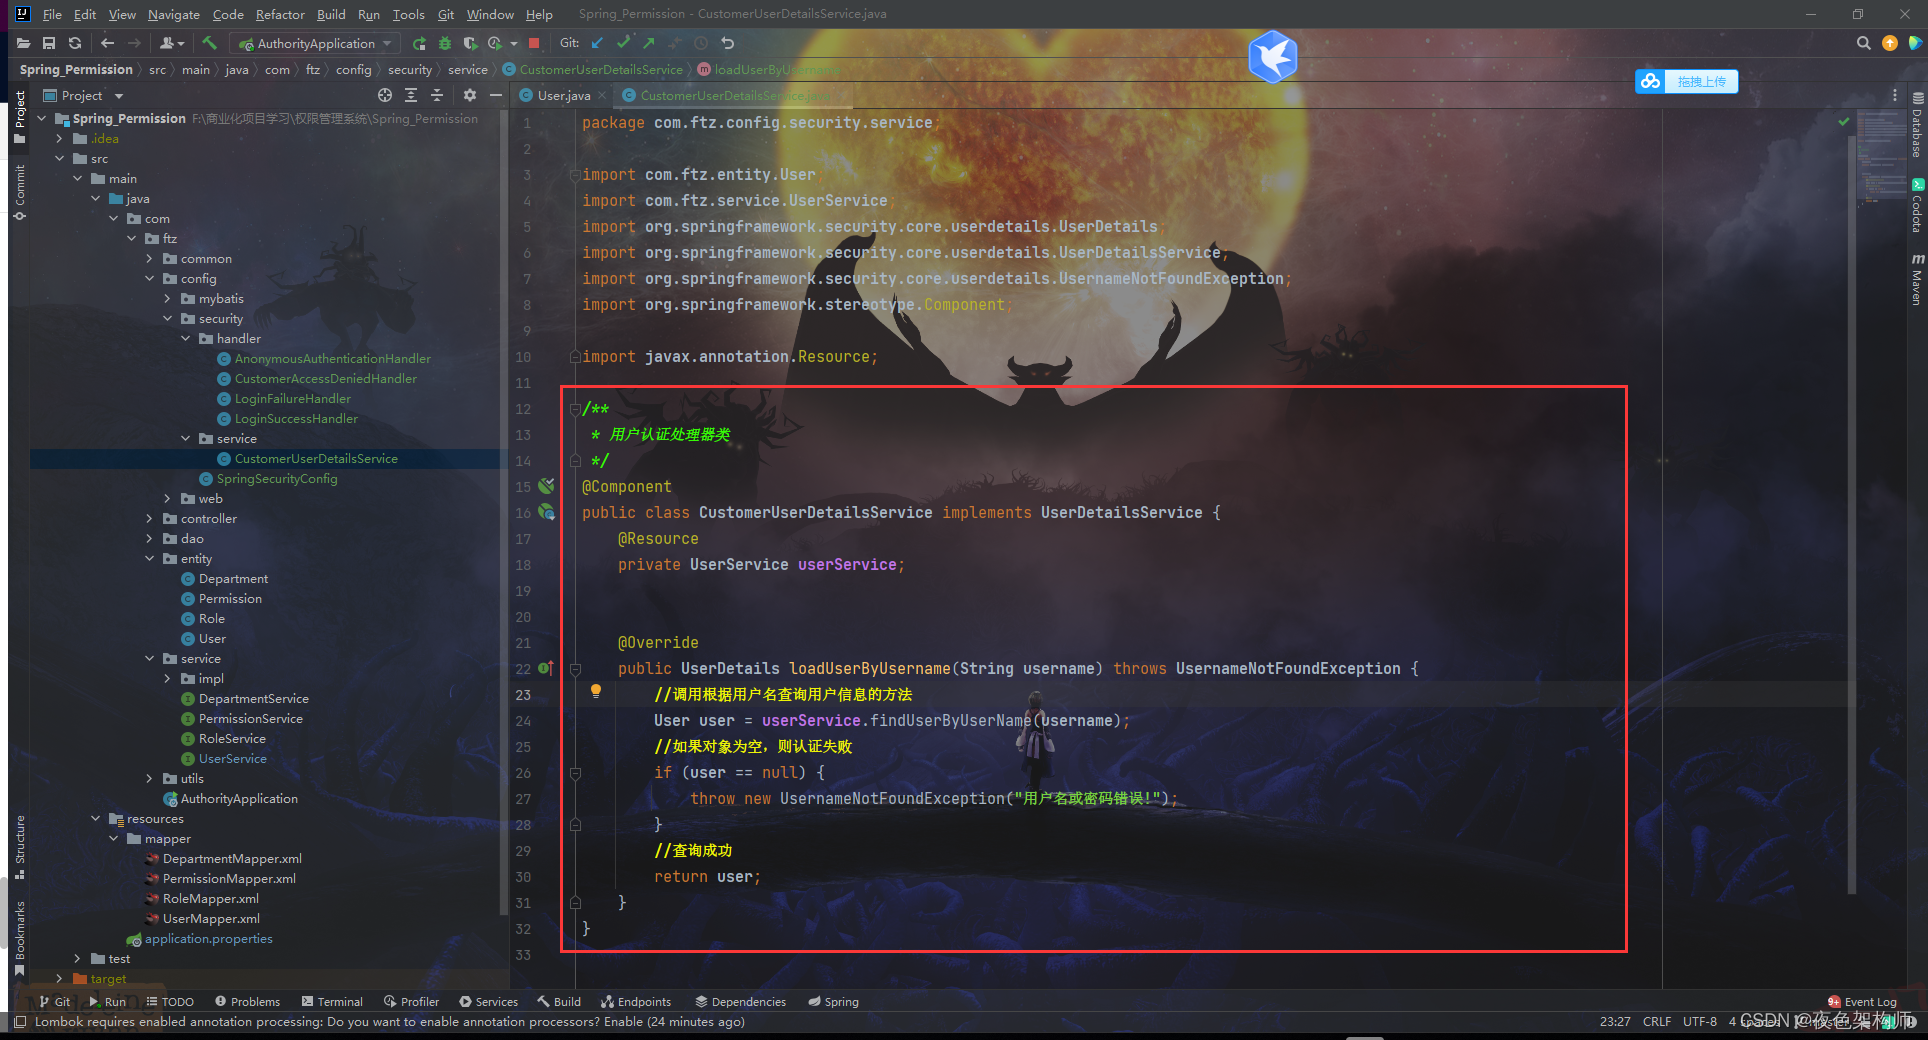
3.2: 自定义UserDetailsService类,主要用于从数据库查询用户信息。:这个官方的UserDetailsService只有一个方法,我们重写就好
package com.ftz.config.security.service;
import com.ftz.entity.User;
import com.ftz.service.UserService;
import org.springframework.security.core.userdetails.UserDetails;
import org.springframework.security.core.userdetails.UserDetailsService;
import org.springframework.security.core.userdetails.UsernameNotFoundException;
import org.springframework.stereotype.Component;
import javax.annotation.Resource;
@Component
public class CustomerUserDetailsService implements UserDetailsService {
@Resource
private UserService userService;
@Override
public UserDetails loadUserByUsername(String username) throws UsernameNotFoundException {
User user = userService.findUserByUserName(username);
if (user == null) {
throw new UsernameNotFoundException("用户名或密码错误!");
}
return user;
}
}

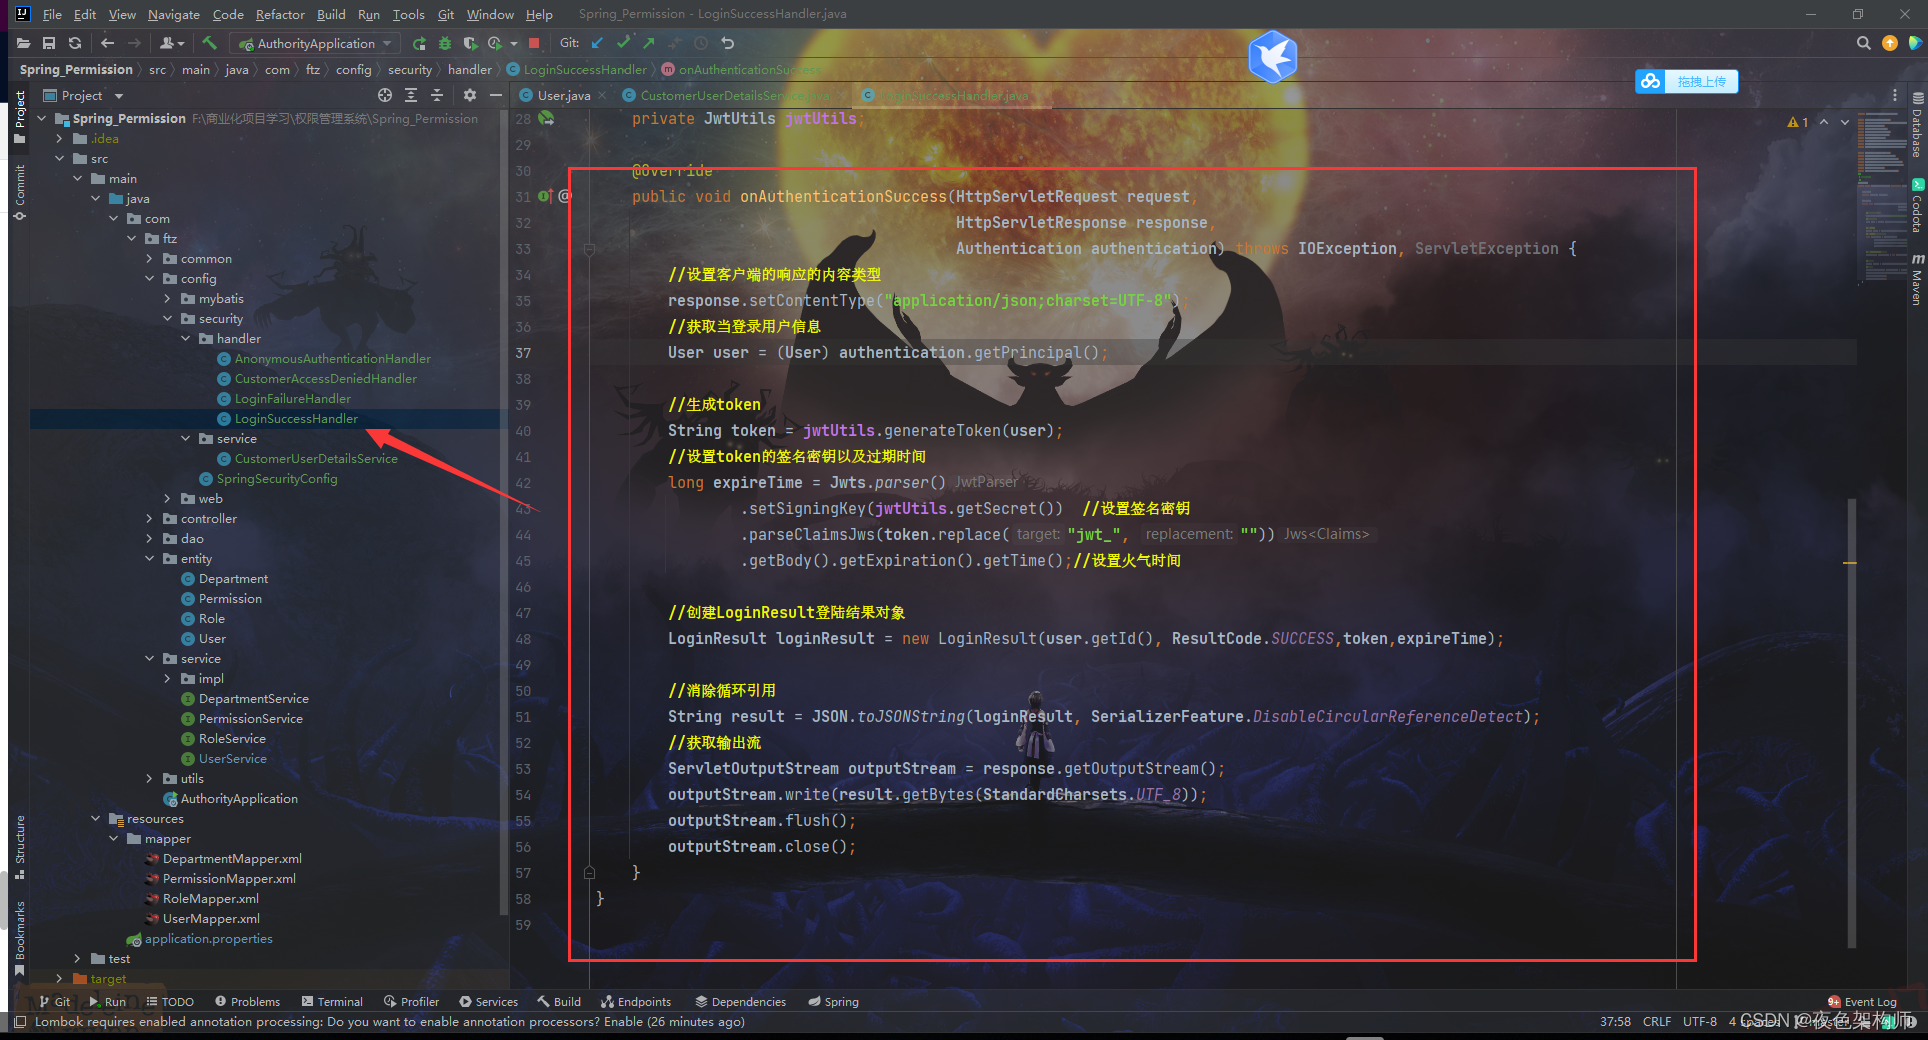
3.3: 创建登录认证成功处理器,认证成功后需要返回JSON数据,菜单权限等。
package com.ftz.config.security.handler;
import com.alibaba.fastjson.JSON;
import com.alibaba.fastjson.serializer.SerializerFeature;
import com.ftz.entity.User;
import com.ftz.utils.JwtUtils;
import com.ftz.utils.LoginResult;
import com.ftz.utils.ResultCode;
import io.jsonwebtoken.Jwts;
import org.springframework.security.core.Authentication;
import org.springframework.security.web.authentication.AuthenticationSuccessHandler;
import org.springframework.stereotype.Component;
import javax.annotation.Resource;
import javax.servlet.ServletException;
import javax.servlet.ServletOutputStream;
import javax.servlet.http.HttpServletRequest;
import javax.servlet.http.HttpServletResponse;
import java.io.IOException;
import java.nio.charset.StandardCharsets;
@Component
public class LoginSuccessHandler implements AuthenticationSuccessHandler {
@Resource
private JwtUtils jwtUtils;
@Override
public void onAuthenticationSuccess(HttpServletRequest request,
HttpServletResponse response,
Authentication authentication) throws IOException, ServletException {
response.setContentType("application/json;charset=UTF-8");
User user = (User) authentication.getPrincipal();
String token = jwtUtils.generateToken(user);
long expireTime = Jwts.parser()
.setSigningKey(jwtUtils.getSecret())
.parseClaimsJws(token.replace("jwt_", ""))
.getBody().getExpiration().getTime();
LoginResult loginResult = new LoginResult(user.getId(), ResultCode.SUCCESS,token,expireTime);
String result = JSON.toJSONString(loginResult, SerializerFeature.DisableCircularReferenceDetect);
ServletOutputStream outputStream = response.getOutputStream();
outputStream.write(result.getBytes(StandardCharsets.UTF_8));
outputStream.flush();
outputStream.close();
}
}

3.4: 创建登录认证失败处理器,认证失败需要返回JSON数据,给前端判断。
package com.ftz.config.security.handler;
import com.alibaba.fastjson.JSON;
import com.ftz.utils.Result;
import org.springframework.security.authentication.*;
import org.springframework.security.core.AuthenticationException;
import org.springframework.security.web.authentication.AuthenticationFailureHandler;
import org.springframework.stereotype.Component;
import javax.servlet.ServletException;
import javax.servlet.ServletOutputStream;
import javax.servlet.http.HttpServletRequest;
import javax.servlet.http.HttpServletResponse;
import java.io.IOException;
import java.nio.charset.StandardCharsets;
@Component
public class LoginFailureHandler implements AuthenticationFailureHandler {
@Override
public void onAuthenticationFailure(HttpServletRequest request,
HttpServletResponse response,
AuthenticationException exception) throws IOException, ServletException {
response.setContentType("application/json;charset=UTF-8");
ServletOutputStream outputStream = response.getOutputStream();
String message = null;
int code = 500;
if(exception instanceof AccountExpiredException){
message = "账户过期,登录失败!";
}else if(exception instanceof BadCredentialsException){
message = "用户名或密码错误,登录失败!";
}else if(exception instanceof CredentialsExpiredException){
message = "密码过期,登录失败!";
}else if(exception instanceof DisabledException){
message = "账户被禁用,登录失败!";
}else if(exception instanceof LockedException){
message = "账户被锁,登录失败!";
}else if(exception instanceof InternalAuthenticationServiceException){
message = "账户不存在,登录失败!";
}else{
message = "登录失败!";
}
String result = JSON.toJSONString(Result.error().code(code).message(message));
outputStream.write(result.getBytes(StandardCharsets.UTF_8));
outputStream.flush();
outputStream.close();
}
}
3.5:创建匿名用户访问无权限资源时处理器,匿名用户访问时,需要提示JSON。
package com.ftz.config.security.handler;
import com.alibaba.fastjson.JSON;
import com.alibaba.fastjson.serializer.SerializerFeature;
import com.ftz.utils.Result;
import org.springframework.security.core.AuthenticationException;
import org.springframework.security.web.AuthenticationEntryPoint;
import org.springframework.stereotype.Component;
import javax.servlet.ServletException;
import javax.servlet.ServletOutputStream;
import javax.servlet.http.HttpServletRequest;
import javax.servlet.http.HttpServletResponse;
import java.io.IOException;
import java.nio.charset.StandardCharsets;
@Component
public class AnonymousAuthenticationHandler implements AuthenticationEntryPoint {
@Override
public void commence(HttpServletRequest request, HttpServletResponse
response, AuthenticationException authException) throws IOException, ServletException {
response.setContentType("application/json;charset=UTF-8");
ServletOutputStream outputStream = response.getOutputStream();
String result = JSON.toJSONString(Result.error().code(600).message("匿名用户无权限访问!"),
SerializerFeature.DisableCircularReferenceDetect);
outputStream.write(result.getBytes(StandardCharsets.UTF_8));
outputStream.flush();
outputStream.close();
}
}
3.6:创建认证过的用户访问无权限资源时的处理器,无权限访问时,需要提示JSON。
package com.ftz.config.security.handler;
import com.alibaba.fastjson.JSON;
import com.alibaba.fastjson.serializer.SerializerFeature;
import com.ftz.utils.Result;
import org.springframework.security.access.AccessDeniedException;
import org.springframework.security.web.access.AccessDeniedHandler;
import org.springframework.stereotype.Component;
import javax.servlet.ServletException;
import javax.servlet.ServletOutputStream;
import javax.servlet.http.HttpServletRequest;
import javax.servlet.http.HttpServletResponse;
import java.io.IOException;
import java.nio.charset.StandardCharsets;
@Component
public class CustomerAccessDeniedHandler implements AccessDeniedHandler {
@Override
public void handle(HttpServletRequest request, HttpServletResponse response,
AccessDeniedException accessDeniedException) throws IOException, ServletException
{
response.setContentType("application/json;charset=UTF-8");
ServletOutputStream outputStream = response.getOutputStream();
String result = JSON.toJSONString(Result.error().code(700).message("无权限访问,请联系管理员!"),
SerializerFeature.DisableCircularReferenceDetect);
outputStream.write(result.getBytes(StandardCharsets.UTF_8));
outputStream.flush();
outputStream.close();
}
}
3.7:配置Spring Security配置类,把上面自定义的处理器交给Spring Security:
package com.ftz.config.security;
import com.ftz.config.security.handler.AnonymousAuthenticationHandler;
import com.ftz.config.security.handler.CustomerAccessDeniedHandler;
import com.ftz.config.security.handler.LoginFailureHandler;
import com.ftz.config.security.handler.LoginSuccessHandler;
import com.ftz.config.security.service.CustomerUserDetailsService;
import org.springframework.context.annotation.Bean;
import org.springframework.context.annotation.Configuration;
import org.springframework.security.config.annotation.authentication.builders.AuthenticationManagerBuilder;
import org.springframework.security.config.annotation.web.builders.HttpSecurity;
import org.springframework.security.config.annotation.web.configuration.EnableWebSecurity;
import org.springframework.security.config.annotation.web.configuration.WebSecurityConfigurerAdapter;
import org.springframework.security.config.http.SessionCreationPolicy;
import org.springframework.security.crypto.bcrypt.BCryptPasswordEncoder;
import javax.annotation.Resource;
@Configuration
@EnableWebSecurity
public class SpringSecurityConfig extends WebSecurityConfigurerAdapter {
@Resource
private CustomerUserDetailsService customerUserDetailsService;
@Resource
private LoginSuccessHandler loginSuccessHandler;
@Resource
private LoginFailureHandler loginFailureHandler;
@Resource
private AnonymousAuthenticationHandler anonymousAuthenticationHandler;
@Resource
private CustomerAccessDeniedHandler customerAccessDeniedHandler;
@Bean
public BCryptPasswordEncoder passwordEncoder() {
return new BCryptPasswordEncoder();
}
@Override
protected void configure(HttpSecurity http) throws Exception {
http.formLogin()
.loginProcessingUrl("/api/user/login")
.successHandler(loginSuccessHandler)
.failureHandler(loginFailureHandler)
.and().csrf().disable()
.sessionManagement().sessionCreationPolicy(SessionCreationPolicy.STATELESS)
.and()
.authorizeRequests()
.antMatchers("/api/user/login").permitAll()
.anyRequest().authenticated()
.and()
.exceptionHandling()
.authenticationEntryPoint(anonymousAuthenticationHandler)
.accessDeniedHandler(customerAccessDeniedHandler)
.and().cors();
}
@Override
protected void configure(AuthenticationManagerBuilder auth) throws Exception
{
auth.userDetailsService(customerUserDetailsService).passwordEncoder(passwordEncoder());
}
}
3.8: 3.7用到的工具类:JwtUtils:
package com.ftz.utils;
import com.ftz.entity.User;
import io.jsonwebtoken.Claims;
import io.jsonwebtoken.Jwts;
import io.jsonwebtoken.SignatureAlgorithm;
import lombok.Data;
import org.springframework.boot.context.properties.ConfigurationProperties;
import org.springframework.security.core.userdetails.UserDetails;
import org.springframework.stereotype.Component;
import java.util.Date;
import java.util.HashMap;
import java.util.Map;
@Data
@ConfigurationProperties(prefix = "jwt")
@Component
public class JwtUtils {
private String secret;
private Long expiration;
private String generateToken(Map<String, Object> claims) {
Date expirationDate = new Date(System.currentTimeMillis() + expiration);
return Jwts.builder().setClaims(claims).setExpiration(expirationDate).signWith(SignatureAlgorithm.HS512, secret).compact();
}
public Claims getClaimsFromToken(String token) {
Claims claims;
try {
claims = Jwts.parser().setSigningKey(secret).parseClaimsJws(token).getBody();
} catch (Exception e) {
claims = null;
}
return claims;
}
public String generateToken(UserDetails userDetails) {
Map<String, Object> claims = new HashMap<>(2);
claims.put(Claims.SUBJECT, userDetails.getUsername());
claims.put(Claims.ISSUED_AT, new Date());
return generateToken(claims);
}
public String getUsernameFromToken(String token) {
String username;
try {
Claims claims = getClaimsFromToken(token);
username = claims.getSubject();
} catch (Exception e) {
username = null;
}
return username;
}
public Boolean isTokenExpired(String token) {
Claims claims = getClaimsFromToken(token);
Date expiration = claims.getExpiration();
return expiration.before(new Date());
}
public String refreshToken(String token) {
String refreshedToken;
try {
Claims claims = getClaimsFromToken(token);
claims.put(Claims.ISSUED_AT, new Date());
refreshedToken = generateToken(claims);
} catch (Exception e) {
refreshedToken = null;
}
return refreshedToken;
}
public Boolean validateToken(String token, UserDetails userDetails) {
User user = (User) userDetails;
String username = getUsernameFromToken(token);
return (username.equals(user.getUsername()) && !isTokenExpired(token));
}
}
3.8:LoginResult:
package com.ftz.utils;
import lombok.AllArgsConstructor;
import lombok.Data;
import lombok.NoArgsConstructor;
@Data
@AllArgsConstructor
@NoArgsConstructor
public class LoginResult {
private Long id;
private int code;
private String token;
private Long expireTime;
}
3.8:Result:
package com.ftz.utils;
import lombok.Data;
@Data
public class Result<T> {
private Boolean success;
private Integer code;
private String message;
private T data;
private Result(){}
public static<T> Result<T> ok(){
Result<T> result = new Result<T>();
result.setSuccess(true);
result.setCode(ResultCode.SUCCESS);
result.setMessage("执行成功");
return result;
}
public static<T> Result<T> ok(T data){
Result<T> result = new Result<T>();
result.setSuccess(true);
result.setCode(ResultCode.SUCCESS);
result.setMessage("执行成功");
result.setData(data);
return result;
}
public static<T> Result<T> error(){
Result<T> result = new Result<T>();
result.setSuccess(false);
result.setCode(ResultCode.ERROR);
result.setMessage("执行失败");
return result;
}
public Result<T> success(Boolean success){
this.setSuccess(success);
return this;
}
public Result<T> code(Integer code){
this.setCode(code);
return this;
}
public Result<T> message(String message){
this.setMessage(message);
return this;
}
public static<T> Result<T> exist(){
Result<T> result = new Result<T>();
result.setSuccess(true);
result.setCode(ResultCode.SUCCESS);
result.setMessage("执行成功");
return result;
}
}
3.8:ResultCode
package com.ftz.utils;
public class ResultCode {
public static final Integer SUCCESS = 200;
public static final Integer ERROR = 500;
public static final int NO_LOGIN = 600;
public static final int NO_AUTH = 700;
}
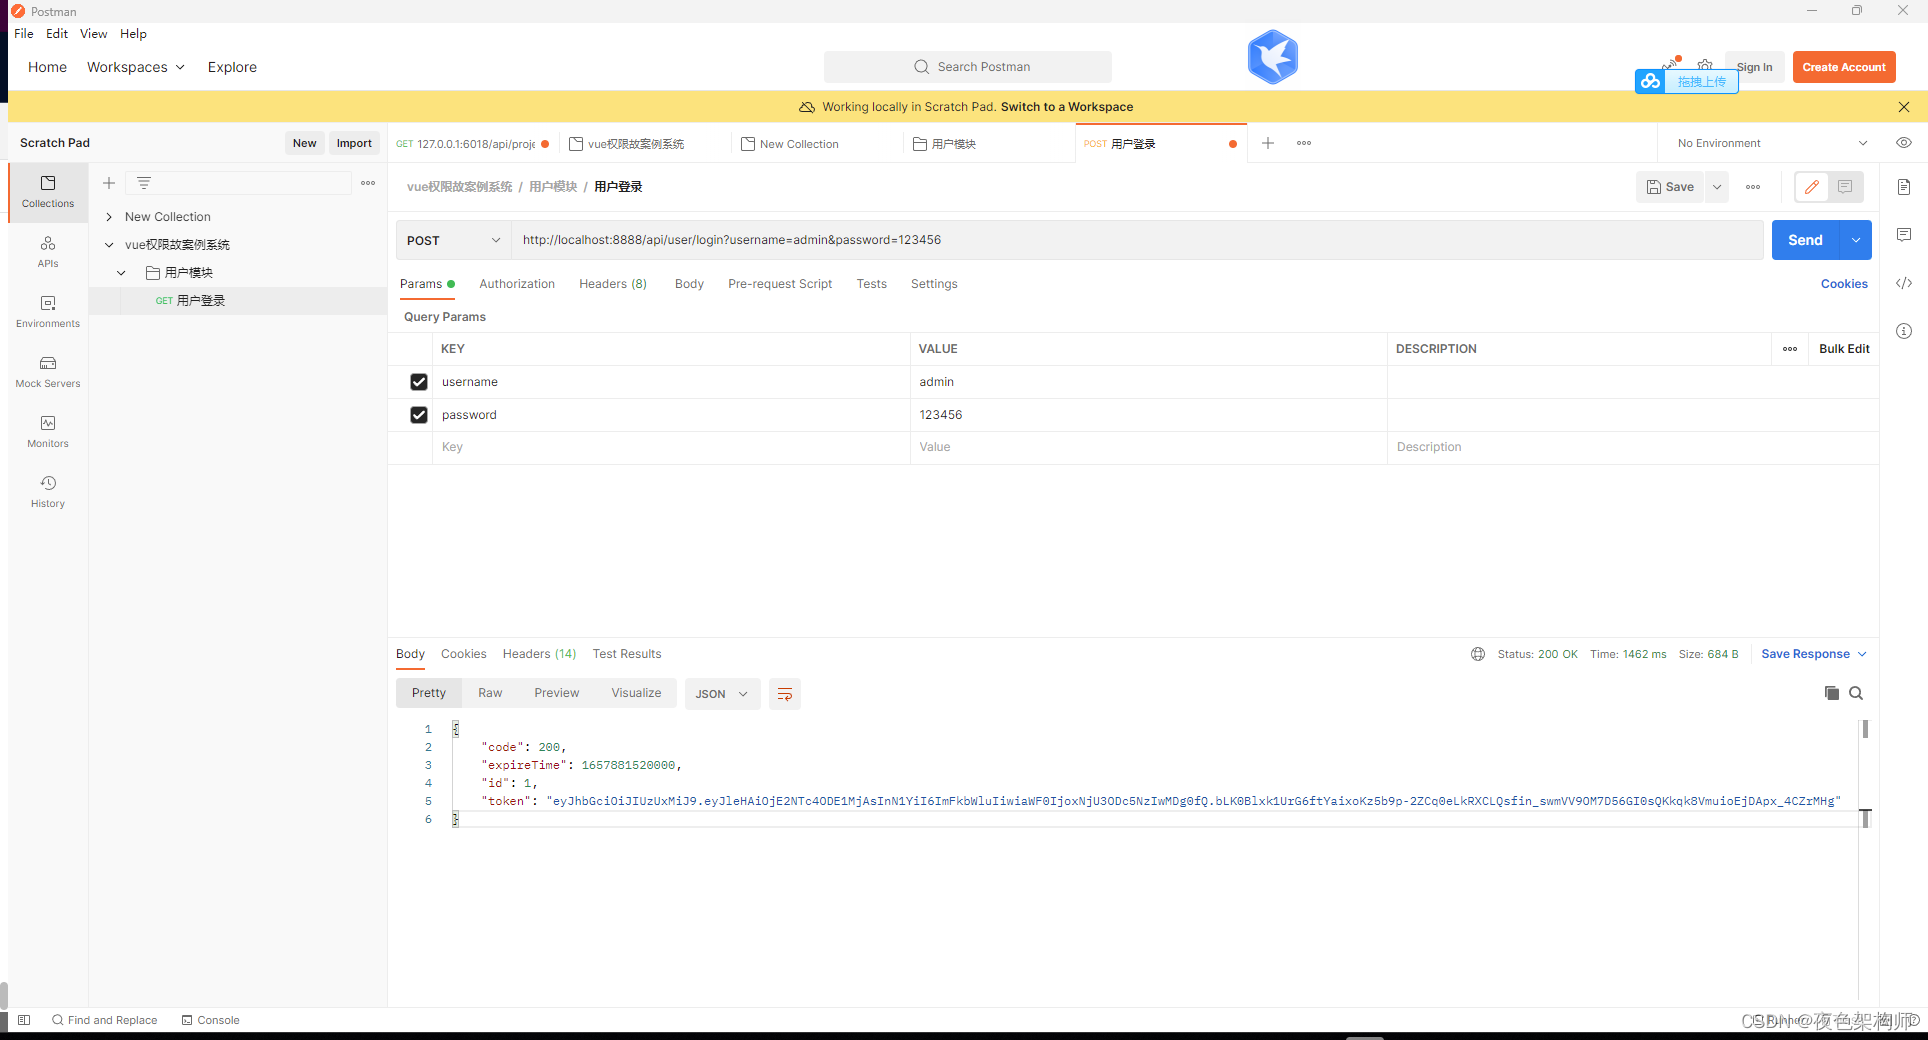
最后PostMan测试就可以返回token:

这就是基于Springboot-security实现token的返回!
| 


