统一异常处理
SpringBoot默认的错误处理机制
我们现在通过浏览器随便访问一个不存在的连接,会出现下面这样的错误提示,应该不陌生吧,之前肯定是遇到过的

我们可以查看一下浏览器发送请求的请求头,如下:

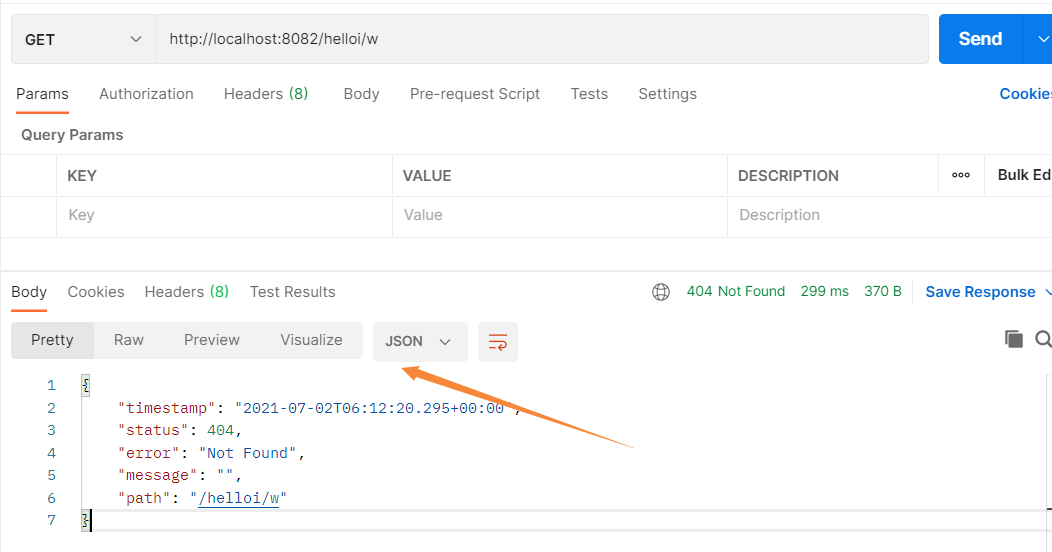
当然SpringBoot还另外规定了客户端访问无效链接的错误机制,如果我们通过客户端访问会返回一个默认的json数据,像下面这样
SpringBoot 统一异常处理自动配置类:ErrorMvcAutoConfiguration
ErrorMvcAutoConfiguration通过给给容器中添加了以下组件,来控制错误处理机制
-
DefaultErrorAttributes:帮我们在页面共享信息
//ErrorMvcAutoConfiguration.class @Bean //在ioc容器中必须没有ErrorAttributes.class这个类型的bean才使用这个自动配置,也就是说我们可以自定义这个配置来覆盖它 @ConditionalOnMissingBean(value = ErrorAttributes.class, search = SearchStrategy.CURRENT) public DefaultErrorAttributes errorAttributes() { return new DefaultErrorAttributes(); } -
BasicErrorController:处理默认/error请求
//ErrorMvcAutoConfiguration.class
@Bean
//在ioc容器中必须没有 ErrorController.class这个类型的bean才使用这个自动配置,也就是说我们可以自定义这个配置来覆盖它
@ConditionalOnMissingBean(value = ErrorController.class, search = SearchStrategy.CURRENT)
public BasicErrorController basicErrorController(ErrorAttributes errorAttributes,
      ObjectProvider<ErrorViewResolver> errorViewResolvers) {
   return new BasicErrorController(errorAttributes, this.serverProperties.getError(),
         errorViewResolvers.orderedStream().collect(Collectors.toList()));
}
BasicErrorController 它其实就是一个用来处理/error请求的控制器
//BasicErrorController.class
@Controller
//先找server.error.path这个配置(找不到)---找error.path这个配置(找不到)---找error这个配置
@RequestMapping("${server.error.path:${error.path:/error}}")
public class BasicErrorController extends AbstractErrorController {
那么我们的异常是如何发送请求的呢?这又是个什么操作?
- 发出一个请求,DispatcherServlet
- 然后后面交给了请求处理方法
- 在处理方法的时候出现了异常,那么就转发请求给/error交给DispatcherServlet处理
- DispatcherServlet 找到对应的handler来处理/error这个请求
- 最后handler交给我们的统一异常处理的控制器:BasicErrorController来进行处理

那么BasicErrorController又是怎么处理/error这个请求的呢?
我们可以先看看里面接受请求的方法:
BasicErrorController.class
//这个是用来处理请求头accept参数为text/html的异常
/*
这个produces是啥?
	通过可以由映射处理程序生成的媒体类型缩小主要映射。 由一种或多种媒体类型组成,其中一种必须通过针对请求的“可接受”媒体类型的内容协商来选择。 通常,这些是从"Accept"标头中提取的,但也可能是从查询参数或其他参数中提取的。 例子:
	   produces = "text/plain"
	   produces = {"text/plain", "application/*"}
	   produces = MediaType.TEXT_PLAIN_VALUE
	   produces = "text/plain;charset=UTF-8"

如果声明的媒体类型包含参数(例如“charset=UTF-8”、“type=feed”、“type=entry”)并且请求中的兼容媒体类型也具有该参数,则参数值必须匹配. 否则,如果来自请求的媒体类型不包含该参数,则假定客户端接受任何值。
可以使用“!”否定表达式运算符,如“!text/plain”,它匹配除“text/plain”以外的Accept所有请求。
在类型级别和方法级别都支持! 如果在两个级别都指定,则方法级别产生条件覆盖类型级别条件
*/
@RequestMapping(produces = MediaType.TEXT_HTML_VALUE)
public ModelAndView errorHtml(HttpServletRequest request, HttpServletResponse response) {
   //获取这个请求的状态,比如404
   HttpStatus status = getStatus(request);
   //这一步就会获取到很多的信息,例如:timestamp=Fri Ju 02 16:33:11 CST 2021, status= 404 error=Not Found, message=, path=/hell 等等,后面会渲染到页面中
   Map<String, Object> model = Collections
         .unmodifiableMap(getErrorAttributes(request, getErrorAttributeOptions(request, MediaType.TEXT_HTML)));
   //设置响应状态,比如:404
   response.setStatus(status.value());
   //获取完要渲染在视图上的数据之后,那么最后它是如何解析的呢?请看下面笔记,errorHTML是如何定制我们的响应页面的呢?resolveErrorView就是关键
   ModelAndView modelAndView = resolveErrorView(request, response, status, model);
   //没有找到我们自定义的模板引擎或者html视图,那么就使用error这个简陋的视图
   return (modelAndView != null) ? modelAndView : new ModelAndView("error", model);
}

//如果上面errorHtml方法没有匹配上,那么就将会由这个方法进行处理
//除了text/html的请求都会交给error方 法来进行处理
@RequestMapping
public ResponseEntity<Map<String, Object>> error(HttpServletRequest request) {
   HttpStatus status = getStatus(request);
   if (status == HttpStatus.NO_CONTENT) {
      return new ResponseEntity<>(status);
   }
   Map<String, Object> body = getErrorAttributes(request, getErrorAttributeOptions(request, MediaType.ALL));
   return new ResponseEntity<>(body, status);
}
那么errorHTML是如何定制我们的响应页面的呢?
resolveErrorView方法解析视图:
 sprotected ModelAndView resolveErrorView(HttpServletRequest request, HttpServletResponse response, HttpStatus status,
      Map<String, Object> model) {
   //循环遍历所有异常视图解析器(其实就是DefaultErrorViewResolver,而我们的DefaultErrorViewResolver就是专门用来解析错误视图页面的)
   for (ErrorViewResolver resolver : this.errorViewResolvers) {
      ModelAndView modelAndView = resolver.resolveErrorView(request, status, model);
      if (modelAndView != null) {
         return modelAndView;
      }
   }
   return null;
}
@Override public ModelAndView resolveErrorView(HttpServletRequest request, HttpStatus status, Map<String, Object> model) { ModelAndView modelAndView = resolve(String.valueOf(status.value()), model); if (modelAndView == null && SERIES_VIEWS.containsKey(status.series())) { modelAndView = resolve(SERIES_VIEWS.get(status.series()), model); } return modelAndView; }private ModelAndView resolve(String viewName, Map<String, Object> model) { //error/状态码 String errorViewName = "error/" + viewName; //先去error目录下找找我们有没有自定义配置的模板引擎视图 TemplateAvailabilityProvider provider = this.templateAvailabilityProviders.getProvider(errorViewName, this.applicationContext); //如果发现我们有自定义模板引擎视图就将参数传给我们自定义的模板引擎视图进行解析返回客户端 if (provider != null) { return new ModelAndView(errorViewName, model); } //如果没有,那么就会按照以下路径寻找搜搜符合条件的html页面响应 /* 例如, HTTP 404将搜索(按特定顺序): '/<templates>/error/404.<ext>' '/<static>/error/404.html' '/<templates>/error/4xx.<ext>' '/<static>/error/4xx.html' */ return resolveResource(errorViewName, model); }private ModelAndView resolveResource(String viewName, Map<String, Object> model) { /* 遍历以下路径搜索符合条件的html页面 '/<templates>/error/404.<ext>' '/<static>/error/404.html' '/<templates>/error/4xx.<ext>' '/<static>/error/4xx.html' */ for (String location : this.resourceProperties.getStaticLocations()) { try { //获取这个路径下的资源 Resource resource = this.applicationContext.getResource(location); //创建与这个资源名字相关的资源 resource = resource.createRelative(viewName + ".html"); //确定该资源是否以物理资源实际存在 if (resource.exists()) { //存在返回就返回视图,不存在继续循环 return new ModelAndView(new HtmlResourceView(resource), model); } } catch (Exception ex) { } } return null; }啊!到这一步,我们的 BasicErrorController 源码 的 errorHtml 方法就刨析完毕了!
通过以上源码的刨析也已经能够知道如何去定制自己的异常页面了,包括其中的原理等等!
王二麻子我爱你:什么?你说你还不会自己定制异常页面?那。。。。要不先自己在看看源码摸索一哈子?
王二麻子:死亡凝视——(?_?)——竿绫量逻辑——(╯‵□′)╯︵┻━┻
王二麻子我爱你:好好好,那就手把手带着操作一边就是了——(~o ̄3 ̄)~
王二麻子我爱你:那接下来来手操一边定制错误页面——(?゚ヮ゚)?
? 如果有模板引擎的情况下,可以通过error/状态码的形式来进行控制,也就是说,我们可以将错误页面命名为“错误状态码.html”,然后放在模板引擎文件夹(即templates目录下)里面的error文件夹下,没有error文件夹就创建一个,发生此状态码的错误就会来到 对应的页面,因为SpringBoot规则中已经默认规定好了。
? 更准确的将我们可以使用4xx和5xx作为错误页面的文件名,进而来匹配该种类型的所有错误,匹配的时候遵循精确优先(优先寻找精确的状态码.html),像下面这样
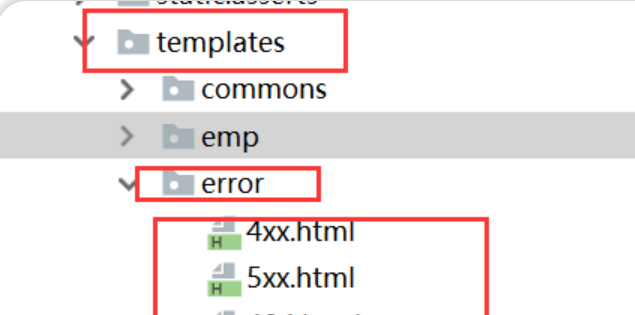
遍历优先级,例如,404:
   		<templates>/error/404.html<ext>
		<static>/error/404.html
		<templates>/error/4xx.html<ext>
		<static>/error/4xx.html
我们在默认的错误页面中可以获得如下信息:
- timestamp:时间戳
- tstatus:状态码
- terror:错误提示
- texception:异常对象
- tmessage:异常消息
- terrors:JSR303数据校验的错误都在这里
这里要说明一下的是,如果我们项目中没有使用模板引擎(或者模板引擎找不到这个错误页面),就会去静态资源文件夹下找。如果静态资源文件夹中也没有错误页面,就是默认来到SpringBoot默认的错误提示页面。
接下来的测试就不浪费时间了,自己启动springboot发个错误请求玩玩
王二麻子:我想给这个玩意配个日志——(づ ̄ 3 ̄)づ
王二麻子我爱你:啊这,要不咱先总结一下上面剖析源码的内容吧是——( ̄﹃ ̄)
王二麻子:也行,先消化消化上面的内容是——(??? )
王二麻子我爱你:关于配日志这块是属于最后的一部分知识点——定制异常处理——o((>ω< ))o
**总结:**从errorHTML方法可以得出结论,我们需要使用自定义的页面响应错误只需要在对应的路径上创建对应的错误代码的页面就行了,但是如果想要记录日志就需要自己定制了,定制这一块待会再说,先不急
接下来来聊聊 BasicErrorController 的另外一个接受请求的方法:error( )
这里先补充一点前面有提到过的知识,error方法的作用:当 /error 这个请求所希望响应的参数非text/html 都会由 error() 这个方法来处理。这里我们主要了解一下它是如何返回json数据的,然后找到规律,最后自己定制响应的json数据
@RequestMapping
public ResponseEntity<Map<String, Object>> error(HttpServletRequest request) {
   //获取状态,例如:404
   HttpStatus status = getStatus(request);
   //判断状态码是否等于204,如果是204直接返回
   //204表示服务器已成功完成请求
   if (status == HttpStatus.NO_CONTENT) {
      return new ResponseEntity<>(status);
   }
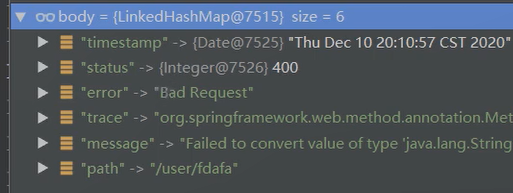
   //getErrorAttributes这个方法就是来获取我们的异常信息响应给客户端。哪些异常信息?请看下图
   Map<String, Object> body = getErrorAttributes(request, getErrorAttributeOptions(request, MediaType.ALL));
   return new ResponseEntity<>(body, status);
}
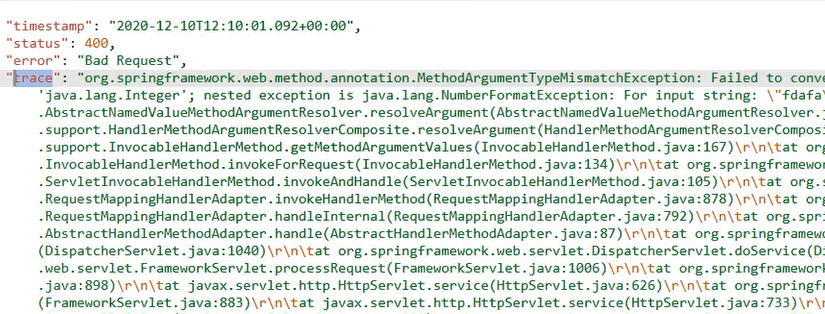
简单了解完了getErrorAttributes这个方法后,现在深入其中探寻其中的奥妙:
首先看一下 getErrorAttributeOptions.class 这个类
它可以动态控制返回的异常信息
- 根据配置文件中的server.error.xxx
protected ErrorAttributeOptions getErrorAttributeOptions(HttpServletRequest request, MediaType mediaType) {
   //获取默认返回的异常信息
   ErrorAttributeOptions options = ErrorAttributeOptions.defaults();
   //这里可以看到它是根据this.errorProperties中的属性来进行配置的,那么我们就来找找看看这个errorProperties属性是如何配置的,算了,不用找了,这边我也懒得填笔记:server.error.xx
   if (this.errorProperties.isIncludeException()) {
      //添加需要返回的异常信息 exception
      options = options.including(Include.EXCEPTION);
   }
   if (isIncludeStackTrace(request, mediaType)) {
      //添加需要返回的异常信息 stack_trace
      options = options.including(Include.STACK_TRACE);
   }
   if (isIncludeMessage(request, mediaType)) {
      //添加需要返回的异常信息 message
      options = options.including(Include.MESSAGE);
   }
   if (isIncludeBindingErrors(request, mediaType)) {
      添加需要返回的异常信息 mediaType
      options = options.including(Include.BINDING_ERRORS);
   }
   //最后需要返回的对象里面就包含了我们所想要返回给客户端的异常信息
   return options;
}
通过这个就可以使用配置类动态控制异常返回的属性

王二麻子:有个问题,那么我该如何定制自己的 异常json响应信息呢?我不希望返回Response这个对象,我希望返回我自己定义的对象,封装我想要返回的信息
王二麻子我爱你:这个问题问的好,接下来我们将要覆盖原本的这个BasicErrorController 的自动配置,自己注册一个ErrorController.class类型的bean来定制异常处理——(?ω?`)o
接下来就到重点了!定制自己的统一异常处理
@Controller //声明为一个控制器注入到ioc容器中,覆盖原来的
@RequestMapping("/error")
public class CustomErrorController extends AbstractErrorController {

    public CustomErrorController(ErrorAttributes errorAttributes,
                                List<ErrorViewResolver> errorViewResolvers) {
        super(errorAttributes, errorViewResolvers);
    }

    /**
     * 处理浏览器请求的
     * @param request
     * @param response
     * @return
     */
    @RequestMapping(produces = MediaType.TEXT_HTML_VALUE)
    public ModelAndView errorHtml(HttpServletRequest request, HttpServletResponse response) {
        HttpStatus status = getStatus(request);
        Map<String, Object> model = Collections
                .unmodifiableMap(getErrorAttributes(request, true));
        System.out.println("========"+model);
        response.setStatus(status.value());
        ModelAndView modelAndView = resolveErrorView(request, response, status, model);
        return (modelAndView != null) ? modelAndView : new ModelAndView("error", model);
    }

    /**
     * 处理json的
     * @param request
     * @return
     */
    @RequestMapping
    @ResponseBody
    public Msg error(HttpServletRequest request) {
        HttpStatus status = getStatus(request);
        if (status == HttpStatus.NO_CONTENT) {
            return new Msg(204,"NO_CONTENT");
        }
        Map<String, Object> body = getErrorAttributes(request, true);
        System.out.println("========"+body);
        return new Msg((Integer)body.get("status"),body.get("message").toString());
    }

    @Override
    public String getErrorPath() {
        return null;
    }

}
然后发送请求:
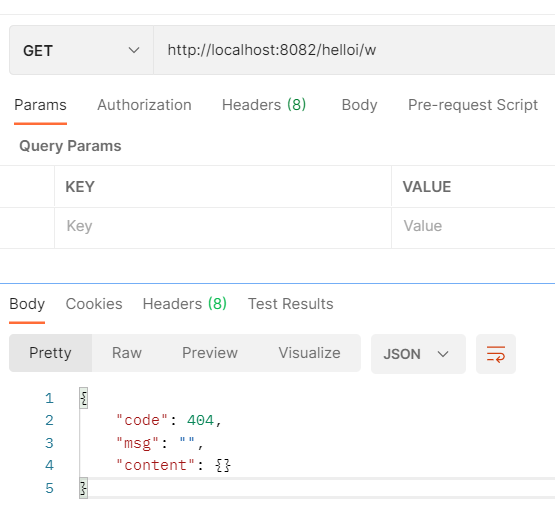
成功返回自定义的对象,message怎么没有东西呢?
我们来看看这句代码里面的数据:
 Map<String, Object> body = getErrorAttributes(request, true);
//看看body里面最后获得到了哪些数据
System.out.println("========"+body);
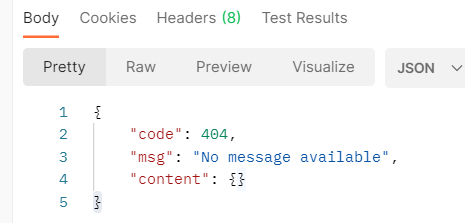
可以看到,我们这里底层给我们返回的异常信息message也是为空——§( ̄▽ ̄)§
为什么没有message信息呢?
因为我们传入了true,这个true只包含了cludeStackTrace这个信息
Map<String, Object> body = getErrorAttributes(request, true);
// 为了获得详细完整的信息,我们需要修改一下getErrorAttributes(request, true)传参
//定义一个ErrorAttributeOptions对象,这个对象里面存放的就是我们需要的异常信息。在代码中建议把这玩意封装成一个方法来获取 ErrorAttributeOptions of = ErrorAttributeOptions.of(ErrorAttributeOptions.Include.MESSAGE, ErrorAttributeOptions.Include.STACK_TRACE, ErrorAttributeOptions.Include.BINDING_ERRORS, ErrorAttributeOptions.Include.EXCEPTION); //将原本的true传参改为ErrorAttributeOptions这个对象 Map<String, Object> body = getErrorAttributes(request, of);//经过上面的代码修改之后的完整代码 /** * 处理json的 * @param request * @return */ @RequestMapping @ResponseBody public Msg error(HttpServletRequest request) { HttpStatus status = getStatus(request); if (status == HttpStatus.NO_CONTENT) { return new Msg(204,"NO_CONTENT"); } Map<String, Object> body = getErrorAttributes(request, getErrorAttributeOptions()); System.out.println("========"+body); return new Msg((Integer)body.get("status"),body.get("message").toString()); } protected ErrorAttributeOptions getErrorAttributeOptions() { ErrorAttributeOptions of = ErrorAttributeOptions.of(ErrorAttributeOptions.Include.MESSAGE, ErrorAttributeOptions.Include.STACK_TRACE, ErrorAttributeOptions.Include.BINDING_ERRORS, ErrorAttributeOptions.Include.EXCEPTION); return of; }启动测试:


成功返回完整异常信息
王二麻子:还有记录异常日志呢?—— (¬︿??¬☆)
王二麻子我爱你:差点忘记了,到这一步那就简单了,定义一下日志对象,然后将我们的异常信息(map)遍历输出到日志就可以了——( ̄▽ ̄ )ゞ*
Logger logger = LoggerFactory.getLogger(this.getClass());
/**
 * 处理json的
 * @param request
 * @return
 */
@RequestMapping
@ResponseBody
public Msg error(HttpServletRequest request) {
    HttpStatus status = getStatus(request);
    if (status == HttpStatus.NO_CONTENT) {
        return new Msg(204,"NO_CONTENT");
    }
    Map<String, Object> body = getErrorAttributes(request, getErrorAttributeOptions());
    System.out.println("========"+body);
    //日志输出
    for (Map.Entry<String, Object> entry : body.entrySet()) {
        String key = entry.getKey();
        Object value = entry.getValue();
        logger.info(key+":"+value);
    }
    return new Msg((Integer)body.get("status"),body.get("message").toString());
}
重启测试:

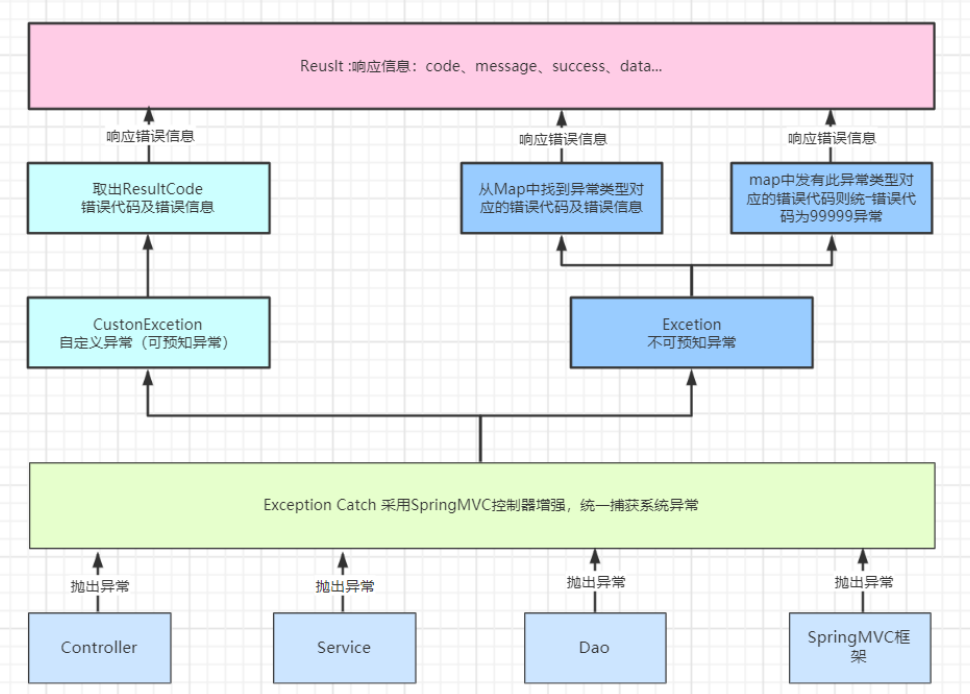
成功输出记录异常日志
-
ErrorPageCustomizer:系统出现错误以后来到error请求进行处理
//ErrorMvcAutoConfiguration.class @Bean public ErrorPageCustomizer errorPageCustomizer(DispatcherServletPath dispatcherServletPath) { return new ErrorPageCustomizer(this.serverProperties, dispatcherServletPath); } -
DefaultErrorViewResolver:用来解析错误视图页面的
//ErrorMvcAutoConfiguration.class -->  DefaultErrorViewResolverConfiguration.class
@Bean
//在ioc容器中必须存在DispatcherServlet类型的bean才生效使用这个自动配置
@ConditionalOnBean(DispatcherServlet.class)
//在ioc容器中必须没有 ErrorViewResolver.class这个类型的bean才使用这个自动配置,也就是说我们可以自定义这个配置来覆盖它
@ConditionalOnMissingBean(ErrorViewResolver.class)
DefaultErrorViewResolver conventionErrorViewResolver() {
   return new DefaultErrorViewResolver(this.applicationContext, this.resourceProperties);
}
如何定制错误的json(另外一种方式,说法)
可以自定义异常处理和返回定制json数据,像下面这样,我们可以专门定义一个配置类用来解决错误定制的,我这里命名为MyExceptionHandler,然后通过@ExceptionHandler来定制响应的相关错误,进而返回定制数据
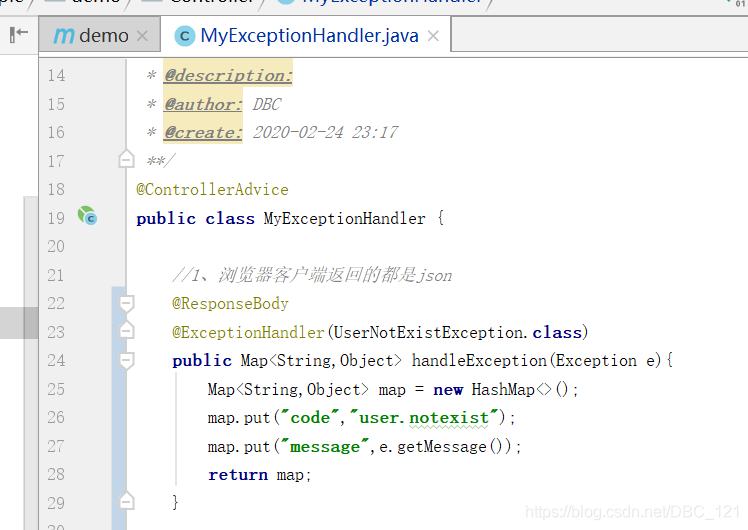
不过这样处理会有个问题,就是我们确实是定制了返回的json数据,但是本来SpringBoot会根据我们用什么访问请求,然后响应什么,比如我们用浏览器访问,响应html页面,客户端响应json数据,现在这样写,返回的都是接送数据了,所以我们需要换种方式,通过将相应转发到/error进行自适应响应效果处理,像下面这样
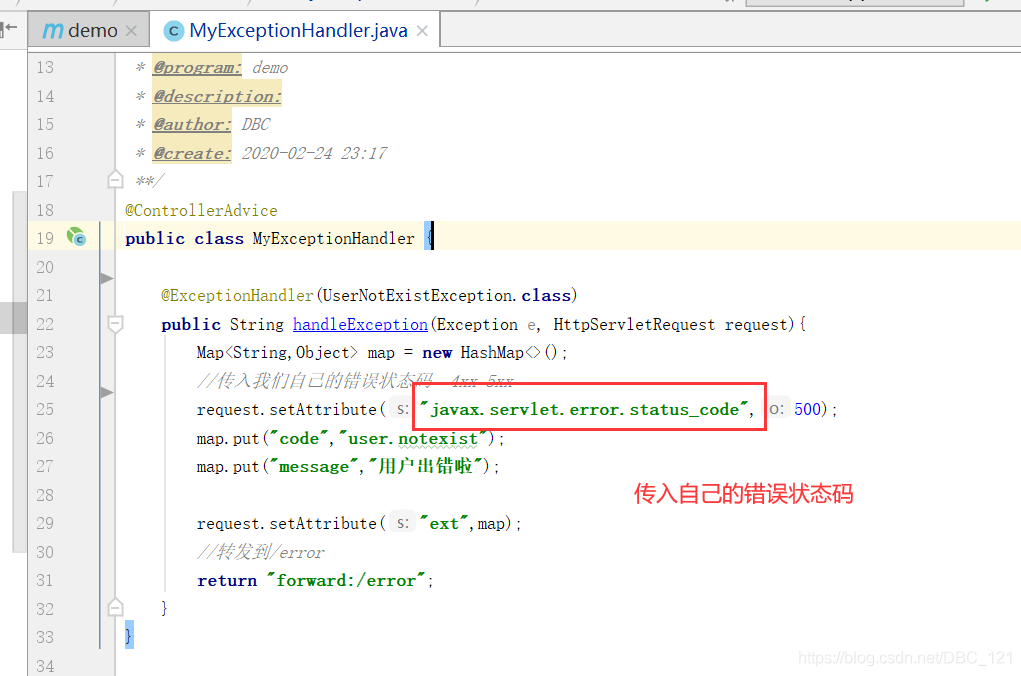
携带定制数据
前面我们讲过,出现错误以后,会来到/error请求,会被BasicErrorController处理,响应出去可以获取的数据是由getErrorAttributes得到的(是AbstractErrorController(ErrorController)规定的方法)
所以,我们可以通过编写一个ErrorController的实现类或者是编写AbstractErrorController的子类,然后放在容器中,我们要知道,页面上能用的数据,或者是json返回能用的数据都是通过errorAttributes.getErrorAttributes得到,也就是说容器中DefaultErrorAttributes.getErrorAttributes()来默认进行数据处理的,我们定制自定义ErrorAttributes,如下
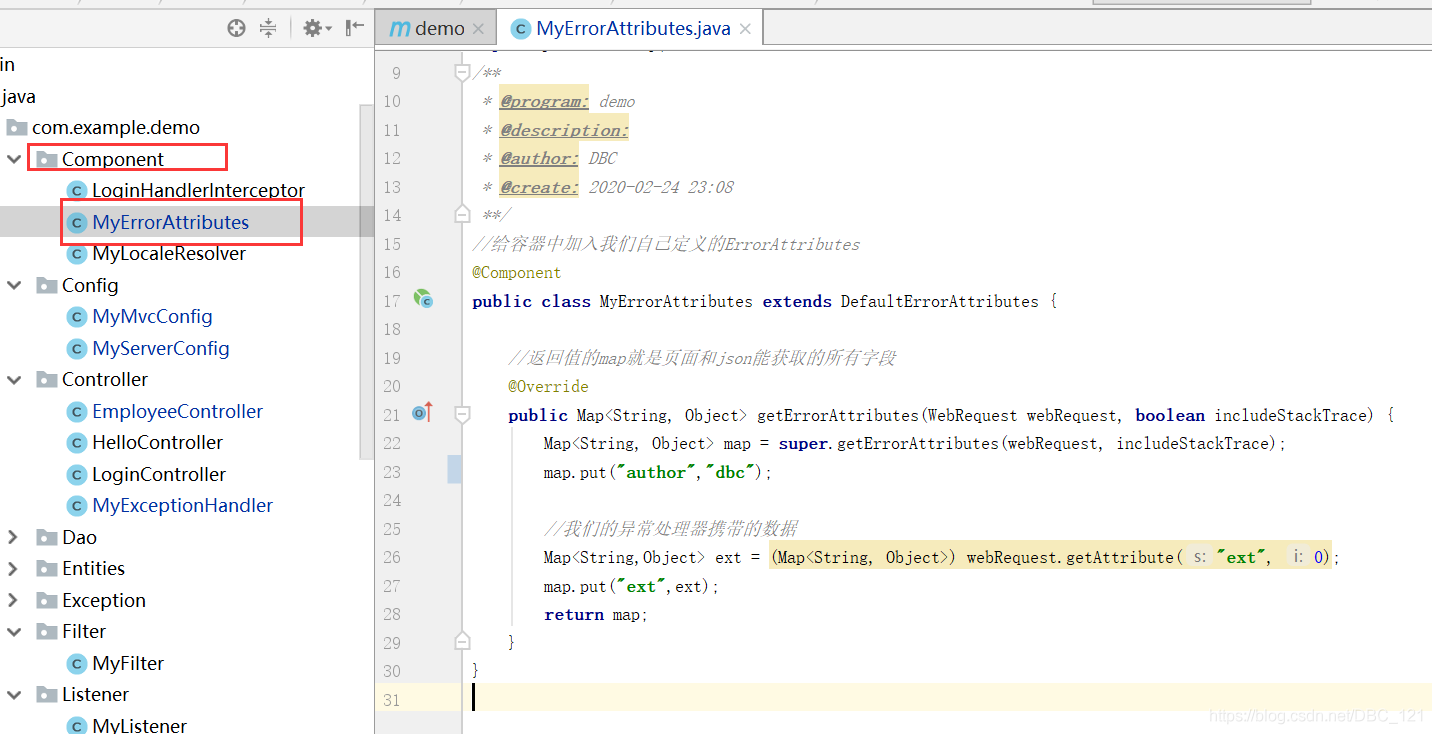
这样,我们的错误响应是自适应的,可以通过定制ErrorAttributes改变需要返回的内容,就不在只有原先的默认属性了,形象的将,我们返回的信息就会是如下
- timestamp:时间戳
- tstatus:状态码
- terror:错误提示
- texception:异常对象
- tmessage:异常消息
- terrors:JSR303数据校验的错误都在这里
- author: dbc