核心容器
两种容器
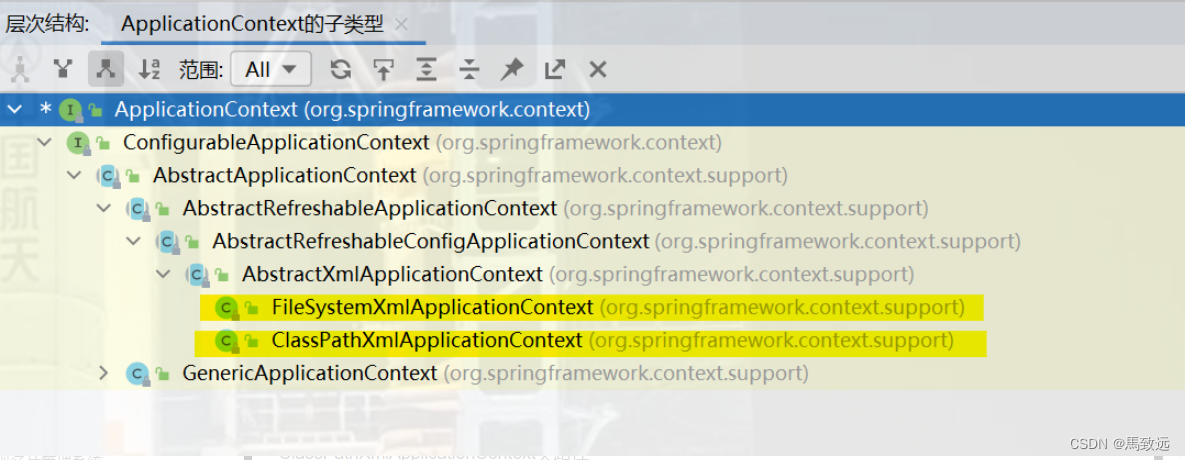
Spring提供IOC容器实现的两种方式:(两个接口)
(1)BeanFactory:
IOC容器中最基本实现方式,时Spring内部使用的接口,不提供开发人员进行使用
**特点:**加载配置文件的时候不会去创建对象,在获取对象(使用)才会去创建对象
(2)ApplicationContext:
BeanFactory接口的子接口,提供更多更强大的功能,一般有开发人员进行使用
**特点:**加载配置文件时候就会把在配置文件的对象进行创建

// 多个配置文件的加载
String [] contexts = {"applicationContext-1.xml","applicationContext-2.xml"};
ClassPathXmlApplicationContext app =
new ClassPathXmlApplicationContext(contexts);

或者
ClassPathXmlApplicationContext app =
new ClassPathXmlApplicationContext("applicationContext-1.xml","applicationContext-2.xml");
Bean标签的id 和name属性
id和name都是spring 容器中中bean 的唯一标识符。
- id: 一个bean的唯一标识 , 命名格式必须符合XML ID属性的命名规范
- name: 可以用特殊字符,并且一个bean可以用多个名称:name=“bean1,bean2,bean3”,用逗号或者分号或者空格隔开。如果没有id,则name的第一个名称默认是id
- 如果 一个 bean 标签未指定 id、name 属性,则 spring容器会给其一个默认的id,值为其类全名。
- 如果有多个bean标签未指定 id、name 属性,则spring容器会按照其出现的次序,分别给其指定 id 值为 “类全名#1”, “类全名#2”
从容器中获取对象的方式
app.getBean(类名.class)
app.getBean("bean的name或者id属性值");
IOC / DI
IOC 控制反转
IOC Inversion of Control 控制反转
DI  Dependency Injection 依赖注入
控制反转- IOC定义:
将原来程序中自己创建实现类对象的控制权反转到iOC容器中,程序只需要从iOC容器获取创建好的对象;
iOC容器相当于一个工厂;
是一种面向对象编程的一种设计理念
可以降低程序代码之间的耦合度
程序中不在需要创建对象, 把创建对象的权利移交给了 Spring
把对象创建 控制权 反转给了 Spring
DI 依赖注入
DI:所谓依赖注入,就是由IOC容器在运行期间,动态地将某种依赖关系注入到对象之中
	相对于 控制反转, 依赖注入的说法, 更加容易理解
	由容器 (Spring 容器) 负责 把组件所依赖的具体对象, 注入给组件,从而避免组件之间以硬编码的方式耦合在一起.
	既然把对象的创建权利交个了 Spring, 对象之间的依赖关系, 也需要 Spring来维护.
	对象的依赖, 由Spring 注入(传递)
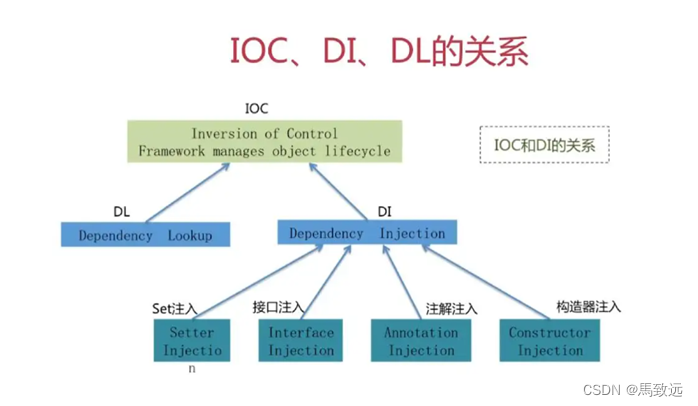
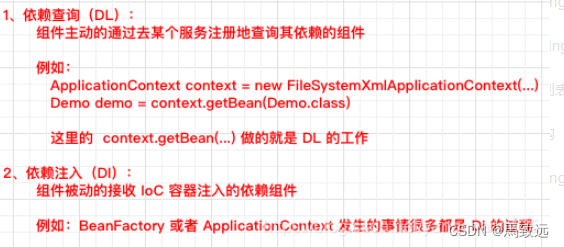
iOC和 DI 、DL的关系
iOC和 DI 描述的是同一件事 ;
iOC强调 将对象的创建权,被反转到IoC 容器;
DI 强调 iOC容器将对象的依赖关系,动态注入到对象之中 ,DI是控制反转具体的实现过程。


依赖注入方式
依赖注入方式
set 方法赋值
<bean id="personId" class="cn.bdqn.Person.Person">
	<property name="name" value="张三"/>
	<property name="age" value="20"/>
</bean>
命名空间传参
引入命名空间
xmlns:p="http://www.springframework.org/schema/p"
<bean id="personId" class="cn.bdqn.Person.Person" p:name="张三" p:age="20">
	</bean>
构造传参
<bean id="personId" class="cn.bdqn.Person.Person">
	<constructor-arg>
		<value>张三</value>
	</constructor-arg>
	<constructor-arg>
		<value>30</value>
	</constructor-arg>
</bean>
<bean id="personId" class="cn.bdqn.Person.Person">
	<constructor-arg value="张三" />
	<constructor-arg value="20"/>
</bean>
不同数据类型注入
基本类型注入
<property name="name" value="张三"/>
引用数据类型注入
<property name="ink" ref="其他对象的 id 值"/>
数组类型
<property name="pens" >
    <array>
        <value>英雄钢笔</value>
        <value>晨光中性笔</value>
    </array>
</property>
list 数据类型
<property name="pens" >
    <list>
        <value>英雄钢笔</value>
        <value>晨光中性笔</value>
    </list>
</property>
set 数据类型
<property name="pens" >
    <set>
        <value>英雄钢笔</value>
        <value>晨光中性笔</value>
    </set>
</property>
map 类型
<property name="map">
    <map>
        <entry key="电脑" value="戴尔"></entry>
        <entry key="手机" value="苹果"></entry>
    </map>
</property>
properties 类型
<property name="pro">
    <props>
        <prop key="1"> one</prop>
        <prop key="2"> two</prop>
    </props>
</property>
依赖注入之打印机案例
开发一个打印机模拟程序
打印机类 -Printer
墨盒类 - Ink
纸张类	-Paper
定义 Ink 和 Paper 接口
public interface Ink {
    /**
     *  定义打印采用的颜色
     */
    String getColor(int r,int g, int b);
}
public interface Paper {
    String newline = "\r\n";
    /**
     * 输出字符到纸上
     */
    void putInChar(char c);
    /**
     * 获取纸上的内容
     */
    String getContent();
}
开发 Ink 和 Paper 接口 的实现类
彩色打印机
import java.awt.*;

public class ColorInk implements Ink{
    @Override
    public String getColor(int r, int g, int b) {
        Color color = new Color(r,g,b);
        return "#"+Integer.toHexString(color.getRGB()).substring(2);
    }

    public static void main(String[] args) {
        Color color = new Color(255,245,100);
        System.out.println(color.getRGB());
        System.out.println(Integer.toHexString(color.getRGB()));

    }
}
灰色打印机
import java.awt.*;

public class GreyInk implements Ink{
    @Override
    public String getColor(int r, int g, int b) {
        int c = (r+b+g)/3;
        Color color = new Color(c,c,c);
        return "#"+Integer.toHexString(color.getRGB()).substring(2);
    }
}
打印纸
public class TextPaper implements Paper{

    private int charPerLine = 16;
    private int linePerPage = 5;

    public void setCharPerLine(int charPerLine) {
        this.charPerLine = charPerLine;
    }

    public void setLinePerPage(int linePerPage) {
        this.linePerPage = linePerPage;
    }

    private String content = "";
    private int posX = 0;
    private int posY = 0;
    private int posP = 1;

    @Override
    public void putInChar(char c) {
        content += c;
        ++ posX;
        if (posX == charPerLine){
            content += Paper.newline;
            posX = 0;
            ++posY;
        }
        if(posY == linePerPage){
            content += "==第"+posP+"页===";
            content += Paper.newline + Paper.newline;
            posY = 0;
            ++posP;
        }
    }

    @Override
    public String getContent() {
        String ret = this.content;

        if(!(posX == 0 && posY == 0)){
            int count = linePerPage - posY;
            for(int i = 0 ; i < count; ++i ){
                ret += Paper.newline;
            }
            ret += "==第"+posP+"页===";
        }
        return ret;
    }
}
使用接口开发Printer 类
/**
 *  一台打印机  必须使用 墨盒 和 纸张
 */
public class Printer {

    private Ink ink = null;
    private Paper paper = null;

    /**
     * 打印机 打印的方法
     */
    public void print(String str){

        System.out.println(ink.getColor(255,200,0));

        // 输出字符到纸张
        char[] chars = str.toCharArray();
        for(char ch : chars){
            paper.putInChar(ch);
        }

        System.out.println(paper.getContent());
    }

    public Ink getInk() {
        return ink;
    }

    public void setInk(Ink ink) {
        this.ink = ink;
    }

    public Paper getPaper() {
        return paper;
    }

    public void setPaper(Paper paper) {
        this.paper = paper;
    }
}
组装打印机, 测试
使用 spring 容器管理对象 并负责注入
<!-- 通过配置 bean 让Spring帮助用户管理对象   IOC 控制反转思想  -->
<bean id="printerId" class="cn.bdqn.print.Printer">
	<!-- 引用类型添加 -->
	<!-- DI 依赖注入  -->
	<property name="ink" ref="colorInkId"/>
	<property name="paper" ref="a4Paper"/>
</bean>

<!-- 通过配置 bean 让Spring帮助用户管理对象   IOC 控制反转思想  -->
<bean id="colorInkId" class="cn.bdqn.print.ColorInk"></bean>

<bean id="greyInkId" class="cn.bdqn.print.GreyInk"></bean>

<bean id="a4Paper" class="cn.bdqn.print.TestPaper">
	<property name="charPerLine" value="10"/>
	<property name="linePerPage" value="5"/>
</bean>

<bean id="a5Paper" class="cn.bdqn.print.TestPaper">
	<property name="charPerLine" value="8"/>
	<property name="linePerPage" value="3"/>
</bean>
使用注解实现IOC
项目分层概念
图书项目中
基础类 = 书籍类, 学生类
业务逻辑类 = 借还书功能
控制类 = 接收前端用户请求, 并作出响应的类
注解定义Bean
<bean id="student" class="cn.bdqn.school.Student"></bean>
定义 Bean 比较繁琐的
简化开发, 使用注解的方式 简化Bean 的 定义方式
在一个类上 添加一个注解
@Component 用以代替<bean class="当前类的路径"></bean>
四大注解
1- @Component
2- @Repository    	用于标注Dao层类的
3- @Service 		用于 标注 业务类的
4- @Controller 		用于 标注 控制器类
获取Bean
添加 context约束文件
<?xml version="1.0" encoding="UTF-8"?>
<!-- xml  约束 命名空间的概念 场景 -->
<beans xmlns="http://www.springframework.org/schema/beans"
    xmlns:xsi="http://www.w3.org/2001/XMLSchema-instance"
       xmlns:context="http://www.springframework.org/schema/context"
	   xmlns:p="http://www.springframework.org/schema/p"
    xsi:schemaLocation="
    http://www.springframework.org/schema/beans
    http://www.springframework.org/schema/beans/spring-beans-3.2.xsd
    http://www.springframework.org/schema/context
    http://www.springframework.org/schema/context/spring-context-3.2.xsd
    ">
配置自动扫描包
<context:component-scan base-package="cn.bdqn.school"/>
获取
context.getBean(类的Id);
context.getBean(Pen.class); 类的字节码类型
使用注解 注入bean
普通类型的注入
@Value("英雄")
引用类型的注入
@Autowired
也可以指定引入
@Autowired
@Qualifier("需要引入的bean的 id 属性")
也可以单独使用
@Resource
@Resource(name = "id 属性")
其他注解
@Lazy
@Scope("prototype")
@Component
public class Car { }