目录
?2.2 springmvc的全局处理--只能识别服务器错误
一、springboot集成jsp
1、创建webapp
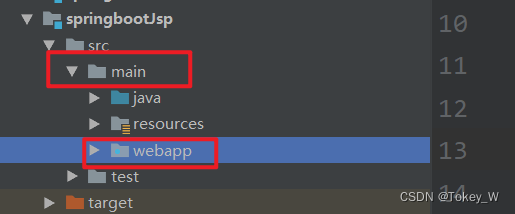
在main下创建webapp的文件夹?
在webapp下创建WEB-INF文件夹
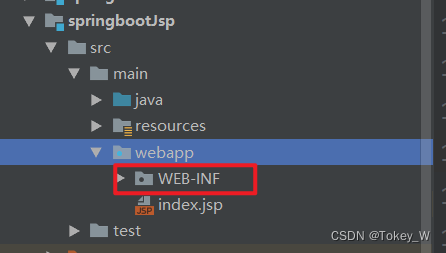
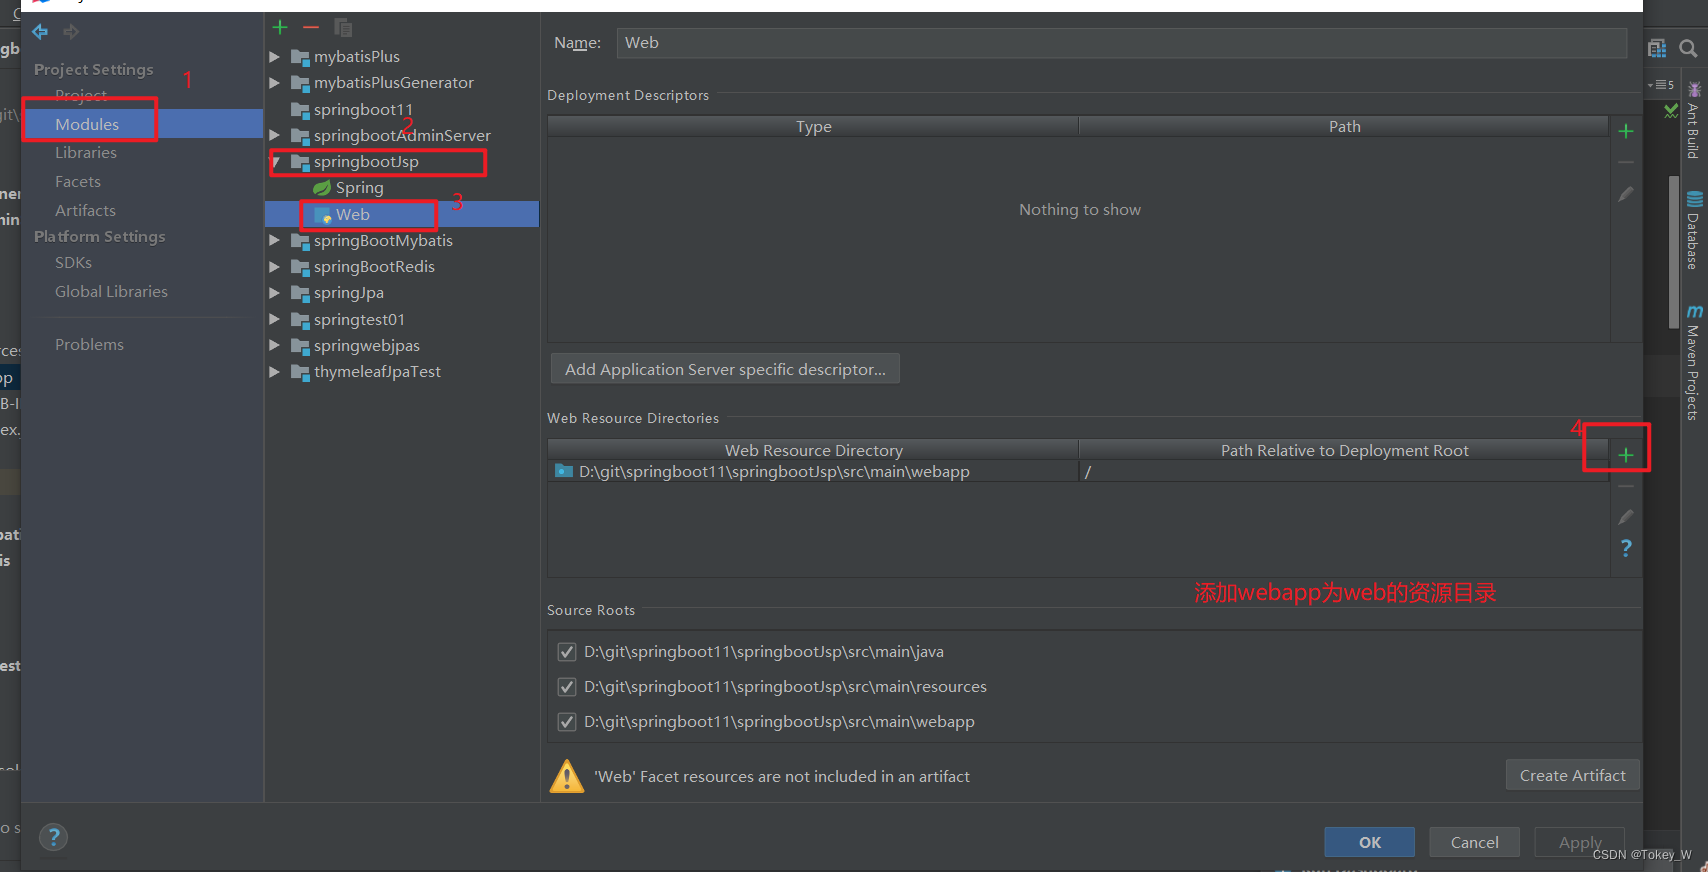
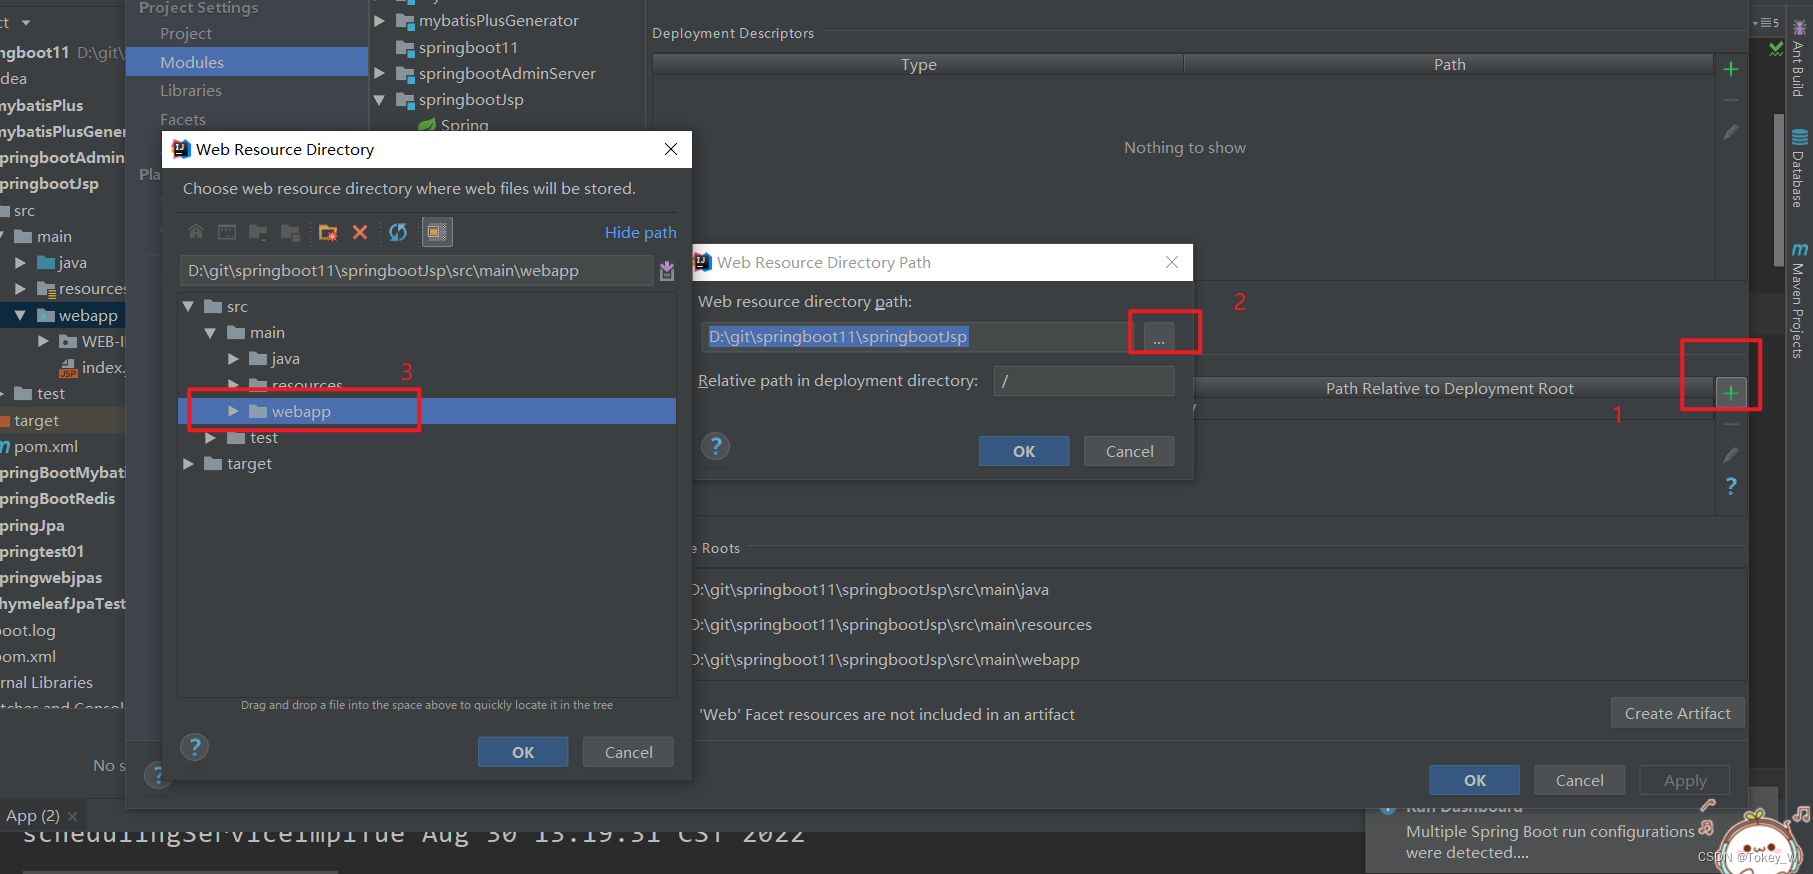
2、将webapp文件夹设置为web的资源
 ?
?
 ?
?
?设置完毕后,webapp出现小蓝点说明正确

?
3、导入依赖,并指定资源到resources下
<dependencies>
        <dependency>
            <groupId>org.springframework.boot</groupId>
            <artifactId>spring-boot-starter-web</artifactId>
        </dependency>
       <!--jsp的依赖-->
        <dependency>
            <groupId>org.apache.tomcat.embed</groupId>
            <artifactId>tomcat-embed-jasper</artifactId>
        </dependency>
        <dependency>
            <groupId>org.springframework.boot</groupId>
            <artifactId>spring-boot-starter-test</artifactId>
        </dependency>
        <!--热部署-->
        <dependency>
            <groupId>org.springframework.boot</groupId>
            <artifactId>spring-boot-devtools</artifactId>
        </dependency>
        <dependency>
            <groupId>org.projectlombok</groupId>
            <artifactId>lombok</artifactId>
        </dependency>
        <dependency>
            <groupId>jstl</groupId>
            <artifactId>jstl</artifactId>
            <version>1.2</version>
        </dependency>

    </dependencies>


    <build>
        <resources>
            <resource> <!-- 源文件夹 -->
                <directory>src/main/webapp</directory>
                <!-- 指定编译到的路径为 META- INF/resources -->
                <targetPath>META-INF/resources</targetPath>
                <!-- 指定源文件夹中的哪些资源需要进行 编译-->
                <includes>
                    <include>
                        **/*.*
                    </include>
                </includes>
            </resource>
        </resources>
    </build>
?4.访问jsp即可
package com.sofwin;

import com.sofwin.service.impl.schedulingServiceImpl;
import org.springframework.beans.factory.annotation.Autowired;
import org.springframework.boot.SpringApplication;
import org.springframework.boot.autoconfigure.SpringBootApplication;
import org.springframework.scheduling.annotation.EnableAsync;
import org.springframework.scheduling.annotation.EnableScheduling;
import org.springframework.stereotype.Controller;
import org.springframework.web.bind.annotation.GetMapping;

import java.util.Map;

/**
 * @author : wentao
 * @version : 1.0
 */

@SpringBootApplication
@Controller
public class App {

  public static void main(String[]args){
      SpringApplication.run(App.class,args);
  }


  @GetMapping("/test")
    public  String test(){

      return "index.jsp";
}
}
?也可以设置前后缀在yml中? ?--视图解析器
spring:
  mvc:
    view:
      prefix: /WEB-INF/    #前缀
      suffix: .jsp        #后缀
二、SpringMVC的自动配置
1.拦截器
1.1创建拦截器实现HandlerInterceptor
package com.sofwin.interceptor;

import lombok.extern.slf4j.Slf4j;
import org.springframework.stereotype.Component;
import org.springframework.web.servlet.HandlerInterceptor;
import org.springframework.web.servlet.ModelAndView;

import javax.servlet.http.HttpServletRequest;
import javax.servlet.http.HttpServletResponse;

/**
 * @author : wentao
 * @version : 1.0
 */
@Component
@Slf4j
public class LoginInterceptor implements HandlerInterceptor {
    public boolean preHandle(HttpServletRequest request, HttpServletResponse response, Object handler) throws Exception {
        log.info("preHandle");
        return true;
    }

    public void postHandle(HttpServletRequest request, HttpServletResponse response, Object handler, ModelAndView modelAndView) throws Exception {
        log.info("postHandle");
    }

    public void afterCompletion(HttpServletRequest request, HttpServletResponse response, Object handler, Exception ex) throws Exception {
        log.info("afterCompletion");
    }
}
1.2 在mvc配置类中设置interceptor?
package com.sofwin.config;

import com.sofwin.interceptor.LoginInterceptor;
import org.springframework.beans.factory.annotation.Autowired;
import org.springframework.context.annotation.Configuration;
import org.springframework.web.servlet.config.annotation.InterceptorRegistry;
import org.springframework.web.servlet.config.annotation.WebMvcConfigurer;

/**
 * @author : wentao
 * @version : 1.0
 */
@Configuration
//注意这里springboot不让在写EnableWeb
public class MvcConfig  implements WebMvcConfigurer {
    @Autowired
    private LoginInterceptor loginInterceptor;
    public void addInterceptors(InterceptorRegistry registry) {
        registry.addInterceptor(loginInterceptor).addPathPatterns("/**");
    }
}
2.异常处理
2.1 Springboot有默认的错误处理
默认情况下,springboot会根据客户端的类型,返回不同的错误信息
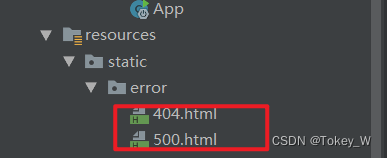
如果在resources文件夹下的static或者public文件夹下的error目录400.jsp、500.jsp等就会执行jsp的页面的错误提示? --可以识别404等客户端的错误
?2.2 springmvc的全局处理--只能识别服务器错误

?
实现HandlerExceptionResolver的接口 ,这个是返回的页面 是同步的异常处理器
package com.sofwin.ex;

import org.springframework.stereotype.Component;
import org.springframework.web.servlet.HandlerExceptionResolver;
import org.springframework.web.servlet.ModelAndView;

import javax.servlet.http.HttpServletRequest;
import javax.servlet.http.HttpServletResponse;

/**
 * @author : wentao
 * @version : 1.0
 */
//全局异常处理器只能处理服务的异常
@Component
public class MyExcepotr implements HandlerExceptionResolver {
    public ModelAndView resolveException(HttpServletRequest request, HttpServletResponse response, Object handler, Exception ex) {
       ModelAndView modelAndView=new ModelAndView("ex");
        return modelAndView;

        // if (ex instanceof NullPointerException)
        //可以使用这样进行不同的异常反映不同的结果
    }
}
2.3 异步的异常处理
package com.sofwin.ex;

import org.springframework.web.bind.annotation.ControllerAdvice;
import org.springframework.web.bind.annotation.ExceptionHandler;
import org.springframework.web.bind.annotation.ResponseBody;

import java.util.HashMap;
import java.util.Map;

/**
 * @author : wentao
 * @version : 1.0
 */
//一般用于异步的异常处理
@ControllerAdvice
public class ResponseException  {

    @ResponseBody
    @ExceptionHandler(NullPointerException.class)
    public Map test01(){
        Map map =new HashMap();
        map.put("message","空异步异常处理");
        return  map;

    }
    @ResponseBody
    @ExceptionHandler(Exception.class)
    public Map test02(){
        Map map =new HashMap();
        map.put("message","全异步异常处理");
        return  map;

    }
}
这个返回的就是json字符串数据?
三、任务管理
1、异步任务
在java应用中,绝大多数情况下都是通过同步的方式来实现交互处理的;但是在处理与第三方系统交互的时候,容易造成迟缓的情况。在spring3.x之后,已经内置了@Async来完美解决这个问题。
1.1开启异步任务
package com.sofwin;

import com.sofwin.service.impl.schedulingServiceImpl;
import org.springframework.beans.factory.annotation.Autowired;
import org.springframework.boot.SpringApplication;
import org.springframework.boot.autoconfigure.SpringBootApplication;
import org.springframework.scheduling.annotation.EnableAsync;
import org.springframework.scheduling.annotation.EnableScheduling;
import org.springframework.stereotype.Controller;
import org.springframework.web.bind.annotation.GetMapping;

import java.util.Map;

/**
 * @author : wentao
 * @version : 1.0
 */

@SpringBootApplication
@EnableAsync   //异步任务
public class App {

  public static void main(String[]args){
      SpringApplication.run(App.class,args);
  }


}
1.2 将方法设置为异步任务
?
package com.sofwin.service.impl;

import org.springframework.scheduling.annotation.Async;
import org.springframework.stereotype.Service;

/**
 * @author : wentao
 * @version : 1.0
 */
//异步任务
    //异步任务就是当这个方法没执行完,也会执行性下面的语句
@Service
public class AsyncServiceImpl {
    @Async
    public  void service01(){
        System.out.println("任务1开始");
        try {
            Thread.sleep(1000);
        } catch (InterruptedException e) {
            e.printStackTrace();
        }
        System.out.println("任务1结束");
    }
    @Async
    public  void service02(){
        System.out.println("任务2开始");
        try {
            Thread.sleep(1000);
        } catch (InterruptedException e) {
            e.printStackTrace();
        }
        System.out.println("任务2结束");
    }
}
1.3 测试
package com.sofwin;

import com.sofwin.service.impl.AsyncServiceImpl;
import org.junit.jupiter.api.Test;
import org.springframework.beans.factory.annotation.Autowired;
import org.springframework.boot.test.context.SpringBootTest;

import java.io.IOException;

/**
 * @author : wentao
 * @version : 1.0
 */
@SpringBootTest
public class MyTest {
    @Autowired
    private AsyncServiceImpl asyncService;
    @Test
    public  void test01(){
        System.out.println("start");
        asyncService.service01();
        asyncService.service02();
        System.out.println("end");
        try {
          //阻塞方法
            System.in.read();
        } catch (IOException e) {
            e.printStackTrace();
        }
    }
}
?
?2. 定时任务
我们经常需要执行一些定时任务,如果需要在每条凌晨的时候,分析一次前一天的日志信息。Spring为我们体用了异步执行任务调度的方式
?2.1 开启定时任务
@EnableScheduling?
package com.sofwin;

import com.sofwin.service.impl.schedulingServiceImpl;
import org.springframework.beans.factory.annotation.Autowired;
import org.springframework.boot.SpringApplication;
import org.springframework.boot.autoconfigure.SpringBootApplication;
import org.springframework.scheduling.annotation.EnableAsync;
import org.springframework.scheduling.annotation.EnableScheduling;
import org.springframework.stereotype.Controller;
import org.springframework.web.bind.annotation.GetMapping;
import springfox.documentation.swagger2.annotations.EnableSwagger2;

import java.util.Map;

/**
 * @author : wentao
 * @version : 1.0
 */

@SpringBootApplication
@Controller
@EnableAsync   //异步任务
@EnableScheduling  //开启定时任务
@EnableSwagger2
public class App {

  public static void main(String[]args){
      SpringApplication.run(App.class,args);
  }


  @Autowired
  private schedulingServiceImpl  schedulingService;

  @GetMapping("/test")
    public  String test(){
//    Map map =null;
    map.put("ww",11);
//      int i=1/0;
      schedulingService.service01();
      return "index";
}
}
?2.2 在方法中声明条件
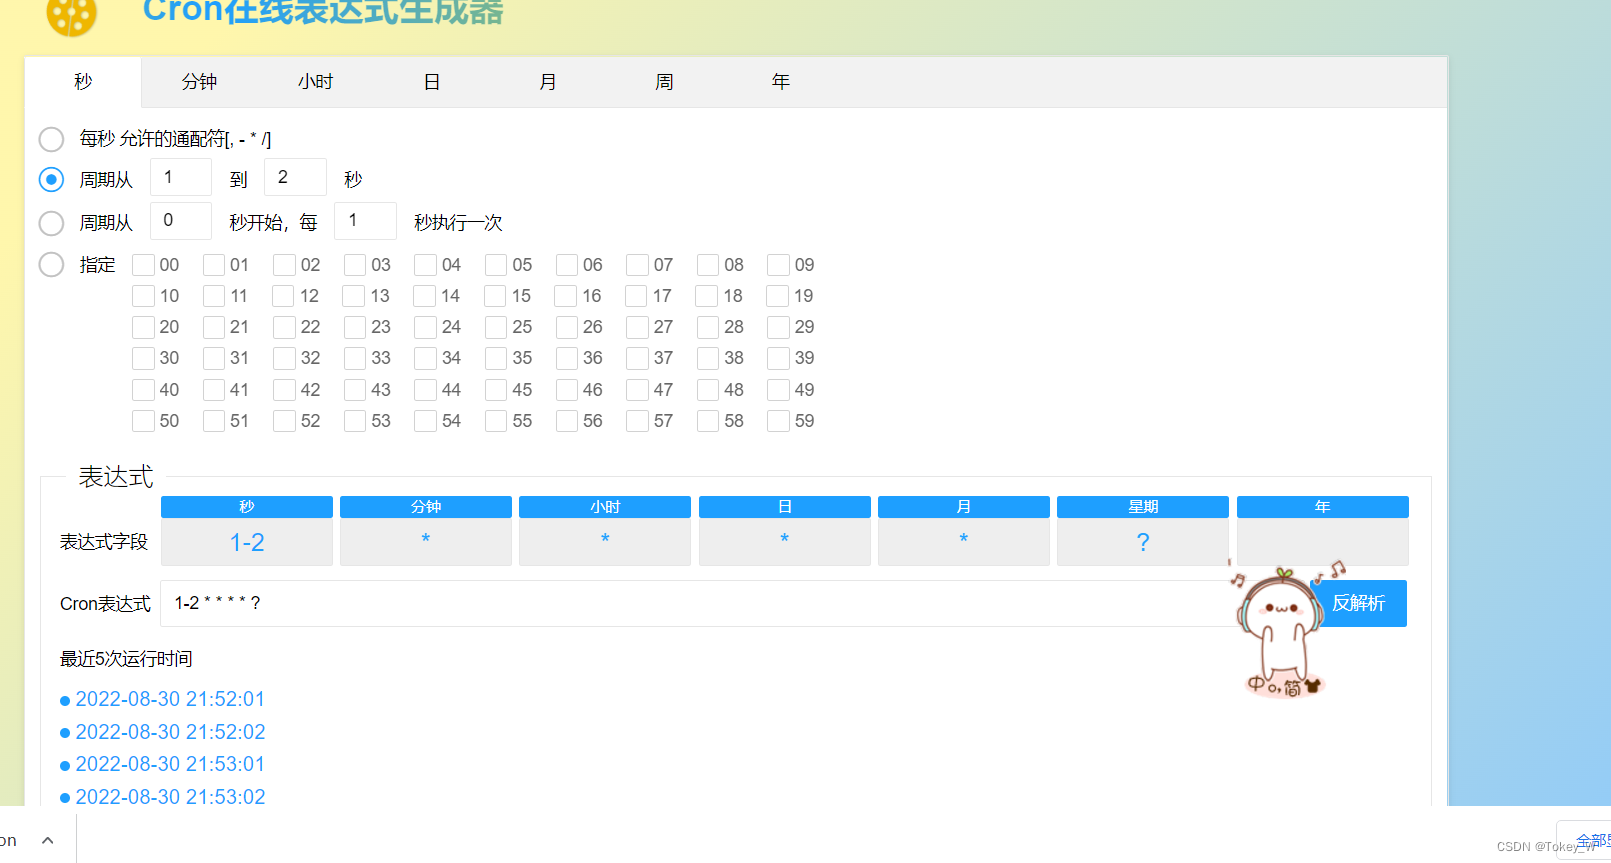
@Scheduled(cron ="1/5 * * * * ?")
cron表达式的含义

cron表达式网上有在线的工具,直接使用即可、
package com.sofwin.service.impl;

import org.springframework.scheduling.annotation.Async;
import org.springframework.scheduling.annotation.Scheduled;
import org.springframework.stereotype.Service;

import java.util.Date;

/**
 * @author : wentao
 * @version : 1.0
 */
//异步任务
    //异步任务就是当这个方法没执行完,也会执行性下面的语句
@Service
public class schedulingServiceImpl {
    //conn 表达式规则:  直接在网上查找conn表达式的在线工具
    //从第一秒开始  每过5秒执行一次
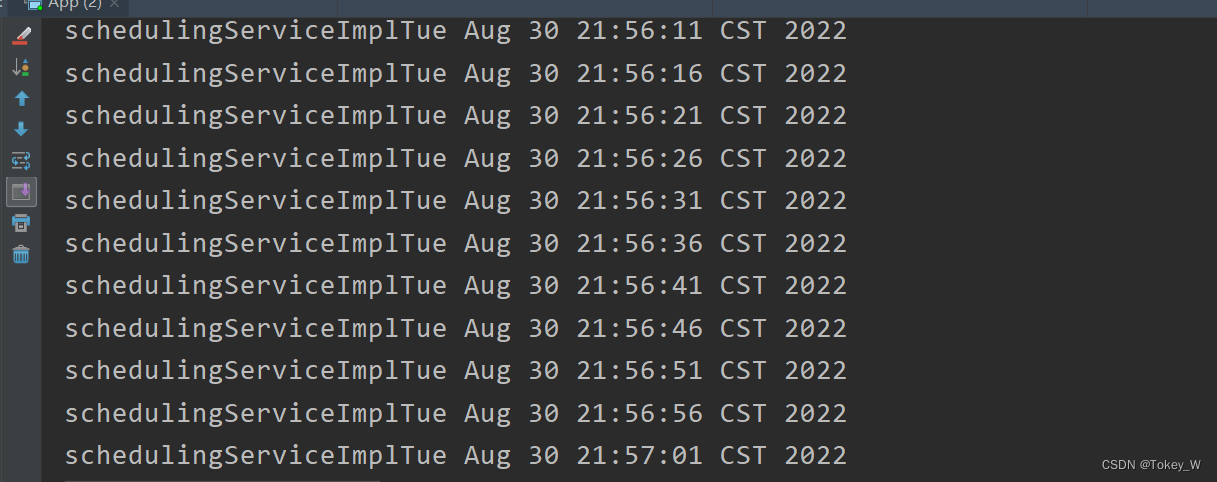
    @Scheduled(cron ="1/5 * * * * ?")
    public  void service01(){
        System.out.println("schedulingServiceImpl"+new Date());
    }

}
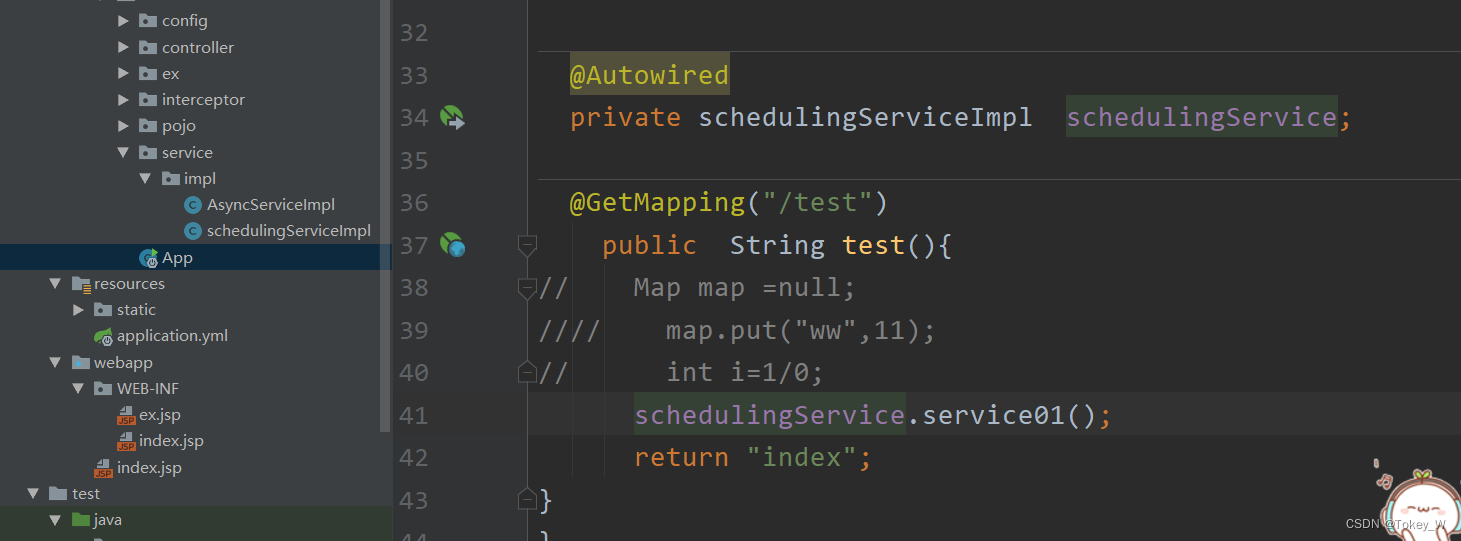
2.3 测试
?
?四、健康监控
我们经常要了解当前应用的运行情况,通常引入spring-boot-starter-actuator,可以使用springboot为我们提供的准生成环境下的应用的监控和管理功能。我们可以通过Http、jmx、ssh进行操作,自动得到审计、监控及指标信息等。
?1、基本使用
导入依赖
     <!--健康检查-->
        <dependency>
            <groupId>org.springframework.boot</groupId>
            <artifactId>spring-boot-starter-actuator</artifactId>
        </dependency>
?配置文件
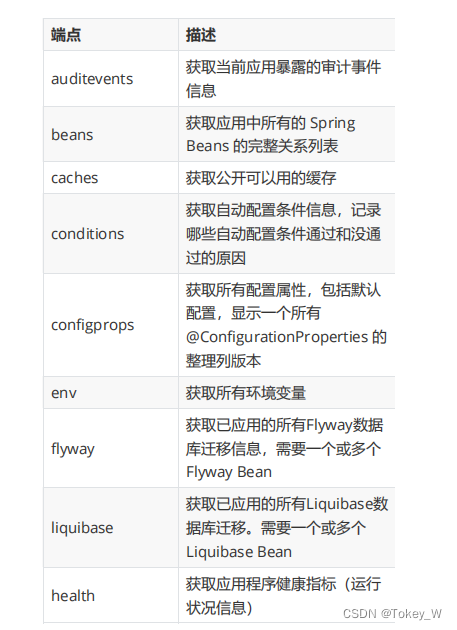
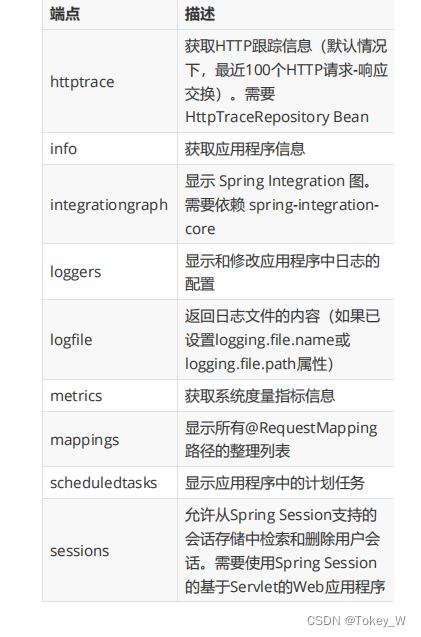
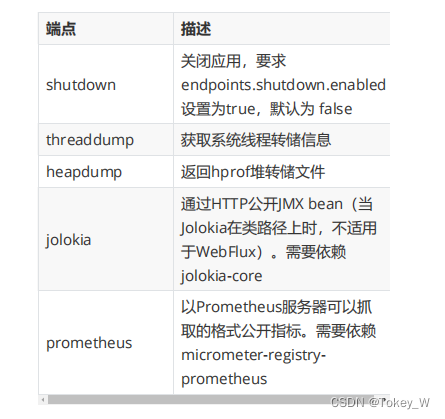
在springboot中,Actuator默认只开放health和info两个端点,添加一下配置可以开放完整的监控端点
management:
  endpoints:
    web:
      exposure:
#      开放所有端口
#直接访问http://localhost/actuator即可得到所有的端口
        include: "*"

  server:
#  设置端口9999
    port: 9999
#   修改访问路径 manager
#http://localhost:9999/manager/actuator
    base-path: /manager
访问
如果不设置默认是?localhost/actuator
因为设置了端口和path因此变成了localhost:9999/manager/actuator
? ?
?
常见的端口
 ??
??
? ?
?
 ??
??
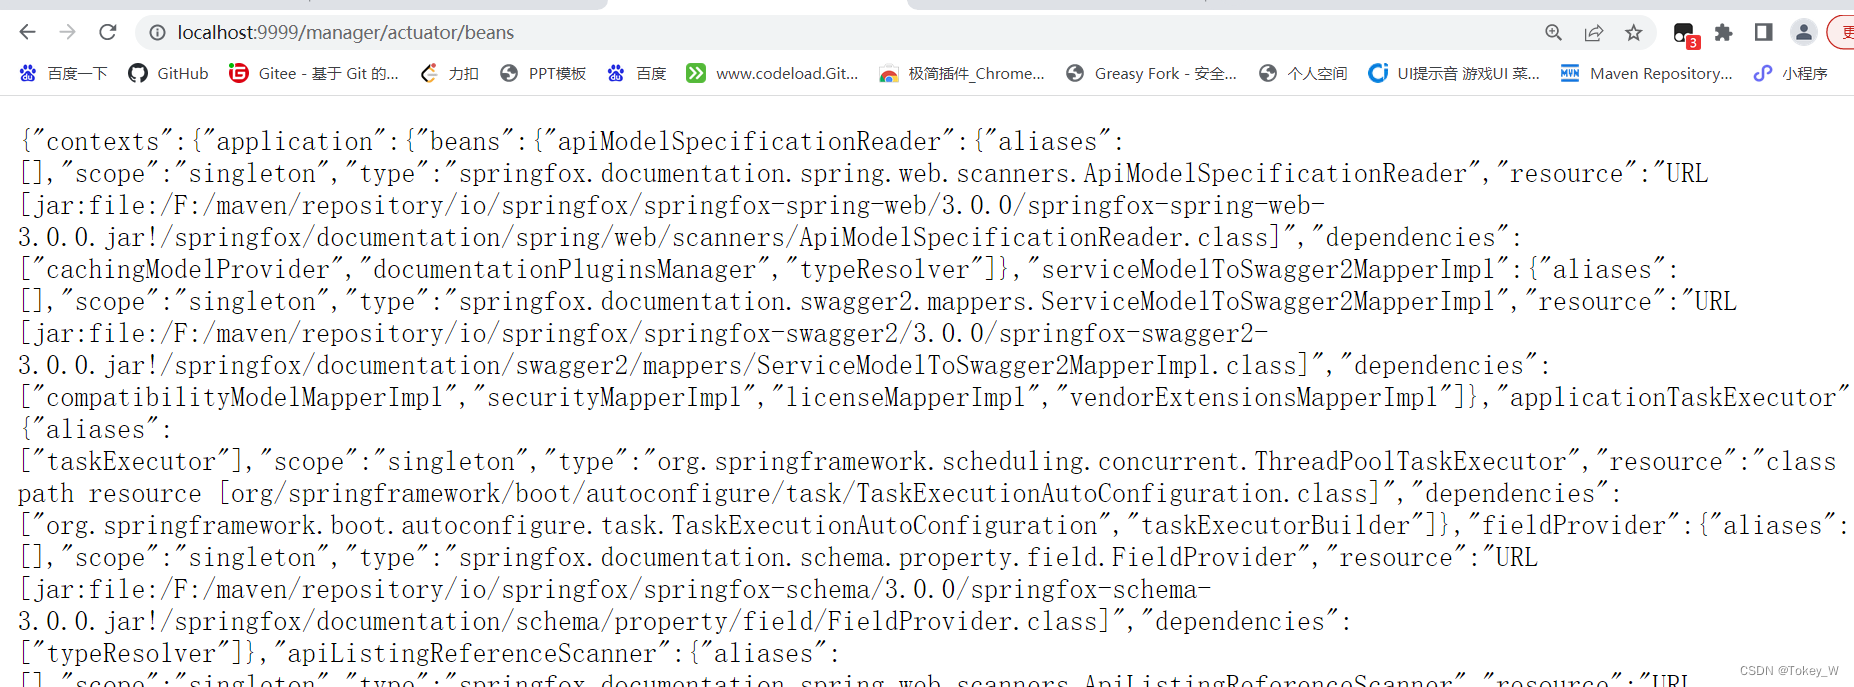
向要查看的话直接复制访问即可??
例如访问beans
?
? ?
?
?2. springboot-admin
这样查询到的数据很乱,因此 actuator提供了可视化的界面,可以监控其他boot工程的各个端点
2.1 先创建客户端
可与有多个客户端? 然后通过一个服务端进行接收、
导入依赖
 <!--springboot-admin提供了健康检查的可视化界面-->
        <!--设置客户端-->
        <dependency>
            <groupId>de.codecentric</groupId>
            <artifactId>spring-boot-admin-starter-client</artifactId>
            <version>2.5.2</version>
        </dependency>
配置url
boot:
    admin:
      client:
#      springboot-admin可视化界面的url设置
        url: http://127.0.0.1:90
2.2 创建服务端端来接受客户端?
新创建一个工程
导入依赖
 <dependencies>
       <dependency>
           <groupId>org.springframework.boot</groupId>
           <artifactId>spring-boot-starter-web</artifactId>
       </dependency>
       <!--健康检查的服务端 加上ui界面-->
       <dependency>
           <groupId>de.codecentric</groupId>
           <artifactId>spring-boot-admin-server</artifactId>
           <version>2.5.2</version>
       </dependency>
       <dependency>
           <groupId>de.codecentric</groupId>
           <artifactId>spring-boot-admin-server-ui</artifactId>
           <version>2.5.2</version> </dependency>
</dependencies>设置端口? 因为客户端设置url的端口是90? 因此?服务端要设置
server:
port: 90创建启动类?
package com.sofwin;

import de.codecentric.boot.admin.server.config.EnableAdminServer;
import org.springframework.boot.SpringApplication;
import org.springframework.boot.autoconfigure.SpringBootApplication;

/**
 * @author : wentao
 * @version : 1.0
 */
@SpringBootApplication
@EnableAdminServer
public class App {

    public static void main(String[]args){
        SpringApplication.run(App.class,args);
    }
}
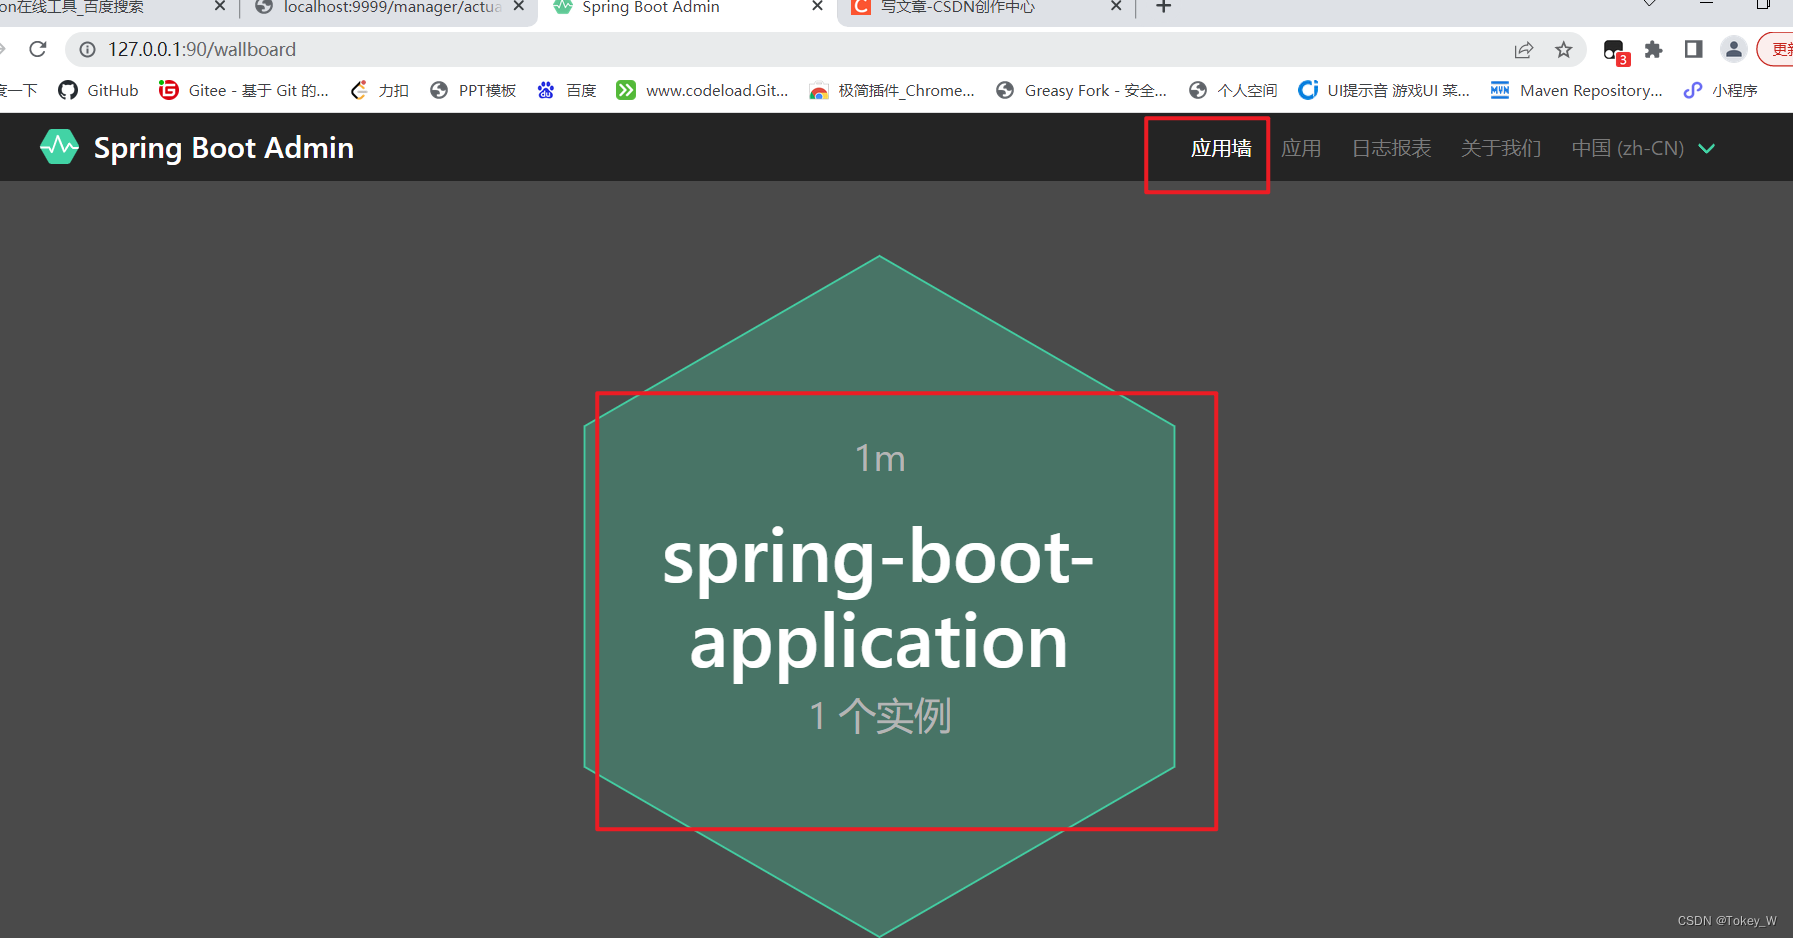
然后分别启动客户端和服务端
?直接访问url即可??http://127.0.0.1:90/

 ?
?
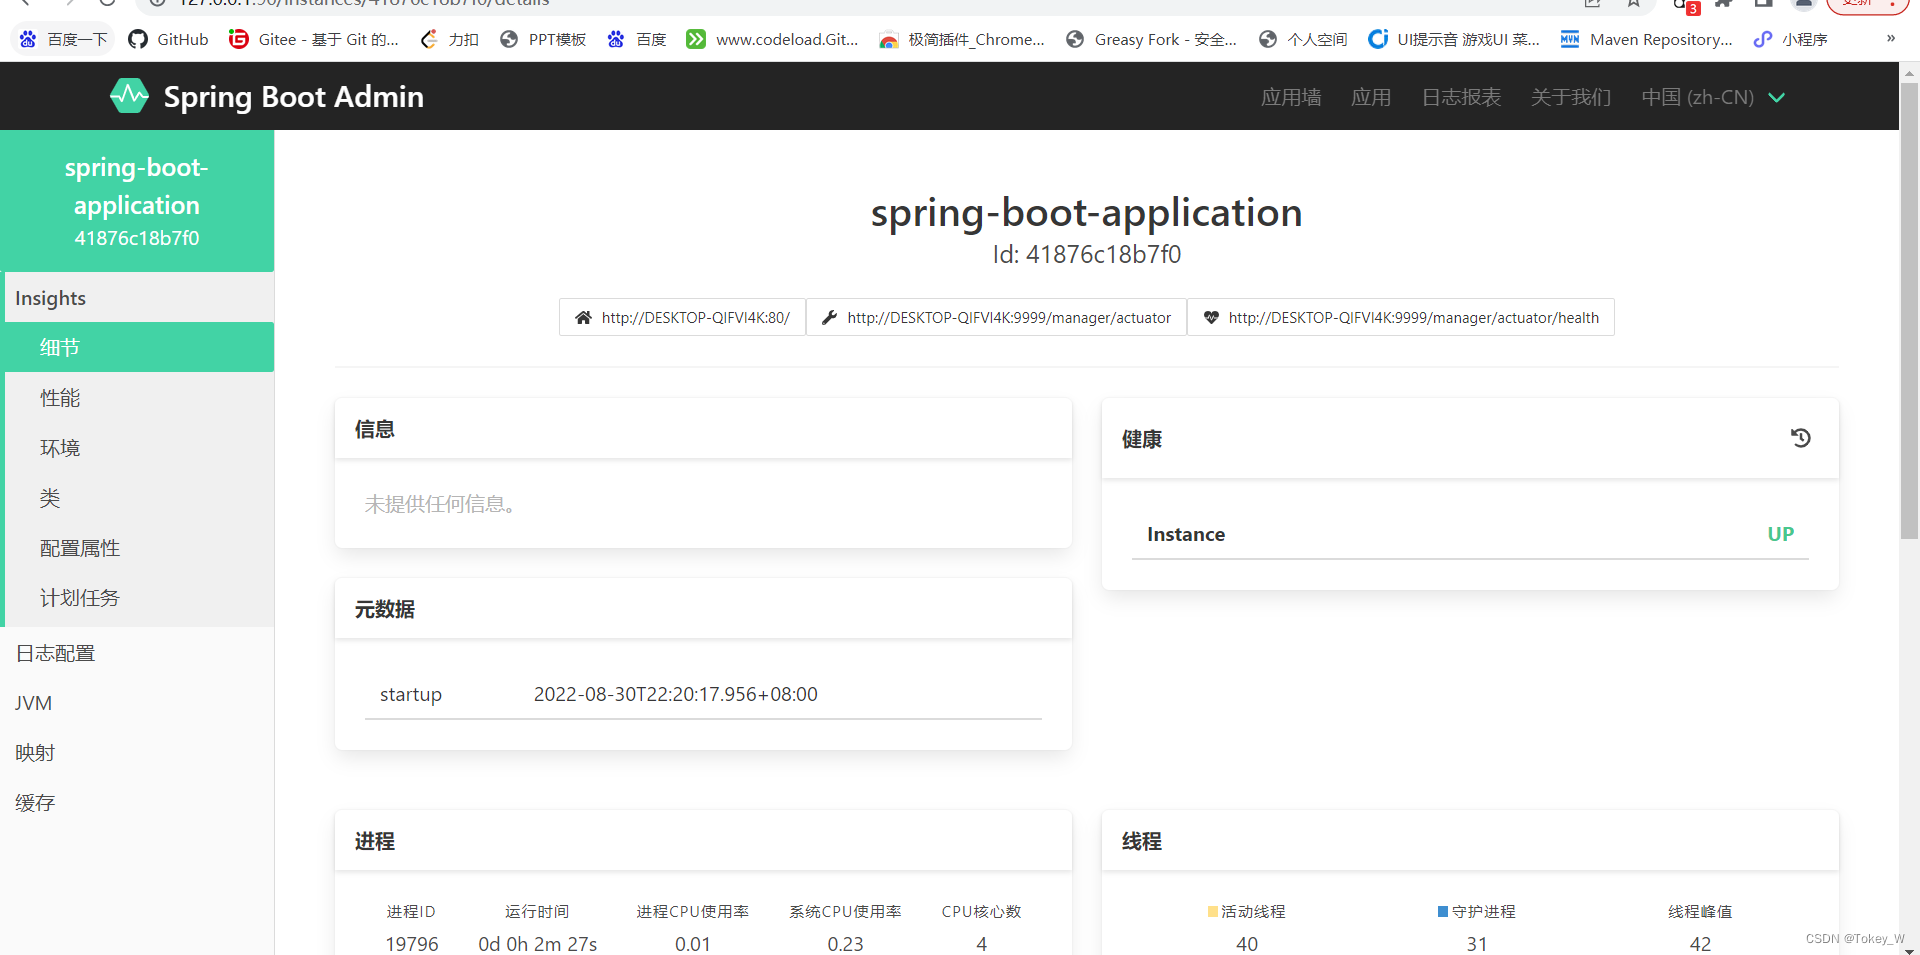
?进入后对应的页面就是各种端口
?五、swapper 文档框架
swapper 是一个api框架,可以帮助我们自动生成api的文档,还可以在线测试api的接口
1、导入依赖
 <!--文档框架  swagger   要跟springboot的低版本兼容  2.4.8-->
        <dependency>
            <groupId>io.springfox</groupId>
            <artifactId>springfox-boot-starter</artifactId>
            <version>3.0.0</version>
        </dependency>
这样要注意的是 swagger的3.0的版本,我试了一下哟啊跟springboot的2.4.8使用,boot的版本太高会出现问题
?2、在app中加入swapper2的注解
package com.sofwin;

import com.sofwin.service.impl.schedulingServiceImpl;
import org.springframework.beans.factory.annotation.Autowired;
import org.springframework.boot.SpringApplication;
import org.springframework.boot.autoconfigure.SpringBootApplication;
import org.springframework.scheduling.annotation.EnableAsync;
import org.springframework.scheduling.annotation.EnableScheduling;
import org.springframework.stereotype.Controller;
import org.springframework.web.bind.annotation.GetMapping;
import springfox.documentation.swagger2.annotations.EnableSwagger2;

import java.util.Map;

/**
 * @author : wentao
 * @version : 1.0
 */

@SpringBootApplication
@Controller
@EnableAsync   //异步任务
@EnableScheduling  //开启定时任务
@EnableSwagger2 //开启swapper2
public class App {

  public static void main(String[]args){
      SpringApplication.run(App.class,args);
  }


  @Autowired
  private schedulingServiceImpl  schedulingService;

  @GetMapping("/test")
    public  String test(){
//    Map map =null;
    map.put("ww",11);
//      int i=1/0;
      schedulingService.service01();
      return "index";
}
}
3、设置config,注解配置类?
package com.sofwin.config;

import io.swagger.annotations.ApiOperation;
import org.springframework.context.annotation.Bean;
import org.springframework.context.annotation.Configuration;
import org.springframework.web.servlet.config.annotation.WebMvcConfigurer;
import springfox.documentation.builders.ApiInfoBuilder;
import springfox.documentation.builders.PathSelectors;
import springfox.documentation.builders.RequestHandlerSelectors;
import springfox.documentation.oas.annotations.EnableOpenApi;
import springfox.documentation.service.ApiInfo;
import springfox.documentation.service.Contact;
import springfox.documentation.spi.DocumentationType;
import springfox.documentation.spring.web.plugins.Docket;

/**
 * @author : wentao
 * @version : 1.0
 */
@Configuration
@EnableOpenApi

//http://127.0.0.1/swagger-ui/index.html 直接访问这个即可
//如果有端口就写端口
public class SwaggerConfig  {

    @Bean
    public Docket createRestApi(){
        return new Docket(DocumentationType.SWAGGER_2)
                // 是否启用Swagger
                .enable(true)
                // 用来创建该API的基本信息,展示在文档的页面中(自定义展示的信息)
                .apiInfo(apiInfo())
                // 设置哪些接口暴露给Swagger展示
                .select()
                // 扫描所有有注解的api,用这种方式更灵活
                .build();
        //.pathMapping(pathMapping);
    }

    /**
     * 添加摘要信息
     */
    private ApiInfo apiInfo(){
        // 用ApiInfoBuilder进行定制
        return new ApiInfoBuilder()
                // 设置标题
                .title("系统数据接口")
                // 描述
                .description("适用于V1.0版本")
                // 作者信息
                .contact(new Contact("sofwin", "http://www.sofwin.com", "laomake@hotmail.com"))
                // 版本
                .version("V1.0")
                .build();
    }
}
4、访问
启动App然后访问
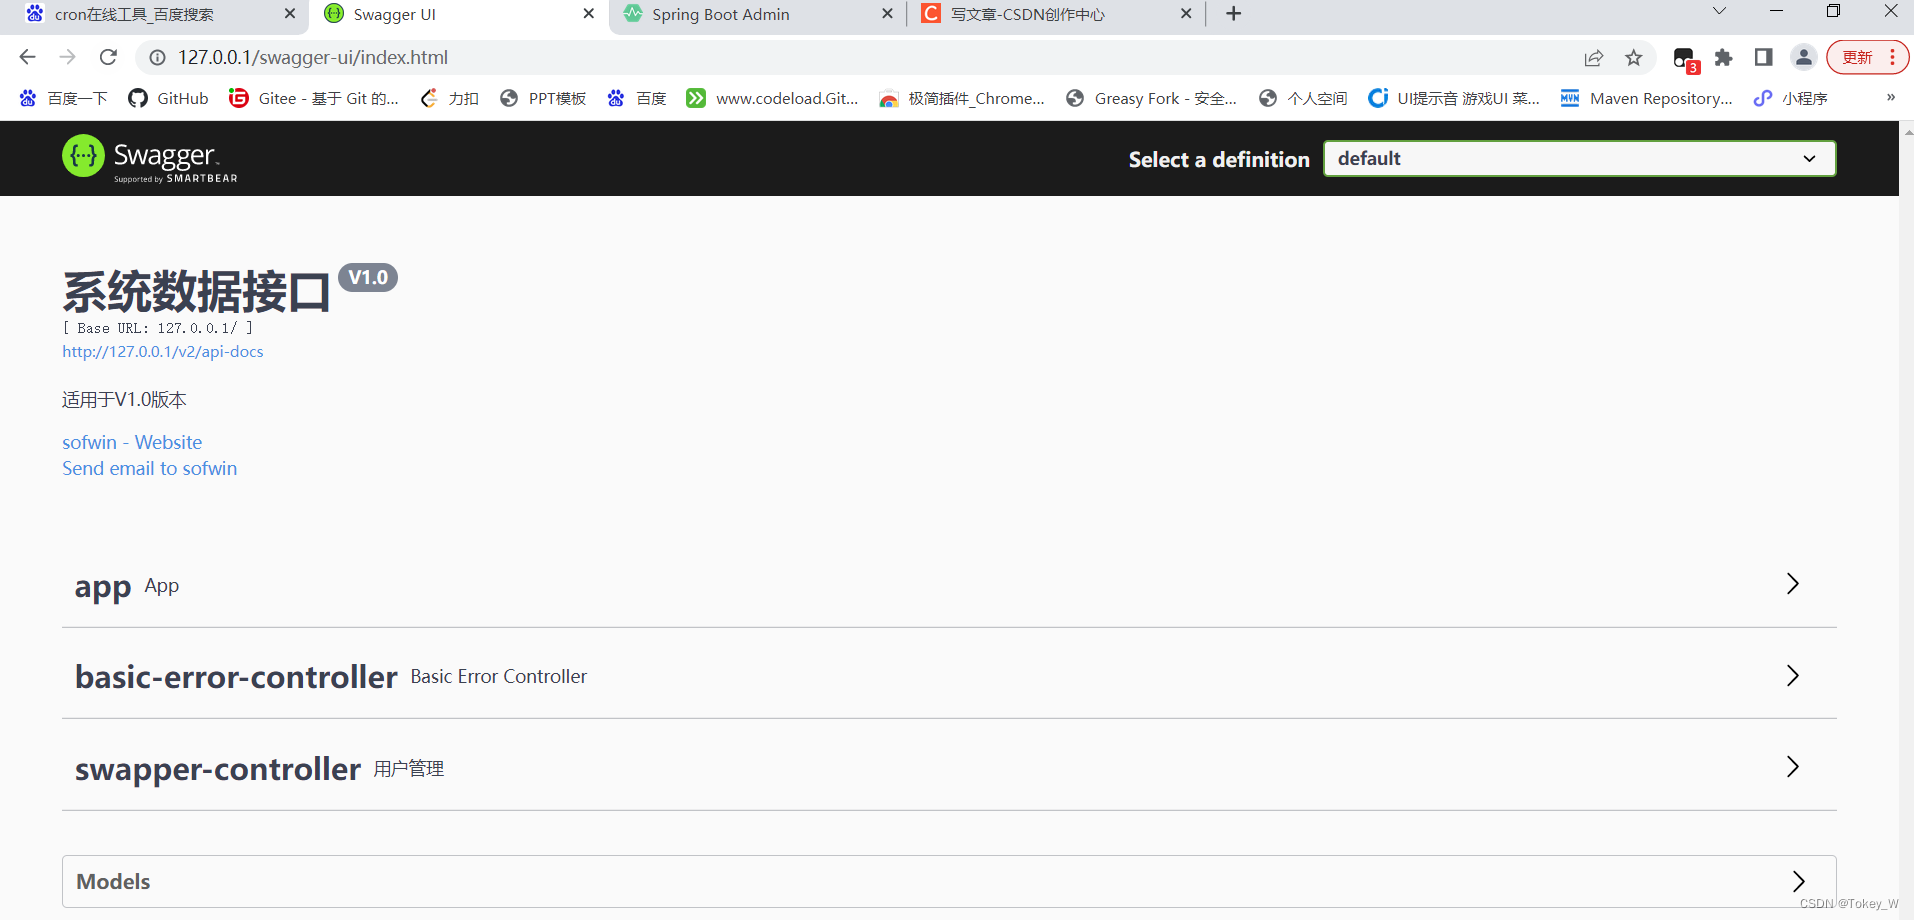
网址是:127.0.0.1/swagger-ui/index.html
?出现这个页面代表正确了
?5、标注接口
package com.sofwin.pojo;

import io.swagger.annotations.ApiModel;
import io.swagger.annotations.ApiModelProperty;
import lombok.Data;

/**
 * @author : wentao
 * @version : 1.0
 */
@Data
@ApiModel(value = "用户实体类")
public class User {
    @ApiModelProperty(value = "id",name = "主键")
    private Integer id;
    @ApiModelProperty(value = "userName",name = "用户名")
    private String userName;
}
?
package com.sofwin.controller;

import com.sofwin.pojo.User;
import io.swagger.annotations.Api;
import io.swagger.annotations.ApiOperation;
import io.swagger.annotations.ApiParam;
import org.springframework.stereotype.Controller;
import org.springframework.web.bind.annotation.GetMapping;
import org.springframework.web.bind.annotation.RequestMapping;
import org.springframework.web.bind.annotation.ResponseBody;

/**
 * @author : wentao
 * @version : 1.0
 */
@Controller
@RequestMapping("/user")
@Api(value = "/user", description = "用户管理")
public class SwapperController {

    @GetMapping("/test")
    @ResponseBody
    @ApiOperation(value ="/test", notes="用户查询")
    public  String test(@ApiParam(value = "主键",defaultValue ="1" ) Integer id){
      return  id.toString();
    }

    @GetMapping("/query")
    @ResponseBody
    @ApiOperation(value ="/query", notes="查询单个用户")
    public User test02(@ApiParam(value = "主键",defaultValue ="1" ) Integer id,
                       @ApiParam(value = "用户名",defaultValue ="zhangsan" ) String userName){
       User user=new User();
       user.setId(id);
       user.setUserName(userName);
        System.out.println(user);
        return  user;
    }
}
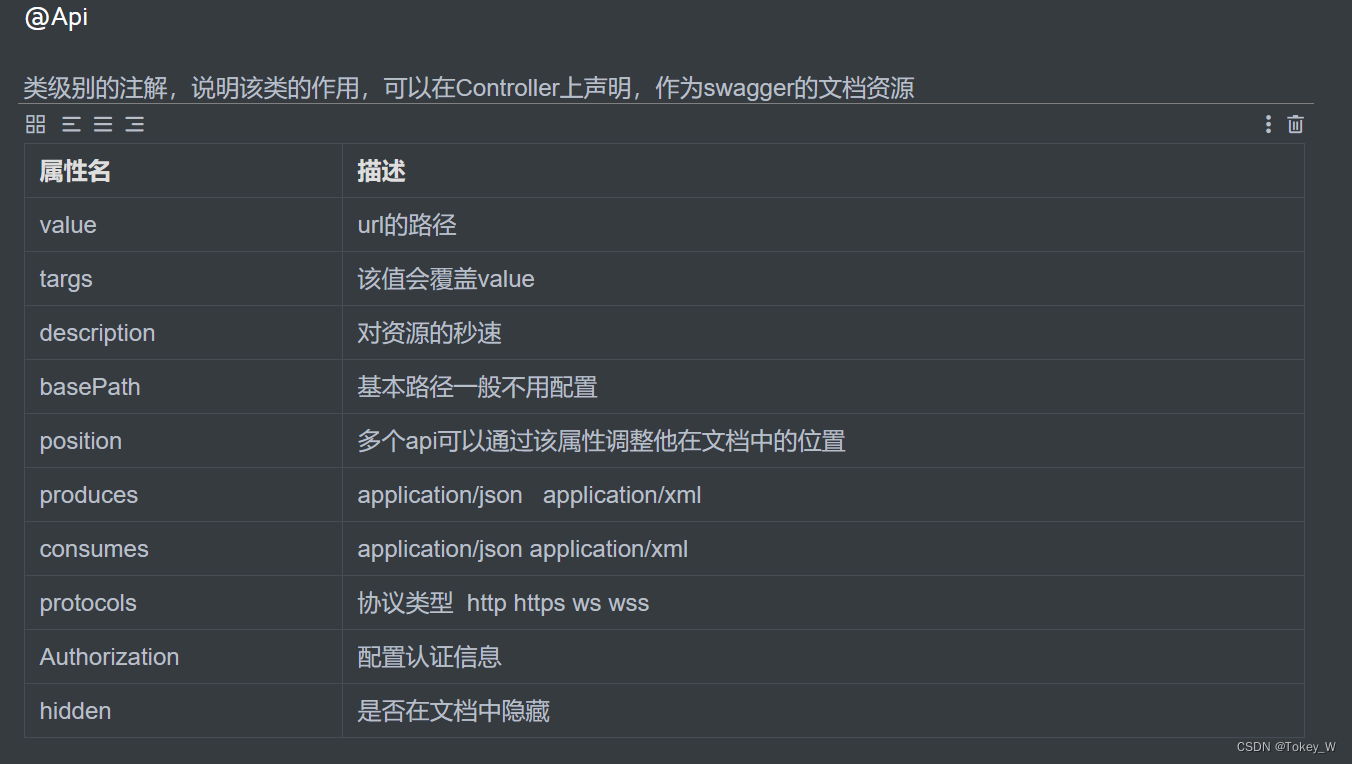
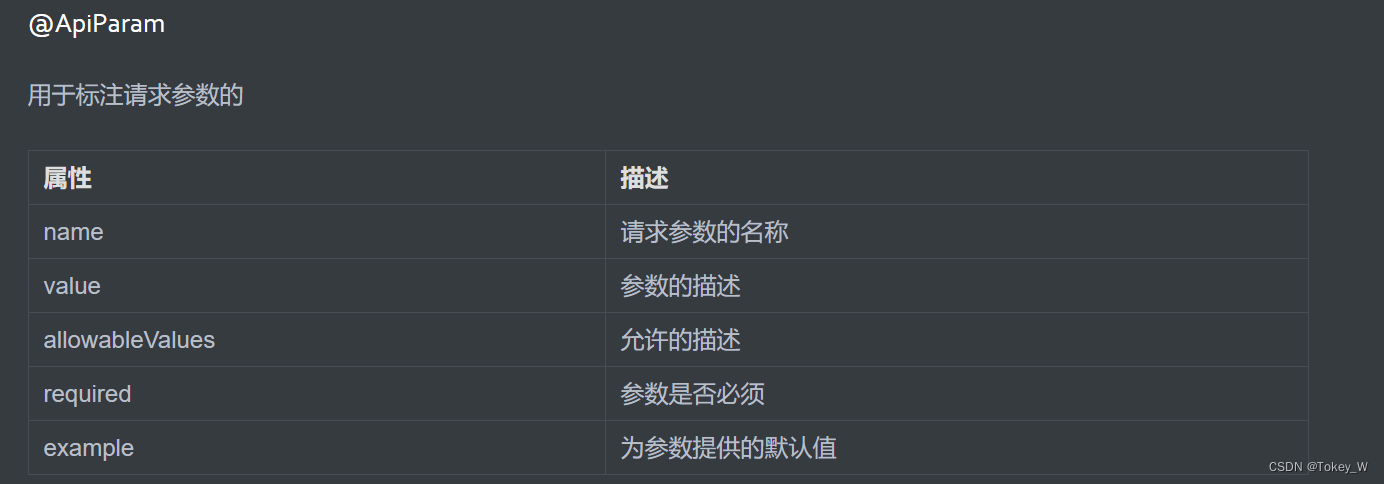
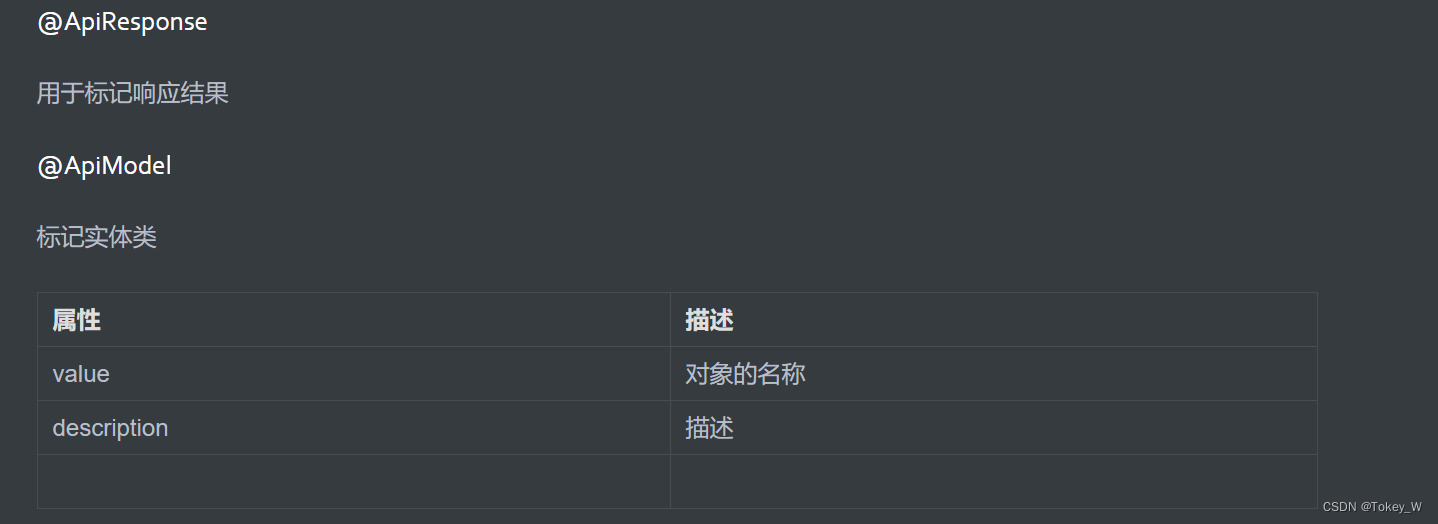
接口的常用注解?
 ?
?
 ?
?
 ?
?
 ?
?
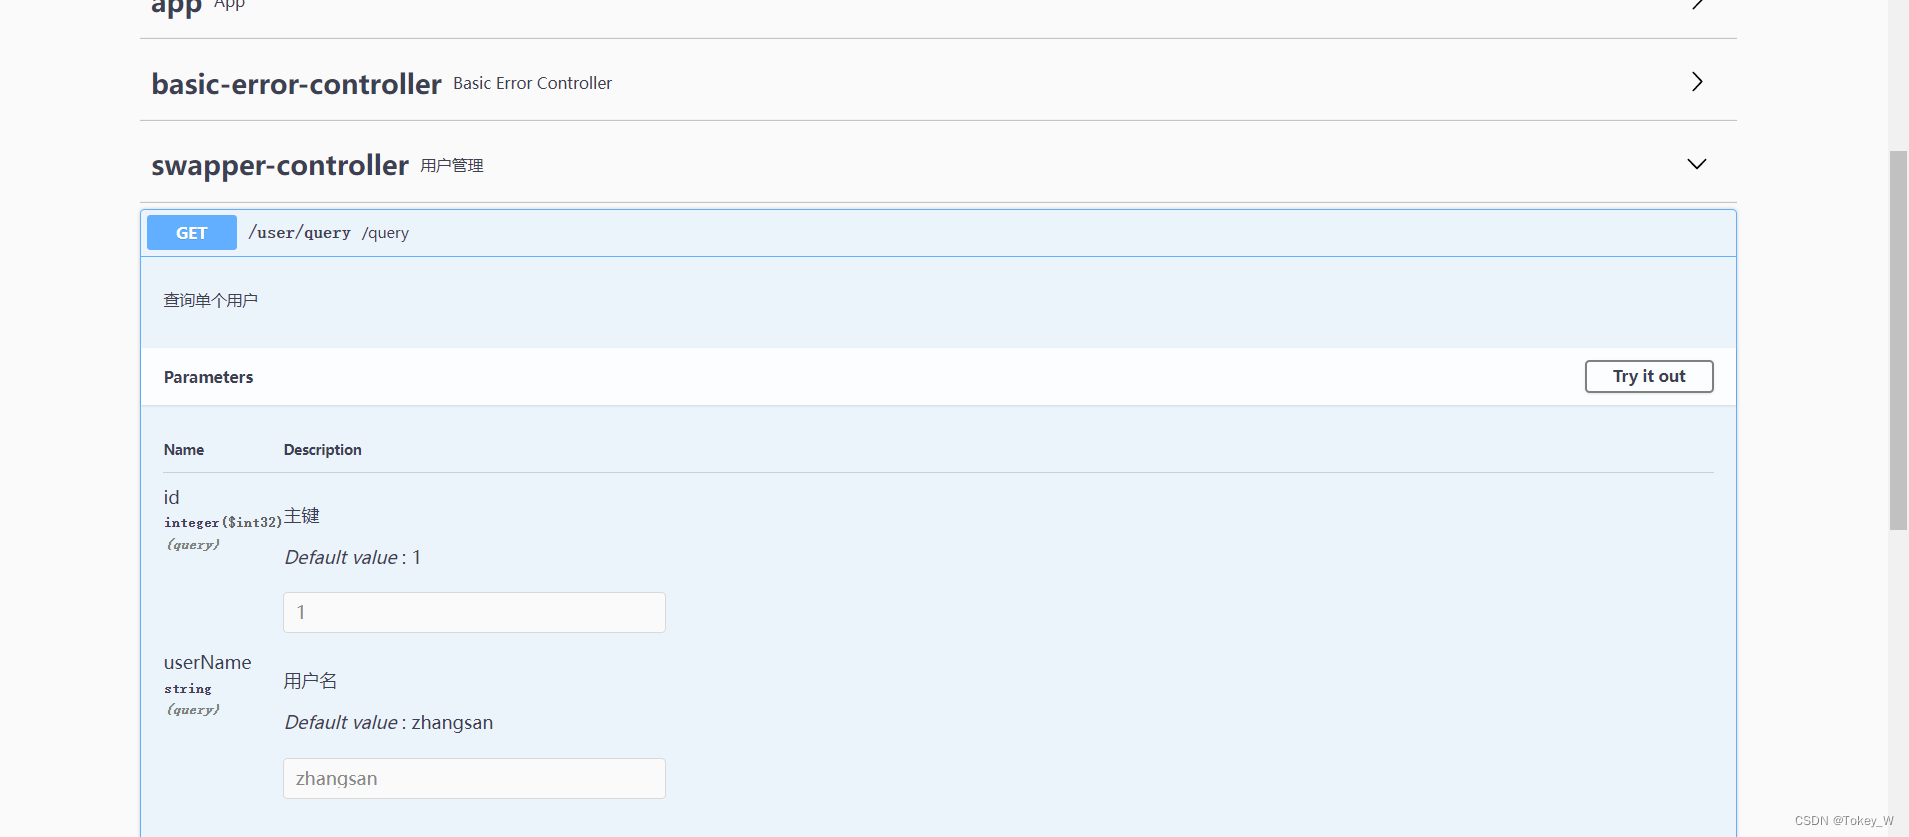
设置后效果
