SpringBoot+axios结合发送ajax
1.搭建环境
1.1 创建表并添加数据
DROP TABLE t_posts;

CREATE TABLE IF NOT EXISTS t_posts(
	pid INT PRIMARY KEY AUTO_INCREMENT,
	author VARCHAR(20) NOT NULL DEFAULT '海康',
	title VARCHAR(50) NOT NULL DEFAULT '中国人民'

)ENGINE=INNODB DEFAULT CHARSET=utf8;
1.2 创建SpringBOot项目
![[外链图片转存失败,源站可能有防盗链机制,建议将图片保存下来直接上传(img-8ftnt2pP-1663596153363)(D:\typora笔记\axios\img\1663576096597.png)]](https://img-blog.csdnimg.cn/261e525a890b4d6390a9fa89853422cb.png)
1.3 相关数据库配置:
#修改端口号
server:
  port: 80

spring:
  #配置数据源信息
  datasource:
    #配置数据源类型
    type: com.zaxxer.hikari.HikariDataSource
    driver-class-name: com.mysql.jdbc.Driver
    url: jdbc:mysql://localhost:3306/crud?characterEncoding=utf-8&useSSL=false
    username: root
    password: root
POJO类
package com.haikang.axios.pojo;

import lombok.AllArgsConstructor;
import lombok.Data;
import lombok.NoArgsConstructor;
import lombok.ToString;

import java.io.Serializable;

/**
 * @Author 海康
 * @Version 1.0
 */
@Data
@AllArgsConstructor
@NoArgsConstructor
@ToString
public class Post implements Serializable {
    private Integer pid;
    private String author;
    private String title;
}
统一数据响应类
package com.haikang.axios.pojo;

import lombok.Data;

import java.io.Serializable;

/**
 * @Author 海康
 * @Version 1.0
 * Json格式的数据进行响应
 */
@Data
public class JsonResult<E> implements Serializable {
    private Integer state;//状态码
    private String message;//描述信息
    private E date;// 数据

    public JsonResult() {
    }

    public JsonResult(Integer state) {
        this.state = state;
    }

    public JsonResult(Throwable e) {
        this.message = e.getMessage();//获取错误信息
    }

    public JsonResult(Integer state, E date) {
        this.state = state;
        this.date = date;
    }

    public JsonResult(Integer state, String message, E date) {
        this.state = state;
        this.message = message;
        this.date = date;
    }
}
1.4 测试
创建index.html页面,并且需要引入axios文件
<script src="https://cdn.bootcdn.net/ajax/libs/axios/0.27.2/axios.js"></script>
<!DOCTYPE html>
<html lang="en" xmlns:th="http://www.thymeleaf.org">
<head>
    <meta charset="UTF-8">
    <title>index页面</title>
    <script src="https://cdn.bootcdn.net/ajax/libs/axios/0.21.1/axios.min.js"></script>
</head>
<body>
<script>

    console.log(axios);

</script>
</body>
</html>
打开页面访问http://localhost/:在控制台中出现说明测试成功

2.axios基本使用
| API | 描述 |
|---|---|
axios(config) | config中需要接收一个对象类型的参数,可以指定相关的配置信息 |
2.1 使用axios(config)发送GET请求
前端页面:
  // 获取所有按钮对象
  let bnts = document.getElementsByTagName("button");

  // 为一个按钮绑定单击事件,使用axios发送ajax请求,查询所有信息
  bnts[0].onclick = ()=>{
    axios({
      method:'GET',
      url:'http://localhost:80/axios/posts'
    }).then(
            (value)=>{
              console.log(value);
            },
            (reason)=>{
              console.log(reason);
            }
    );
  }
Dao层的编写
Mapper接口
@Mapper
public interface PostMapper {
    // 查询所有Posts信息
    List<Post> getAllPosts();
}
xml文件
<!--
    // 查询所有Posts信息
    List<Post> getAllPosts();
-->
    <select id="getAllPosts" resultType="Post">
        select * from t_posts;
    </select>
Service层
PostService接口
public interface PostService {
    // 查询所有Post信息
    List<Post> getPosts();
}
PostServiceImpl实现类
/**
 * @Author 海康
 * @Version 1.0
 */
@Service
public class PostServiceImpl implements PostService {

    @Autowired
    private PostMapper postMapper;

    @Override
    public List<Post> getPosts() {
        return postMapper.getAllPosts();
    }
}
controller层
package com.haikang.axios.controller;

import com.haikang.axios.pojo.Post;
import com.haikang.axios.service.PostService;
import org.springframework.beans.factory.annotation.Autowired;
import org.springframework.web.bind.annotation.RequestMapping;
import org.springframework.web.bind.annotation.RestController;

import java.util.List;

/**
 * @Author 海康
 * @Version 1.0
 */
@RestController
@RequestMapping("/axios")
public class AxiosController {

    @Autowired
    private PostService postService;

    @RequestMapping("/posts")
    public List<Post> posts(){
        return postService.getPosts();
    }
}
返回结果

2.2 使用axios(config)发送POST请求
案例:使用POST请求添加用户信息
  // 为第二个按钮绑定单击事件,使用axios发送ajax请求,添加一个用户信息
  bnts[1].onclick = ()=>{
      axios({
          method: 'POST',
          url:'http://localhost:80/axios/posts',
          data:{
              "title": "haikang",
              "author": "haiknag人民",
          }
      }).then(
          (value)=>{
              console.log(value);
          },
          (reason)=>{
              console.log(reason);
          }
      );
  }
dao层
mapper接口
@Mapper
public interface PostMapper {

    // 添加一个Post信息
    Integer addPost(Post post);
}
xml文件
<!--
    // 添加一个Post信息
    Integer addPost(Post post);
-->
    <insert id="addPost" useGeneratedKeys="true" keyProperty="pid">
        insert into t_posts (author,title) value(#{author},#{title});
    </insert>
service层
service接口
public interface PostService {

    Integer addPost(Post post);
}
service实现类
@Service
public class PostServiceImpl implements PostService {

    @Autowired
    private PostMapper postMapper;


    @Override
    public Integer addPost(@RequestBody Post post) {
        return postMapper.addPost(post);
    }
}
controller层
@RestController
@RequestMapping("/axios")
public class AxiosController {
    private static final Integer OK = 200;

    @Autowired
    private PostService postService;


    @PostMapping("/posts")
    public JsonResult addPost(@RequestBody Post post){
        System.out.println(post);
        return new JsonResult(OK,postService.addPost(post));
    }
}
响应数据:

2.3使用axios(config)发送PUT请求
**案例:**修改Post信息
  // 为第三个按钮绑定单击事件,修改post信息
  bnts[2].onclick = ()=>{
      axios({
          method:'PUT',
          url:'http://localhost:80/axios/posts',
          data:{
              "pid":10,
              "title": "西安",
              "author": "haiknag人民"
          }
      }).then(
          (value)=>{
              console.log(value);
          },
          (reason)=>{
              console.log(reason);
          }
      );
  }
dao层
Mapper接口
@Mapper
public interface PostMapper {

    // 修改Post信息
    Integer updatePost(Post post);
}
xml文件
<!--
    // 修改Post信息
    Integer updatePost(Post post);
-->
    <update id="updatePost">
        update t_posts set author=#{author},title=#{title} where pid=#{pid}
    </update>
service层
public interface PostService {

    // 修改Post信息
    Integer updatePost(Post post);
}
controller层
package com.haikang.axios.controller;

import com.haikang.axios.pojo.JsonResult;
import com.haikang.axios.pojo.Post;
import com.haikang.axios.service.PostService;
import org.springframework.beans.factory.annotation.Autowired;
import org.springframework.web.bind.annotation.*;

import java.util.List;

/**
 * @Author 海康
 * @Version 1.0
 */
@RestController
@RequestMapping("/axios")
public class AxiosController {
    private static final Integer OK = 200;

    @Autowired
    private PostService postService;

    @PutMapping("/posts")
    public JsonResult updatePost(@RequestBody Post post){
        return new JsonResult(OK,postService.updatePost(post));
    }
}
响应结果:

2.4 使用axios(config)发送DELETE请求
案例:根据pid删除post信息
  // 为第四个按钮绑定单击事件,删除post信息
  bnts[3].onclick = ()=>{
      axios({
          method:'DELETE',
          url:'http://localhost:80/axios/posts',
          params: {
              pid: 10
          }
      }).then(
          (value)=>{
              console.log(value);
          },
          (reason)=>{
              console.log(reason);
          }
      );
  }
dao层
mapper接口
@Mapper
public interface PostMapper {

    // 删除Post信息
    Integer deletePost(@Param("pid") Integer pid);
}
xml文件
<!--
    // 删除Post信息
    Integer deletePost(@Param("pid") Integer pid);
-->
    <delete id="deletePost">
        delete from t_posts where pid=#{pid}
    </delete>
service层
接口:a
    // 删除Post信息
    Integer deletePost(Integer pid);
实现类:
    @Override
    public Integer deletePost(Integer pid) {
        return postMapper.deletePost(pid);
    }
contorller层
    @DeleteMapping("/posts")
    public JsonResult deletePost(Integer pid){
        System.out.println(pid);
        return new JsonResult(OK,postService.deletePost(pid));
    }
响应结果:

3.axios其他方法发送ajax请求
![[外链图片转存失败,源站可能有防盗链机制,建议将图片保存下来直接上传(img-jH4ItozT-1663596153371)(D:\typora笔记\axios\img\1663592556147.png)]](https://img-blog.csdnimg.cn/b2046594362f47b0b4c95097ce0d6de9.png)
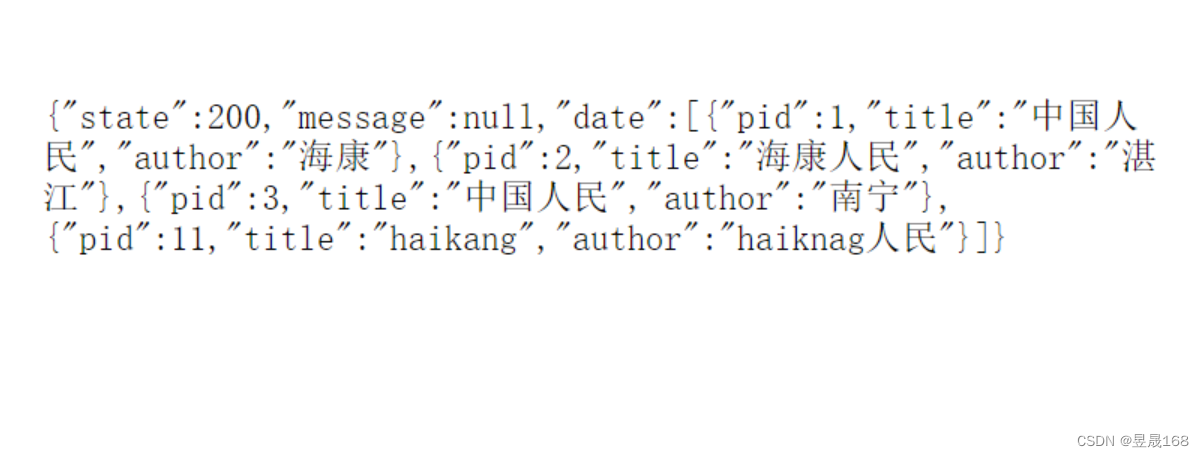
在[]括号中表示是不是必须的,上述的这些方法也可以发送ajax请求
注意是:config表示是需要一个对象类型的参数
3.1.axios.request(config)方法
使用axios.request(config)方法发送ajax请求,也是需要一个对象类型的参数,使用方式和上面的基本使用一致也需要一个对象类型参数
  // 为第五个按钮绑定单击事件,使用request请求ajax请求,使用方法与`axios(config)一致`
  bnts[4].onclick = ()=>{
      axios.request({
        method:'GET',
        url:'http://localhost:80/axios/posts'
      }).then(
          (value)=>{
              console.log(value);
          },
          (reason)=>{
              console.log(reason);
          }
      );
  }
3.2 axios.get(url[,config])方法
config表示是需要一个对象类型的参数,get和delete的使用一致
  // 为第六个按钮绑定单击事件,使用GET请求ajax请求
  bnts[5].onclick = ()=>{
    axios.get(
            'http://localhost:80/axios/posts/1',).then(
            (value)=>{
              console.log(value);
            },
            (reason)=>{
              console.log(reason);
            });
  }
3.3 axios.post(url[,data[,config]])方法
注意是:data表示是请求体,post和put的使用一致
    // 为第六个按钮绑定单击事件,使用POST请求ajax请求
    bnts[6].onclick = ()=>{
      axios.post(
              'http://localhost:80/axios/posts',
              {
                title: '菜菜的程序员',
                author:'明天'
              }).then(
              (value)=>{
                console.log(value);
              },
              (reason)=>{
                console.log(reason);
              }
      );
    }
注意是:config是一个配置对象,对象是{}包裹着
5.config配置对象介绍
config就是上述需要使用config对象,可以设置那些属性
{
  // `url` 是用于请求的服务器 URL
  url: '/user',

  // `method` 是创建请求时使用的方法
  method: 'get', // 默认值

  // `baseURL` 将自动加在 `url` 前面,除非 `url` 是一个绝对 URL。
  // 它可以通过设置一个 `baseURL` 便于为 axios 实例的方法传递相对 URL
  baseURL: 'https://some-domain.com/api/',

  // `transformRequest` 允许在向服务器发送前,修改请求数据
  // 它只能用于 'PUT', 'POST' 和 'PATCH' 这几个请求方法
  // 数组中最后一个函数必须返回一个字符串, 一个Buffer实例,ArrayBuffer,FormData,或 Stream
  // 你可以修改请求头。
  transformRequest: [function (data, headers) {
    // 对发送的 data 进行任意转换处理

    return data;
  }],

  // `transformResponse` 在传递给 then/catch 前,允许修改响应数据
  transformResponse: [function (data) {
    // 对接收的 data 进行任意转换处理

    return data;
  }],

  // 自定义请求头
  headers: {'X-Requested-With': 'XMLHttpRequest'},

  // `params` 是与请求一起发送的 URL 参数
  // 必须是一个简单对象或 URLSearchParams 对象
  params: {
    ID: 12345
  },

  // `paramsSerializer`是可选方法,主要用于序列化`params`
  // (e.g. https://www.npmjs.com/package/qs, http://api.jquery.com/jquery.param/)
  paramsSerializer: function (params) {
    return Qs.stringify(params, {arrayFormat: 'brackets'})
  },

  // `data` 是作为请求体被发送的数据
  // 仅适用 'PUT', 'POST', 'DELETE 和 'PATCH' 请求方法
  // 在没有设置 `transformRequest` 时,则必须是以下类型之一:
  // - string, plain object, ArrayBuffer, ArrayBufferView, URLSearchParams
  // - 浏览器专属: FormData, File, Blob
  // - Node 专属: Stream, Buffer
  data: {
    firstName: 'Fred'
  },

  // 发送请求体数据的可选语法
  // 请求方式 post
  // 只有 value 会被发送,key 则不会
  data: 'Country=Brasil&City=Belo Horizonte',

  // `timeout` 指定请求超时的毫秒数。
  // 如果请求时间超过 `timeout` 的值,则请求会被中断
  timeout: 1000, // 默认值是 `0` (永不超时)

  // `withCredentials` 表示跨域请求时是否需要使用凭证
  withCredentials: false, // default

  // `adapter` 允许自定义处理请求,这使测试更加容易。
  // 返回一个 promise 并提供一个有效的响应 (参见 lib/adapters/README.md)。
  adapter: function (config) {
    /* ... */
  },

  // `auth` HTTP Basic Auth
  auth: {
    username: 'janedoe',
    password: 's00pers3cret'
  },

  // `responseType` 表示浏览器将要响应的数据类型
  // 选项包括: 'arraybuffer', 'document', 'json', 'text', 'stream'
  // 浏览器专属:'blob'
  responseType: 'json', // 默认值

  // `responseEncoding` 表示用于解码响应的编码 (Node.js 专属)
  // 注意:忽略 `responseType` 的值为 'stream',或者是客户端请求
  // Note: Ignored for `responseType` of 'stream' or client-side requests
  responseEncoding: 'utf8', // 默认值

  // `xsrfCookieName` 是 xsrf token 的值,被用作 cookie 的名称
  xsrfCookieName: 'XSRF-TOKEN', // 默认值

  // `xsrfHeaderName` 是带有 xsrf token 值的http 请求头名称
  xsrfHeaderName: 'X-XSRF-TOKEN', // 默认值

  // `onUploadProgress` 允许为上传处理进度事件
  // 浏览器专属
  onUploadProgress: function (progressEvent) {
    // 处理原生进度事件
  },

  // `onDownloadProgress` 允许为下载处理进度事件
  // 浏览器专属
  onDownloadProgress: function (progressEvent) {
    // 处理原生进度事件
  },

  // `maxContentLength` 定义了node.js中允许的HTTP响应内容的最大字节数
  maxContentLength: 2000,

  // `maxBodyLength`(仅Node)定义允许的http请求内容的最大字节数
  maxBodyLength: 2000,

  // `validateStatus` 定义了对于给定的 HTTP状态码是 resolve 还是 reject promise。
  // 如果 `validateStatus` 返回 `true` (或者设置为 `null` 或 `undefined`),
  // 则promise 将会 resolved,否则是 rejected。
  validateStatus: function (status) {
    return status >= 200 && status < 300; // 默认值
  },

  // `maxRedirects` 定义了在node.js中要遵循的最大重定向数。
  // 如果设置为0,则不会进行重定向
  maxRedirects: 5, // 默认值

  // `socketPath` 定义了在node.js中使用的UNIX套接字。
  // e.g. '/var/run/docker.sock' 发送请求到 docker 守护进程。
  // 只能指定 `socketPath` 或 `proxy` 。
  // 若都指定,这使用 `socketPath` 。
  socketPath: null, // default

  // `httpAgent` and `httpsAgent` define a custom agent to be used when performing http
  // and https requests, respectively, in node.js. This allows options to be added like
  // `keepAlive` that are not enabled by default.
  httpAgent: new http.Agent({ keepAlive: true }),
  httpsAgent: new https.Agent({ keepAlive: true }),

  // `proxy` 定义了代理服务器的主机名,端口和协议。
  // 您可以使用常规的`http_proxy` 和 `https_proxy` 环境变量。
  // 使用 `false` 可以禁用代理功能,同时环境变量也会被忽略。
  // `auth`表示应使用HTTP Basic auth连接到代理,并且提供凭据。
  // 这将设置一个 `Proxy-Authorization` 请求头,它会覆盖 `headers` 中已存在的自定义 `Proxy-Authorization` 请求头。
  // 如果代理服务器使用 HTTPS,则必须设置 protocol 为`https`
  proxy: {
    protocol: 'https',
    host: '127.0.0.1',
    port: 9000,
    auth: {
      username: 'mikeymike',
      password: 'rapunz3l'
    }
  },

  // see https://axios-http.com/zh/docs/cancellation
  cancelToken: new CancelToken(function (cancel) {
  }),

  // `decompress` indicates whether or not the response body should be decompressed
  // automatically. If set to `true` will also remove the 'content-encoding' header
  // from the responses objects of all decompressed responses
  // - Node only (XHR cannot turn off decompression)
  decompress: true // 默认值

}
常用设置:
-
url:用于请求的服务器url -
method:是创建请求时使用的方法,默认是get -
baseURL:可以通过设置一个baseURL便于axios实例的方法传递相对url,如:baseURL:'https://some-domain.com/api/' -
params: 是与请求一起发送的url参数,必须是一个简单对象或URLSearchParams对象params:{ ID:123 }, -
data:是作为请求体被发送数据, 仅适用 ‘PUT’, ‘POST’, 'DELETE 和 ‘PATCH’ 请求方法data: { firstName:'haikang' },
6.axios默认配置
axios默认配置常用默认配置有:
axios.defaults.method设置默认请求类型axios.defaults.baseURL设置基础的URLaxios.defaults.timeout超时时间
    <script>
        //获取按钮
        const btns = document.querySelectorAll('button');
        //默认配置
        axios.defaults.method = 'GET';//设置默认的请求类型为 GET
        axios.defaults.baseURL = 'http://localhost:3000';//设置基础 URL
        axios.defaults.params = {id:100};
        axios.defaults.timeout = 3000;//

        btns[0].onclick = function(){
            axios({
                url: '/posts'
            }).then(response => {
                console.log(response);
            })
        }

    </script>
7.axios创建实例对象发送请求
就是通过axios对象创建实例来发送请求,作用就是为我们方便使用
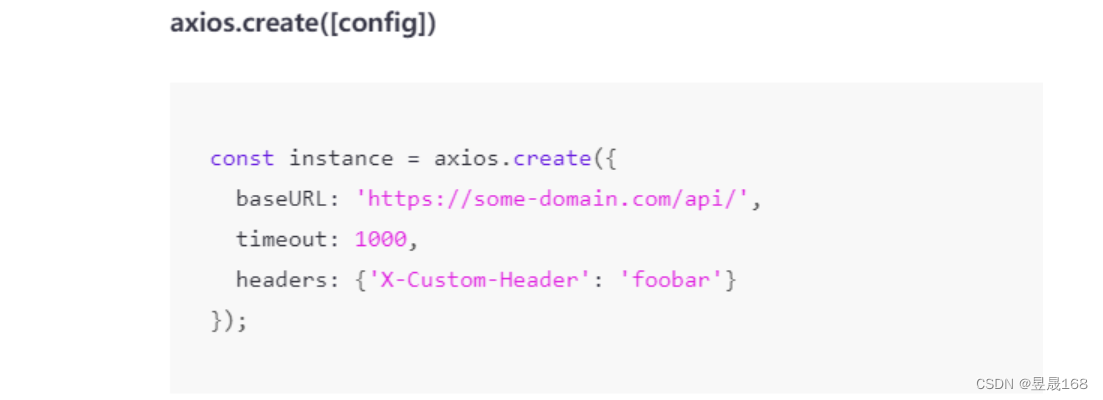
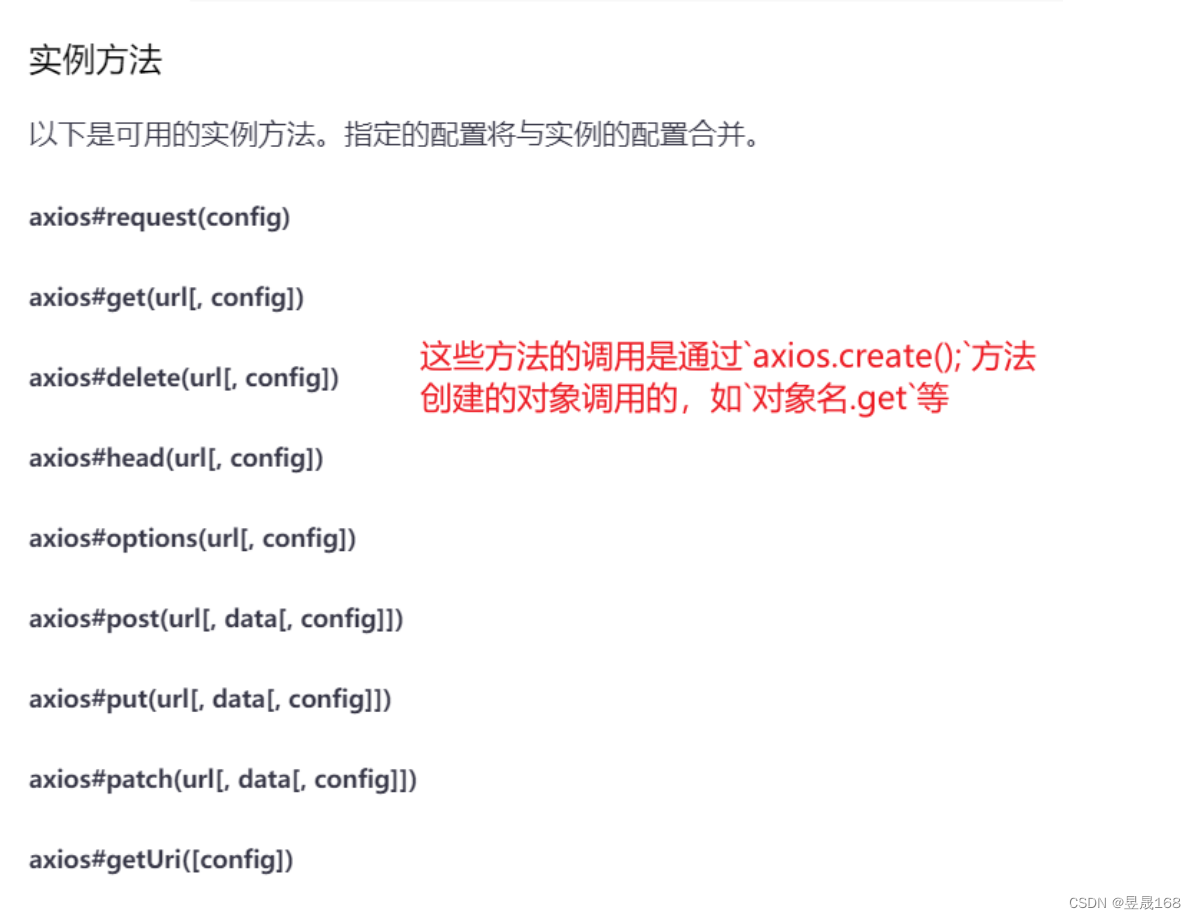
使用和axios一致
    <script>
        // 创建实例对象 haikang
        const haikang = axios.create({
            baseURL:'http://localhost:3000/',
            timeout:2000
        });

        // 可以使用haikang调用相关的方法发送ajax请求,使用和axios一致
        haikang.get(
            '/posts/3'
        ).then(Response=>{
            console.log(Response);
        });
    </script>
8.拦截器
在请求或响应被then或catch处理前拦截它们
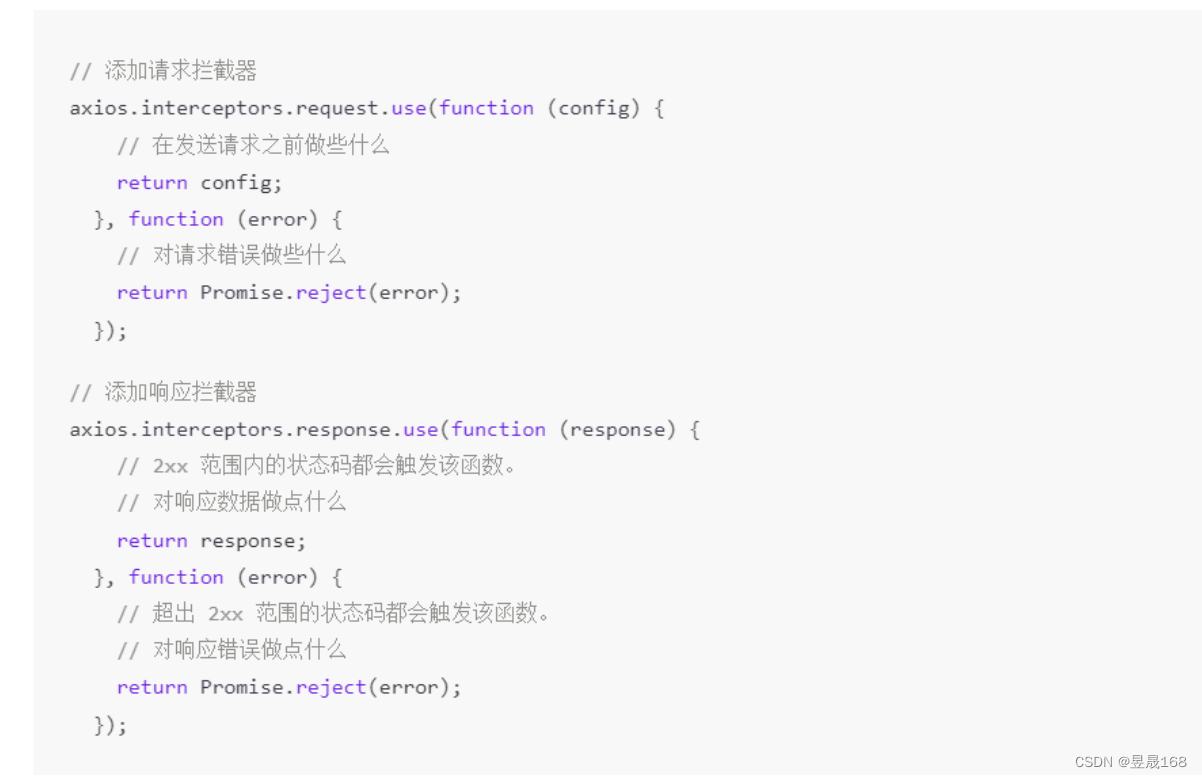
如果你稍后需要移除拦截器,可以这样:

可以给自定义的axios实例添加拦截器

<!DOCTYPE html>
<html lang="en">
<head>
    <meta charset="UTF-8">
    <meta name="viewport" content="width=device-width, initial-scale=1.0">
    <title>拦截器</title>
    <script src="https://cdn.bootcdn.net/ajax/libs/axios/0.21.1/axios.min.js"></script>
</head>
<body>
    <script>
        // Promise
        // 设置请求拦截器  config 配置对象
        axios.interceptors.request.use(function (config) {
            console.log('请求拦截器 成功 - 1号');
            //修改 config 中的参数
            config.params = {a:100};

            return config;
        }, function (error) {
            console.log('请求拦截器 失败 - 1号');
            return Promise.reject(error);
        });

        axios.interceptors.request.use(function (config) {
            console.log('请求拦截器 成功 - 2号');
            //修改 config 中的参数
            config.timeout = 2000;
            return config;
        }, function (error) {
            console.log('请求拦截器 失败 - 2号');
            return Promise.reject(error);
        });

        // 设置响应拦截器
        axios.interceptors.response.use(function (response) {
            console.log('响应拦截器 成功 1号');
            return response.data;
            // return response;
        }, function (error) {
            console.log('响应拦截器 失败 1号')
            return Promise.reject(error);
        });

        axios.interceptors.response.use(function (response) {
            console.log('响应拦截器 成功 2号')
            return response;
        }, function (error) {
            console.log('响应拦截器 失败 2号')
            return Promise.reject(error);
        });

        //发送请求
        axios({
            method: 'GET',
            url: 'http://localhost:3000/posts'
        }).then(response => {
            console.log('自定义回调处理成功的结果');
            console.log(response);
        });
    </script>
</body>
</html>
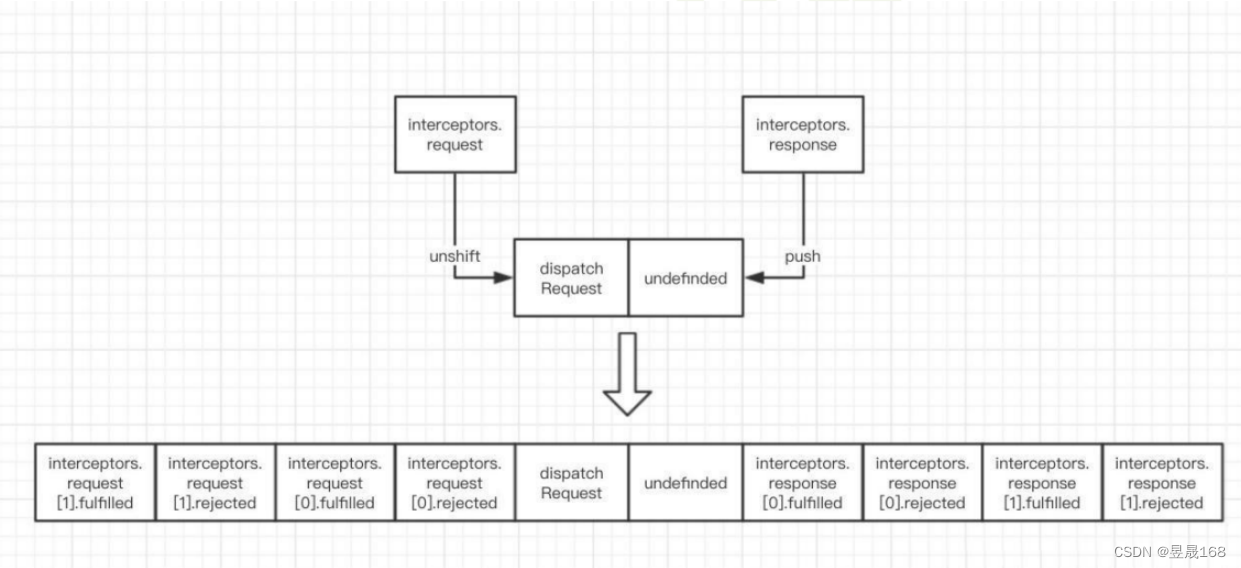
多个拦截器执行流程是:后加先执行,2号是后添加的

这样执行的原因:
// Hook up interceptors middleware
// 创建拦截器中间件  第一个参数用来发送请求, 第二个为 undefined 用来补位
var chain = [dispatchRequest, undefined];
// 创建一个成功的 promise 且成功的值为合并后的请求配置
var promise = Promise.resolve(config);//  promise 成功的Promise
// 遍历实例对象的请求拦截器,
this.interceptors.request.forEach(function unshiftRequestInterceptors(interceptor) {
    //将请求拦截器压入数组的最前面
    chain.unshift(interceptor.fulfilled, interceptor.rejected);
});

this.interceptors.response.forEach(function pushResponseInterceptors(interceptor) {
    //将相应拦截器压入数组的最尾部
    chain.push(interceptor.fulfilled, interceptor.rejected);
});
9.取消请求
<!DOCTYPE html>
<html lang="en">
<head>
    <meta charset="UTF-8">
    <meta name="viewport" content="width=device-width, initial-scale=1.0">
    <title>取消请求</title>
    <link crossorigin='anonymous' href="https://cdn.bootcss.com/twitter-bootstrap/3.3.7/css/bootstrap.min.css" rel="stylesheet">
    <script src="https://cdn.bootcdn.net/ajax/libs/axios/0.21.1/axios.min.js"></script>
</head>
<body>
    <div class="container">
        <h2 class="page-header">axios取消请求</h2>
        <button class="btn btn-primary"> 发送请求 </button>
        <button class="btn btn-warning" > 取消请求 </button>
    </div>
    <script>
        //获取按钮
        const btns = document.querySelectorAll('button');
        //2.声明全局变量
        let cancel = null;
        //发送请求
        btns[0].onclick = function(){
            //检测上一次的请求是否已经完成
            if(cancel !== null){
                //取消上一次的请求
                cancel();
            }
            axios({
                method: 'GET',
                url: 'http://localhost:3000/posts',
                //1. 添加配置对象的属性
                cancelToken: new axios.CancelToken(function(c){
                    //3. 将 c 的值赋值给 cancel
                    cancel = c;
                })
            }).then(response => {
                console.log(response);
                //将 cancel 的值初始化
                cancel = null;
            })
        }

        //绑定第二个事件取消请求
        btns[1].onclick = function(){
            cancel();
        }
    </script>
</body>
</html>